
Page 1 of 96
10/7/2017
Home-Network Implementation
Using the Ubiquiti EdgeRouter X and Ubiquiti AP-AC-LR Access Point
By Mike Potts
Table of Contents

Page 1 of 96
10/7/2017
Home-Network Implementation
Using the Ubiquiti EdgeRouter X and Ubiquiti AP-AC-LR Access Point
By Mike Potts
Table of Contents

Page 2 of 96
10/7/2017
Page 3 of 96
10/7/2017
1. Overview
This guide will attempt to show users how to set up two Ubiquiti pieces of equipment, to provide for a secure and
flexible firewall / router and a Wi-Fi Access Point. The two pieces of equipment used in this guide are:
- Ubiquiti EdgeRouter X
(about $50 when this guide was written)
- Ubiquiti AP-AC-LR Wi-Fi Access Point (about $100 when this guide was written).
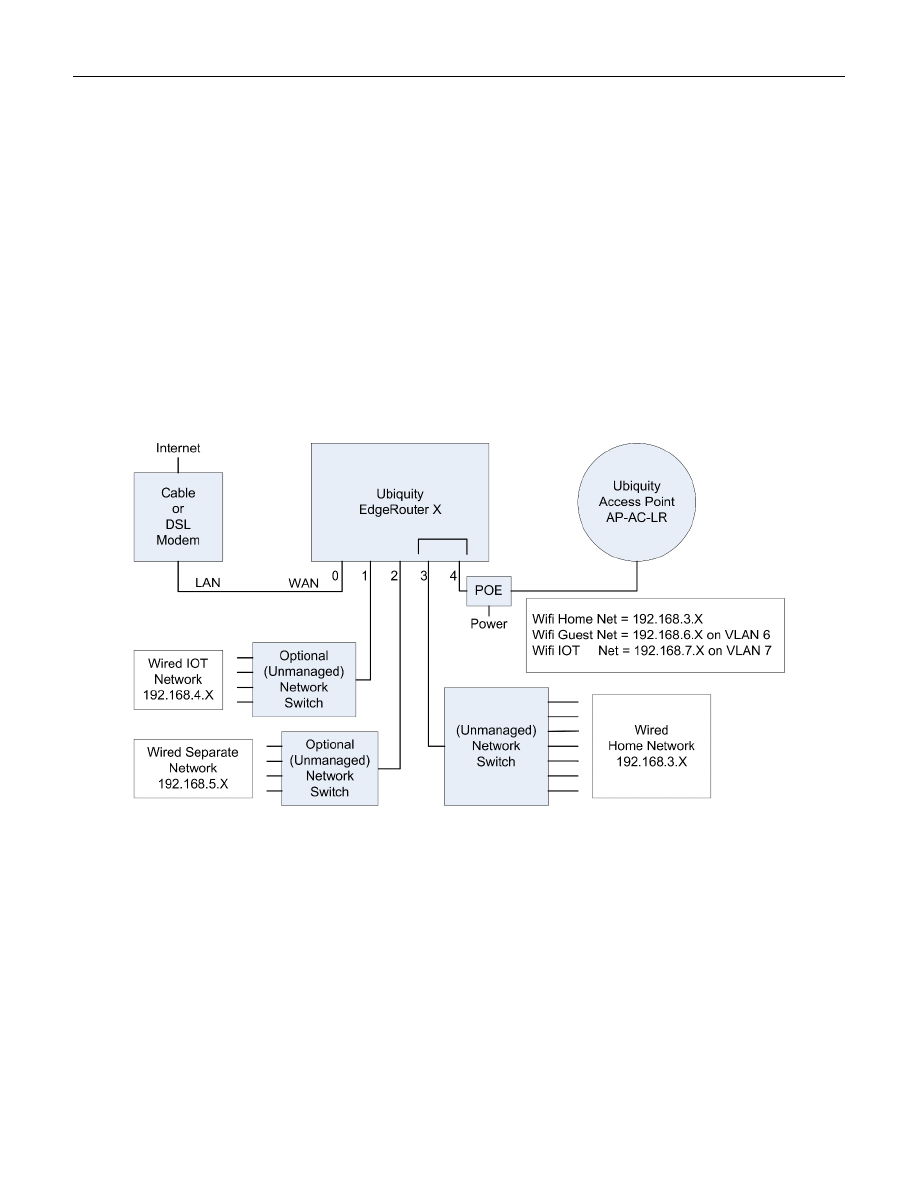
This equipment can provide 3 isolated or semi-isolated wired networks, and up to 4 isolated or semi-isolated Wi-Fi
SSIDs. The networks provided by this equipment configuration are as follows:
- Wired Home Network
For most of the household personal computers
- Wired Separate Network
For an isolated and/or separate network and/or personal computer(s)
- Wired IOT Network
For wired Internet-Of-Things devices
- Wi-Fi Home Network
For household personal computers, tablets and smartphones
- Wi-Fi Guest Network
For visiting friends’ tablets and smartphones
- Wi-Fi IOT Network
For Wi-Fi Internet-Of-Things devices
The Wired Home Network and Wi-Fi Home Network is actually the same Network. Your naming and use may / can
be different. See Figure 1 - Overview Diagram.
Figure 1 - Overview Diagram
With this setup, the Home Network (both Wired and Wi-Fi) is able to initiate connections / communicate with
devices on both the Wired IOT Network and the Wi-Fi IOT Network. Devices on the IOT Networks are NOT able to
initiate connections / independently communicate to the Home Network. None of these Networks can
communicate with the Wired Separate Network, and the Wired Separate Network cannot communicate with
them.
Page 4 of 96
10/7/2017
2. Disclaimer
This is a guide, your results may vary. I am not a network engineer. Enough said.
3. Purpose
One purpose of this guide is to provide a stable and usable router / firewall / access point configuration. I also
want to provide background on what these configuration settings accomplish, so that the reader can understand
why these settings were chosen.
4. EdgeRouter IP Address Use
For the purposes of this guide, I am assuming that you will put your Ubiquiti EdgeRouter in series with your
existing firewall / router, after the EdgeRouter has been initially configured. This way, you can leave your existing
network alone, while securely setting up and testing your EdgeRouter. You need to ensure that your existing
network does not use any of the following network addresses: 192.168.3.X, 192.168.4.X, 192.168.5.X,
192.168.6.X, or 192.168.7.X, as these address ranges will be used within the EdgeRouter. I suggest that you set up
or re-configure your existing router to use IP addresses of 192.168.2.X on its LAN ports. Existing router addresses
of 192.168.0.X or 192.168.1.X will also work. Your existing equipment may have the “Cable or DSL Modem”
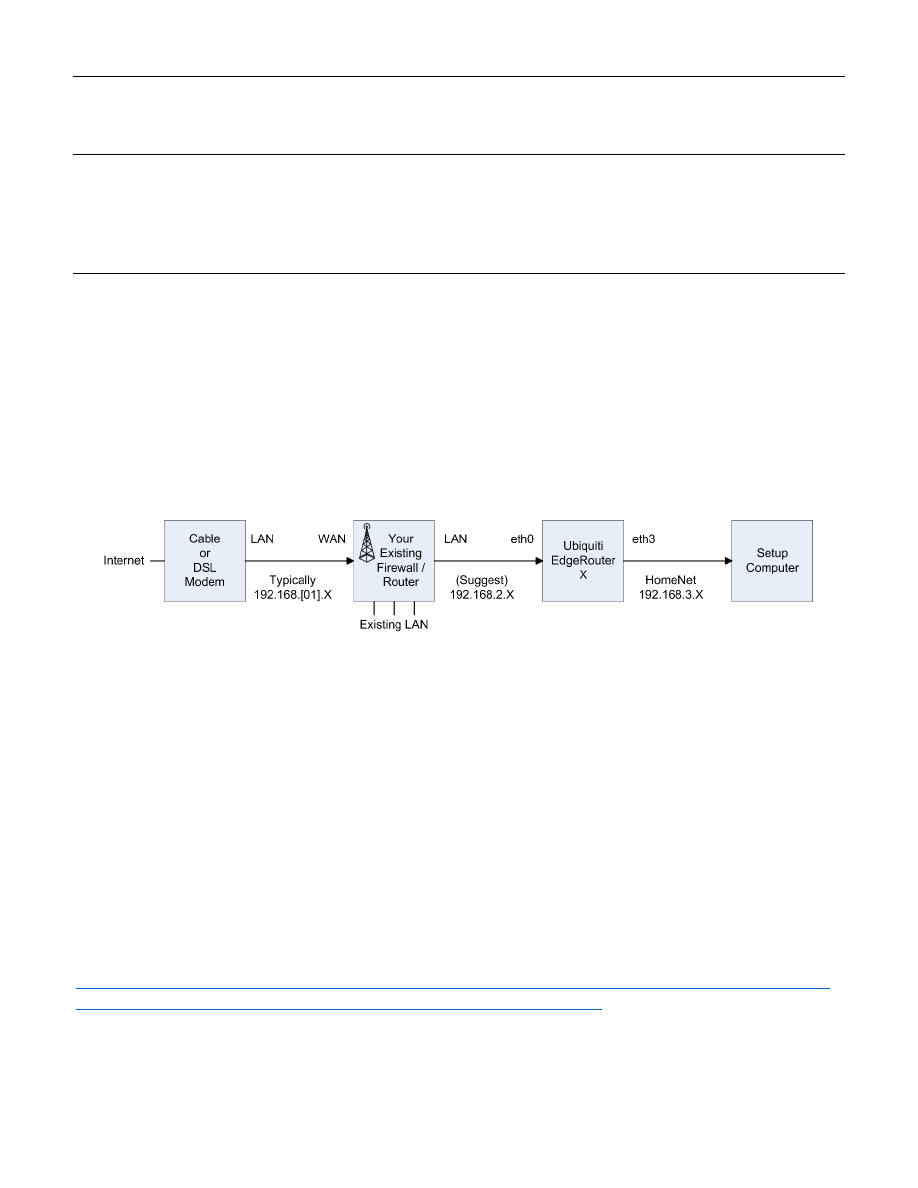
portion and “Your Existing Firewall / Router” portion combined into one single unit. See Figure 2 - EdgeRouter
Configuration Setup. You will also need a computer to setup the EdgeRouter.
Figure 2 - EdgeRouter Configuration Setup
Most cable / DSL modems seem to be pre-configured for DHCP, and for using addresses of 192.168.0.X or
192.168.1.X on their LAN ports. Therefore, I configured the EdgeRouter Network addresses not to include those
ranges. I deliberately left the address range of 192.168.2.X unused within the EdgeRouter, so those addresses
could be used by an existing firewall / router’s LAN ports.
If the EdgeRouter was using an address that was also used by your Cable / DSL modem, it would mask / hide that
equipment’s setup web page(s), and you would not be able to access those pages.
The EdgeRouter will NOT work if the address presented via DHCP to its eth0 port maps anywhere within one of
the address ranges used internally by the EdgeRouter.
If your Internet Service Provider’s (ISP) equipment does not provide an IP address via DHCP, then you will need to
adjust your WAN (eth0) settings after running the setup wizard. In particular, if you need to use PPPoE, then you
might want to read:
https://community.ubnt.com/t5/EdgeMAX/Can-t-open-some-webpages/m-p/1950743/highlight/true#M163311
https://samuel.kadolph.com/2015/02/mtu-and-tcp-mss-when-using-pppoe-2/

Page 5 of 96
10/7/2017
5. Acquire EdgeRouter Documentation
On the computer, you use to setup the EdgeRouter X, download the newest documentation from:
https://www.ubnt.com/download/edgemax/edgerouter-x/er-x
There are both a User’s Guide and a Quick Start Guide.
Note that Ubiquiti makes several models of EdgeRouter equipment. Each model uses different hardware, has
different capabilities, supports a different number of ports, and may be configured (sometimes subtly) differently
from each other. For instance, the EdgeRouter Lite typically uses eth1 as its WAN port, while the EdgeRouter X
typically uses eth0 as its WAN port. Watch out for these types of differences when doing internet searches.
EdgeMAX is the operating system for the EdgeRouter series.
6. Web Resources
EdgeMax
https://help.ubnt.com/hc/en-us/categories/200321064-EdgeMAX
EdgeMax FAQ https://community.ubnt.com/t5/tkb/allarticlesprintpage/tkb-id/EdgeMAX_FAQ
Community
https://community.ubnt.com/t5/EdgeMAX/bd-p/EdgeMAX
Unofficial
https://www.reddit.com/r/Ubiquiti/
Here are some more references:
https://help.ubnt.com/hc/en-us/articles/115002531728-EdgeRouter-Beginners-Guide-to-EdgeRouter
http://www.guruadvisor.net/en/networking/321-edgerouter-x-tiny-but-full-of-resources
These postings perform similar items as this guide does:
https://community.ubnt.com/t5/EdgeMAX/EdgeRouter-X-segmentation/td-p/1767545
Page 6 of 96
10/7/2017
7. Initial EdgeRouter Hardware Setup
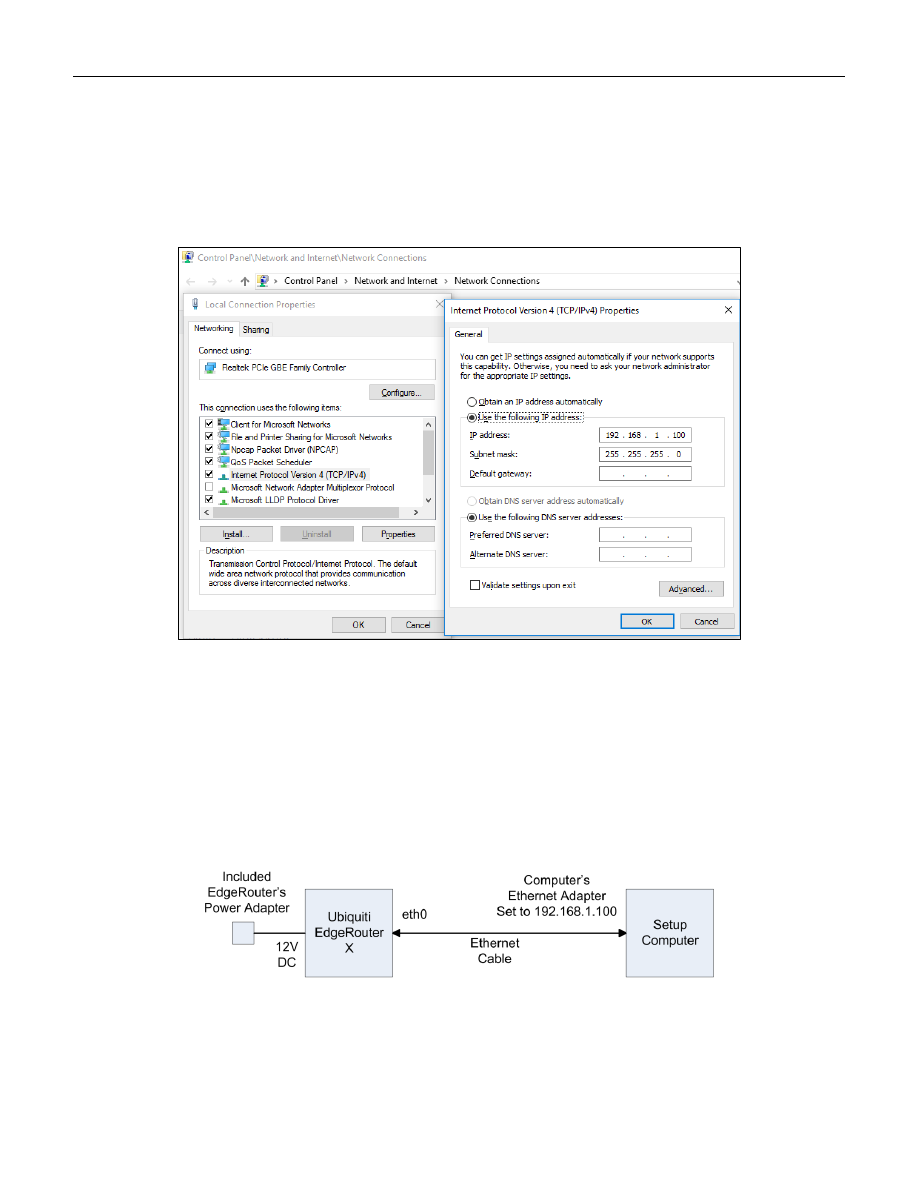
Configure the setup computer’s Ethernet jack as having a fixed IP address of 192.168.1.X (where X is 2 to 254),
and a netmask of 255.255.255.0. There are many tutorials available on the internet that show how to configure a
computer’s Ethernet port to use a fixed IP address. One way to configure a Windows 10 computer is:
Control Panel -> Network & Internet -> Ethernet -> Change Adapter Settings -> Internet Protocol Version 4
-> Properties -> Use the following IP address.
See Figure 3 – Windows 10 Ethernet Address Setup.
Figure 3 – Windows 10 Ethernet Address Setup
Power up your EdgeRouter X using the supplied power adapter, and then depress and hold the reset button for
about 15 seconds. After releasing the reset button, connect a standard Ethernet cable from the EdgeRouter’s eth0
port to the setup computer’s Ethernet jack. See Figure 4 – Initial EdgeRouter Hardware Setup.
Note that some setup computers may have an additional Ethernet adapter or have an additional Wi-Fi adapter
installed. If any additional adapter(s) are installed, and an adapter is using or connecting to an address within the
range of 192.168.1.X, then you will need to temporarily disable that additional adapter. The additional adapter
only needs to be disabled while you are trying to access the EdgeRouter at its initial hardware setup address of
192.168.1.1.
Figure 4 – Initial EdgeRouter Hardware Setup
Reference Quick Start Guide and the User’s Guide @Chapter 2:Using EdgeOS.
Page 7 of 96
10/7/2017
8. Initial EdgeRouter Login
Wait about three minutes for the EdgeRouter to boot up, then open a web browser of your choice on your setup
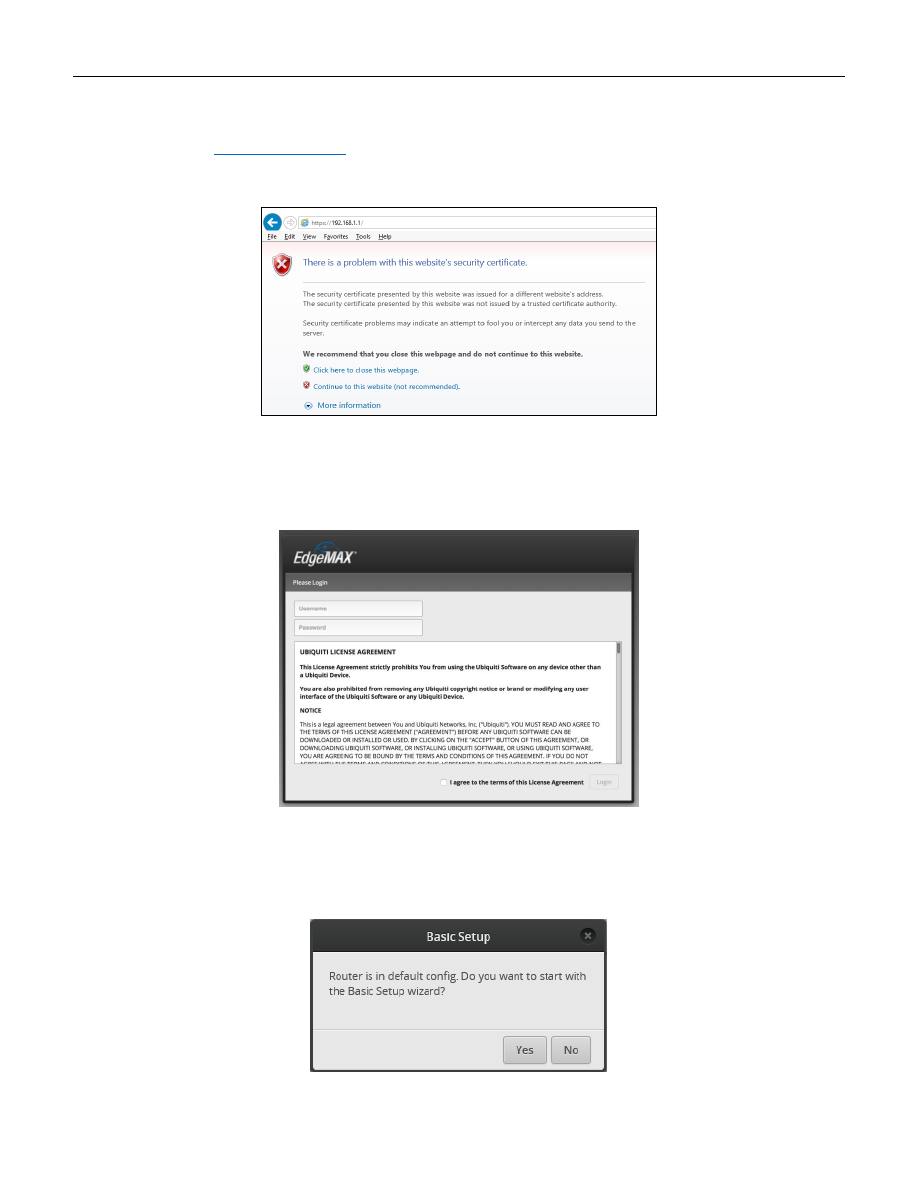
computer and enter https://192.168.1.1 into the address field. The browser may issue a security warning. You will
need to “Continue to this web site” or equivalent. The exact prompts and responses vary by browser. See Figure 5
– IE Security Certificate Example.
Figure 5 – IE Security Certificate Example
You will likely see a combined login and license agreement dialog. Enter the username and password. The default
username is “ubnt” and the default password is “ubnt”. Do what you need to do for the agreement. See Figure 6 –
Ubiquiti License Agreement Dialog.
Figure 6 – Ubiquiti License Agreement Dialog
Depending upon the version of firmware that was pre-installed on your EdgeRouter, you may be presented with a
dialog box stating that the “Router is in default config. Do you want to start with the Basic Setup wizard?” If
presented, answer No. See Figure 7 – Basic Setup Question.
Figure 7 – Basic Setup Question
Page 8 of 96
10/7/2017
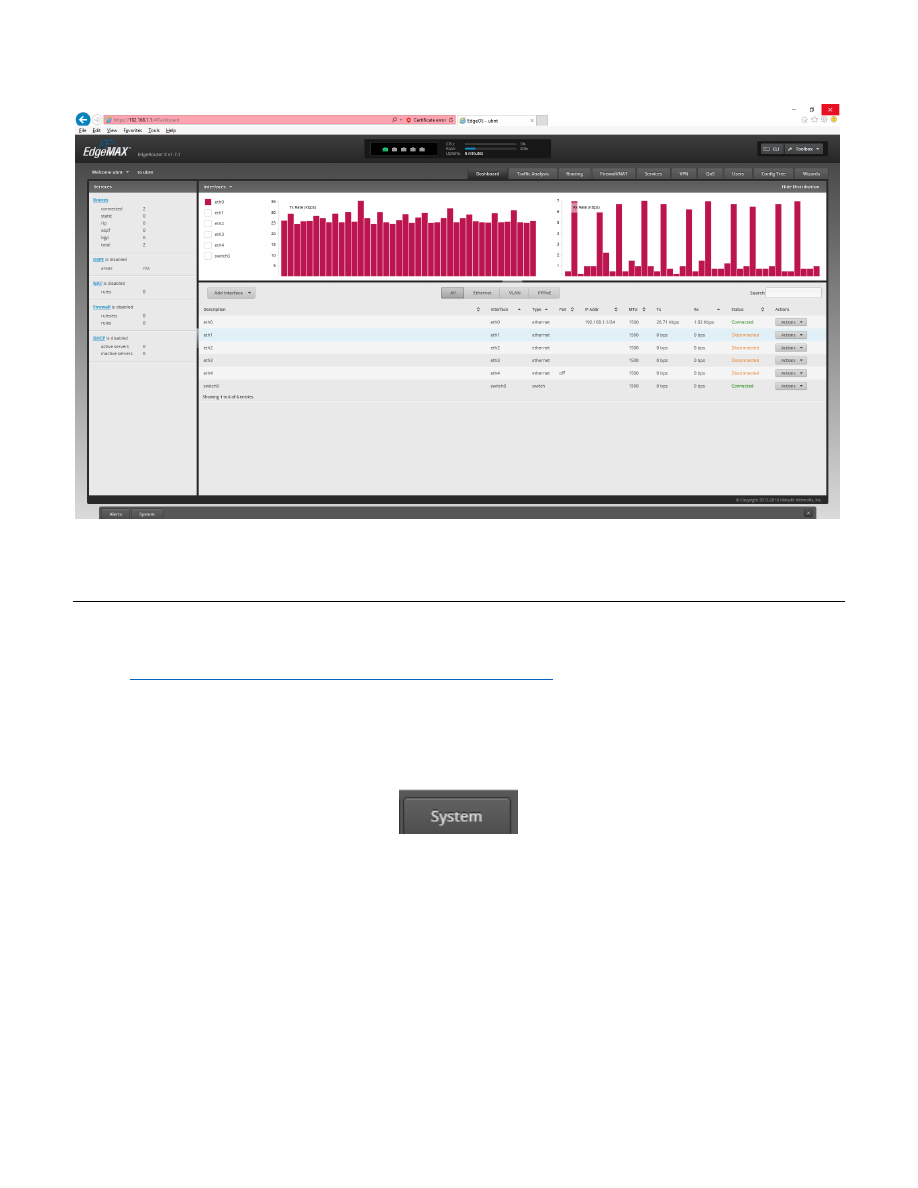
You will land on the Dashboard screen. See Figure 8 – Initial Dashboard Screen.
Figure 8 – Initial Dashboard Screen
Reference Quick Start Guide and the User’s Guide @Chapter 2:Using EdgeOS.
9. Update EdgeRouter Firmware
On your setup computer, download the newest firmware from:
https://www.ubnt.com/download/edgemax/edgerouter-x/er-x
During the writing of this document, the firmware was at:
“EdgeRouter ER-X/ER-X-SFP/EP-R6: Firmware v1.9.1”.
Press the “System” button. See Figure 9 – System Button. This button is located near the lower-left corner of the
dashboard screen, as shown in Figure 8 – Initial Dashboard Screen.
Figure 9 – System Button
Page 9 of 96
10/7/2017
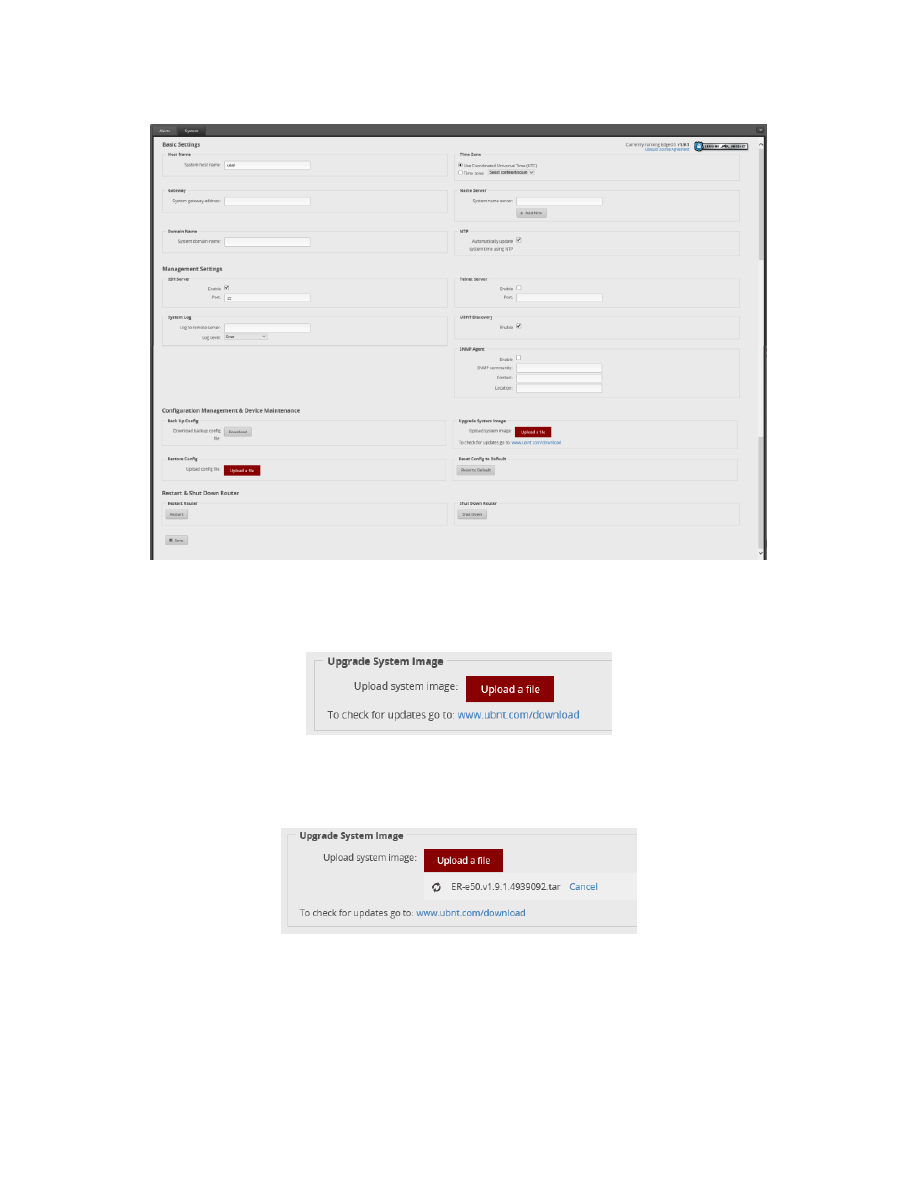
The System window will then pop-up an overlay that will cover most of your screen. See Figure 10 – System Pop-
Figure 10 – System Pop-up Screen
Find the “Upgrade System Image” section, and press the “Upload a file” button. See Figure 11 – Upgrade System
Figure 11 – Upgrade System Image
Choose the firmware file that you downloaded earlier. The EdgeRouter will then install the chosen file. See Figure
Figure 12 – Upload a file
Page 10 of 96
10/7/2017
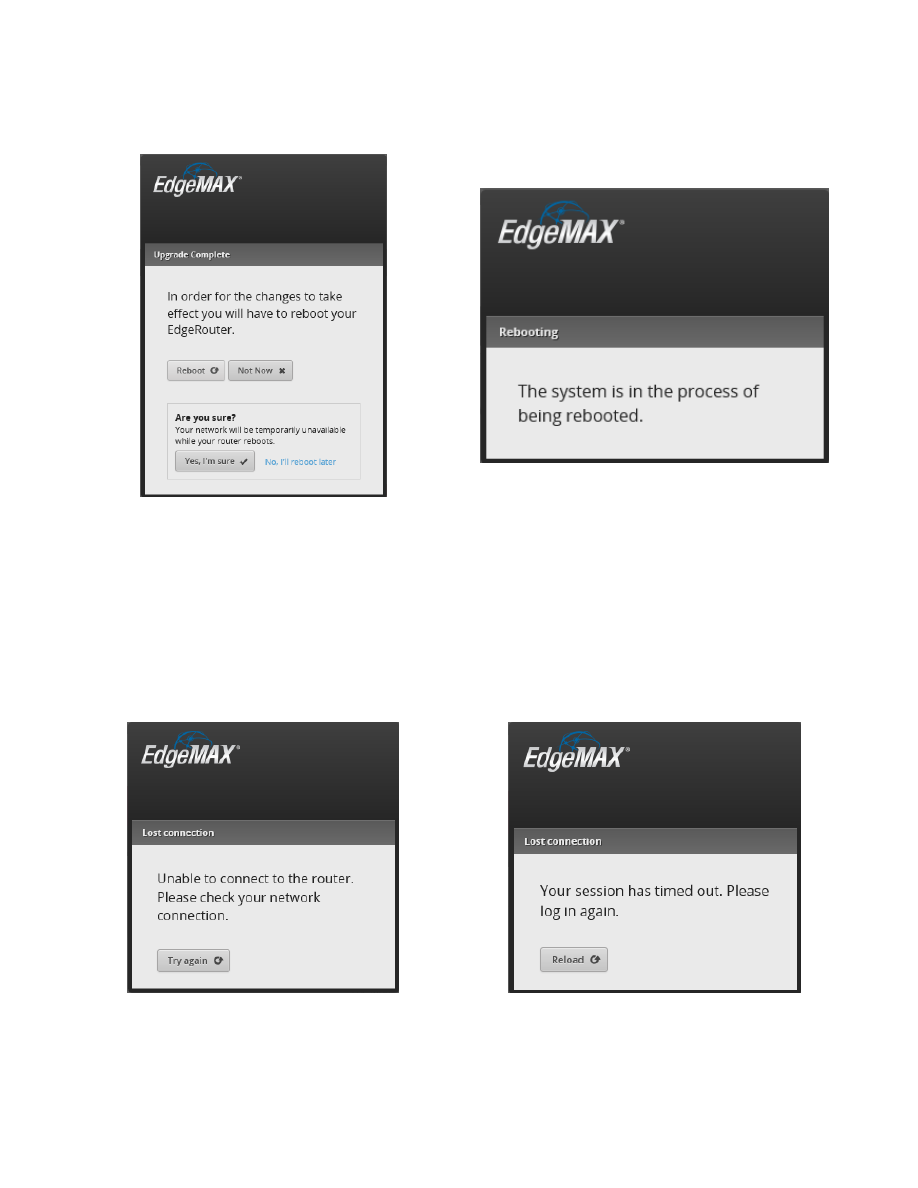
You will eventually be asked if you want to reboot the EdgeRouter. Press the “Reboot” button. You will then be
asked to confirm the reboot, click on the “Yes, I’m sure” button. See Figure 13 – Upgrade Complete Dialog.
The router will inform you that it is rebooting. See Figure 14 – Reboot Process.
Figure 13 – Upgrade Complete Dialog
Figure 14 – Reboot Process
While the EdgeRouter is rebooting, the web page will present you with a Lost Connection Dialog. See Figure 15 –
Eventually, when the EdgeRouter has fully re-booted, the presented dialog will change to Figure 16 – Timed-Out
Dialog. This is a nice touch of web programming from Ubiquiti, so you can easily know when re-booting has
completed.
Press the Reload button.
Figure 15 – Lost Connection Dialog
Figure 16 – Timed-Out Dialog
Page 11 of 96
10/7/2017
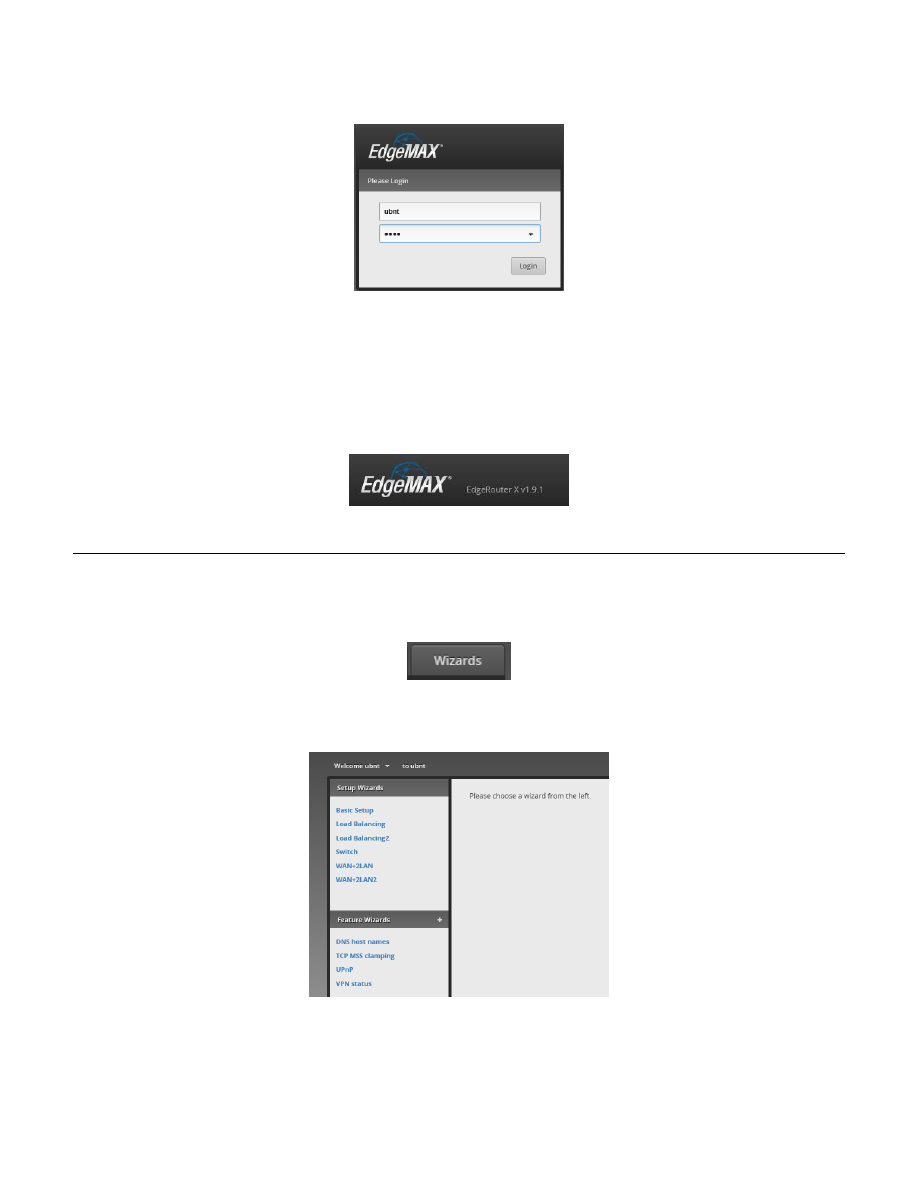
You will be asked to login; please enter the username and password into the dialog. The default username is
“ubnt” and the default password is “ubnt”. See Figure 17 – Login Dialog.
Figure 17 – Login Dialog
You should be presented with a dialog box stating that the “Router is in default config. Do you want to start with
the Basic Setup wizard?” Answer “no.” Reference Figure 7 – Basic Setup Question.
You will (again) land at the Dashboard screen. Reference Figure 8 – Initial Dashboard Screen. Check the upper left
of the screen and verify that you are presented with the version of code that you just downloaded. See Figure 18
Figure 18 – Example EdgeRouter Version
10. EdgeRouter Wizard
Press the “Wizards” button, which is located in the upper-right portion of the Dashboard screen. See Figure 19 –
Figure 19 – Wizards Button
You will see the following (portion shown) of the Wizard Screen. See Figure 20 – Wizard Screen Portion.
Figure 20 – Wizard Screen Portion
Note that there are various Wizards available, which can turn the EdgeRouter into a network switch, or perform
load balancing between two WAN interfaces. Most people will probably be interested in a “standard” setup, as
described in this guide, which is “WAN+2LAN2”.

Page 12 of 96
10/7/2017
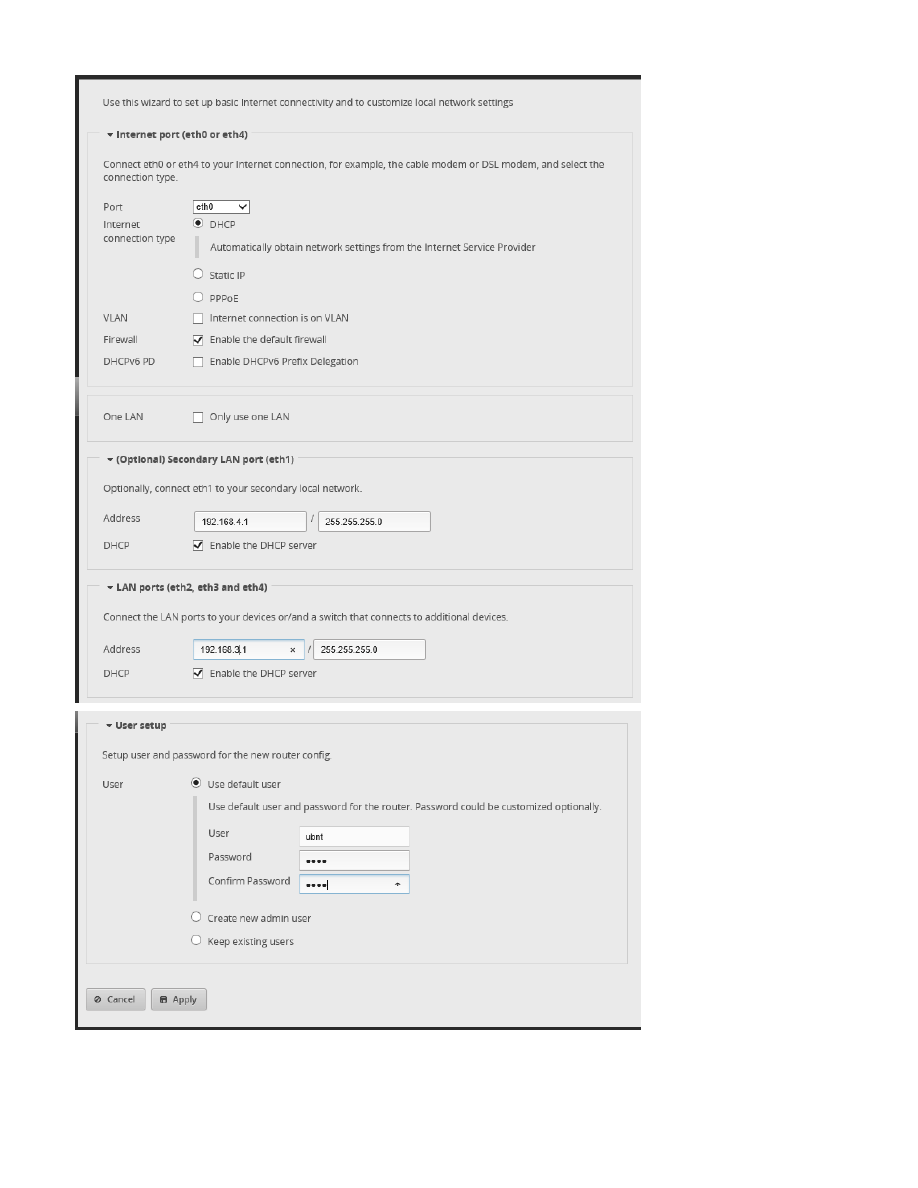
Choose “WAN+2LAN2”. See Figure 21 – Wan+2LAN2 Dialog. You will need to expand / open sections, and make
the following selections:
In the “Internet Port” section:
Port:
eth0
Internet CT:
DHCP
VLAN:
UN-Checked
(Internet Connection is on VLAN)
Firewall:
CHECKED
(Enable the default firewall)
DHCv6 PD:
UN-Checked
(Enable DHCv6 Prefix Delegation)
In the next (unlabeled) section:
One LAN:
UN-Checked
(Only use one LAN)
In the “(Optional) Secondary LAN port (eth1)” section:
Address:
192.168.4.1 / 255.255.255.0
DHCP:
CHECKED
(Enable the DHCP server)
In the “LAN ports (eth2, eth3, eth4)” section:
Address:
192.168.3.1 / 255.255.255.0
DHCP:
CHECKED
(Enable the DHCP server)
If your internet provider uses something other than DHCP (i.e. IP address provided from your cable / dsl modem),
you will need to select “Static IP” or “PPPoE”, and then configure those settings accordingly.
Unchecking the “Only use one LAN” selection informs the Wizard to un-bundle eth1 from eth2-4, allowing for the
provision of a separate Network. I used this eth1 Network for Wired IOT devices.
It is important that “Enable the default firewall” is CHECKED. The entire security of this router depends upon this
setting.
Under the “User setup” section, either change the default password to something secure / unique or “Create new
admin user” with a secure / unique password. If you “Create new admin user”, you will need to also return to this
dialog and delete the default “ubnt” login. You will need to remember your login credentials.
Press “Apply” at the bottom of the screen.
Page 13 of 96
10/7/2017
Figure 21 – Wan+2LAN2 Dialog
Page 14 of 96
10/7/2017
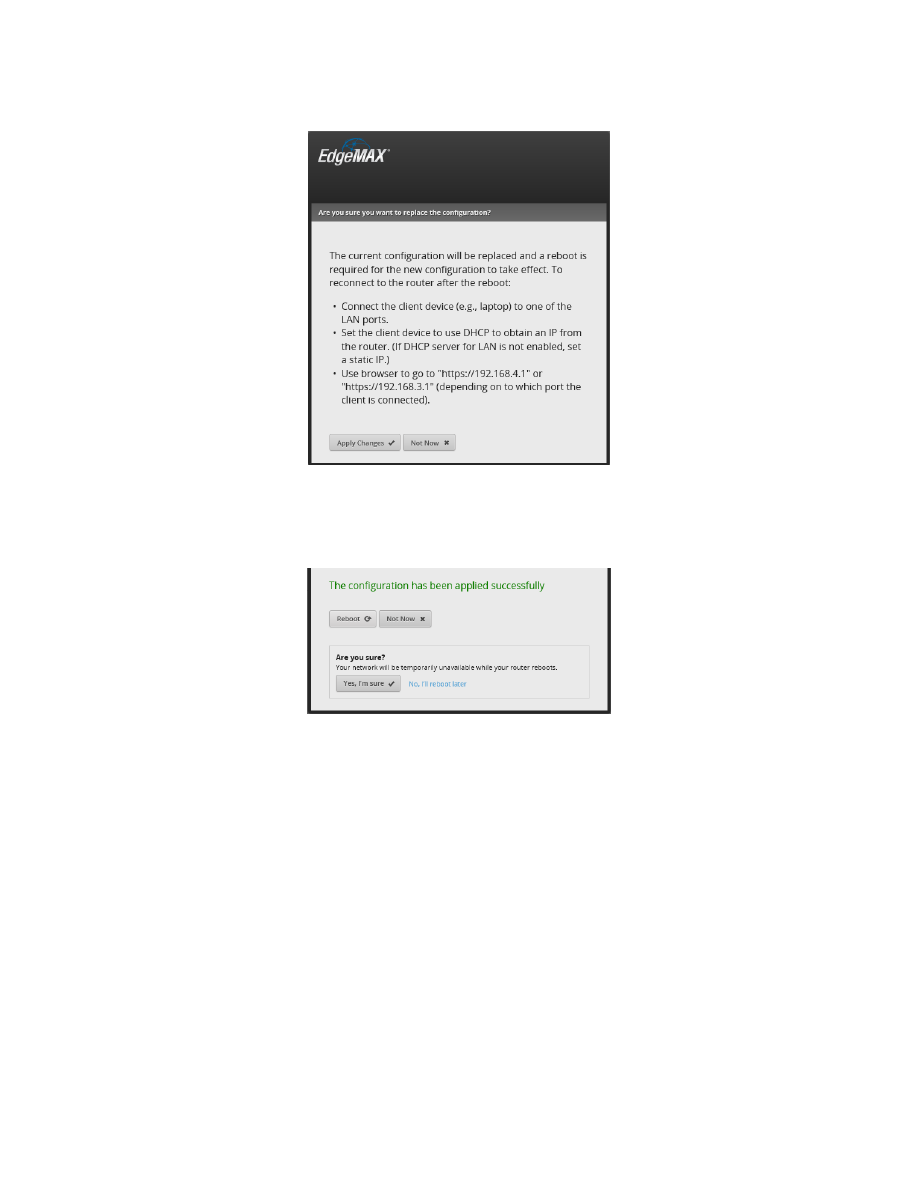
After Applying, you will be presented with Figure 22 – Replace Configuration. Please study what it says. Press
“Apply Changes.”
Figure 22 – Replace Configuration
Press Reboot, then confirm the reboot, by pressing the “Yes, I’m sure” button. See Figure 23 – Reboot into New
Figure 23 – Reboot into New Configuration
The EdgeRouter will inform you that it is rebooting. Reference Figure 14 – Reboot Process. The EdgeRouter takes
several minutes to reboot.
Disconnect your setup computer’s Ethernet jack from the EdgeRouter’s eth0 connection. Re-configure your setup
computer’s Ethernet port back to using DHCP. Again, there are many tutorials available on the internet that show
how to configure a computer’s Ethernet jack to use DHCP. Reference section 7 - Initial EdgeRouter Hardware
Setup, but instead choose “Obtain an IP address automatically.” Also reference Figure 3 – Windows 10 Ethernet
Page 15 of 96
10/7/2017
11. EdgeRouter Re-Connection
Ensure that your existing router’s LAN ports are not using any of the addresses utilized by the EdgeRouter, i.e. not
using 192.168.3.0 through 192.168.7.255. Reference section “4 - EdgeRouter IP Address Use.” Connect the
EdgeRouter’s eth0 port into your existing router’s LAN port with a standard Ethernet cable. Connect your setup
computer’s Ethernet port (now re-configured for DHCP) into the EdgeRouter’s eth3 port. See Figure 2 -
EdgeRouter Configuration Setup.
Open a web browser on your computer and enter https://192.168.3.1 into the address field.
Acknowledge the browser’s security warning, Reference Figure 5 – IE Security Certificate Example.
Login to your EdgeRouter, as shown in Figure 17 – Login Dialog.
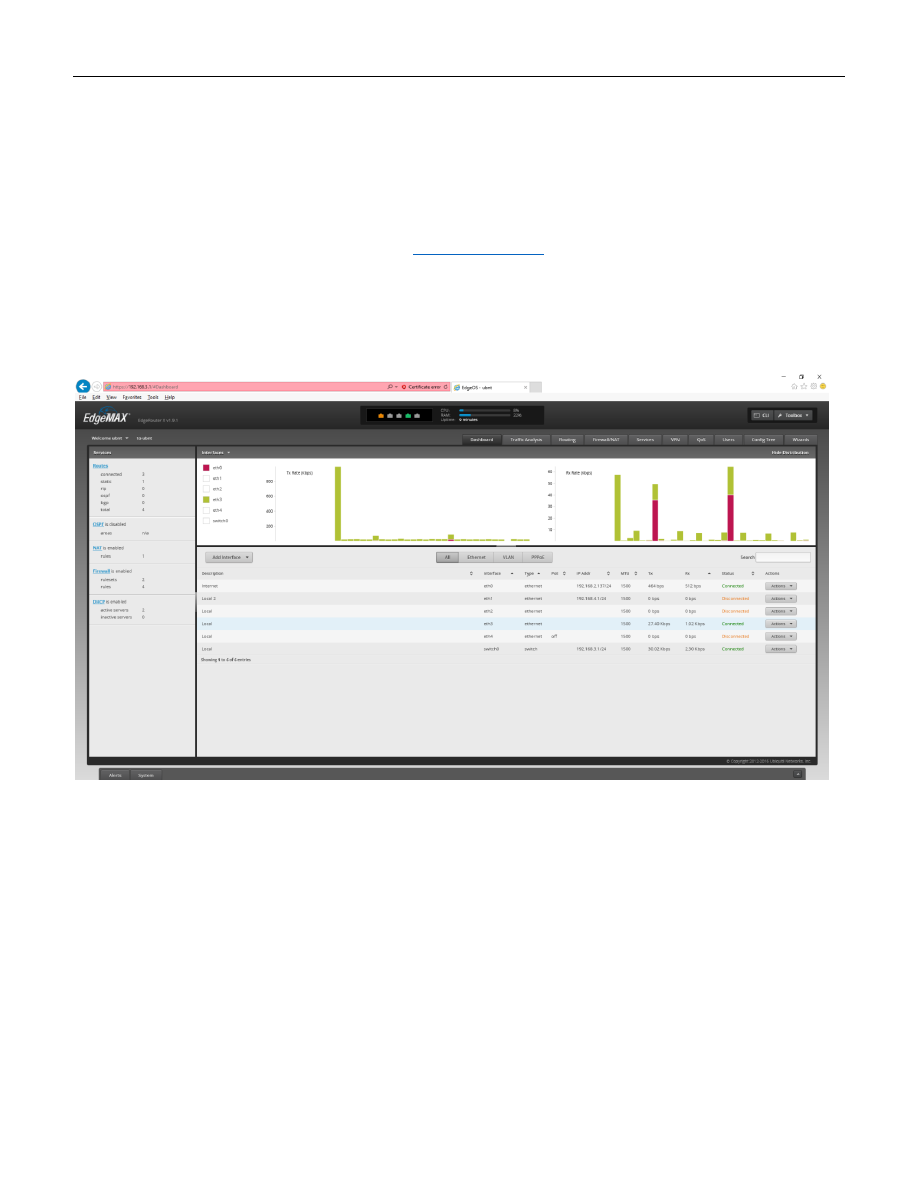
You will be presented with the Dashboard Screen. See Figure 24 – Dashboard Screen.
Figure 24 – Dashboard Screen

Page 16 of 96
10/7/2017
12. Network Naming
Setting up the EdgeRouter, per this guide, provides for several separate Networks. In this guide, I try to use the
word “Network” (capitalized) for these. Each Network has a unique IP address range / subnet. See Table 1 - Table
Network Name
IP Address Range
VLAN
Address Group Term
Home Network
192.168.3.X
No
HOME_GROUP
Wired IOT Network
192.168.4.X
No
WIRED_IOT_GROUP
Wired Separate Network
192.168.5.X
No
WIRED_SEPARATE_GROUP
Wi-Fi Guest Network
192.168.6.X
6
WIFI_GUEST_GROUP
Wi-Fi IOT Network
192.168.7.X
7
WIFI_IOT_GROUP
Table 1 - Table of Networks
Some of these Networks are on a Virtual LAN (VLAN). VLANs provide the ability for separate network data to be
carried over shared Ethernet cables. Data that is “tagged” as belonging to a specific VLAN cannot interact with
either non-VLAN data (trunk data) or with data from any different VLAN.
When VLANs are used, all devices involved with this data need to be VLAN aware. Any network switches carrying
VLAN traffic will need to be IEEE 802.1Q capable, e.g. a Level 2 managed switch.
Note that the only VLAN traffic shown in Table 1 - Table of Networks is involved with the Wi-Fi Guest Network and
the Wi-Fi IOT Network. The Ubiquiti AP-AC-LR access point is VLAN aware. Eventually the Access Point will be
plugged-into the EdgeRouter’s eth4 interface, so VLAN data will be able to be carried between them. This Wi-Fi
VLAN data does NOT need to flow to devices on the Wired Home Network. If you only have one Access Point, the
network switch attached to the EdgeRouter’s eth3 interface can be (a cheaper) unmanaged switch. If you are
going to deploy multiple Access Points, then the switch attached to the EdgeRouter’s eth3 interface MUST be IEEE
802.1Q capable. Reference Figure 1 - Overview Diagram. If they are needed, the network switches attached to the
EdgeRouter’s eth1 and/or eth2 interfaces can be (cheaper) unmanaged switches.
Each Network is also customizable to provide functionality and connectivity. The rest of this guide will provide
sufficient details on that.
There are many VLAN references on the web. Here is one brief tutorial:
http://www.microhowto.info/tutorials/802.1q.html
Page 17 of 96
10/7/2017
13. EdgeRouter Command Line Interface (CLI)
In most of Ubiquiti’s Edgerouter forum posts, steps to (re-)configure items are given as Command line Interface
(CLI) commands. In fact, not very many GUI screenshots are used, and they are typically posted only by novices.
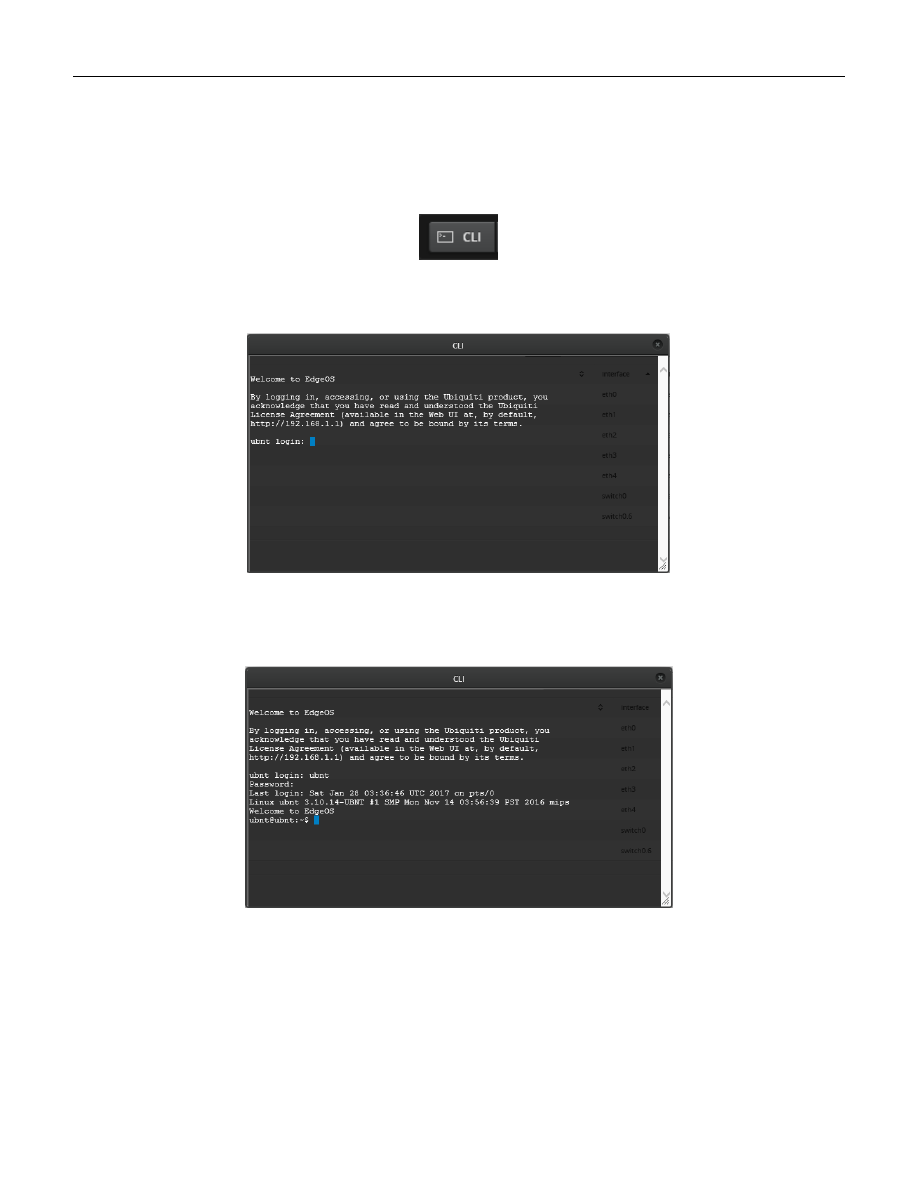
The following steps show how to open and use the built-in CLI interface. Click on the “CLI” button, in the upper-
right screen. See Figure 25 – CLI Button.
Figure 25 – CLI Button
The initial CLI window will appear as a semi-transparent overlay. See Figure 26 – Initial CLI Window.
Figure 26 – Initial CLI Window
Login to this window, using your EdgeRouter’s user name and password. You will now be presented with a
command prompt. See Figure 27 – Logged-In CLI Window.
Figure 27 – Logged-In CLI Window
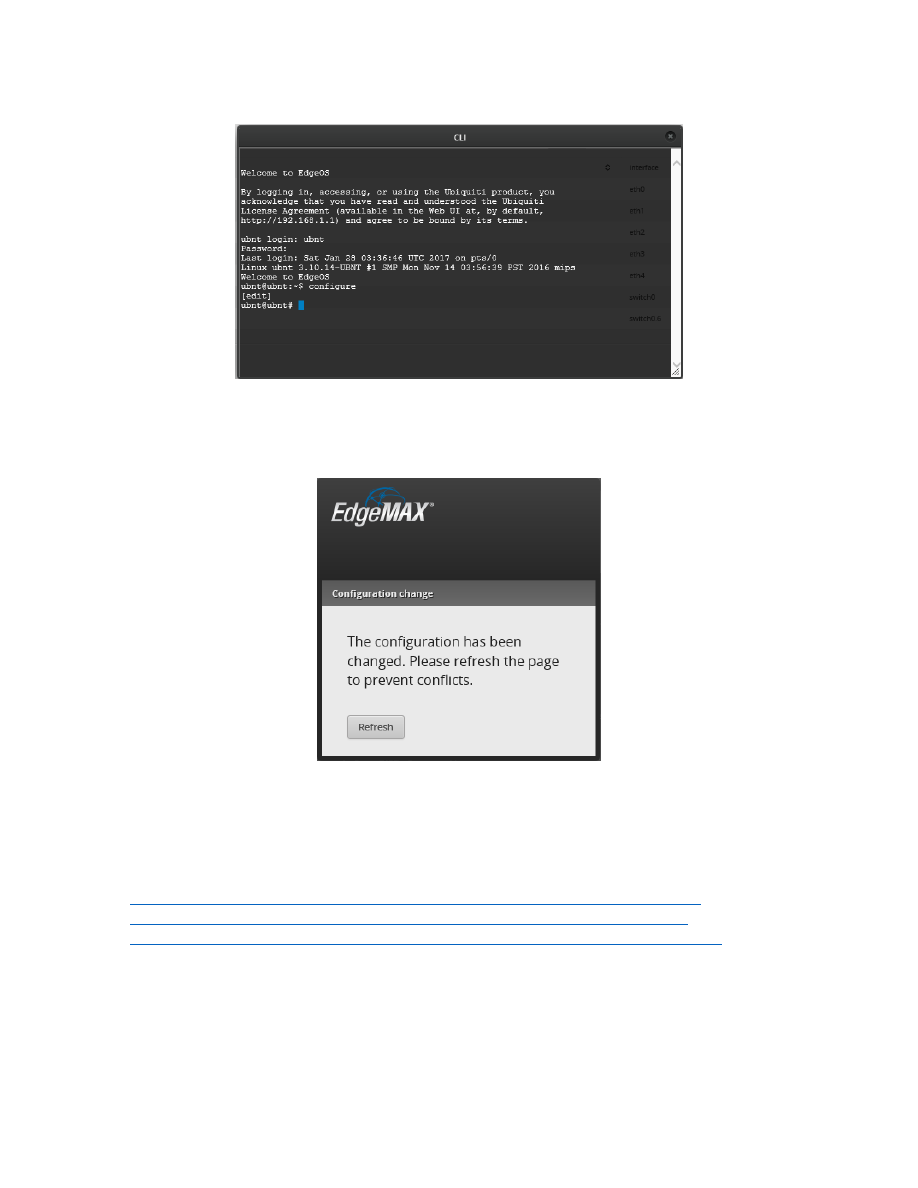
CLI commands are typically divided into configuration commands and non-configuration commands. The CLI
interface will accept only configuration commands when in configuration mode. Type the “configuration”
command to enter configuration mode. The “exit” command is used to leave configuration mode and return to
normal (non-configuration) mode.
Page 18 of 96
10/7/2017
If you enter the “configure” command, the CLI window’s prompt will now include “[edit]”. See Figure 28 –
Figure 28 – Configure CLI Window
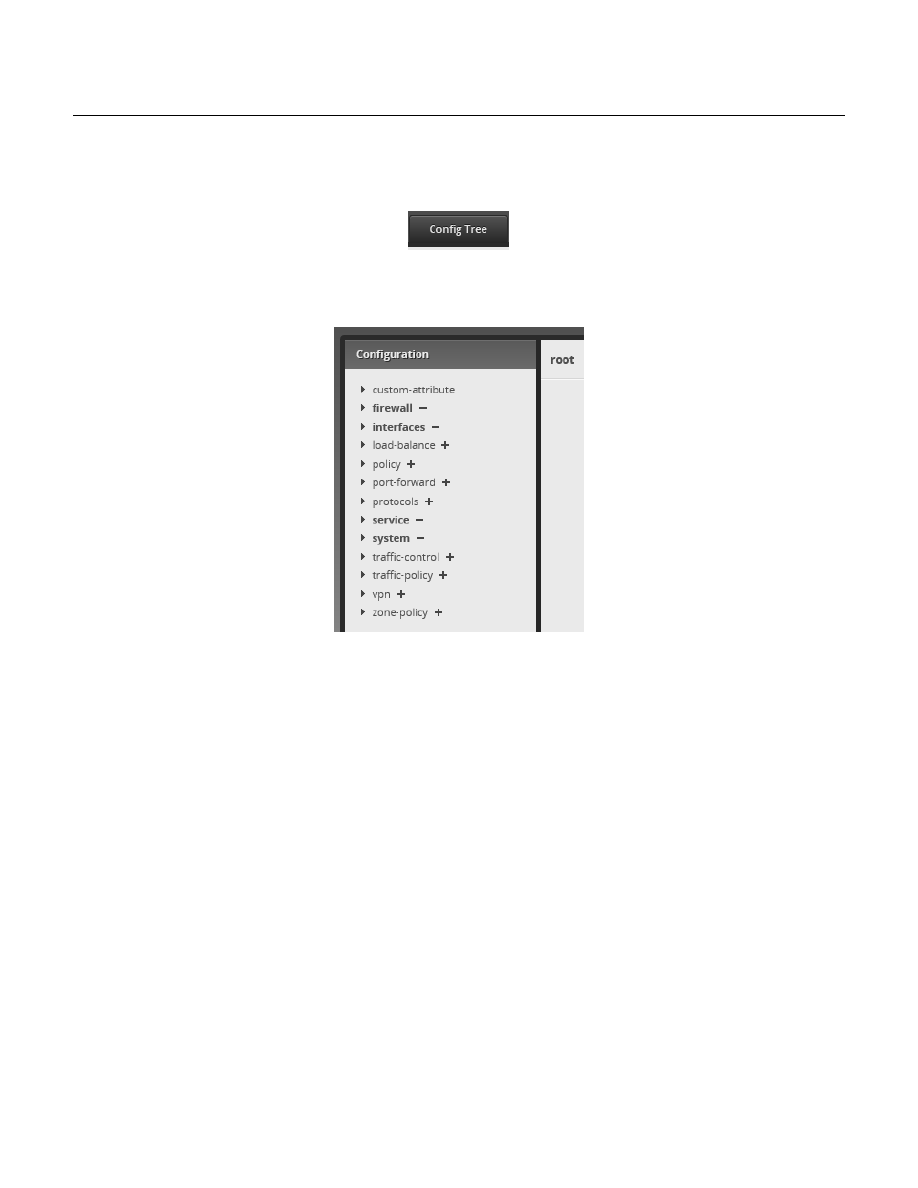
Many times when doing a commit and/or a save command, the page will need to be refreshed. A refresh dialog
box will pop-up on the screen. See Figure 29 – Configuration Change. Press the “Refresh” button.
Figure 29 – Configuration Change
You can also use a popular Windows program, called putty.exe, to Secure Shell (SSH) into the EdgeRouter, and
then issue CLI commands. Linux users should already be familiar with how to use SSH.
Here are some CLI references:
https://dl.ubnt.com/guides/edgemax/EdgeSwitch_CLI_Command_Reference_UG.pdf
https://community.ubnt.com/t5/EdgeMAX/EdgeOS-CLI-Primer-part-1/td-p/285388
https://community.ubnt.com/t5/EdgeMAX-CLI-Basics-Knowledge/tkb-p/CLI_Basics@tkb
Page 19 of 96
10/7/2017
14. EdgeRouter Config Tree
There is a neat and alternate way to configure the EdgeRouter. Near the top of the screen is a “Config Tree”
button. See Figure 30 – Config Tree Button.
Figure 30 – Config Tree Button
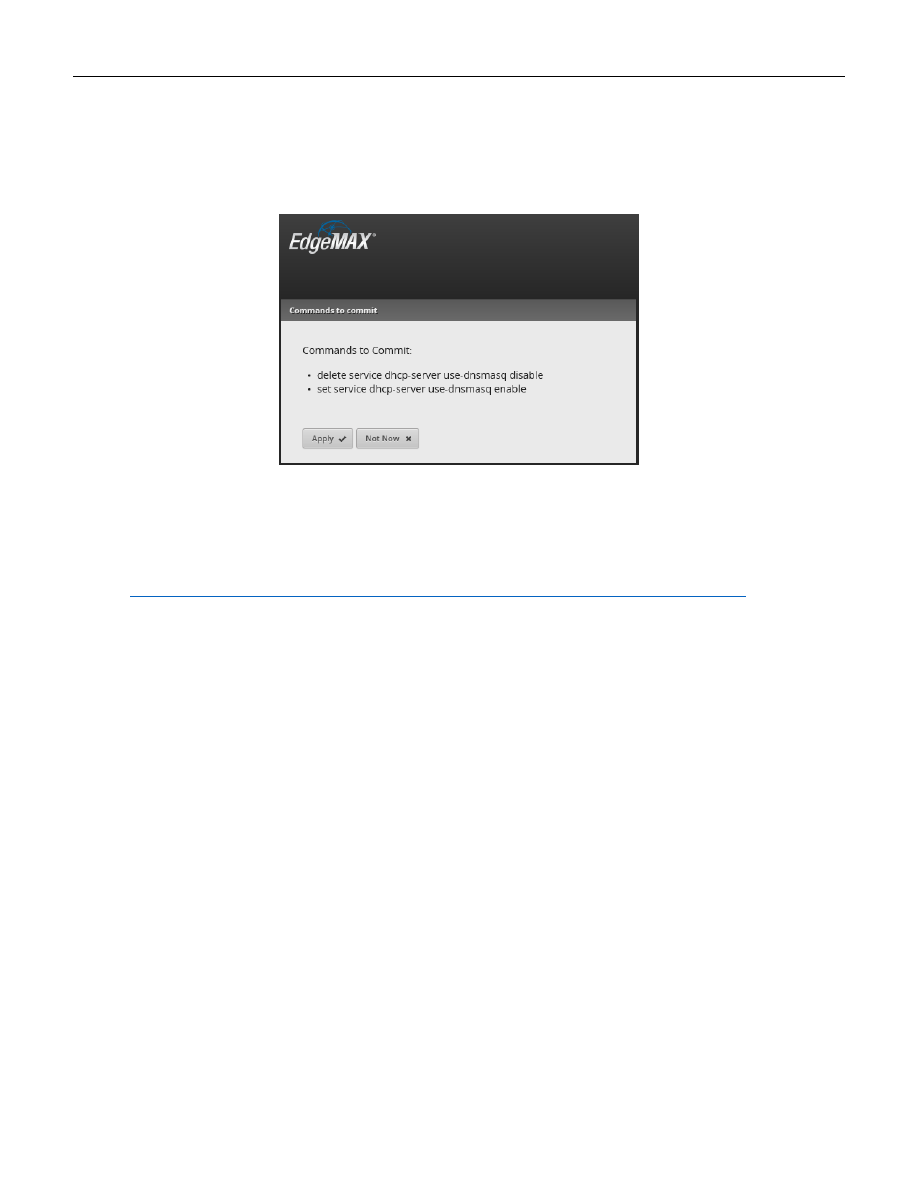
When you press it, the “Configuration” Tree window will appear. See Figure 31 – Config Tree Initial Screen.
Figure 31 – Config Tree Initial Screen
Using the config tree is an alternate method (for some items) to using the Command Line Interface (CLI).
Page 20 of 96
10/7/2017
15. My Command Line Trouble
When I was experimenting with dnsmasq, many internet resources simply gave CLI commands to enable this
feature. When I tried some of these commands, my EdgeRouter had problems. I no longer remember what the
exact problem was, but I noticed that sometimes when using the Config Tree, multiple commands were issued.
See Figure 32 – Example of Multiple Config Tree Commands.
Figure 32 – Example of Multiple Config Tree Commands
Dnsmasq was incomplete as of firmware 1.9.0 and had an additional bug added in firmware 1.9.1. It sounds like
dnsmasq would be worth it, but I am waiting for dnsmasq to be fixed.
Here is a recent post of (some of the) EdgeMAX (EdgeRouter’s firmware) Known Issues:
https://community.ubnt.com/t5/EdgeMAX/Known-Issues-of-EdgeMax-Series/td-p/1805816
Page 21 of 96
10/7/2017
16. EdgeRouter Backup / Configuration Files
When EdgeRouters are described in most internet forums, their configuration parameters are usually described
(in text) by a standard file format. Eventually, you will need to be fluent in reading these files and translating that
data into actions taken in the Command Line Interface (CLI), the Config Tree or the GUI.
You can find this configuration data within the config.boot file that is inside of the backup file generated from the
system window. The file that is generated is typically named edgeos_ubnt_<date>.tar.gz, with <date> replaced by
numbers representing todays date.
To generate a backup file, first press the System button, as shown in Figure 9 – System Button. You will be
presented with the System screen, as shown in Figure 10 – System Pop-up Screen.
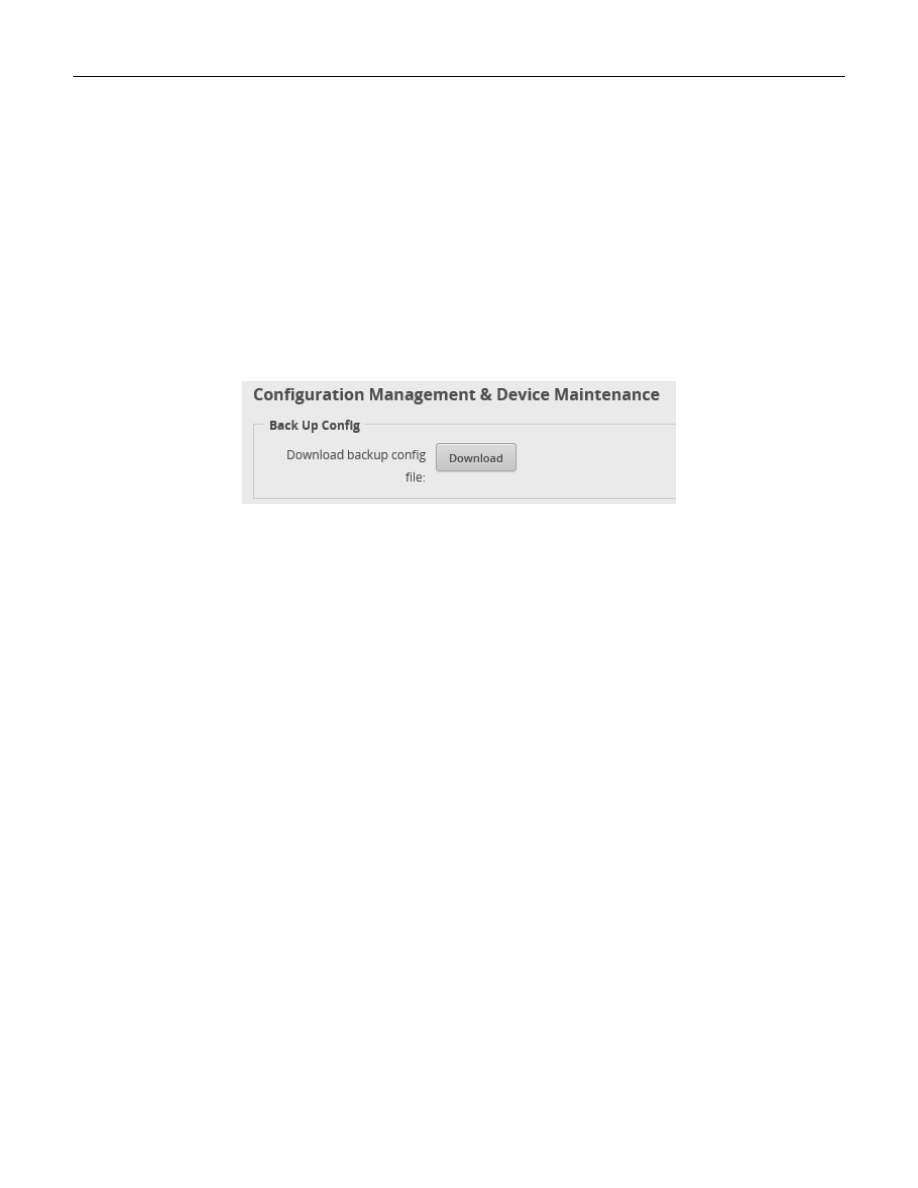
Find and press the “Download” button under the Configuration Management & Device Management section. See
Figure 33 – Back Up Config Download Button.
Figure 33 – Back Up Config Download Button
You will be presented with a dialog of where to (open or) save your backup file. This dialog is browser specific.
Save your file to a directory of your choice on your setup computer. This file will be needed if you ever need to
reload your EdgeRouter.You may want to do this frequently, when setting up this device.
Another way to obtain a relevant portion of this file is to issue one of the following commands into the Command
Line Interface (CLI) window. For information about the CLI, reference section “13 - EdgeRouter Command Line
Two different / similar normal-mode CLI command for acquiring the system configuration are:
cat /config/config.boot
show configuration | no-more
I will show as many portions of this config data as possible throughout this guide. One goal of this guide is to teach
users enough about this EdgeRouter that they are comfortable reading and understanding the backup files.
Page 22 of 96
10/7/2017
17. Remove eth2 from the EdgeRouter’s Internal Switch
In this step, we will manually un-bundle the eth2 interface from the EdgeRouter’s internal switch chip. This allows
us to provide for an additional Network. The switch chip will remain enabled for eth3 and eth4 interfaces. The
eth2 interface will be used as the Wired Separate Network. Later, we will setup firewall rules that will keep this
Network isolated from the other Networks.
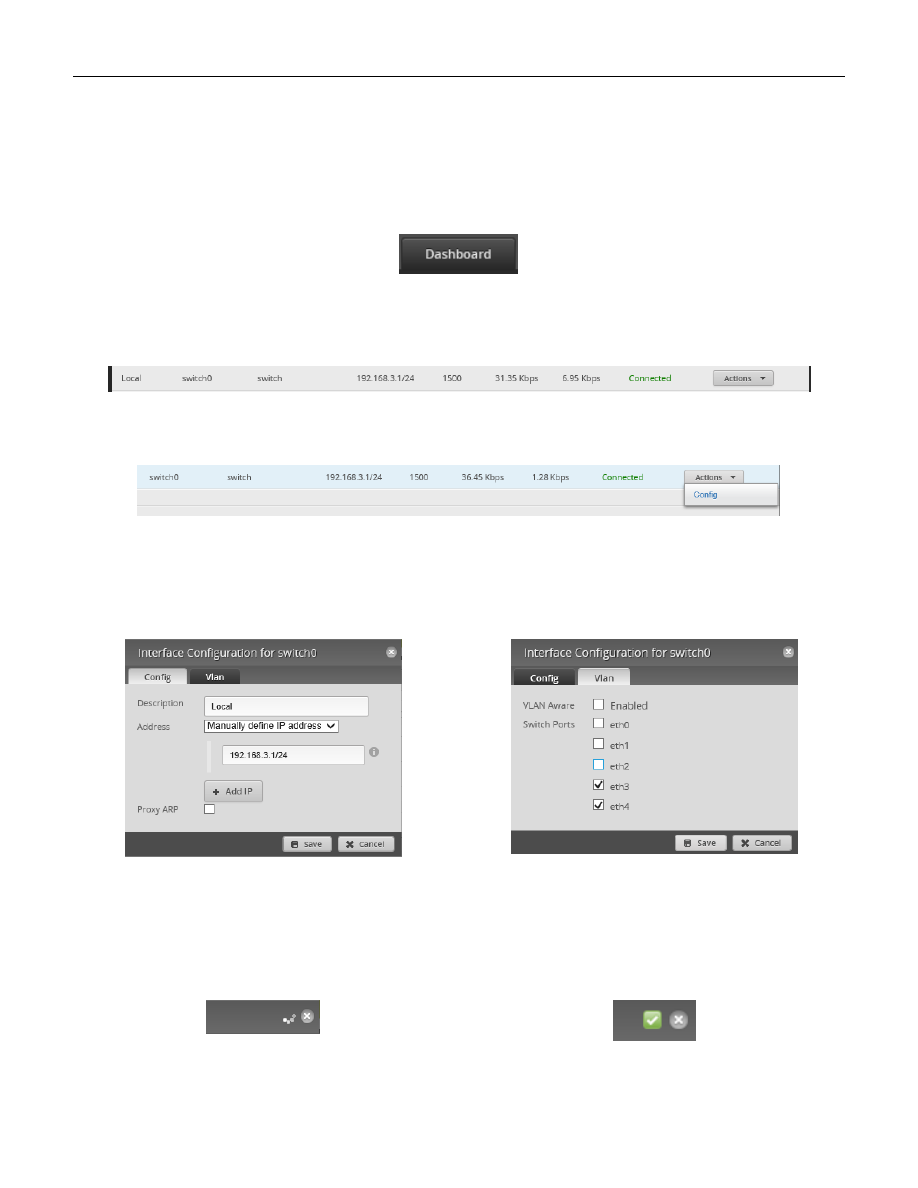
Press the Dashboard Button. See Figure 34 – Dashboard Button.
Figure 34 – Dashboard Button
On the right side of the Dashboard screen, select switch0’s “Actions” button. See Figure 35 – switch0’s Action
Figure 35 – switch0’s Action Button
A sub-menu will appear, Select “Config” from the menu items. See Figure 36 – switch0 Actions Config.
Figure 36 – switch0 Actions Config
You will be presented with the configuration dialog for switch0. See Figure 37 – switch0 Configuration.
Select the VLAN tab. Under the section labeled “Switch Ports”, UN-CHECK eth2. See Figure 38 – switch0 Switch
Figure 37 – switch0 Configuration
Figure 38 – switch0 Switch Ports
Press “Save”. While the EdgeRouter is completing this task, a busy indicator will spin, in the upper right corner of
the dialog. See Figure 39 – Busy Indicator. Wait for the Busy Indicator to finish spinning. It will be replaced by a
Green checkmark when the task is completed. See Figure 40 – Finished Checkmark.
Figure 39 – Busy Indicator
Figure 40 – Finished Checkmark
Page 23 of 96
10/7/2017
18. Configure EdgeRouter’s eth2 IP Addresses
Now that the eth2 interface has been un-bundled, we need to allocate a new IP address range to this interface.
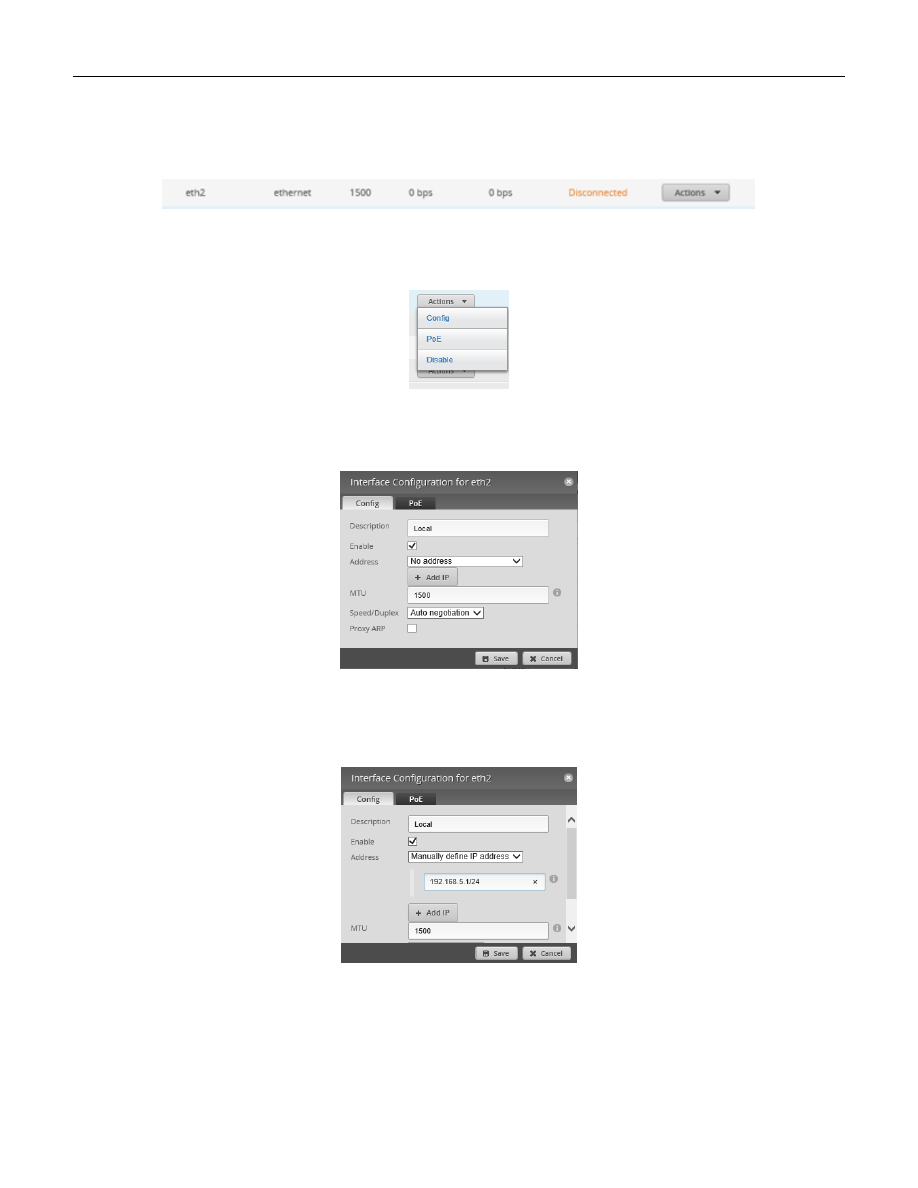
On the right side of the Dashboard screen select eth2’s “Actions” button. See Figure 41 – eth2’s Actions Button.
Figure 41 – eth2’s Actions Button
A sub-menu will appear, See Figure 42 – Interface Actions.
Figure 42 – Interface Actions
Select “Config“. You will be presented with Figure 43 – Configuration for eth2 Dialog.
Figure 43 – Configuration for eth2 Dialog
Under the Address selection, choose “Manually define IP address”, and enter “192.168.5.1/24” into the address
field. See Figure 44 – eth2 Address Dialog.
Figure 44 – eth2 Address Dialog
Click the Save button.

Page 24 of 96
10/7/2017
19. About DNS settings
I seem to have spent more time investigating DNS settings for the EdgeRouter than in learning firewall rules.
There are two different DNS packages available within the EdgeRouter. They are ISC (default) and dnsmasq. As of
firmware release 1.9.0, dnsmasq worked, but would not populate the GUI / Traffic Analysis page. At least one
dnsmasq bug was introduced into firmware 1.9.1.
Reference 1.9.0 Release Notes, section “[DHCP server]”:
https://community.ubnt.com/t5/EdgeMAX-Updates-Blog/EdgeMAX-EdgeRouter-software-release-v1-9-0/ba-
New Bug
https://community.ubnt.com/t5/EdgeMAX/EdgeOS-1-9-1-dhcp-server-using-domain-search-rather-than-
For now, I’m staying with ISC.
Within this guide, I am using Level3 DNS addresses for the Home Network and Separate Network. I am also using /
forcing OpenDNS DNS addresses for the IOT and Guest Networks. Change any or all of these addresses to the DNS
provider / resolver addresses of your choice.
Steve Gibson has a web page that can help you characterize various DNS providers. Since it runs from your
computer, the results are localized to your connection / ISP. Until the EdgeRouter is fully setup, you might want to
run this from a computer that is currently wired outside of the EdgeRouter. This is shown as “Existing LAN” in
Figure 2 - EdgeRouter Configuration Setup. The page is at:
https://www.grc.com/dns/benchmark.htm
Steve Gibson has another web page that tests the “spoofability” (security) of DNS resolvers. It is at:
https://www.grc.com/dns/dns.htm
Here are some alternate DNS resolvers, and additional DNS information pages:
https://en.wikipedia.org/wiki/List_of_managed_DNS_providers
https://dns.norton.com/configureRouter.html,
https://dns.norton.com/faq.html
https://support.opendns.com/hc/en-us/articles/228006047-Generalized-Router-Configuration-
https://use.opendns.com/#router
https://en.wikipedia.org/wiki/OpenDNS
EdgeRouter DNS References:
https://community.ubnt.com/t5/EdgeMAX/ERL-3-1-9-0-No-DHCP-leases-since-switching-to-DNSMasq/td-
https://community.ubnt.com/t5/EdgeMAX/Traffic-Analysis-host-name-resolution/m-
https://github.com/confirm/edgerouter-dnsmasq-updater
https://loganmarchione.com/2016/08/edgerouter-lite-dnsmasq-setup/
Page 25 of 96
10/7/2017
20. System DNS Settings
This step instructs the EdgeRouter to use specific DNS servers to resolve web URLs into IP addresses. These DNS
servers are specified under the System widow. The Guest and IOT Networks set up via this guide use different DNS
servers, as overridden by their specific DHCP servers.
Press the “System” button. Reference Figure 9 – System Button.
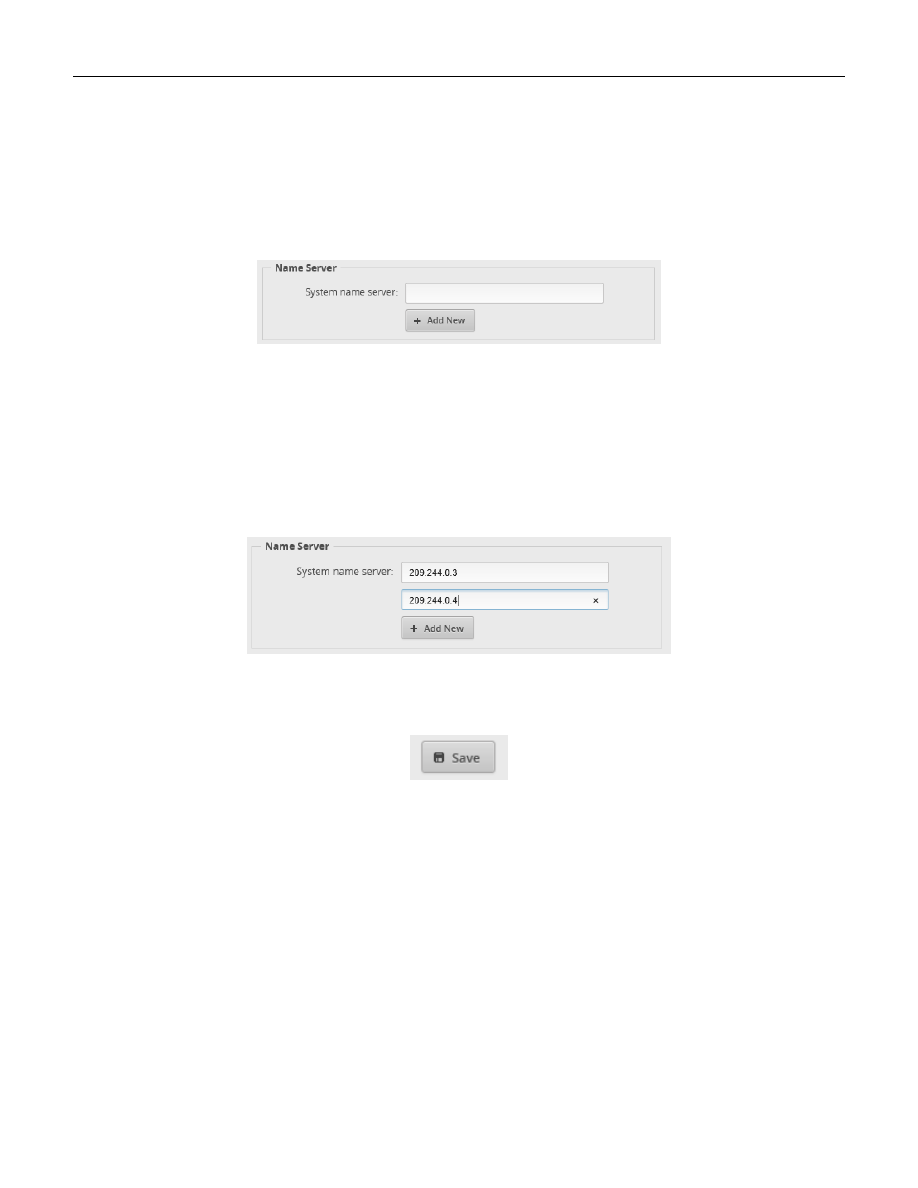
On the system window, find the Name Server Box. See Figure 45 – Initial System Name Server.
Figure 45 – Initial System Name Server
Fill in the System name server field with your primary DNS server address. I am using a Level3 address of:
209.244.0.3
Then press the “+ Add New” button and enter your secondary DNS server address. I am using a Level3 address of:
209.244.0.4
See Figure 46 – Example System DNS Entries.
Figure 46 – Example System DNS Entries
Press the Save button near the bottom of the system page.
Figure 47 – System Save Button

Page 26 of 96
10/7/2017
21. Remove ISP Provided DNS Resolvers
I don’t depend upon the DNS servers that are provided by my dsl / cable modem. The specific DNS resolver
addresses are specified as part the DHCP data, which is given to the EdgeRouter’s eth0 WAN port from the dsl /
cable modem. Performing the commands in this section is optional / up to you.
These ISP DNS servers are probably OK, but I don’t trust the security of phone-company/cable-company provided
modems. Consumer modems are typically full of unpatched security holes, and many have programmed
backdoors in them. Commercial modems bulk produced by the lowest bidder and externally controlled by large,
uncaring companies have got to be even worse.
The site http://routersecurity.org/ is a big reason why I moved to this Ubiquiti equipment.
In particular, there are DNS changer worms, which attack consumer / commercial routers and change their DNS
resolver settings. The way to circumvent this problem is to instruct the EdgeRouter to ignore the DHCP provided
DNS resolver address from your commercial router.
Since the DNS changer worm could attack an EdgeRouter, remember to change the EdgeRouter’s password.
To see the DNS resolvers being used by the EdgeRouter, issue the CLI command:
show dns forwarding nameservers.
(For information on the CLI, reference section “13 - EdgeRouter Command Line Interface (CLI)”)
The following text shows the two Level3 resolvers that were entered into the system page, and an ISP-provided
resolver, delivered via my existing router, which has an address of 192.168.2.1:
-----------------------------------------------
Nameservers configured for DNS forwarding
-----------------------------------------------
192.168.2.1 available via 'dhcp eth0'
209.244.0.3 available via 'system'
209.244.0.4 available via 'system'
To remove the ISP-provided nameservers, drop into the Command Line Interface (CLI) and issue the following
commands:
configure
set service dns forwarding system
commit
save
exit
To see if this worked, re-issue the CLI command “show dns forwarding nameservers”. This is what I got:
-----------------------------------------------
Nameservers configured for DNS forwarding
-----------------------------------------------
209.244.0.3 available via 'optionally configured'
209.244.0.4 available via 'optionally configured'
-----------------------------------------------
Nameservers NOT configured for DNS forwarding
-----------------------------------------------
192.168.2.1 available via 'dhcp eth0'
Reference https://community.ubnt.com/t5/EdgeMAX/Change-WAN-DNS-Server/td-p/977885
QUESTION: Is this the best way to achieve this?
QUESTION: How do you restore using the ISP’s resolvers?
Page 27 of 96
10/7/2017
22. Configure EdgeRouter’s eth2 DHCP Server
Now that eth2 has been un-bundled, and has a unique IP subnet assigned to it, we need to provide a DHCP server
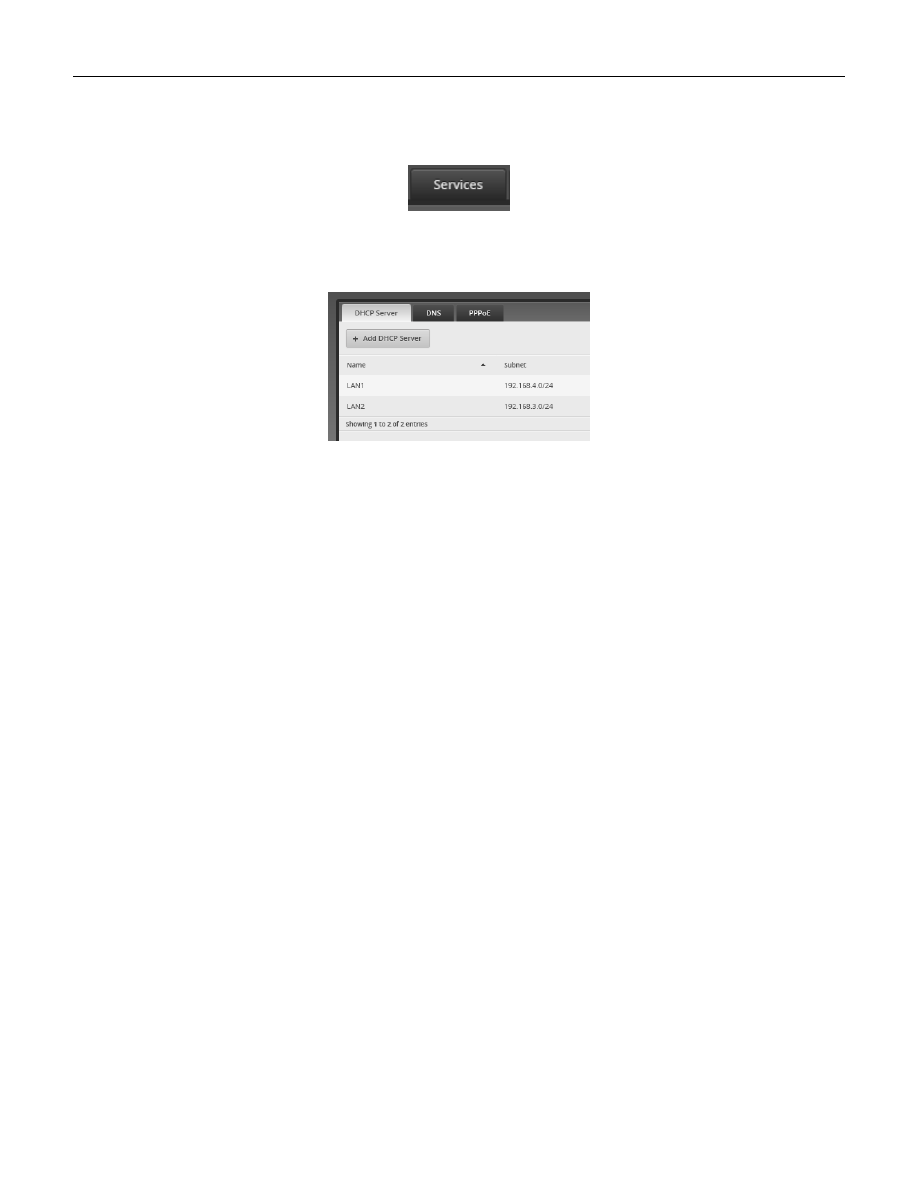
on this port. Near the top of the screen select the “Services” button. See Figure 48 – Services Button.
Figure 48 – Services Button
Ensure that the “DHCP Server” tab is selected. See Figure 49 – DHCP Server Screen.
Figure 49 – DHCP Server Screen
Note that I am using Level 3 DNS resolver addresses for DNS1 and DNS2 (below). You can change these to
providers of your choice. If you change them here, you will also need to manually modify some firewall / NAT
rules, presented later within this guide.
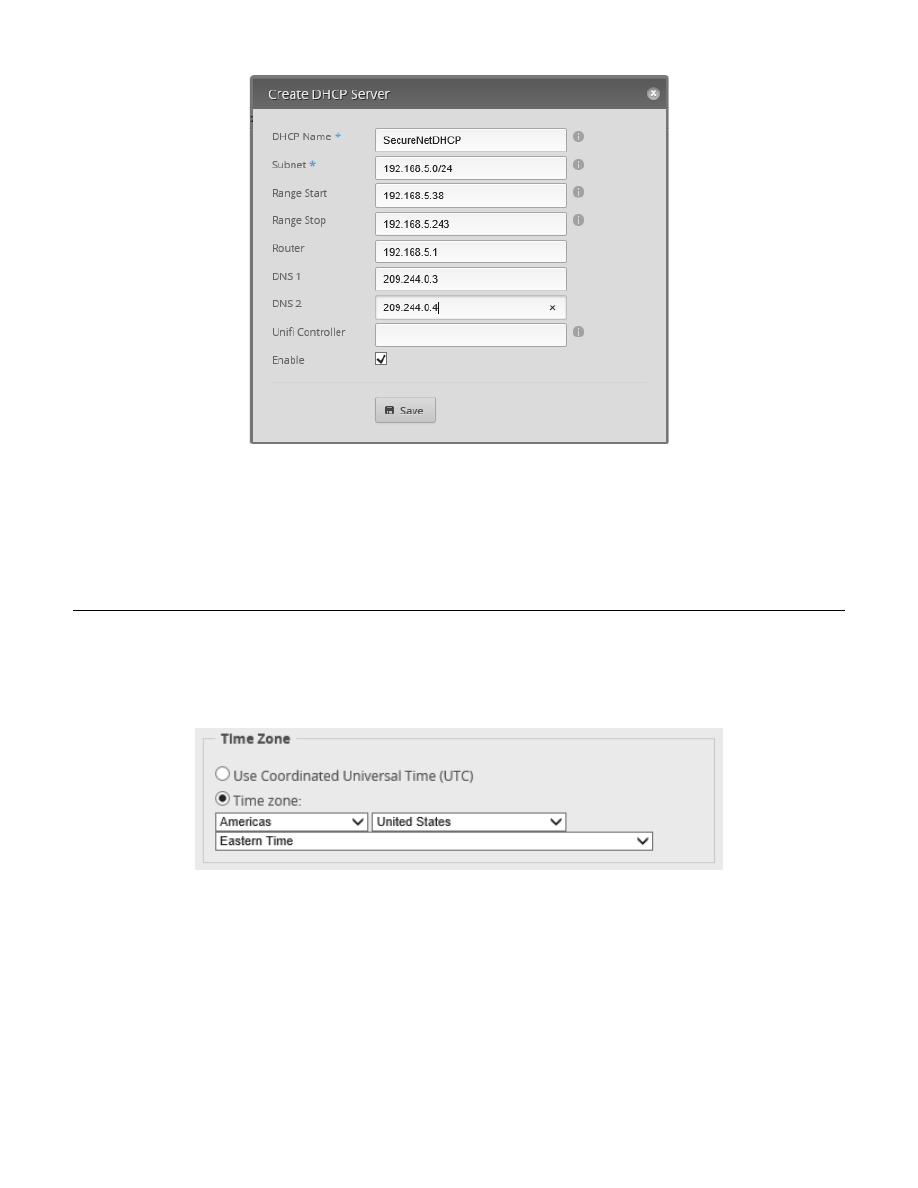
Click on the “+ Add DHCP Server” button. You will be presented with a Create DHCP Server dialog. See Figure 50 –
Create eth2 DHCP Server Screen. Fill in the form as follows:
DHCP Name:
SecureNetDHCP
Subnet:
192.168.5.0/24
Range Start:
192.168.5.38
Range Stop:
192.168.5.243
Router:
192.168.5.1
DNS 1:
209.244.0.3
DNS 2:
209.244.0.4
Enable:
CHECKED
Click “Save.”
Page 28 of 96
10/7/2017
Figure 50 – Create eth2 DHCP Server Screen
I used the same range start and range stop values (38 and 253) that the wan+2lan2 wizard used within the DHCP
servers for LAN1 and LAN2.
For some reason, the Ubiquity GUI programmers seem to have forgotten to include the setting of “authoritative
enable” and “domain” from this GUI interface. Setting of those will come later.
23. Configure EdgeRouter’s Time Zone
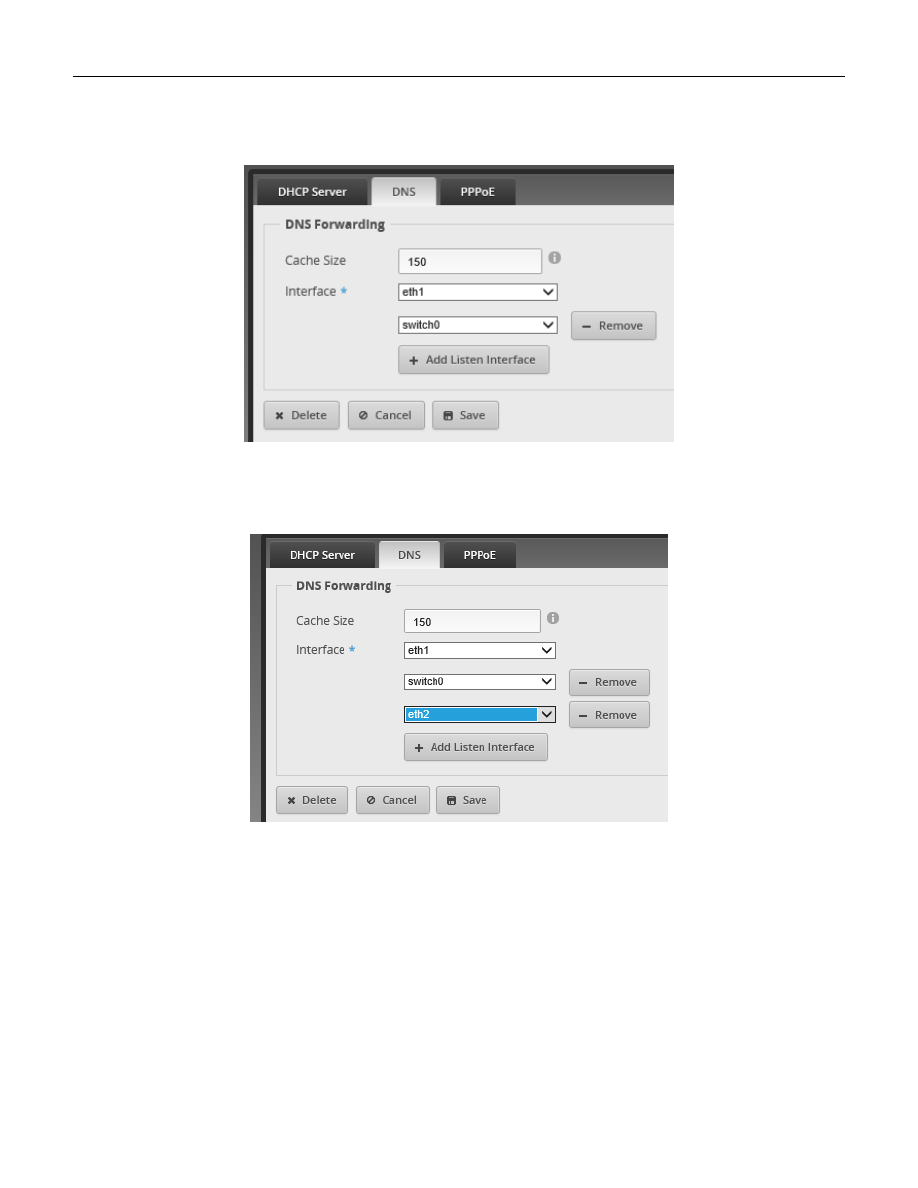
Near the top of the screen select the “Services” button. Reference Figure 48 – Services Button. Find the section
titled “Time Zone” and configure the data in these fields according to the time zone you are in, unless you want
your router to remain in UTC. See Figure 51 – Time Zone.
Figure 51 – Time Zone
Page 29 of 96
10/7/2017
24. Add eth2 to DNS Server
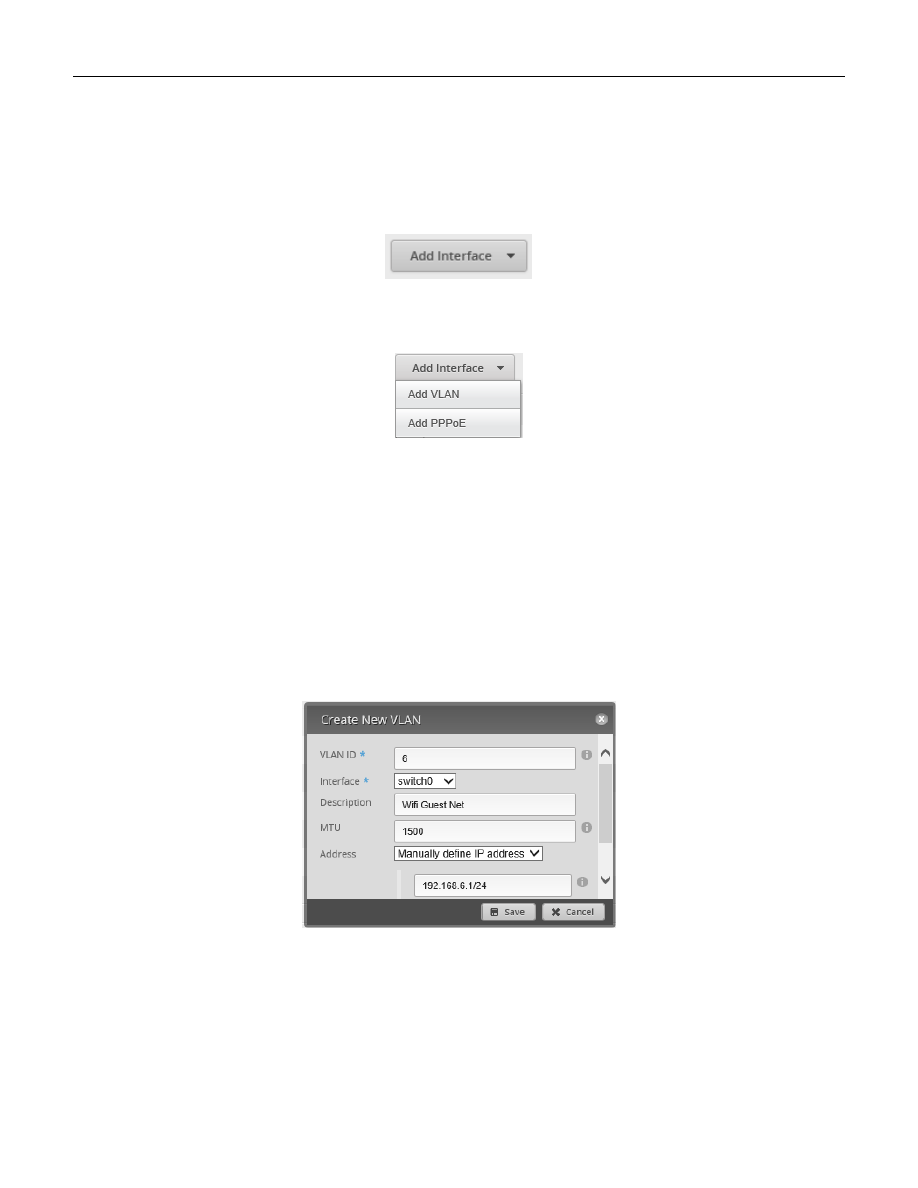
Press the “Services” button, near the top right of the window. Reference Figure 48 – Services Button. Ensure that
the “DNS” Tab is selected. See Figure 52 – DNS Tab.
Figure 52 – DNS Tab
Press the “+ Add Listen Interface” button, which is inside the DNS forwarding section, and select “eth2” from the
selection box. See Figure 53 – Add eth2 to DNS. Press “Save.”
Figure 53 – Add eth2 to DNS
Page 30 of 96
10/7/2017
25. Add VLAN Networks to the EdgeRouter
The Ubiquiti AC-AP-LR Wi-Fi access point can manage up to four separate Networks / SSIDs, by using VLANS.
VLANS allow separated IP data to flow over one Ethernet cable, without the data being mixed together. This
section will create two new Networks using VLANs.
Press the Dashboard button near the top of the Screen. Reference Figure 34 – Dashboard Button. On the upper
left side of the Dashboard screen select the Add Interface button. See Figure 54 – Add Interface Button
Figure 54 – Add Interface Button
The Add Interface menu will appear. Select “Add VLAN”. See Figure 55 – Add Interface Menu
Figure 55 – Add Interface Menu
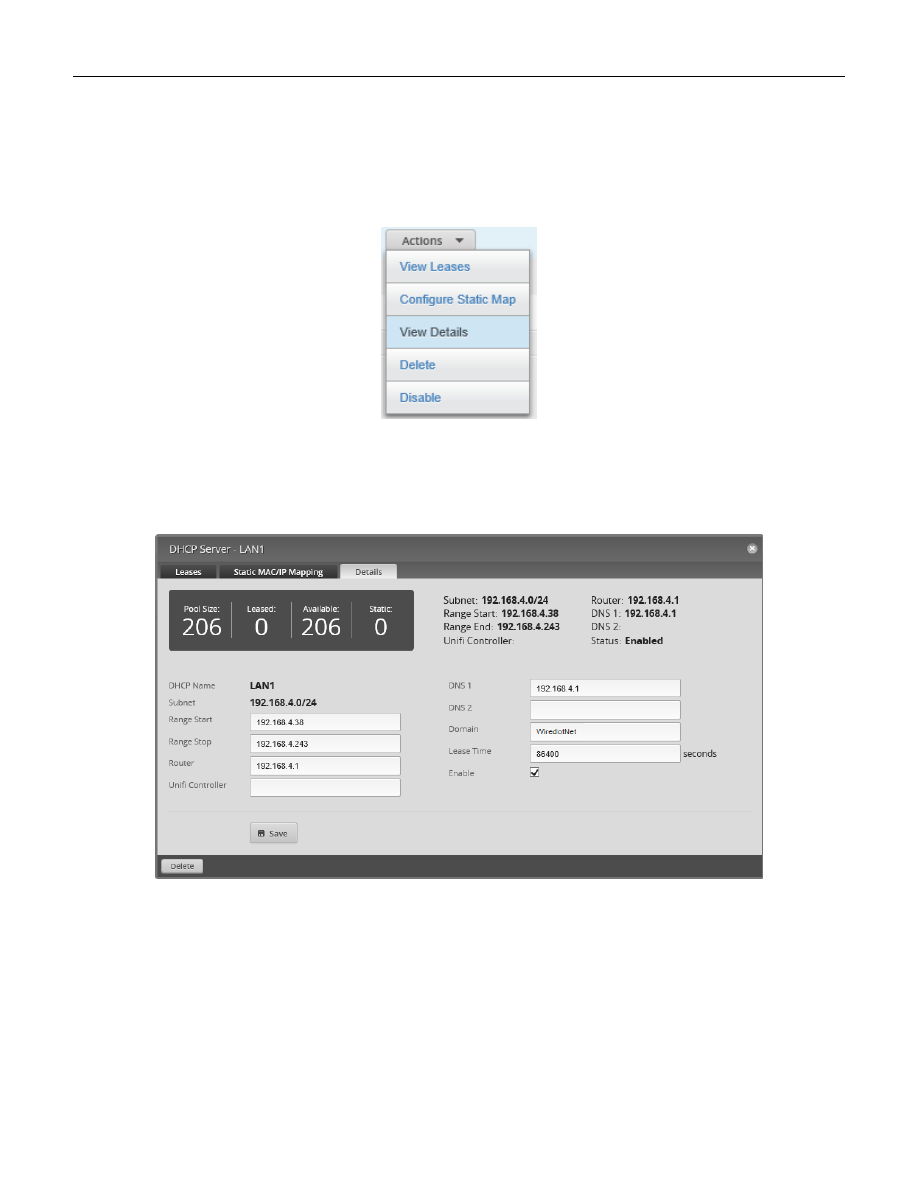
You will be presented with the “Create New VLAN” dialog. Fill in the information as follows:
VLAN ID:
6
Interface:
switch0
Description:
“Wifi Guest Net”
MTU:
1500
Address:
Manually define IP address
192.168.6.1/24
The AC-AP-LR access point will eventually be connected to the eth4 interface. The eth3 and eth4 interfaces are
internally using the switch0 chip. Therefore, this VLAN needs to be attached to switch0, not to eth3 or to eth4.
See Figure 56 – Create New VLAN Example. Press the “Save” button.
Figure 56 – Create New VLAN Example

Page 31 of 96
10/7/2017
Repeat these steps for adding a VLAN the Wi-Fi IOT Network. Fill in the information as follows:
VLAN ID:
7
Interface:
switch0
Description:
“Wifi Iot Net”
MTU:
1500
Address:
Manually define IP address
192.168.7.1/24
There are the relevant sections from the backup file:
vif 6 {
address 192.168.6.1/24
description "Wifi Guest Net"
mtu 1500
}
vif 7 {
address 192.168.7.1/24
description "Wifi Iot Net"
mtu 1500
}

Page 32 of 96
10/7/2017
26. Add DHCP Servers to the VLANs
Following the directions that are in the section titled “22 - Configure EdgeRouter’s eth2 DHCP Server”, add DHCP
servers for the two VLANs that were just created. Note that I am using Open DNS servers for these networks. If
you change them here, you will also need to manually modify some firewall / NAT rules, presented later within
this guide.
The information for VLAN 6, is as follows:
DHCP Name:
WifiGuestDHCP
Subnet:
192.168.6.0/24
Range Start:
192.168.6.38
Range Stop:
192.168.6.243
Router:
192.168.6.1
DNS 1:
208.67.222.222
DNS 2:
208.67.220.220
Enable:
CHECKED
The information for VLAN 7, is as follows:
DHCP Name:
WifiIotDHCP
Subnet:
192.168.7.0/24
Range Start:
192.168.7.38
Range Stop:
192.168.7.243
Router:
192.168.7.1
DNS 1:
208.67.222.222
DNS 2:
208.67.220.220
Enable:
CHECKED
You should now have five DHCP servers.
Page 33 of 96
10/7/2017
27. Set Domain Names for Networks
Near the top of the screen select the “Services” button. Reference Figure 48 – Services Button. Ensure that the
“DHCP Server” tab is selected. Reference Figure 49 – DHCP Server Screen
Find the LAN1 line, and follow it to the right side, to the line’s “Actions” button. Click the “Actions” button. You
will be presented with a list of actions. Choose “View Details”. See Figure 57 – DHCP Actions.
Figure 57 – DHCP Actions
A dialog will open. See Figure 58 – DHCP Server Details Dialog.
Figure 58 – DHCP Server Details Dialog
Fill-in the “Domain” field with:
WiredIotNet
and then click “Save.” When it is done updating, close the dialog.

Page 34 of 96
10/7/2017
Repeat these steps for the following DHCP Servers as show in Table 2 - Table of Domain Names (You have just
done the first one of them):
DHCP Servers
Domain
LAN1
WiredIotNet
LAN2
HomeNet
SecureNetDHCP
SeparateNet
WiFiGuestDHCP
WifiGuestNet
WifiIOTDHCP
WifiIotNet
Table 2 - Table of Domain Names
28. Modify EdgeRouter’s eth1 DHCP Server
Select the “Services” button. Reference Figure 48 – Services Button.
Ensure that the “DHCP Server” tab is selected. Reference Figure 49 – DHCP Server Screen
Select the “Action” button to the right of the “LAN1” line. Reference Figure 57 – DHCP Actions.
Choose “View Details.” Reference Figure 58 – DHCP Server Details Dialog.
Modify / enter the following information:
DNS 1:
208.67.222.222
DNS 2:
208.67.220.220
These DNS addresses have the equipment on the Wired Iot Network use Open DNS resolvers. If different resolver
addresses are used here, then some firewall rules (and probably group addresses) will also need to be modified.
Covered later in this guide.
Page 35 of 96
10/7/2017
29. Make DHCP Servers “authoritative”
The EdgeRouter does not default any newly created DHCP servers to “authoritative.” This means that devices on
the added Networks can take a long time to acquire an IP address. The Networks that were added by the Wizard
(LAN1 and LAN2) are made authoritative by default.
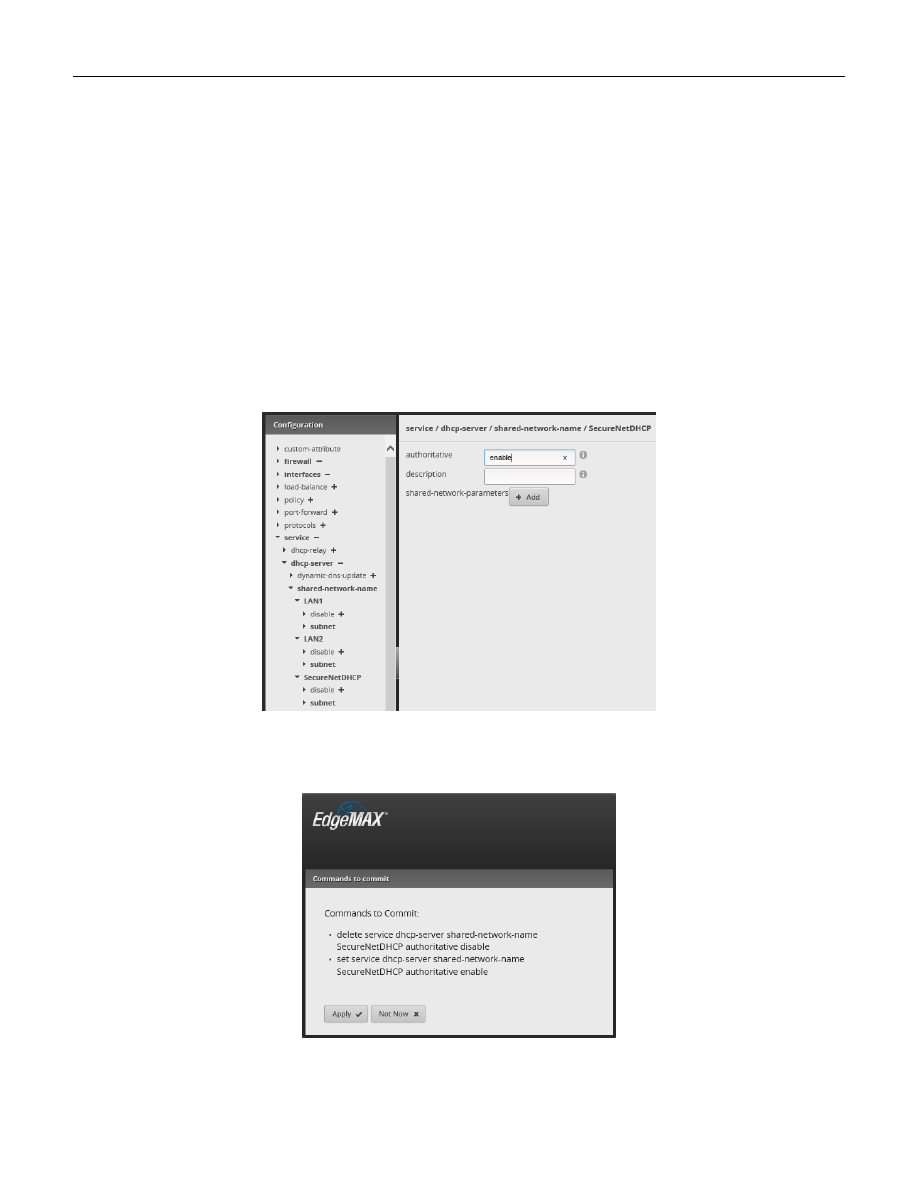
Enter the Config Tree. Reference section “14 - EdgeRouter Config Tree.” Select and open up the following config
tree sub-menu items from the configuration screen:
service
dhcp-server
shared-network-name
Click on the DHCP server you want to configure; in this case, it is:
SecureNetDHCP
You should see some DHCP settings, including authoritative. (Note, your screen will still show “disable”). See
Figure 59 – Authoritative Example.
Figure 59 – Authoritative Example
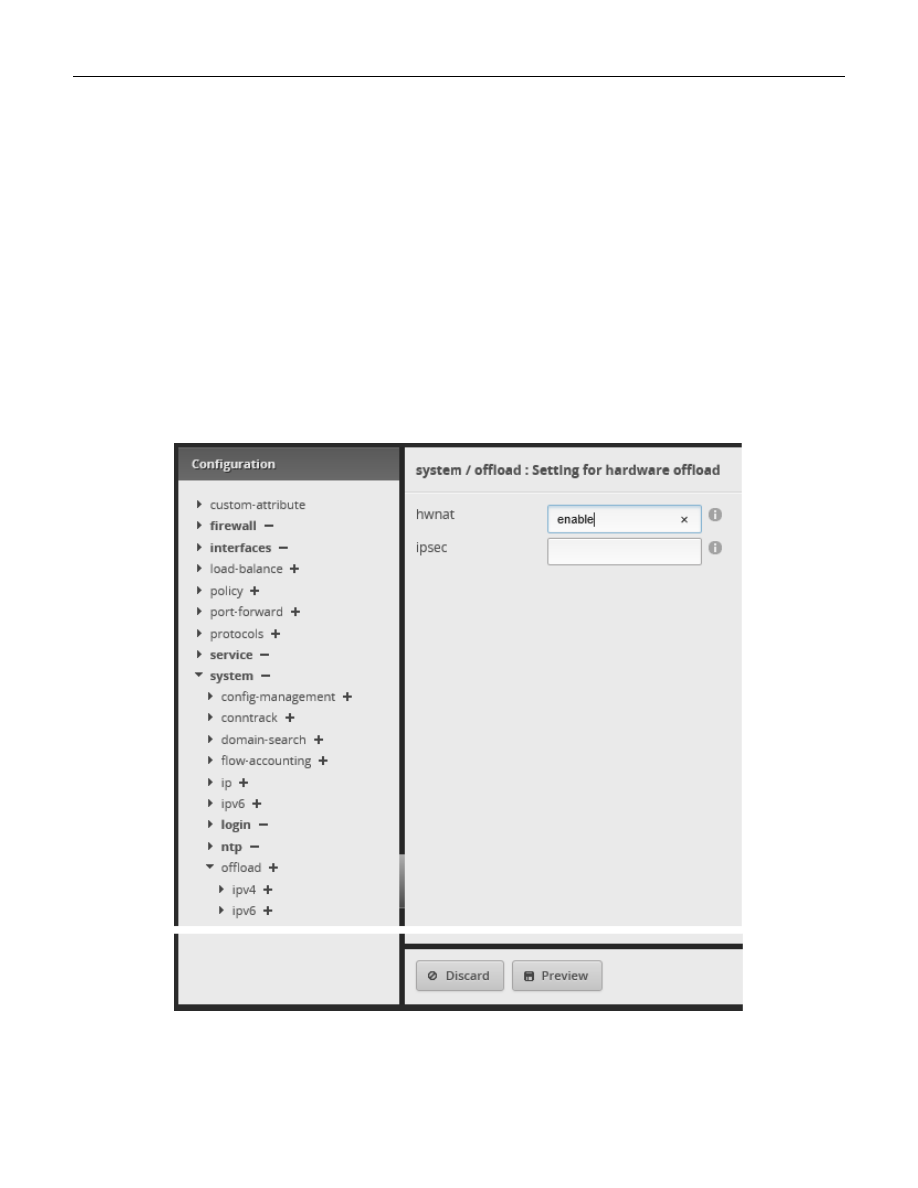
Type “enable” in the authoritative box. Then press the “Preview” button. See Figure 60 – Authoritative Commit.
Figure 60 – Authoritative Commit

Page 36 of 96
10/7/2017
Press “Apply.” You should see the message “The configuration has been applied successfully”, in green, near the
bottom of the screen.
Repeat these steps for the following Authoritative DHCP Servers as shown in Table 3 - Table of Authoritative DHCP
Servers. (You have just done the first one of them):
Authoritative DHCP Servers
SecureNetDHCP
WiFiGuestDHCP
WifiIotDHCP
Table 3 - Table of Authoritative DHCP Servers
Shown below are excerpts of three of the five DHCP sections from the backup file:
dhcp-server {
disabled false
hostfile-update disable
shared-network-name LAN2 {
authoritative enable
subnet 192.168.3.0/24 {
default-router 192.168.3.1
dns-server 192.168.3.1
domain-name HomeNet
lease 86400
start 192.168.3.38 {
stop 192.168.3.243
}
}
}
shared-network-name SecureNetDHCP {
authoritative enable
subnet 192.168.5.0/24 {
default-router 192.168.5.1
dns-server 209.244.0.3
dns-server 209.244.0.4
domain-name SeparateNet
lease 86400
start 192.168.5.38 {
stop 192.168.5.243
}
}
}
shared-network-name WifiGuestDHCP {
authoritative enable
subnet 192.168.6.0/24 {
default-router 192.168.6.1
dns-server 208.67.222.222
dns-server 208.67.220.220
domain-name WifiGuestNet
lease 86400
start 192.168.6.38 {
stop 192.168.6.243
}
}
}
use-dnsmasq disable
}
Page 37 of 96
10/7/2017
30. EdgeRouter Enable HW NAT Assist
Enabling “hwnat” turns on some features of a hardware switching chip that is within the EdgeRouter. This chip
assists the EdgeRouter’s CPU with routing and NAT functionality, speeding up the operation of the EdgeRouter X.
Without this hardware assist, routing of packets is relatively slow. Be warned; if Quality of Service (QoS)
functionality is enabled, then this hwnat assist is internally / automatically disabled. You also don’t want to
enable bridging, since bridging is implemented via the CPU of the EdgeRouter X and is also relatively slow.
With hwnat enabled, many people report 800 – 900Mbps throughput.
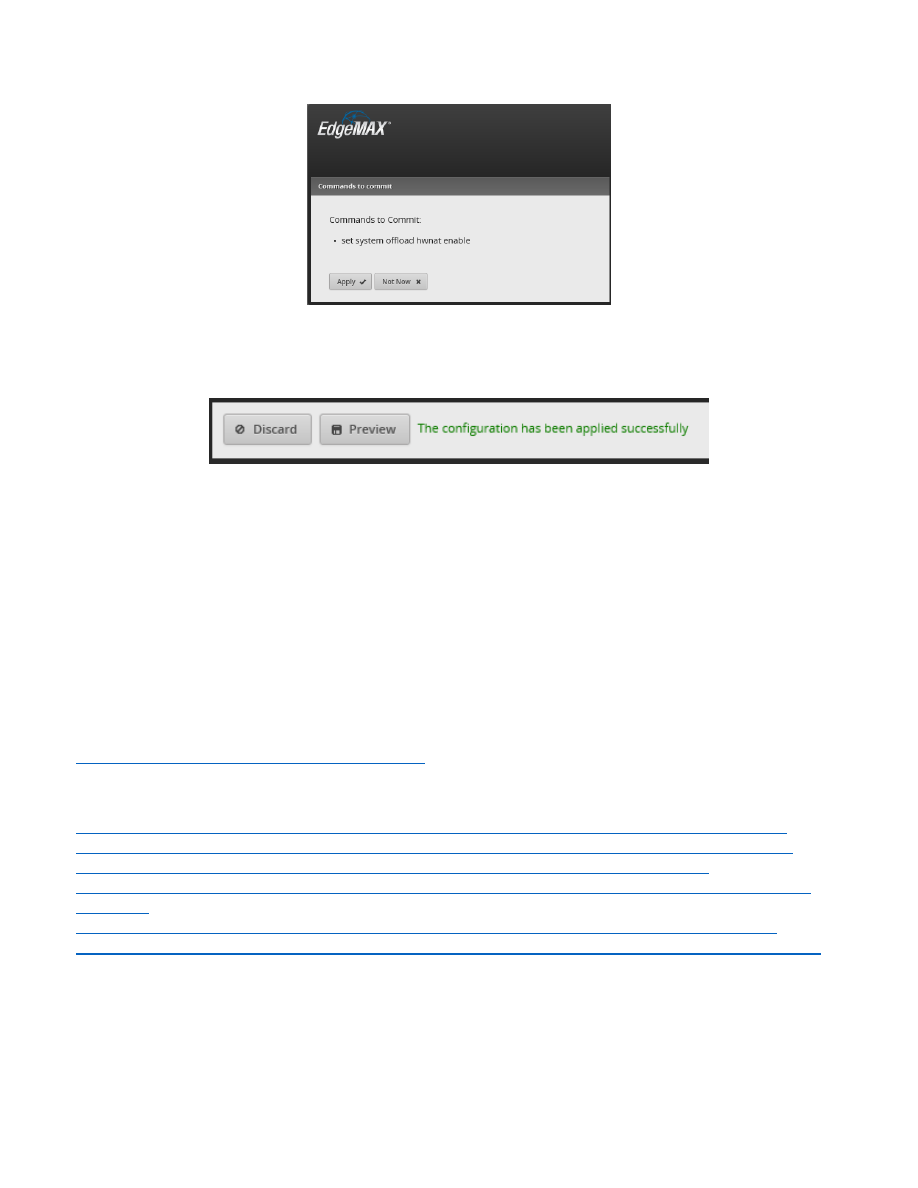
Open up the Configuration Tree. Reference section 14 - EdgeRouter Config Tree.
Select and open up the following config tree sub-menu items from the configuration screen:
system
offload
In the hwnat setting area, type:
enable
then select the “Preview” button at the bottom of the page.
See Figure 61 – System Offload Hwnat Selection (Partial).
Figure 61 – System Offload Hwnat Selection (Partial)
Page 38 of 96
10/7/2017
The Edgerouter will preview what command(s) it will issue. See Figure 62 – Preview hwnat Config.
Figure 62 – Preview hwnat Config
Press “Apply.” The system will inform you that, “The configuration has been applied successfully”. See Figure 63 –
Figure 63 – hwnat Success
The above config-tree hwnat-enable could have been performed with the following CLI commands:
configure
set system offload hwnat enable
commit
save
exit
Compare the above command(s) with the command that the conifg-tree automatically issued in Figure 62 –
Remember that different models of EdgeRouters have different abilities / hardware assisting chips within them.
Their commands may be different.
The following article is well worth reading:
http://kazoo.ga/re-visit-the-switch-in-edgerouter-x/
Performance references:
https://community.ubnt.com/t5/EdgeMAX/What-is-the-switch0-interface-re-EdgeRouter-X/td-p/1485842
https://community.ubnt.com/t5/EdgeMAX/Performance-of-EdgerouterX-vs-Edgerouter-Lite/td-p/1230924
https://community.ubnt.com/t5/EdgeMAX/EdgeRouter-X-low-throughput-slow/td-p/1392229
https://community.ubnt.com/t5/EdgeMAX/ER-X-vs-ER-Lite-Head-to-Head-Speed-Results-on-Google-Fiber/td-
p/1839844
https://www.stevejenkins.com/blog/2017/02/edgerouter-x-vs-edgerouter-lite-google-fiber-speed-tests/
https://community.ubnt.com/t5/EdgeMAX/Edgerouter-X-Fios-Gigabit-Won-t-go-over-500-Mbps/td-p/1910761
Page 39 of 96
10/7/2017
31. EdgeRouter Enable Traffic Analysis
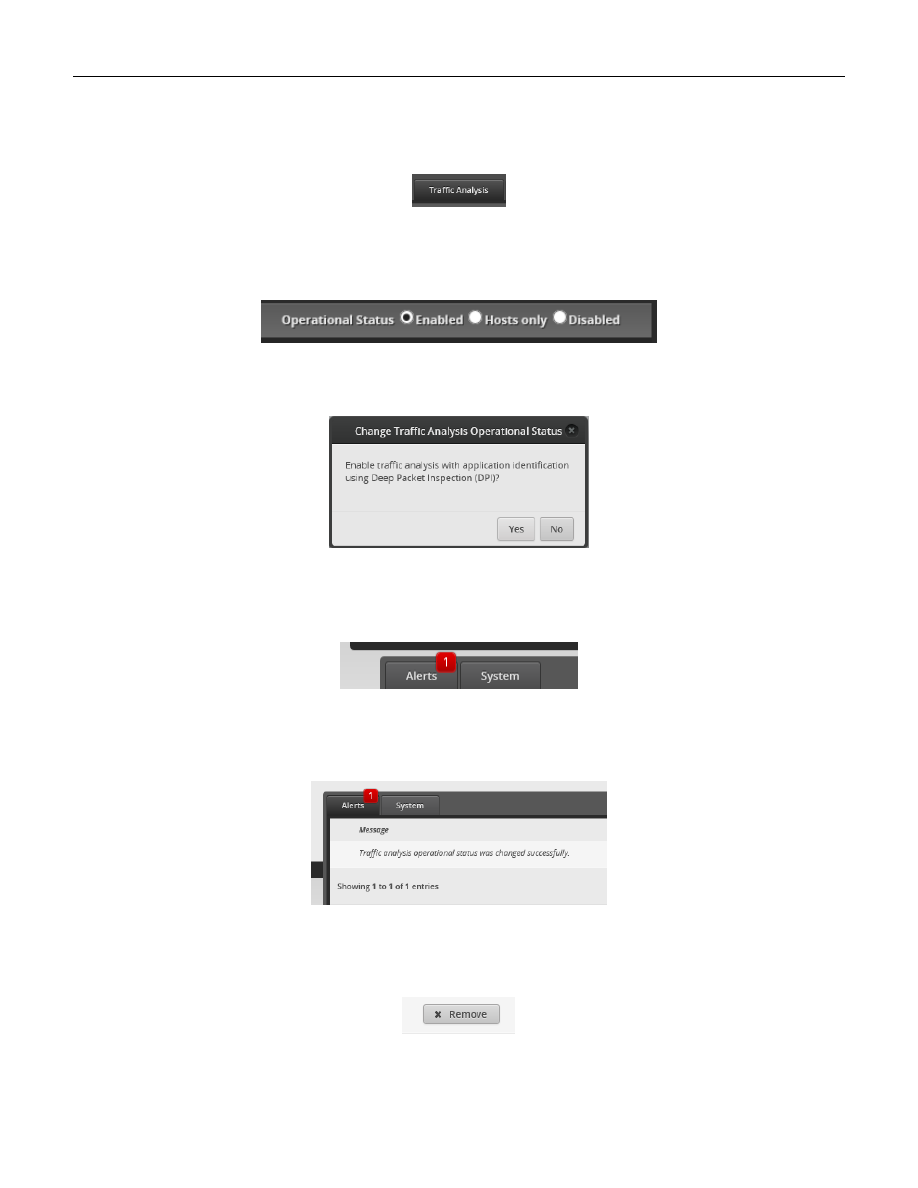
This step will enable the EdgeRouter to perform Deep Packet Inspection (DPI) / Traffic Analysis.
Press the “Traffic Analysis” button, near the top right of the screen. See Figure 64 – Traffic Analysis Button.
Figure 64 – Traffic Analysis Button
In the upper-right area of the traffic analysis screen, is an “Operational Status” selection. Select “Enabled.” See
Figure 65 – Enable Operational Status
Figure 65 – Enable Operational Status
You will be presented with a confirmation dialog. See Figure 66 – Operational Status Confirmation.
Figure 66 – Operational Status Confirmation
Select “Yes.” The software will (for some reason) present you with an Alert. This is seen in the lower-left of the
screen. See Figure 67 – Active Alert.
Figure 67 – Active Alert
Click on the “Alerts” button. You will be presented with the Alert message(s). See Figure 68 – Active Traffic
Figure 68 – Active Traffic Analysis Message
To remove this Alert message, press the “Remove” button, located on the right side of the screen. See Figure 69 –
Figure 69 –Remove Alert Button
Page 40 of 96
10/7/2017
32. EdgeRouter Traffic Analysis
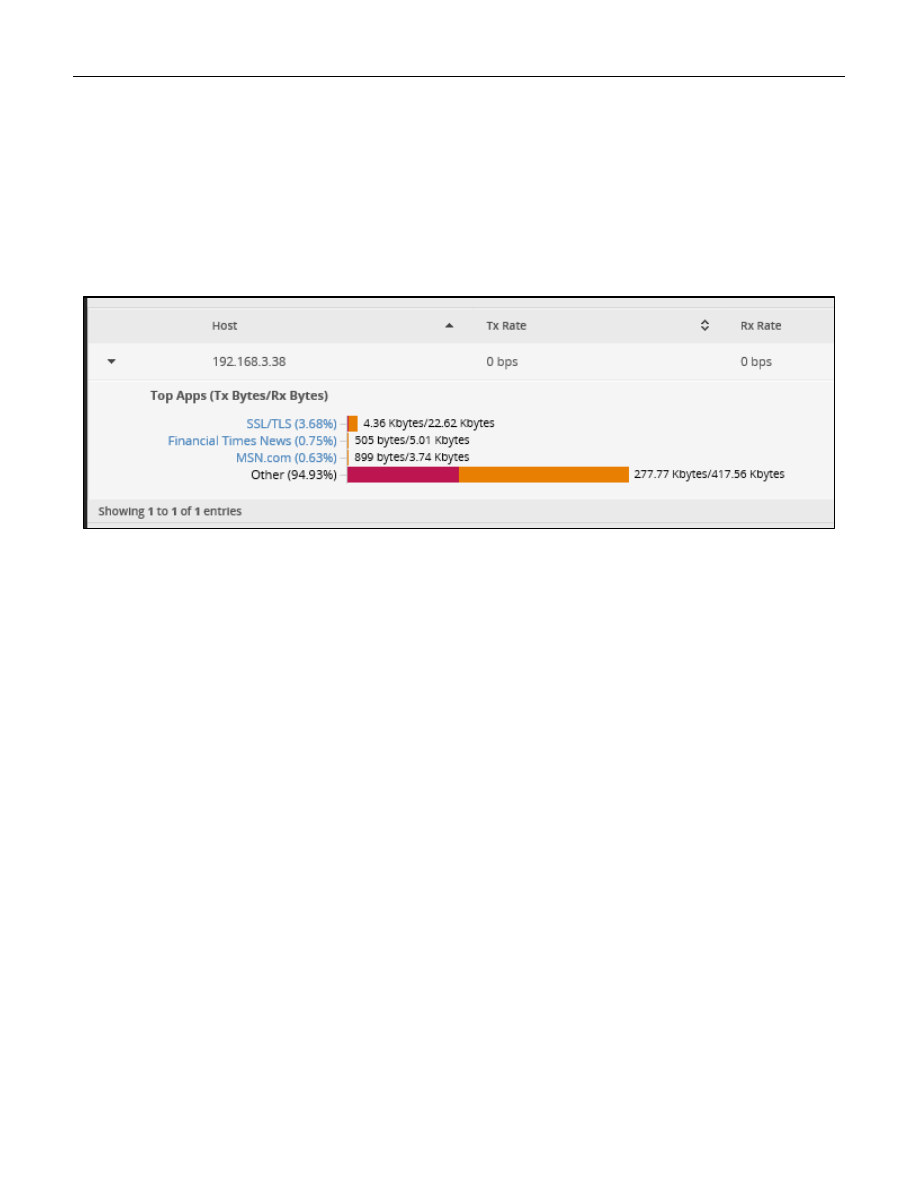
The Traffic Analysis performed by the EdgeRouter X is pretty neat. The following screen shot was taken when the
Edgerouter was at this configuration step in generating this configuration document. The EdgeRouter had been
booted for 41 minutes.
The only thing I had done, since I booted the “setup” computer, was to configure the EdgeRouter. I NEVER
purposefully go to MSN.com, or to the Financial Times News. I only assume that those web lookups are from
Microsoft’s Internet Explorer / Microsoft performing their Windows 10 monetization of their users, sometimes
referred to as “spying.” See Figure 70 –Sample Traffic Analysis. This feature is pretty neat. In real use, there does
seem to be a lot of uncharacterized traffic under “Other.”
Figure 70 –Sample Traffic Analysis
Note that when HW NAT Assist is enabled, some traffic, which is handled by the internal switch chip, is not shown
in traffic analysis. That is because Traffic Analysis is a CPU function, and the traffic that is being handled internally
by the switch chip is not visible to the CPU. The configuration used in this guide has setup the switch0 chip only to
move traffic between eth3 and eth4, which is the Home Net (Network).

Page 41 of 96
10/7/2017
33. EdgeRouter X/X-SFP bootloader bug
There is an initialization issue in the bootloader for the ER-X and ER-X-SFP models that causes all ports to act as a
"switch" during a brief period of time when the router is booting up.
When this guide was written, Ubiquiti had still not updated their production line to incorporate the patched
bootloader.
Reference https://community.ubnt.com/t5/EdgeMAX/EdgeRouter-X-acts-as-switch-during-boot/td-p/1393679
34. EdgeRouter X/X-SFP check bootloader version
Check the version of your bootloader per:
https://community.ubnt.com/t5/EdgeMAX/EdgeRouter-X-X-SFP-check-bootloader-version/td-p/1617287
Some postings may be missing the “s” in “firmwares”.
Add Clarifications / Hints.
35. EdgeMAX EdgeRouter X/X-SFP bootloader update
If your bootloader is not the newest, update your bootloader per:
http://community.ubnt.com/t5/EdgeMAX-Updates-Blog/EdgeMAX-EdgeRouter-X-X-SFP-bootloader-update/ba-
It is much easier to update the EdgeRouter’s bootloader when the EdgeRouter is connected to the internet.
You may need to prepend “sudo” to one for more commands, to get this to work.
https://community.ubnt.com/t5/EdgeMAX/ERX-bootloader-update/td-p/1892923
Add Clarifications / Hints.
Page 42 of 96
10/7/2017
36. EdgeRouter Power Cycle Warning
Generally, you should use the reboot button that is located on the system screen to restart the EdgeRouter; don’t
simply remove power to the EdgeRouter, if you can help it.
Reference TBD
37. EdgeRouter UPnP
Don’t enable UPnP. If you need to connect devices like an Xbox behind your EdgeRouter, then manually open /
forward the firewall ports by hand. If you really want UPnP, I’ve got a slightly used D-Link router for sale, which
probably has lots of holes already in its firewall. Just ask the Federal Trade Commission.
Reference TBD
38. Extended GUI Access / Use May Crash the EdgeRouter
Leaving the EdgeRouter’s GUI interface up for extended periods of time (maybe like a day or so) may crash the
Edgerouter.
Reference TBD
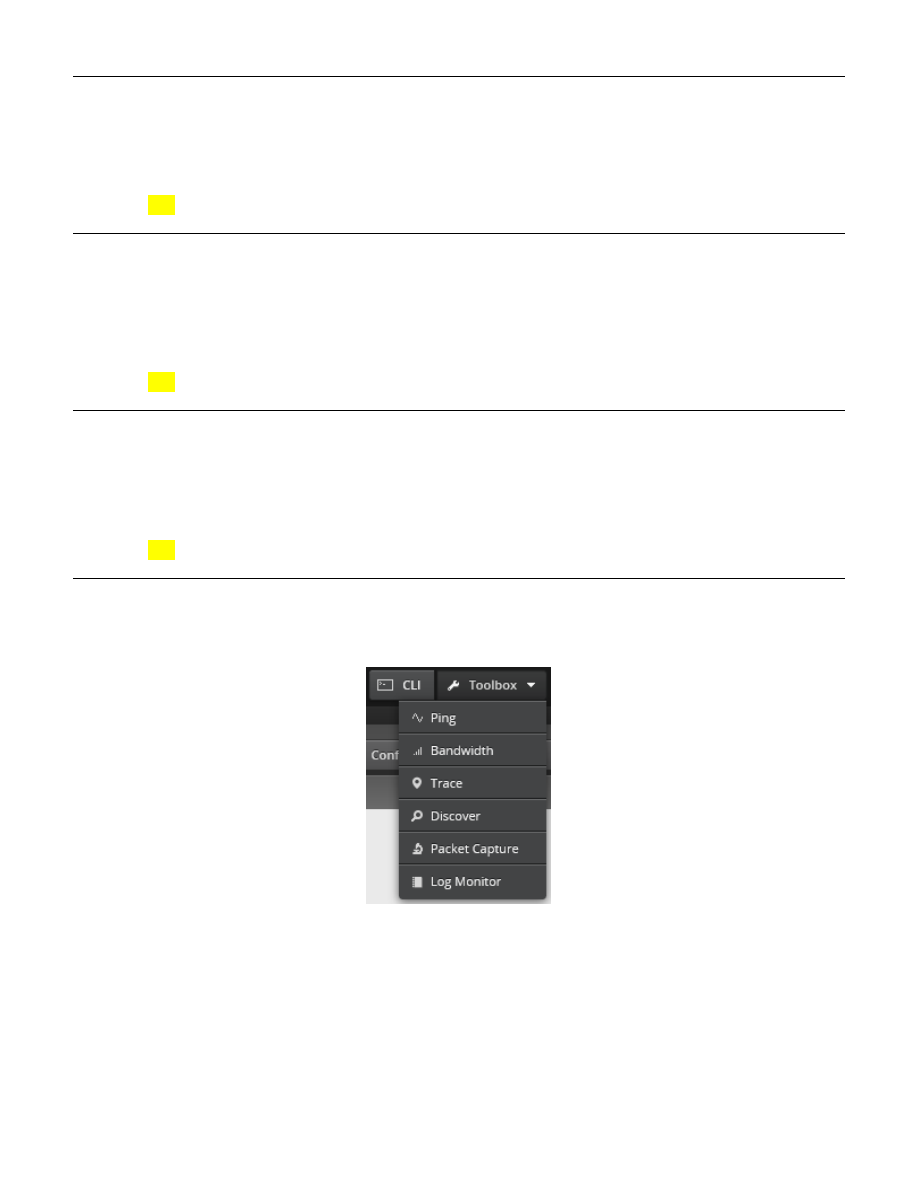
39. EdgeRouter Toolbox
In the upper right side of the main page, is a Toolbox button. When you click on it, you will see some nice utilities.
Figure 71 –Toolbox Items
Page 43 of 96
10/7/2017
40. Address Groups
The software in the EdgeRouter allows the user to define Address Groups. These groups are used for convenience.
We will define several address groups, including one for each Network. Reference Table 1 - Table of Networks.
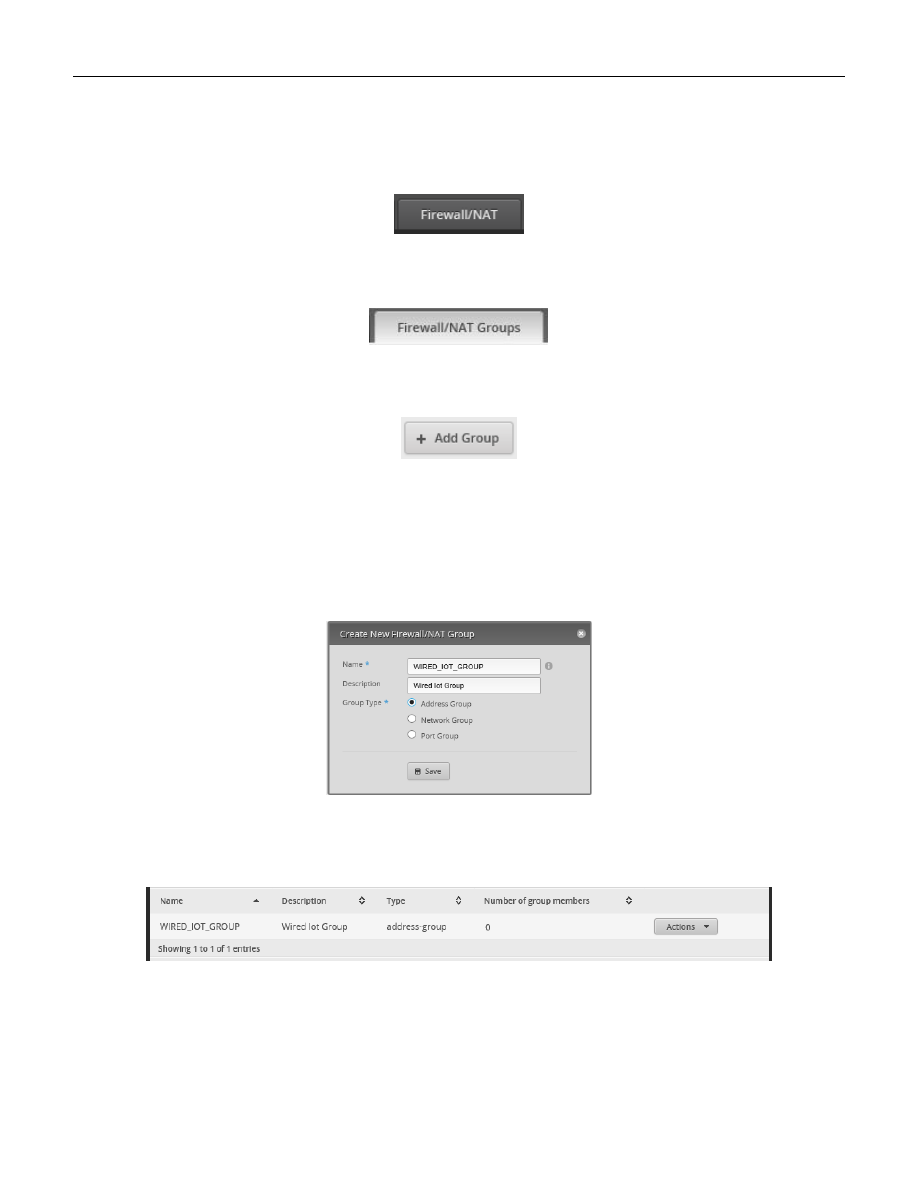
Select the “Firewall/NAT” Button from the top of the screen. See Figure 72 – Firewall/NAT Button.
Figure 72 – Firewall/NAT Button
From the tabs that are shown, select “Firewall/NAT Groups”. See Figure 73 – Firewall/NAT Groups Tab.
Figure 73 – Firewall/NAT Groups Tab
Find the “+ Add Group” button and click it. See Figure 74 – Add Group Button.
Figure 74 – Add Group Button
You will see the “Create New Firewall/NAT Group” dialog. Fill in this form as follows:
Name:
WIRED_IOT_GROUP
Description:
Wired Iot Group
Group Type:
Address Group.
See Figure 75 – Example New Address Group Dialog. Press “Save.”
Figure 75 – Example New Address Group Dialog
An empty Address group will have been added. Note that the “Number of group members” is 0. See Figure 76 –
Figure 76 – Added Address Group
Page 44 of 96
10/7/2017
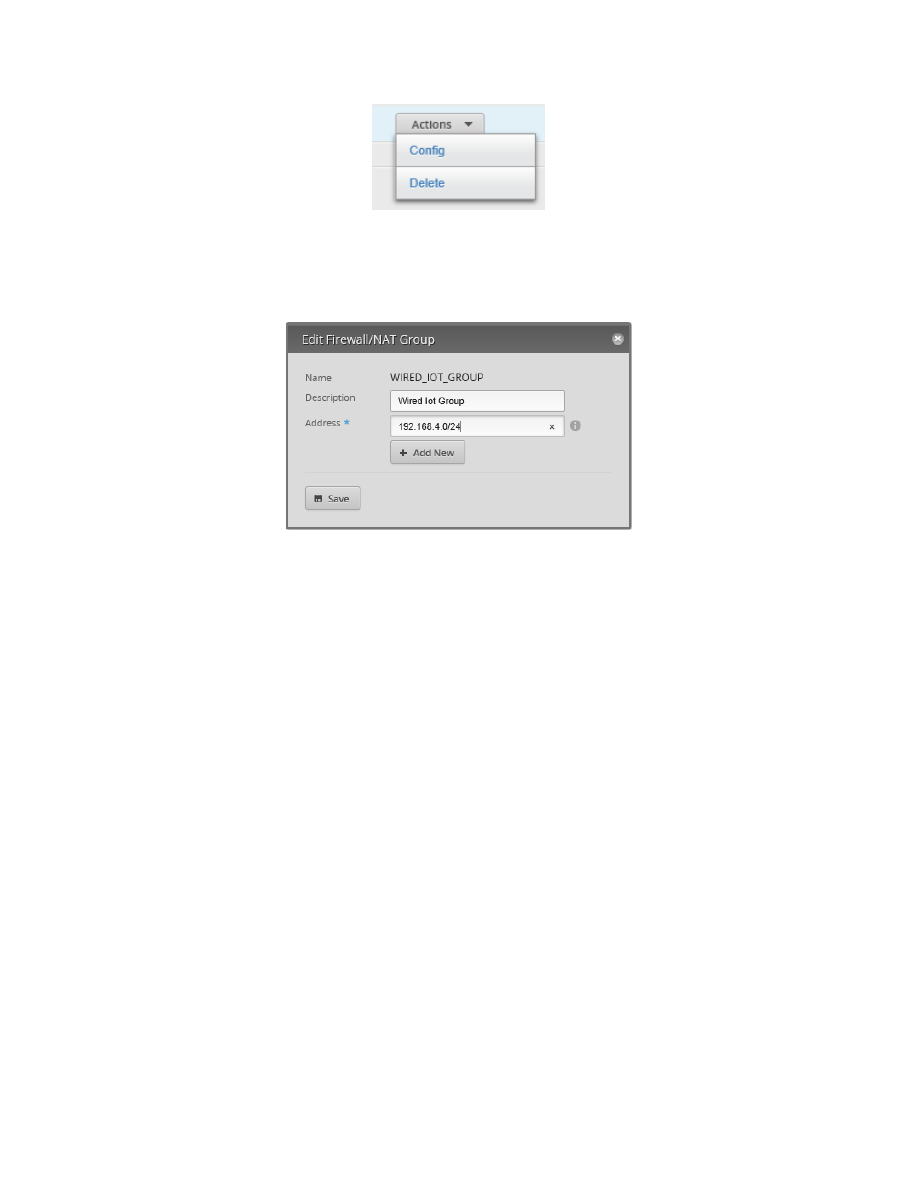
Press the WIRED_IOT_GROUP‘s Action button and select Config. See Figure 77 – Address Group Actions
Figure 77 – Address Group Actions
Enter the address specifier of:
192.168.4.0/24
See Figure 78 – Example Edit Address Group. Press “Save.” When it is finished updating, close the dialog.
Figure 78 – Example Edit Address Group

Page 45 of 96
10/7/2017
Repeat the above steps for the following address groups. If there is more than one address listed in a group, then
you will need to use the “+ Add New” button to add additional address(es) to the group. You have just done the
WIRED_IOT_GROUP.
group {
address-group HOME_GROUP {
address 192.168.3.0/24
description "Home Group"
}
address-group MULTIPLE_GROUP {
address 192.168.3.0/24
address 192.168.4.0/24
address 192.168.6.0/24
address 192.168.7.0/24
description "Multiple Groups"
}
address-group OPENDNS_SERVERS_GROUP {
address 208.67.222.222
address 208.67.220.220
description "OpenDNS Servers"
}
address-group WIFI_GUEST_GROUP {
address 192.168.6.0/24
description "Wifi Guest Group"
}
address-group WIFI_IOT_GROUP {
address 192.168.7.0/24
description "Wifi Iot Group"
}
address-group WIRED_IOT_GROUP {
address 192.168.4.0/24
description "Wired Iot Group"
}
address-group WIRED_SEPARATE_GROUP {
address 192.168.5.0/24
description "Wired Separate Group"
}
}
The above text section is from the backup file.
Page 46 of 96
10/7/2017
41. EdgeRouter Layman’s Firewall Explanation
I initially had trouble understanding the EdgeRouter’s firewall rules. The firewall rules that I saw on the internet
appeared backwards (in direction) to me. I also didn’t understand what “local” rules meant or applied to. Then I
found the article “Layman's firewall explanation”.
Reference: https://community.ubnt.com/t5/EdgeMAX/Layman-s-firewall-explanation/td-p/1436103
I highly recommend that you should stop and read that entire posting now.
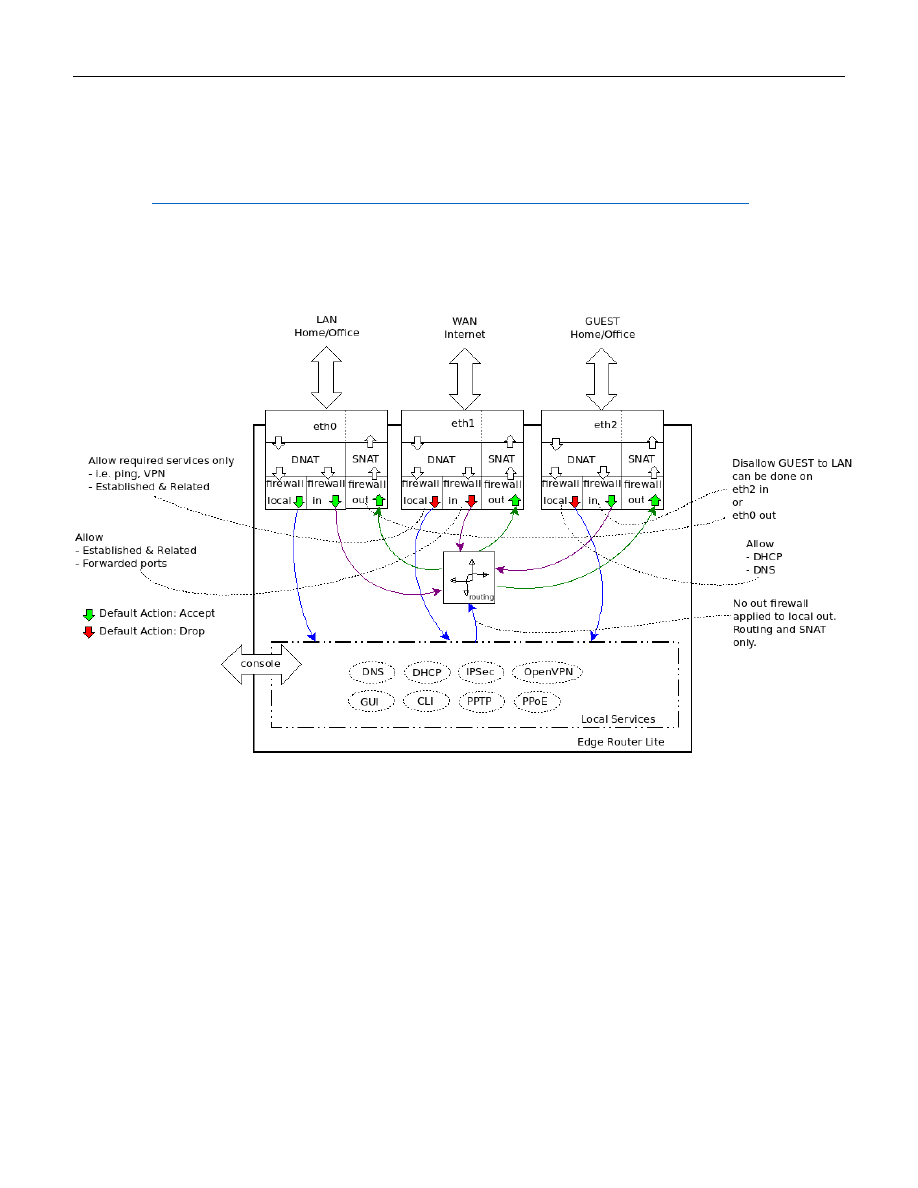
I have re-produced the main diagram, from that article, as Figure 79 – Layman’s Firewall Explanation Diagram.
Note that this diagram is for an EdgeRouter Lite, which has its WAN port on eth1. The WAN interface is therefore
shown in the middle of this diagram.
Figure 79 – Layman’s Firewall Explanation Diagram
A firewall policy (ruleset) is a set of firewall rules along with a default action. The default action can be “accept,”
“reject,” or “drop.” A firewall ruleset is applied to a specific interface as well as applied to a specific “direction.”
For an EdgeRouter, the directions are “In,” “Out,” and “Local.” The “In” direction is input IP packets from the
internet, as well as input into the EdgeRouter from devices on a Network (LAN). The “Out” direction consists of IP
packets output from the EdgeRouter destined for the internet, as well as output to your Network devices from the
EdgeRouter. “Local” refers to IP data coming into the EdgeRouter destined for (services on the) EdgeRouter itself.
Reference Figure 79 – Layman’s Firewall Explanation Diagram.
Each firewall rule, within a ruleset, also has an action of “accept,” “reject,” or “drop.” Each IP packet attempting to
traverse an interface that has firewall rules will be tested by the individual firewall rules, in the ruleset order, until
a firewall rules matches the rule’s condition criteria. The individual firewall rules contain conditions that need to
all be matched for that firewall rule to perform its action. If no firewall rules match an IP packet, then the ruleset’s
default action is taken for that packet. Once an IP packet matches an individual firewall rule, no other firewall
processing is needed for that IP packet.

Page 47 of 96
10/7/2017
Firewall rules within the ruleset are applied (tested) in the specific order that they were arranged. Therefore, it is
important to order the firewall rules so that the most frequently used rules are arranged at or near the top of the
set of rules, allowing for efficiency within the EdgeRouter.
Firewall policies are applied before SNAT (Source Network Address Translation) and after DNAT (Destination
Network Address Translation).
The descriptions above are by no means exact regarding what is happening internally. These descriptions are just
meant to convey enough information to help understand these firewall rules, their design, and their operation.
Additional References:
https://help.ubnt.com/hc/en-us/articles/204976664-EdgeMAX-How-are-packets-processed-by-EdgeRouter

Page 48 of 96
10/7/2017
42. Firewall State
There are many conditions available that can constitute a firewall rule. One of the most important conditions is
“State.” States are maintained internally by the underlying firewall code that is within the EdgeRouter, and are:
New – a packet starting a new connection
Invalid – packets that have invalid data in them
Established – packets associated with an existing connection (conversation)
Related – packets related to an existing connection (conversation)
43. WAN Firewall Rules
The most important firewall rules in an EdgeRouter, from a security standpoint, are the default WAN_IN and
WAN_LOCAL rulesets. These rulesets were generated by the WLAN+2LAN2 Wizard. The firewall rules with these
rulesets provide the “firewall” protection associated with (consumer) Network Address Translation (NAT) routers.
The WAN_IN and WAN_LOCAL rulesets are identical, except for naming, and for the interface that they are
applied to. This is the WAN_IN ruleset, from the backup file:
name WAN_IN {
default-action drop
description "WAN to internal"
rule 10 {
action accept
description "Allow established/related"
state {
established enable
related enable
}
}
rule 20 {
action drop
description "Drop invalid state"
state {
invalid enable
}
}
}
The name of this ruleset is WAN_IN. The rules in this ruleset are applied (not shown here) to the input side of the
eth0 interface, i.e., to IP packets that are entering the EdgeRouter from the internet.
This ruleset has a default action of drop. If a packet destined for this interface doesn’t match any firewall rule,
then the packet will be dropped.
The first rule (rule 10) in the ruleset has an action of “accept,” and will allow packets that are “established” and
“related” (i.e. associated) to an existing IP conversation to enter eth0. The only way to have an existing
connection on eth0 is for the connection to have been started from within the EdgeRouter’s system, i.e., from the
EdgeRouter itself, or from a device on one of the EdgeRouter Networks. Note that there are no other / additional
qualifiers on this rule(s), so it is applied to every IP packet entering from the internet.
The second rule (rule 20) has an action of “drop.” Any packet matching this rule: “invalid state” will be dropped.
QUESTION: I’ve often wondered why the invalid state rule (number 20) has not been placed before the
established/related rule (10). For well-behaved web sites this order should not matter. With badly coded web
servers, having the invalid rule first might break some web usage. With the advent of malicious advertisements
now being served up on legitimate web sites, it seems like it might make sense to place the invalid rule first, and
risk some amount of web usage breakage.
Page 49 of 96
10/7/2017
44. EdgeRouter Detailed Firewall Setup
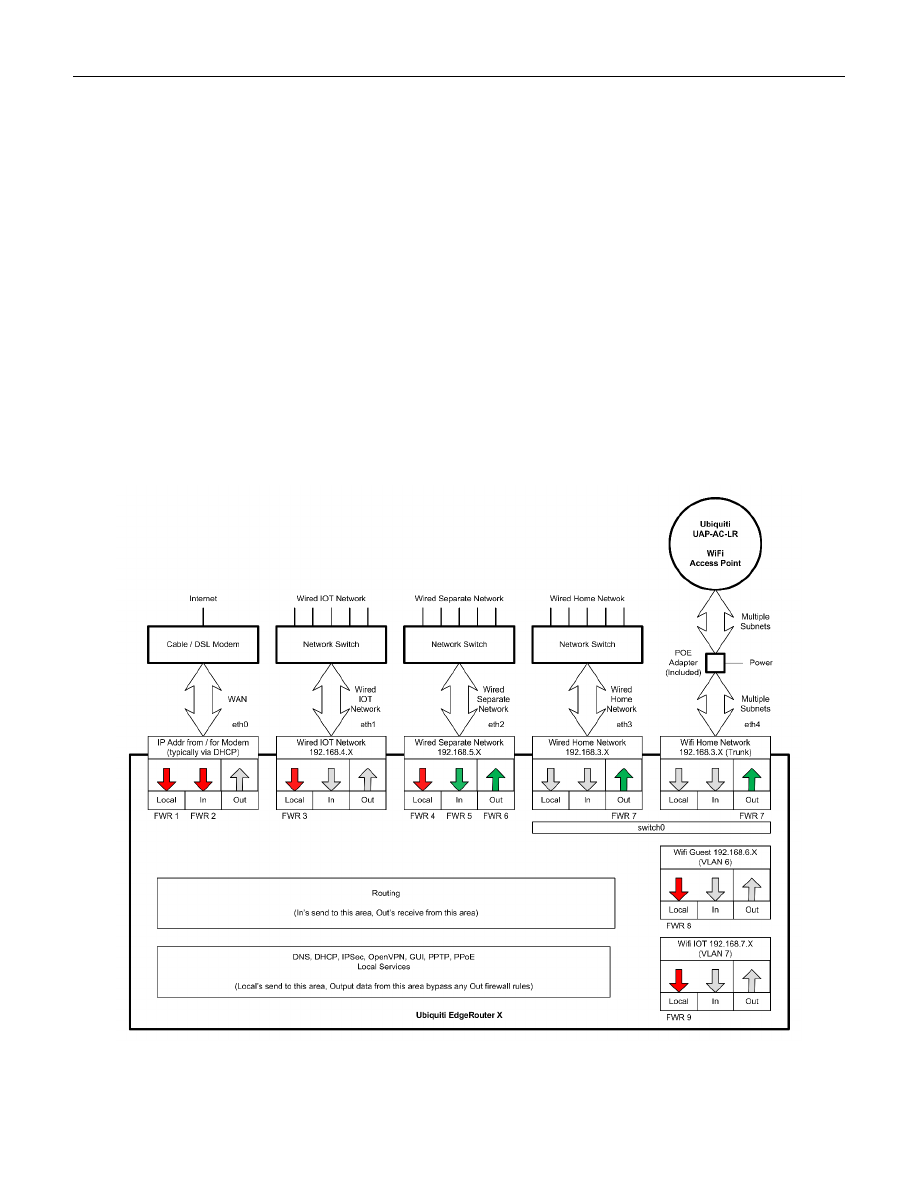
I have adapted Figure 79 – Layman’s Firewall Explanation Diagram to my own diagram. See Figure 80 – Detailed
The FireWall Rules (FWR) that are described in this guide are numbered (as FWR*) in Figure 80 – Detailed Firewall
Setup Diagram. Each is associated with a named firewall ruleset that will be described in the following sections.
FWRs that are colored red means a ruleset terminates with a default of drop, while FWRs colored green mean a
default of accept. The firewall rule sets are:
FWR1 =
WAN_LOCAL.
FWR2 =
WAN_IN.
FWR3 =
WIRED_IOT_LOCAL.
FWR4 =
WIRED_SEPARATE_LOCAL.
FWR5 =
WIRED_SEPARATE_IN.
FWR6 =
WIRED_SEPARATE_OUT.
FWR7 =
HOME_OUT (same single set of rules, but shown in two places).
FWR8 =
WIFI_GUEST_LOCAL.
FWR9 =
WIFI_IOT_LOCAL.
The descriptions below are by no means exact regarding what is happening internally. These descriptions are just
meant to convey enough information to help understand these firewall rules, their design and their operation.
Figure 80 – Detailed Firewall Setup Diagram

Page 50 of 96
10/7/2017
45. WAN_LOCAL Firewall Rules
The basic operation of these firewall rules is described above, in the section titled “43 - WAN Firewall Rules”.
These rules are FRW1 as shown in Figure 80 – Detailed Firewall Setup Diagram.
Add Optional VPN information, etc…
46. WAN_IN Firewall Rules
The basic operation of these firewall rules is described above, in the section titled “43 - WAN Firewall Rules”.
These rules are FRW2 as shown in Figure 80 – Detailed Firewall Setup Diagram.
Add forwarded ports, etc…
Add information on double NAT.

Page 51 of 96
10/7/2017
47. HOME_OUT Firewall Rules
There are six firewall rules in this ruleset. These firewall rules inspect IP packets that are exiting the EdgeRouter
towards devices on the Home Network. Reference “FWR7,” shown as two instances, in the upper-right of Figure
80 – Detailed Firewall Setup Diagram.
These six rules are maintained as three sets of two rules per interface, i.e., these two-rule-sets are applied to
three interfaces. Each interface is a separate Network. Except for naming and the Network that they are applied
to, the sets of two rules are identical. Only one set of two rules are shown here. The three Networks, which these
three sets are applied-to, are: Wired Iot Network, Wifi Iot Network, and Wifi Guest Network.
The following section of backup file will be referenced later, so it was given a reference tag of Equation 1 – A
Portion of the HOME_OUT Firewall Ruleset
This is one set of two rules from the backup file:
name HOME_OUT {
default-action accept
description "Home Out"
rule 1 {
action accept
description "Allow Wired Iot Replies"
log disable
protocol all
source {
group {
address-group WIRED_IOT_GROUP
}
}
state {
established enable
invalid disable
new disable
related enable
}
}
rule 2 {
action drop
description "Drop Rest-Of Wired Iot Traffic"
log disable
protocol all
source {
group {
address-group WIRED_IOT_GROUP
}
}
}
…
Equation 1 – A Portion of the HOME_OUT Firewall Ruleset

Page 52 of 96
10/7/2017
The name of this ruleset is HOME_OUT. The rules in this ruleset are applied (not shown here) to the output side of
both of the eth3 and eth4 interfaces, i.e., switch0. These interfaces are also known as the Home Network. IP
packets that are exiting the EdgeRouter (on eth3/eth4) towards equipment on the Home Network are inspected
and potentially dropped by these firewall rules. Remember that eth3 and eth4 are still bound together by the
switch hardware within the EdgeRouter. In Figure 80 – Detailed Firewall Setup Diagram, this information is shown
as duplicated in two blocks (in the upper-right portion of the diagram), each labeled with FWR7.
This ruleset has a default action of “accept.” If a packet destined for this interface doesn’t match any individual
firewall rule, then the packet will be accepted, i.e., passed along to devices attached to the Home Network.
The first rule (rule 1) in this ruleset has an action of “accept,” and will allow IP packets that are “established” and
“related” (i.e. associated) to an existing IP conversation, to exit the EdgeRouter to devices that are on the Home
Network. Note that this rule has an additional qualifier that the source address must be in the address range of
the WIRED_IOT_GROUP, i.e., this rule only apples to traffic that originates from the Wired IOT Network. The only
way to have an existing connection between Wired IOT Network and the Home Network is for the conversation to
have been started from devices within the Home Network. The name associated with this rule is "Allow Wired Iot
Replies."
The second rule (rule 2) in this ruleset has an action of “drop,” and will drop all other IP packets that originate
from the Wired IOT Network. Note that this rule also has the additional qualifier that the source address must be
within the address range of the WIRED_IOT_GROUP. I.e., this rule only apples to traffic that originates from the
Wired IOT Network. The name associated with this rule is "Drop Rest-Of Wired Iot Traffic."
These two rules, treated together, describe the IP connections (conversations) that can occur between equipment
on the Wired IOT Network and the Home Network.
If the conversation was started by devices in the Home Network and directed to devices residing on the Wired IOT
Network, then replies to those conversations will be allowed back into the Home Network by firewall rule number
1. Internally, the firewall code keeps track of IP connections, which are entering the EdgeRouter (the “In” side)
and then allows traffic that is related to that data to exit the EdgeRouter towards the Home Network devices.
If a conversation was instead started by devices within the Wired IOT Network and directed towards the Home
Network, firewall rule 1 will have no prior knowledge about this conversation (because it is not
“established”/”related”). Therefore, firewall rule number 1 will not match, and firewall rule processing will then
proceed to rule number 2. Rule number two drops all traffic from the Wired IOT Network.
There are two more sets of two rules (not shown here) within this ruleset, an identical set applied to the Wifi
Guest Network (WIFI_GUEST_GROUP), and an identical set applied to the Wifi IOT Network (WIFI_IOT_GROUP).
Remember that the default action for this ruleset is “accept.” You want the Home Network to be able to operate
on its own, when it is not conversing with just these three networks.
Note that every IP packet attempting to exit the EdgeRouter towards devices on the Home Network will need to
be inspected by these six firewall rules. Most of the traffic destined for the Home Network will not be from one of
the IOT or Guest Networks.
QUESTION: Maybe a single firewall rule can be added, at the top of this ruleset, which allows internet traffic to be
accepted. This would increase the efficiency of this ruleset, by not depending upon most of the traffic to reach the
default “accept” rule before being accepted.
Page 53 of 96
10/7/2017
48. Firewall Conditions
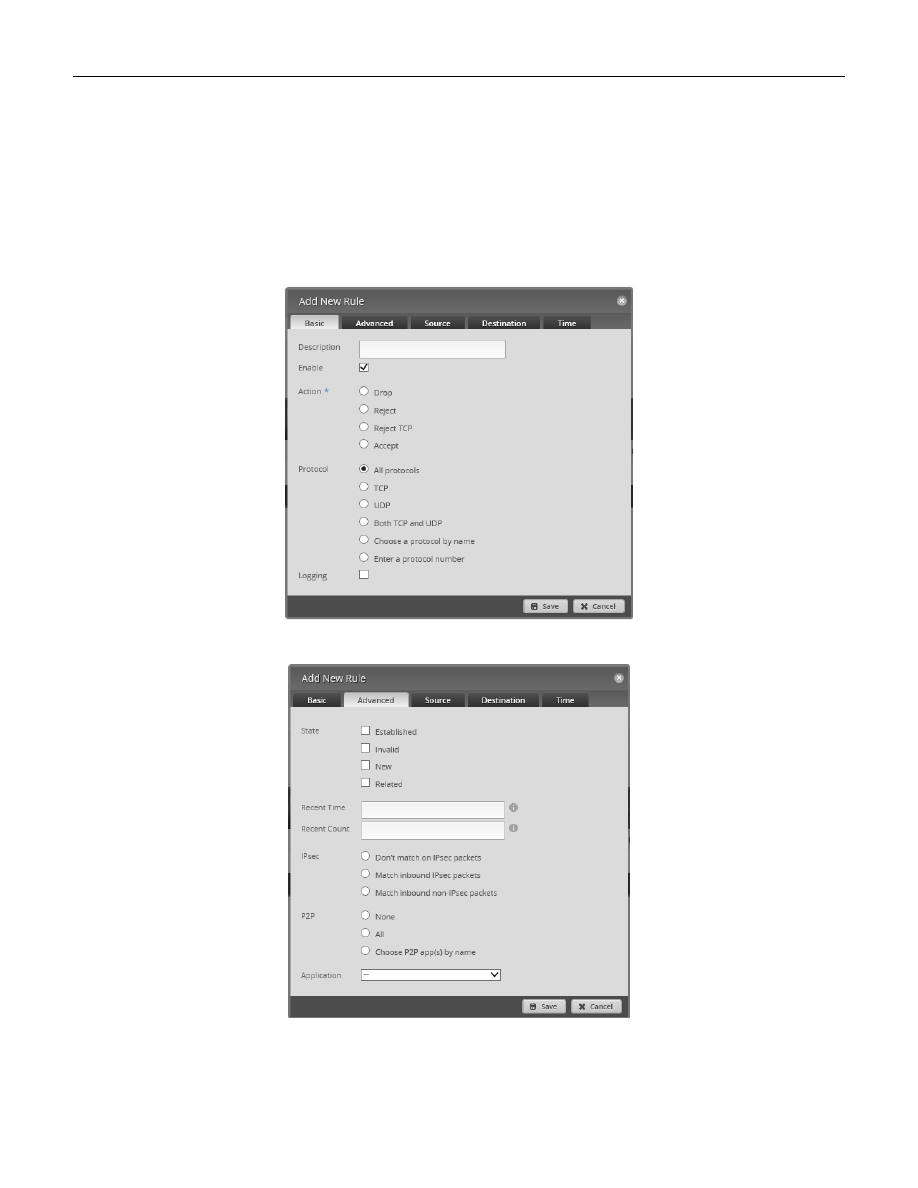
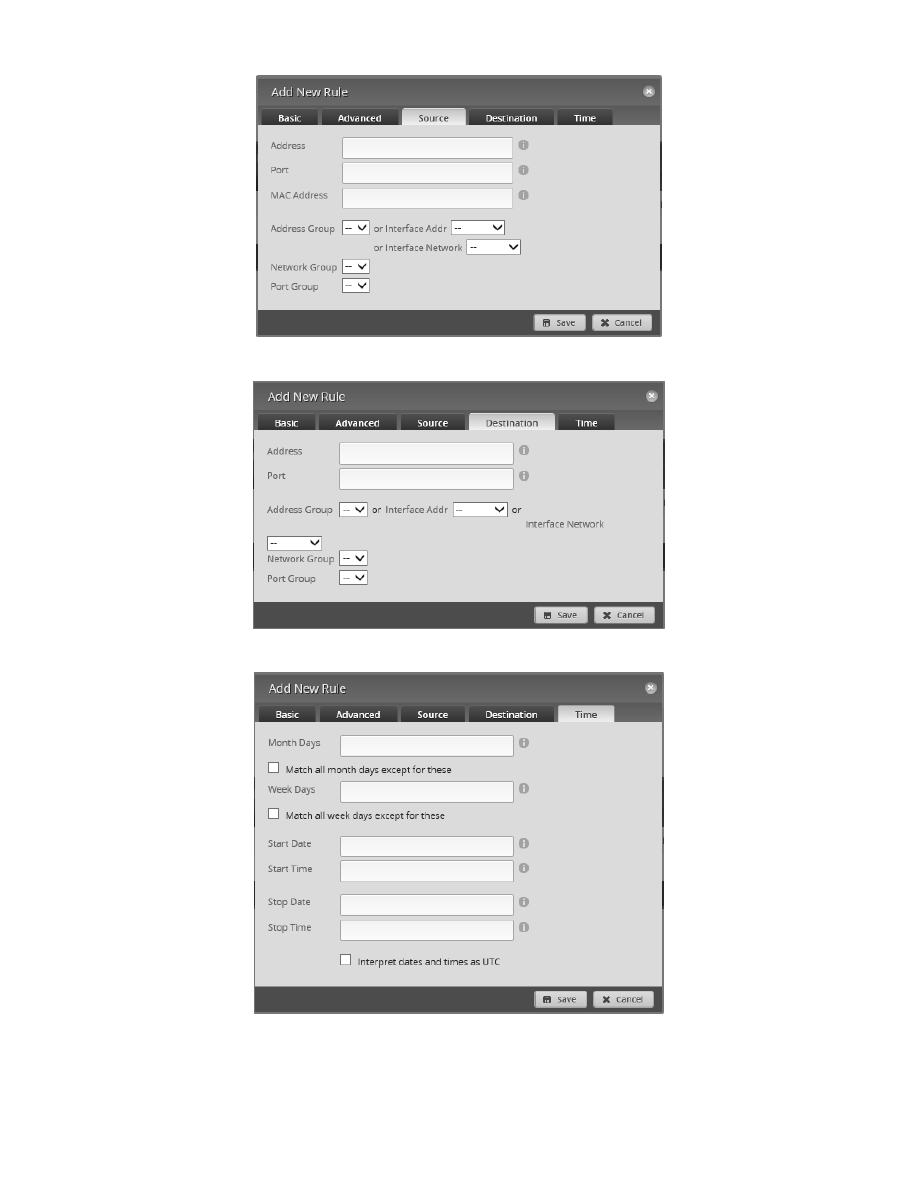
The following figures are from the “Add New Rule” firewall dialog. We will explain how to get to these in the next
section. There are several Tabs in this dialog for entering firewall conditions. You might want to study the
following figures, and familiarize yourself with what firewall conditions are available. See the following figures:
Figure 81 – Firewall Conditions, Basic Tab.
Figure 82 – Firewall Conditions, Advanced Tab.
Figure 83 – Firewall Conditions, Source Tab.
Figure 84 – Firewall Conditions, Destination Tab.
Figure 85 – Firewall Conditions, Time Tab.
Figure 81 – Firewall Conditions, Basic Tab
Figure 82 – Firewall Conditions, Advanced Tab
Page 54 of 96
10/7/2017
Figure 83 – Firewall Conditions, Source Tab
Figure 84 – Firewall Conditions, Destination Tab
Figure 85 – Firewall Conditions, Time Tab
Page 55 of 96
10/7/2017
49. Adding Firewall Rules
Hopefully, you now understand the design of the HOME_OUT firewall rules. Now it is time to actually add these
rules. This section will use a pair of HOME_OUT rules as an example of how to add firewall rules using the GUI
interface.
While you are using the GUI to add these rules, please frequently reference the backup file segment labeled
”, which is in section “47 - HOME_OUT Firewall Rules.”
Equation 1 – A Portion of the HOME_OUT Firewall Rules
This should help you better relate between the two forms - that of the backup text description versus that of GUI
entry.
Select the “Firewall/NAT” button from the top of the screen. Reference Figure 72 – Firewall/NAT Button.
Ensure that the “Firewall Policies” tab is selected. See Figure 86 – Firewall Policies Tab.
Figure 86 – Firewall Policies Tab
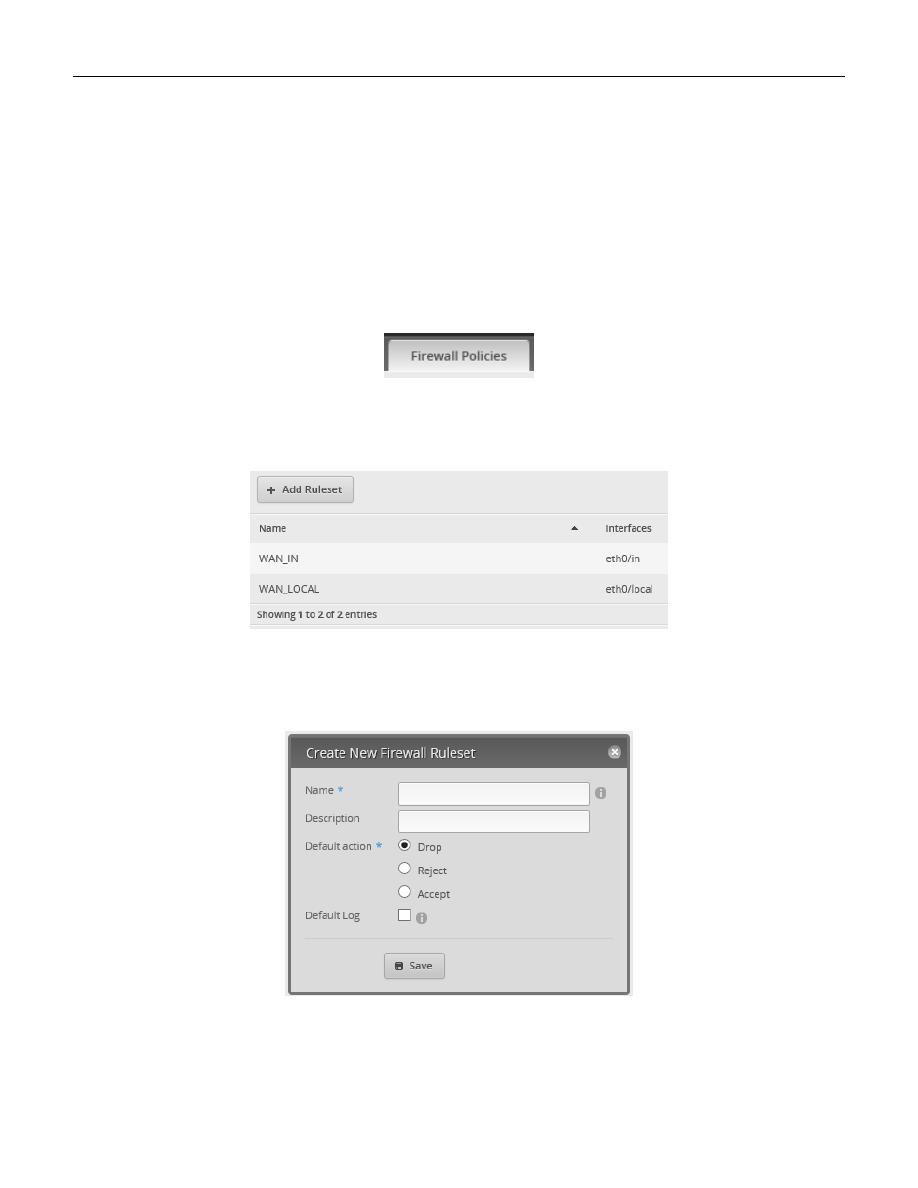
The two WAN rulesets, which were added by the Wizard, should be shown. Press the “+ Add Ruleset” button. See
Figure 87 – Add Ruleset
You will be presented with a “Create New firewall Ruleset.” See Figure 88 – Blank Create New Firewall Ruleset.
Figure 88 – Blank Create New Firewall Ruleset
Page 56 of 96
10/7/2017
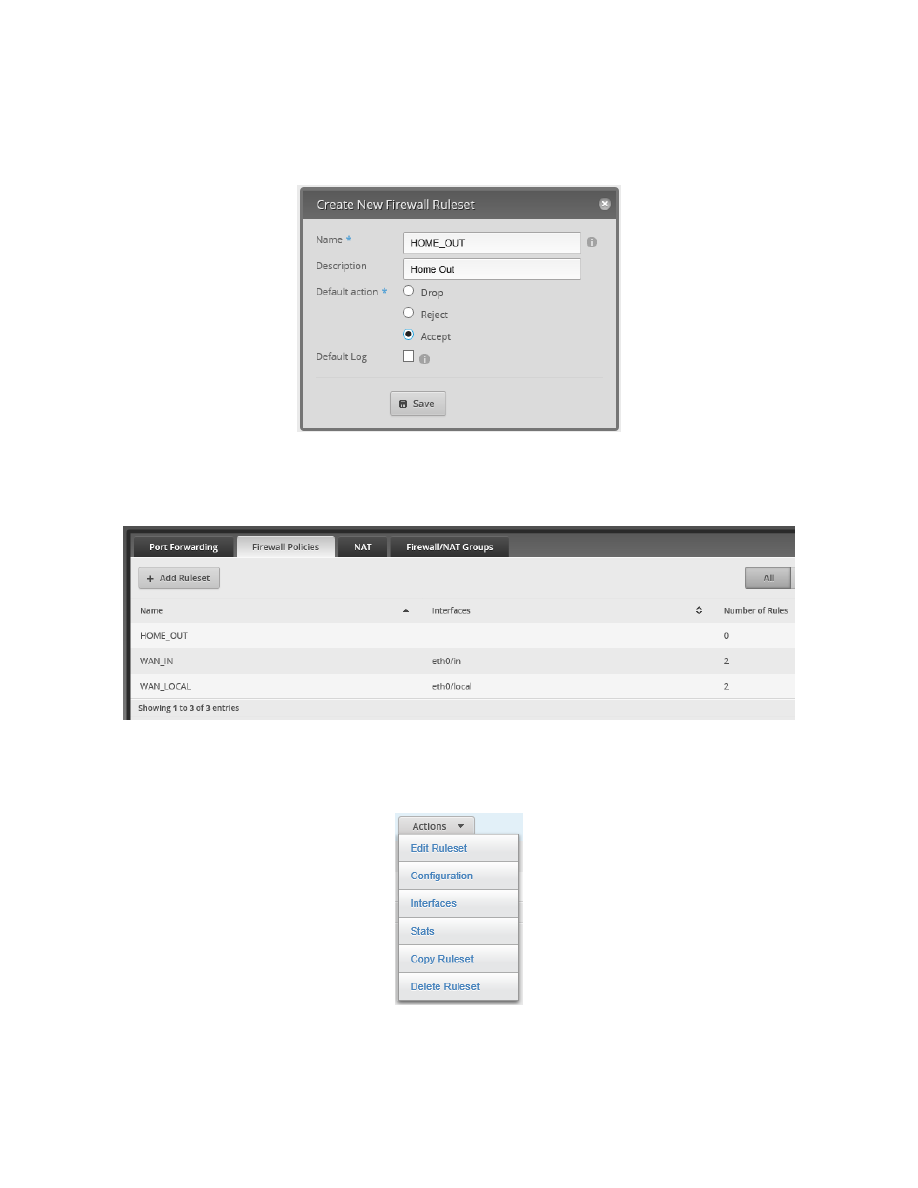
Enter the following into the Create New Firewall Ruleset dialog:
Name
HOME_OUT
Description
Home Out
Default action
Accept
See Figure 89 – HOME_OUT Example New Ruleset.
Figure 89 – HOME_OUT Example New Ruleset
Press “Save.” A HOME_OUT ruleset will be created. Note that no interfaces have been selected, and the number
of rules is 0. See Figure 90 – Empty HOME_OUT Ruleset.
Figure 90 – Empty HOME_OUT Ruleset.
Find the “Actions” button at the right end of the HOME_OUT line (not shown) and press it. You will be presented
with a “Firewall Actions Menu.” See Figure 91 – Firewall Actions Menu.
Figure 91 – Firewall Actions Menu
Page 57 of 96
10/7/2017
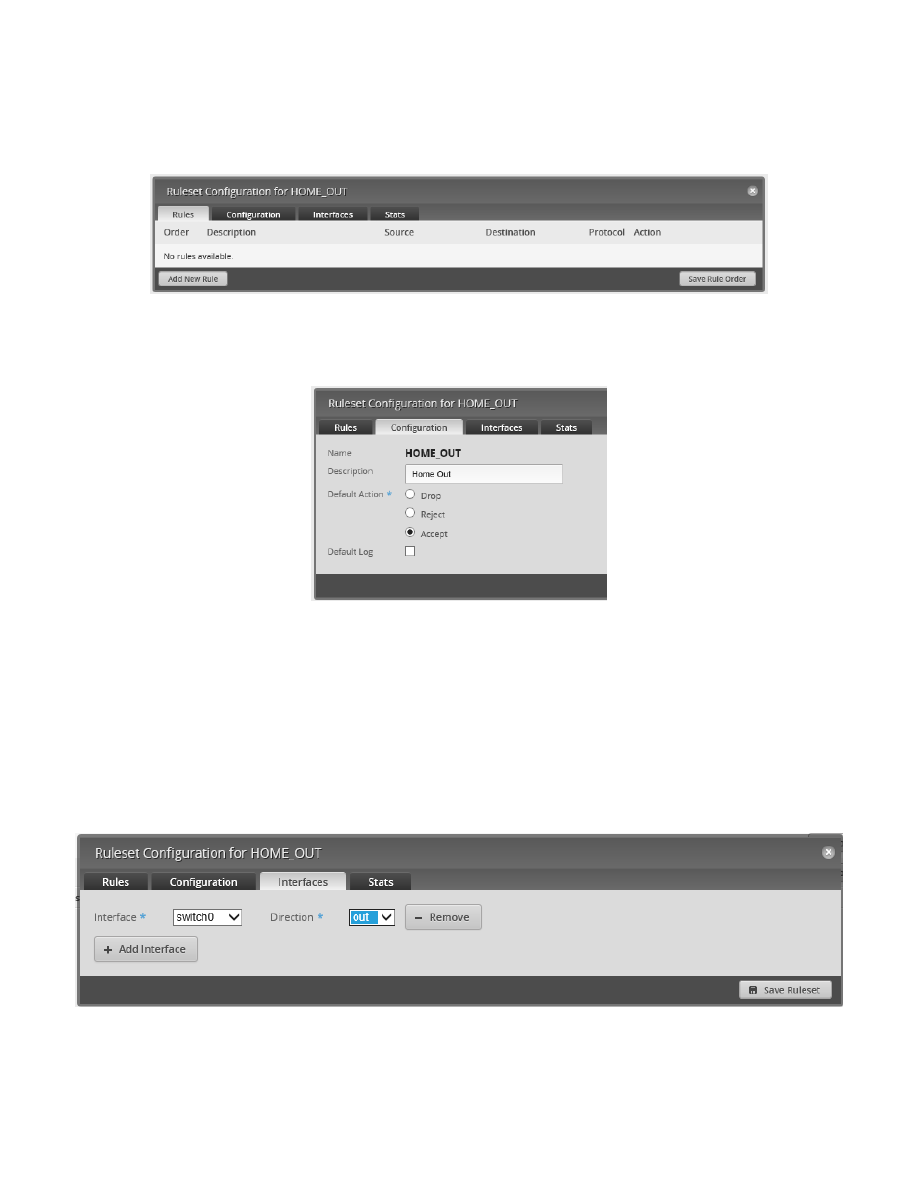
Choose “Edit Ruleset.” A dialog for editing firewall rules appears. The “Rules” Tab should already be selected. See
Figure 92 – Edit Ruleset Dialog.
Note that this dialog also contains Tabs of “Configuration,” “Interfaces,” and “Stats.” These match the handy
shortcuts that are also in the previously shown Actions menu, reference Figure 91 – Firewall Actions Menu.
Figure 92 – Edit Ruleset Dialog
Choose the “Configuration” Tab. You should see the information that was entered earlier. See Figure 93 – Firewall
Figure 93 – Firewall Rule Configuration Tab
Choose the “Interfaces” Tab. Select the following information in the dialog:
Interface
switch0
Direction
out
Then press the “Save Ruleset” button.
A lot of problems occur because a ruleset is created and the interface / direction is never set and/or saved.
Since the Home Network is governed by switch0 (i.e. switch0 contains interfaces of eth3 and eth4), we need to
choose “switch0” for the Interface, not the individual eth3 or eth4. If an interface is not part of switch0 (eth0,
eth1, or eth2) then we would just select that individual interface. See Figure 94 – Firewall Rule Interface Tab.
Figure 94 – Firewall Rule Interface Tab
Page 58 of 96
10/7/2017
Re-select the “Rules” Tab, and press the “Add New Rule” Button, that is shown in Figure 92 – Edit Ruleset Dialog.
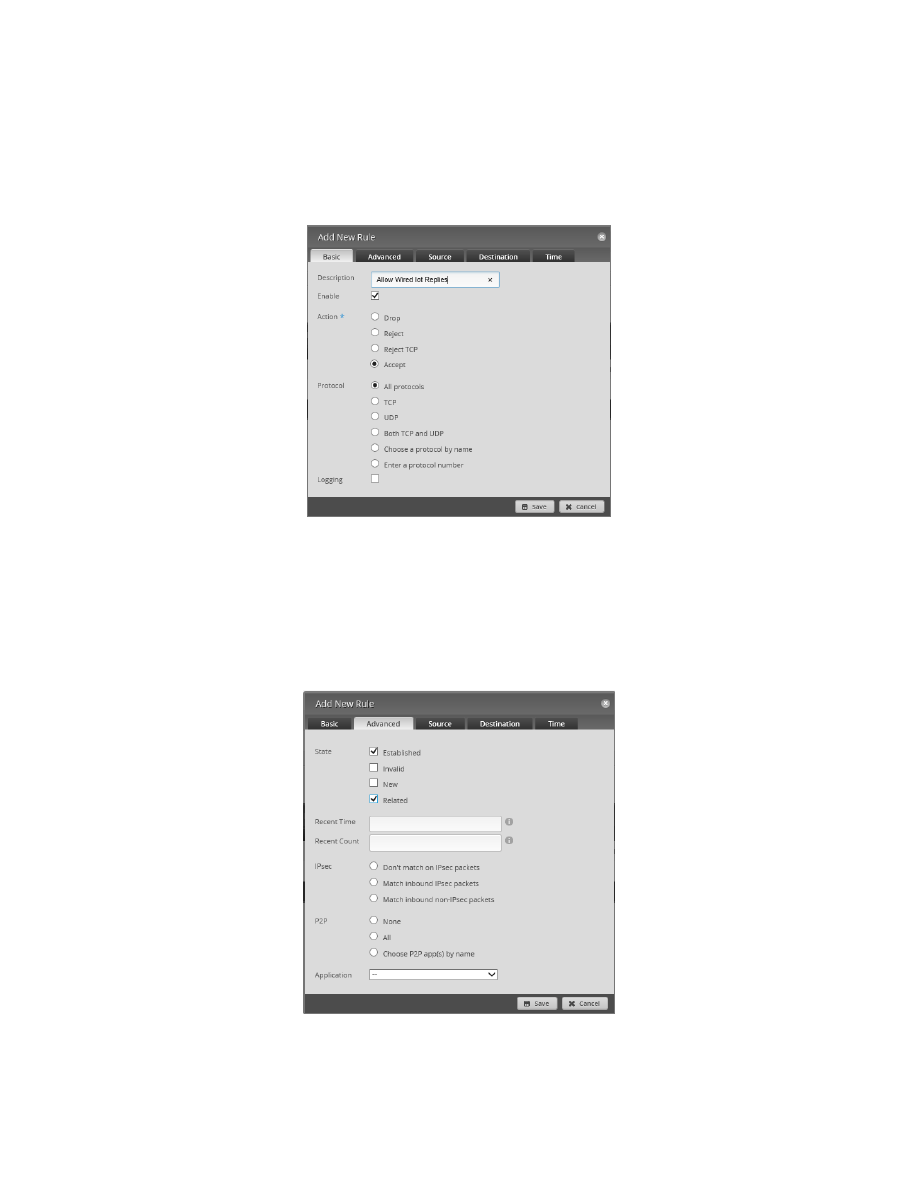
An “Add New Rule” dialog will be shown. See Figure 95 – HOME_OUT Firewall, Rule1, Basic. Enter the following
into the Basic Tab:
Description
Allow Wired Iot Replies
Enable
CHECKED
Action
Accept
Protocol
All protocols
Figure 95 – HOME_OUT Firewall, Rule1, Basic
Click on the Advanced Tab. See Figure 96 – HOME_OUT Firewall, Rule1, Advanced. Enter the following information
into the Advanced Tab:
State, Established
CHECKED
State, Invalid
Un-checked
State, New
Un-checked
State, Related
CHECKED
Figure 96 – HOME_OUT Firewall, Rule1, Advanced
Page 59 of 96
10/7/2017
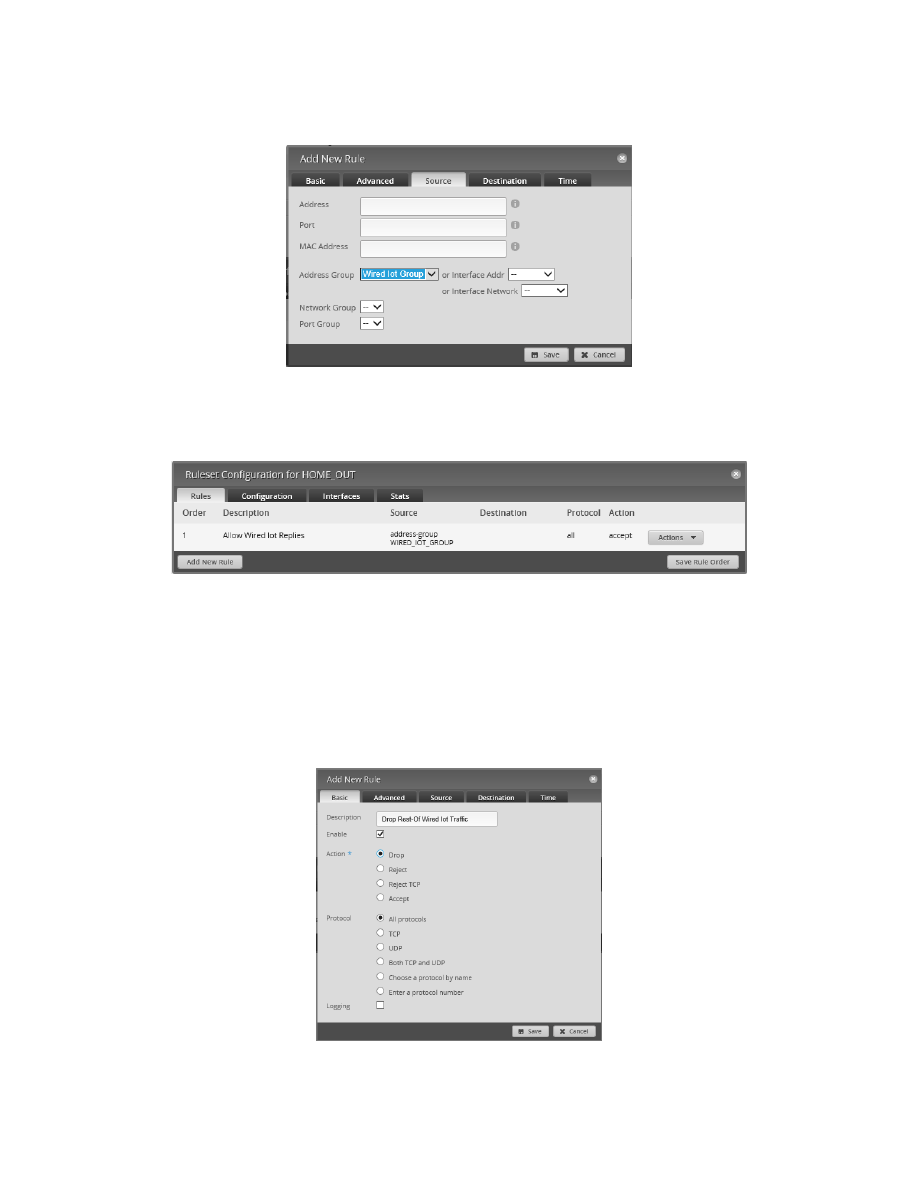
Click on the Source Tab. See Figure 97 – HOME_OUT Firewall, Rule 1, Source. Select the following information for
the Source Tab:
Address Group
Wired Iot Group.
Figure 97 – HOME_OUT Firewall, Rule 1, Source
Press the “Save” button. You now have a new rule in the HOME_OUT ruleset. See Figure 98 – HOME_OUT
Figure 98 – HOME_OUT Firewall, Rule 1
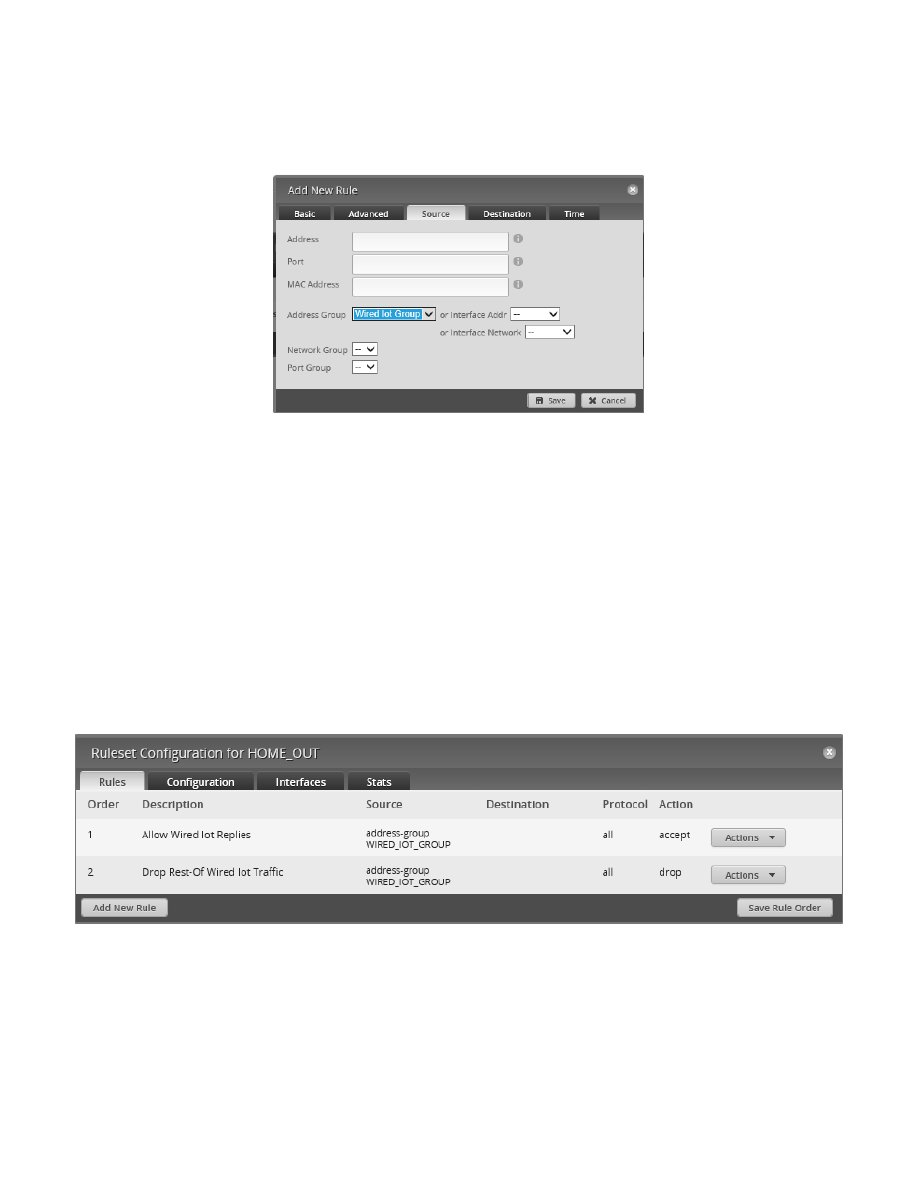
It is time to add the second firewall rule of this ruleset. Press the “Add New Rule” button, as shown in Figure 98 –
HOME_OUT Firewall, Rule 1. You will be presented with the Basic dialog for adding firewall rules. See Figure 99 –
HOME_OUT Firewall, Rule 2, Basic. Enter the following information into the Basic Tab:
Description
Drop Rest-Of Wired Iot Traffic
Enable
CHECKED
Action
Drop
Protocol
All protocols
Figure 99 – HOME_OUT Firewall, Rule 2, Basic
Page 60 of 96
10/7/2017
Click on the Source Tab. See Figure 100 – HOME_OUT Firewall, Rule 2, Source. Select the following information
for the Source Tab:
Address Group
Wired Iot Group.
Figure 100 – HOME_OUT Firewall, Rule 2, Source
Press the “Save” button. You now have two rules in the HOME_OUT ruleset, as shown in Figure 101 – HOME_OUT
The first rule allow traffic that is “established” and “related” (i.e. associated) to go out FROM the EdgeRouter,
towards devices on the Home Network that have a SOURCE address that matches (originated from) the Wired IOT
Network. The association would be to traffic that previously went IN (towards the EdgeRouter) destined for the
Wired IOT Network. This would typically be a request to a device on the Wired IOT Network from a device on the
Home Network.
The second rule drops all traffic from the Wired IOT Network that was not matched by the first rule, i.e., any non-
requested traffic that was initiated by the Wired IOT Network.
The default action for the HOME_OUT ruleset is “accept,” allowing traffic that is not SOURCED from the Wired IOT
Network to pass OUT to devices on the Home Network. This could be traffic SOURCED from another Network, or
traffic coming from the internet, or from the EdgeRouter itself.
Figure 101 – HOME_OUT Firewall, Two Rules

Page 61 of 96
10/7/2017
50. Adding More HOME_OUT Firewall Rules
We now need to add four more rules to the HOME_OUT Ruleset. Using the steps that are shown in the above
section “49 - Adding Firewall Rules”, add four more rules per the backup data that is shown below:
rule 3 {
action accept
description "Allow Wifi Guest Reples"
destination {
group {
}
}
log disable
protocol all
source {
group {
address-group WIFI_GUEST_GROUP
}
}
state {
established enable
invalid disable
new disable
related enable
}
}
rule 4 {
action drop
description "Drop Rest-Of Wifi Guest Traffic"
log disable
protocol all
source {
group {
address-group WIFI_GUEST_GROUP
}
}
}
rule 5 {
action accept
description "Allow Wifi Iot Reples"
log disable
protocol all
source {
group {
address-group WIFI_IOT_GROUP
}
}
state {
established enable
invalid disable
new disable
related enable
}
}
rule 6 {
action drop
description "Drop Rest-Of Wifi Iot Traffic"
log disable
protocol all
source {
group {
address-group WIFI_IOT_GROUP
}
}
}

Page 62 of 96
10/7/2017
51. WIRED_IOT_LOCAL, WIFI_IOT_LOCAL Firewall Rules
These rules are FWR3 and FWR9 as shown in Figure 80 – Detailed Firewall Setup Diagram.
The purpose of these rules is to block the use of EdgeRouter local services from these two IOT Networks, except
for the use of DNS and the operation of DHCP.
The DHCP protocol uses port 67 and port 68 of UDP.
The DNS protocol uses port 53 of both TCP and UDP.
The DNS firewall rules for the Wired Iot and Wifi Iot Networks, presented below, contain an additional
destination-address restriction. These DNS firewall rules will only accept DNS requests, which are issued to the
Open DNS resolver addresses. DNS requests to other providers will be dropped via the ruleset’s default drop rule.
Note that the destination addresses specified here (via the OPENDNS_SERVERS_GROUP) must match the Wired
Iot and Wifi Iot Network’s DHCP entered DNS1 and DNS2 addresses. Reference section 26 - Add DHCP Servers to
the VLANs and section 28 - Modify EdgeRouter’s eth1 DHCP Server. It’s not good to tell your Iot devices to use one
set of DNS provider addresses (via DHCP) and then drop those requests when your firewall rules only accept
addresses of a different DHCP provider.
We now need to add two more rulesets, with each ruleset containing two firewall rules. Using the steps that are
shown in the above section “49 - Adding Firewall Rules”, add the following two rulesets, each containing two
firewall rules, per the backup data that is shown below:
When adding the following WIRED_IOT_LOCAL ruleset, remember to also set and SAVE the following:
Interface:
eth1
Direction:
local
name WIRED_IOT_LOCAL {
default-action drop
description "Wired IOP Local"
rule 1 {
action accept
description "Allow DHCP"
destination {
port 67-68
}
log disable
protocol udp
source {
}
}
rule 2 {
action accept
description "Allow Only OpenDNS"
destination {
group {
address-group OPENDNS_SERVERS_GROUP
}
port 53
}
log disable
protocol tcp_udp
}
}
When adding the DNS rule, the above “tcp_ucp” description is shown in the GUI as “Both TCP and UDP.”

Page 63 of 96
10/7/2017
When adding the following WIFI_IOT_LOCAL ruleset, remember to also set and SAVE the following:
Interface:
switch0.7
Direction:
local
name WIFI_IOT_LOCAL {
default-action drop
description "Wired Iot Local"
rule 1 {
action accept
description "Allow DHCP"
destination {
port 67-68
}
log disable
protocol udp
}
rule 2 {
action accept
description "Allow Only OpenDNS"
destination {
group {
address-group OPENDNS_SERVERS_GROUP
}
port 53
}
log disable
protocol tcp_udp
}
}
When adding the DNS rule, the above “tcp_ucp” description is shown in the GUI as “Both TCP and UDP.”

Page 64 of 96
10/7/2017
52. WIFI_GUEST_LOCAL Firewall Rules
The purpose of these rules is to block the use of EdgeRouter local services from the Wi-Fi Guest Network, except
for the use of DNS and the operation of DHCP.
To add the following ruleset and rules, follow what was done in the above section 51 - WIRED_IOT_LOCAL,
WIFI_IOT_LOCAL Firewall Rules.
Note that we are not dropping DNS requests based upon which DNS provider address(es) your guests may be
using in their devices. Most people’s devices are probably configured just to use the providers’ (provided via
DHCP) DNS resolvers addresses. If a guest hardcoded the DNS resolver addresses within their device AND we only
accepted DNS requests going to specific DNS resolvers, then we could have just denied our guests service on our
network.
When adding the following WIFI_GUEST_LOCAL ruleset, remember to also set and SAVE the following:
Interface:
switch0.6
Direction:
local
name WIFI_GUEST_LOCAL {
default-action drop
description "Wifi Guest Local"
rule 1 {
action accept
description "Allow DHCP"
destination {
port 67-68
}
log disable
protocol udp
}
rule 2 {
action accept
description "Allow DNS"
destination {
port 53
}
log disable
protocol tcp_udp
}
}
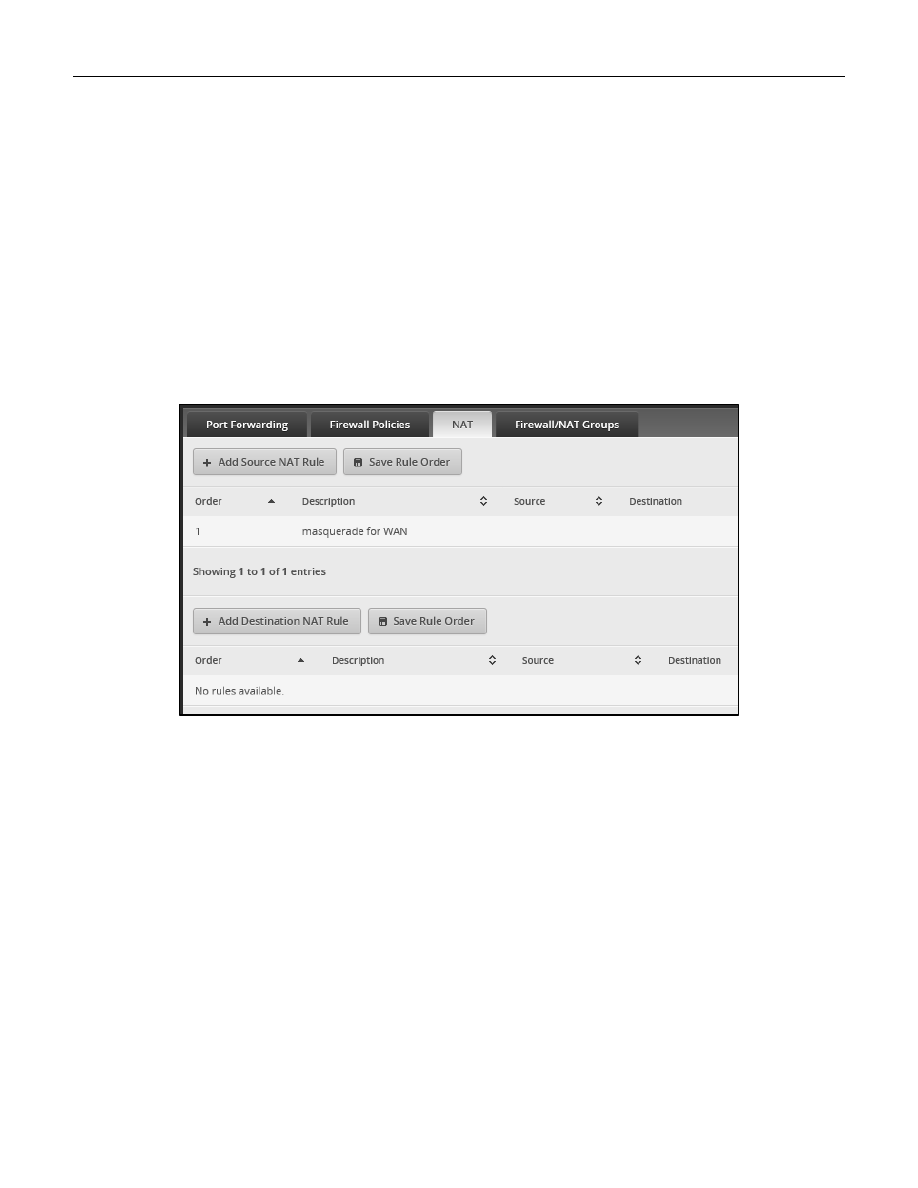
Page 65 of 96
10/7/2017
53. Optional DNS Forcing of the WIFI_GUEST_LOCAL Network
Performing the steps within this section is optional.
The destination Network Address Translation (NAT) rules, presented here, will force any devices on the guest
Network to only be able to use Open DNS resolvers. This is regardless of if the devices specify their own DNS
resolver addresses and ignore the DNS resolver addresses suggested by the EdgeRouter’s guest DHCP server.
The two rules presented here work with each other. Rule #1 will exclude NAT from being performed on either of
the OpenDNS resolver addresses. These two addresses are in an address group. This allows both the primary and
secondary resolver addresses to pass-through the EdgeRouter from the Guest Network. Rule #2 will act upon any
port 53 (DNS) request from the Guest network, and translate the associated IP address into the address of the
primary OpenDNS resolver.
Press the Firewall/NAT button near the top of the screen. Reference Figure 72 – Firewall/NAT Button.
Ensure that the NAT tab is selected and then press the “+ Add Destination NAT Rule” button. See Figure 102 – NAT
Figure 102 – NAT Tab
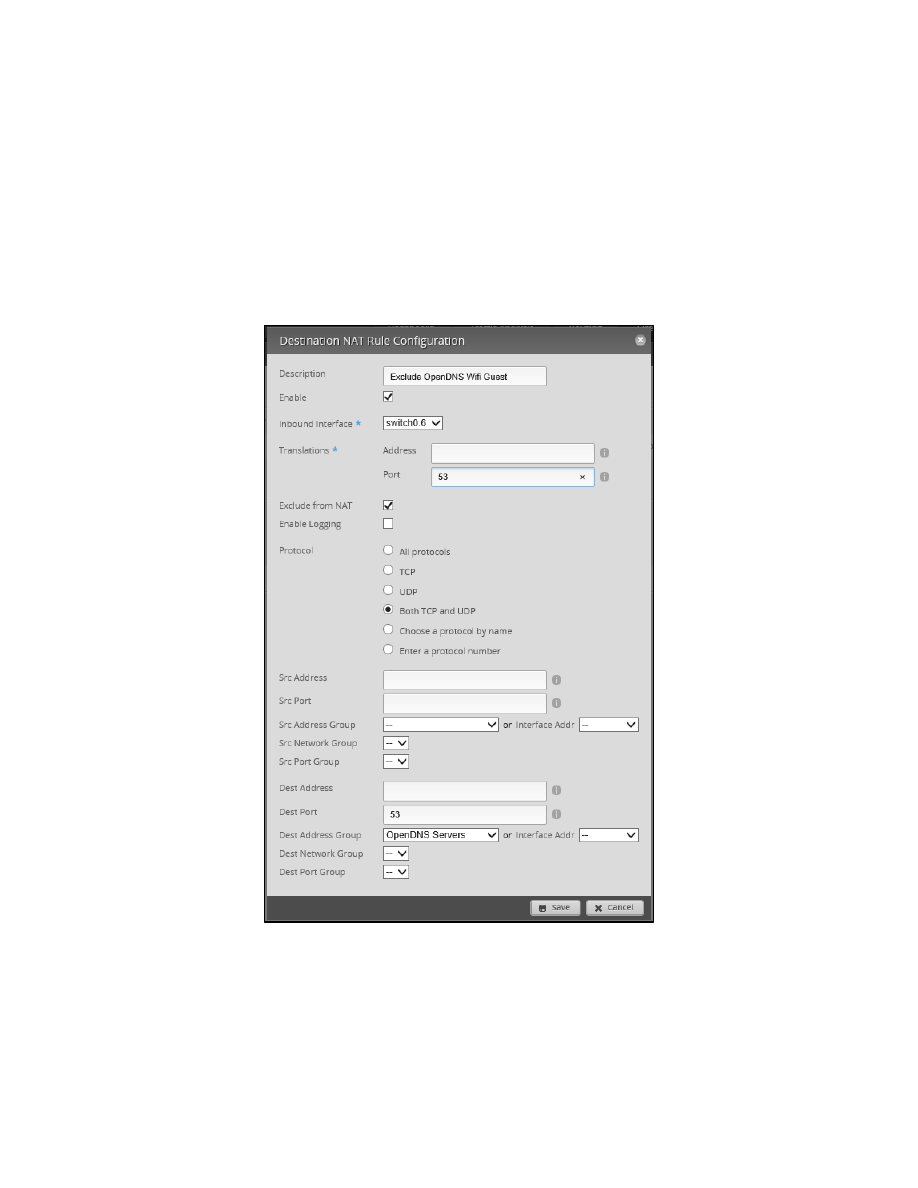
Page 66 of 96
10/7/2017
You will be presented with a “Destination NAT Rule Configuration” dialog.
Enter the data for NAT rule #1, as follows:
Description
Exclude OpenDNS Wifi Guest
Enable
CHECKED
Inbound Interface
switch0.6
Translations, Port
53
Exclude From NAT
CHECKED
Protocol
Both TCP and UDP
Dest Port
53
Dest Address Group
OpenDNS Servers
and save it. See Figure 103 – NAT Rule Number 1.
Figure 103 – NAT Rule Number 1
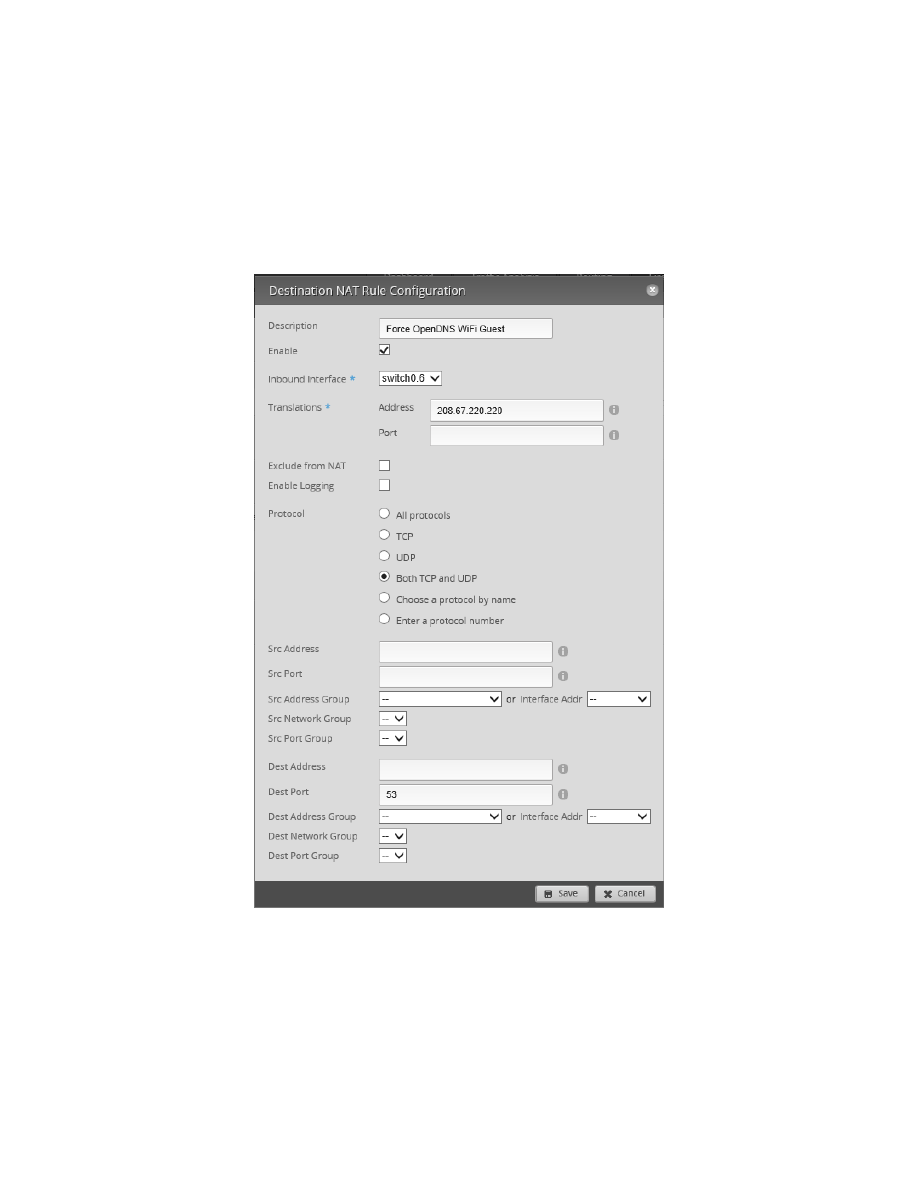
Page 67 of 96
10/7/2017
Press the “+ Add Destination NAT Rule” button and enter the data for NAT rule #2, as follows:
Description
Force OpenDNS Wifi Guest
Enable
CHECKED
Inbound Interface
switch0.6
Translations, Address 208.67.220.220
Exclude From NAT
Un-Checked
Protocol
Both TCP and UDP
Dest Port
53
and save it. See Figure 104 – NAT Rule Number 2.
Figure 104 – NAT Rule Number 2

Page 68 of 96
10/7/2017
This is the relevant portion from the backup file. Rule 5010 is an existing Source NAT rule for handling the WAN
port (eth0).
nat {
rule 1 {
description "Exclude OpenDNS Wifi Guest"
destination {
group {
address-group OPENDNS_SERVERS_GROUP
}
port 53
}
exclude
inbound-interface switch0.6
inside-address {
port 53
}
log disable
protocol tcp_udp
type destination
}
rule 2 {
description "Force OpenDNS WiFi Guest"
destination {
port 53
}
inbound-interface switch0.6
inside-address {
address 208.67.220.220
}
log disable
protocol tcp_udp
type destination
}
rule 5010 {
description "masquerade for WAN"
outbound-interface eth0
type masquerade
}
}
These rules can be tested, if you are implementing this DNS forcing using actual OpenDNS resolvers. This is
because OpenDNS has a test page:
that can show if you are using OpenDNS as a resolver.
To perform this test, first temporarily change the DNS resolvers associated with the Guest Network’s DHCP server
(switch0.6) to something else. I used addresses of 8.8.8.8 and 8.8.4.4 from Google. Reference section 26 - Add
DHCP Servers to the VLANs. Then, using a device attached to the Guest Network, visit the OpenDNS test page. If
you get their success page, then these two rules translated the Google DNS addresses into OpenDNS addresses.
You may have to reboot the EdgeRouter and/or the Guest device to ensure that the changed DNS resolver
addresses propagated to the Guest device. Remember to return the Guest Network’s DNS resolver addresses (in
the DHCP area) back to the OpenDNS addresses.
Reference this OpenDNS page about testing:

Page 69 of 96
10/7/2017
54. WIRED_SEPARATE Firewall Rules
The Wired Separate Network is meant to be kept separate from the other Networks, i.e., not allow
communications with anyone except with the Internet.
There are two usage scenarios, which I can think of, for the Separate Network.
1. You might want to put your banking computer on this Separate Network.
In this instance, people and devices on the Home Network cannot get to your banking computer.
2. You might want to provide internet access to the friend’s kid who lives in your basement.
In this instance, you don’t want any people or devices on the Separate Network to be able to access any
of your Networks, or be able to access internals of the EdgeRouter.
Reference Figure 80 – Detailed Firewall Setup Diagram, for FWR numbers and Network routing / interactions
Reference Table 1 - Table of Networks, for Network subnet addresses
To block instance number 1, we need to block traffic from exiting OUT of the EdgeRouter and going to devices
that are on the Separate Network. This ruleset will be labeled WIRED_SEPARATE_OUT and is denoted as FWR6.
This ruleset will need to block addresses from the WIRED_IOT_GROUP and the HOME_GROUP.
Note that two of the Networks: “Wifi IOT Network” and “Wifi Guest Network” are using VLANs and originate from
the Access Point. Within the Access Point, these Networks will be configured as Guest Networks, and will
therefore be denied access to all of the EdgeRouter’s addresses except for the Home Network, which is at
192.168.3.X. So no firewall rules are needed to block these two Networks from accessing the Wired Separate
Network.
To add the following ruleset and rules, follow what was done in the above section 51 - WIRED_IOT_LOCAL,
WIFI_IOT_LOCAL Firewall Rules.
When adding the following WIRED_SEPARATE_OUT ruleset, remember to also set and SAVE the following:
Interface:
eth2
Direction:
out
name WIRED_SEPARATE_OUT {
default-action accept
description "Wired Separate Out"
rule 1 {
action drop
description "Drop Home Network"
log disable
protocol all
source {
group {
address-group HOME_GROUP
}
}
}
rule 2 {
action drop
description "Drop Wired Iot Network"
log disable
protocol all
source {
group {
address-group WIRED_IOT_GROUP
}
}
}
}

Page 70 of 96
10/7/2017
To block instance number 2, we need to block traffic from entering IN the EdgeRouter and going to devices that
are on the other networks. This ruleset will be labeled WIRED_SEPARATE_IN and is denoted as FWR5.
Additionally, we need to block traffic from entering the EdgeRouter itself (LOCAL) except for DNS and DHCP
requests. This ruleset will be labeled WIRED_SEPARATE_LOCAL and is denoted as FWR4.
When adding the following WIRED_SEPARATE_IN ruleset, remember to also set and SAVE the following:
Interface:
eth2
Direction:
in
name WIRED_SEPARATE_IN {
default-action accept
description "Wired Separate In"
rule 1 {
action drop
description "Block Multiple Networks"
destination {
group {
address-group MULTIPLE_GROUP
}
}
log disable
protocol all
}
}
When adding the following WIRED_SEPARATE_LOCAL ruleset, remember to also set and SAVE the following:
Interface:
eth2
Direction:
local
name WIRED_SEPARATE_LOCAL {
default-action drop
description "Wired Separate Local"
rule 1 {
action accept
description "Allow DHCP"
destination {
port 67-68
}
log disable
protocol udp
}
rule 2 {
action accept
description "Allow DNS"
destination {
port 53
}
log disable
protocol tcp_udp
}
}

Page 71 of 96
10/7/2017
55. EdgeMax Change Interface Names
Press the Dashboard Button. Reference Figure 34 – Dashboard Button.
Find the line with an Interface of “switch0”. Click on the Action button to the right of this line. Select “Config”
from the Actions Menu. You will see a dialog similar to Figure 37 – switch0 Configuration. Change the Description
field to “Home Net.”
Repeat these steps for the following Interfaces as shown in Table 4 - Table of Interface Names:
(You have just done the last one)
Interface
Description
eth1
Wired Iot Net
eth2
Wired Separate Net
eth3
Home Net
eth4
Home Net
switch0
Home Net
Table 4 - Table of Interface Names
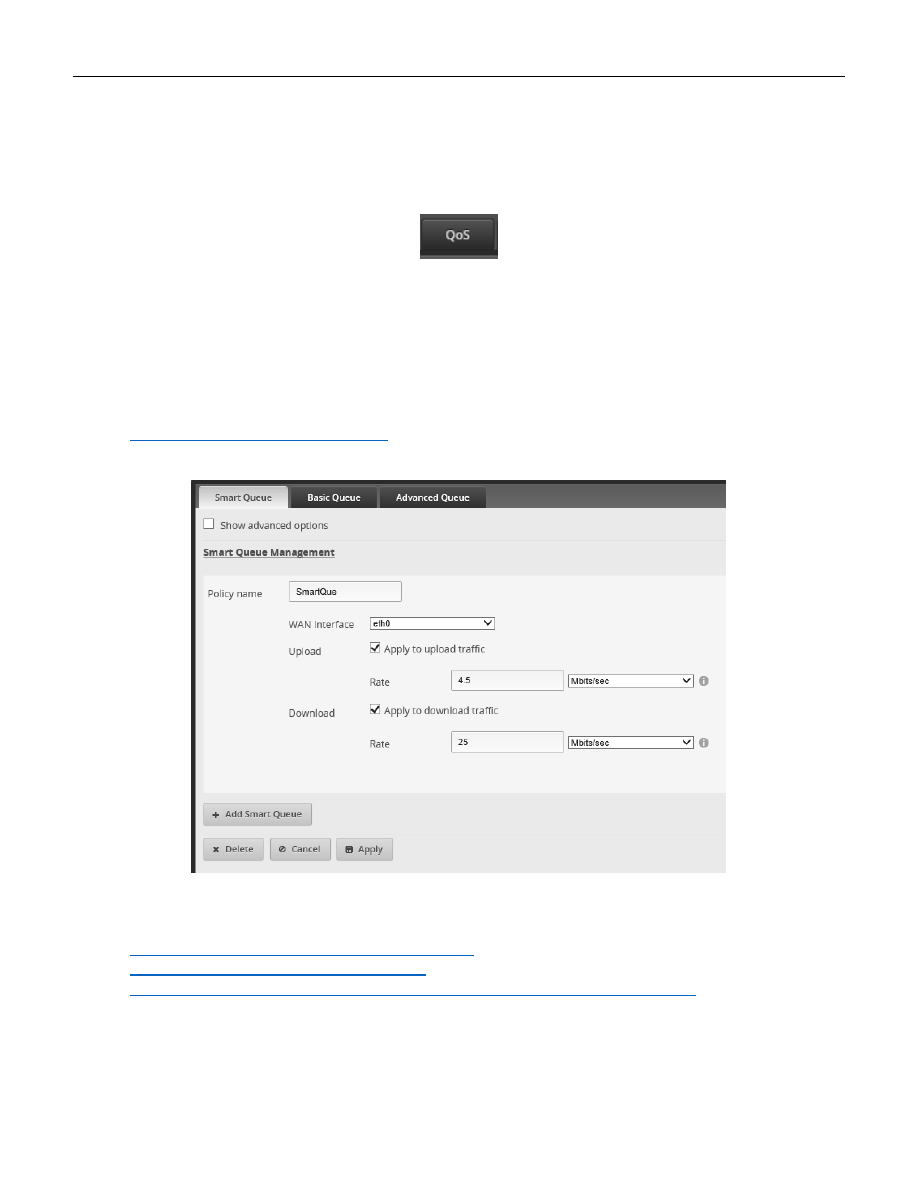
Page 72 of 96
10/7/2017
56. SmartQueue Setup
This section is optional and is not implemented in the associated backup file. Turning on SmartQueue (on your
WAN port) can help solve the issue of “bufferbloat”. Reference the internet for “bufferbloat” if you are unfamiliar
with it.
To enable SmartQueue, press the QoS button, located near the top of the page. See Figure 105 – QoS button.
Figure 105 – QoS button
Ensure that the Smart Queue tab is selected, then press the “+ Add Smart Queue” button.
From what I understand, you should enter about 95% of you connection speeds into the form. My connection
speeds are 26 down and about 5 up. Adjust the values for your own connection speed(s). There are also posting /
indications that you should only implement SmartQueue in the Upload direction.
One place to test connection speeds (and bufferbloat) is:
http://www.dslreports.com/speedtest
See Figure 106 – Example SmartQueue Settings
Figure 106 – Example SmartQueue Settings
References:
https://www.youtube.com/watch?v=3hvmzEv8iNQ
http://kazoo.ga/edgerouter-x-smart-queue/
https://www.reddit.com/r/Ubiquiti/comments/5otj22/edgerouter_x_qos_question/
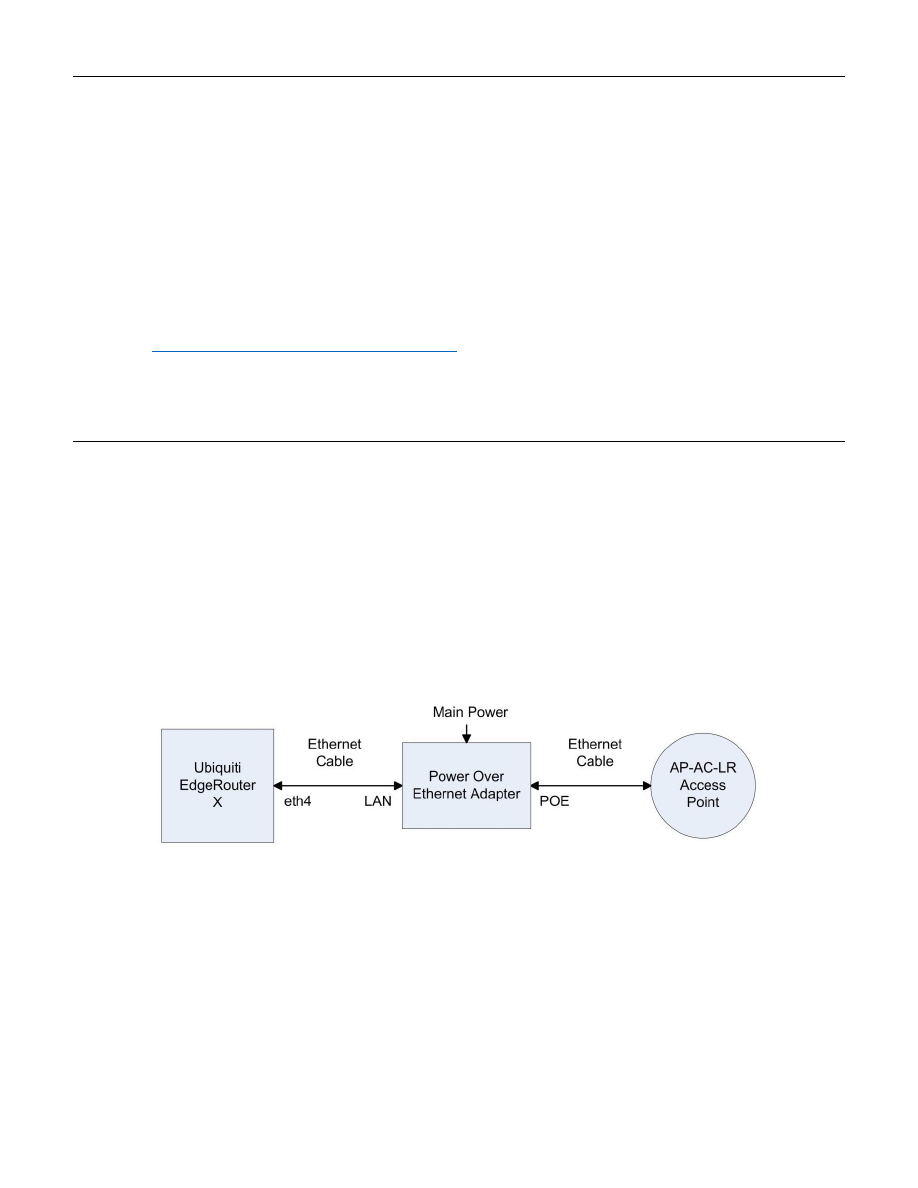
Page 73 of 96
10/7/2017
57. Ubiquiti AP-AC-LR Access Point Setup
This guide will utilize Access Point software installed on a Windows PC. This software ONLY needs to be running
WHEN you are adopting or making configuration changes to your Access Point(s). The software does NOT need to
be running all the time.
Other Ubiquiti Access points should work; the Ubiquiti AP-AC-LR model is just the one that I purchased.
There are also clients available for Linux, Macs, Android phones and Apple phones.
There are optional guest portal / data-collection features that require this software to be running all the time.
These features might be found in a Motel/Hotel WiFi system. Some people choose to therefore run this software
on a Raspberry Pi. Ubiquiti has a Cloud Key device that is recommended, if you are going to be running this
software all the time.
Reference: https://www.ubnt.com/unifi/unifi-cloud-key/
If you are going to re-purpose a consumer router as an access point, instead of using a Ubiquiti Access Point,
remember that some of the Network security is achieved via VLANS and Guest options within the Access Point.
Firewall rules within the EdgeRouter may need to be adjusted.
58. Hookup the Ubiquiti AP-AC-LR Access Point
Using two standard Ethernet cables:
Wire the EdgeRouter’s eth4 port to the LAN port of the included Power Over Ethernet (POE) Adapter.
Wire the POE port of the POE adapter to the Ethernet port on the Ubiquiti AP-AC-LR Access Point.
See Figure 107 – Access Point Wiring.
Plug the POE adapter into your main electrical power.
Note: Connecting the POE port of the POE adapter to any other device will probably burn-up that other device.
There are also internet posts that have the POE adapter powering both the EdgeRouter and the AP-AC-LR Access
point. I am not powering my devices that way. Ubiquiti seems to be changing its Access Point voltages / powering
options.
Figure 107 – Access Point Wiring
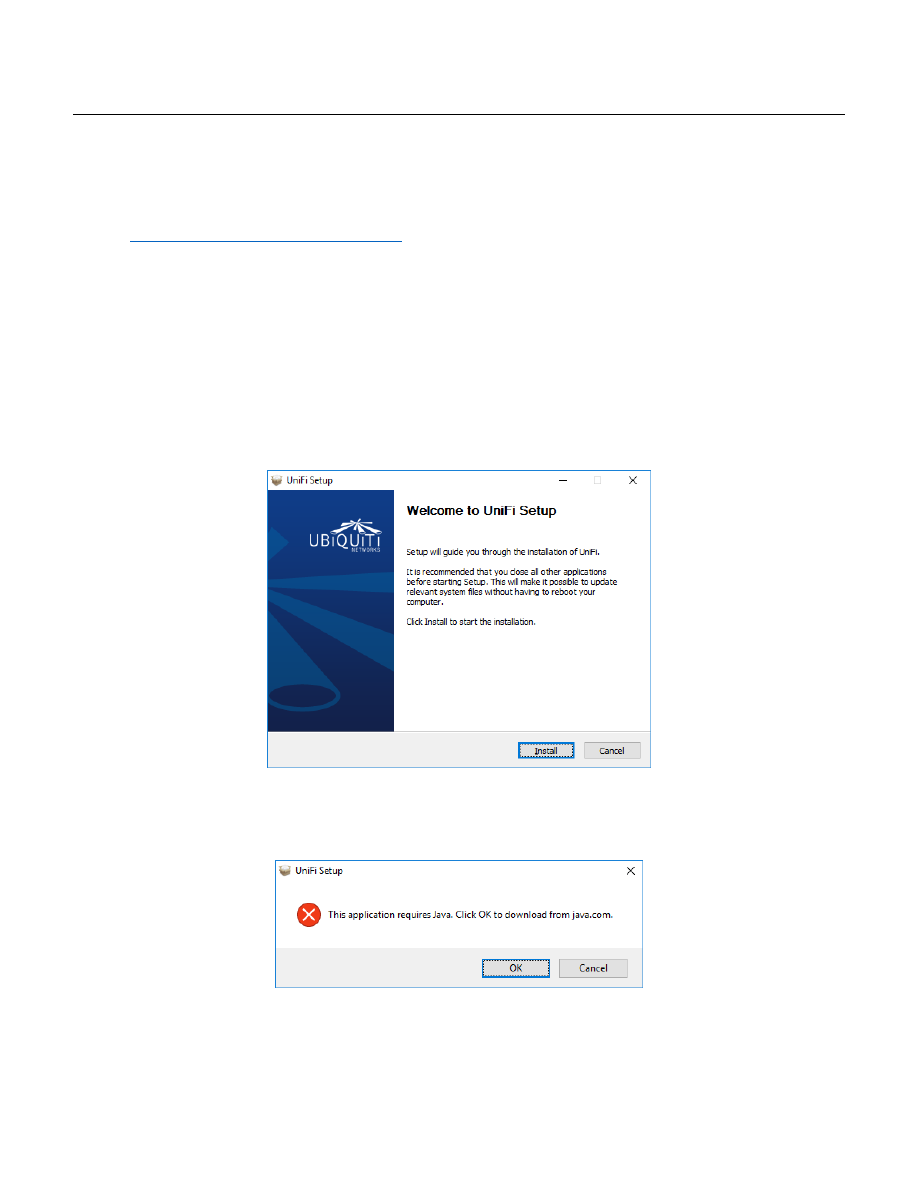
Page 74 of 96
10/7/2017
59. Download and Install the Access Point Software
For Windows users, you will need to be an Administrator, or the installation will install (somewhere else) in the
area belonging to the admin’s account that was used.
Browse to:
https://www.ubnt.com/download/unifi/
Under the SOFTWARE section, download the latest “Unifi Controller for Windows” software (Unifi-installer.exe).
When this guide was written, it was version 5.4.11.
Under the DOCUMENTATION section, you might also want to download:
UniFi Controller v5 Users Guide (or later version)
UniFi AC-LR-AP Quick Start Guide.
The following install items may be slightly out of order between your installation and that of this guide. I had to
re-start the UniFi Setup.
Run the Unifi-installer.exe. Acknowledge any Windows admin prompts. See Figure 108 – UniFi Setup Welcome
Figure 108 – UniFi Setup Welcome Screen
If Java is not installed on your your PC, you will be prompted to install Java. See Figure 109 – UniFi Java Required.
Click “OK”.
Figure 109 – UniFi Java Required
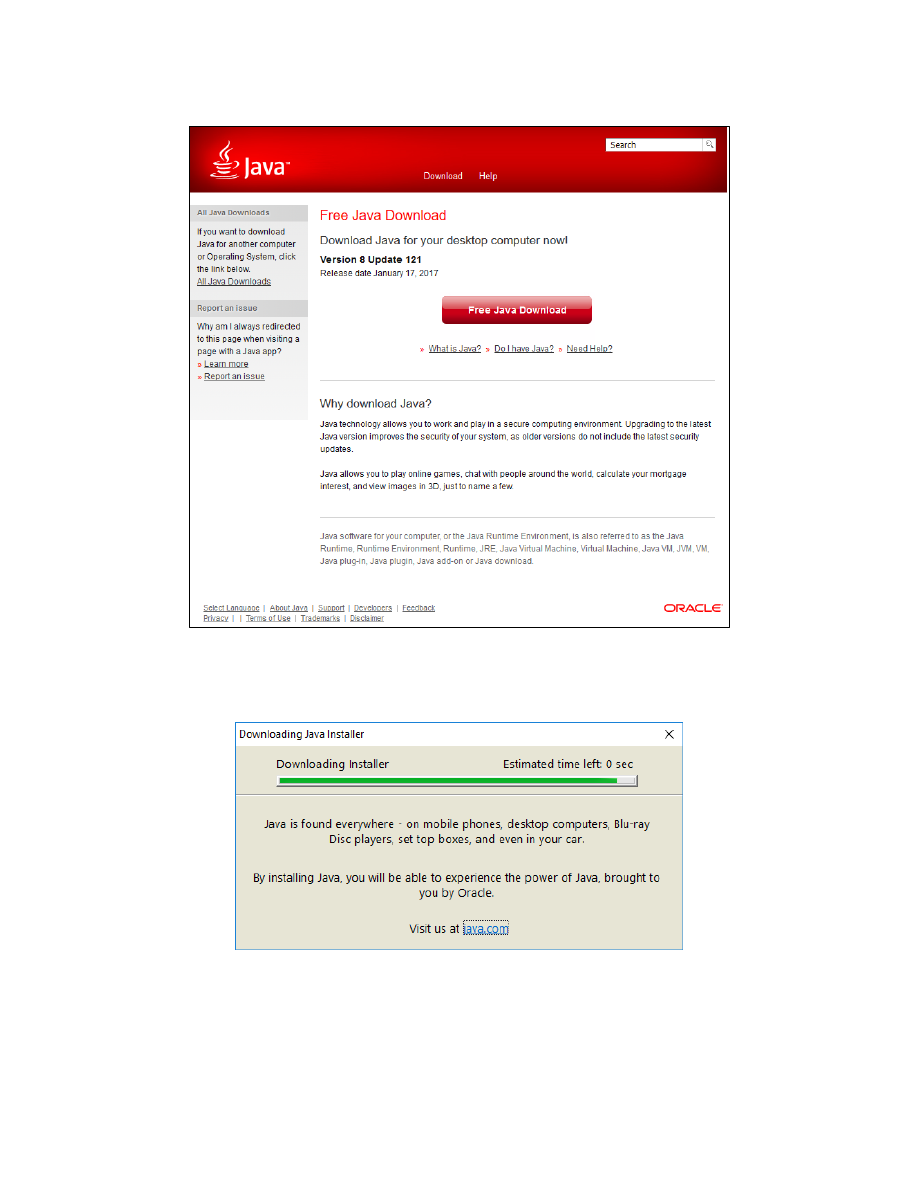
Page 75 of 96
10/7/2017
You will be taken to an Oracle site to download Java. Click on the “Free Java Download” button. See Figure 110 –
Unifi Download Oracle Java. Note that Oracle asks “Why download Java?” My only answer is “Because I have to”.
Figure 110 – Unifi Download Oracle Java
While downloading, Oracle will inform you that their security holes are found everywhere, and that you can
experience that also. See Figure 111 – UniFi Downloading Oracle Java.
Figure 111 – UniFi Downloading Oracle Java
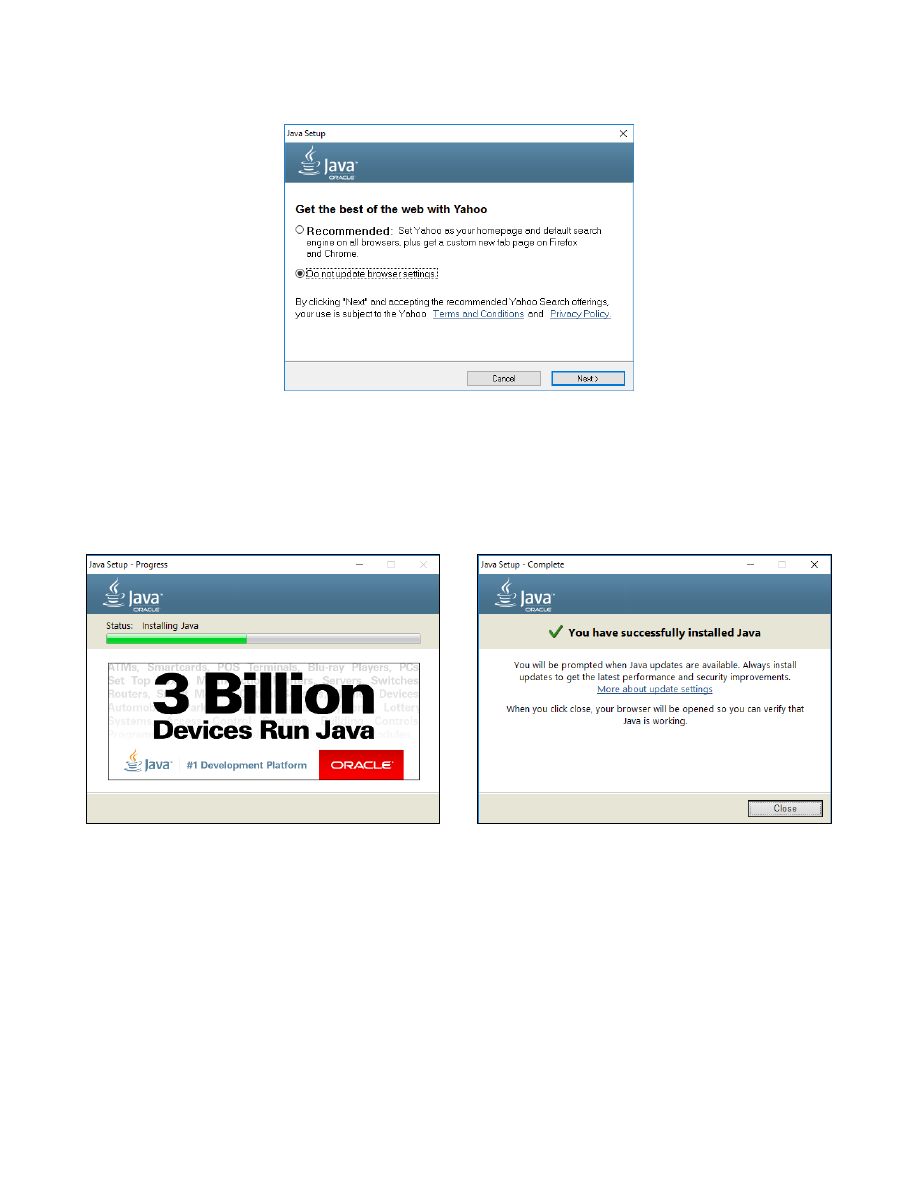
Page 76 of 96
10/7/2017
When done downloading, they will try and monetize you by setting up crapware. Select “Do not update browser
settings”, unless you like this type of stuff. See Figure 112 – UniFi Oracle Crapware.
Figure 112 – UniFi Oracle Crapware
Run the downloaded JavaSetup*.exe executable. Java will install. Oracle will again inform you that they are
probably responsible for hundreds of billions of accumulated security holes, with billions of them in internet
connected devices that will never be patched. See Figure 113 –UniFi Java Installing.
When Java is done installing you will see the dialog of See Figure 114 – UniFi Java Done. Press “Close”. When the
next browser window opened (to verify Java is working), I closed that browser verify page.
Figure 113 –UniFi Java Installing
Figure 114 – UniFi Java Done
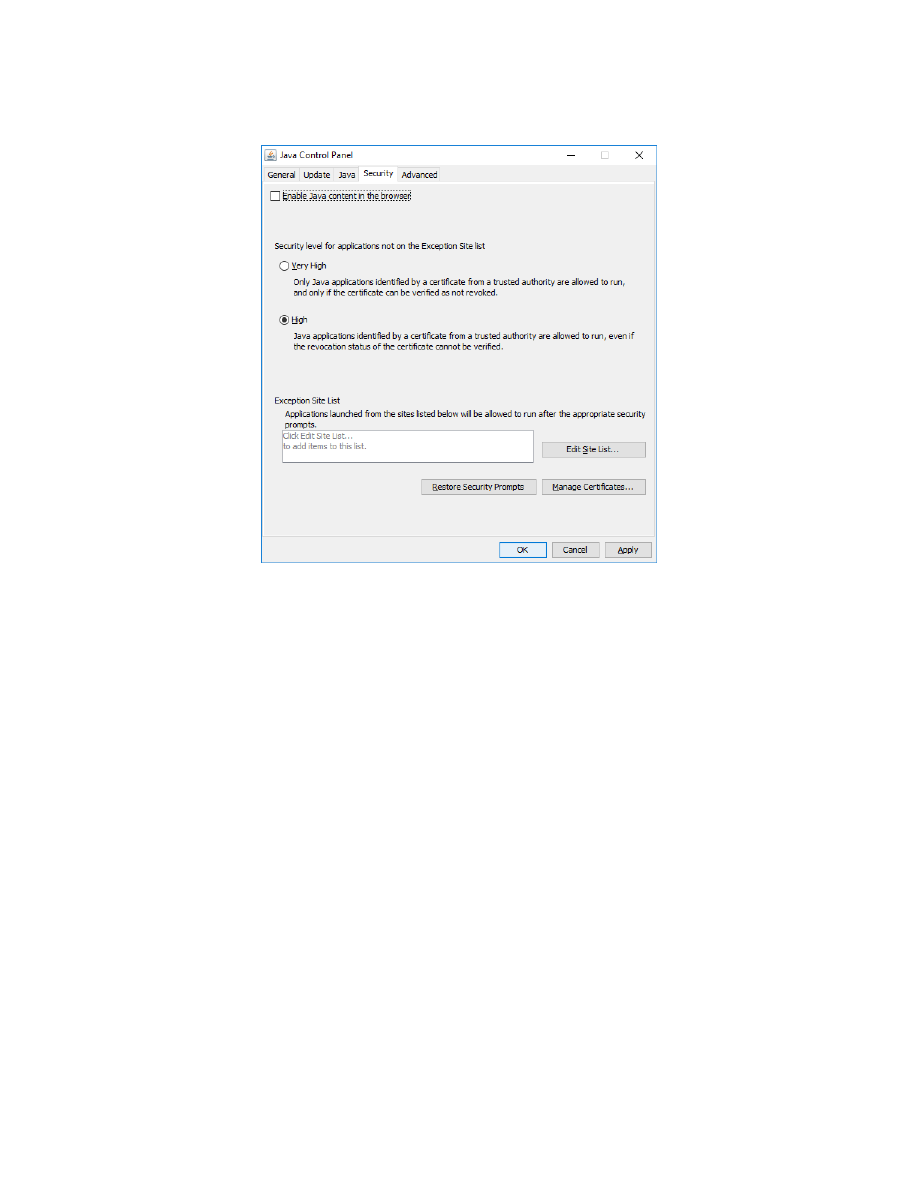
Page 77 of 96
10/7/2017
Press the Windows Start button; Go to the list of programs, select Java, then select “Configure Java”. Press the
“Security” tab, and UNCHECK the”Enable Java content in the browser” checkbox. See Figure 115 – UniFi Java
Control Panel. Without this you will be live-bait for any drive-by browsing malware.
Figure 115 – UniFi Java Control Panel
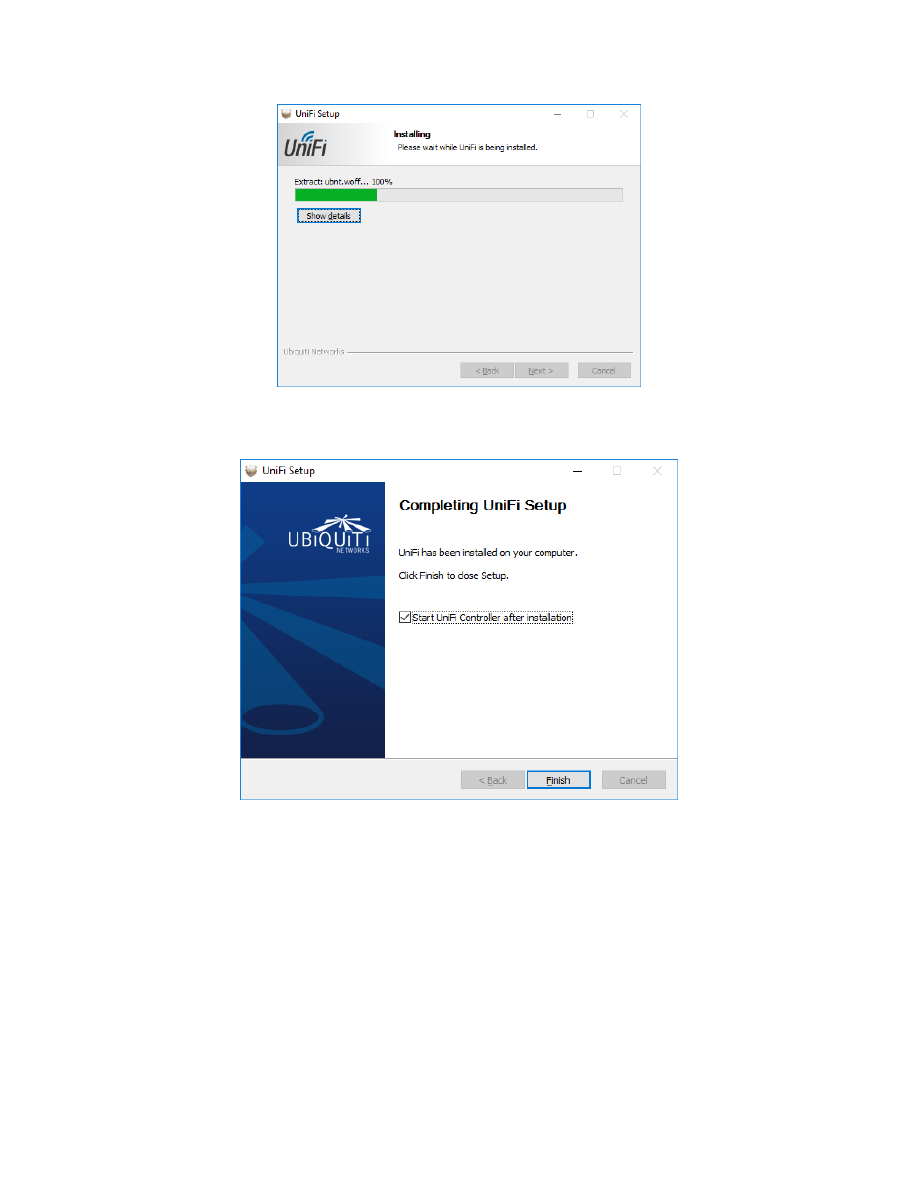
Page 78 of 96
10/7/2017
I had to restart the UniFi installer. See Figure 116 – UniFi Installing.
Figure 116 – UniFi Installing
The UniFi software will finish installing. See Figure 117 – UniFi Done Installing
Figure 117 – UniFi Done Installing
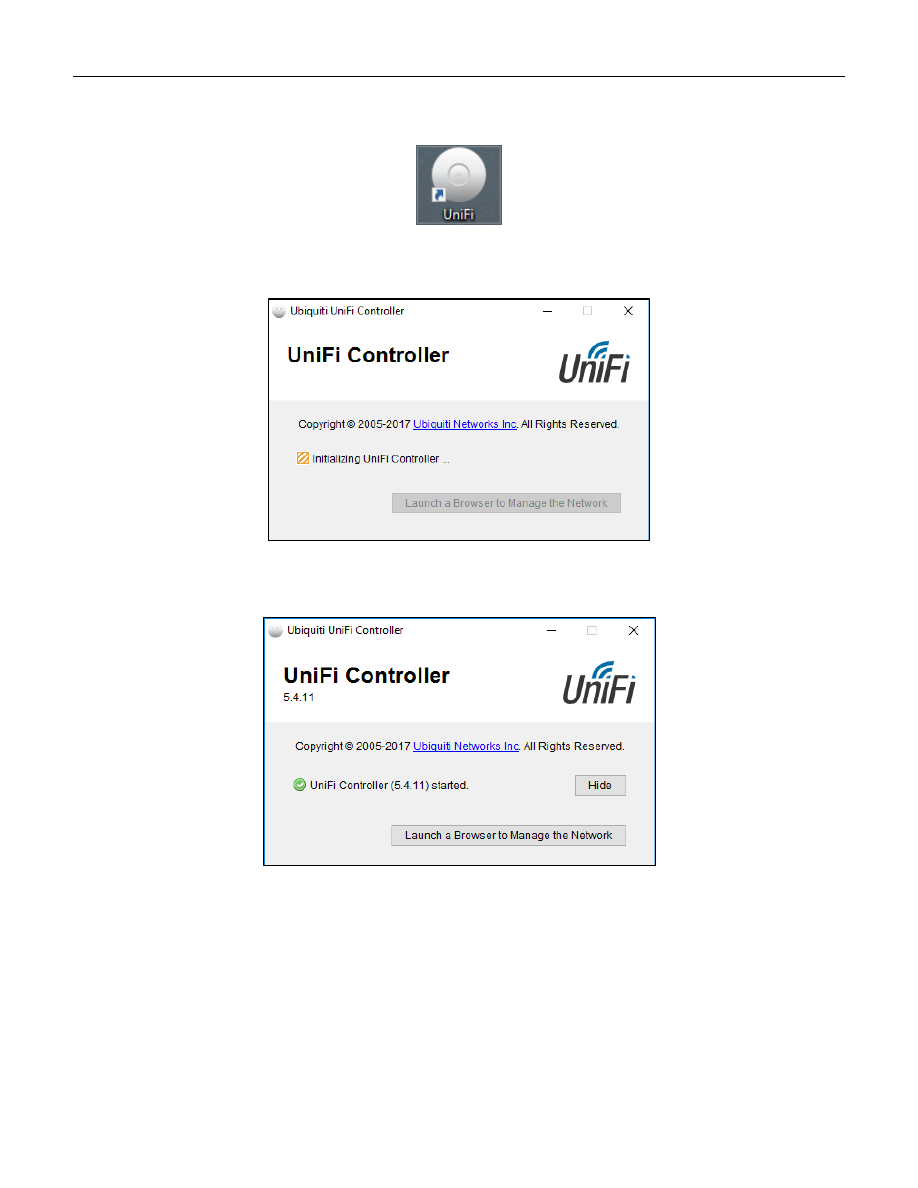
Page 79 of 96
10/7/2017
60. Running the UniFi Software
Double click the Unifi icon on your desktop. See Figure 118 – UniFi Icon
Figure 118 – UniFi Icon
The UniFi controlling software will start to initialize. See Figure 119 – UniFi Controller Software Initializing.
Figure 119 – UniFi Controller Software Initializing
When it has fully started, it will look like Figure 120 – UniFi Controller Software Running.
Figure 120 – UniFi Controller Software Running
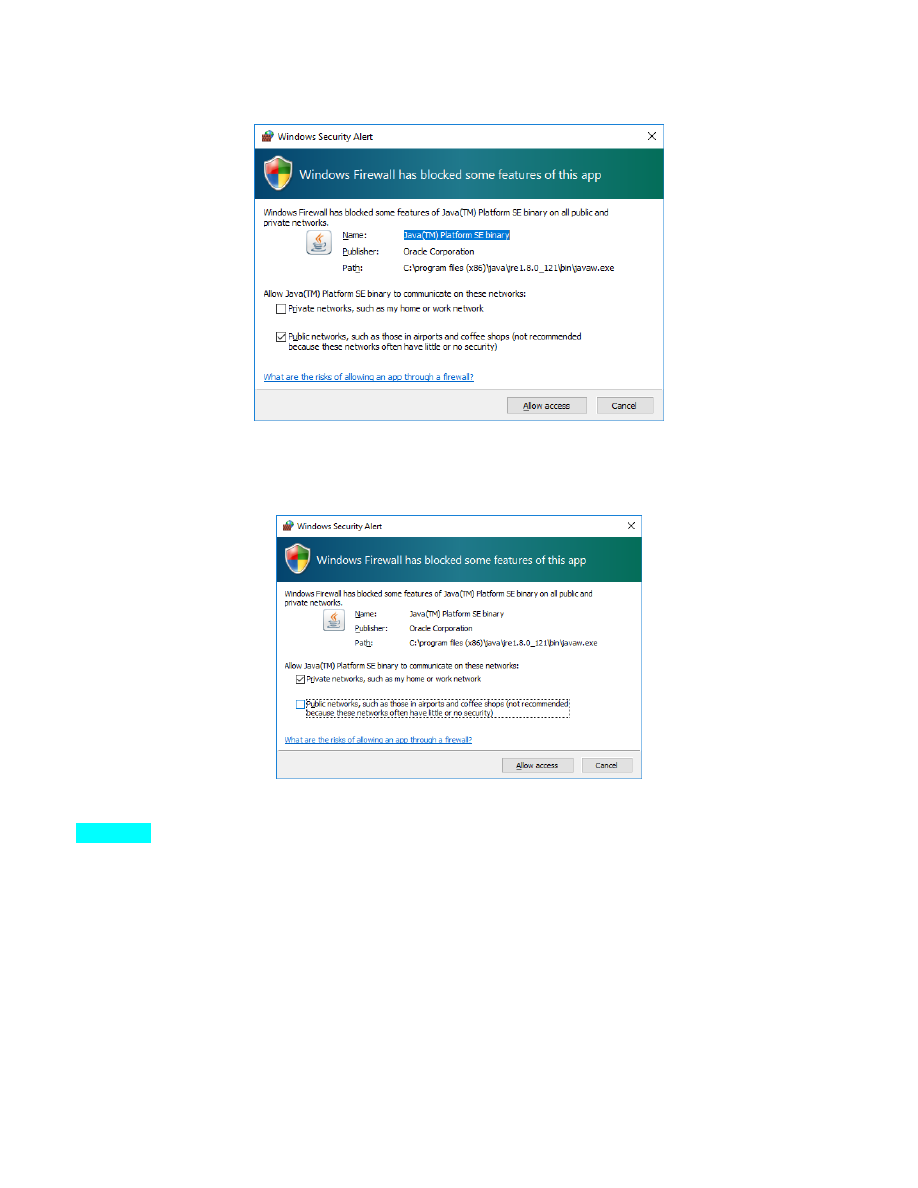
Page 80 of 96
10/7/2017
When the UniFi Software started for the first time, a Windows Firewall dialog popped up. See Figure 121 –
Windows Initial Firewall - UniFi.
Figure 121 – Windows Initial Firewall - UniFi
The wording and default selections seem backwards to me. I reversed the selections and pressed “Allow access”.
See Figure 122 – Windows My Firewall Settings - UniFi.
Figure 122 – Windows My Firewall Settings - UniFi
QUESTION: Which settings are correct for keeping Java to only my local / private network?
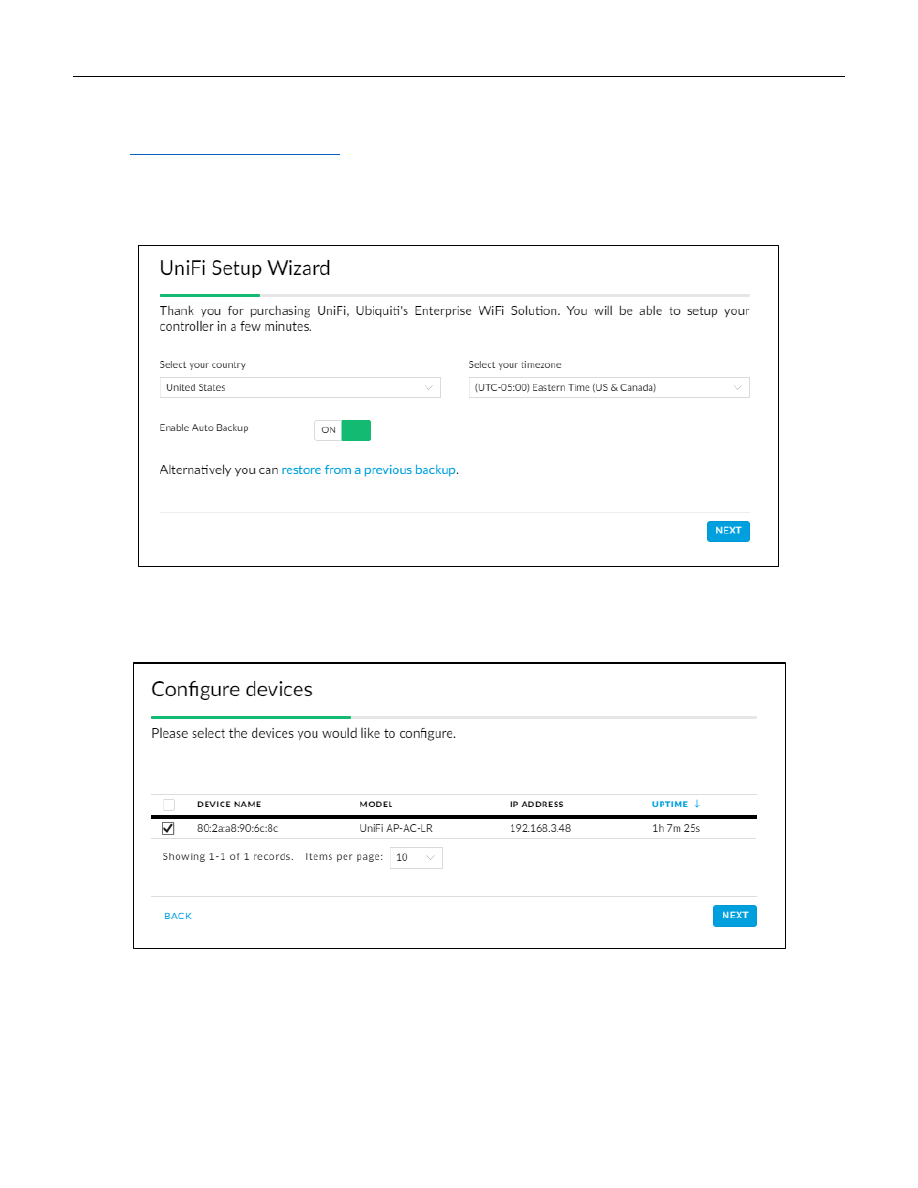
Page 81 of 96
10/7/2017
61. Initial Setup of the UniFi Software
Either press the “Launch a Browser to Manage the Network” button or enter:
into your browser.
Most of the following screenshots are portions of the full browser screen.
Select you country, time zone, and enable Auto Backup”, then press Next. See Figure 123 – UniFi Setup Wizard.
Figure 123 – UniFi Setup Wizard
Your Ubiquiti Access Point should show up in the list. Check it and then press Next. See Figure 124 – UniFi
Figure 124 – UniFi Configure Devices
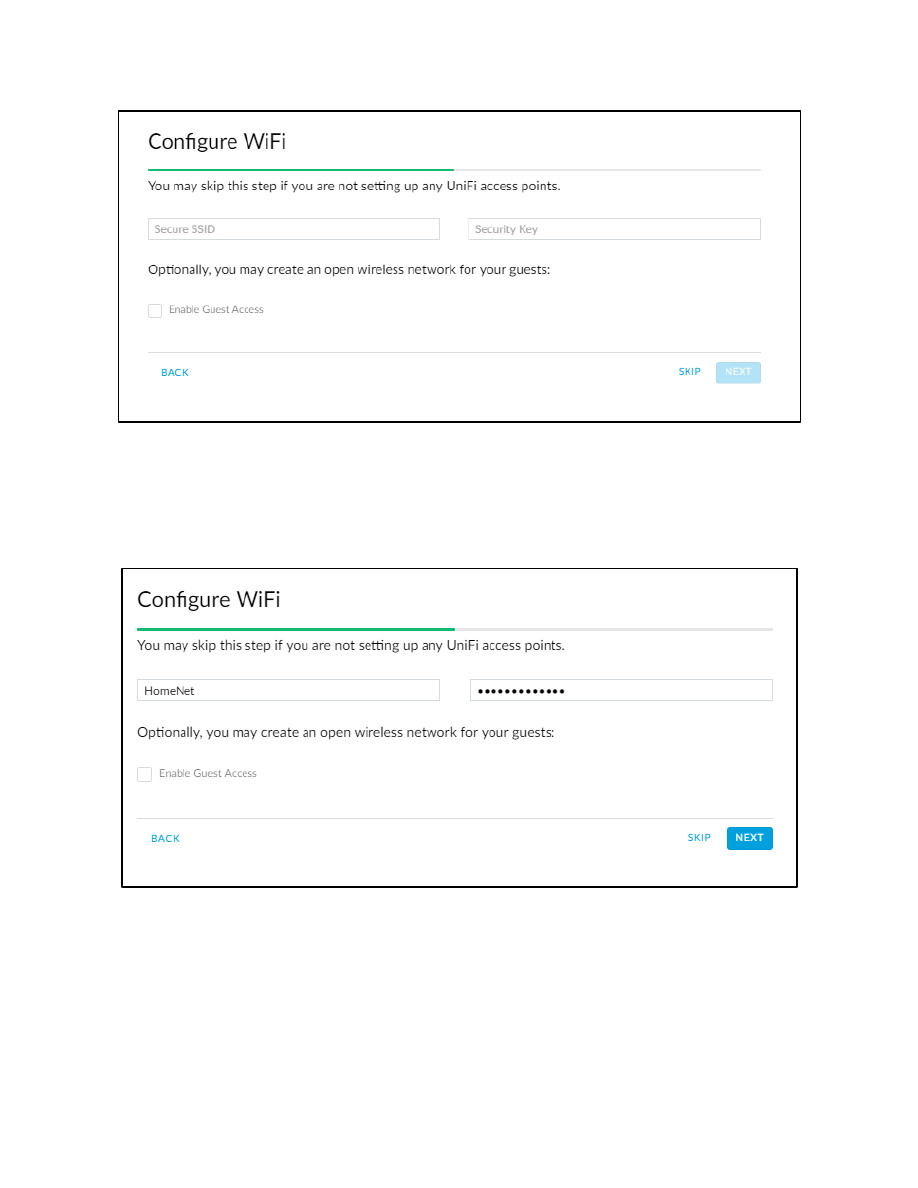
Page 82 of 96
10/7/2017
You will see the initial configure WiFi screen. See Figure 125 – UniFi Initial Configure WiFi.
Figure 125 – UniFi Initial Configure WiFi
Fill in your main network’s SSID and your WiFi password. I used the name “HomeNet “for this guide. This is the
WiFi network that most of your computers, tablets, and cell phones will connect to. Leave the Enable Guest
Network as UNCHECKED, and then press Next. See Figure 126 – UniFi Configure Wifi SSID.
Figure 126 – UniFi Configure Wifi SSID
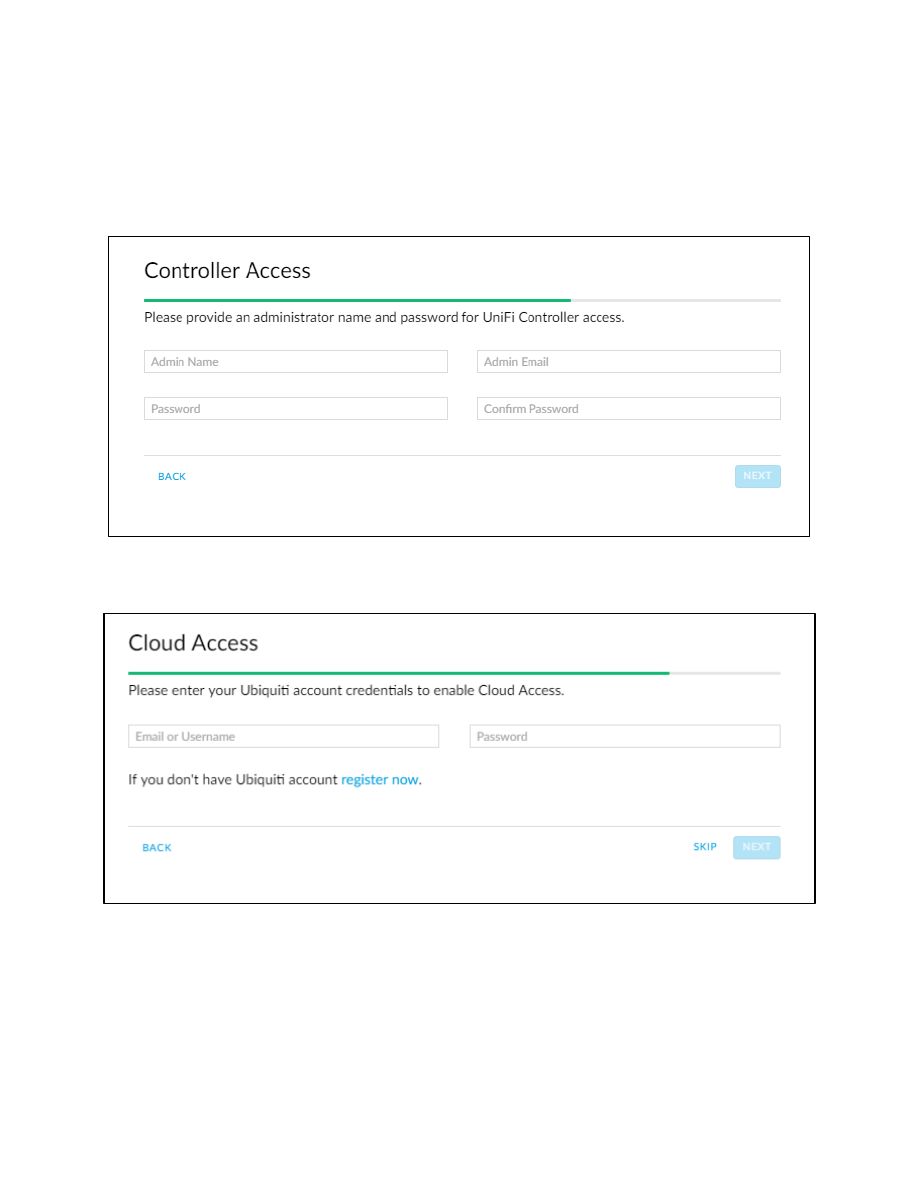
Page 83 of 96
10/7/2017
To access this UniFi software later on, fill in the following information:
Admin Name
Admin Email
Password
You will want to write these down and/or put them in your password safe. The email address is used for password
recovery. When finished, press Next. See Figure 127 – UniFi Controller Access.
Figure 127 – UniFi Controller Access
Since I am not using Cloud Access, I pressed Skip. See Figure 128 – UniFi Cloud Access.
Figure 128 – UniFi Cloud Access
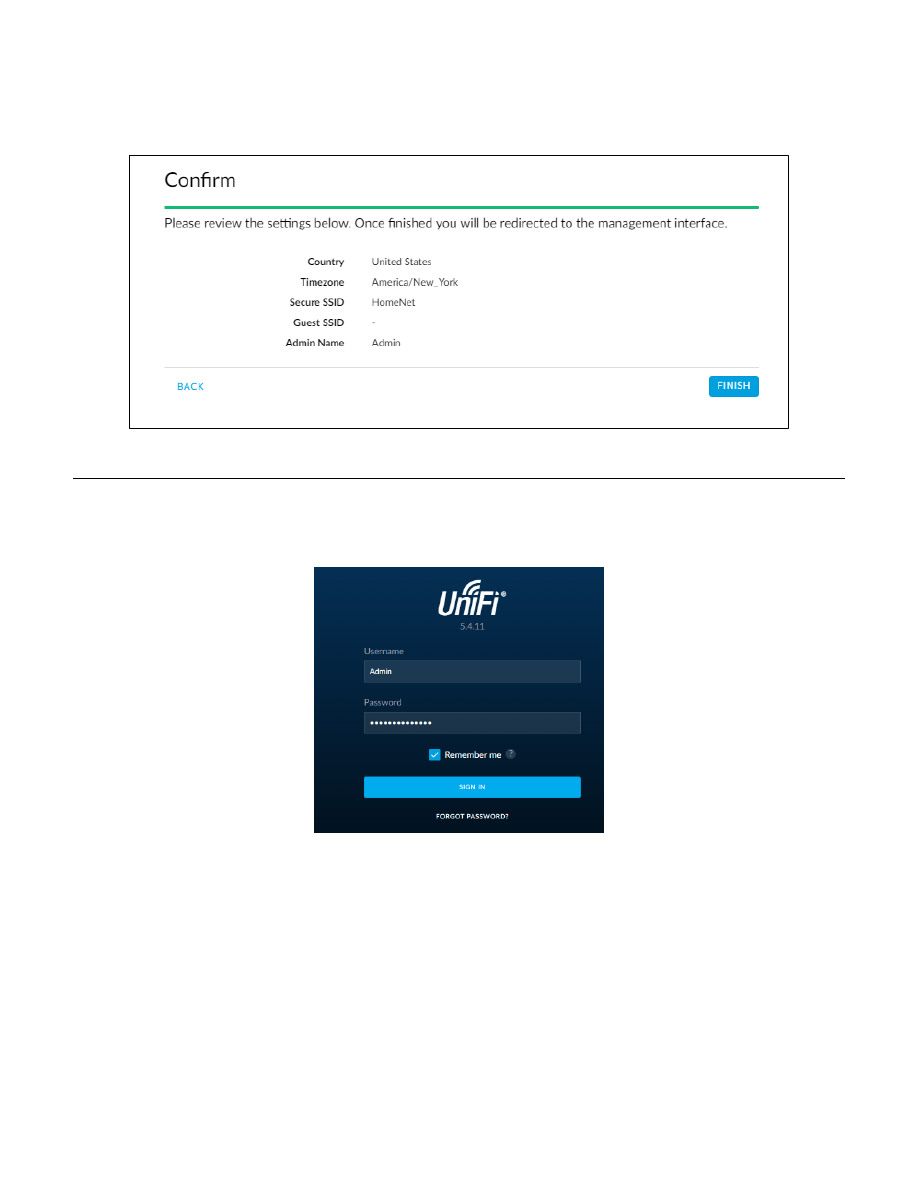
Page 84 of 96
10/7/2017
You are then asked to confirm the above information. If it is correct, press Finish. See Figure 129 – UniFi Confirm
Figure 129 – UniFi Confirm Setup
62. Login to the UniFi Software
You will be asked to login to the UniFi Software. See Figure 130 – UniFi Login. Use your newly created credentials
that were entered at Figure 127 – UniFi Controller Access.
Figure 130 – UniFi Login
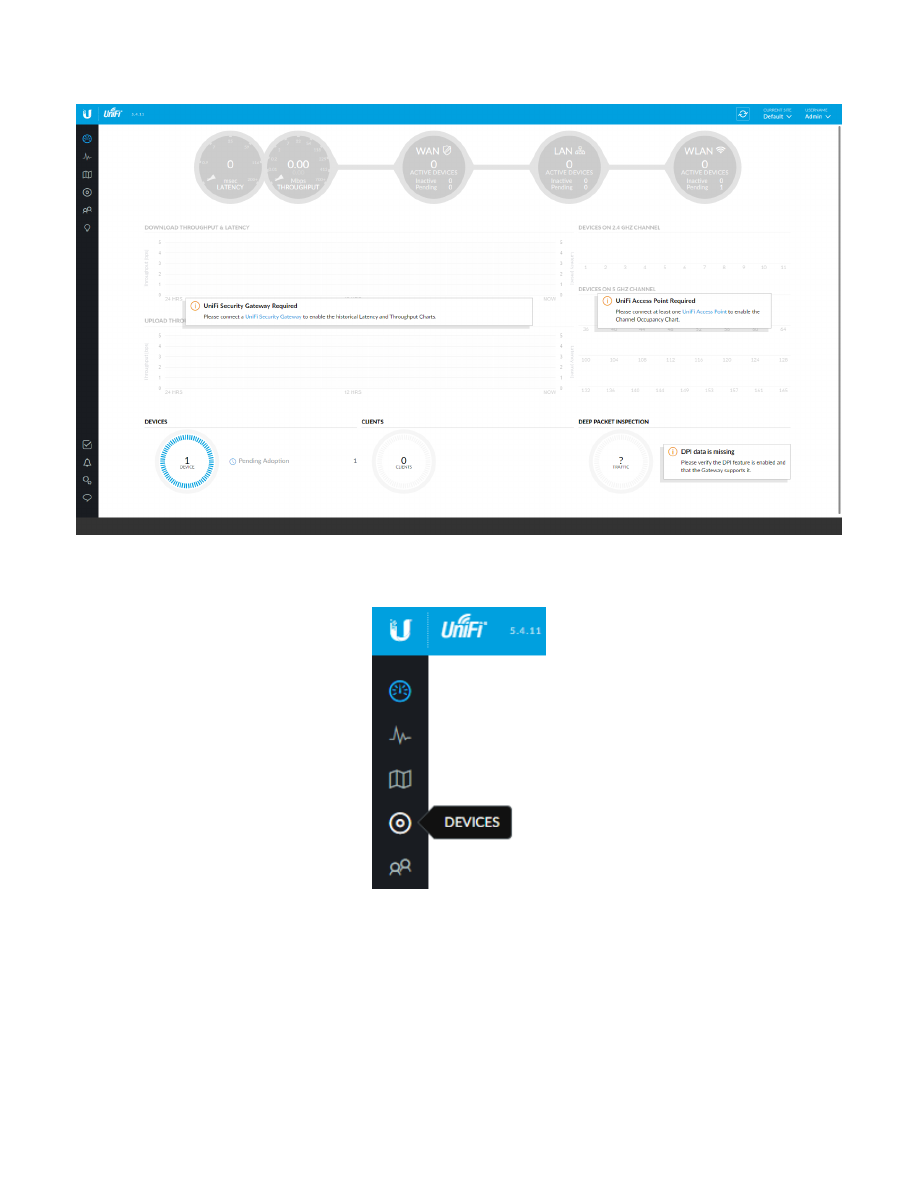
Page 85 of 96
10/7/2017
You will land on the Dashboard page. See Figure 131 – Initial UniFi Dashboard Page
Figure 131 – Initial UniFi Dashboard Page
From the upper left hand side choose Devices. See Figure 132 – UniFi Devices Button.
Figure 132 – UniFi Devices Button
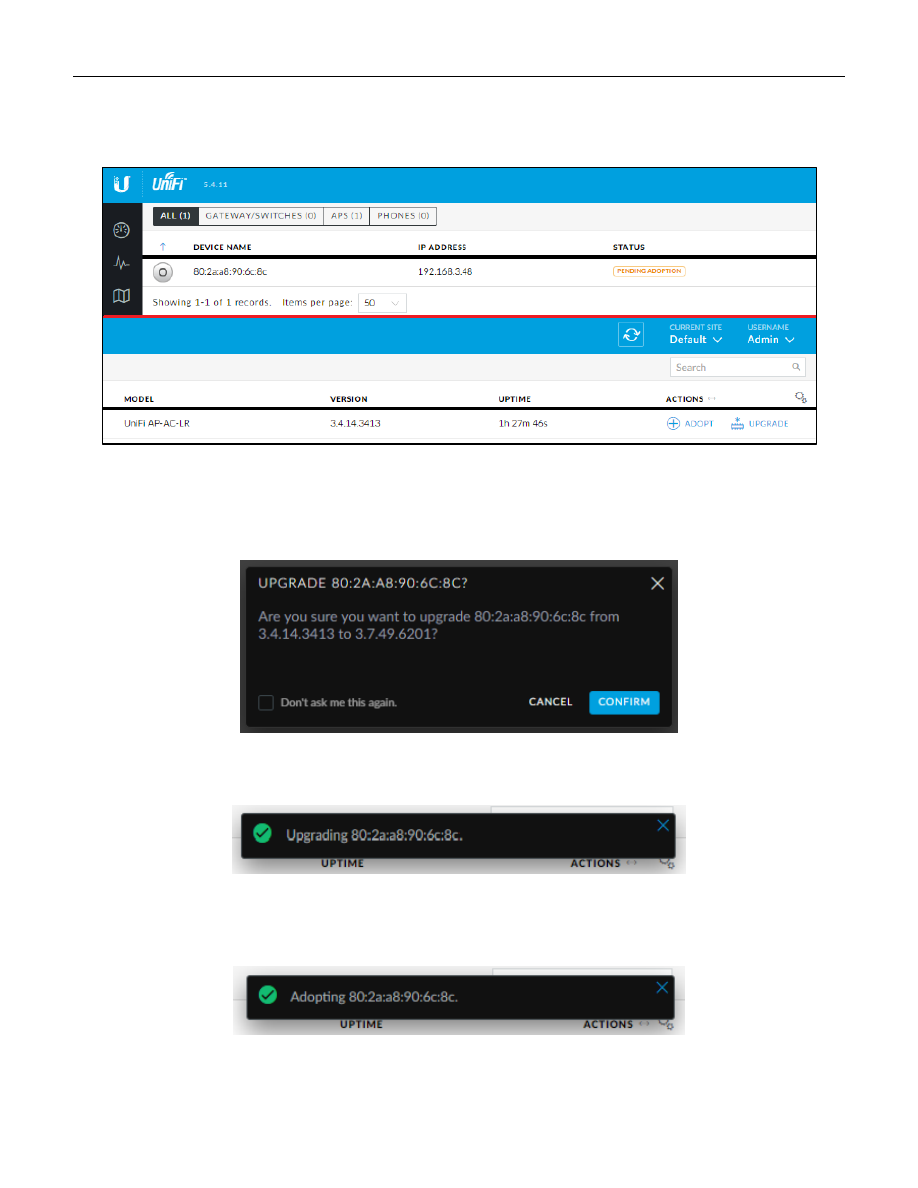
Page 86 of 96
10/7/2017
63. UniFi Devices
You will see the devices page, and the Access Point should be Pending Adoption. See Figure 133 – Initial UniFi
Device Screen. Note that this screenshot / figure was cut into two pieces and folded into one image.
Figure 133 – Initial UniFi Device Screen
Press the Upgrade button on the right side of the device line. Reference Figure 133 – Initial UniFi Device Screen.
You will be presented with an upgrade confirmation dialog. Press Confirm. See Figure 134 – UniFi - Upgrade
Figure 134 – UniFi - Upgrade Access Point
You should see acknowledgement of the upgrade. See Figure 135 – UniFi – Upgrading.
Figure 135 – UniFi – Upgrading Access Point
When the upgrade is finished, press the Adopt button on the right side of the device line. Reference Figure 133 –
Initial UniFi Device Screen. You should see acknowledgement of the Adoption. SeeFigure 136 – UniFi – Adopting.
Figure 136 – UniFi – Adopting Access Point
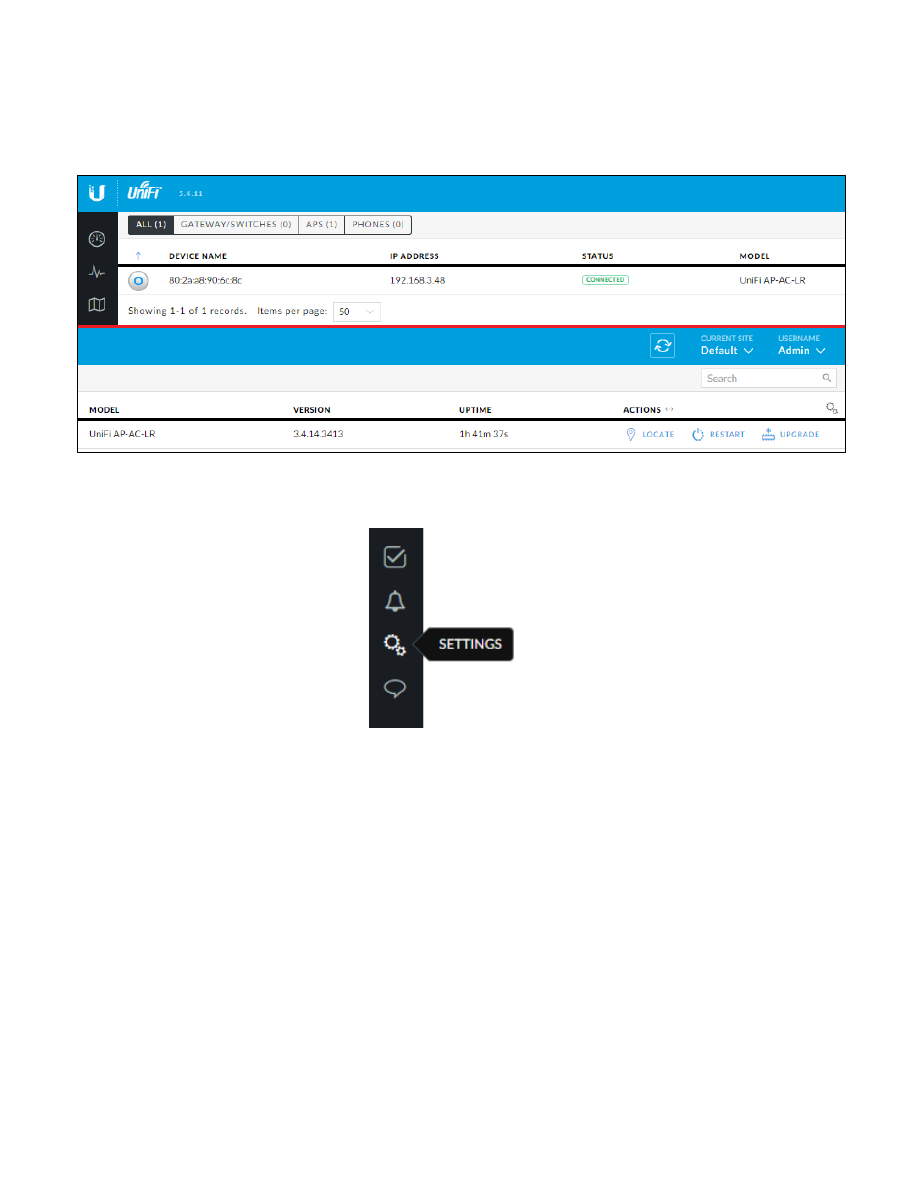
Page 87 of 96
10/7/2017
Your device should now say Connected. The buttons on the right now allow you to locate, restart, and upgrade
the Access Point. See Figure 137 – UniFi Access Point Connected. Note that this screenshot / figure was cut into
two pieces and folded into one image.
Figure 137 – UniFi Access Point Connected
Find the Settings button, near the lower left side of the screen, and press it. See Figure 138 – Settings Button
Figure 138 – Settings Button
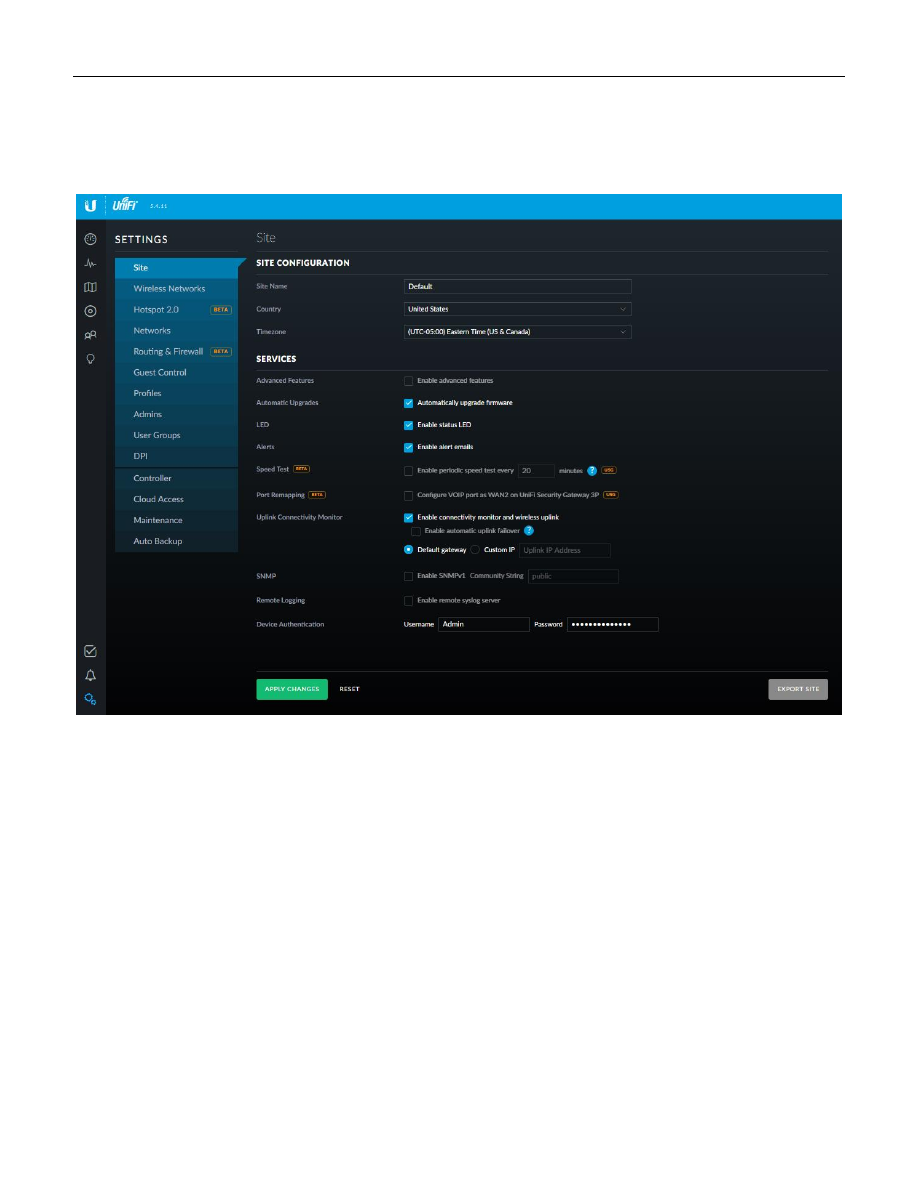
Page 88 of 96
10/7/2017
64. UniFi Settings
You should see the Site Tab of the Settings page. Check Automatically Upgrade firmware, and then press Apply
Changes. See Figure 139 – UniFi Site Configuration.
Figure 139 – UniFi Site Configuration
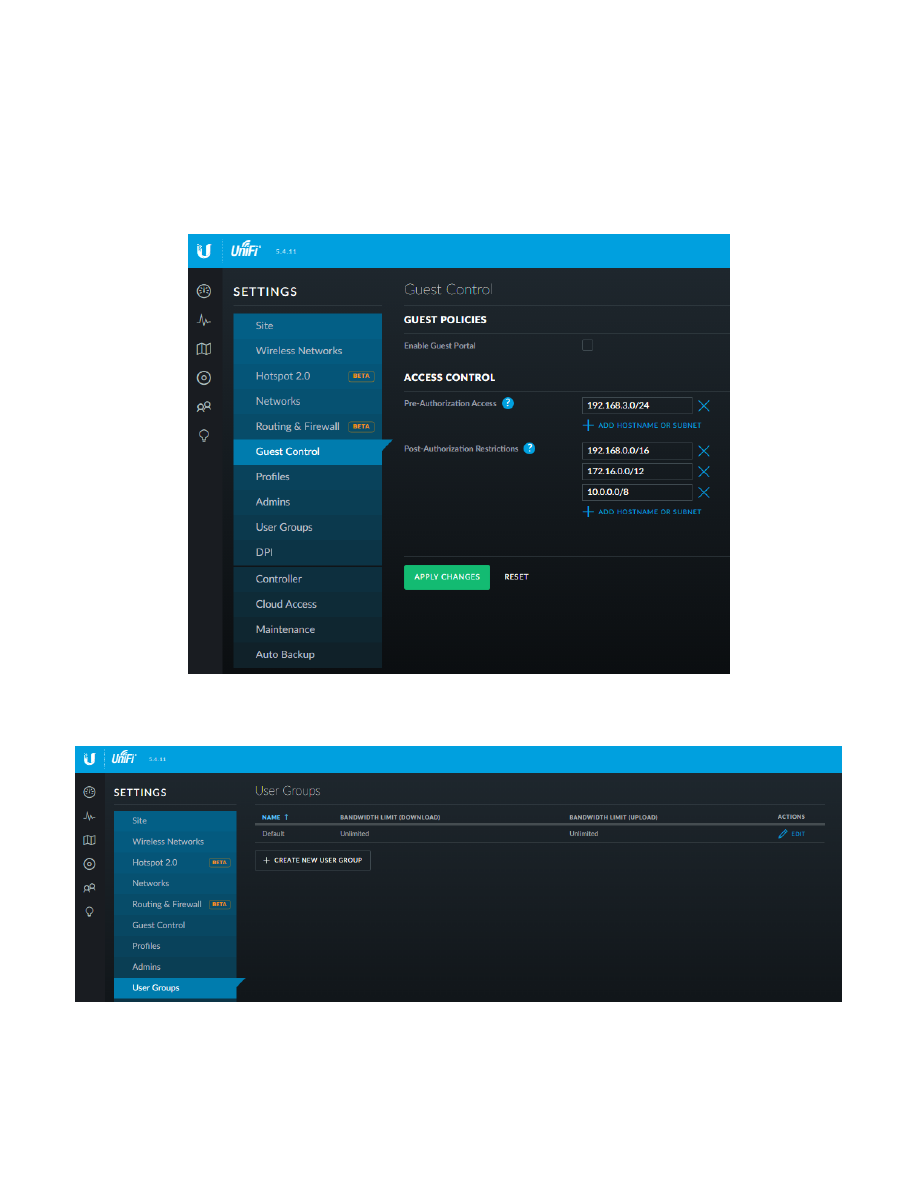
Page 89 of 96
10/7/2017
Click on the Guest Control tab. Under the Access Control section, add:
192.168.3.0/24
to Pre-Authorization Access, then press Apply Changes. See Figure 140 –Unifi Guest Control.
This will allow devices on the Wifi Guest Network to (respond to) communications from the Home Network.
Remember that the EdgeRouter has firewall rules prohibiting Guest network devices from initiating
communications with the Home Network. This allows Guest devices to RESPOND to Home Network initiated
conversations.
Figure 140 –Unifi Guest Control
Click on the User Groups tab, and then press Create New User Group. See Figure 141 – UniFi Initial User Groups.
Figure 141 – UniFi Initial User Groups
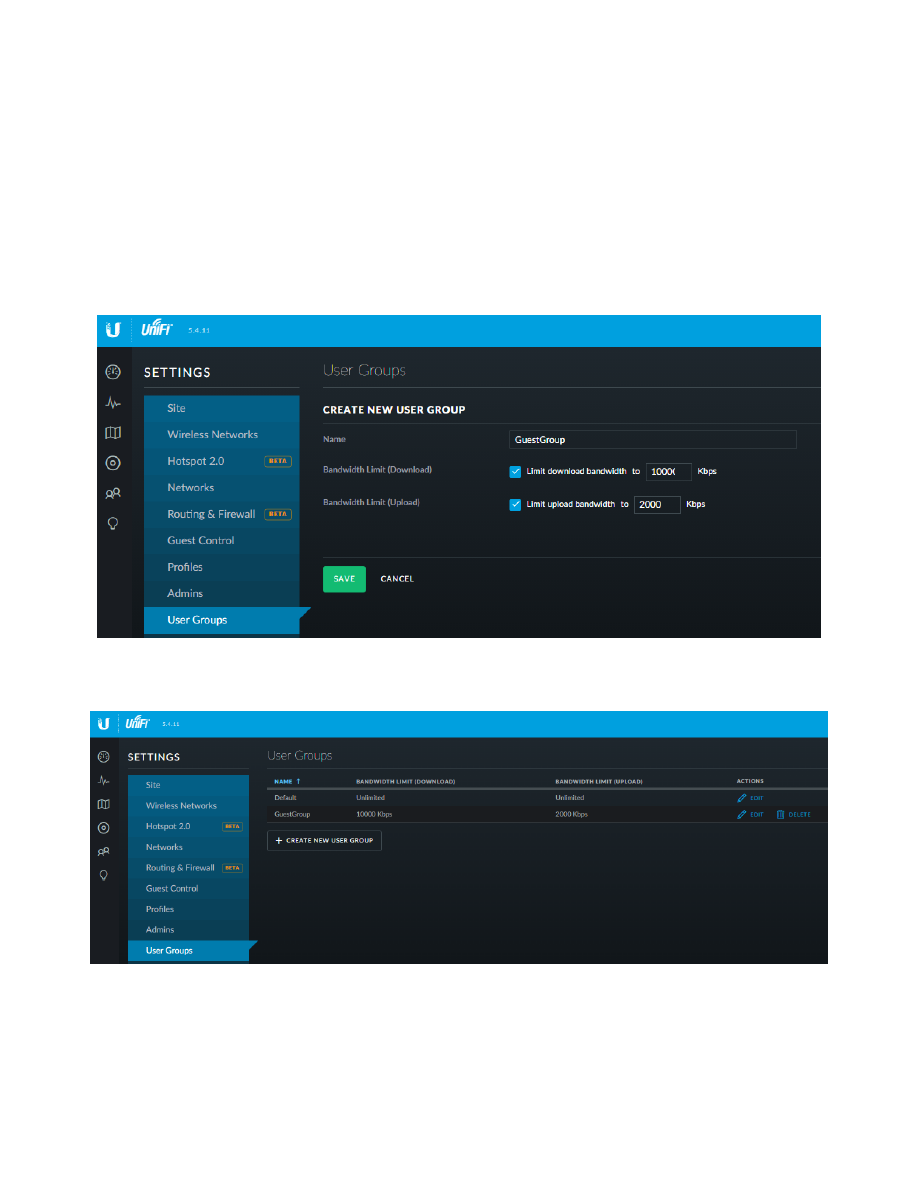
Page 90 of 96
10/7/2017
The following settings allow the Access Point to limit the bandwidth used by users within the guest networks. You
may choose to enter different limit values and/or leave either or both of the settings as unchecked. Unchecked is
unlimited. The values used here are:
download speed is limited to 10 Mbps
upload speed is limited to 2 Mbps.
I believe that the limits are per user, not per network.
To use the values that are in this guide, complete the form as follows:
Name
GuestGroup
Bandwidth Limit (Download)
Checked
10000
Bandwidth Limit (Upload)
Checked
2000
then press Save. See Figure 142 – UniFi Guest Group
Figure 142 – UniFi Guest Group
You should now see the newly created group. See Figure 143 – UniFi New User Groups.
Figure 143 – UniFi New User Groups
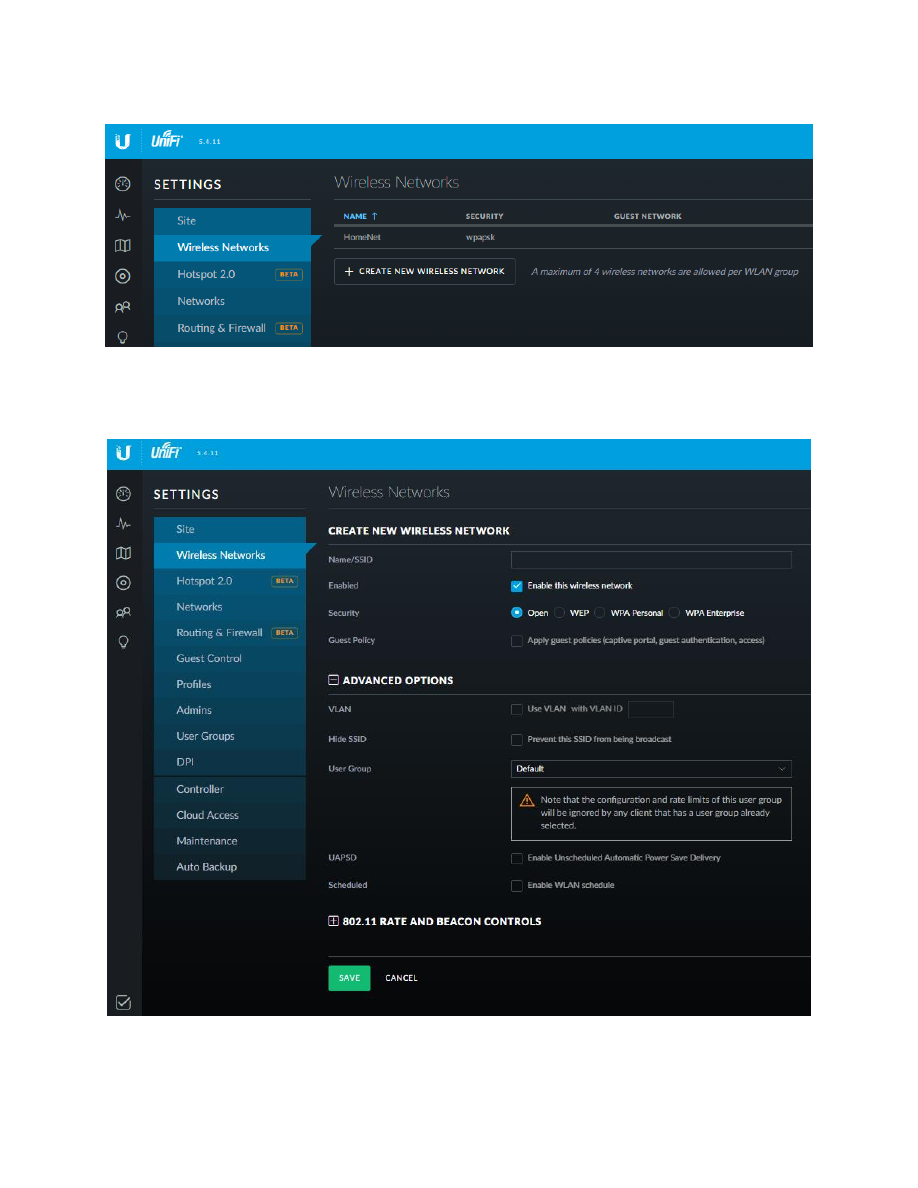
Page 91 of 96
10/7/2017
Click on the Wireless Networks tab, you should see the Home Network that was setup earlier. See Figure 144 –
UniFi Wireless Network Setup. Click on Create New Wireless Network button
Figure 144 – UniFi Wireless Network Setup
Click on Create New Wireless Network button. You will be presented with the Create New Wireless Network
dialog. See Figure 145 – UniFi Create New Wireless Network.
Figure 145 – UniFi Create New Wireless Network
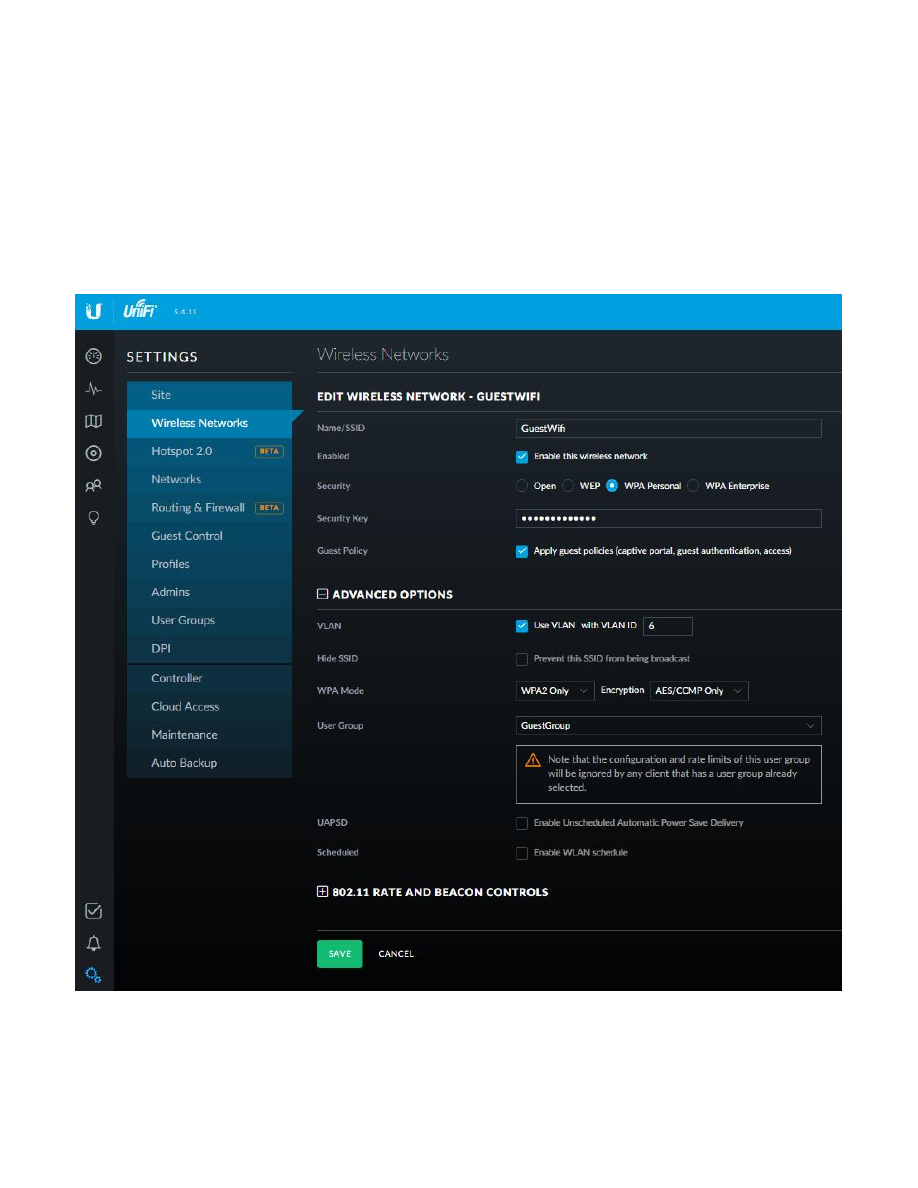
Page 92 of 96
10/7/2017
You can change the Name/SSID, Security Key (i.e. password) and WPA Modes as suites you.
Change / Enter the following information:
Name/SSID
GuestWifi
Security
WPA Personal
Security Key
<Enter your own password for the guest wifi network >
Guest Policy
CHECKED
Apply guest policies
VLAN
CHECKED
VlanId
6
WPA Mode
WPA2 Only
Encryption
AES/CCMP Only
User Group
GuestGroup
Press Save. See Figure 146 – UniFi Guest Wif.
Figure 146 – UniFi Guest Wif
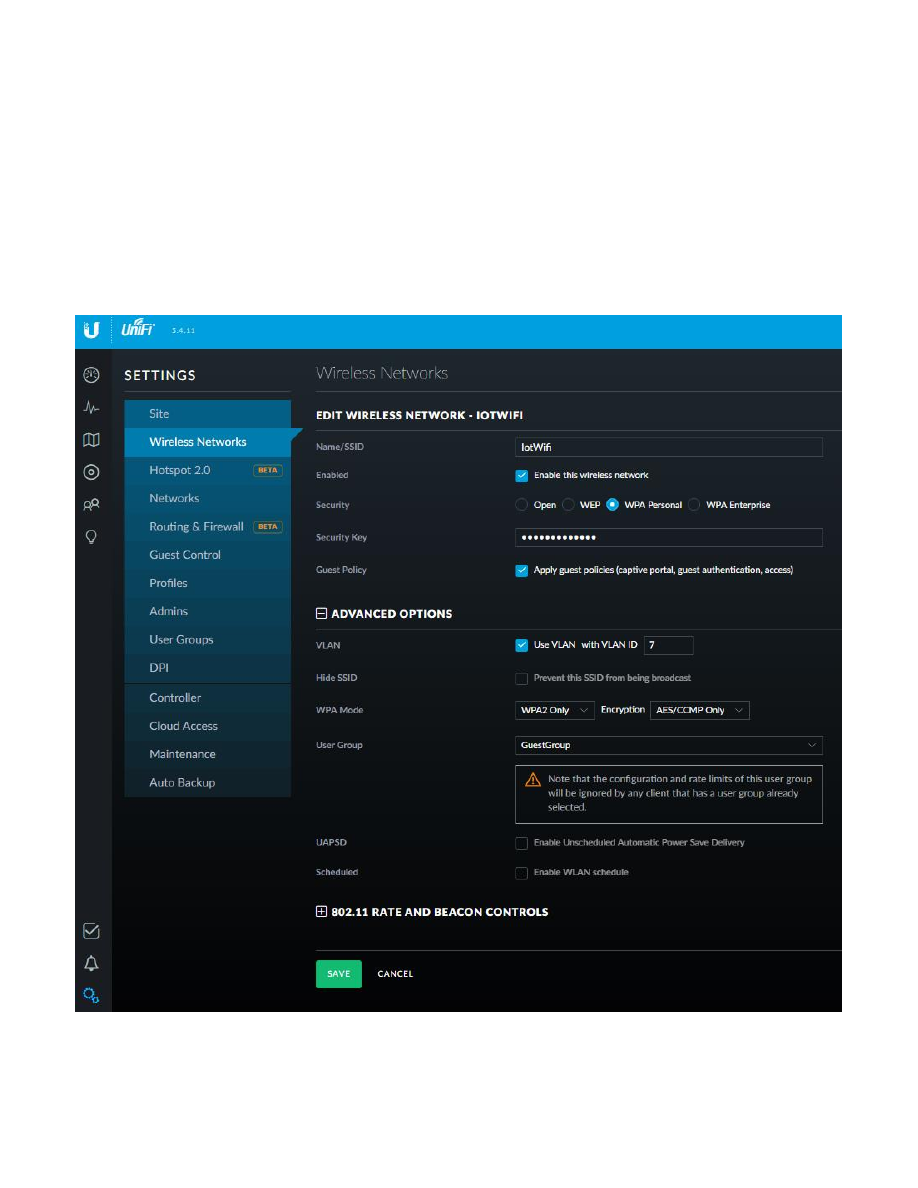
Page 93 of 96
10/7/2017
Click on Create New Wireless Network button. You can change the Name/SSID, Security Key (i.e. password) and
WPA Modes as suites you.
Change / Enter the following information:
Name/SSID
IotWifi
Security
WPA Personal
Security Key
<Enter your own password for the iot wifi network >
Guest Policy
CHECKED
Apply guest policies
VLAN
CHECKED
VlanId
7
WPA Mode
WPA2 Only
Encryption
AES/CCMP Only
User Group
GuestGroup
Press Save. SeeFigure 147 – UniFi Iot WiFi.
Figure 147 – UniFi Iot WiFi
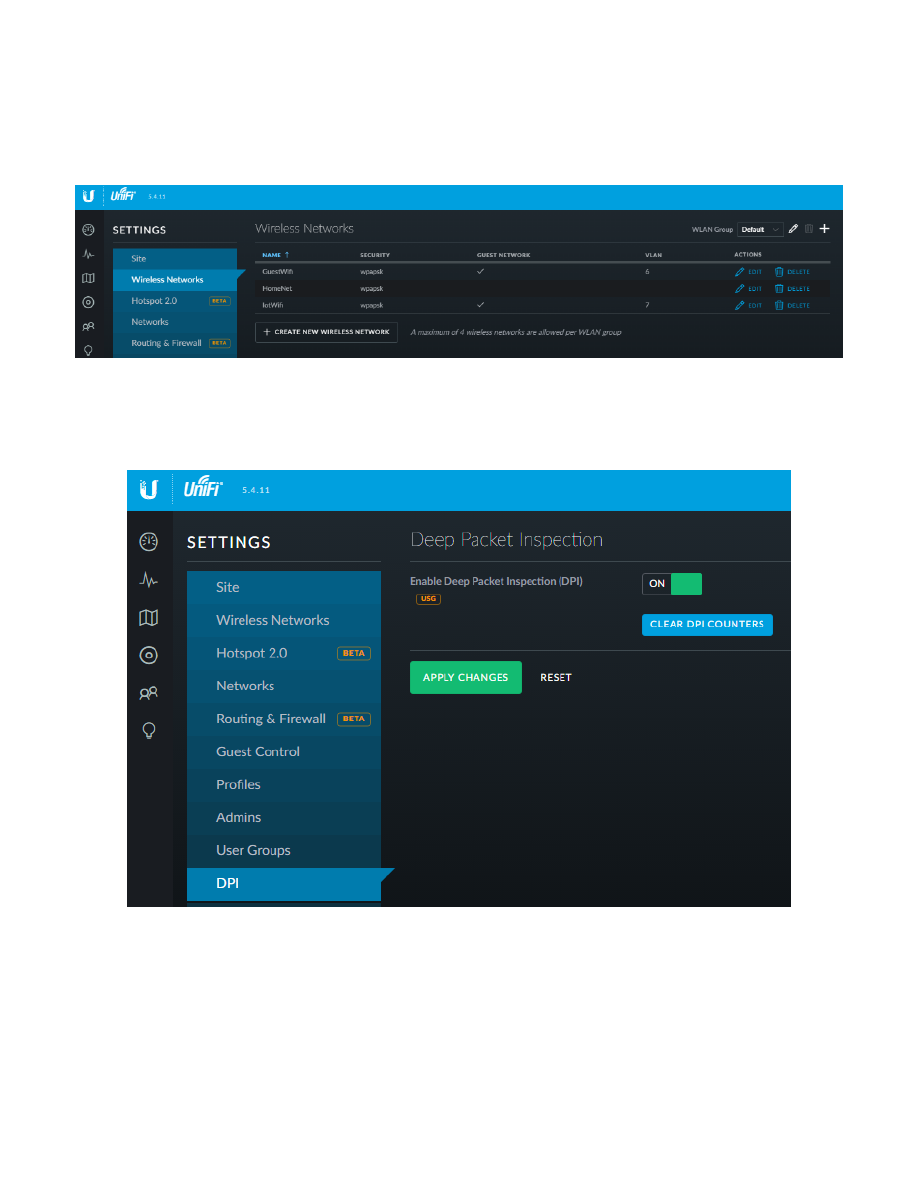
Page 94 of 96
10/7/2017
You should now have the following networks. Note that:
GuestWifi
Checked as Guest
Vlan 6
HomeNet
(Unchecked Guest)
(no Vlan)
IotWifi
Checked as Guest
Vlan 7
See Figure 148 – UniFi Three WiFi Networks.
Figure 148 – UniFi Three WiFi Networks
Click on the DPI tab, and set:
Enable Deep Packet Inspection (DPI)
On
Press Apply Changes. See Figure 149 – UniFi Deep Packet Inspection
Figure 149 – UniFi Deep Packet Inspection
Page 95 of 96
10/7/2017
Return to the Dashboard screen by pressing the Dashboard button. See Figure 150 – UniFi Dashboard Button.
Figure 150 – UniFi Dashboard Button
In the upper right part of the dashboard screen is the Open Properties button. Press the button. See Figure 151 –
Figure 151 – UniFi Open Properties Button
These are the Properties of the access point. There are some nice settings in here. See Figure 152 – UniFi Access
Figure 152 – UniFi Access Point Properties.
You can now exit the UniFi browser and close the UniFi Controller Software by pressing the X in the upper-right
corner, as shown in Figure 120 – UniFi Controller Software Running.

Page 96 of 96
10/7/2017
65. Timed Based Firewall Rules
Several people want to restrict their children’s Internet usage based upon time. Here are some sample llinks:
https://community.ubnt.com/t5/UniFi-Wireless/User-based-time-control-of-wifi-access/td-p/1490803
https://community.ubnt.com/t5/EdgeMAX/Time-control-parental-controll/td-p/1035259
https://community.ubnt.com/t5/EdgeMAX/Set-up-time-limits-for-kids-internet-access/td-p/1824135
66. One last link
This seems like a wealth of information:
http://wiki.indie-it.com/wiki/Ubiquiti
67. Conclusions
I hope that this guide helped you set up your Ubiquiti equipment, and that you have learned a lot.
Enjoy your new network.
-Mike