How to Reduce/Shrink LVM’s (Logical Volume Resize) in Linux
Reducing/Shrinking the logical volume is the highest risk of data corruption.
So try to avoid this kind of situation if possible, but go ahead if you have no other options.
It is always recommended to make a backup before shrinking an LVM.
When you are running out of disk space in LVM, you can make some free space on the volume group by reducing the exsisting LVM that no longer uses the full size, instead of adding a new physical disk.
Make a note: Shrinking is not supported on a GFS2 or XFS file system.
If you are new to Logical Volume Management (LVM), I suggest you start with our previous article.
- Part-1: How to Create/Configure LVM (Logical Volume Management) in Linux
- Part-2: How to Extend/Increase LVM’s (Logical Volume Resize) in Linux
Reducing the logical volume involves the below steps.
- Unmount the file system.
- Check the file system for any errors.
- Shrink the file system size.
- Reduce the logical volume size.
- Re-check the file system for errors (Optional).
- Mount the file system
- Check the reduced file system size
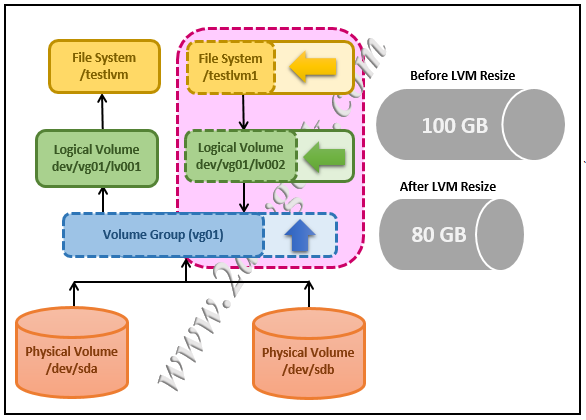
For instance; You have a 100GB LVM that no longer uses the full size, you want to reduce it to 80GB so 20GB can be used for other purposes.
# df -h /testlvm1

Filesystem              Size Used Avail Use% Mounted on
/dev/mapper/vg01-lv002  100G 15G  85G   12%  /testlvm1
1) Unmount the file system
Use the umount command to unmount the file system.
# umount /testlvm1
2) Check the file system for any Errors
Check the file system for any errors using the e2fsck command.
# e2fsck -f /dev/mapper/vg01-lv002

e2fsck 1.42.9 (28-Dec-2013)
Pass 1: Checking inodes, blocks, and sizes
Pass 2: Checking directory structure
Pass 3: Checking directory connectivity
Pass 4: Checking reference counts
Pass 5: Checking group summary information
/dev/mapper/vg01-lv002: 13/6553600 files (0.0% non-contiguous), 12231854/26212352 blocks
3) Shrink the file system.
The below command will reduce the “testlvm1” file system from 100GB to 80GB.
Common syntax for file system resize (resize2fs).
resize2fs [Existing Logical Volume Name] [New Size of File System]
The actual command is as follows.
# resize2fs /dev/mapper/vg01-lv002 80G

resize2fs 1.42.9 (28-Dec-2013)
Resizing the filesystem on /dev/mapper/vg01-lv002 to 28321400 (4k) blocks.
The filesystem on /dev/mapper/vg01-lv002 is now 28321400 blocks long.
4) Reduce the Logical Volume (LVM)
Now reduce the logical volume (LVM) size using the lvreduce command. The below command “/dev/mapper/vg01-lv002” will shrink the Logical volume (LVM) from 100GB to 80GB.
Common syntax for LVM Reduce (lvreduce)
lvreduce [New Size of LVM] [Existing Logical Volume Name]
The actual command is as follows.
# lvreduce -L 80G /dev/mapper/vg01-lv002

WARNING: Reducing active logical volume to 80.00 GiB
THIS MAY DESTROY YOUR DATA (filesystem etc.)
Do you really want to reduce lv002? [y/n]: y
Reducing logical volume lv002 to 80.00 GiB
Logical volume lv002 successfully resized
5) Optional: Check the file system for any Errors
Check the file system again if there are any errors after LVM has been reduced.
# e2fsck -f /dev/mapper/vg01-lv002

e2fsck 1.42.9 (28-Dec-2013)
Pass 1: Checking inodes, blocks, and sizes
Pass 2: Checking directory structure
Pass 3: Checking directory connectivity
Pass 4: Checking reference counts
Pass 5: Checking group summary information
/dev/mapper/vg01-lv002: 13/4853600 files (0.0% non-contiguous), 1023185/2021235 blocks
6) Mount the file system and check the reduced size
Finally mount the file system and check the reduced file system size.
Use the mount command to mount the logical volume.
# mount /testlvm1
Check the newly mounted volume using the df command.
# df -h /testlvm1

Filesystem              Size Used Avail Use% Mounted on
/dev/mapper/vg01-lv002  80G  15G  65G   18%  /testlvm1