
AV Linux 2020.5.10
AV Linux 2020.5.1
USER MANUAL
USER MAN
by Glen MacArthur
DISCLAIMER (PLEASE READ) :
Debian/GNU Linux comes with no guarantees so consequentially neither does AV Linux. I accept no responsibility for any hardware/
software malfunctions or data loss resulting from its use. It is important to note that the AV Linux ISO may contain software that is
non-free and may be distributed under special licensing arrangements with the original developers, re-distributing the AV Linux ISO
with the non-free content included is a violation of these licenses. AV Linux may potentially contain Multimedia Codecs that may be
under patent in certain countries, it is the Users responsibility to know the law as it applies to their own respective country before
downloading or installing AV Linux.
1

ABOUT AV LINUX :
What AV Linux 2020 is, and what it ain't…:
This '2020' version of AV Linux represents numerous significant changes and differences from
previous versions briefly detailed in these notes. Essentially AV Linux is a downloadable and installable
shared snapshot ISO image of my own personal Operating System based on Debian/GNU Linux with
many customizations and tweaks. This a project I have been working on and refining since about 2007
and it is prepared and pre-configured to be used as an Audio and Video production Workstation OS. It
is really intended to just be that simple, an AV production system prepared and shared by a single User
with some practical experience in setting such things up. It is NOT intended to be a bona-fide full and
proper “Linux Distribution”, as its sole maintainer I don’t claim to have any unique credentials as a
Linux System Administrator and am merely doing this in my spare time as a hobby. The implications of
this are that AV Linux is provided 'as-is' with absolutely NO guarantee of any kind to function on any
given computer, or any guarantee of regular, sustained or future development .
Now hold on a second, that sounds pretty bleak doesn't it…? Bear in mind that you are reading this
statement in a complete User Manual so please let's just mutually understand that I like doing this, I
want to do this, but 'real life' may intervene and I may occasionally need to divert my focus elsewhere
and therefore I can't in good conscience make any promises about the permanence of AV Linux. OK,
phew…I feel better now... are we good?
Components of AV Linux and differences from stock Debian/GNU Linux :
➢
Originates from 64bit snapshots of Debian’s Stable Distribution… PLUS
➢
Trulan Martin's Custom Realtime Preempt Kernel.
➢
Extensive tuning for best RT Kernel Performance
➢
CPU governed for performance by default.
➢
Optional choices of Liquorix or Debian Kernels.
➢
Sspecial custom packaging not found in default Repositories.
➢
Full XFCE4 Desktop Environment with attractive customizations.
➢
falkTX's KXStudio Repositories for up to date Audio Applications.
➢
Extensive Audio/Video and Administrator-friendly Thunar Custom Actions.
➢
Complete JACK Audio/MIDI environment with PulseAudio Integration.
➢
Robust Environment for developers: Compilers, Package scripts, GIT, SVN, BZR, + dev libs.
➢
Choices of GCC Compilers.
➢
Mozilla builds of Firefox and Thunderbird.
➢
Extended Platforms ‘Flatpak ‘ and ‘Docker’ included.
➢
Demo versions of Commercial Software.
➢
‘su’ set up to work as it did in pre-’Buster’ Debian versions.
➢
Many customized scripts for convenience..
3

ISO
INFO
:
ISO Size Info :
Why is it so big!? <insert obligatory joke here>. I often get asked why AV Linux ISO's are significantly
larger than <insert obligatory Distro name here>. Here are a few reasons:
➢
My priority is functionality and attention to detail over size for its own sake.
➢
AV Linux uses a more relaxed ratio for its compressed Live filesystem than mainline Distros.
➢
'Bundled' apps that are self-contained are much larger than apps that use the system libraries.
➢
AV Linux ships with a full development environment for developers and experienced Users.
➢
Hundreds of hidden Audio Plugins are included, many are fairly large in size.
➢
None of the extra 'bulk' in AV Linux affects performance, it is still light and efficient to use.
Verifying the ISO Download with MD5sums :
When you download the AV Linux ISO you will see that in the server download folder is the actual
'isotester-avl64-202X.X.X.iso' file containing the operating system and two accompanying '.md5' and
‘sha256’ text files. You should download the both the 'iso' and both text files, you should be able to
right-click and use 'Save target as' for the md5 file. Before running AV Linux Live or installing it on
your computer you should verify that the 'md5sum' of your ISO download matches the md5sum
on the download server. This will ensure that you have a complete and proper download of the ISO as
well as confirming that you haven't downloaded a compromised ISO that has been maliciously
tampered with.
For verification we use the 'md5sum' Terminal command. As an example let's say you downloaded the
64bit ISO to the 'Downloads' folder in your User's home folder. Open a Terminal and 'change
directory' to the 'Downloads' folder like this:
cd Downloads
Now run the md5sum command on the downloaded 64bit ISO file :
md5sum isotester-avl64-2020.5.10.iso
The terminal will calculate the md5 'hash' and then print it in the terminal. It will be a long string of
numbers and letters and show the ISO filename at the end. If the hash generated by the terminal
matches the hash in the md5 text file you downloaded you are good to go.
4

Verifying With SHA256sum :
A last minute addition to AV Linux 2020 is the inclusion of even more secure ‘SHA256’ checksum files
with the ISO files. These will be in the download folder along with the MD5 files and for an extra
measure of safety you can also run ‘sha256sum’ on the downloaded ISO file in the same way as what
was just described in the previous section on Md5 files. The main difference is the command changes
from ‘md5sum’ to ‘sha256sum’.
Again using the example of the downloaded 64bit ISO to your 'Downloads' folder in your User's home
folder. Open a Terminal and 'change directory' to the 'Downloads' folder like this:
cd Downloads
Now run the sha256sum command on the downloaded 64bit ISO file :
sha256sum isotester-avl64-2020.5.10.iso
The terminal will calculate the sha256 'hash' and then print it in the terminal. It will be an even longer
string of numbers and letters and show the ISO filename at the end. If the hash generated by the
terminal matches the hash in the sha256 text file you downloaded you can be confident you are
getting the authentic ISO file.
5

RUNNING AV LINUX “LIVE”
AV Linux can be used “Live” in 2 different ways with no changes to the host machine operating it, by
running it from a LiveDVD or using a Bootable USB Key.
LiveDVD:
➢
Download the AV Linux ISO file from http://www.bandshed.net/avlinux
➢
Burn the ISO file to a DVD-R or RW using your existing Burning Software.
➢
Set your Computer BIOS to Boot from your DVD Drive if it doesn't by default.
➢
Reboot into the AV Linux LiveDVD.
METHOD 1 - Bootable USB Key with ‘DD’ (Suggested Method for older non-UEFI Computers):
Requirements:
An existing AV Linux install OR a running AV Linux LiveISO session
PC Capable of booting from USB Key with block sizes greater than 1024mb
At least 4GB USB Key
AV Linux ISO image from here: http://www.bandshed.net/avlinux
Bootable USB Keys can be created with the AV Linux DD LiveUSB Writer in the ‘Accessories’ Menu.
This unique tool uses ‘DD’ to create an 'ISOhybrid' USB Key. Please note that this tool overwrites any
existing USB FAT32 or other filesystem and writes the actual ISOhybrid image itself to the key. This
means the Key will no longer be usable for Data storage, however you can use the USB Key Tool to
overwrite the ISOhybrid image as many times as you want. This USB Key Tool will only work with
ISOhybrid images. The AV Linux ISO comes ready to use as a formatted ISOhybrid image. USB Keys can
be returned to normal storage use with ‘Gparted’. Rewriting an MSDOS partition table and then
formatting the Key to a FAT32 filesystem will allow it to be used for data storage again.
6

METHOD 2 - Unetbootin Method (STRONGLY Suggested for newer UEFI Computers)
Requirements:
PC Capable of booting from USB Key
At least 4GB USB Key
Latest AV Linux ISO image from here: http://www.bandshed.net/avlinux
This guide is written assuming you are using an existing AV Linux install, however any current distro
with GParted and Unetbootin will work. This operation will utilize the entire USB Key so use a key you
don't want to share data on other computers with and remove any important data from the key. I
would also suggest you use a clean key without any U3 or other proprietary launching software on it,
most manufacturers provide utilities to remove this.
STEP 1.
Insert your USB Key into the USB Port but don't mount it (or unmount it) in the File Manager. From the
menu go to 'Preferences'-->GParted and launch GParted.
STEP 2.
Using the drop down dialog in the upper right corner of GParted select your USB Key. MAKE SURE YOU
KNOW WHICH DRIVE YOUR USB KEY IS!!
STEP 3. (DO WITH CAUTION)
Select any existing Partitions on the Key, Right Click on them and delete them until the Key is
completely unallocated space.
STEP 4.
Create a new FAT32 partition on the USB Key equal to or slightly larger than the size of the AV Linux
ISO. In the remaining unpartitioned space create an ext2 or ext3 partition and in the 'label' field enter
'live-rw'.
STEP 5.
Click on the checkmark icon at the top of GParted and apply the partitions you have created to the key.
STEP 6.
Once GParted has finished creating your new partitions right click on the FAT32 Partition and select
'Manage Flags' and from the list select 'boot'. When you close the Flags dialog Gparted should quickly
rescan and display the boot flag on your FAT32 Partition. Close Gparted.
STEP 7.
Remove your USB Key and then plug it back in. Then open the File Manager, you should see 2
partitions available to mount relating to your USB Key you can mount them both but you only need to
mount the FAT32 one. Hint... it is the one not called 'live-rw'.
STEP 8.
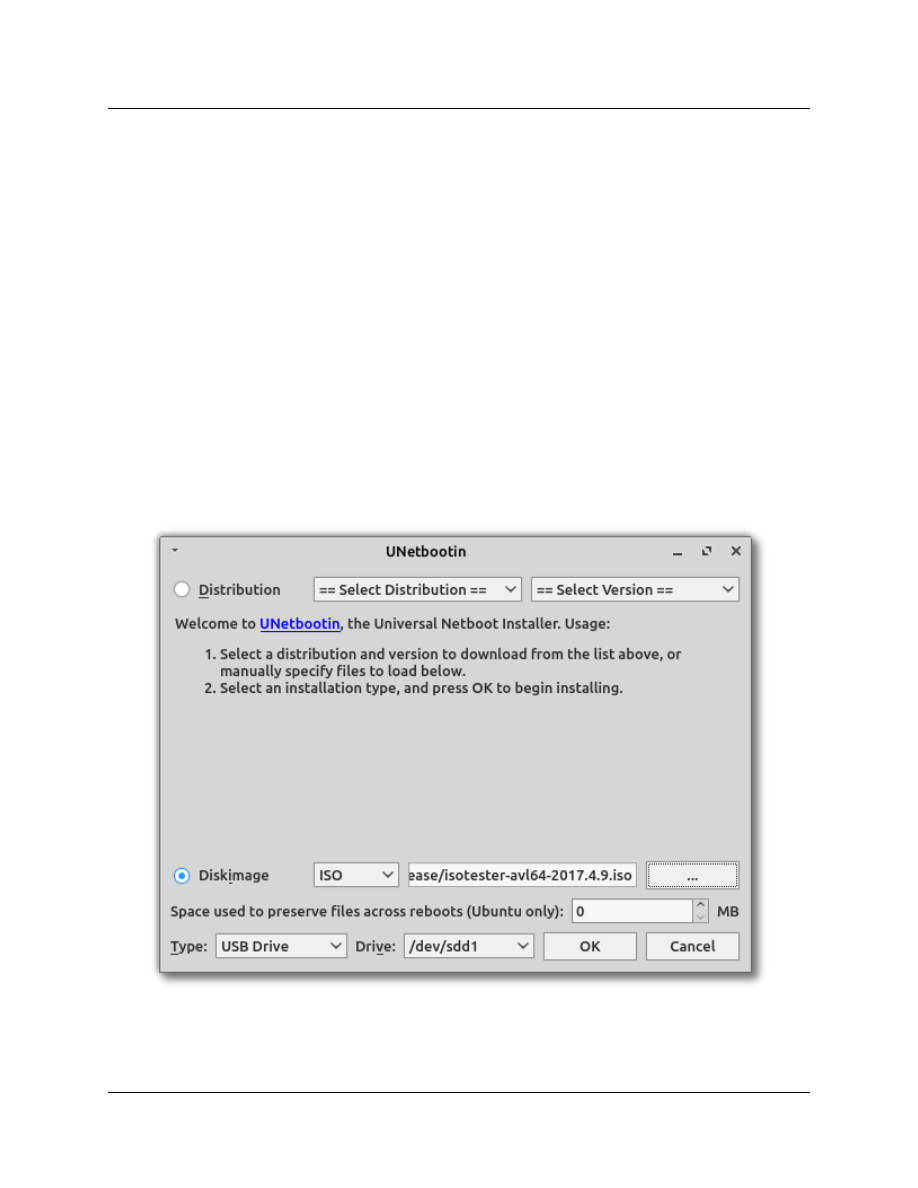
From the menu open 'System'--->Unetbootin. Select the Diskimage option and navigate to where you
have downloaded or placed the ISO Image file and Click OK. Unetbootin will take several minutes to
copy the image and bootloader to your Key.
7
Adding Persistence to the Key (May not work on newer UEFI Computers):
If you simply want AV Linux on a USB Key without persistent storage you can stop here. This will give
you the partition AV Linux runs from and a small additional partition to store files on while you are
running it. For persistence there are a few more steps and a few things to consider:
- Persistence will dramatically slow bootup time the first boot after enabling it.
- Persistence may cause the system response to be a little slower than a non-persistent Key.
- Installing AV Linux from a persistent Key has NOT been tested and may not work.
- Do not remove your persistent key when prompted until it stops flashing.
STEP 9.
Mount the FAT 32 Partition of your Key (if it isn't already) in the File Manager and navigate to the
'syslinux.cfg' file. Right click on it and open it in Mousepad and modify its text in line 9 like the example
below, once done save the edited syslinux.cfg file and you are ready to boot into your new Key. Enjoy!
append initrd=/ubninit boot=live config threadirqs quiet splash persistent --
8

AV LINUX BASIC BOOTING BIBLE
When Booting an AV Linux ISO :
1. Be patient...This is a large ISO it can take several seconds to start the boot especially on LiveDVD
media.
2. Watch for disk activity, if you see nothing immediately on the monitor but there is disk activity it is
still working on the boot.
3. Closely observe the Kernel console text output for red text errors, warnings and even many regular
console colored errors are normally harmless. AV Linux doesn't use a bootsplash is so the User can
monitor what the Kernel is doing at boot.
4. The SliM Login window may take a few seconds to show up, possibly even longer when using a
LiveDVD vs a Bootable USB Drive.
5. If the desktop partially loads OR the display resolution is wrong or corrupted it is most likely a
Kernel Modesetting/Video Driver issue which is covered in more detail below.
Possible Causes of Boot Failures :
1. A corrupted or broken ISO image on the Project ftp server.
This is extremely unlikely and rare and is easily ruled out by a single successful install by an end-user,
AV Linux is pre-tested by a third party before any release is made public to make sure the ftp ISO
images are intact and functional.
2. A bad download of the ISO image.
This is not common, but quite possible and can be verified by using the accompanying ISO.md5 or
sha256 file from the ftp download folder. Another simple indication is if the file sizes on both the ftp
and the downloaded file match perfectly.
3. A bad burn of the ISO to disk media.
This is usually the most likely cause of boot failure and is generally evident when the disk does
nothing at all or freezes after displaying a few lines of console text which may be accompanied by
numerous console red error messages. Always burn any compressed filesystem media like ISO images
at low burn speeds (i.e. 4X or less) and make sure to use good disk media. If a LiveDVD fails try it on a
different computer, this is the number one way to discern if your media is bad or not or whether your
computer has a specific hardware issue with the LiveDVD.
4. Incompatible Video Hardware and Kernel Mode Setting (KMS).
This issue is generally evidenced by the Kernel completing its console output and dying at the login or
unsuccessfully trying to load the Desktop and/or displaying the Desktop at a very low or garbled
resolution.
9

AV LINUX
LiveISO
LOGIN :
Login Username and Password Required:
AV Linux 2020 requires a login to the LiveISO, when the LiveISO finishes booting and proceeds into
the SliM login screen you will need to enter the following Username and Password:
AV Linux 32bit (No longer developed as of 2020!) :
Username: isotester
Password: avl32
Root Password: avl32admin
AV Linux 64bit :
Username: isotester
Password: avl64
Root Password: avl64admin
10

LIMITATIONS OF LIVE SESSIONS :
Due to some changes in how AV Linux LiveISO's are built there are now some limitations when
running AV Linux live from both DVDs and USB keys. The live session should be looked at as an
opportunity to kick the tires of AV Linux, to see how it works, if it supports your PC hardware and to
demo some of the great included applications. It is not really recommended to use AV Linux live for
actual production for the following reasons:
➢
The audio latency performance of Live sessions is noticeably higher than that of installs to
HDD. The cause for this is unknown but it seems to relate to how the Bootable ISOs are
created by Systemback. By default Qjackctl on the Live ISO is set for a conservative latency of
1024fpp, depending on your hardware AV Linux once installed to hard disk should easily run at
significantly lower latencies. Performance may potentially be further impeded by the
necessary ‘KPTI Meltdown’ kernel security patch.
➢
The LiveISO contains a well-rounded collection of applications but there are literally thousands
more in the included Debian and external repositories that are available after installing AV
Linux, if you require applications that are not included on the ISO as provided then you will
need an internet connection to enable installing and updating applications.
➢
By default the AV Linux LiveISO runs in English with the English keyboard map, if you need a
different keyboard map during a Live session please see the 'Changing the Keyboard Settings'
section of the Manual.
➢
By default the 'Performance' CPU Governor is enabled, this is an absolute must have' setting
for working with Audio and may negatively impact battery life to a small degree on laptops.
11

IMPORTANT PRE-INSTALLATION IN
FO! :
Systemback and GPT Partition Table Support:
AV Linux 2020 utilizes the Systemback Installer which at the time of this writing does not support
formatting of and installation to Hard Drives with ‘GPT’ partition tables when using BIOS or legacy-
boot mode computers. GPT can however be used in many newer computers in UEFI mode but it has
not been tested as widely.
Installation on UEFI Secure Boot Computers:
In the past computer boot management and system hardware configuration outside of the installed
Operating System was handled by the ‘BIOS’ (Basic Input Output System) but in recent years as a
security feature the ‘UEFI’ (Unified Extensible Firmware Interface) has come to be the new standard.
UEFI manages booting with ‘Secure Boot’ software and requires any new Operating Systems to be
installed on the computer to have a digitally signed ‘.efi’ file that can be verified by the Secure Boot
software. AV Linux has been successfully installed on many UEFI systems but there are reports that
some systems do not boot AV Linux with the default UEFI system utility defaults. If you are unable to
boot the AV Linux ISO you may need to change the settings in your system BIOS setup utilities,
disabling “Secure Boot” or enabling “Legacy Boot” options may solve this issue on some systems.
Make sure to choose “Boot Live System” from the Boot Options!
When You Boot the AV Linux ISO at the beginning of the boot you will see the Systemback ‘splash
screen’ which will have four options listed, the top two options are “Boot Live System” and “Boot
System Installer”. It is strongly suggested to NOT install AV Linux using the “Boot System Installer”
menu option and to instead choose the top “Boot Live System” option and follow the instructions in
the next section closely.
12
INSTALLING AV LINUX :
*WARNING!! - The following section involves major system changes like hard drive partitioning etc.
There is always a risk of Data loss or corruption when installing a new or different Operating System.
ALWAYS back up any important Data before making changes to your existing Hard Drive!
Systemback Installation Info:
Installation of AV Linux is now handled by 'Systemback' which is an excellent Linux Backup utility
which contains an Installer as well. While it is not really intended to be an ISO tool for Distribution
creation it does the job required to get AV Linux from ISO to the target system. Systemback's installer
is not like a complete Distribution installer and does not provide setting up of locales etc. during the
install process, it merely provides some basic disk formatting tools, copies the Live ISO Image as-is to
the target machine and then installs the GRUB Bootloader. Users who require a locale and language
support other than the default English will now find that installing AV Linux and setting it up for non-
English locales is a 2-step process: Step 1 is to install the Live ISO. Step 2 is to use the ' AV Linux
Assistant' to set up language, keyboard and locales after installing.
13
Su not sudo :
*PLEASE NOTE! AV Linux does not use 'sudo' it uses the pure Debian Root Superuser and User
method. When installing and setting up AV Linux you will need to have a separate and unique password
for your Root Superuser to administrate the system and a regular User password for normal system use.
Further to this AV Linux is set up to behave as Debian versions before Debian 10 “Buster’ did and has an
added entry in /etc/login.defs on line 104: ‘ALWAYS_SET_PATH yes’. If the User wishes to disable this then
a comment hash ‘#’ needs to be placed at the beginning of line 104. Be forewarned that many Root apps
like Gdebi Package Installer and Synaptic Package Manager will then cease to function as expected!!
14

Installation on older BIOS-based Systems or with ‘legacy-boot’ enabled :
This is an example of installing AV Linux running in a Live session preferably running from a USB Key,
this example will go from formatting and partitioning the hard disk all the way through to rebooting
into the new system. This is how you would install AV Linux on an older computer with a BIOS that
predates UEFI or a computer with a ‘legacy-boot’ that allows booting without UEFI. Installing on a
UEFI boot computer is covered here.
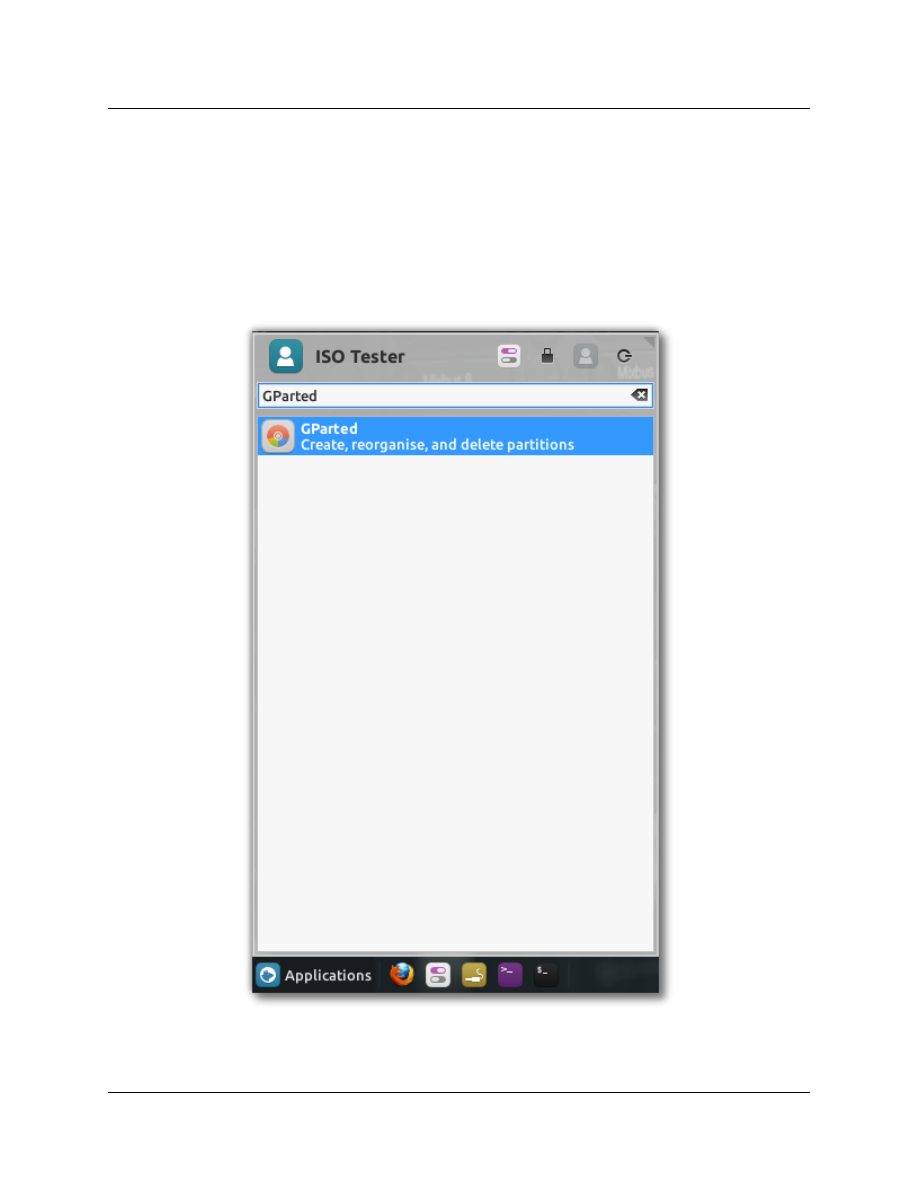
Once logged into to a Live session launch Gparted to set up a partition table and create disk
partitions to install to. For simplicity and clarity we are assuming AV Linux is the only OS to be installed
on the computer and we are using two primary partitions with AV Linux being installed on a single root
‘/’ partition with an additional swap partition.
15
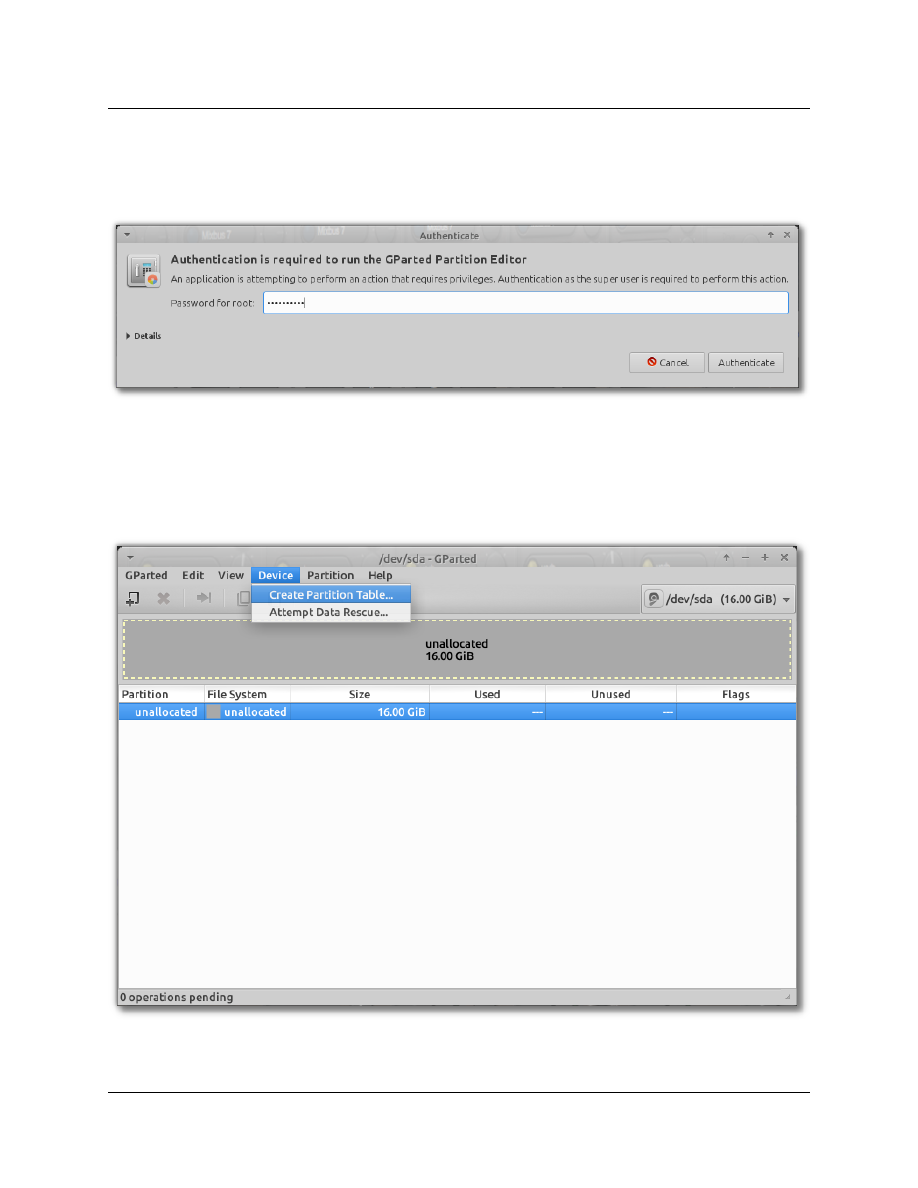
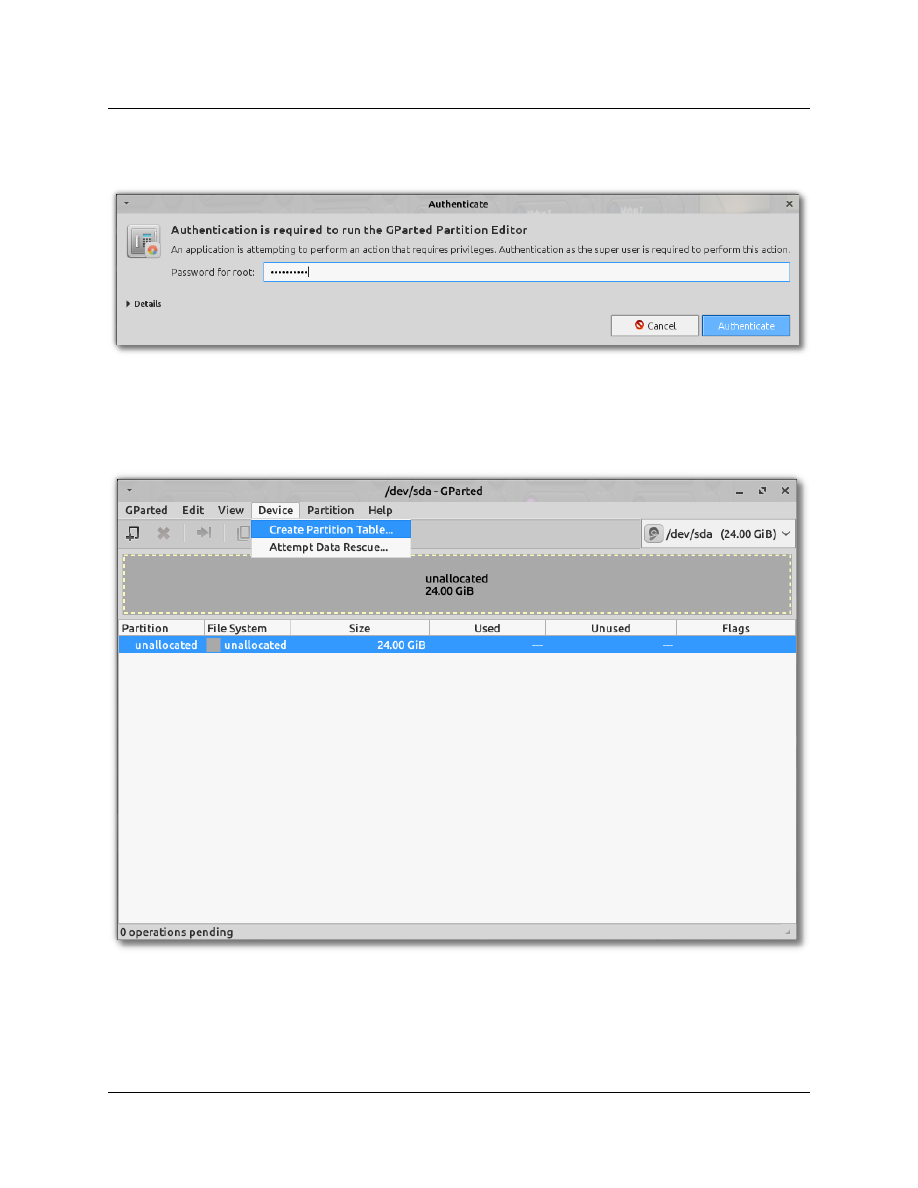
Gparted will need to run with Root privileges so you need to enter the AV Linux ISO Root password,
‘avl64admin’.
The hard drive in this example case has no partition table or partitions so we are starting from
scratch, for this mode of install we want to create an ‘msdos’ partition table from the Gparted ‘Device’
menu. If you are installing to an existing hard disk with data already on it this step will erase all data.
16

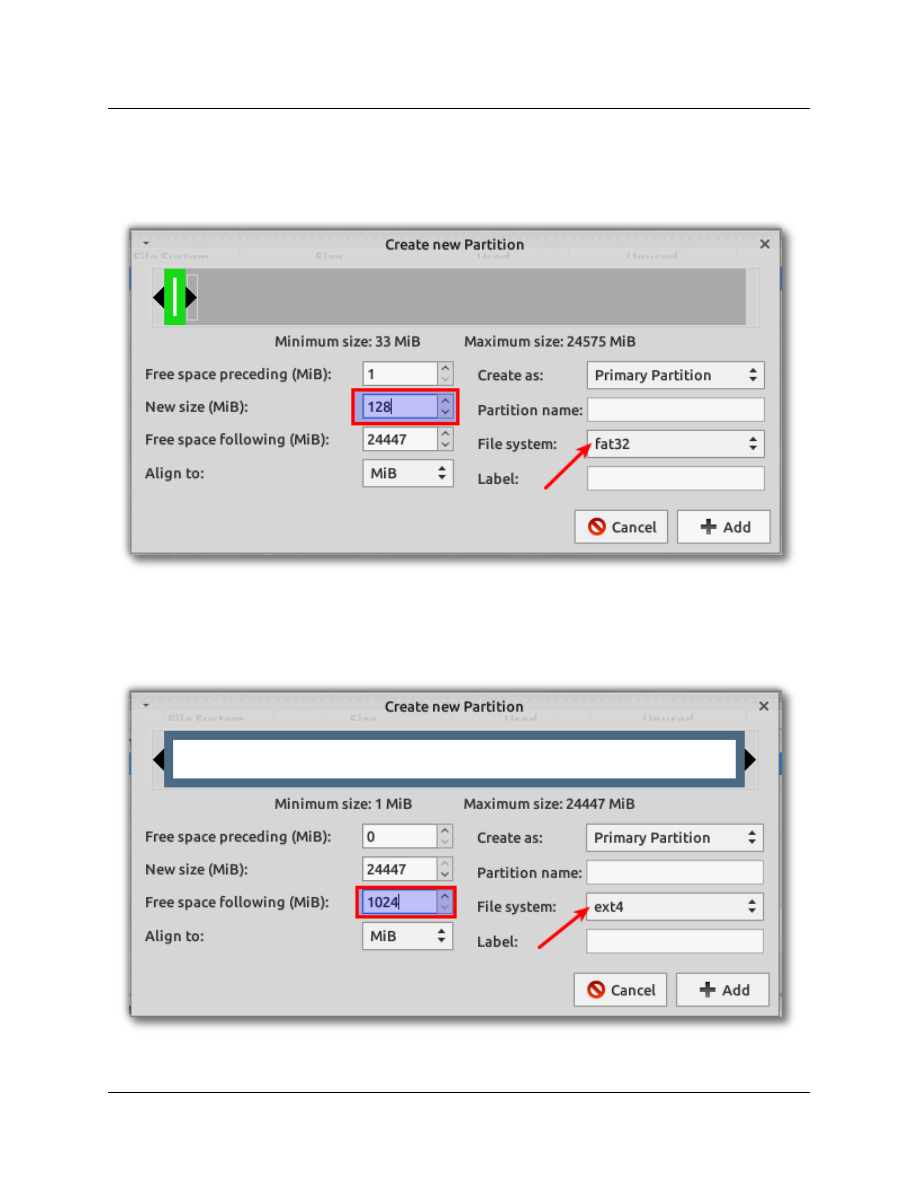
Once the partition table has been written we can right-click on the unallocated space to create our
new partitions, we want one ext4 (sda1) partition for the operating system and one linux-swap (sda2)
partition.
17
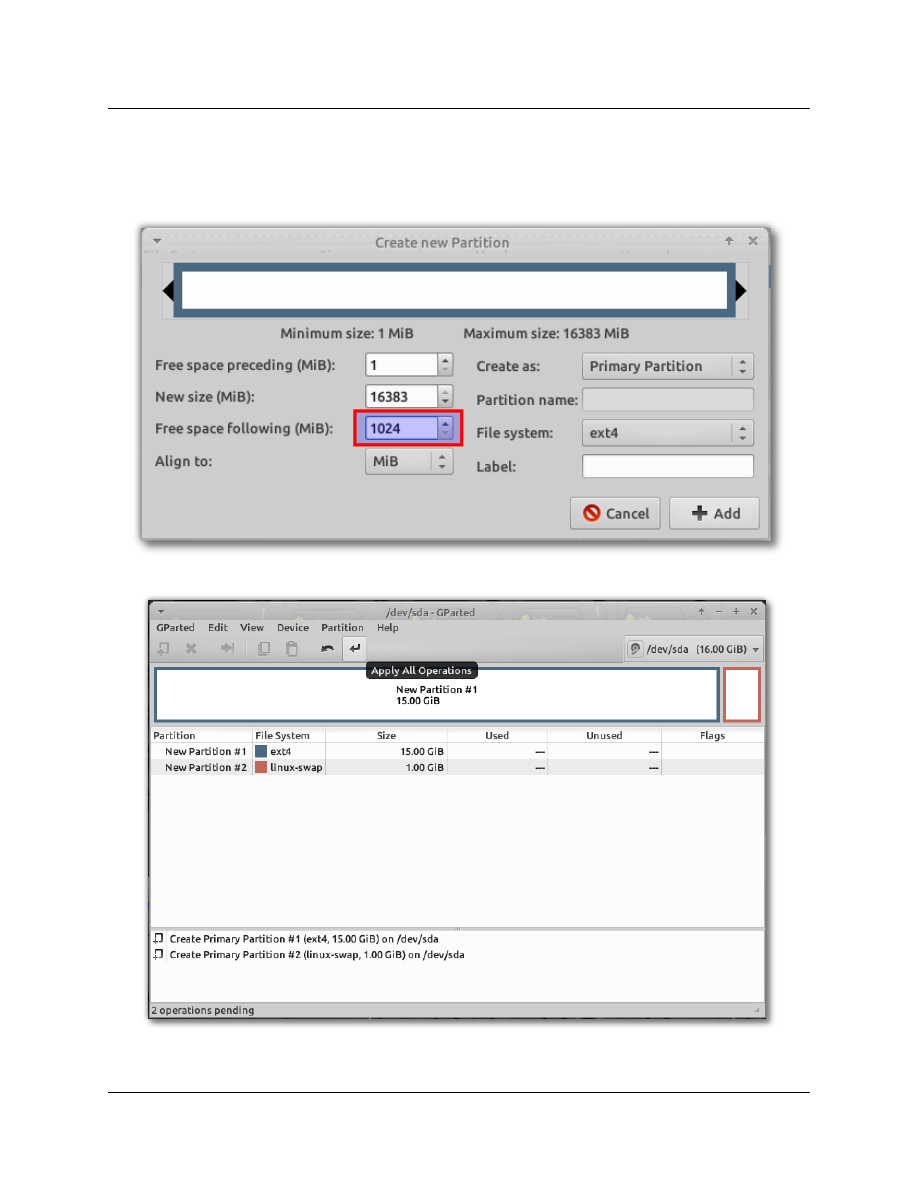
Create an ext4 partition with 1024mb free space following to prepare room to create the linux-swap
partition. Once you have created the 1024mb linux-swap partition in the remaining unallocated space
click the ‘Apply’ button to write the partitions to the disk.
18
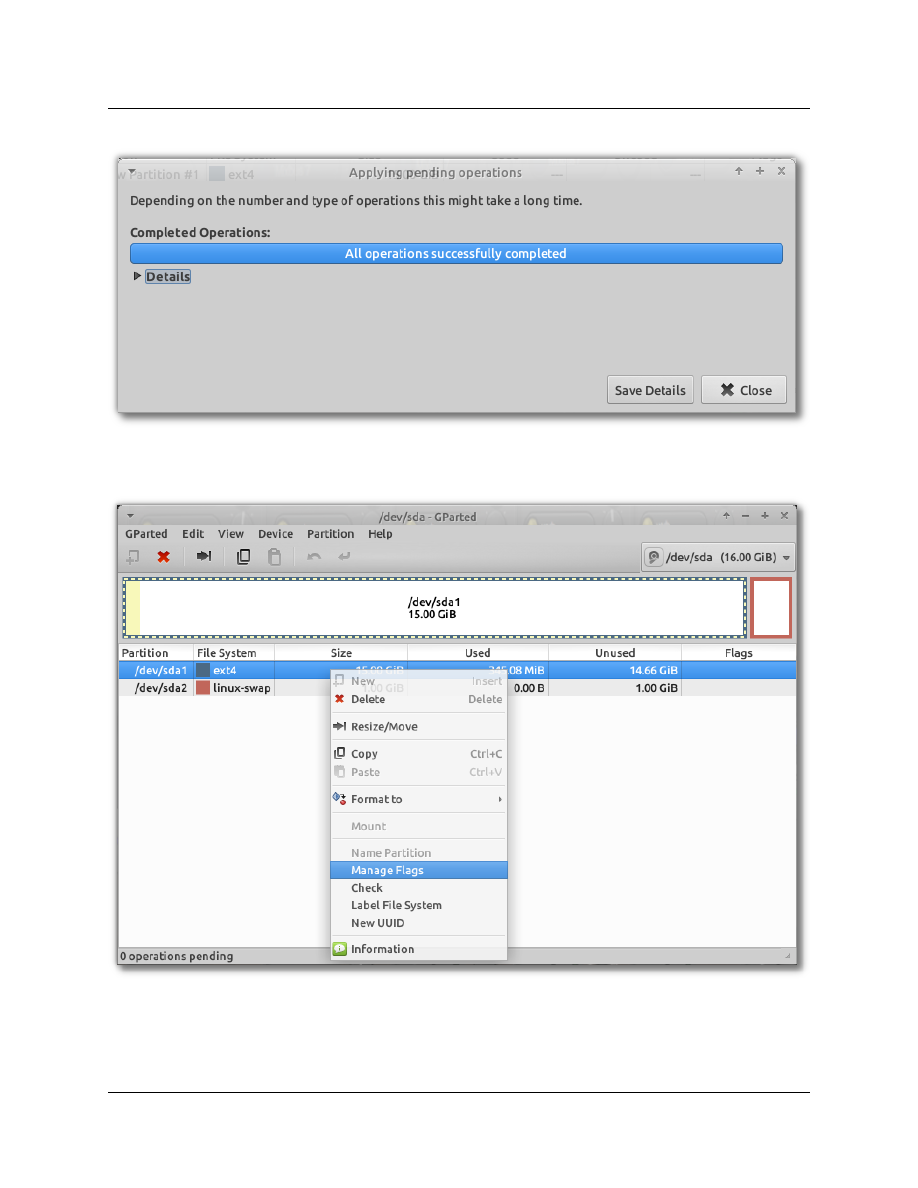
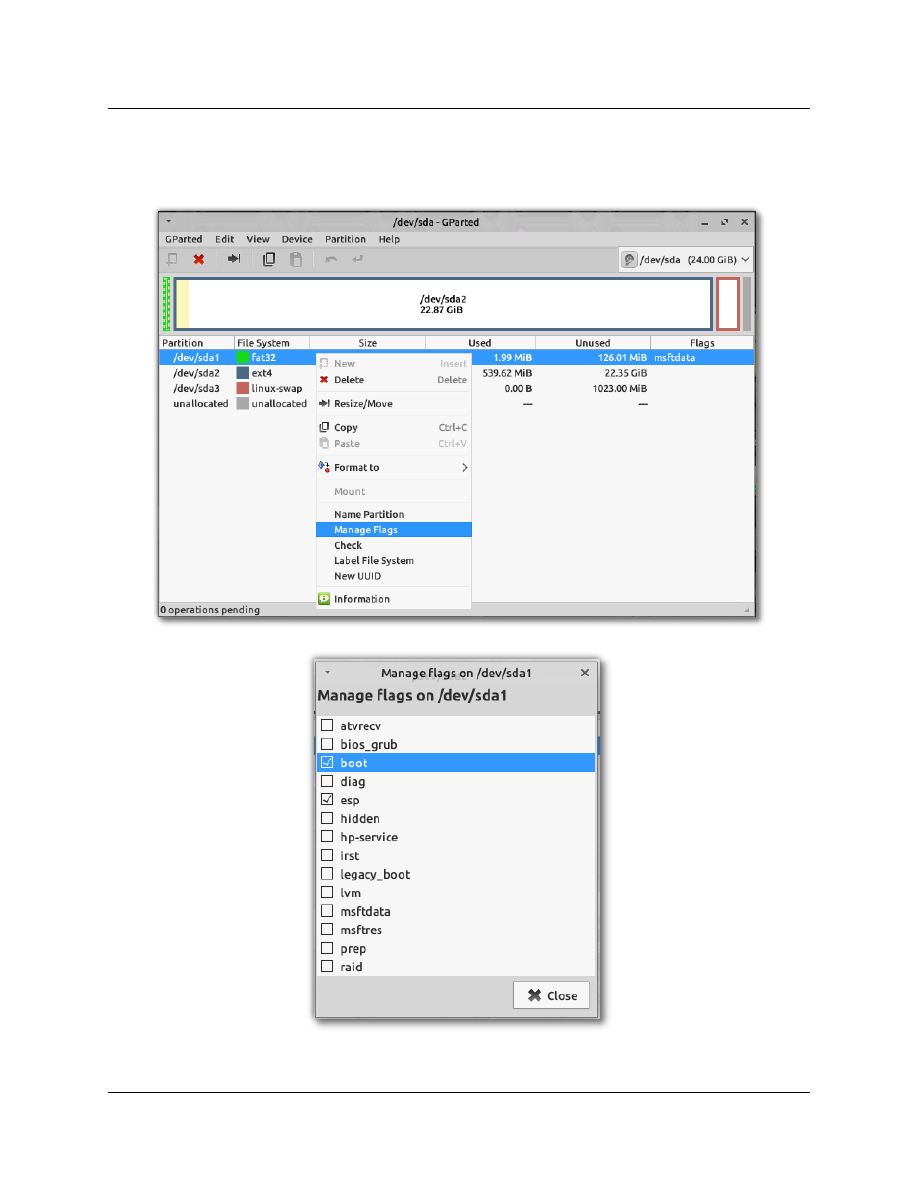
Before closing Gparted we want to right-click on the (sda1) ext4 partition and add a ‘boot’ flag.
19
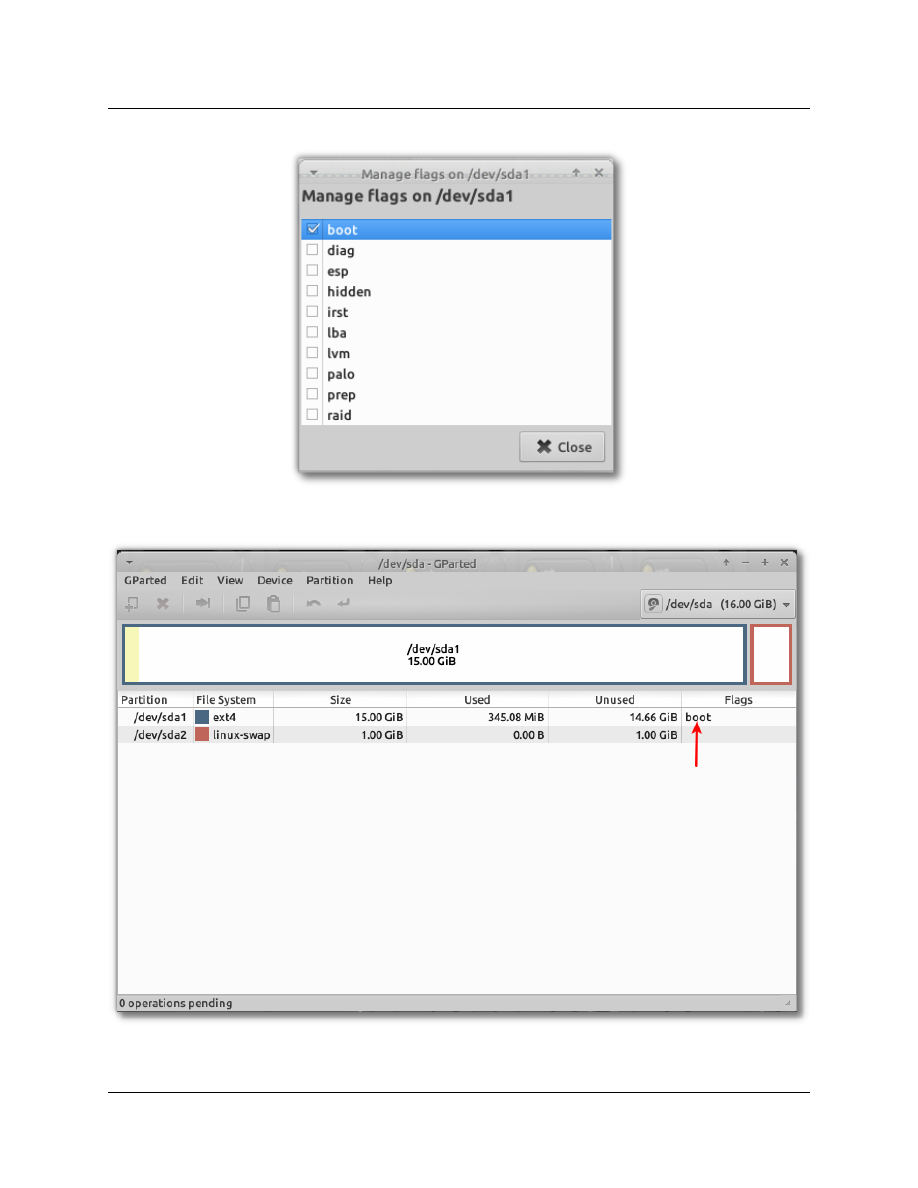
If everything has completed successfully we can verify our new partitions in Gparted and close it.
20
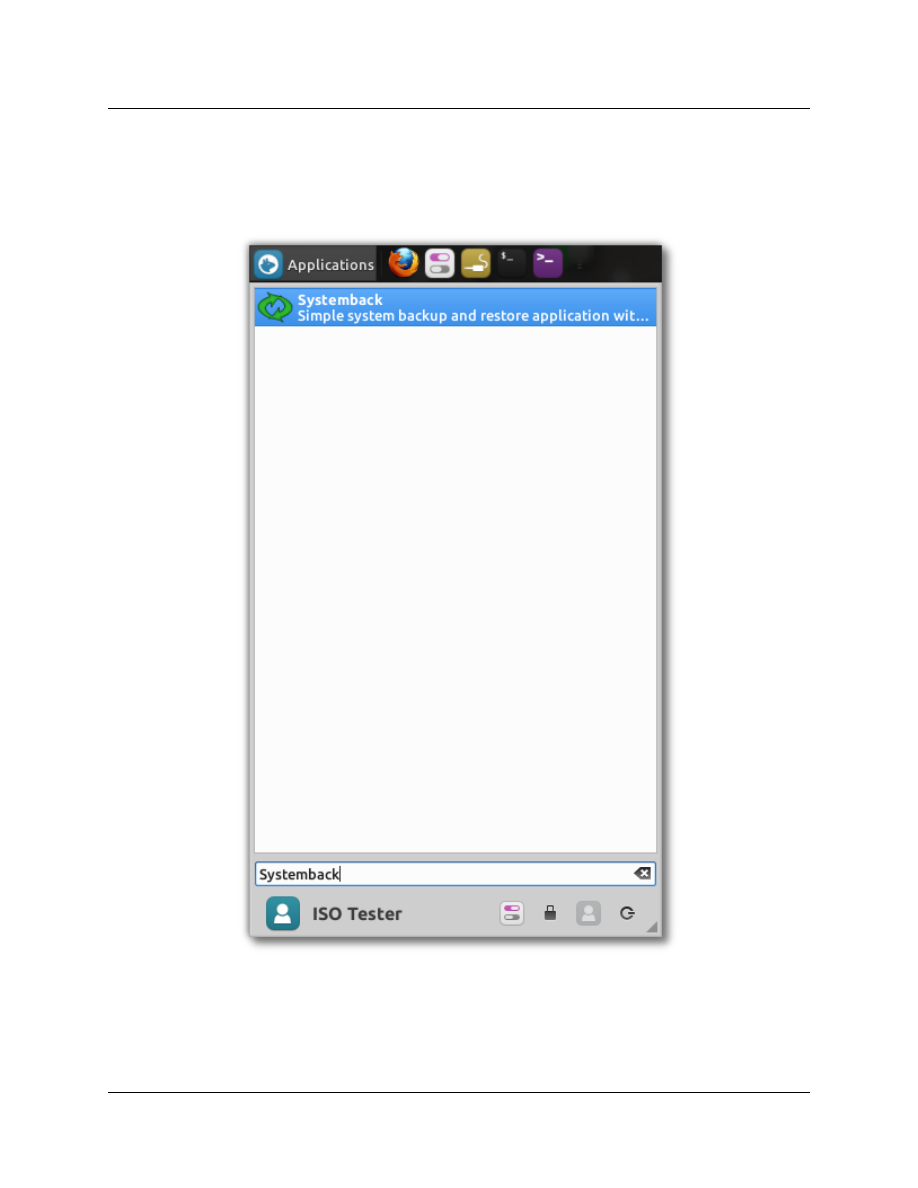
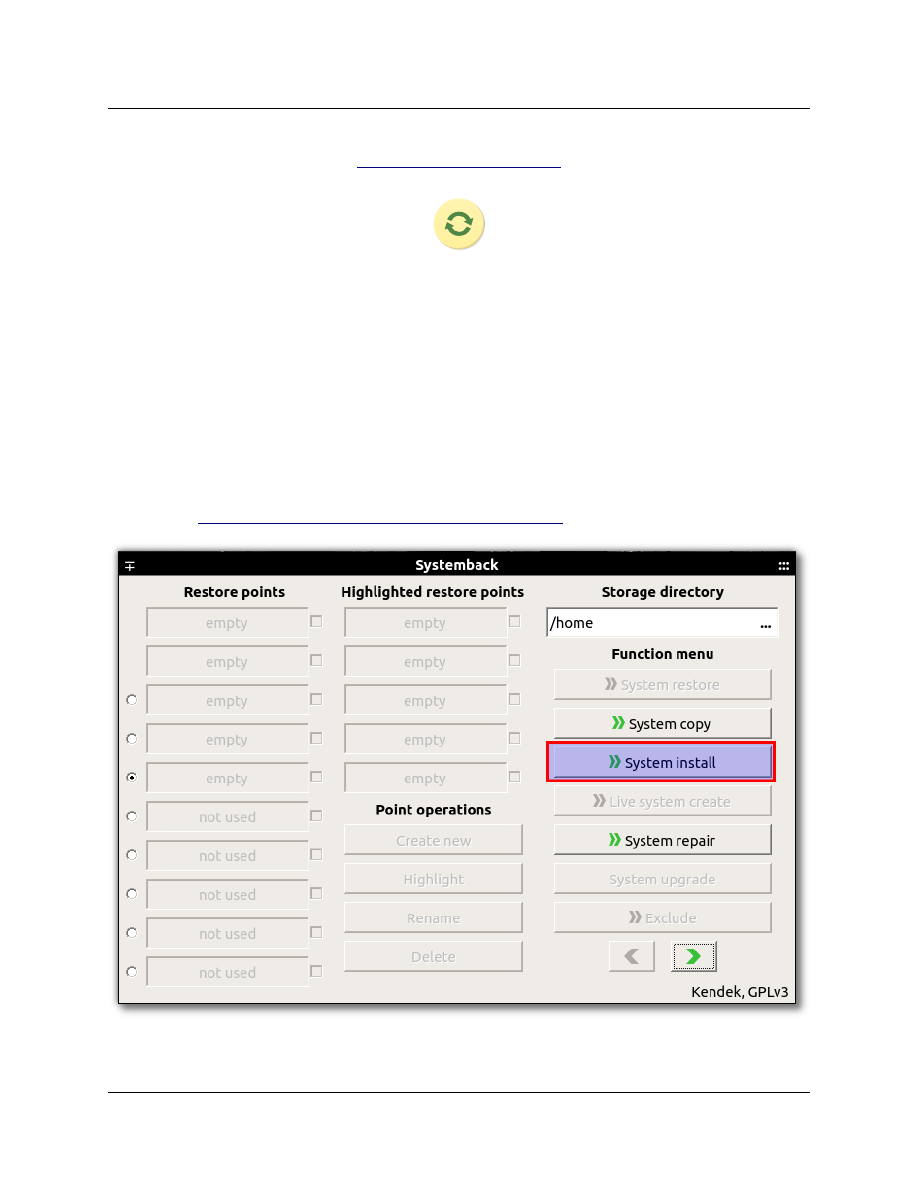
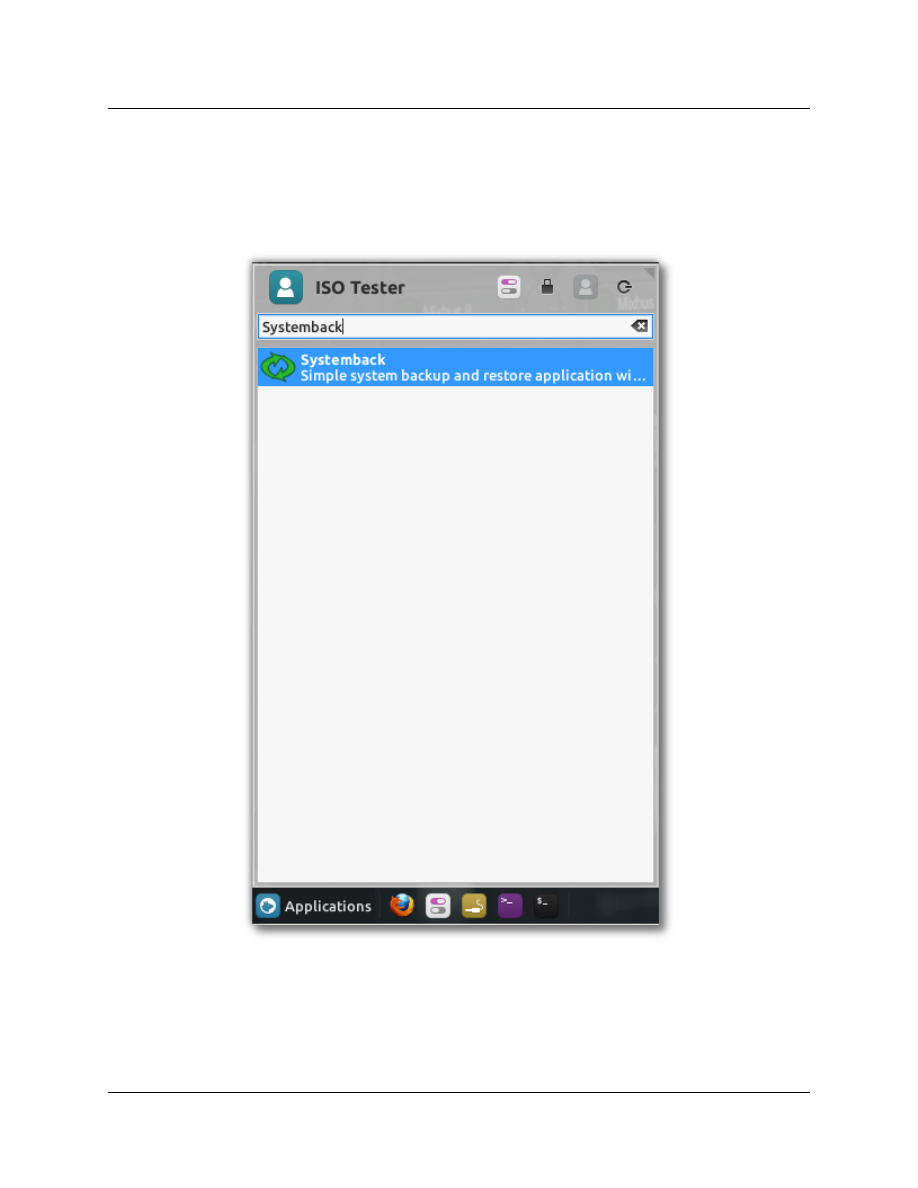
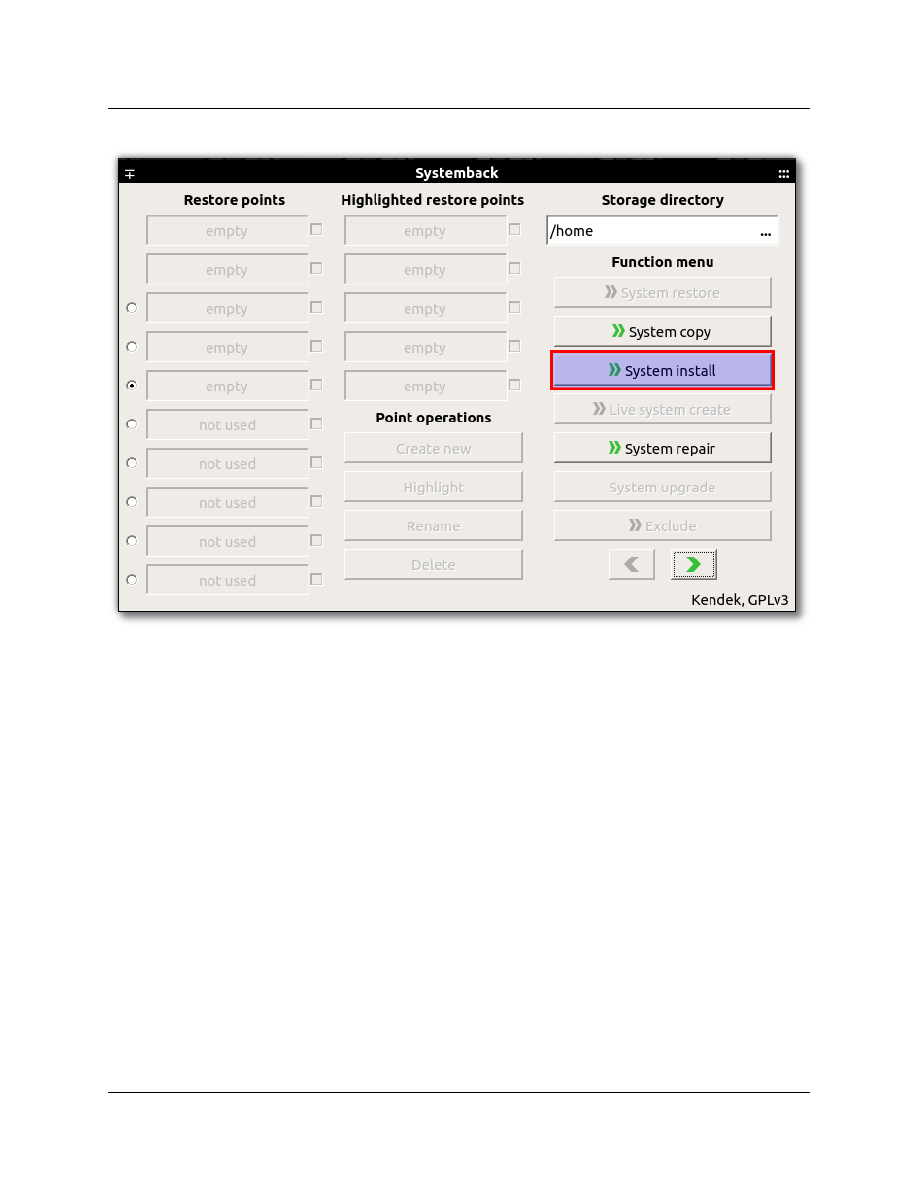
Now that the hard drive has been partitioned we are ready to use Systemback to install AV Linux from
the Live session to the Hard Drive. Launch Systemback from the Whisker menu and click on the ‘System
Install’ button.
21

22
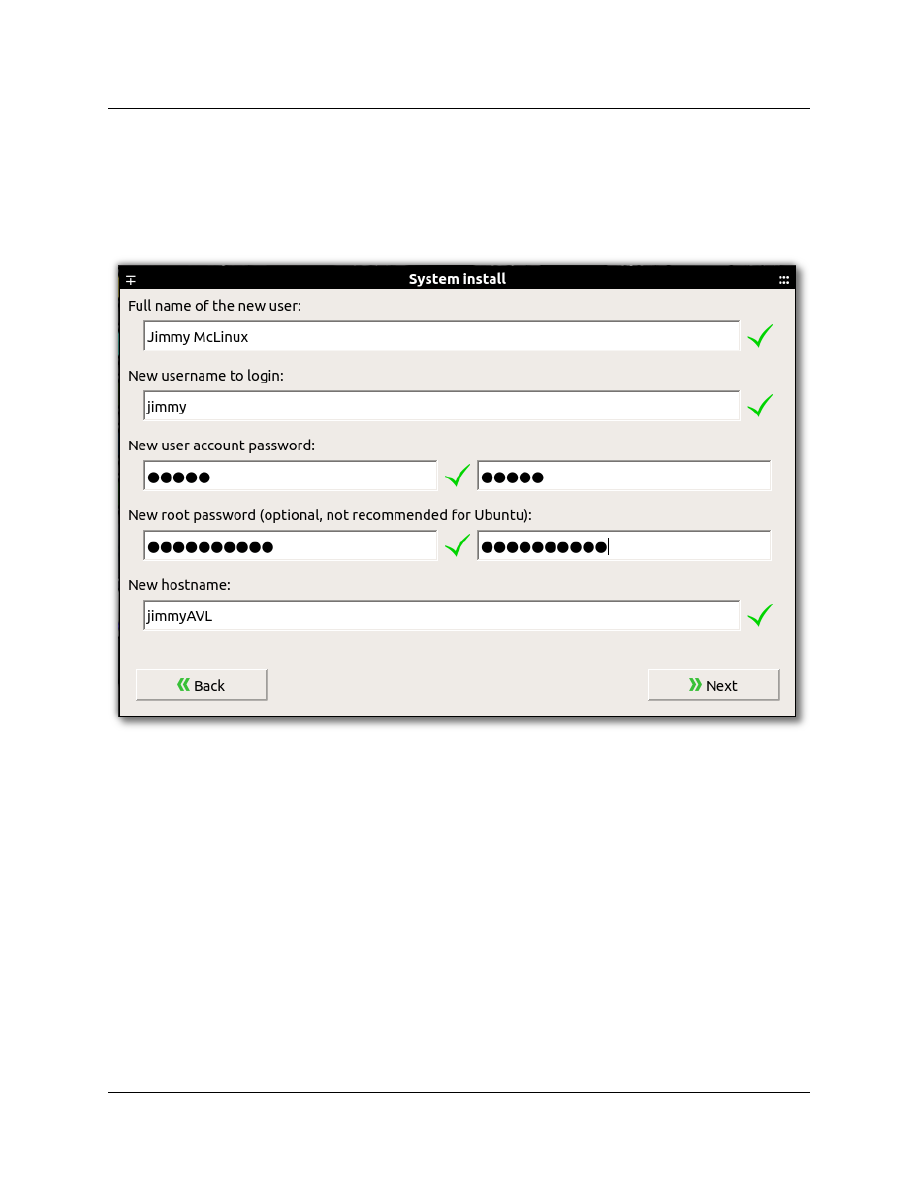
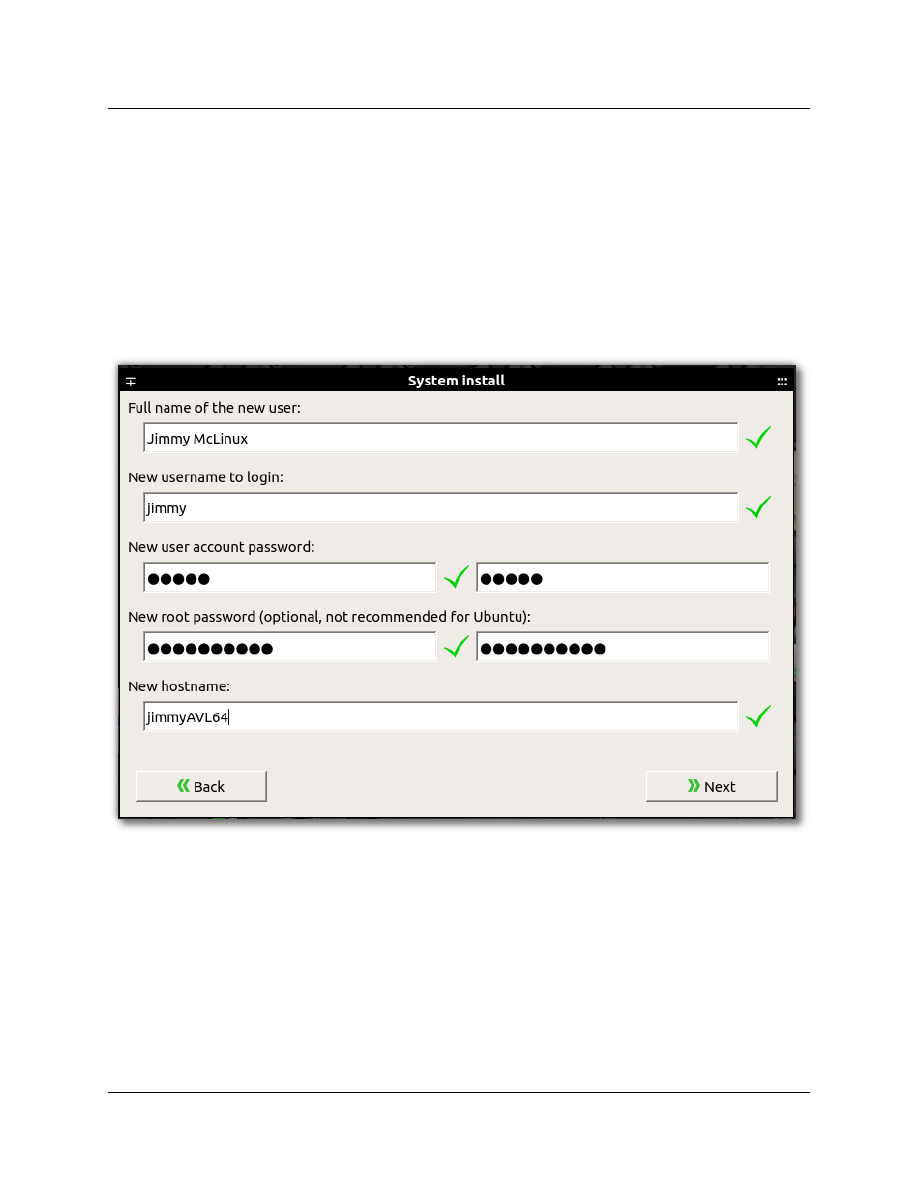
Enter your name, Username and a separate and distinct password for your User and the root User,
you can also create a hostname, this is the name the computer will display on a network and at the
terminal prompt.
23

In the ‘Partition Settings’ window we set up the partitions and mount points for install. In the
example below we set the mount point for the ext4 (sda1) partition as ‘/’ and check ‘Format’ to clear
the partition, once you have set the mount point click the green arrow button to apply the settings. It
is also suggested to uncheck ‘Transfer User configuration and data files’ to allow some system defaults
to be incorporated in the install.
24
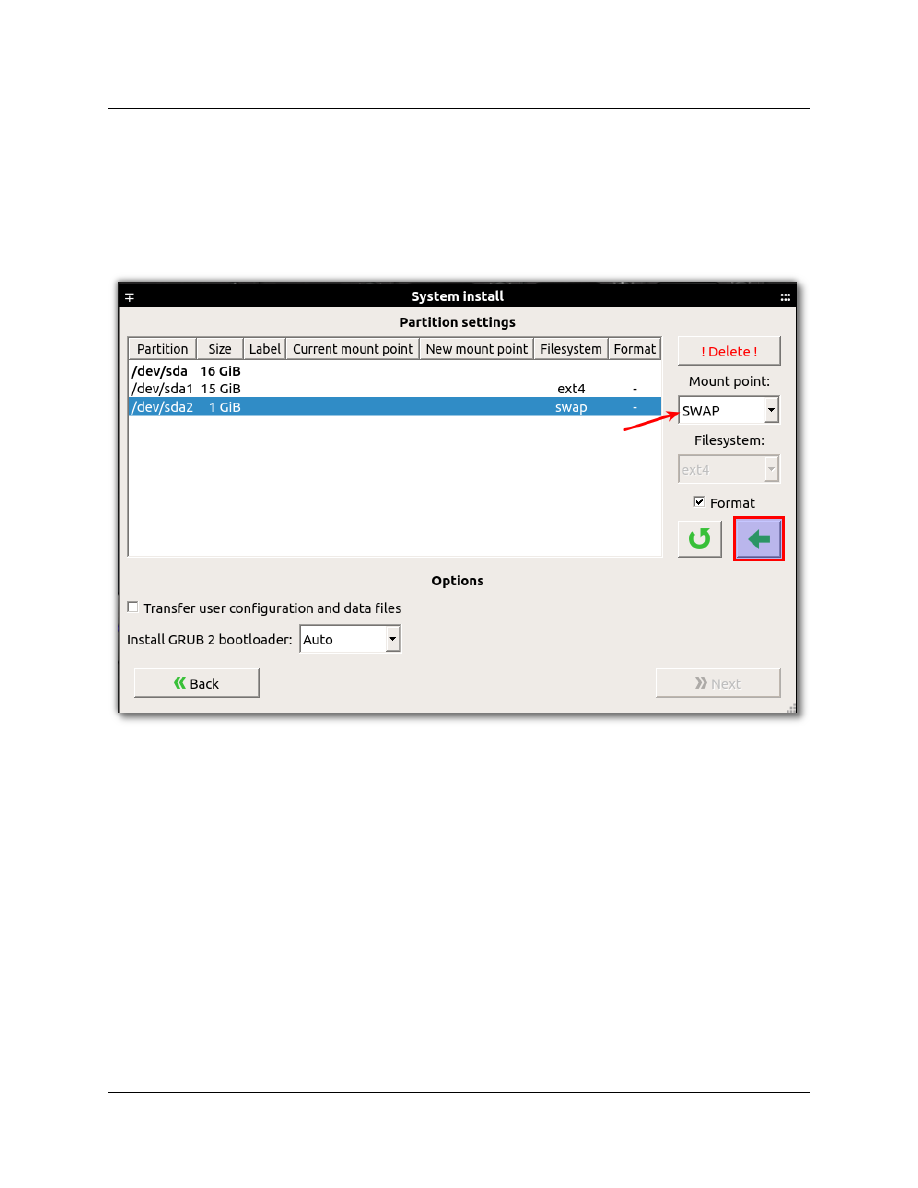
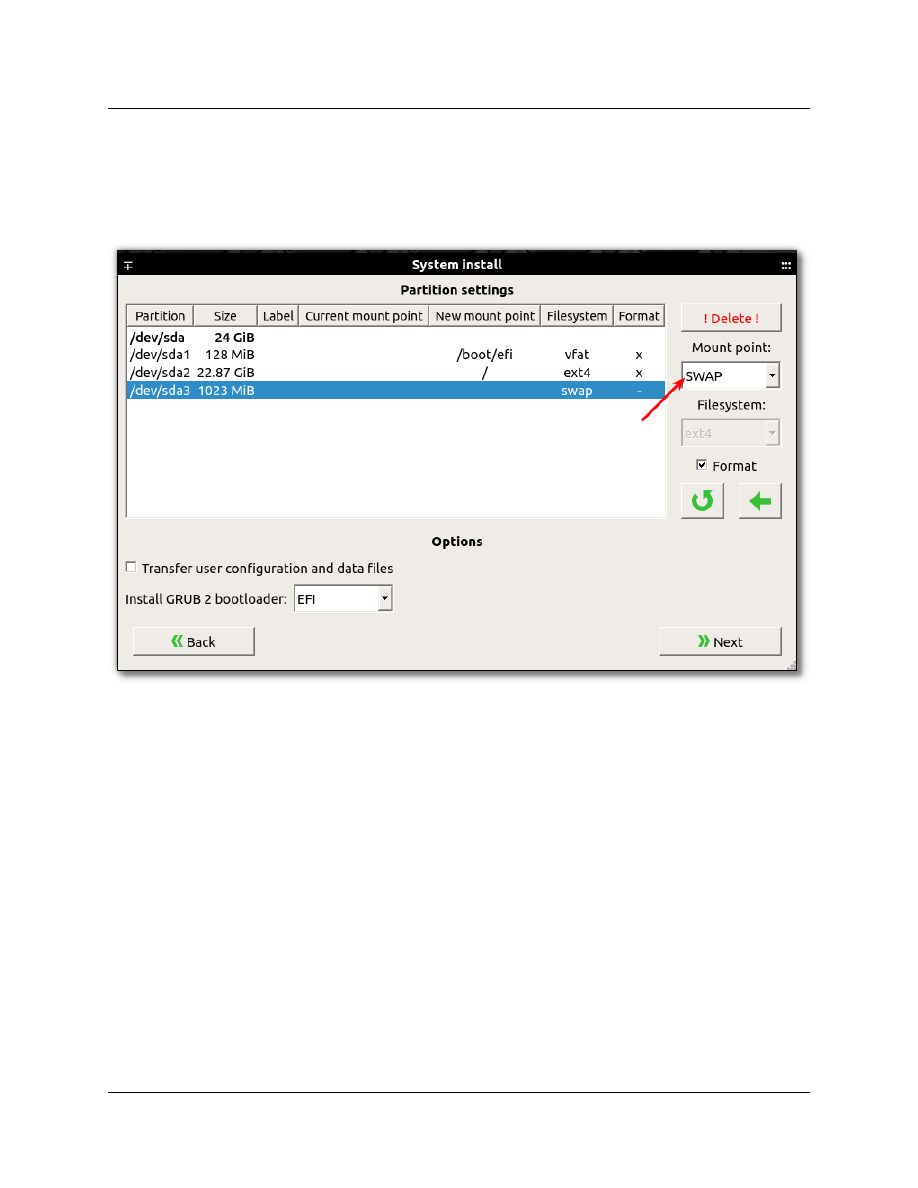
Set the mount point for the linux-swap (sda2) partition to ‘SWAP’ and apply the change with the
green arrow button. Once the partition settings are done the ‘Next’ button will become active and you
can start the install. The ‘Install GRUB 2 bootloader:’ dropdown box should say ‘Auto’ and not be
greyed out.
25
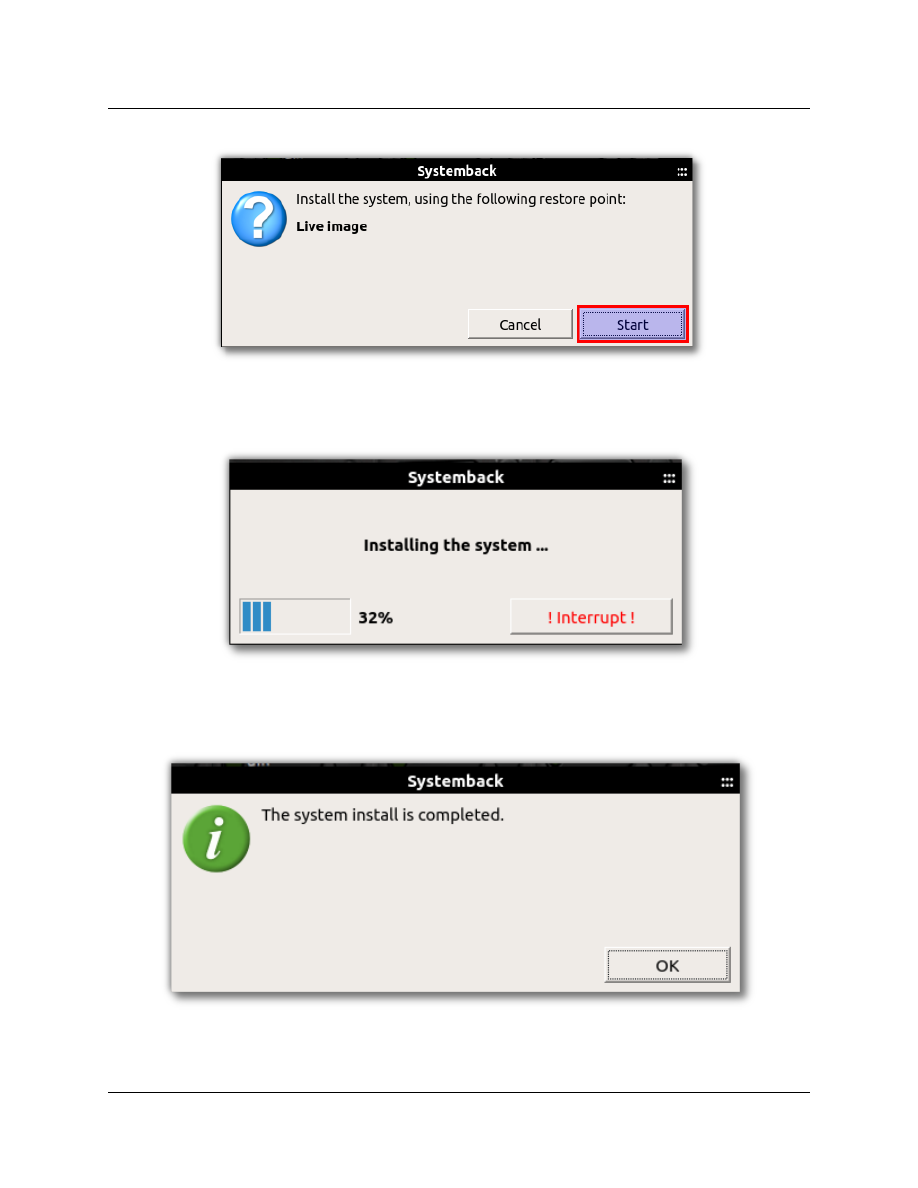
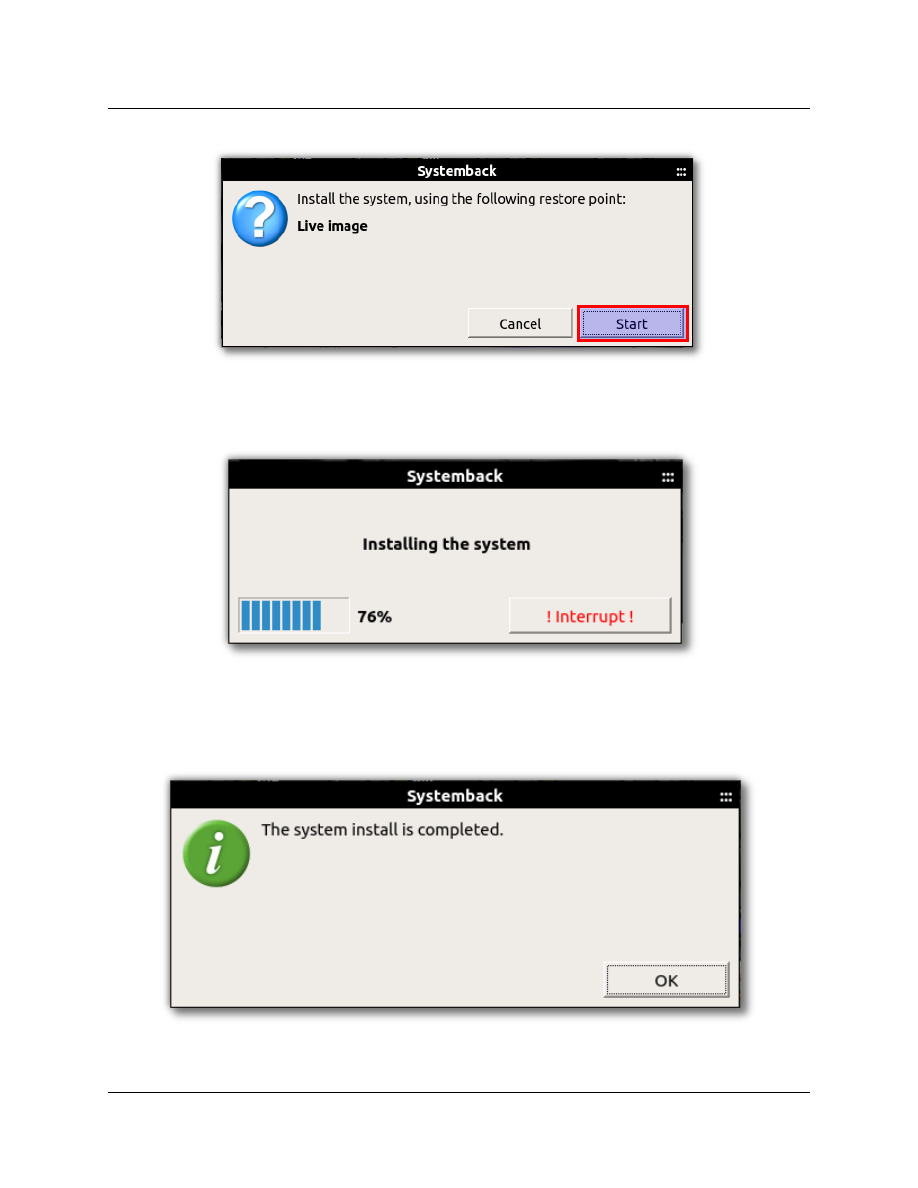
Installation from USB key should take 20 minutes or less and will also look after installing the GRUB 2
bootloader.
Once the system install has completed you can close Systemback and boot into your new system
whenever you are ready!
26
Installing on UEFI computers :
Once logged into to a Live USB session launch Gparted to set up a partition table and create disk
partitions to install to. For simplicity and clarity we are assuming AV Linux is the only OS to be installed
on the computer and we will use three primary partitions, a 128mb FAT32 EFI boot partition at (sda1),
an ext4 (sda2) root partition to install AV Linux to and last a ‘linux-swap’ (sda3) partition.
27
Gparted requires Root privileges so enter the 64bit LiveISO Root password; avl64admin
We can use a GPT partition table for UEFI boot, create one from the ‘Devices’ menu. If you have
existing data on the Hard Drive creating a partition table will erase the disk!
28

Once the partition table has been written we can create partitions on the disk to install to, we need a
128mb FAT32 EFI partition at (sda1), a single ext4 (sda2) partition for the operating system and one
linux-swap (sda3) partition. Right-click on the unallocated disk space to create the new partitions.
29
First create a 128mb primary partition and format it to FAT32, this will be the boot partition that
contains the EFI boot files.
Next create a primary partition and format it to ext4, create 1024mb of free space to follow to make
room for a swap partition.
30

Lastly in the 1024mb of remaining unallocated space create a primary linux-swap partition.
Hit the Apply button to write the changes to disk.
31
Once the partitions have been successfully created and written to disk right-click on the (sda1) FAT32
partition select ‘Manage Flags’ from the menu and check off ‘boot’ this will automatically select ‘esp’.
32

Now all partitions will be visible in the main Gparted window, once you have verified that they are
created correctly you can close Gparted and move on to installation with Systemback.
33
Now that the hard drive has been partitioned we are ready to use Systemback to install AV Linux from
the Live session to the Hard Drive. Launch Systemback from the Whisker menu and click on the ‘System
Install’ button.
34
35
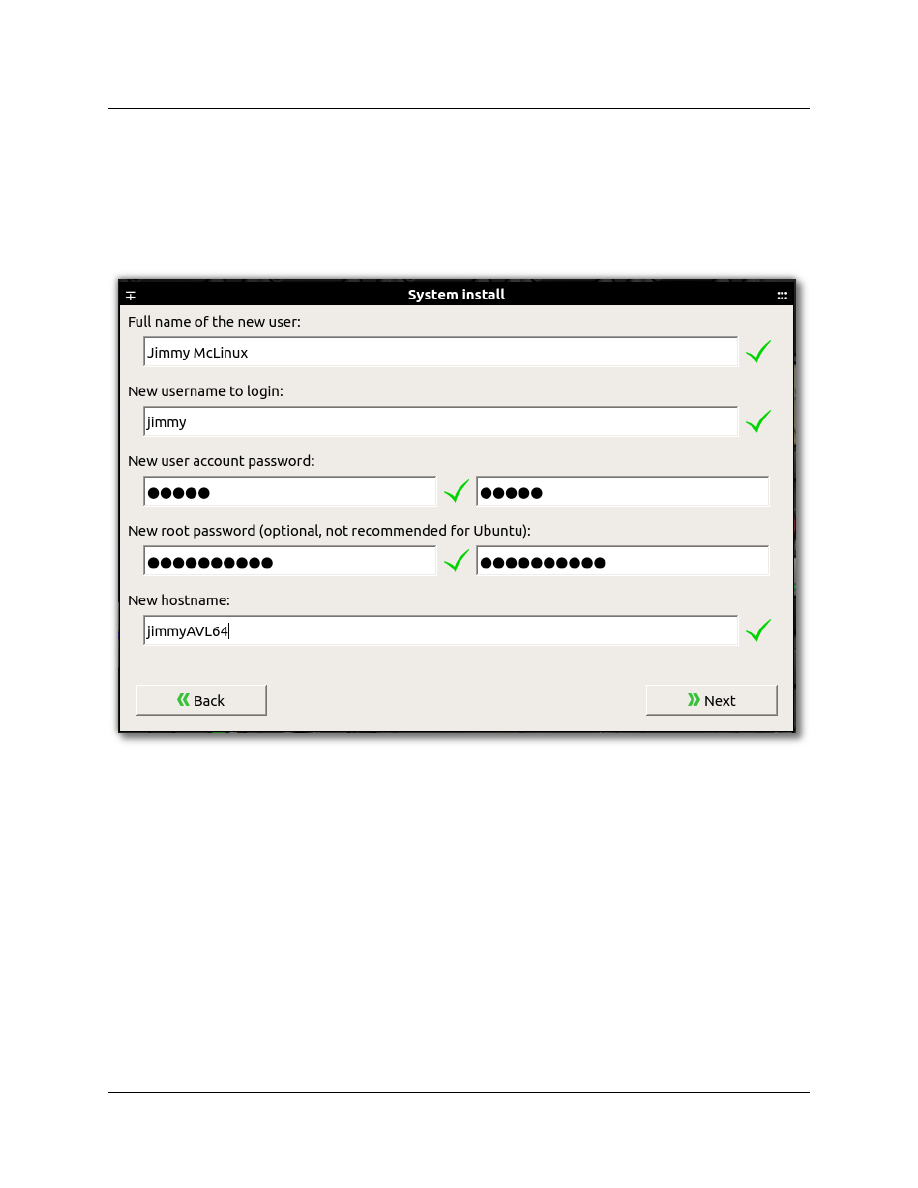
Enter your name, Username and a separate and distinct password for your User and the root User,
you can also create a hostname, this is the name the computer will display on a network and at the
terminal prompt.
36
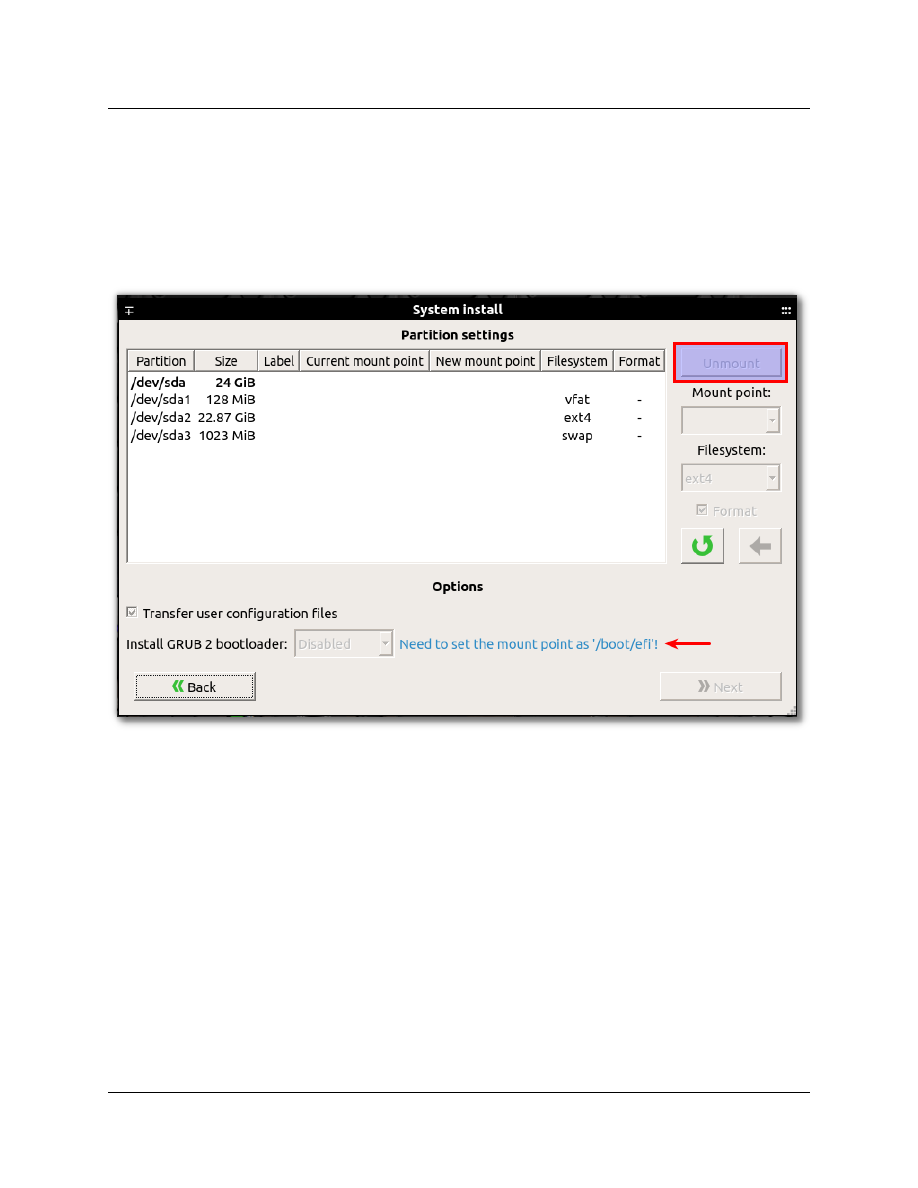
In the ‘Partition Settings’ window we set up the partitions and mount points for install. Before we get
to that in an UEFI install it should be noted that the ‘Install GRUB 2 bootloader’ dropdown is greyed
out but beside it Systemback hints that we need to set a mount point as ‘/boot/efi’. This is pertaining
to the first FAT32 (sda1) partition.
37
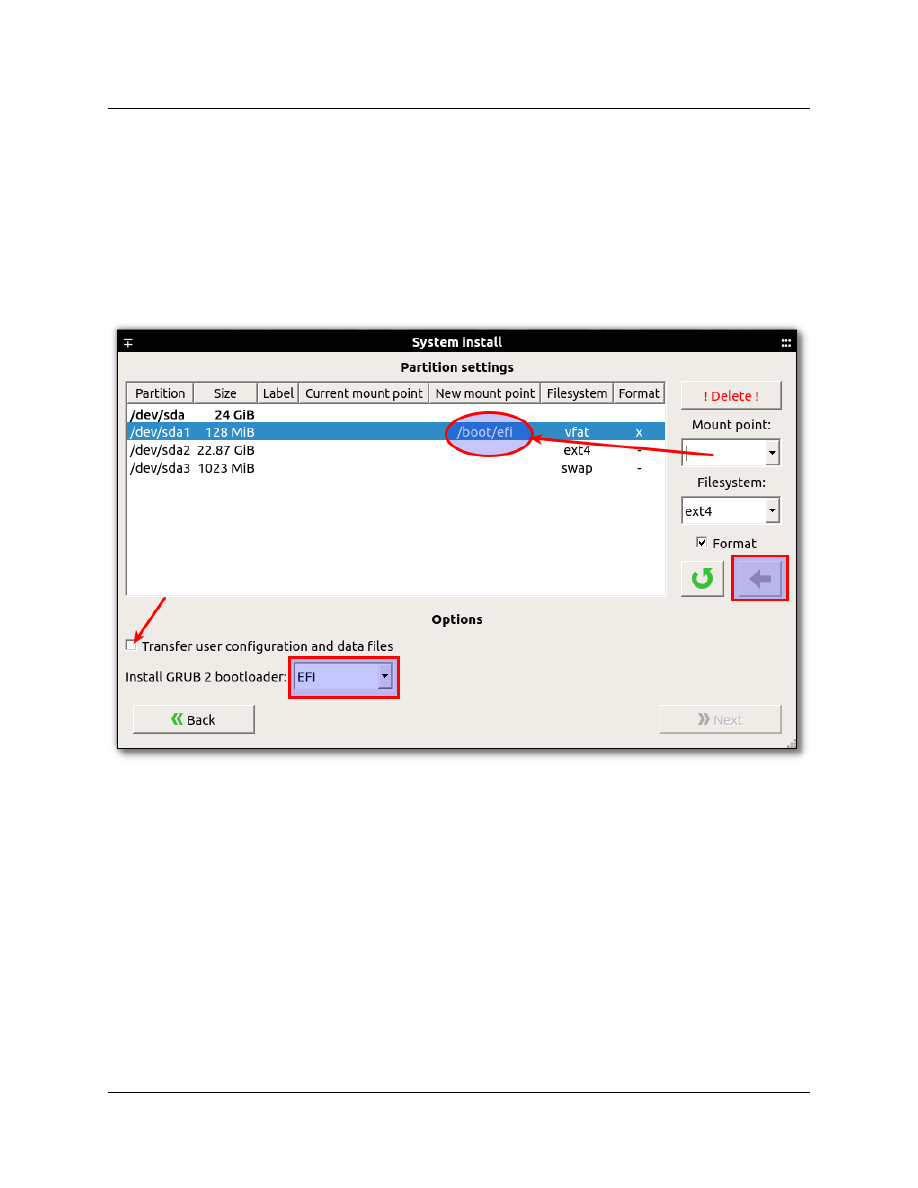
In the example below we select and set the mount point for the intended EFI FAT32 (sda1) partition
as ‘/boot/efi’ and check ‘Format’ to clear the partition, once you have set the mount point click the
green arrow button to apply the settings. You will notice that once you have applied the settings the
GRUB 2 bootloader dropdown will change from greyed out to ‘EFI’. It is also suggested to uncheck
‘Transfer User configuration and data files’ to allow some system defaults to incorporated in the
install.
38

Next set the mount point of the ext4 (sda2) partition to ‘/’ and apply it with the green arrow.
39
Lastly set the mount point of the linux-swap (sda3) partition to ‘SWAP’ and apply it with the green
arrow. Now that all partitions are set up and you can proceed with the install.
40
Installation from USB key should take 20 minutes or less and will also look after installing the GRUB 2
bootloader to the ‘EFI’ folder.
Once the system install has completed you can close Systemback and boot into your new system
whenever you are ready!
41

*Last Resort Manual GRUB-efi install in case the above doesn’t work.
Reboot AVLinux Live from USB, this step is important because running from the Live USB will allow us
to make changes to the partitions we created previously.
Mount the ext4 sda2 partition:
mount /dev/sda2 /mnt
Mount the FAT32 sda1 partition:
mount /dev/sda1 /mnt/boot
Now run this command:
for i in /dev /dev/pts /proc /sys /run; do sudo mount -B $i /mnt$i; done
Now change root on the /mnt directory:
chroot /mnt
Mount sda1:
mount /dev/sda1 /boot/efi
Install/Reinstall grub-efi:
apt-get install --reinstall grub-efi
Install grub to the partitioned drive:
grub-install /dev/sda
Make grub generate the changes in it’s config
update-grub
Verify the install:
efibootmgr --verbose | grep debian
References:
https://help.ubuntu.com/community/Grub2/Installing#via_ChRoot
https://wiki.debian.org/GrubEFIReinstall
42
P
OST-INSTALL VIRTUALBOX GUEST ADDITIONS REMOVAL :
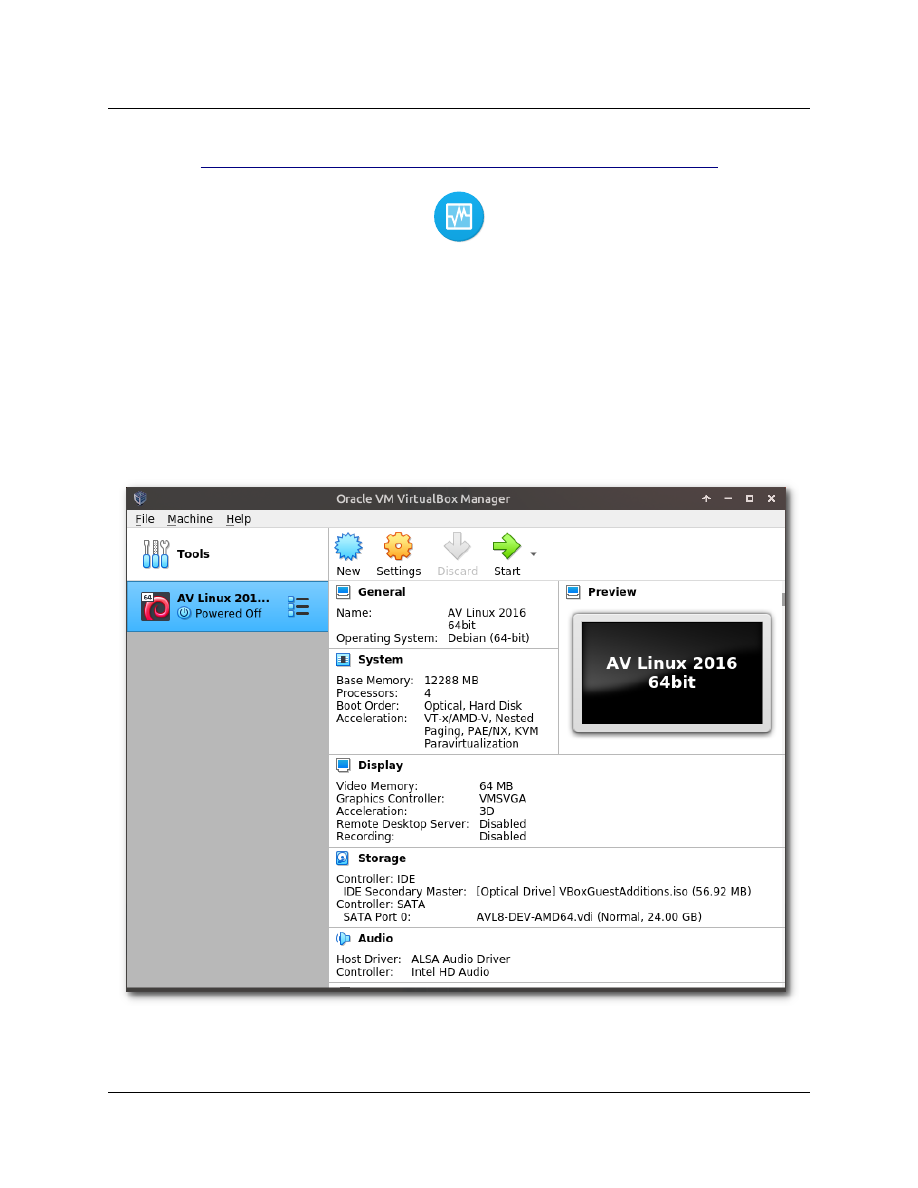
AV Linux is built in Virtualbox ‘Virtual Machines’ and utilizes ‘Guest Additions’ for full functionality
with the Host machine. The Guest Additions modules are left in AV Linux because they don’t do any
harm and are actually useful to people who may try AV Linux out in Virtualbox. When AV Linux boots
on a computer that isn’t a Virtualbox host the modules are not initialized and will display a notification
on when logging in to the Desktop and will aslo display a red warning in the kernel boot progress text.
These notifications and warnings are harmless and will not impact performance at all.
It is important to note that the Virtualbox Guest Additions are now automatically removed when Live
booting or installing AV Linux on computer hardware systems, installations in Virtualbox Virtual
Machines will retain the Guest Additions for convenience.
43

IMPORTANT POST-INSTALL STEPS :
Changing the Default Language :
AV Linux is created and developed in my native Canadian English language so unsurprisingly the
default Language is Canadian English:
LANGUAGE=en_CA:en
LANG=en_CA.UTF-8
It is important to note that changing AV Linux to a different language than the default is a
combination of changing the default language and using the ‘AV Linux Assistant’ to install new
Locales. If you do change the default Language please note that many of the convenience features in
AV Linux (AV Linux Assistant, Quick Update Utility, Custom Scripts etc.) will remain in English because
they are unique to AV Linux and not translated into any other languages.
In order to change to another language you need to know the two letter country code for your
country, some common examples are ‘FR’ for French, ‘ES’ for Spanish, ‘DE’ for German and ‘JP’ for
Japanese. If you don’t know your country code you can find it here. Once you know the two letter code
then you can change it in a Root Terminal with this command (using Spanish as an example):
export LANG=es_ES.UTF-8
For further information on changing the default System language please read this page from the
Debian Wiki:
https://wiki.debian.org/ChangeLanguage
44
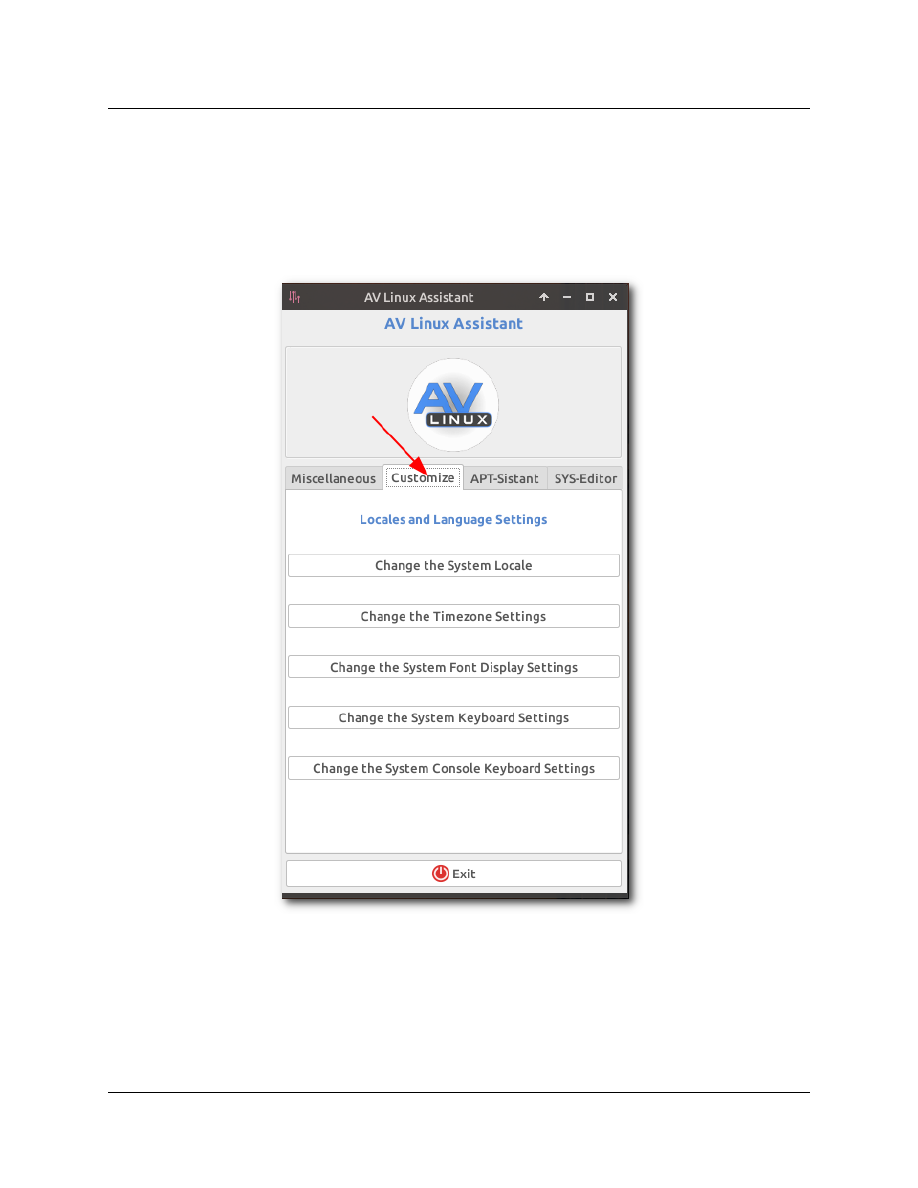
Post-Install Setup of Locales using the AV Linux Assistant :
The Systemback installer used to install the Live system to HDD simply copies the running Live
session as-is. If you require a different locale, language and keyboard layout once AV Linux is installed
you can use the ‘Customize’ Tab of the 'AV Linux Assistant' to assist you with adding your locale and
changing the system keyboard settings.
45
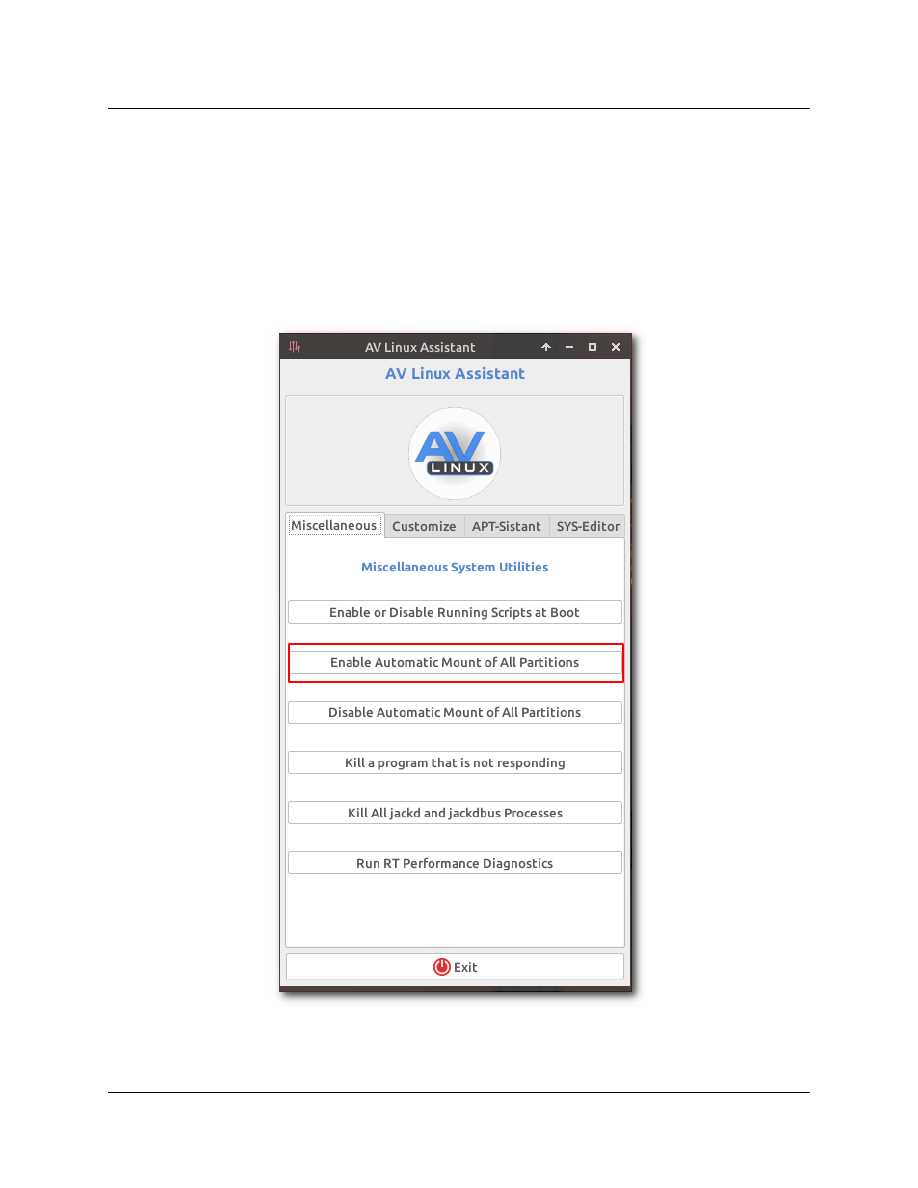
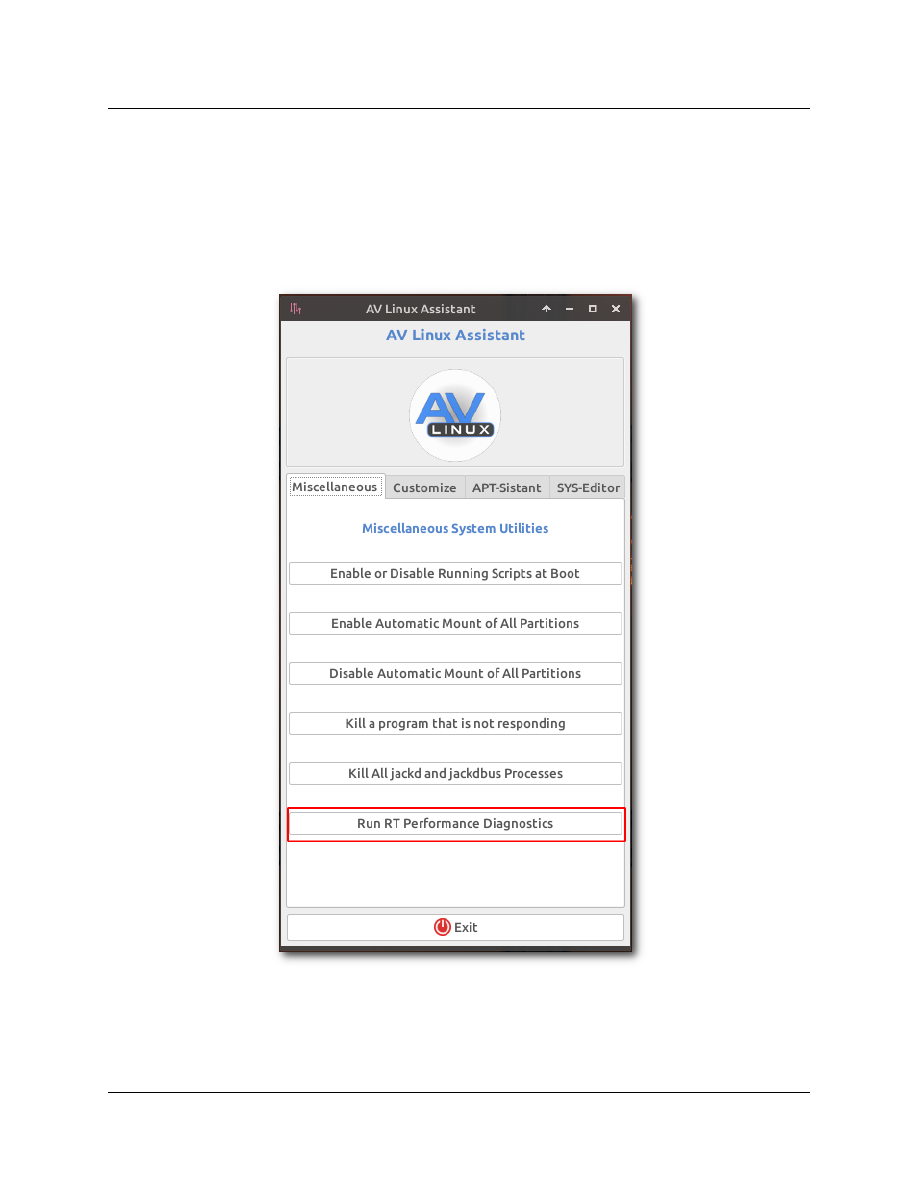
Enabling Automatic Mount of External Partitions :
Previous versions of AV Linux would mount any external drives and partitions on the system
automatically at boot, not everyone liked this feature and some had security concerns about all their
system data being instantly available to a Live system so this feature is disabled in AV Linux 2020 and
can be re-enabled after installing in the Miscellaneous tab of the ‘AV Linux Assistant’. The system must
be rebooted for the setting to take effect.
46
W
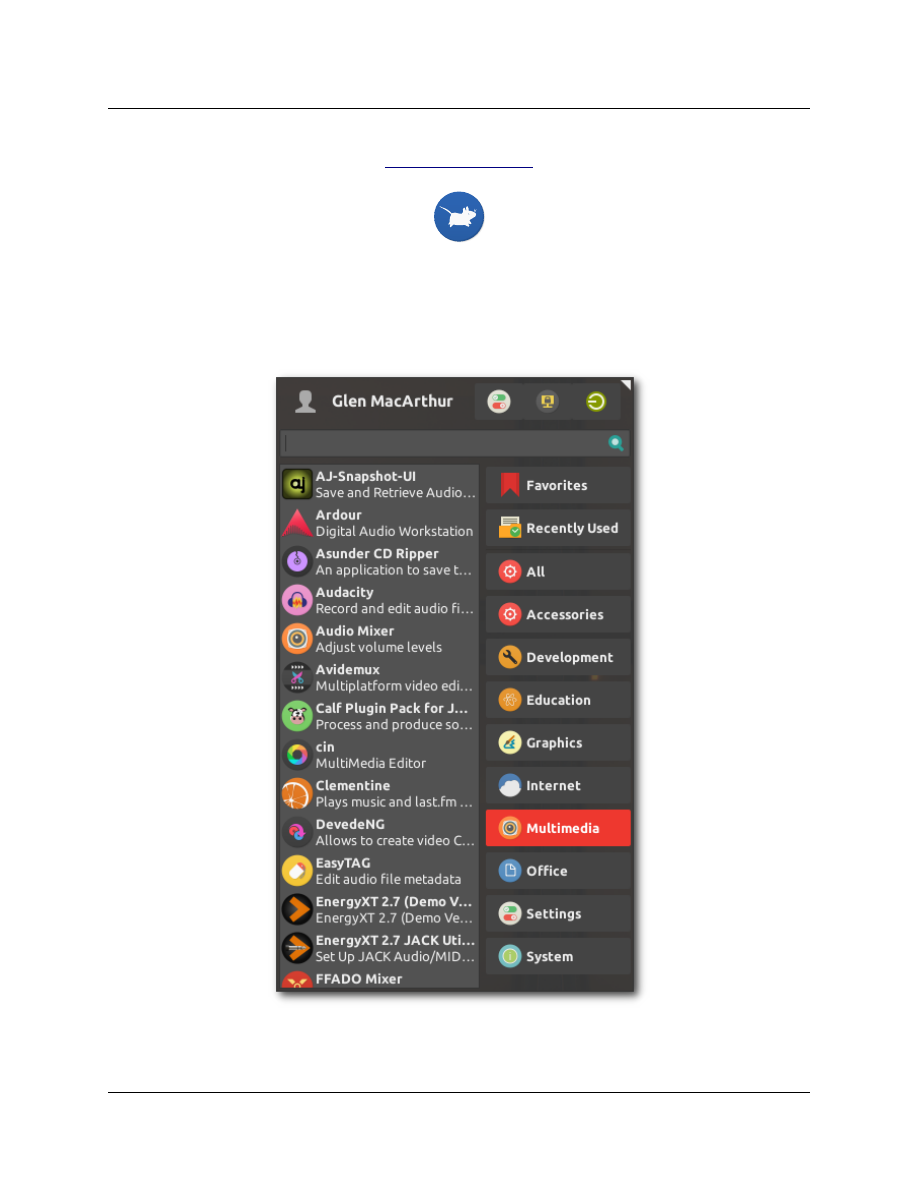
HISKER MENU :
Customized Menu :
AV Linux 2020 uses the XFCE4 'Whisker Menu' which allows you to browse Applications as you would
in a regular Menu as well as providing a Search bar that you can type the name of the Application into.
47
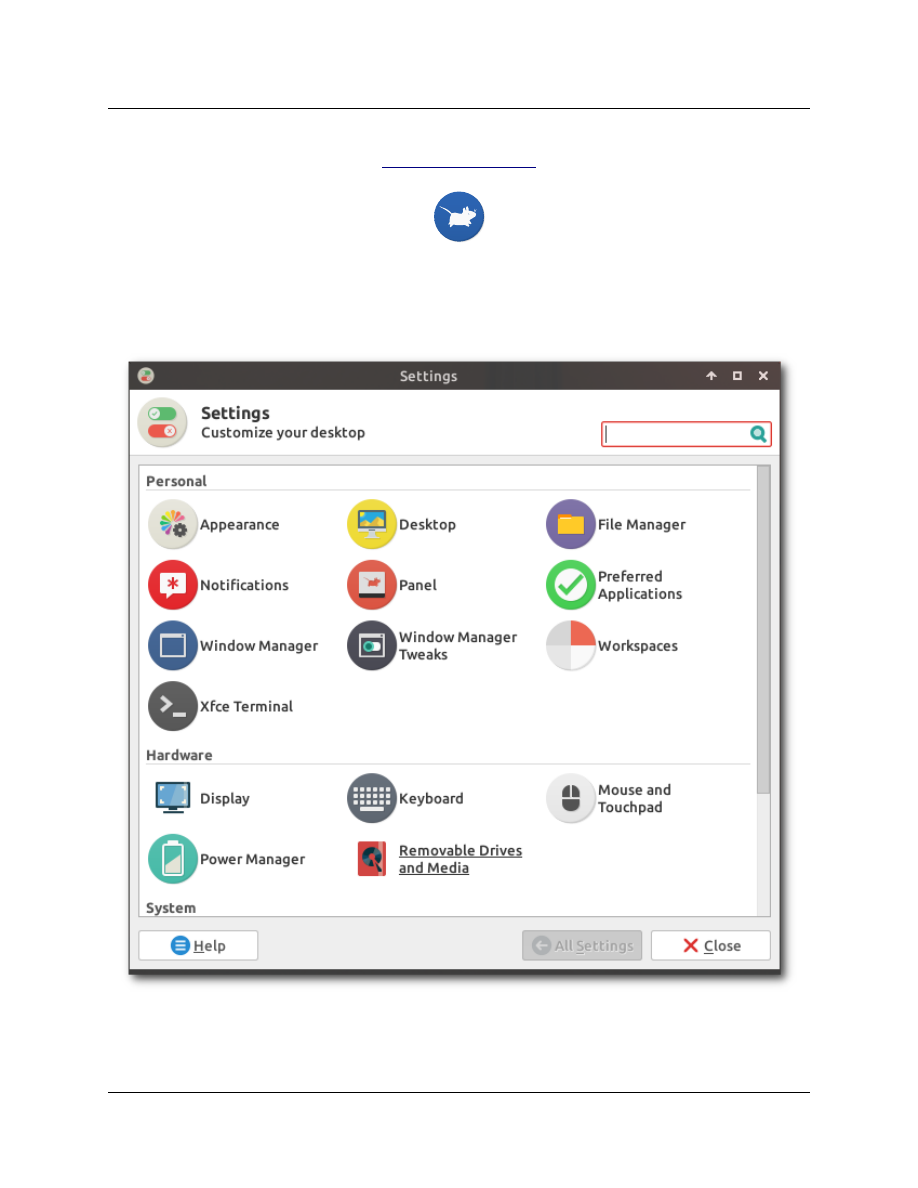
XFCE4 SETTINGS :
The settings for XFCE4 are accessed by using the 'Settings Manager'. Find it by either typing 'Settings'
in the Whisker Menu search bar or navigate to 'Settings' 'Settings Manager'.
→
48
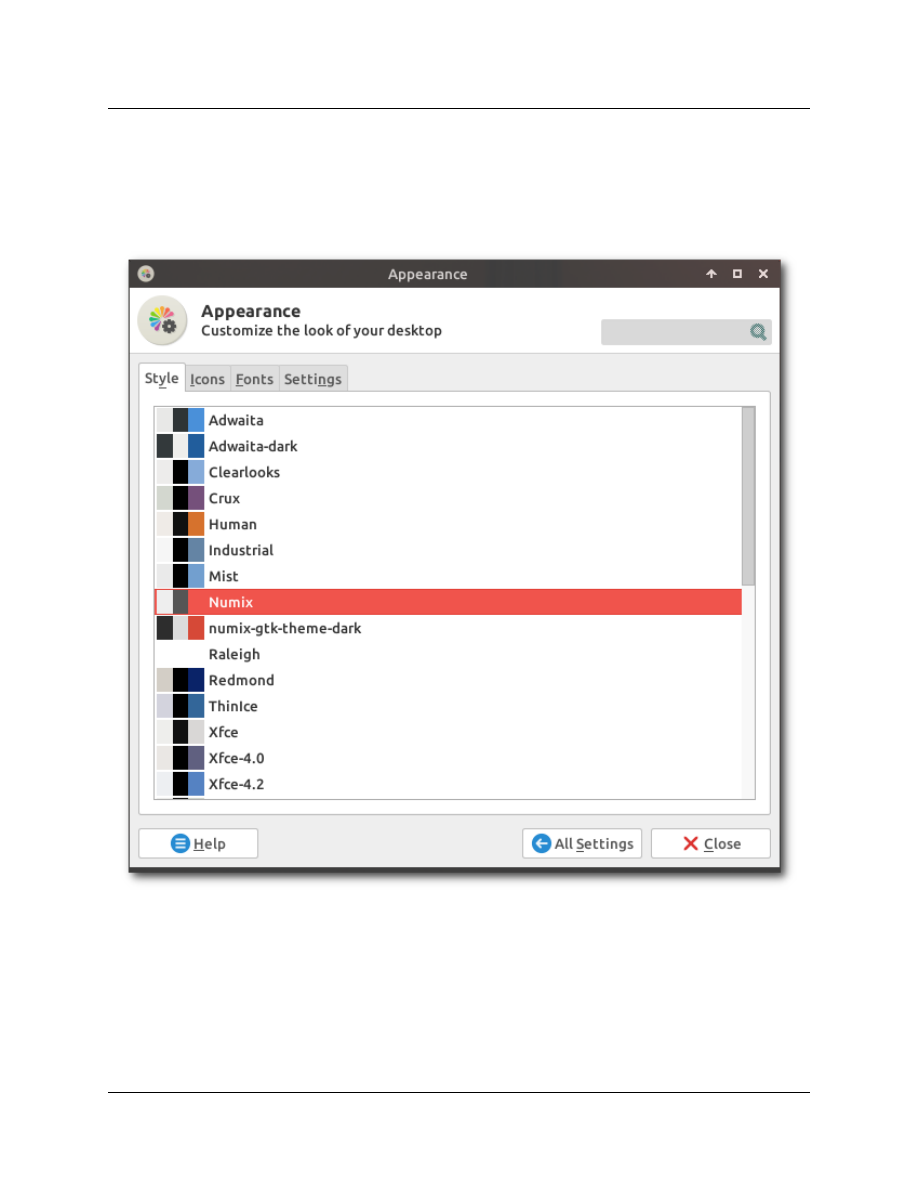
You can change how the system looks with the 'Appearance' settings. This will allow you to set the
GTK theme, system icons, system fonts and some menu related items. AV Linux comes pre-loaded
with a large amount of themes and colors to choose from.
49
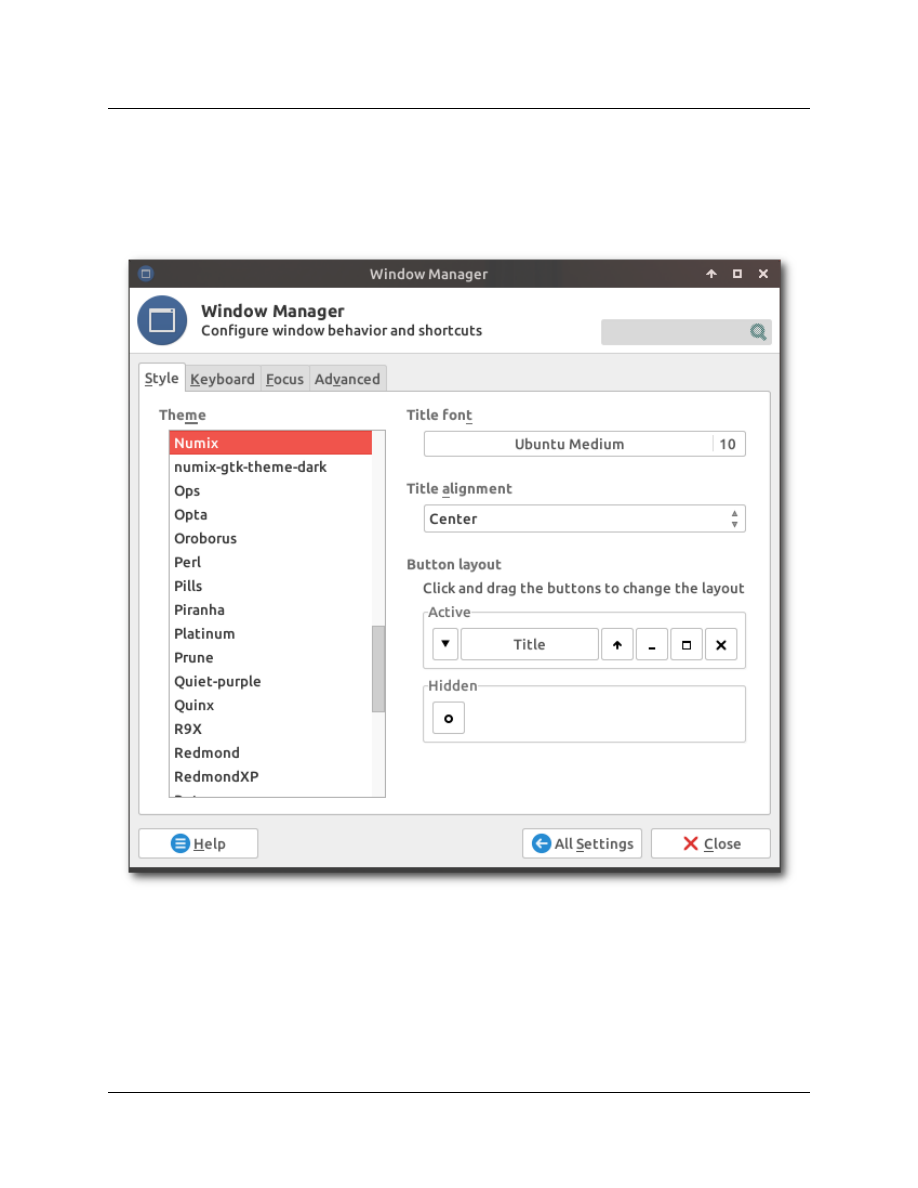
The Window Manager themes are not set in the 'Appearance' dialog, they have a separate 'Window
Manager' applet in the Settings Manager.
50
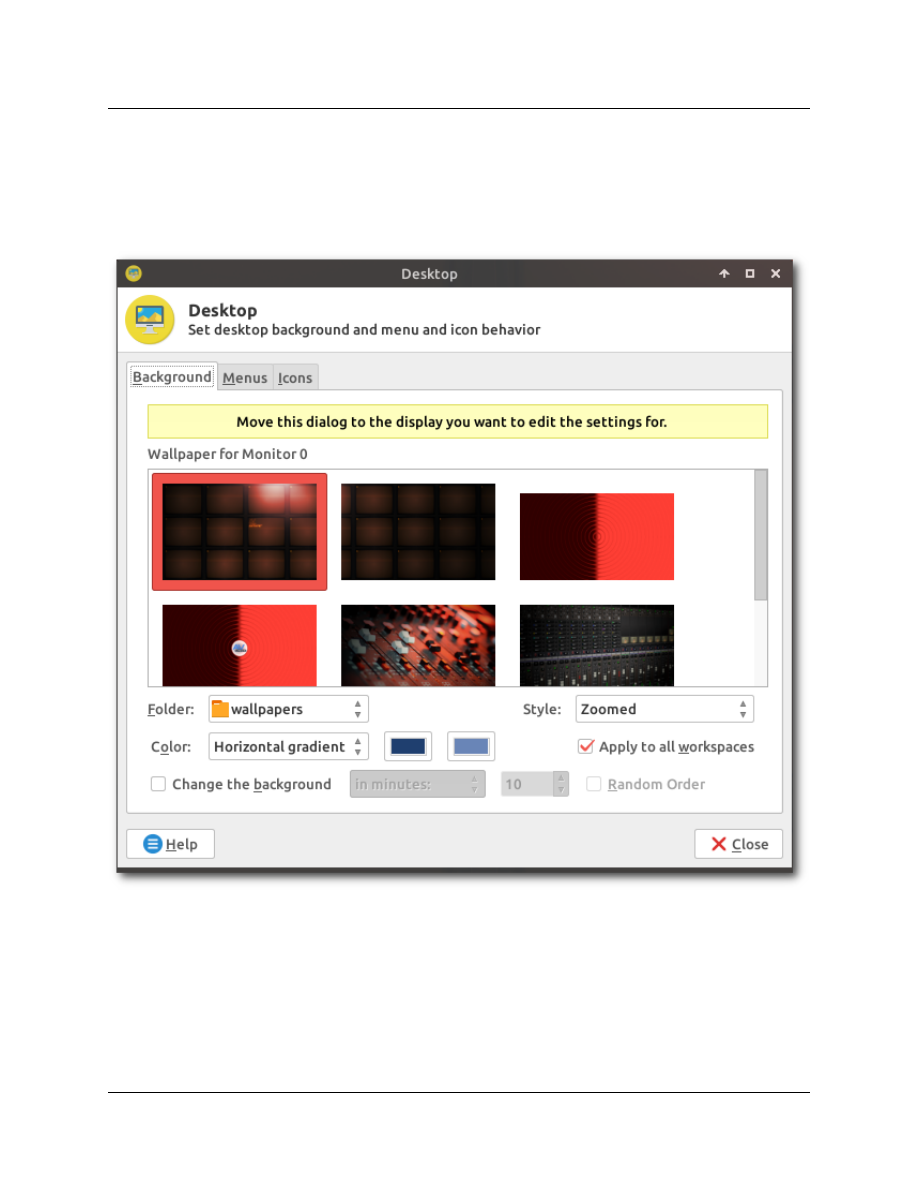
Change your Desktop wallpaper and other settings with the 'Desktop' applet in the Settings Manager
or right-click on the Desktop and select 'Desktop Settings' from the Menu. Most common image file
formats will also give you the ability to 'Set As Wallpaper' when you right-click on them.
51
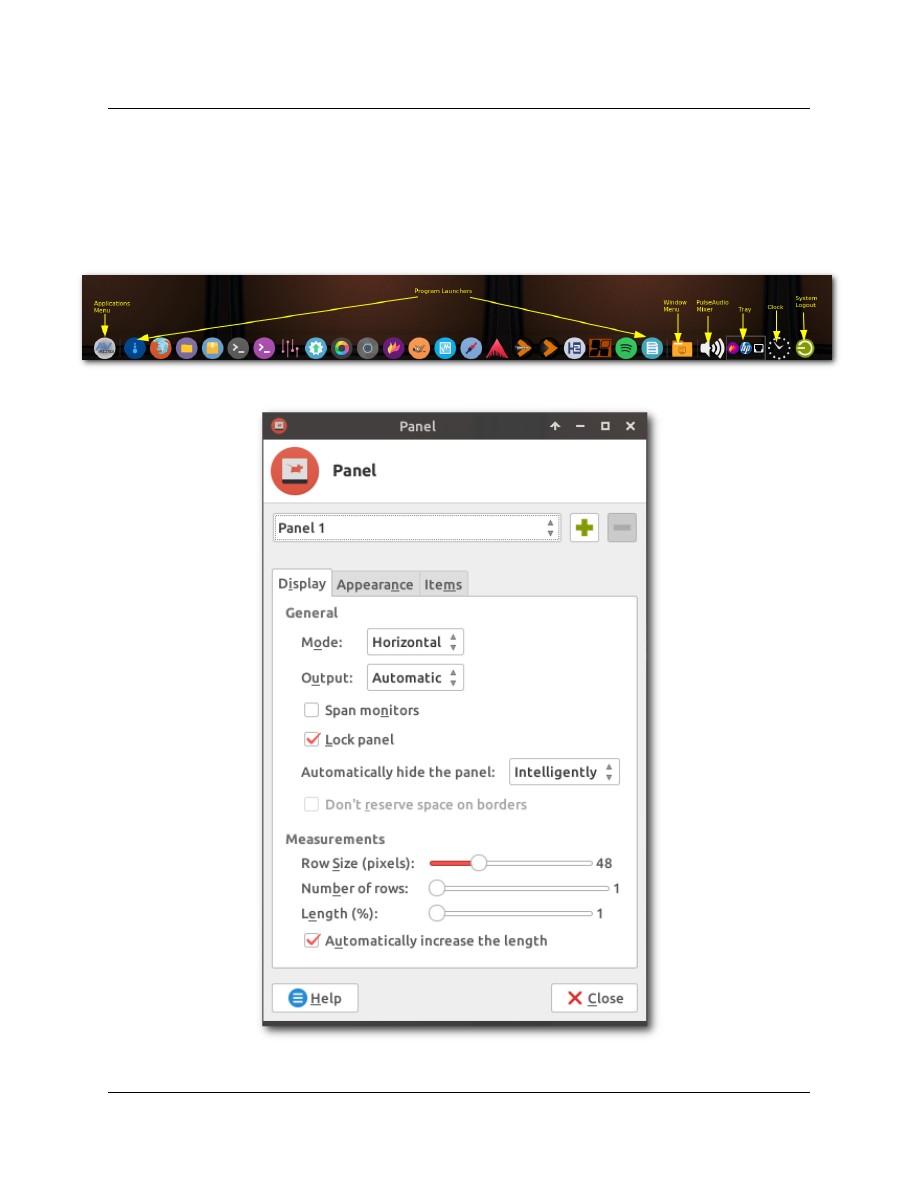
The XFCE4 Panel at the bottom of the Desktop screen combines access to the menu with program
launchers, a window menu, PulseAudio sound mixer, notification tray, system clock and session logout
buttons. By default the menu is set up to look like a “Dock” but right-clicking on any item on the Panel
and selecting ‘Panel’ ‘Panel Preferences’ will open a window to configure the Panel however you
→
want.
52
T
HUNAR FILE MANAGER :
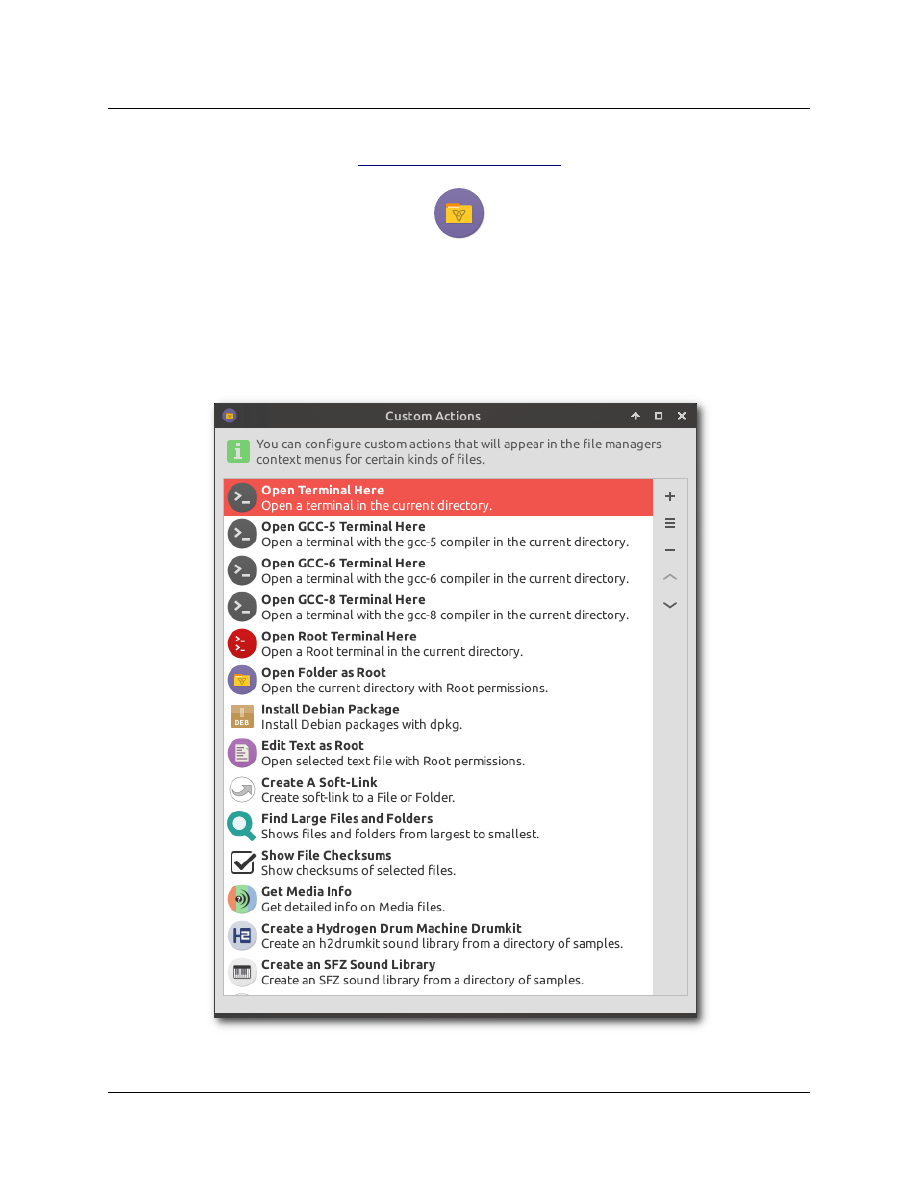
The Thunar File Manager included in AV Linux has been customized and extended with Custom
Actions to do MUCH more than simply manage files. As you navigate the System you will see there are
numerous options when you right-click on the Desktop and in folders , more different options appear
when you right-click on certain file types. Custom Actions enable many tasks including system
administration, media playing, media conversions, networking and much more! A summary of the
Custom Actions is shown below, most options are self-explanatory. Some will be explained further on
following pages.
53
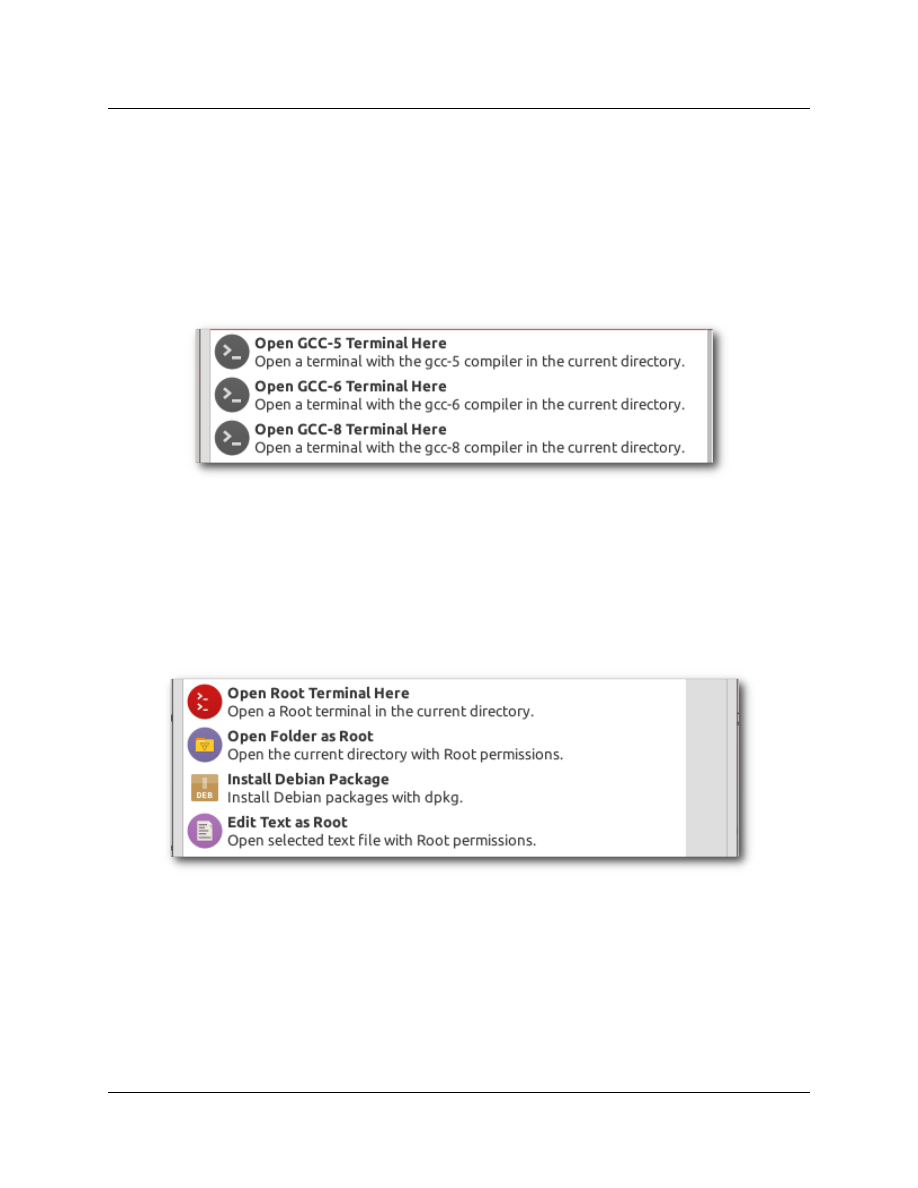
Choice of Compilers :
A unique Custom Action feature of interest to developers and those who like to compile their own
programs is the ability to choose which 'gcc' version to compile software source code with. This not a
common requirement for end-users but may be handy for developers who need to compile older
programs or compile with a gcc version which provides greater compatibility with other outside
systems. Don't forget AV Linux is OOTB developer-friendly containing most common build systems,
source code tools and development libraries.
Root Custom Actions (USE CAUTION!) :
For those who need to administrate their system and make changes outside of their home folder in
the file system some handy Root Custom Actions are provided. These allow to open a Root Terminal
within the folder you’re viewing, open the current folder with Root privileges, Install a Debian package
from Thunar (simple install, does not resolve external dependencies) and to Edit configuration text
files as Root.
54
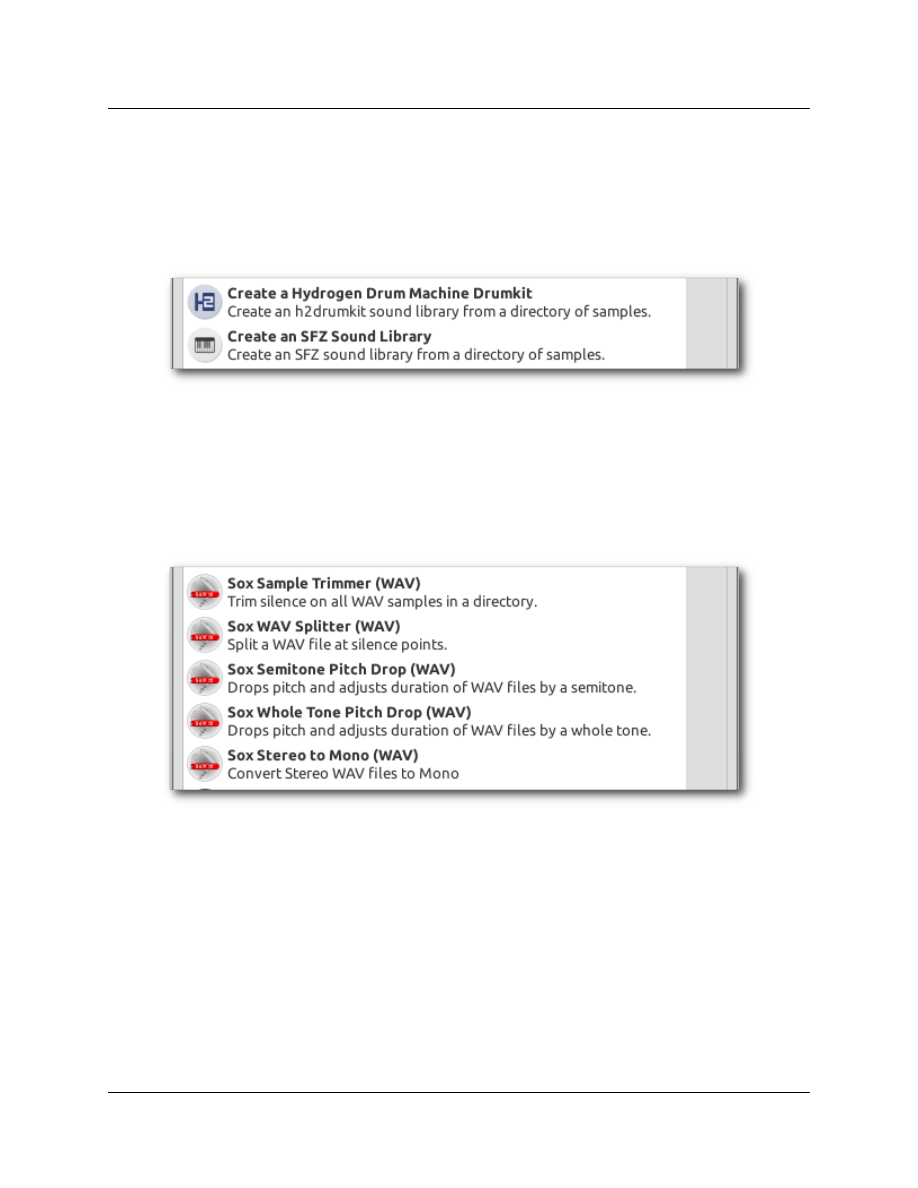
Create SFZ Sound Libraries and Hydrogen Drumkits :
From within Thunar you can launch interactive scripts to create SFZ and Hydrogen sound libraries. It is
essential that you have your sound samples organized and properly formatted for the target
application in a folder first.
Split, Trim, Transpose and Convert WAV Samples with SoX Utilities :
This is a brand new feature in AV Linux 2020 and will probably require further future polishing but it
currently allows for quick n’ dirty manipulation of WAV files to prepare them for use in Sound libraries
all from the comfort of Thunar! The SoX scripts themselves can be found in usr/local/bin and can be
modified there for those who are savvy with SoX command line.
55
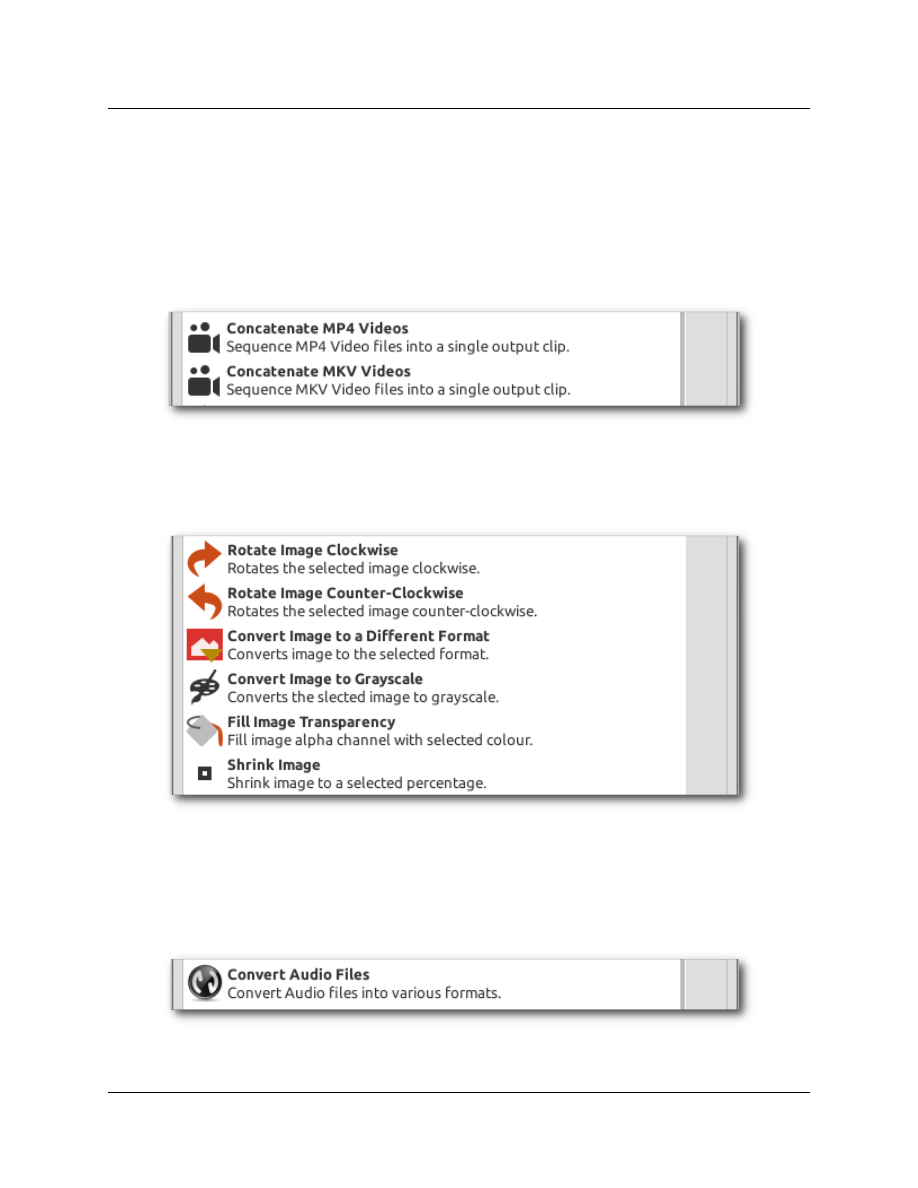
Concatenate MP4 and MKV Video files :
You can join MP4 and MKV Video files together, for example you have finished clips you want to
combine without having to reopen them in a Video Editor and re-encode them with the resulting
quality loss. If the clips are the same resolution, have been encoded with the same encoder and
settings and if they are the same Audio sample rate you can use these Concatenate Custom Actions to
join them without re-encoding.
Manipulate, Convert and Work with Image files :
There are some newly added Custom Actions to quicky and easily work with pictures and image files.
Convert Audio Files With PACPL :
You can quickly and easily convert Audio files from one format to another with the integrated PACPL
Custom Action. When you right click on an Audio file in a folder you will will see the option to
“Convert Audio Files” as one of the menu options. Pretty much all common options for conversion are
supported.
56
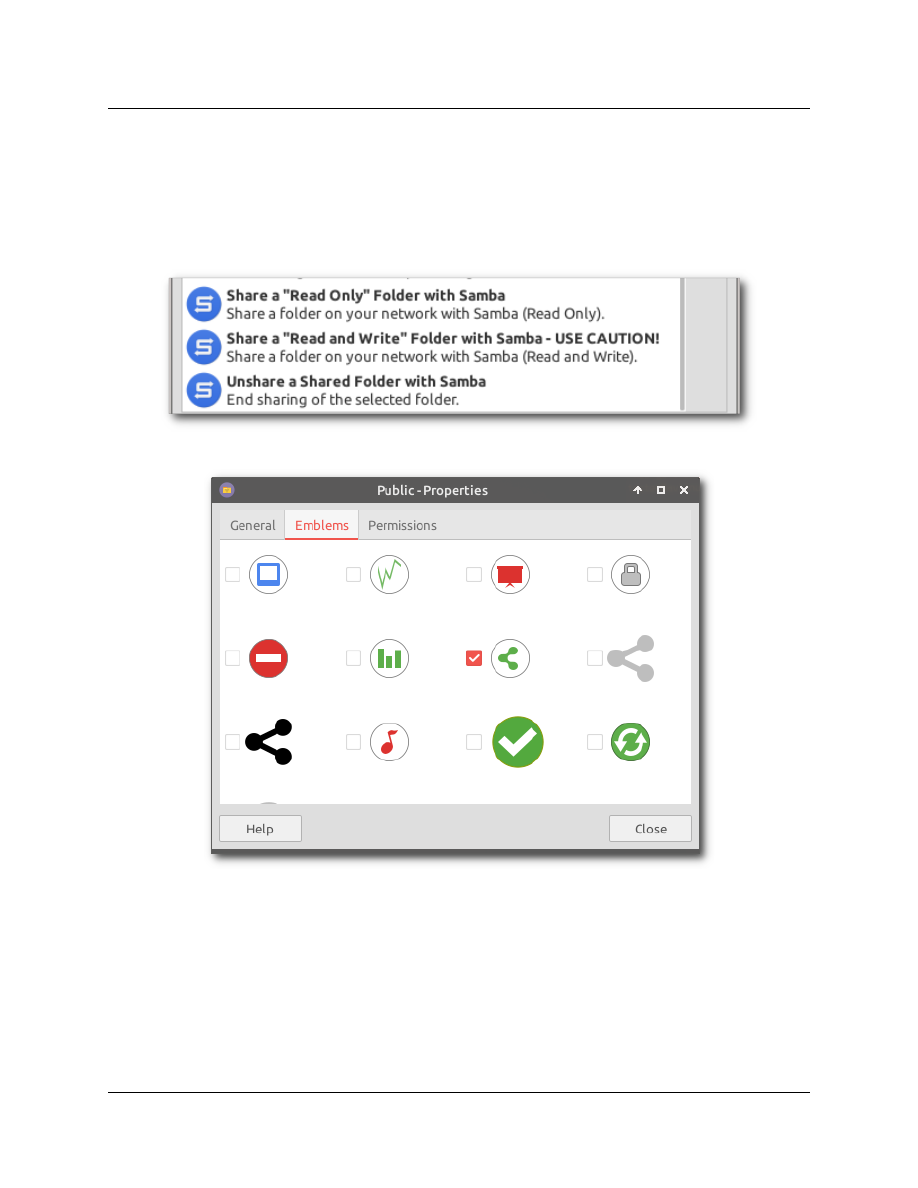
One-Click Samba Sharing on Your Network :
Right-clicking on a folder in Thunar will allow you to 'one-click' share it on your network. If you do
share a folder on your network you may want to right-click on it and select a sharing or network
‘Emblem’ to display on the folder to visually remind you it is shared.
*PLEASE NOTE!! - “Read and Write” will expose any folders you enable for sharing on your Network
with permissions for ALL Users on your Network, if you are concerned about the security of your
network, or are not sure which files you are making available DO NOT enable Samba sharing! It is also
not recommended to share the root directory of a drive and all its contents on a Network.
57

DEBIAN SY
STEM ADMINISTRATION BASICS :
Simple Commands for SysAdmin Tasks :
As a Linux User I used to wonder why XFCE4 and other light Desktop Environments didn't have any
fancy graphical tools for common tasks like adding or removing Users and password changes. After
learning how simple the actual Terminal commands were I could see that trying to put these tasks into
a GUI could potentially make them more confusing and time consuming than they really need to be. In
this section I've tried to demonstrate the most commonly used SysAdmin commands.
To add a new User to your system and create a new folder for them in the System '/home'folder you
need to know what the new User's name will be and run this command in a Root Terminal:
adduser <USERNAME>
Obviously you replace '<USERNAME>' with the actual User name, when you execute this command
you will be prompted for some more information and when finished the new Users folder will be
created in the system '/home' folder.
To add a system User to a 'Group' on the system (ie the 'lpadmin' Group to allow printing) then use
this command in a Root Terminal:
adduser <USERNAME> <GROUP>
To add a Group to the System use this command in a Root Terminal:
addgroup <GROUPNAME>
To remove a User from the System you use this command in a Root Terminal:
deluser <USERNAME>
To remove the User and their User folder from the systems '/home' add this:
deluser <USERNAME> --remove-home
To remove a User from a Group use this command:
deluser <USERNAME> <GROUP>
To change your 'Root' Password use this command in a Root Terminal:
passwd
To change a User's Password use this command in a Root Terminal:
passwd <USERNAME>
58

CHANGING USER AND GROU
P ID's :
How to change ‘UID’ and ‘GID’ for System Users :
By default the primary User on a Linux system is assigned a numerical User and Group ID (a.k.a. ‘UID’
and ‘GID’) of ‘1000’, additional Users are assigned numbers in excess of 1000 (ie 1001, 1002, etc). File
and folder ownership permissions are assigned to the User and Group that created them. A scenario
where this may come into play is if you are a secondary User and the primary User has been removed
from the system now making you the new primary User/System Administrator, the files of the primary
User will all have UID’s and GID’s of ‘1000’ so since you are a secondary User with a UID/GID of ‘1001’
you will not have ownership permissions of any files associated with User or Group ‘1000’. To fix this
you’ll need to change your UID/GID.
AV Linux 2020 has scripts to ease the changing of User and Group ID’s for situations where it is necessary,
it is highly recommended to not use these scripts unless you know exactly what you are doing.
In order to be used these scripts must be run as Root outside of the ‘X’ graphical environment in the
the basic system Console this ensure that no files to be changed are being used by the graphical
Desktop Environment. There are 2 ways to login to the bare Console:
1. Boot the system and select ‘Advanced Options’ from the initial GRUB Boot menu, then select
‘Recovery Mode’ in the Kernel Boot choices. When the computer completes it’s boot in recovery mode
you will arrive at a login prompt to the Console, in some cases you may need to hit the ‘Enter’ key on
your computer keyboard to initiate the login prompt. Once prompted enter your Username as ‘root’
and then enter your Root password. You are now logged in to the Console as Root and can proceed to
run the scripts
2. If you are using your computer you can use the Ctrl+Alt+F3 key to get out of X, you will then be
presented with a bare Console login prompt and can enter the Username ‘root’ and your Root
password at the Console prompt.
Using the UID/GID Scripts :
It is very important to note that you use these scripts for the regular Username you log into the
system with. As an example we are changing the UID/GID for a User named ‘tester’ from ‘1001’ to ‘1000’.
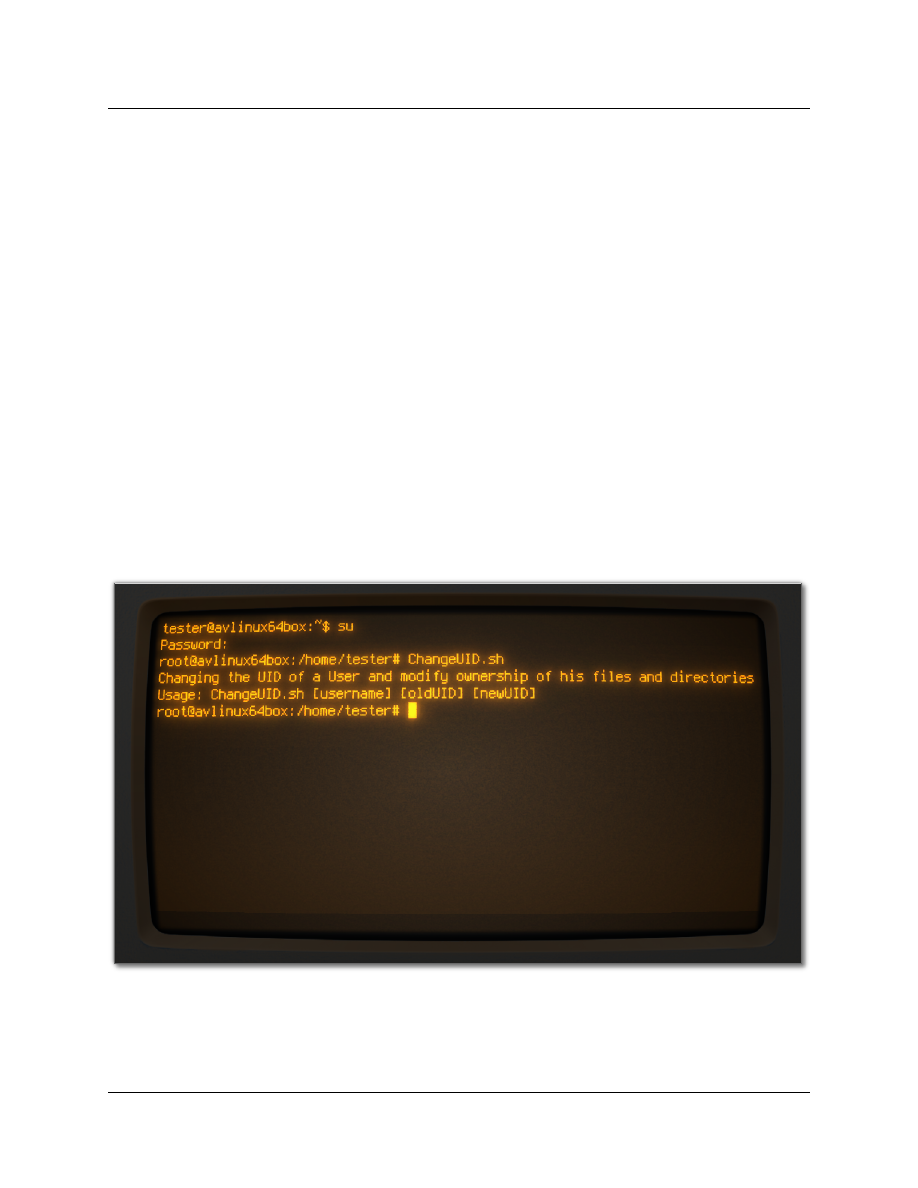
Once logged in to the Console as Root enter this command to change your UID:
ChangeUID.sh
This will launch an interactive script which will indicate the syntax required.
ChangeUID.sh [username] [oldUID] [newUID]
To demonstrate our example from above complete the command and fill in the required information
like the example below, then hit ‘Enter’:
ChangeUID.sh tester 1001 1000
59
Depending on the size of your Hard Drives and number of files on your system it could take the
scripts several seconds to a few minutes to find and change the file ownerships. It is normal to see
some warnings and terminal output about files located in ‘/proc’.
We are not done yet, so far only the User ID’s have been changed, we now need to to also change the
Group ID’s. You must change both User ID’s and Group ID’s. Group ID’s are done with a different script,
as before we will use the example of the ‘tester’ Group being changed from ‘1001’ to ‘1000’.
ChangeGID.sh
This will launch an interactive script which will indicate the syntax required.
ChangeGID.sh [username] [oldGID] [newGID]
To demonstrate our example from above complete the command and fill in the required information
like the example below then hit ‘Enter’:
ChangeGID.sh tester 1001 1000
As before, depending on the size of your Hard Drives and number of files on your system it could take
the scripts several seconds to a few minutes to find and change the file Group ownerships. It is normal
to see some warnings and terminal output about files located in ‘/proc’.
60

CHANG
ING
KEYBOARD SETTINGS :
Changing the Keyboard Layout for Other Languages :
To set the keyboard for a different language during a LiveISO session open a Terminal and use the
'setxkbmap' command with the accompanying 2 letter code for your language. The screenshot below
shows the command for French (setxkbmap fr).
61
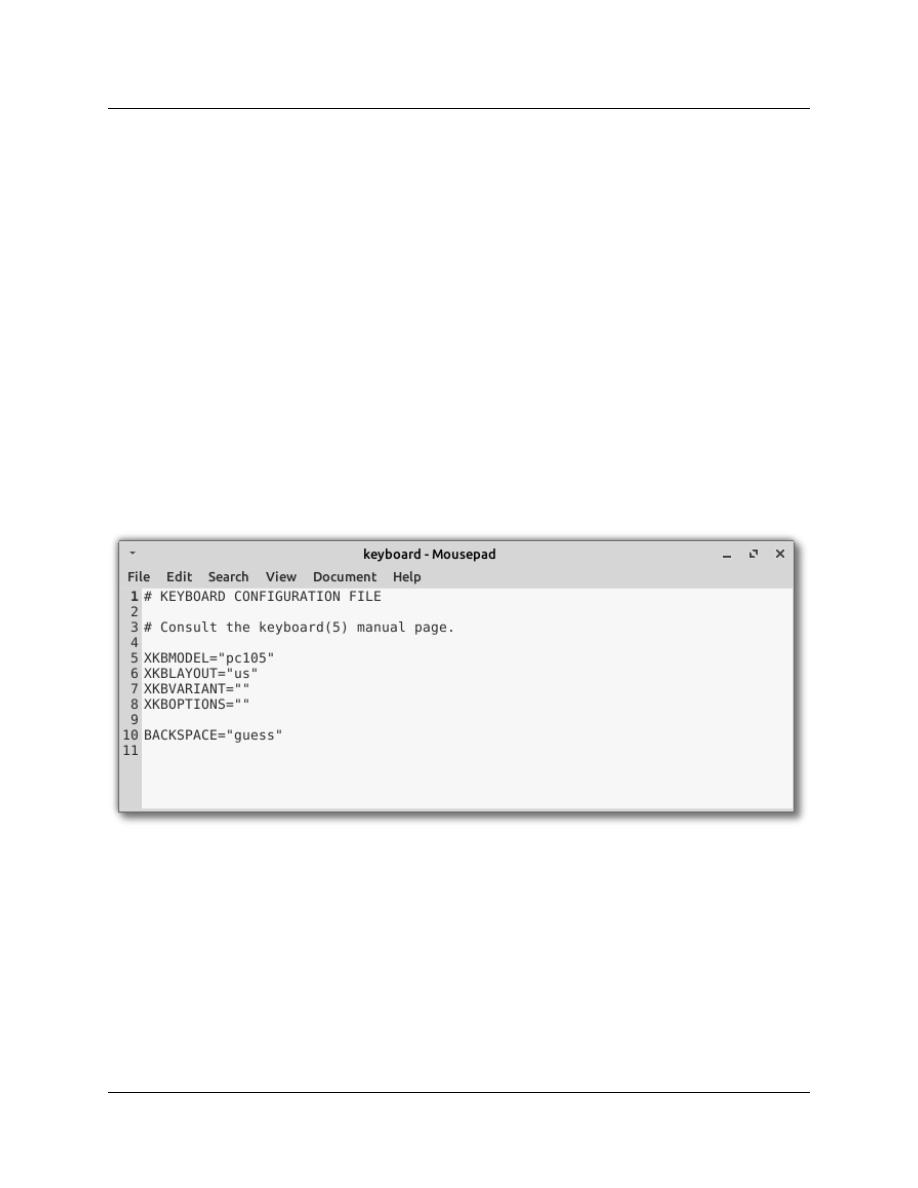
To permanently change the keyboard setting in an AV Linux install click the ‘Change Keyboard
Settings’ button found in the ‘SYS-Editor’ tab of the AV Linux Assistant. You can also change the
System keyboard manually by opening a Root Terminal from the Accessories menu and editing the
configuration file in /etc/default/keyboard with this command:
mousepad /etc/default/keyboard
Change the Model and Country codes within the quotes to the correct ones for your Country and save
the changes.
XKBMODEL="pc104"
XKBLAYOUT="us"
XKBVARIANT=""
XKBOPTIONS=""
62

SliM LOGIN MANAGER :
Setting SliM For Autologin :
AV Linux features 'SliM' as its default login manager. SliM has a very light system footprint and is still
quite configurable by editing its configuration file in /etc/slim.conf. The example below will cover the
most popular configuration request...autologin.
You can open the SliM configuration file for editing from the ‘SYS-Editor’ tab of the AV Linux Assistant.
To enable autologin two separate variables must be changed in slim.conf. Scroll down the file to find
the following line:
# default_user
To set yourself as the default User remove the '#' comment from the beginning of the line and then
add your Username, USERNAME is used here as an example:
default_user USERNAME
If we leave the file like this then on next login it will automatically enter your Username but still
require your password, to have autologin work fully you need to edit the autologin line:
# auto_login no
Once again remove the '#' comment and change the 'no' to a 'yes' like this:
auto_login yes
When you have completed editing the slim.conf file click 'Save' in the Mousepad Text Editor and
autologin should be active on your next login.
*PLEASE NOTE! - SliM does NOT support remote login, if you require remote login it is recommended
to install 'lightDM' from the Debian repositories and configure it as the default login manager.
63

Setting SliM Default Session Using Other Desktop Environments :
Open a Root Terminal from the 'Accessories' Menu and enter:
mousepad /etc/slim.conf
Scroll down the file to find the following line:
login_cmd exec /bin/bash -login /etc/X11/Xsession %session
Change '%session' to the start command of your desired other default Desktop Environment.
Command Examples For Some Other Common Light Desktops:
default,startxfce4,openbox,ion3,icewm,wmaker,blackbox,awesome
64

P
ERFORMANCE SETTINGS
:
CPU Governor Settings :
Governing the CPU in AV Linux is set by the 'cpufrequtils' configuration file found in /etc/default. For
Audio work it is NOT recommended to change this setting. This configuration file can be opened
directly for editing in the ‘SYS-Editor’ tab of the ‘AV Linux Assistant’.
NEW! Change CPU Governor Settings Dynamically :
For those who want to conserve battery life in a laptop or want the flexibilty to change the CPU
Governor on-the-fly AV Linux 2020 now has the Korakios ‘Set CPU Governor’ Utility in the ‘Settings’
Menu.
65
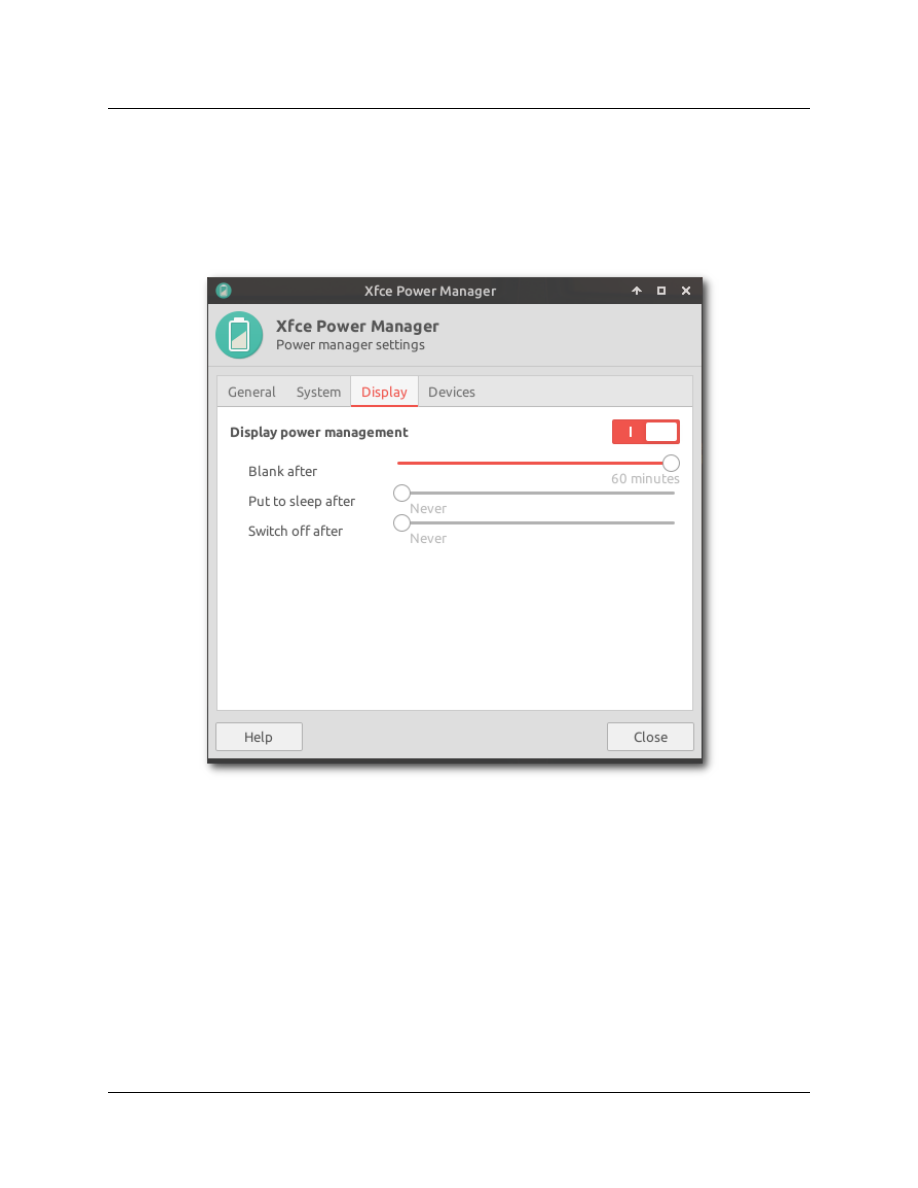
Power Management :
To change settings related to System power consumption use the XFCE4 Power Manager found in the
‘Settings’ Menu.
66
System Check for Additional Performance Parameters :
AV Linux 2020 has Raboof’s ‘Realtime Quick Config Scan’ in the ‘AV Linux Assistant’ as a useful
graphical way to check and verify important Linux-centric performance configurations on the system,
by default AV Linux is pre-configured to pass all of the various configuration parameters.
67
MONITOR AND DISPLAY SETTINGS
:
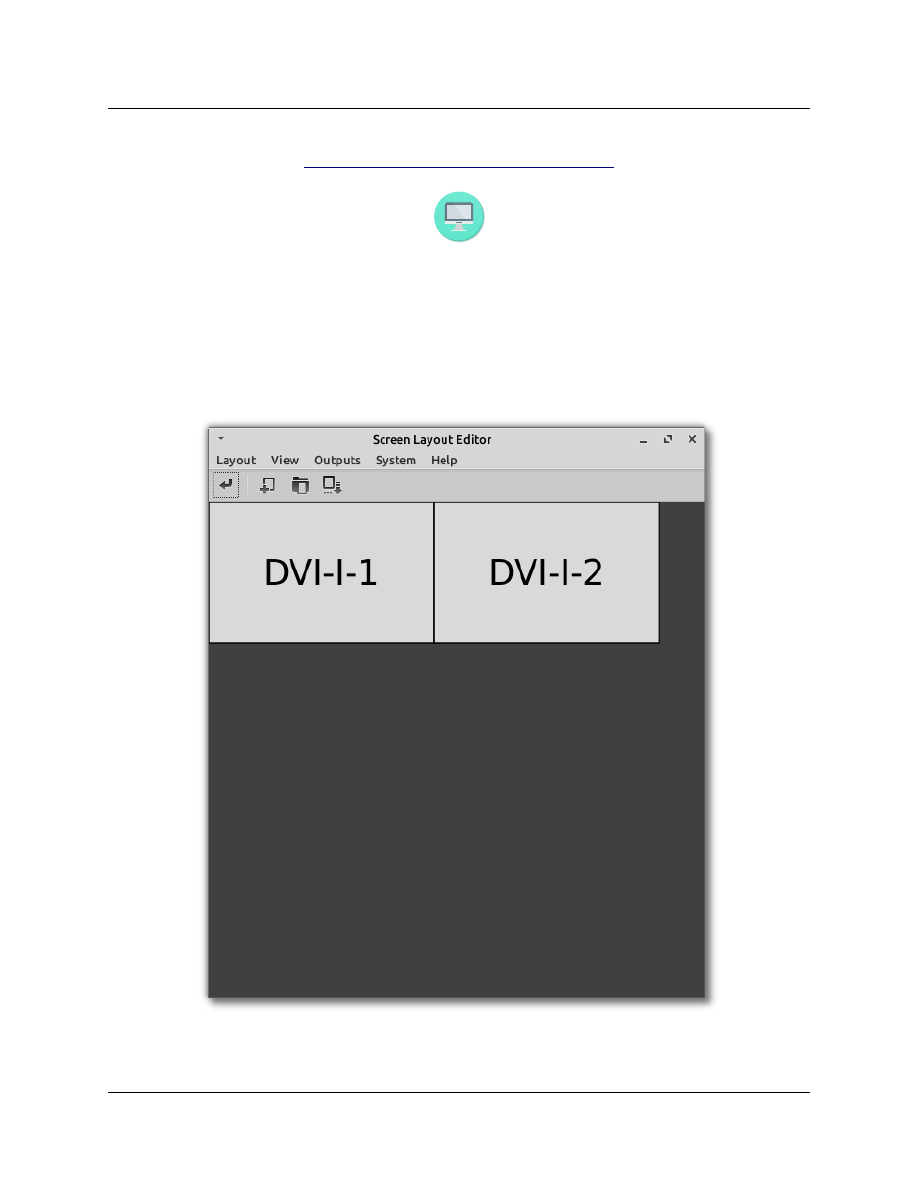
AV Linux uses an application called 'Arandr' to handle setting the monitor screen resolution and also
for setting up Dual-head displays. Arandr can be found in the 'Settings' menu. To change and select
the monitor resolution right-click on the rectangle within the Arandr window that represents the
Video output and display you are using. If you are using more than one output and display there will be
more than one rectangle present within the Arandr window.
*PLEASE NOTE! - To use Dual-head for certain nVidia and AMD Video cards it may be necessary to
have Proprietary Video Drivers installed which is not possible with the AV Linux RT Kernel.
68

Making a Persistent Dual-Head Setup :
If you have a permanent setup with Dual-head monitors you may want to have the Arandr
configuration settings automatically start it up for you when you boot up your computer. This is
possible but requires some extra steps and placing a '.desktop' launcher in
/home/<YOURUSERNAME>/.config/autostart. Here's how to do it:
➢
Start Arandr configure the displays as desired.
➢
Save and name your configuration from the 'Save As' menu (ie dualhead.sh).
➢
'dualhead.sh' will be saved in /home/<YOURUSERNAME>/.screenlayout by default.
➢
Find your created 'dualhead.sh' in the '.screenlayout' folder and right-click on it.
➢
Go to 'Properties' -->'Permissions' and make sure 'Allow executing file as program' is checked.
➢
In your home folder right-click and 'Create Document' 'Empty File' and name it
→
'dualhead.desktop'.
➢
Right-click on the 'dualhead.desktop' file you created and 'Open with Mousepad'.
➢
From the example below copy and paste the Launcher text into the 'dualhead.desktop' file.
➢
Change the yellow highlighted '<YOURUSERNAME>' to your actual User name.
➢
Save your changes in Mousepad
➢
Copy the 'dualhead .desktop' file to /home/<YOURUSERNAME>/.config/autostart.
➢
On reboot your ArandR configuration should be automatically loaded.
Example 'dualhead.desktop' Launcher File :
[Desktop Entry]
Encoding=UTF-8
Version=1.0
Type=Application
Categories=System
Terminal=false
Icon=
Name=Dualhead
Exec=/home/<YOURUSERNAME>/.screenlayout/dualhead.sh
Comment=Autostart Dual Monitors
69

P
ROPRIETARY VIDEO DRIVERS IN AV LIN
UX :
*PLEASE NOTE! - PROPRIETARY VIDEO DRIVERS ARE NOT COMPATIBLE WITH 'RT' KERNELS!!
Install the optional AV Linux ‘lowlatency’ kernel (Installed by default in AV Linux 2020.5.10) :
Proprietary Video drivers are not installable with ‘RT’ Kernels which AV Linux optionally uses for the
best performance. If you are not experiencing any problems relating to Video drivers on your system
then it is recommended to just use the default Xorg AMD and Nouveau video drivers. If you feel it is
absolutely necessary to install 3rd party Video drivers then the first step for compatibility is to install
the optional AV Linux ‘lowlatency’ kernel. To do this go to Menu ’System’ ’Synaptic Package
→
→
Manager’ and in Synaptic’s ‘Quick filter’ search bar enter one at a time:
“linux-image-5.4.28avl2-lowlatency”
“linux-headers-5.4.28avl2-lowlatency”
Select these packages to install with Synaptic and install them.
The SGFXI Script:
The installation of proprietary 3D nVidia and AMD video card drivers is handled by a 3rd party script in
AV Linux called SGFXI. Proprietary drivers are not supported and are to be installed at the risk and
discretion of the User, potentially very new Video cards or very old legacy Video Cards may not be
supported by SGFXI! AV Linux provides this method as a courtesy to help facilitate the installation of
proprietary 3D drivers since some Users may want this option and Debian Linux has no tools to handle
this operation other than for the stock Debian Kernel which AV Linux does not use.
Running SGFXI :
SGFXI cannot be run in a regular Desktop session it has to run in the bare system console. In order to
run SGFXI this way you need to shut down the graphical XFCE4 Desktop Environment by hitting the
Ctrl, Alt, F2 keys simultaneously. Your system will then go to the basic system console where you will
be prompted to login. Since SGFXI requires running with Root privileges you need to login as 'root' and
then enter your root password. If a login prompt doesn't immediately appear in the console you may
need to hit the 'Enter' key to display the login prompt. Once you have successfully logged in as ‘root’
then at the console command prompt run SGFXI by typing:
sgfxi
When SGFXI launches carefully read and follow the screen prompts.
70
*PLEASE NOTE! - In the case of nVidia Video cards since SGFXI needs to blacklist the Xorg ‘Nouveau’
driver module it is sometimes necessary to run SGFXI twice in a row to completely install the nVidia
proprietary Video drivers. In this case SGFXI will most likely run the first time and obtain the drivers
and when you are prompted to log back in the computer will fail to use the new driver and leave you at
the bare console unable to login. The reason for this is that SGFXI cannot both install the drivers and
blacklist modules from the Xorg Video drivers at the same time. Although this is somewhat
cumbersome usually logging in as 'root' and running SGFXI again will allow the driver installation to
complete.
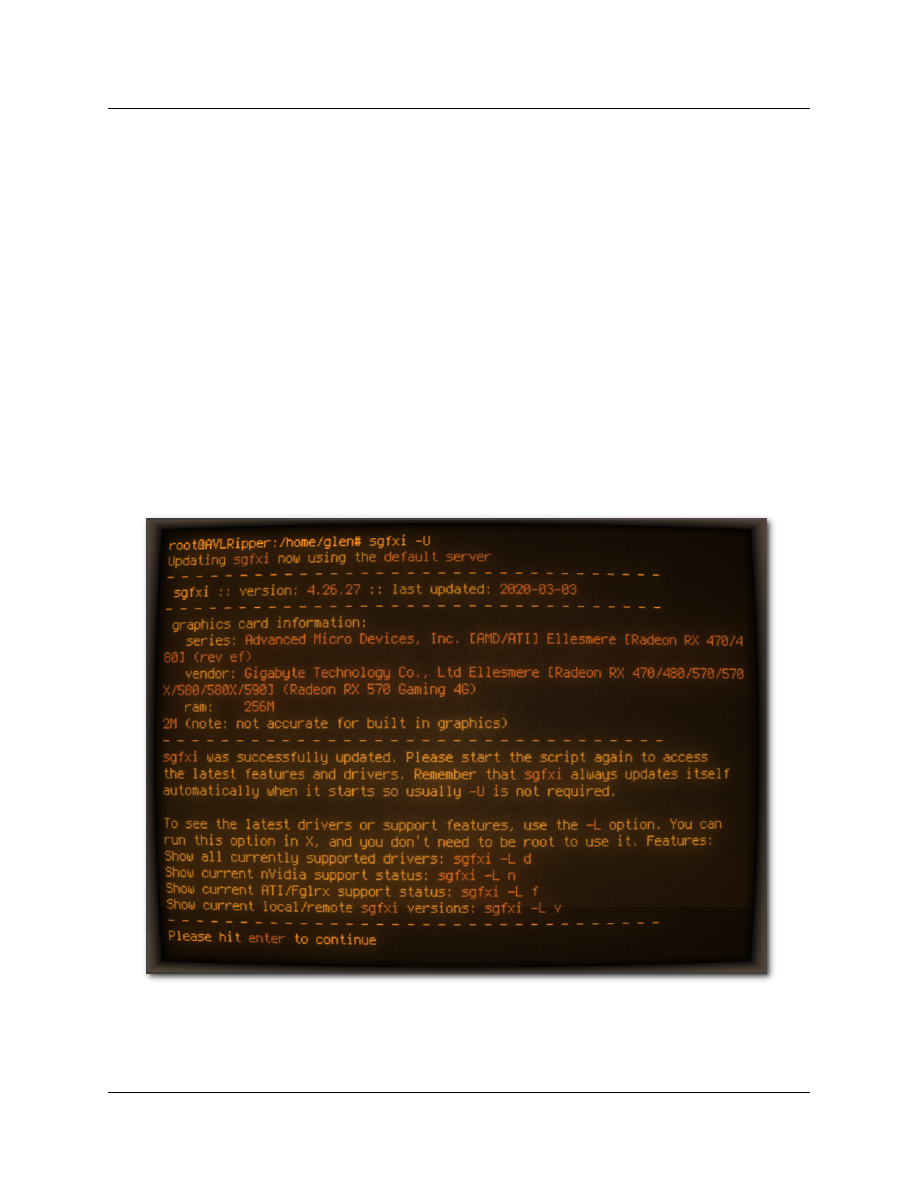
SGFXI is quite flexible and can be run with many optional commands which can be accessed in a
terminal by typing 'sgfxi -h':
Return the system to Xorg Video Drivers :
In the event that driver installation does not complete properly or you wish to go back to the Xorg
drivers then follow the steps above to log in to the bare system console as root and run:
sgfxi -! 32
71

KERNEL NOTES :
Default ‘lowlatency’ Kernel :
AV Linux offers a range of choices for post-install Kernels, by default it now features a ‘lowlatency’
Kernel which (if necessary) will support the installation of 3rd party proprietary Video card drivers. AV
Linux 2020 also features optionally installable ‘RT’ (Realtime Preempt) Kernels. ‘RT” Kernels can offer
lower latency performance advantages on some systems with certain hardware but they do NOT
support the installation of 3rd party proprietary Video card drivers. Updated AV Linux Kernels can be
installed from the AV Linux Kernel Repository which is enabled by default in the AV Linux 2020
Software Sources. If for some reason you require features that are not in the AV Linux kernel it is
possible to install the 'Liquorix' kernels or the stock Debian kernels using Synaptic Package Manager. It
is strongly recommended to only change or update your Kernel if absolutely necessary.
72

Cheatcodes Enabled By Default in AV Linux :
threadirqs - force-threaded irq handlers (realtime preemption)
Threaded irq's have long been a major part of the RT_PREEMPT patchset, and can offer significant
benefits for low latency audio uses. Use this parameter unless you have a really good reason not to.
transparent_hugepage=never - turn off hugepages (a new memory management feature)
Transparent hugepages should be useful in memory intensive applications, such as virtual machines,
databases, and possibly video editing. If ultra-low latency is desired, it seems to be best to disable
them. Use this parameter if you want to squeeze the lowest latency possible out of your audio chain.
noresume - stops system from resuming from hibernation
This option is enabled on the LiveISO image to suppress the “running /scripts/local-block...done”
message from displaying and delaying login. If you have problems with hibernation you may want to
remove this option after installing AV Linux.
To Be Enabled Optionally :
noautogroup - disable auto cgroup scheduling
The famous "200 line patch that does wonders", aka SCHED_AUTOGROUP, is useful when cpu-
intensive tasks, such as make, are being done in a terminal, while the desktop is in use. Use this
parameter to disable it if you think it is causing problems.
mitigations=off - disable Kernel Page Table Isolation patches (aka the Meltdown mitigation)
This option is only recommended if you use your computer solely for Audio and Video work and do not
have it connected to the Internet. This will disable protection from the ‘Meltdown’ security threat.
Example grub kernel command line:
threadirqs transparent_hugepage=never noresume quiet
Making GRUB-2 Add the Boot Flags Automatically :
1. In a Root Terminal:
mousepad /etc/default/grub
2. Add the desired boot flags to the GRUB_CMDLINE_LINUX_DEFAULT line, like this:
GRUB_CMDLINE_LINUX_DEFAULT="threadirqs transparent_hugepage=never"
3. Then run in a Root Terminal:
update-grub
4. Reboot
73
AUDIO & MIDI IN AV LINUX :
*Recommended Reading!*
PulseAudio with JACK :
It cannot be overstated that AV Linux differs significantly from your usual Linux Desktop in its
handling of Audio routing and subsystems. AV Linux relies on the low-latency Jack Audio Connection
Kit (a.k.a JACK) for its powerful interconnectivity. JACK is a low-latency sound server which runs on
top of ALSA (Advanced Linux Sound Architecture). ALSA is the basic 'driver' level of Audio hardware
support and is both integrated in the Kernel itself as well as being a core component of the Operating
System. By default many distributions and Desktop Environments install the ‘PulseAudio’ Audio server,
in recent years PulseAudio can be made to peacefully coexist with JACK and AV Linux makes this
easier by pre-configuring JACK and PulseAudio to work together with a custom ‘pajackconnect’ script .
Setting things up with Qjackctl :
The most initially confusing thing for many people getting started with Linux Audio is how to get the
applications they want to use to 'see' (or perhaps hear) their Audio device. Reading this section will
hopefully facilitate getting everything to 'just work'. The biggest step required of the User is to
identify and select the Audio device they want to use, after that most of the complexity is looked after
for you.
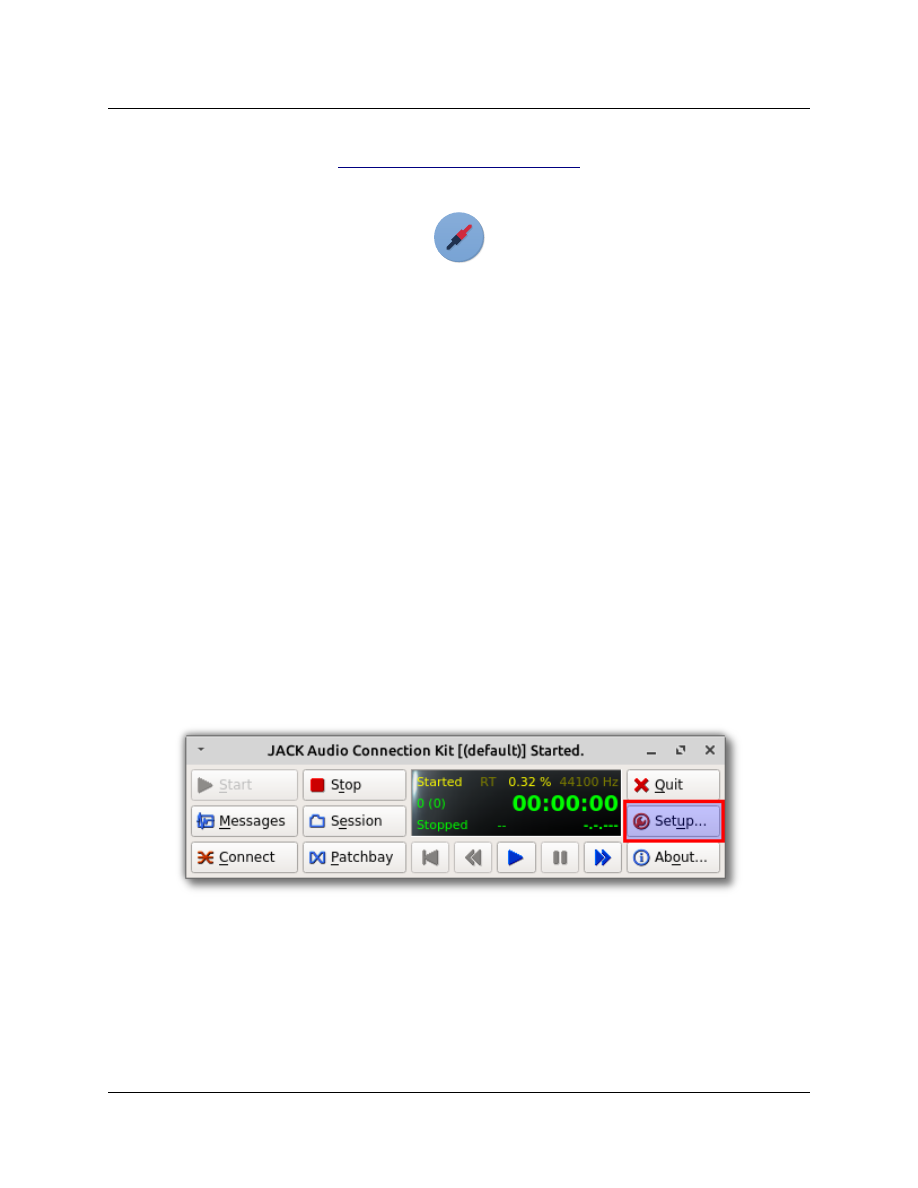
The easiest way to setup the JACK Audio server is to use the JACK Control app (a.k.a. Qjackctl). It can
easily be launched from the XFCE4 Panel or Whisker Menu. To setup your Audio device click the 'Setup'
button.
74
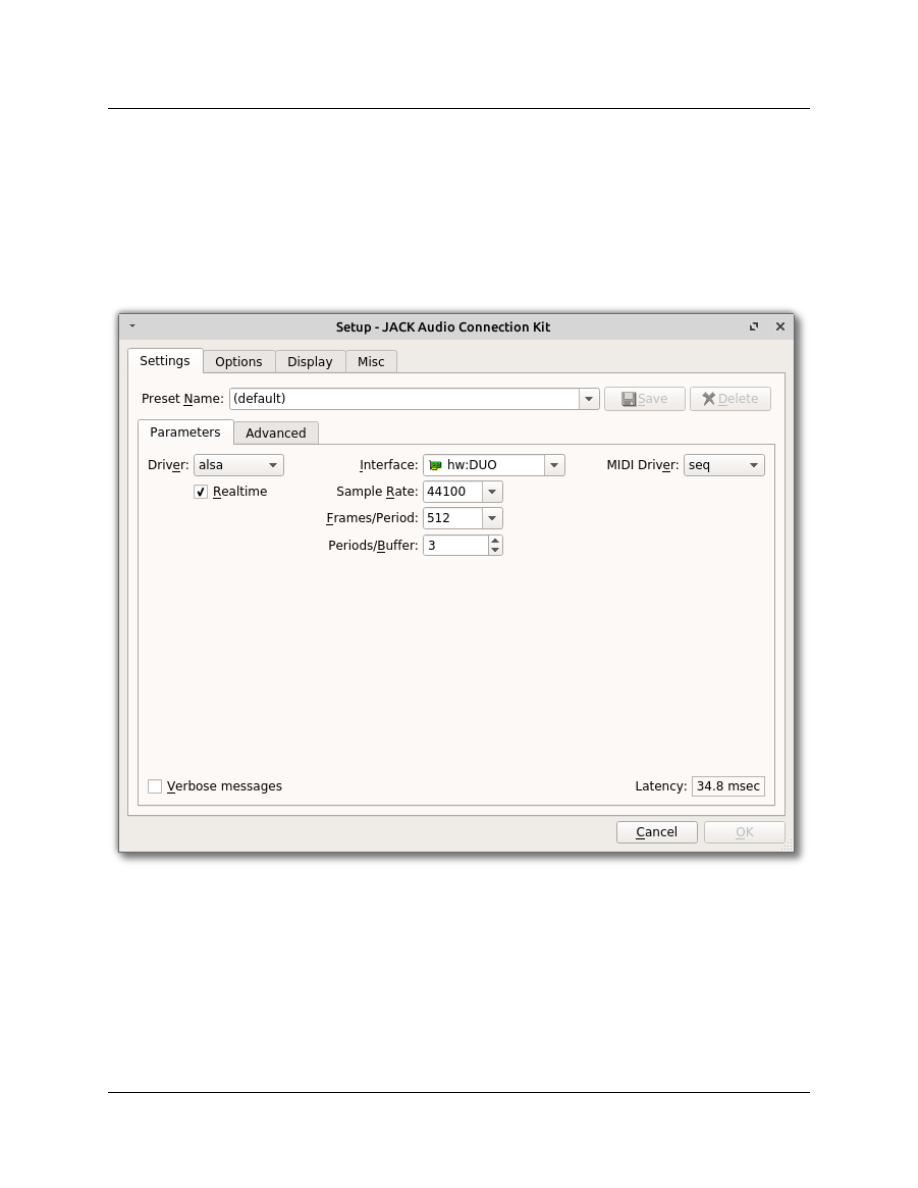
The 'Setup' Window has multiple tabs which we will go over one at a time, the 'Settings' tab is where
we initially select and set up the device we want to use with JACK in the 'Parameters' tab. To the left is
the 'Driver' select dropdown box. Internal, PCI, and USB 1.1 and 2.0 Audio devices require the 'alsa'
driver and FireWire devices require you to select the ‘alsa’ or 'firewire' driver (depending on the
firewire driver being used). It is essential that the 'Realtime' checkbox is selected. Next we need to
select our desired Audio device from the 'Interface' dropdown box.
75
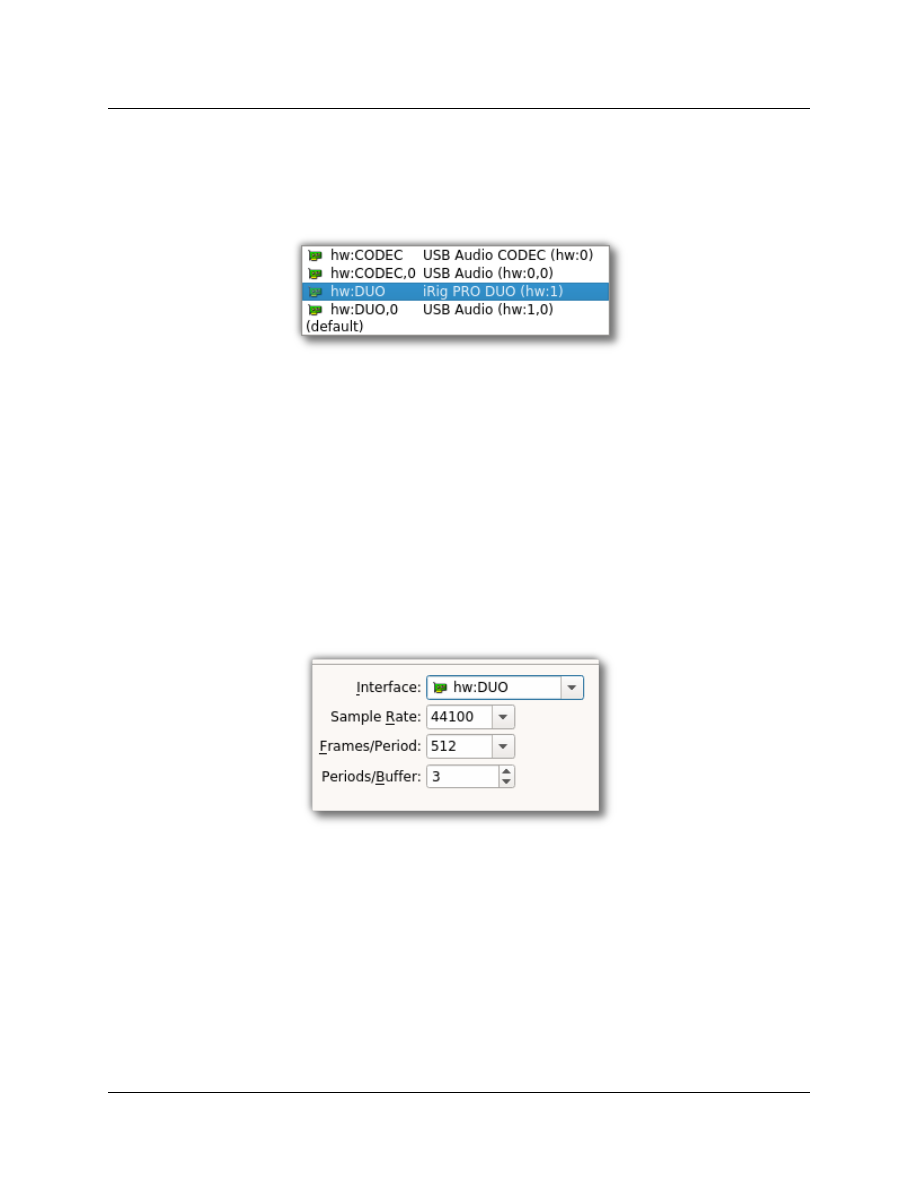
In the 'Interface' dropdown box we will see a list of available Audio devices on the system, generally
speaking whatever appears in the dropdown box should be supported to use with JACK, below is an
example with multiple ALSA devices on a system to illustrate what to look for.
In the example picture above we can see that the system has a ‘USB Audio CODEC’ device at 'hw:0'
and an iRig DUO USB Audio device at ‘hw:1’
Underneath the 'Interface' dropdown box we can set the 'Sample Rate' , 'Frames/Period' and
'Periods/Buffer'. By default AV Linux is pre-configured for a Sample Rate of 44100, 1024
Frames/Period and 3 Periods/Buffer. Potentially these default settings will work OOTB for most Users
but may need to be changed depending on the performance of your hardware. The the most
influencial number is 'Frames/Period'. If you are experiencing Audio dropouts or 'Xruns' you may need
to increase from '1024', conversely if you want to have lower 'latency' you can decrease from '1024'
until Xruns reappear. The 'Periods/Buffer' figure is dependent on the Audio device type, USB and
Internal Audio devices generally perform best at a setting of '3' Buffers and PCI(e) Audio devices
require a setting of '2'. Once you are happy with your settings you can start JACK by hitting the 'Start'
button on Qjackctl.
*PLEASE NOTE! - 'Latency' is the delay incurred by your Audio/MIDI signals going into your
Audio/MIDI device Inputs and following the signal path of both the hardware and software
Applications being used and coming back out of the Audio/MIDI device's Outputs.
76
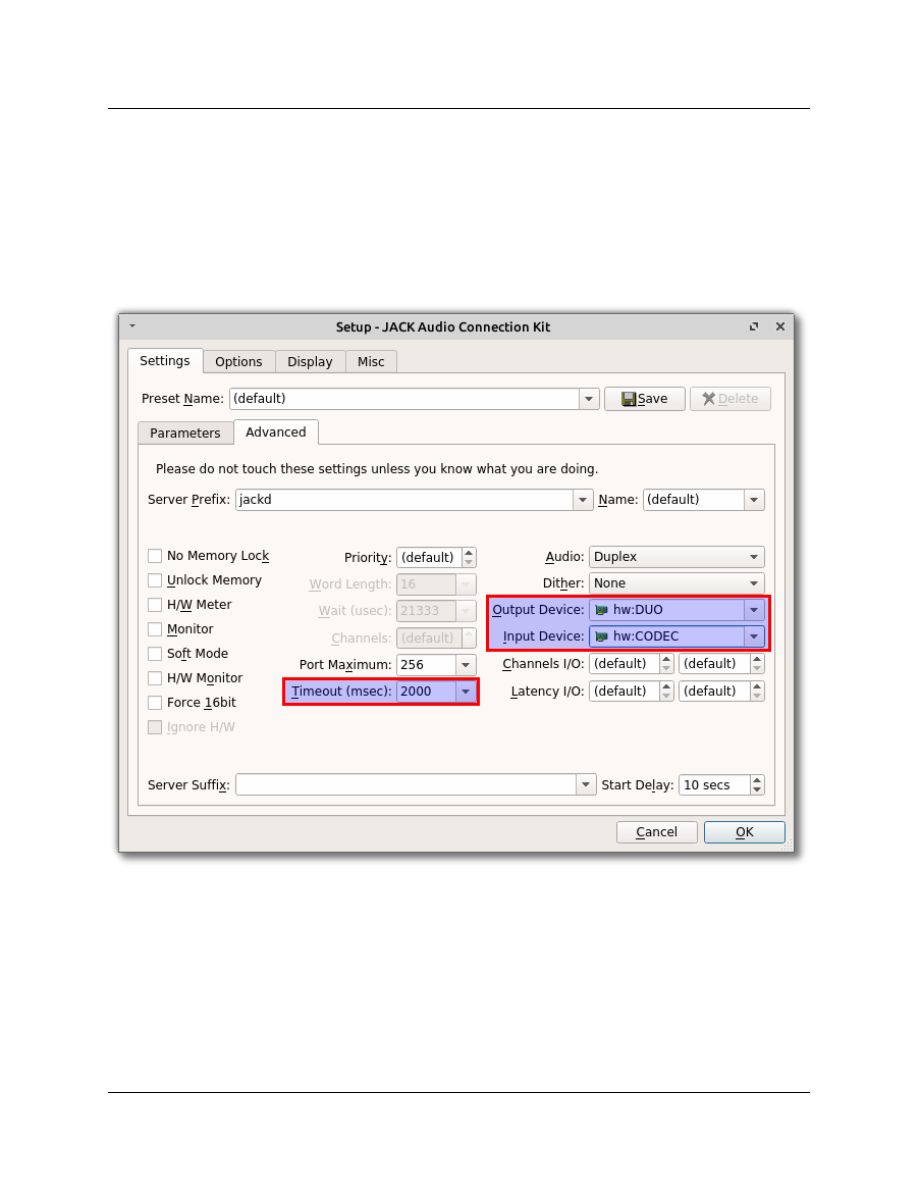
The 'Advanced' tab of the Setup window contains extra settings for experienced Users and in most
cases these settings do not need to be changed. The ability to choose separate Output and Input
devices may be of interest to people who want to use multiple Audio devices, a common scenario is
using USB microphones to record and another System Audio device to play back. Another important
JACK setting is the 'Timeout' value for running MIDI Plugins and editing a setting of 2000ms is
recommended and set by default.
77
JACK's L'il Helpers: pajackconnect and a2jmidid :
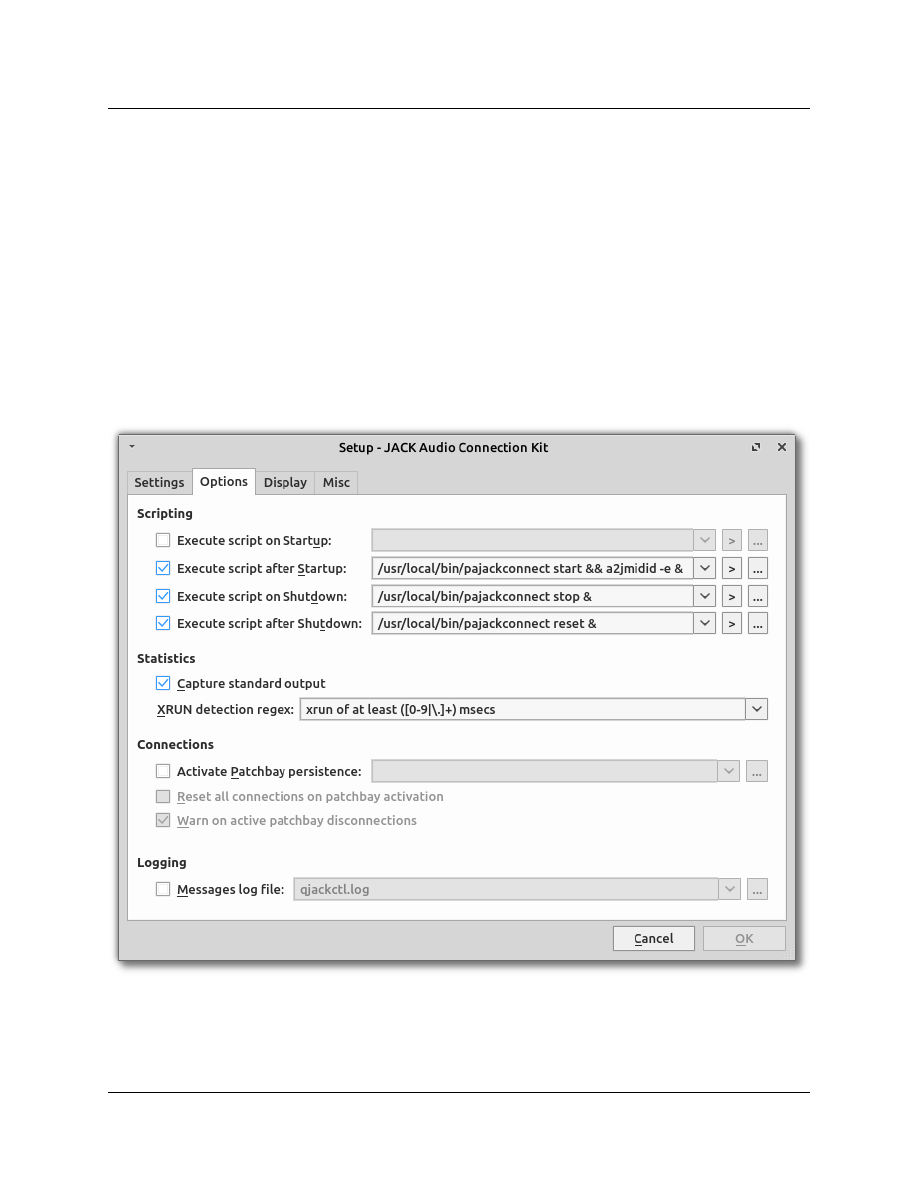
The next 'Options' tab is where we can have Qjackctl execute any optional scripts when it is started,
by default AV Linux provides a 'pajackconnect' script as one of two very important helper applications
when Qjackctl starts JACK. One helper application is 'a2jmidid'' (ALSA to JACK MIDI Daemon). In Linux
there are 2 methods of handling MIDI I/O, one is at the ALSA driver level and the other is with JACK.
This can be a problem if you are using an application with JACK and trying to connect a MIDI device
with ALSA, the two methods cannot be used at the same time so the solution is to bridge any ALSA
MIDI devices so they appear available as JACK MIDI and this is exactly what 'a2jmidid' is for, now any
ALSA MIDI devices seamlessly appear to be selected as 'a2j' in Applications using JACK.
The second helper application is a script known as 'pajackconnect' and it’s purpose is to integrate
PulseAudio as a source and sink server and client routed through JACK. The ensures that applications
using PulseAudio will route their Audio to the selected running Audio device you’ve selected in
Qjackctl.
78
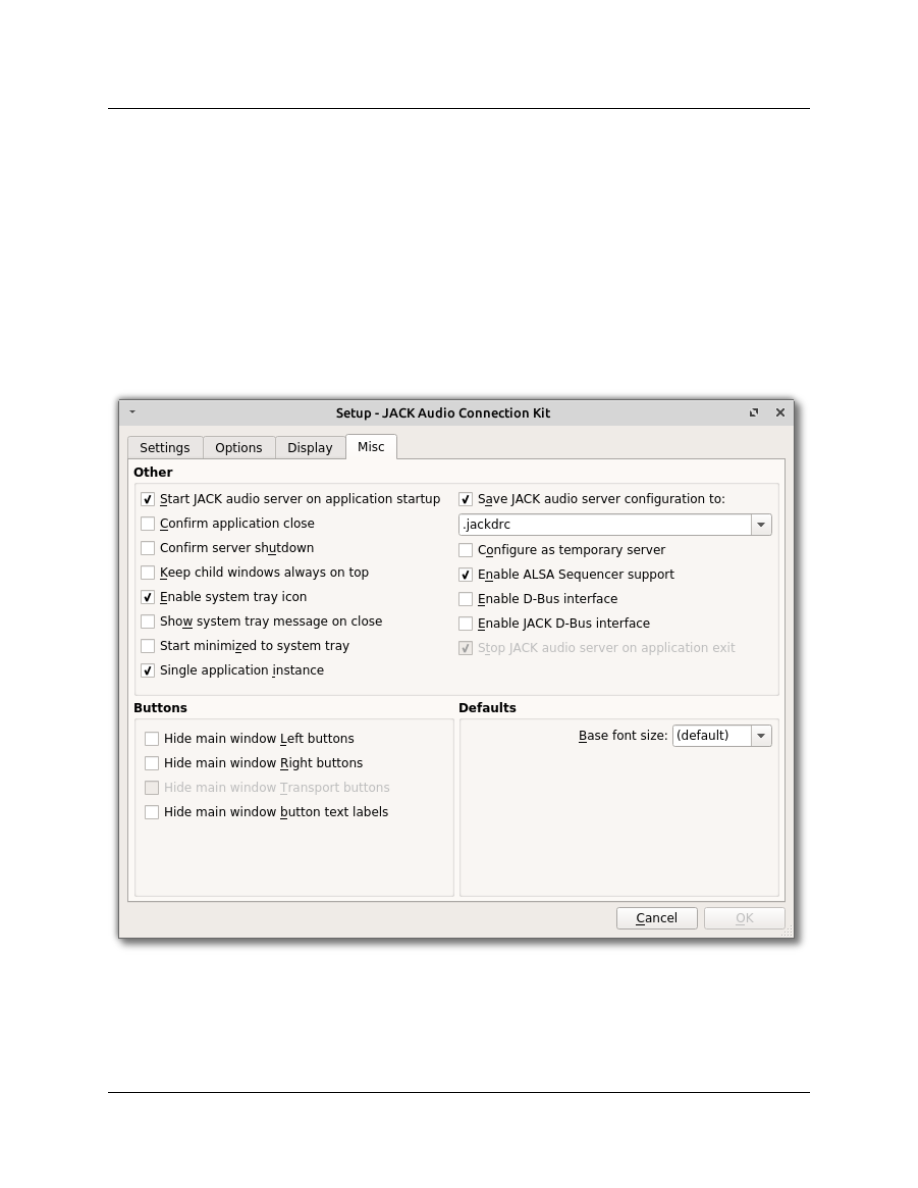
JACK Autostart and Other Settings :
The 'Misc' tab of the Qjackctl 'Setup' window gives some other convenient options for getting JACK
integrated smoothly. The 'Start JACK Audio server on application startup' checkbox means as soon as
you launch Qjackctl it will start JACK without you needing to hit the 'Start' button. You can also have
Qjackctl run in the system tray on the XFCE4 panel when you close the GUI. If you have a setup where
you are using one Audio device and it doesn't change you can have Qjackctl automatically start when
you log in to your computer, for this to work you need to select the option to 'Start JACK Audio server
on application startup'. To have Qjackctl automatically start you need to add it to the XFCE4 'Session
and Startup' list. Go to the Whisker Menu and type 'Session' into the search bar and the top choice
should be 'Session and Startup', go to the 'Application Autostart' tab and click the 'Add' button and
create an entry for Qjackctl like the one shown on the next page.
79
Getting Connected :
If you are using a monolithic DAW like Ardour or Mixbus with JACK you will find that most of the
connectivity you need is managed within the program itself so making manual connections is not
necessary, in these cases you simply start JACK and then launch your program. However if you want to
use and connect individual JACK-aware programs you may want to use the connection features of
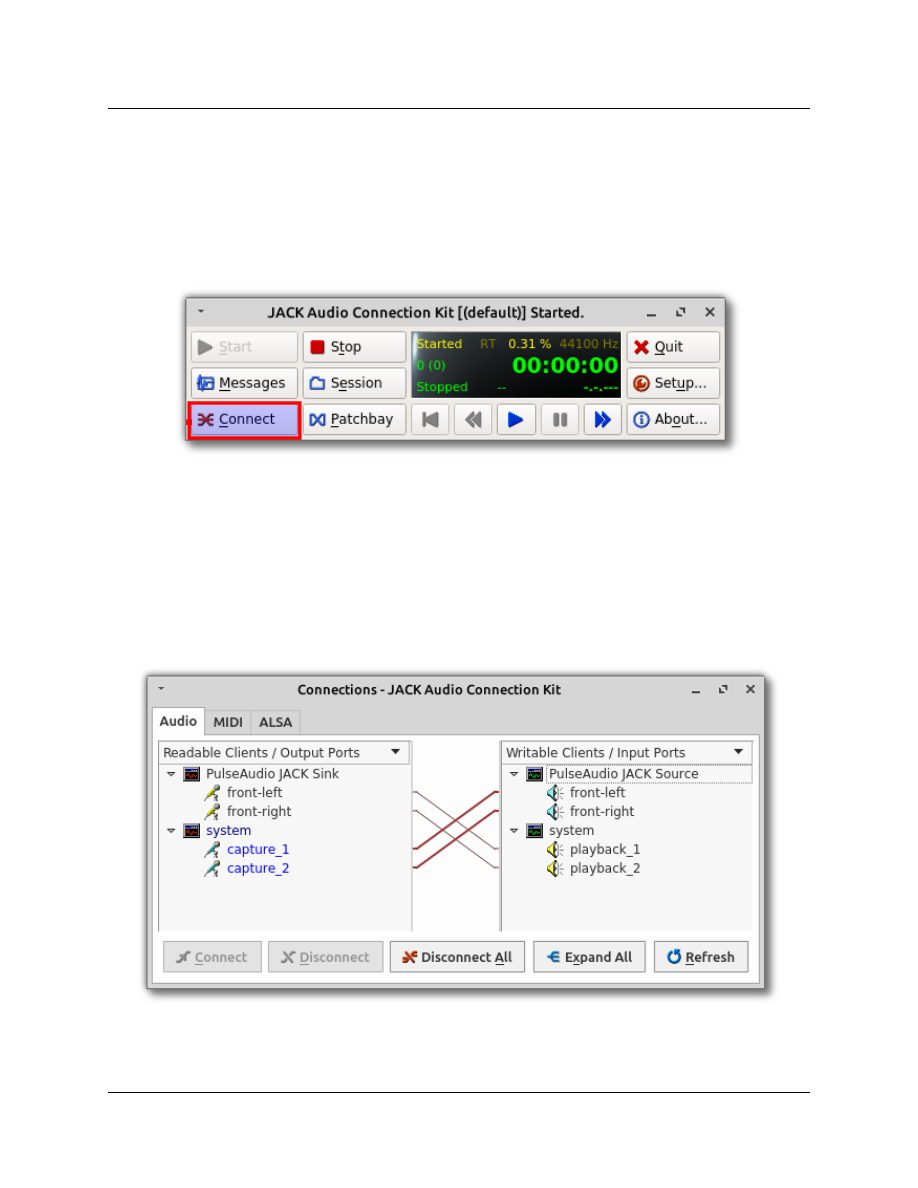
Qjackctl. To access the connections window click the 'Connect' button.
There are three tabs in the 'Connections' window which pertain to three specific connection points.
'Audio' is for both hardware and software Audio (not MIDI) connections. When you are using the
default AV Linux settings it is normal and expected for the 'PulseAudio JACK Sink' and 'PulseAudio
JACK Source' clients to appear because PulseAudio is still active on the system. If you have a JACK-
aware application running it should appear in the 'Readable or Writable Clients' panes and in most
cases you will want to connect it to the 'system' playback or 'system' capture ports not the PulseAudio
ports.
80

The center 'MIDI' tab is for 'JACK MIDI' connections, because JACK MIDI is being bridged by 'a2jmidid'
its ports appear under the 'a2j' Client. You can see the iRig PRO DUO is visible in this tab ready to be
connected to JACK-aware MIDI applications.
The 'ALSA' tab is for ALSA MIDI hardware and software to be connected, as you can see since the iRig
PRO DUO is supported by ALSA it also appears in the ALSA tab.
81
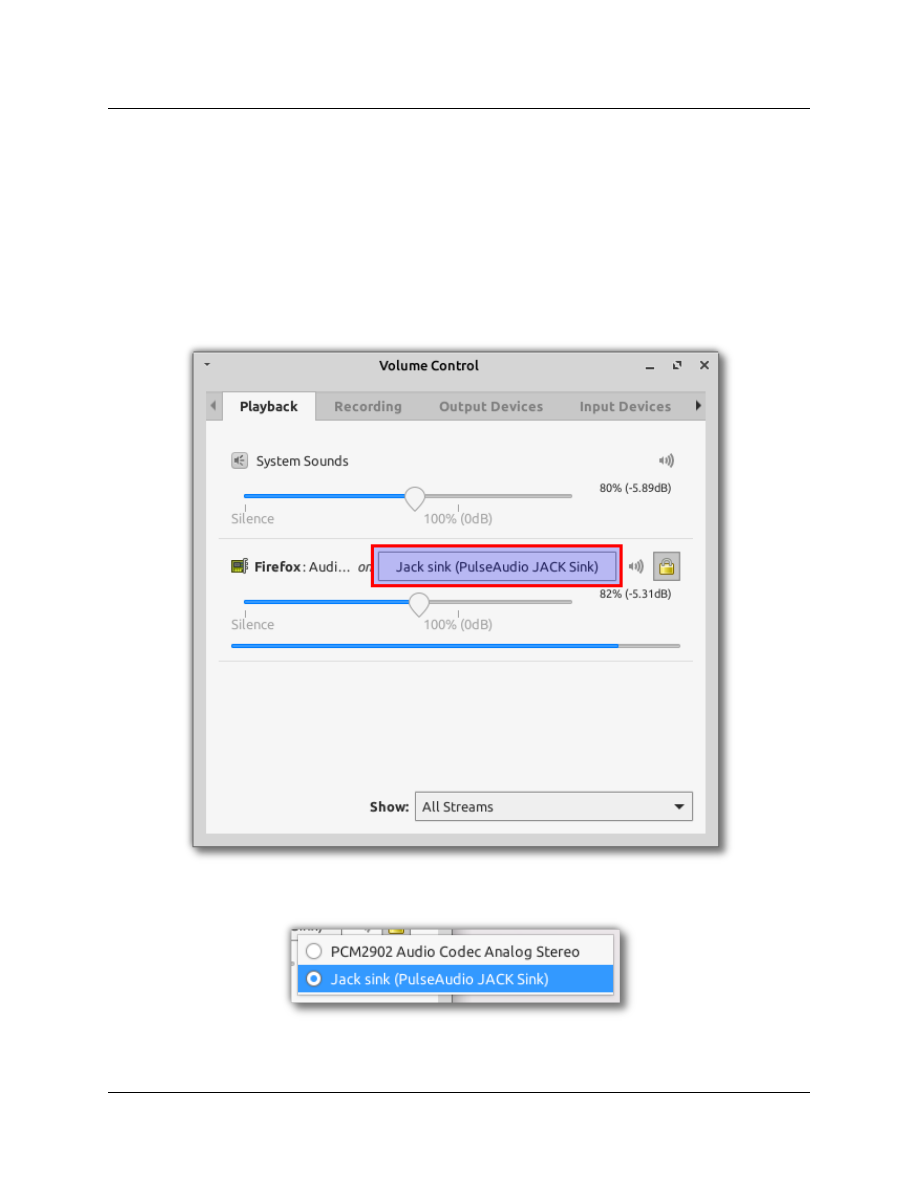
Potential Audio Routing Problems with Mozilla Firefox :
Recently Mozilla’s Firefox Web Browser changed it’s Audio routing from directly connecting to ALSA
to utilizing PulseAudio. It has been noted that if PulseAudio and JACK are working together utilizing
the ‘PulseAudio JACK Source/Sink’ Firefox may try to access the default system Audio device directly
rather than connecting through the already running PulseAudio JACK Sink. This results in no Browser
sound and Audio and Video streams that will not play back. To fix this Firefox needs to be directed to
use the JACK Sink by using the PulseAudio Volume Control launched either from Menu Multimedia-
→
PulseAudio Volume Comtrol or clicking the PulseAudio applet on the XFCE4 Panel
→
Look for ‘Firefox’ in the ‘Playback’ Tab and click on the highlighted Audio device button.
Make sure you have the ‘PulseAudio JACK Sink’ selected for Playback rather than the system Audio
device.
82
jackd and jackdbus :
There are 2 different ways the system can run JACK behind the scenes, the simplest is by running the
‘jackd’ executable with ‘Qjackctl’ and this is what AV Linux uses by default, however there is a second
way of running JACK and this is with the Desktop interprocess communication mechanism known as
‘D-bus’. Running JACK with D-bus is a selectable option in Qjackctl (Setup Misc. tab). If you start
→
JACK with Qjackctl before doing Audio and MIDI work you will probably not encounter the D-bus JACK
executable known as ‘jackdbus’.
Occasionally other JACK-aware programs that are launched before Qjackctl may inadvertently start
jackdbus and when you later try to launch JACK with Qjackctl you will see JACK is already running and
displaying as ‘Active’ in the Qjackctl GUI and you may even notice that the sample rate may set to a
different value than intended. Only one instance of JACK can run at a time so you may not be able to
launch other JACK-aware programs or you may find that your Audio setup seems to have a mind of it’s
own if jackdbus is running undetected in the background.
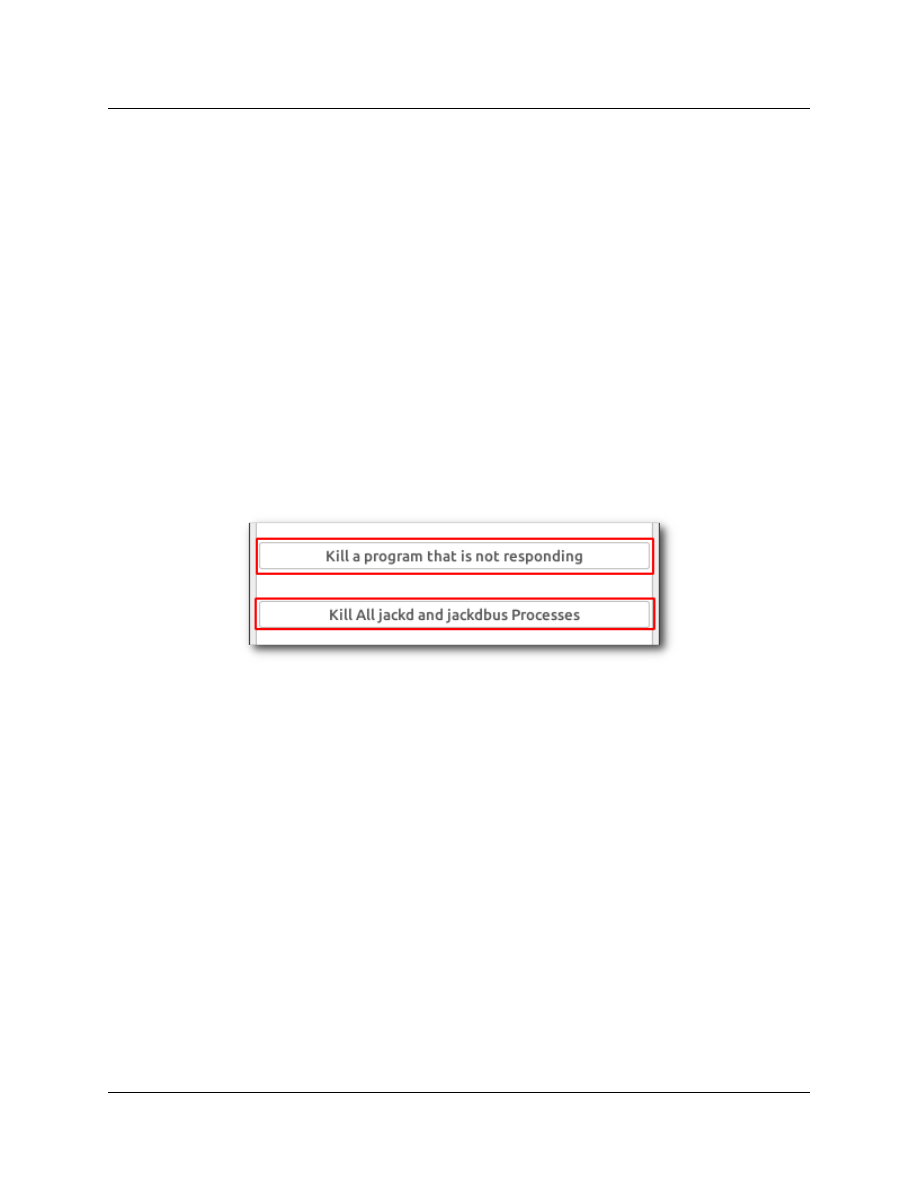
The ‘AV Linux Assistant’ has utilities to help shutdown hung or misbehaving programs and also to kill
any instances of jackd and jackdbus running in the background and reset the system to start JACK
cleanly.
You can also manually kill all JACK processes by running this command in a regular Terminal:
killall -9 jackd jackdbus
83

FireWire Audio Drivers: ALSA or FFado?? :
We are in a period of dual support for FireWire Audio devices, with the older FFado method and the
newer ALSA FireWire drivers which are present in the Linux kernel as modules. An issue is you have to
use one or the other and it seems for most Users that FFado still provides the best latency (256fpp or
less). By default AV Linux will load the ALSA modules for FireWire so to select your FireWire Audio
device in Qjackctl you need to use the ‘alsa’ JACK driver not ‘firewire’. It is now necessary to tell the
system not to load the ALSA 'snd_dice' module before running FFado and JACK will work. To do this
during a session open a Root Terminal and use this command to remove the ALSA FireWire module:
rmmod snd_dice
It is important to note this is a ‘per-use’ command and will not be persistent on a reboot in order to
make it persistent on every boot some further configuration is needed.
Disabling ALSA FireWire Modules from loading at Boot :
If you want to permanently disable snd_dice you can blacklist the module so it will not load at boot like
this:
➢
Create a text file in /etc/modprobe.d/ called ‘snd_dice.conf’ containing only the text 'blacklist
snd_dice'.
➢
Run 'depmod -ae' as root.
➢
Recreate your initrd with 'update-initramfs -u'
With the ‘snd_dice’ ALSA modules disabled you can now use the older FFado drivers, to do this select
the ‘firewire’ driver in Qjackctl as detailed earlier in this section.
84
INITIAL SET UP OF ARDOUR/MIXBUS :
Choosing An Audio Backend :
For many people new to Audio Recording with Linux it can be a bit confusing and daunting to initially
set up the full-featured DAWs Ardour and Mixbus. Both powerful programs share the same core so we
will use Ardour as an example. Recently Ardour and Mixbus have gained the ability to be used with
either JACK, ALSA and most recently PulseAudio 'backends'. If you don’t wish to use Ardour or
Mixbus with JACK then choose one of the other Audio backends and ignore the JACK specific
instructions in this section. As stated in the previous chapter AV Linux is centered around using
the JACK Audio server, because JACK has interconnectivity with other external JACK-aware
programs it is recommended to prefer the JACK backend for using Ardour/Mixbus and to have
JACK up and running before Ardour and Mixbus are launched.
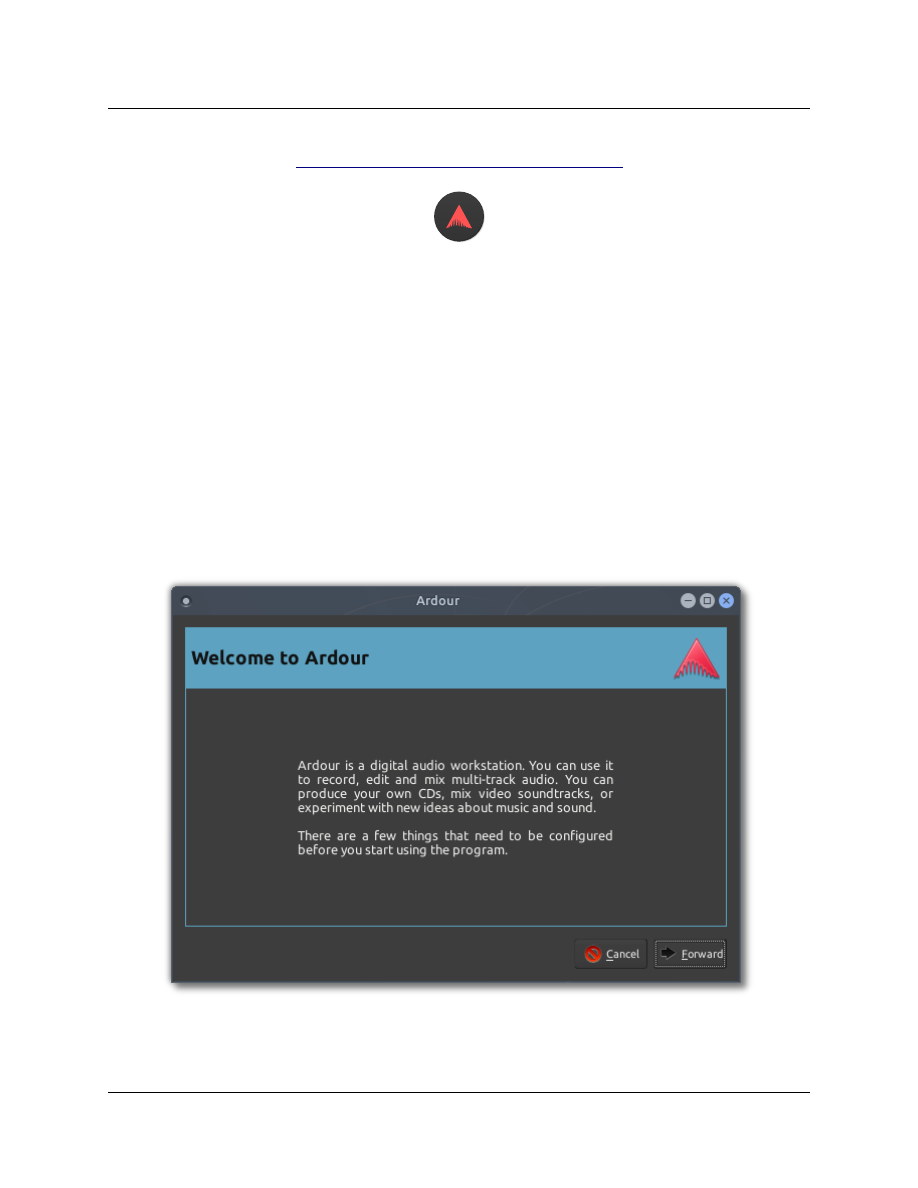
When you initially launch Ardour or Mixbus either in a Live Session or a fresh HDD install you will be
greeted by an initial welcome screen and walked through a few setup dialogs, in most cases except for
what is detailed here you can accept the default setup choices as offered.
85
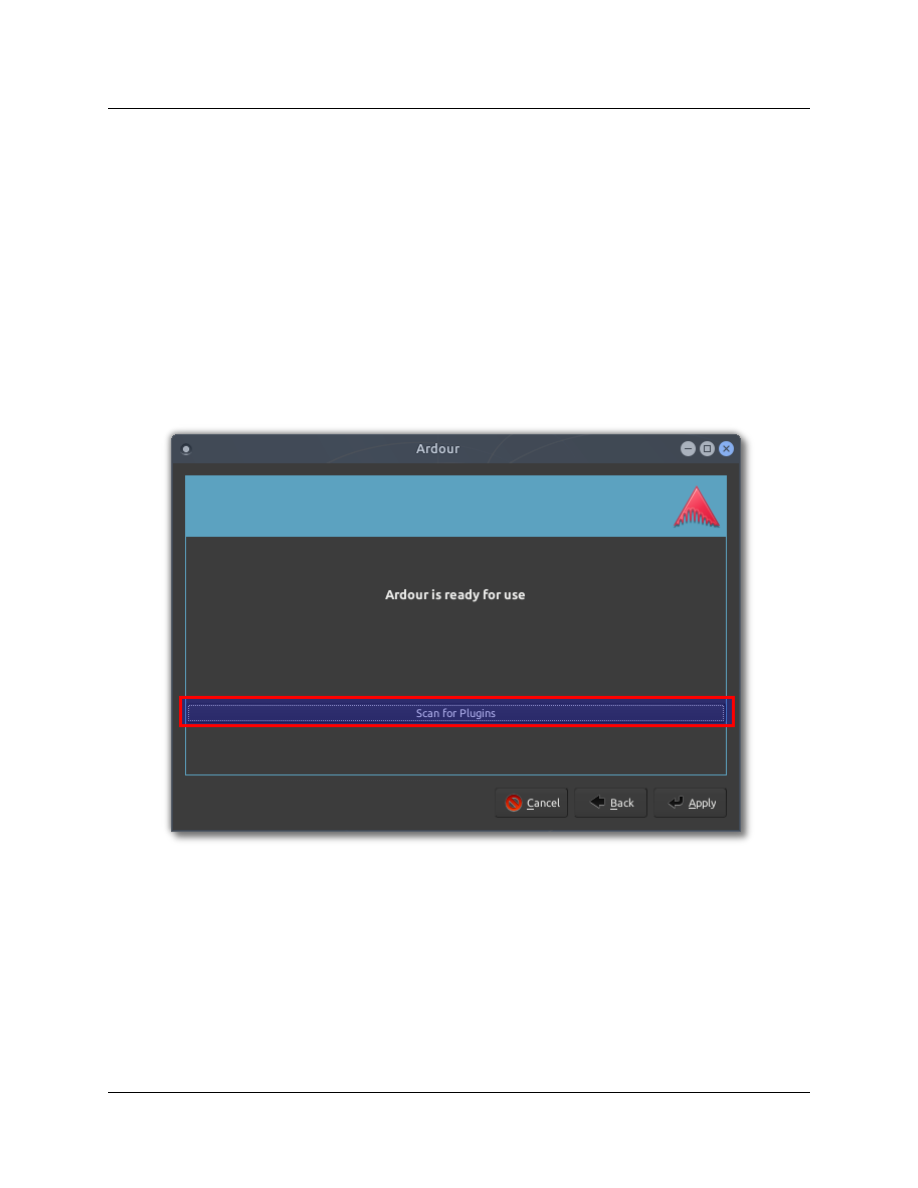
A very important part of the initial setup process is to have Ardour scan for Audio plugins, the scan
doesn't take very long and doing this now will ensure that the hundreds of pre-installed Audio Plugins
included in AV Linux will all be present and ready to use in your Ardour sessions. Ardour will auto-
detect LADSPA and LV2 Audio plugins, LinuxVST plugins specifically will be found during the scan. It is
important to note that any LinuxVST plugins you may have added yourself that aren't located in the
standard paths of /usr/local/lib/vst or /usr/lib/vst will require you to to point Ardour/Mixbus to their
folders by adding a custom path after launching the program, custom paths are set in 'Edit'
→
'Preferences' 'Plugins'.
→
*PLEASE NOTE! - Mixbus now requires Plugins to be scanned from 'Edit' 'Preferences' 'Plugins'
→
→
and does not offer a Scan option at first run.
86
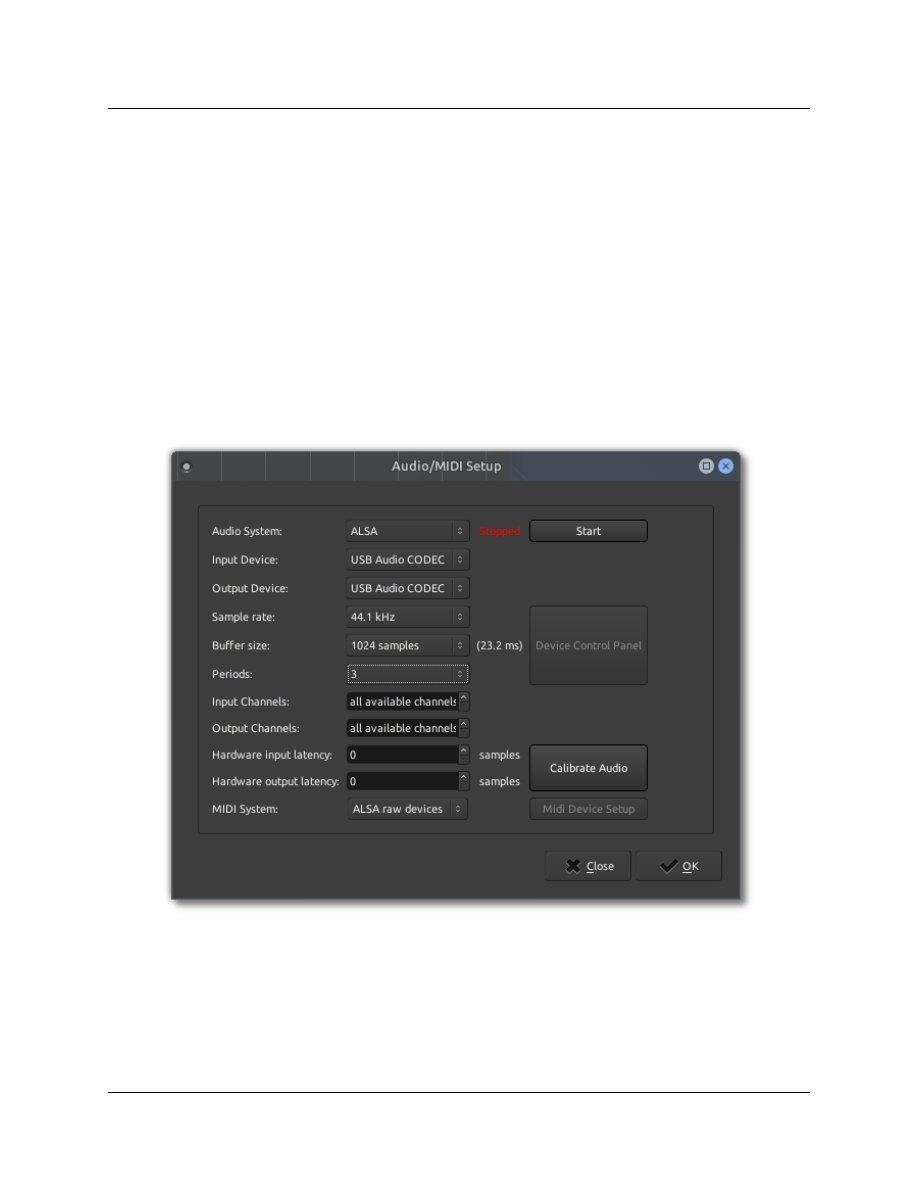
When you set up your initial Ardour/Mixbus session you will be presented with an 'Audio/MIDI Setup'
dialog, this is where you will choose whichever Audio backend you will use. As stated JACK is the
preferred recommendation, ALSA can be selected but has the following caveat: No Audio/MIDI from
any other external programs or applications can be routed in or out of Ardour/Mixbus. In the ALSA
setup example below we are using the same USB Audio device for both Input and Output which is a
suggested practice. It is possible to select a different Input than the Output, people using USB
Microphones may want to use the mic with an Input and the System Audio device as an Output.
Take note that since this is a USB Audio device we set the 'Periods' dropdown selection to '3', for
internal or PCI(e) Audio devices it is recommended to use a setting of '2'. If required it is also possible
(but not usually necessary) to accurately calibrate Audio/MIDI latency using a cable looped from your
Audio/MIDI outputs to the inputs to calculate the actual latencies. Once you have your settings
selected click the 'Start' button to your upper-right.
87

If you already have JACK up and running before setting up your intial Ardour/Mixbus session when
you select the 'JACK' backend it will detect that JACK is already running and simply clicking the
'Connect to JACK' button will connect you to whatever settings and Audio device you've chosen in
Qjackctl.
Further Info: The Ardour Reference Manual
88
CARLA PLUGIN HOST SETUP :
Carla… She's Quite a Gal! :
AV Linux includes 'Carla' which is a very useful host for all common Linux Audio plugin formats and
comes with the optional extensions required to host Windows VST Audio plugins with Wine. Carla can
be used to host plugins 'Standalone' or or also can be used as an LV2 or LinuxVST Plugin within Ardour
or Mixbus to facilitate loading plugin formats that are not natively supported (ie DSSI). In addition
Carla can also host Soundfont2, GIG and SFZ Sound Library formats. In order to get the best
performance out of Carla it is advised to do an initial setup and scan for all Plugins available in various
formats on the system. When this scan is performed with Carla running 'Standalone' it will then also
ensure all Plugins scanned are available to Carla running as a Plugin when Ardour or Mixbus are used.
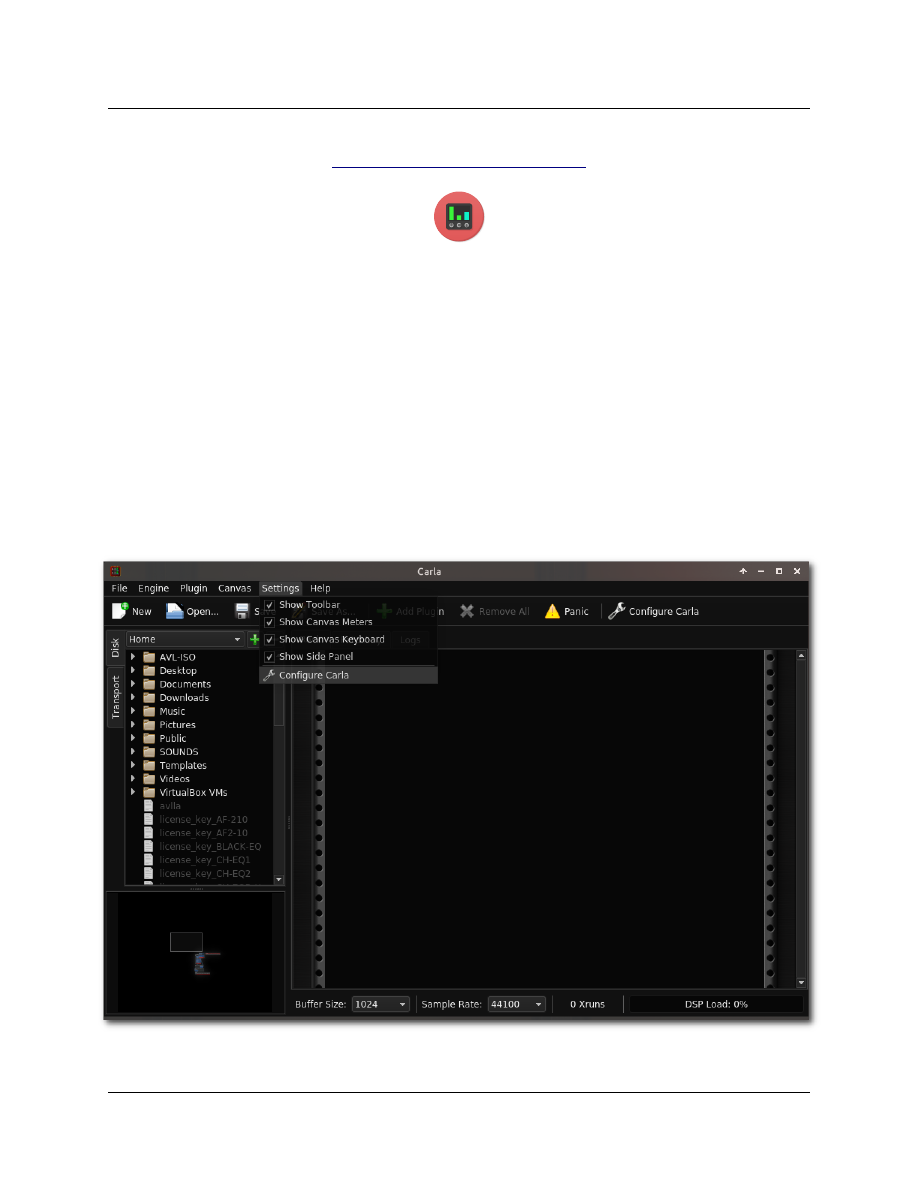
If you have downloaded any outside plugins or Soundfont2, SFZ, or GIG Sound Libraries to your
system you may first want to tell Carla where they are by adding the 'PATH' to Carla's scan. To do this,
make sure you have JACK running and launch Carla from the Whisker Menu and select
‘Settings’ ’Configure Carla’.
→
89
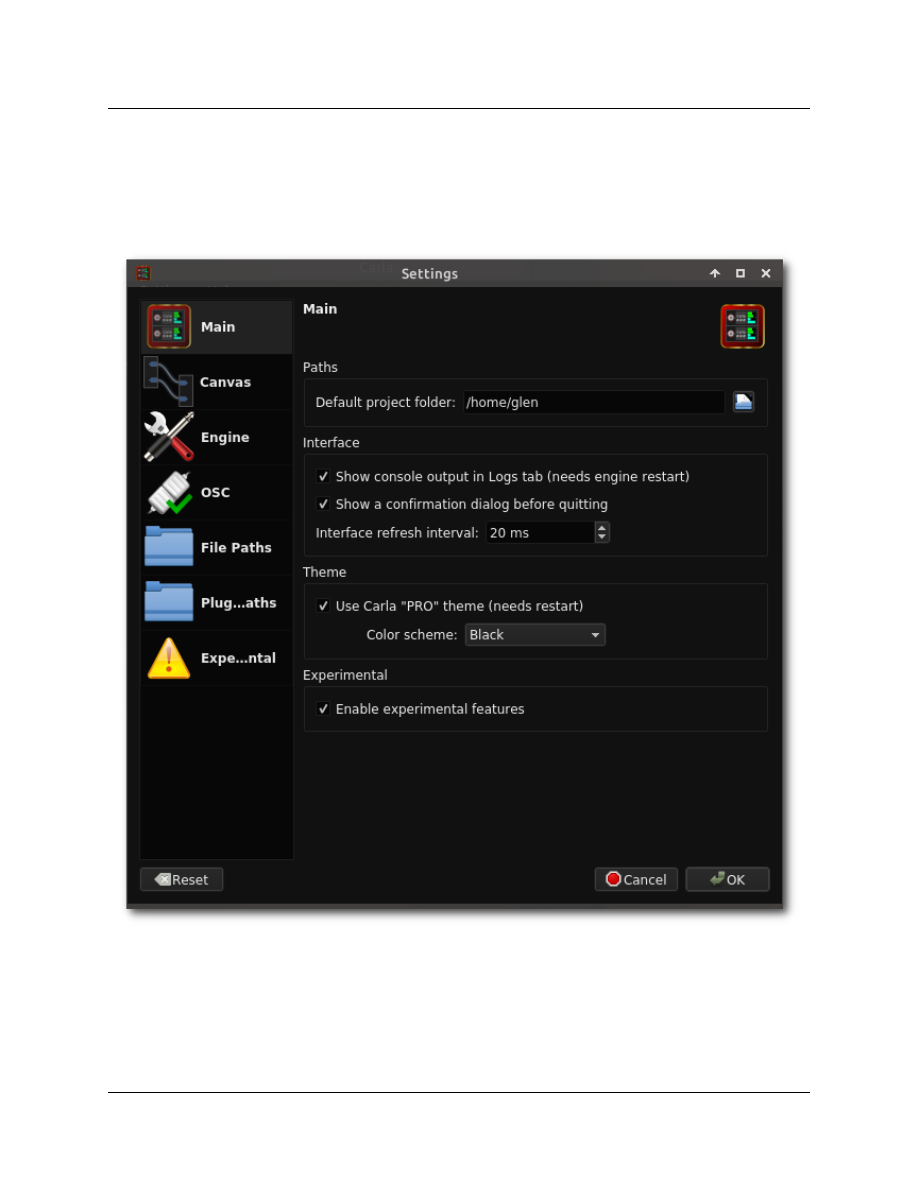
The 'Settings' window will open, select either the ‘File Paths’ or 'Plugin Paths' Icon and from the
Dropdown box select whichever type of Plugin or Sound Library you want to create a path for and if it
isn't already listed use the '+Add' button to add your custom path for scanning. It is advised to restart
Carla for the new paths to be taken into account.
90
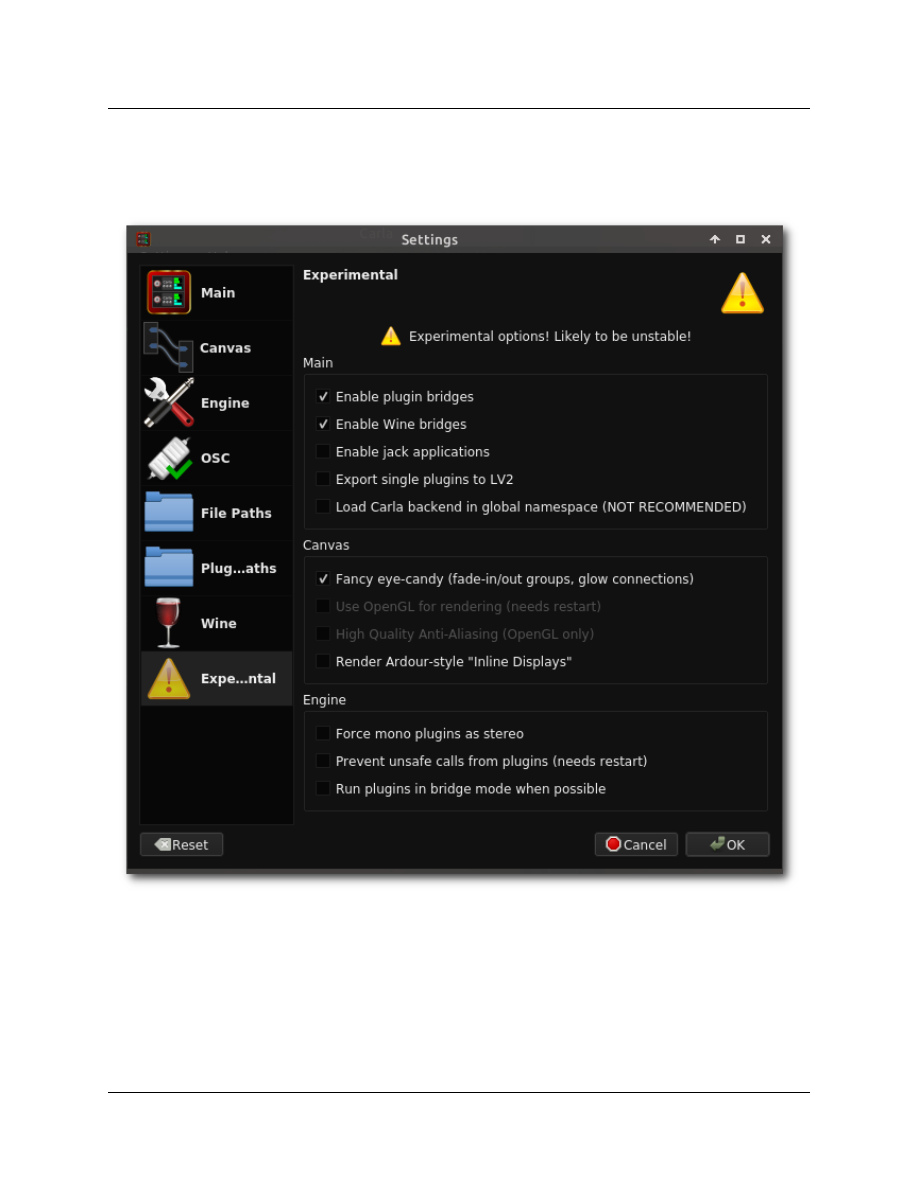
*PLEASE NOTE! – For Windows VST Plugins and other Plugin Bridges to work with Carla it is now
necessary to enable that feature in the new ‘Experimental’ tab found in ‘Settings’ ’Configure Carla’.
→
91
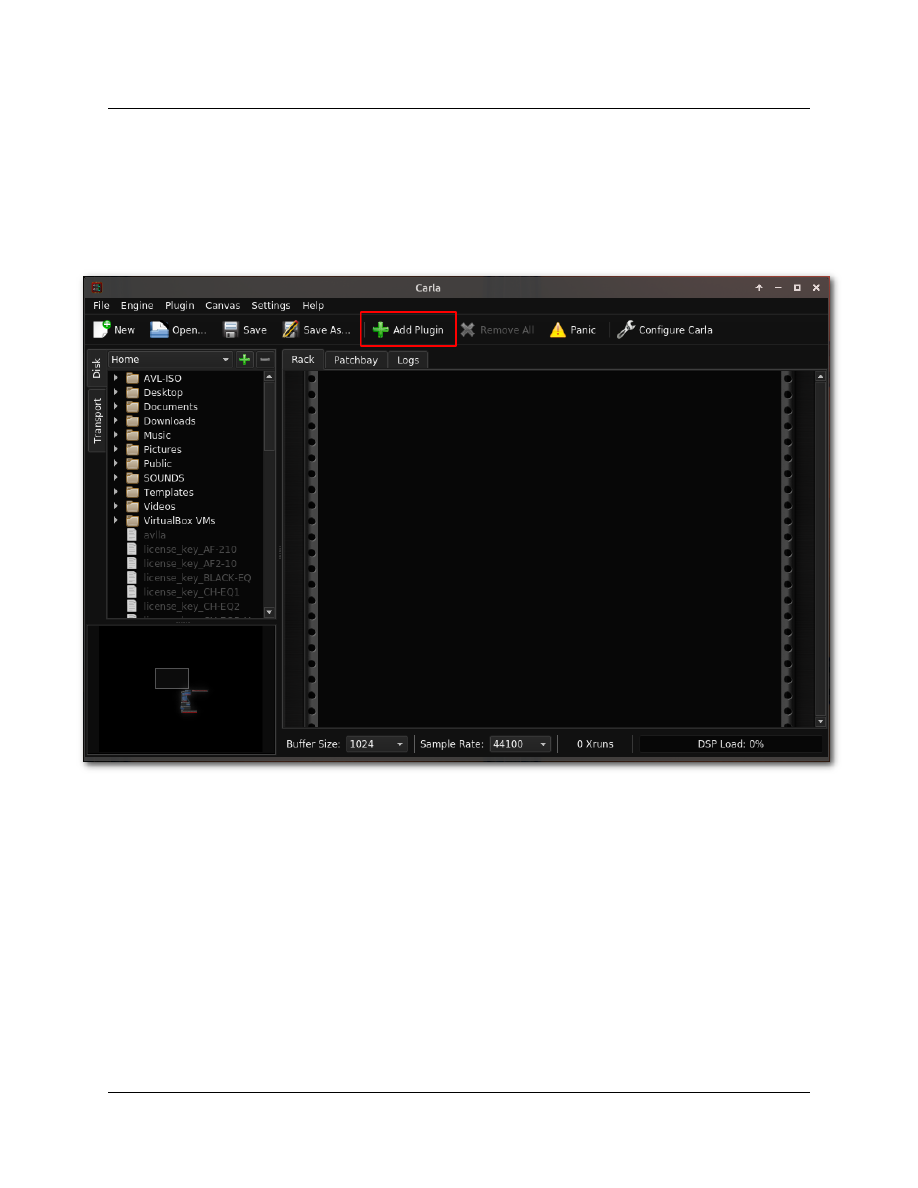
To access the scanning setup dialog click '+Add Plugin'.
92
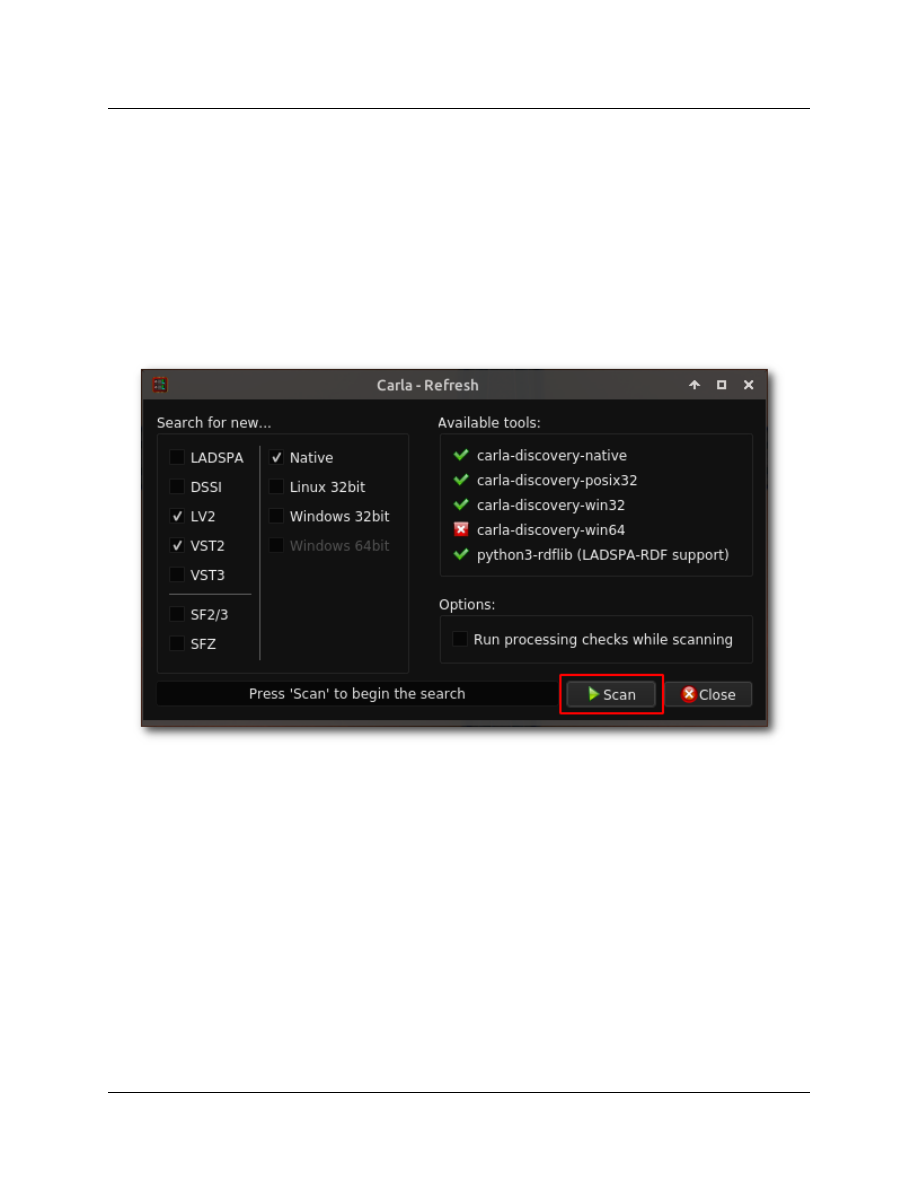
At this point Carla will display what Plugins are already scanned and and available, to perform the
actual scanning operations for new Plugins that aren't available yet. Click the 'Refresh' button and
Carla’s Scan Window will open. Check off as many or as few Plugin types as you would like Carla to
scan for and then select the 'Scan' Button to perform the actual scan. After scanning when you click
the '+Add Plugin' on Carla's main window button you should be able to search and select your desired
plugin by entering its name in the search field at the top of the 'Add New' window.
93
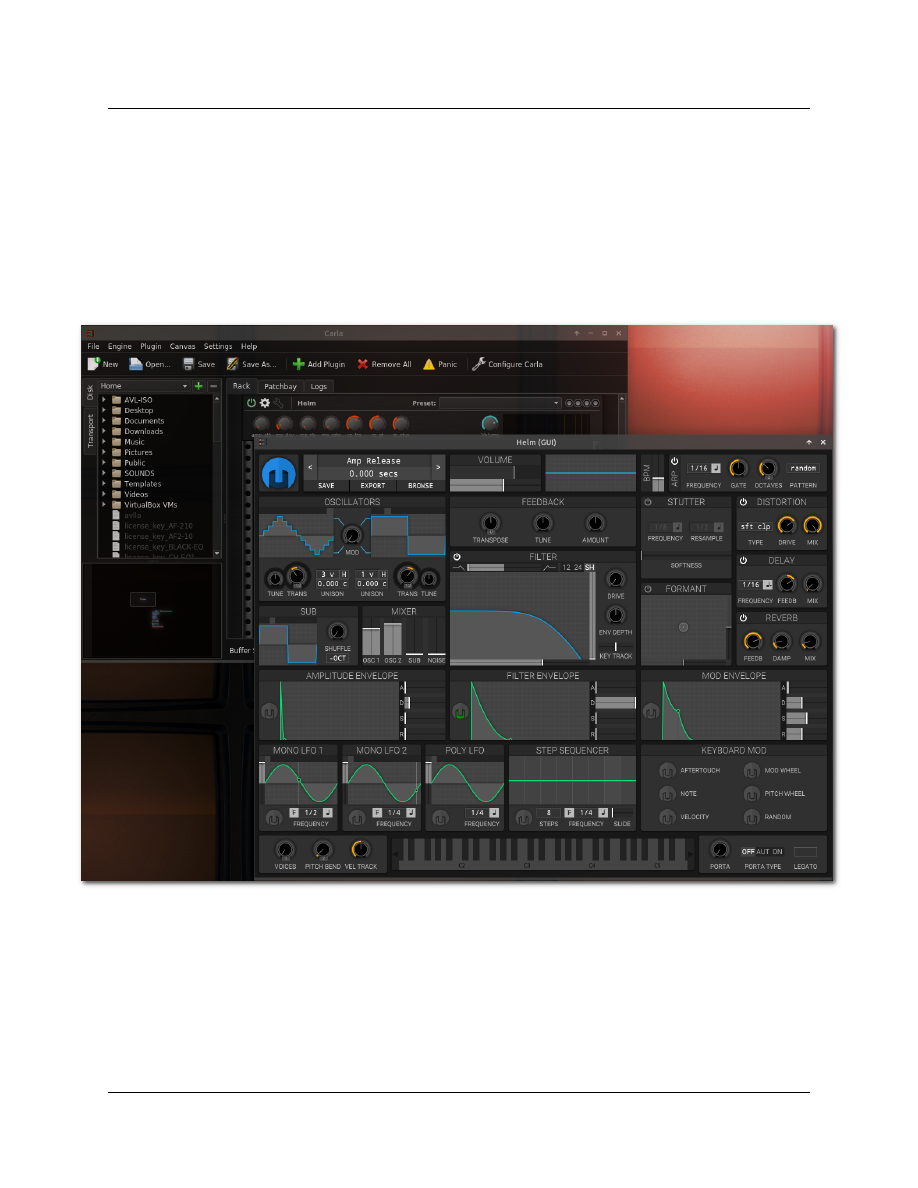
Once you have Carla set up and have the Plugins you need to use included in the list you will notice
that when a Plugin is selected it appears in 'Carla Rack'. From here you can simply tweak the Plugin
parameters visually in the presented Rack UI or for most LV2, LinuxVST and DSSI plugins you can click
on the 'gear' Icon in the Rack slot and the plugin will show its own GUI to handle settings. In the
example below the ‘Helm’ Synthesizer Plugin is loaded in Carla Rack and it’s GUI is enabled. Note that
LADSPA plugins and GIG, SFZ and SF2 Sound Libraries don't have GUI's and can have their settings
modified by selecting the 'wrench' icon which will open a new parameters window.
Any plugins that are loaded into Carla running as a Standalone host will not automatically connect to
the system Audio outputs, this differs from Carla running as a Plugin within Ardour or Mixbus in which
case the connections are handled automatically within the DAW. When Carla is used by itself it
provides its own Patchbay to make connections. Carla can save both your Rack and Patchbay settings
to a file to be retrieved later which makes preserving complicated setups easy.
94
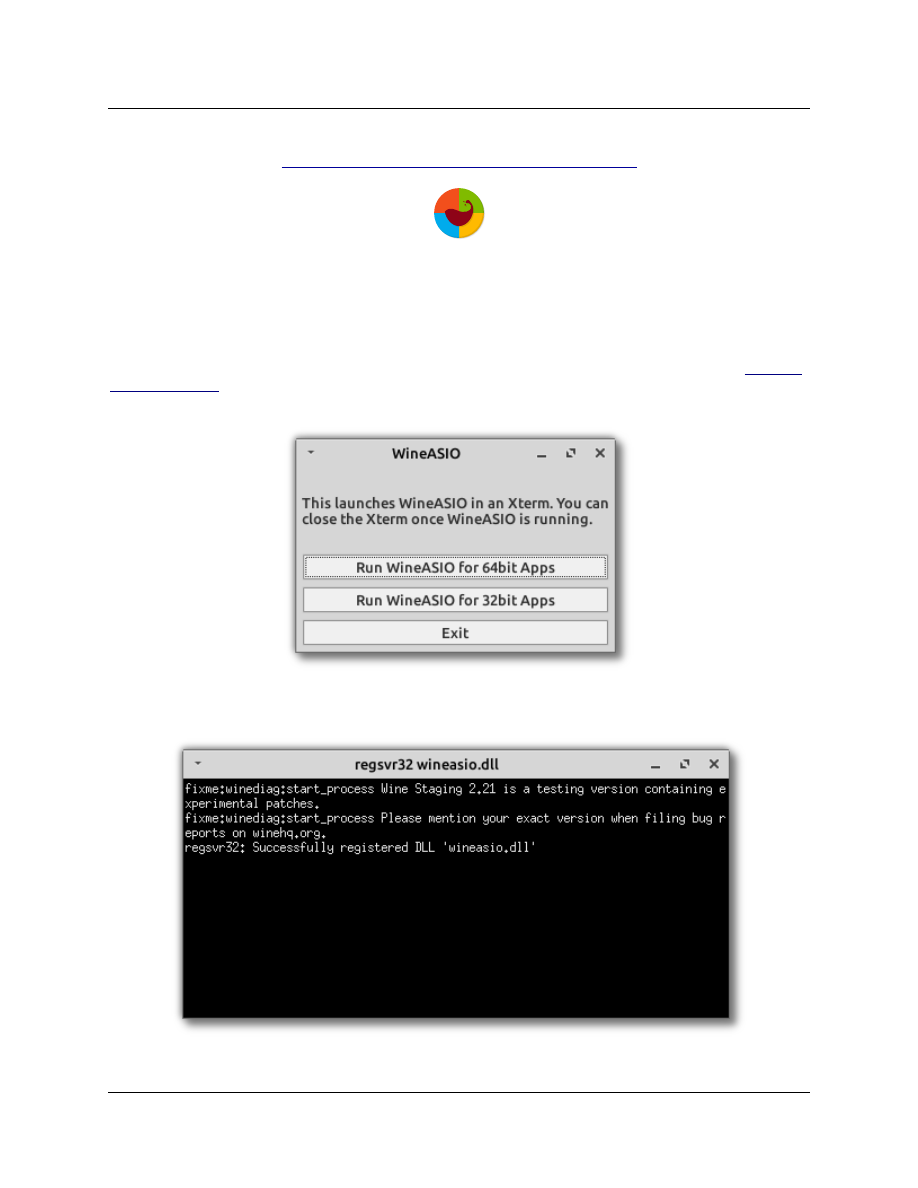
RUNNING WINDOWS AUDIO SOFTWARE :
Exposing Windows ASIO Audio drivers to JACK with WineASIO :
It is possible to run some popular Windows Audio software in AV Linux and have it run with Windows
native ASIO Audio drivers. This is accomplished using a utility called WineASIO which runs in the
Microsoft Windows emulating Linux software known as ‘Wine’. AV Linux 2020 comes with ‘Wine-
staging’ installed and a WineASIO launching utility that can be found in the ‘Multimedia’ ’Audio Tools’
→
menu. To use WineASIO you must first have the JACK Audio server running as detailed in the ‘Audio &
Midi in AV Linux’ section. WineASIO can be used with both 32bit and 64bit Windows software
applications.
Once you select the appropriate button pertaining to the Windows Audio application you want to run
a Terminal window will open confirming that the WineASIO ‘.dll’ has successfully launched.
95
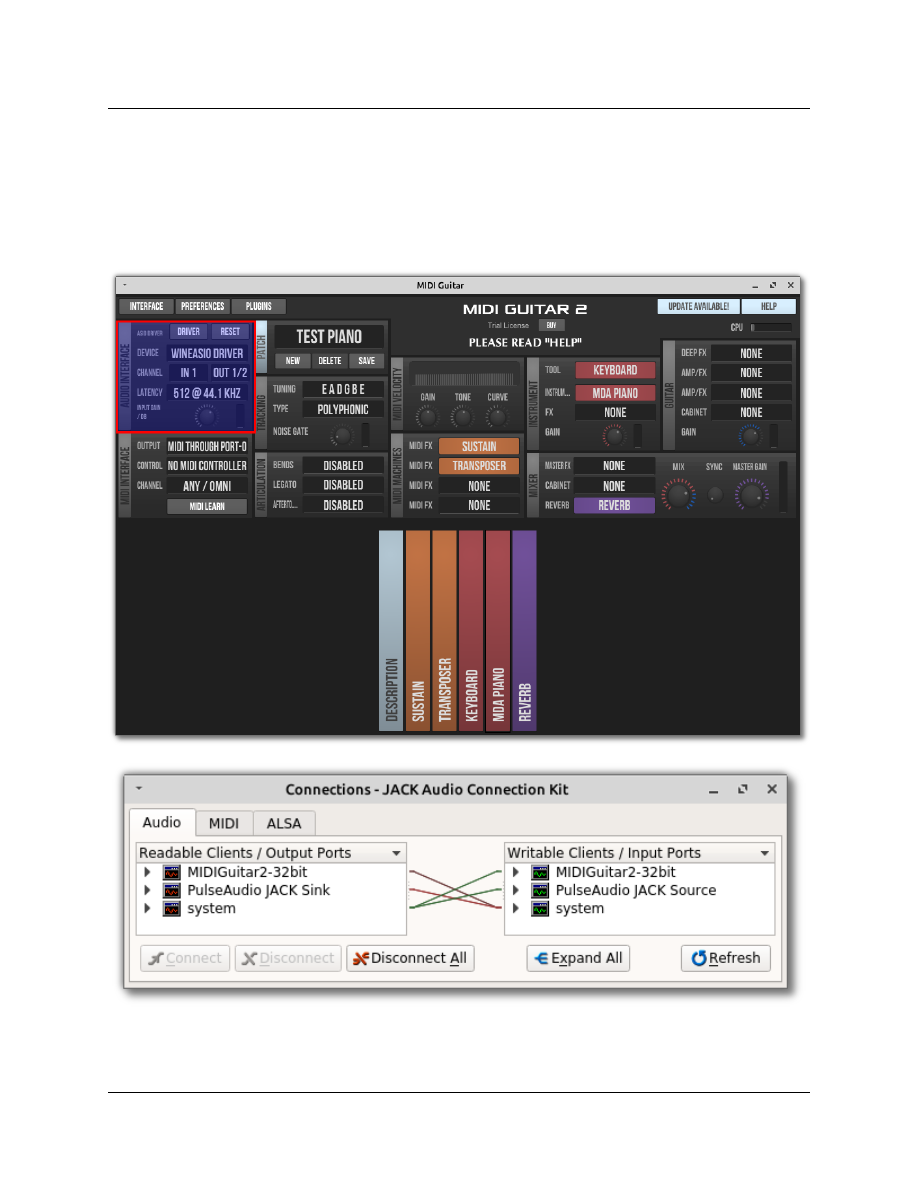
When WineASIO is up and running you can launch your Windows program and select the WineASIO
driver in the Audio setup dialog of the application. As an example we will use the standalone version of
the Windows software ‘Jam Origin MIDI Guitar 2’. As you can see in the highlighted section the
WineASIO driver has been selected which will route the Audio output through JACK.
96
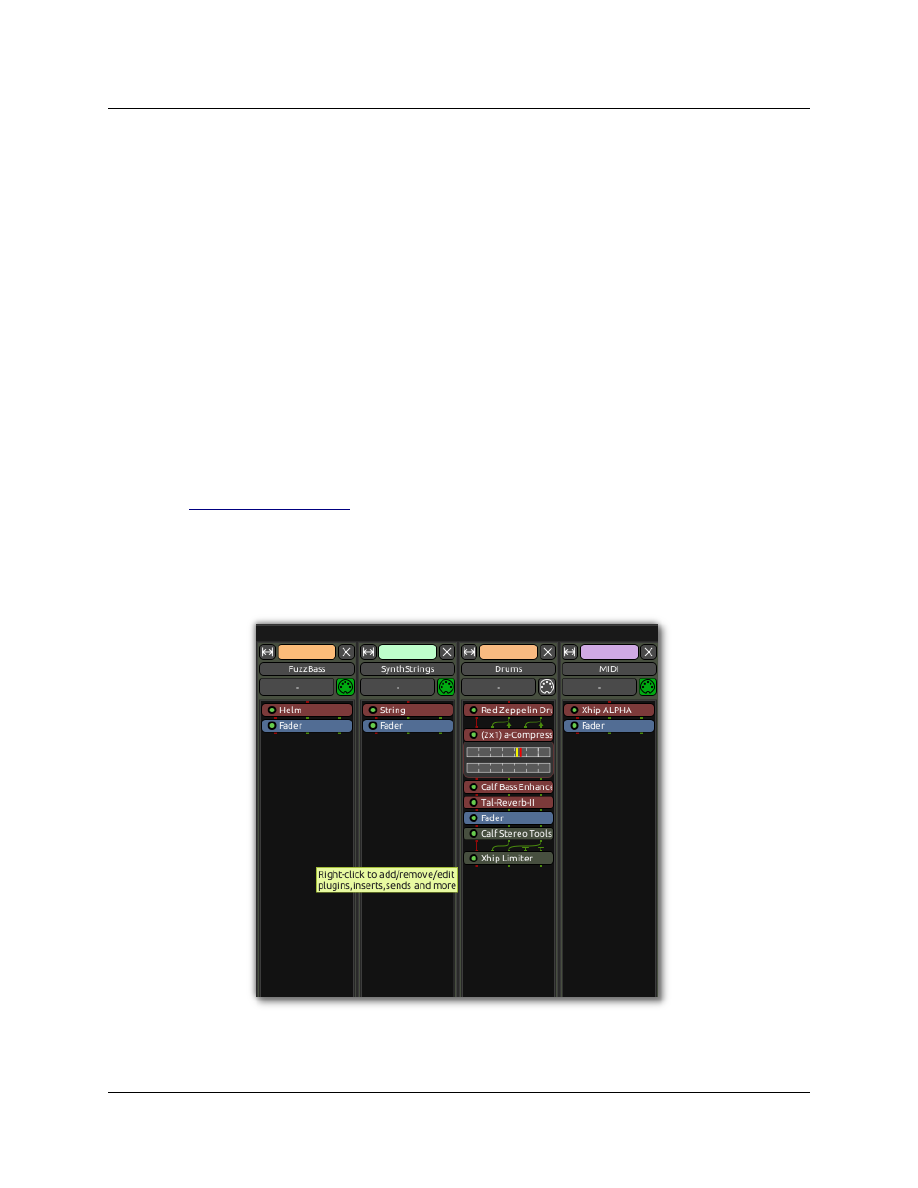
Running Windows VST Plugins in Ardour/Mixbus :
Steinberg’s ‘Virtual Studio Technology’ or ‘VST’ Audio plugin format is a cross-platform industry
standard and there are a wealth of good quality commercial and free VST plugins available. VST’s for
Windows are by far the most common and a large number of them will run on Linux with the aid of
‘wine’ Windows emulating software and various bridging applications. As you would expect running
Audio plugins that are not native to Linux presents challenges and it can not be overstated that there
are no guarantees of functionality and stability, it is always preferable to run Audio plugins that were
intended for the Linux platform.
AV Linux comes with a small set of ‘oldie-but-goodie’ free 32bit Windows VST Audio plugins placed in
the ‘/usr/local/lib/vst’ folder of the filesystem. With ‘wine-staging’ pre-installed these plugins can be
hosted and used in Ardour and Mixbus in two distinct ways.
The first method of hosting Windows VST’s in Ardour and Mixbus on both 32 and 64bit AV Linux is
using ‘Carla-Rack’ as a plugin host within Ardour and Mixbus. Carla is a standalone application but also
exists as an LV2 and VST plugin that can be loaded into a channel strip and used as a bridge to allow
hosting various plugins that may not be natively supported by the host, as an example in Ardour and
Mixbus ‘Carla-Rack’ can be used to host Windows VST plugins that aren’t natively supported. Before
using Carla-Rack as a plugin it is important to have run Carla standalone and perform a Plugin Scan as
detailed in ‘Carla Plugin Host Setup’.
To use Carla-Rack in Ardour and Mixbus right click on a Mixer window channel strip and load the Carla-
Rack LV2 or VST Plugin.
97
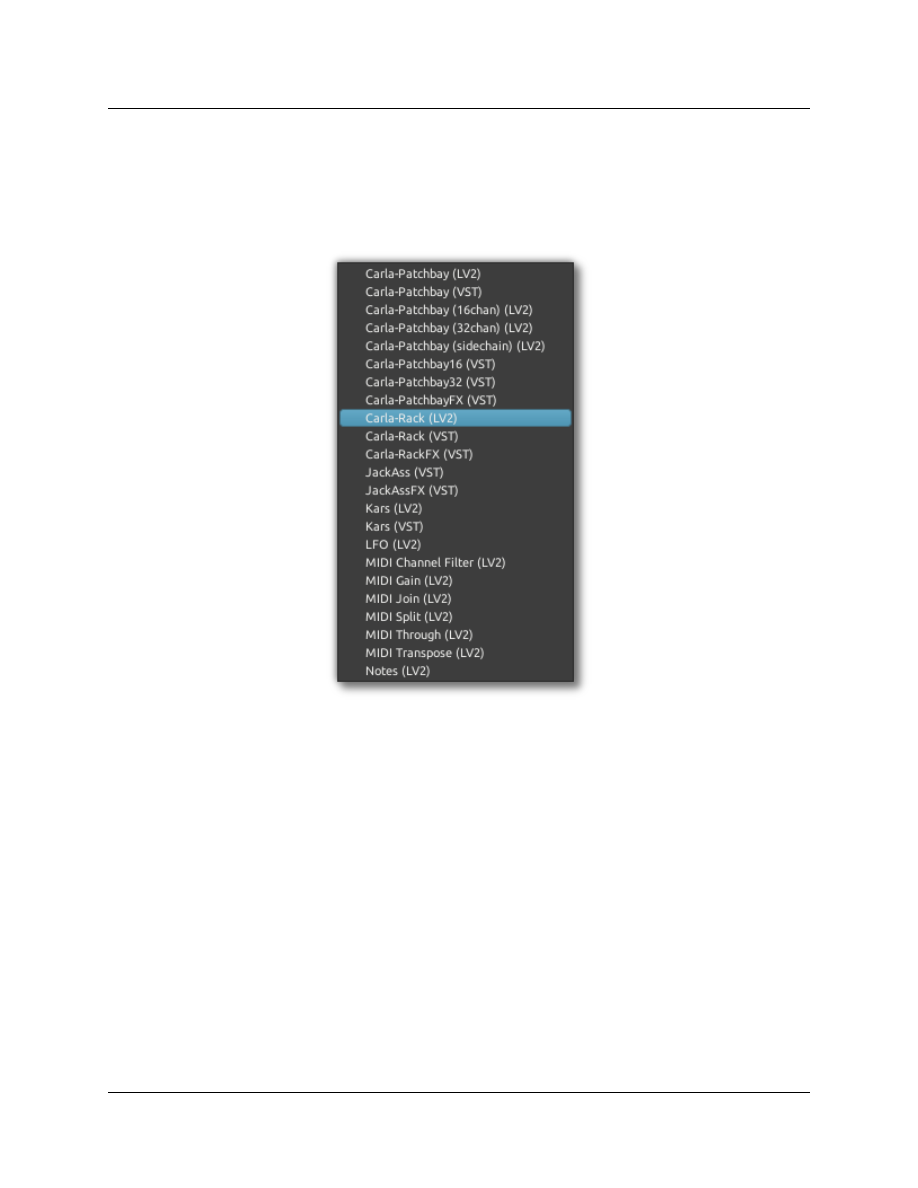
Then find Carla-Rack in the plugin list under the ‘falkTX’ category, both the LV2 and VST versions are
supported by Ardour and Mixbus
Once Carla-Rack is added to the channel strip you open the Rack GUI by double-clicking on it, you can
add Windows VST’s by pressing the ‘+Add Plugin’ button on the Carla-Rack GUI and then select the
plugin you want from the list within Carla. Besides Windows VST’s any format supported by Carla
including Sound Libraries like GIG, SF2 and SFZ and Audio Plugin formats like DSSI can now be loaded
into Carla-Rack within that channel strip. The Rack will host both 32bit and 64bit plugins in the 64bit
version of AV Linux. The image below shows Carla-Rack hosting the ‘Tokyo Dawn Labs Slick EQ’
Windows VST in Ardour.
*Slick EQ is not available in AV Linux and must be downloaded separately.
98
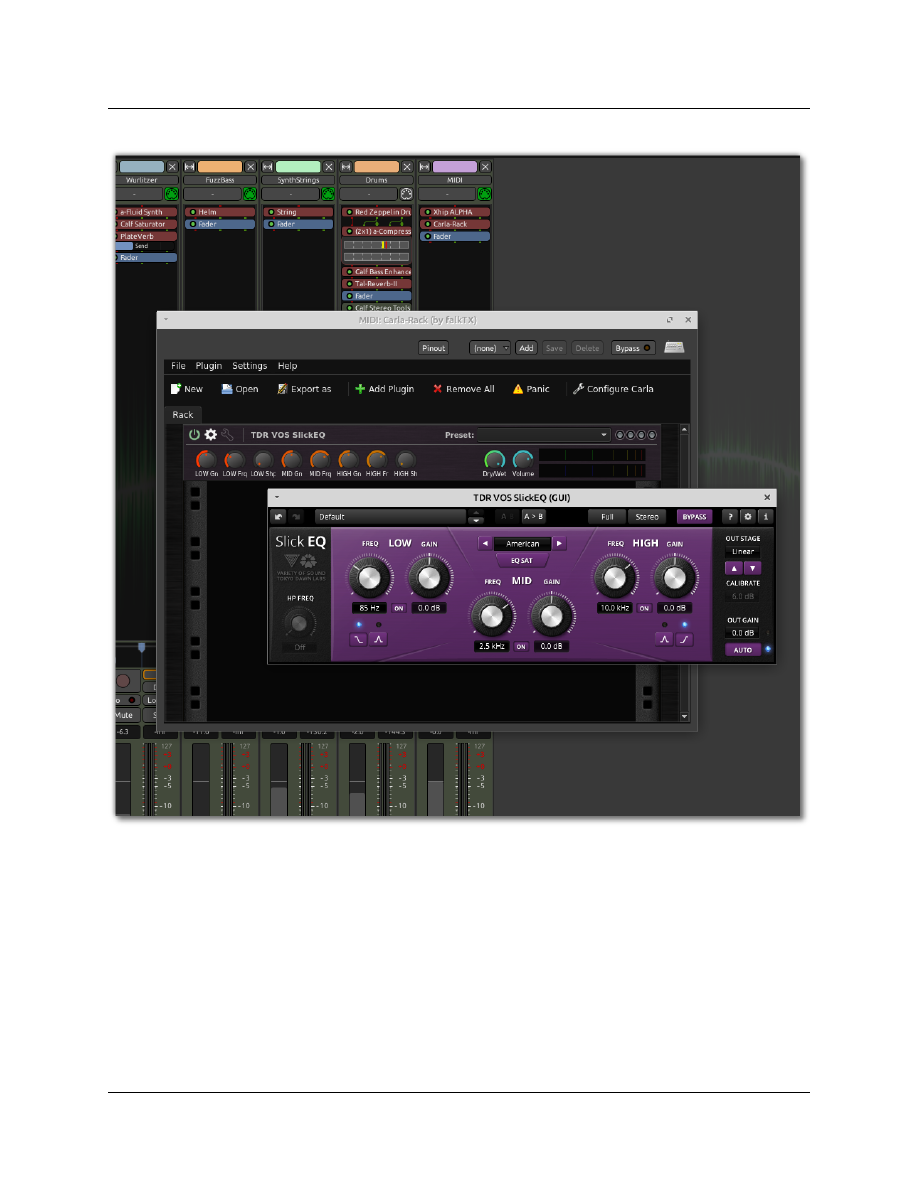
99

Hosting Windows VST’s with ‘LinVST’ :
A second (and better) method of hosting Windows VST plugins is the use of the ‘LinVST’ bridge,
LinVST works a bit differently by wrapping the Windows ‘.dll’ filetype and making it appear to the
plugin host as a native Linux VST ‘.so’ file. The included Windows VST plugins in AV Linux already have
been converted, follow the instructions below for any new Windows VST’s you may add.
In AV Linux Windows VST's are placed in /usr/local/lib/vst and /usr/lib/vst is for native for Linux VST's
only... The rationale for this is that most DAWs will look along both of those paths automatically for
VST plugins of any kind and we want VST's to be available system-wide for all Users not buried in
the .wine folder in the Users home folder. One of the files pre-installed by LinVST is a dummy file
called 'linvst.so' which is used as a test reference to convert all your Windows VST '.dll' files to Linux-
friendly '.so' files. It is the '.so' files which LinVST will make appear in the usual list of plugins in Ardour/
Mixbus.
LinVST comes with a little graphical utility to find the linuxvst.so file and then find all your .dll files
and do the conversion, linuxvst.so is installed to /usr/share/linvst. Once you are certain that linuxvst.so
is in the correct spot then you will need to run the conversion utility in a terminal, if you have kept
everything in /usr/local/lib/vst then you will want to be in a Root Terminal because that folder is
outside the User’s home folder in the filesystem, if you have everything together in a different VST
folder in '.wine' or elsewhere in your home folder then you can use a regular terminal, then run this
command in the terminal
linvstconvert
If your Windows VSTs have associated subfolders you may want to use this conversion command
instead:
linvstconverttree
This will open a little dialog that prompts you to find 'linvst.so' (find it in /usr/share/linvst) and then
find where your Windows VST .dlls are, once that is done hit 'Start' and it will convert the dlls to so's.
Now open Ardour/Mixbus and go to Edit--->Preferences--->Plugins--->VST and make sure the path to
your Windows VST folder is there (this is why I use /usr/local/lib/vst because Mixbus looks there
automatically). If your particular path isn't there you'll need to add it manually so Ardour/Mixbus
knows where to scan..
Once that is done run a plugin scan and if all goes well those converted '.so' files should be picked up
and appear as selectable in the Ardour/Mixbus plugin list. The image below shows the ‘Slick EQ’
Windows VST Plugin running with LinVST in Ardour.
100
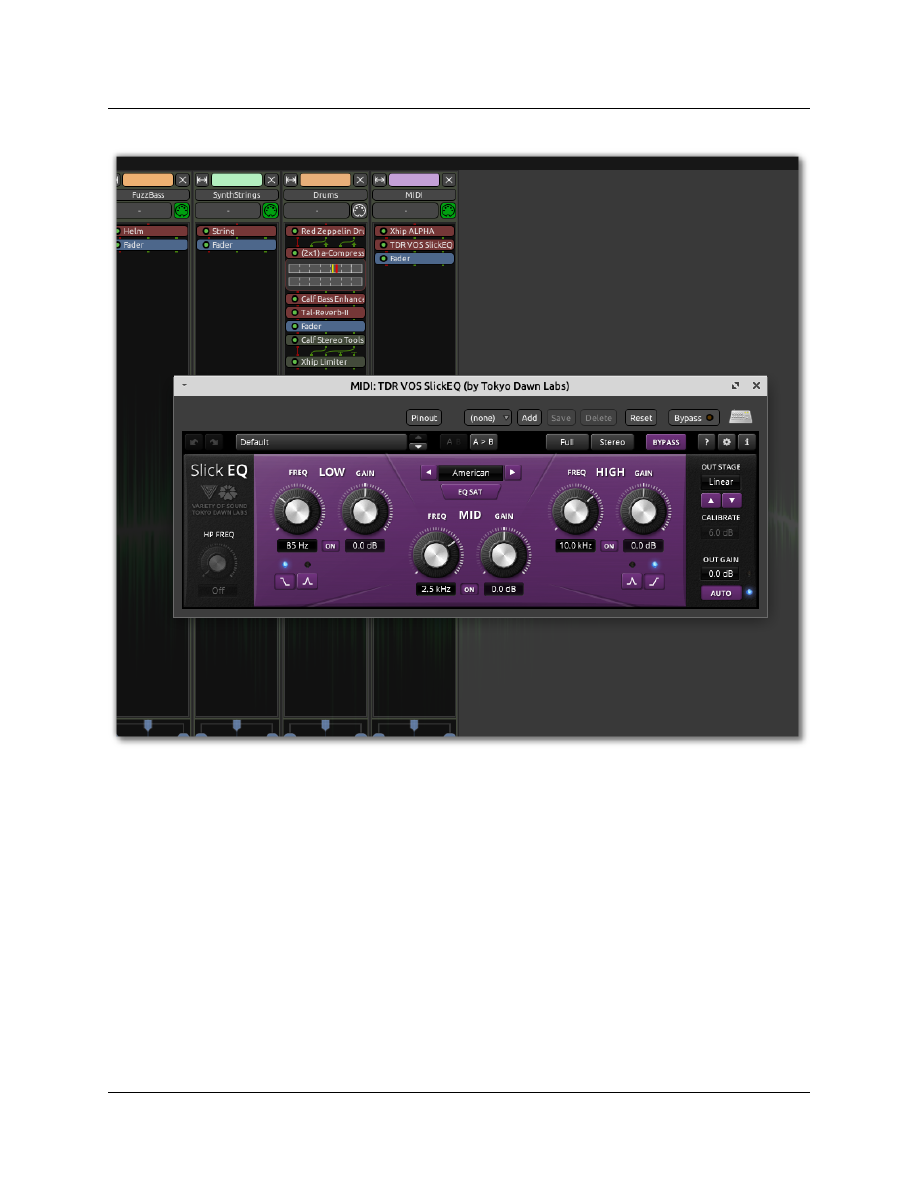
*PLEASE NOTE* The first time Wine runs on your computer it needs to configure itself and set up it’s
directories in a hidden ‘.wine’ directory in your User home folder. Wine does not run it’s setup until the
first time it is called to run a Windows program by the host system. If the first time Wine is initiated is
during a plugin scan within a DAW it is possible the initial Wine configuration setup will occur as you
are running the LinVST plugin scanner which ensure the renamed ‘.so’ files of the Windows VST Plugins
show up in your Linux DAW. On some systems this may cause the scan to time out, fail and not
completely finish. Once Wine has set up it’s initial config you should be able to run the plugin scan
again in your DAW and it should be able to successfully complete.
101
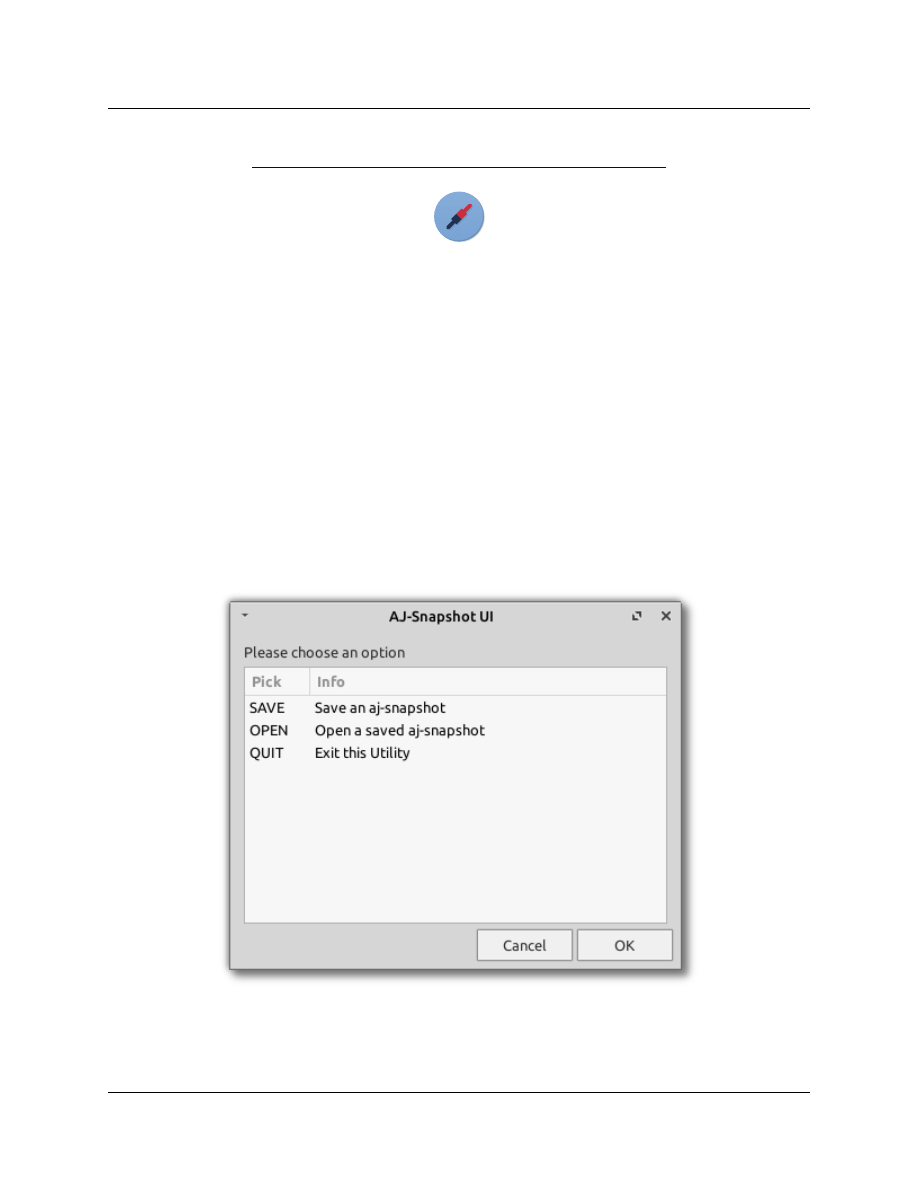
SAVING AND RESTORING JACK CONNECTIONS :
AJ-Snapshot for JACK-Aware External Application Connections :
If you are using several JACK-Aware applications and connecting them together those unique
individual JACK connections will be lost when you you shut down the individual applications. This is a
much different scenario than when you are working within a DAW like Ardour, or a single host like
Carla, in that case the DAW remembers the connections when you save your session. What if you want
to use external JACK programs in various combinations with a complicated routing? You certainly
don't want to have to remember and manually re-connect every time you use those uniquely arranged
programs.
A very simple and effective tool to save and restore ALSA and JACK Routing is a little CLI utility called
aj-snapshot. In AV Linux I have added a very simple UI to make using aj-snapshot a little easier. With
JACK running and your applications connected simply launch 'AJ-Snapshot-UI' from the Whisker Menu,
it can be found in Multimedia Audio Tools AJ-Snapshot-UI. Select the option to 'Save an aj-
→
→
snapshot' and it will prompt you t enter the name of the snapshot and present a File Manager to save
it where you want. Later, with JACK running and the applications you wish to re-connect launched and
running simply open your saved Snapshot and the routing and connections will be restored.
102
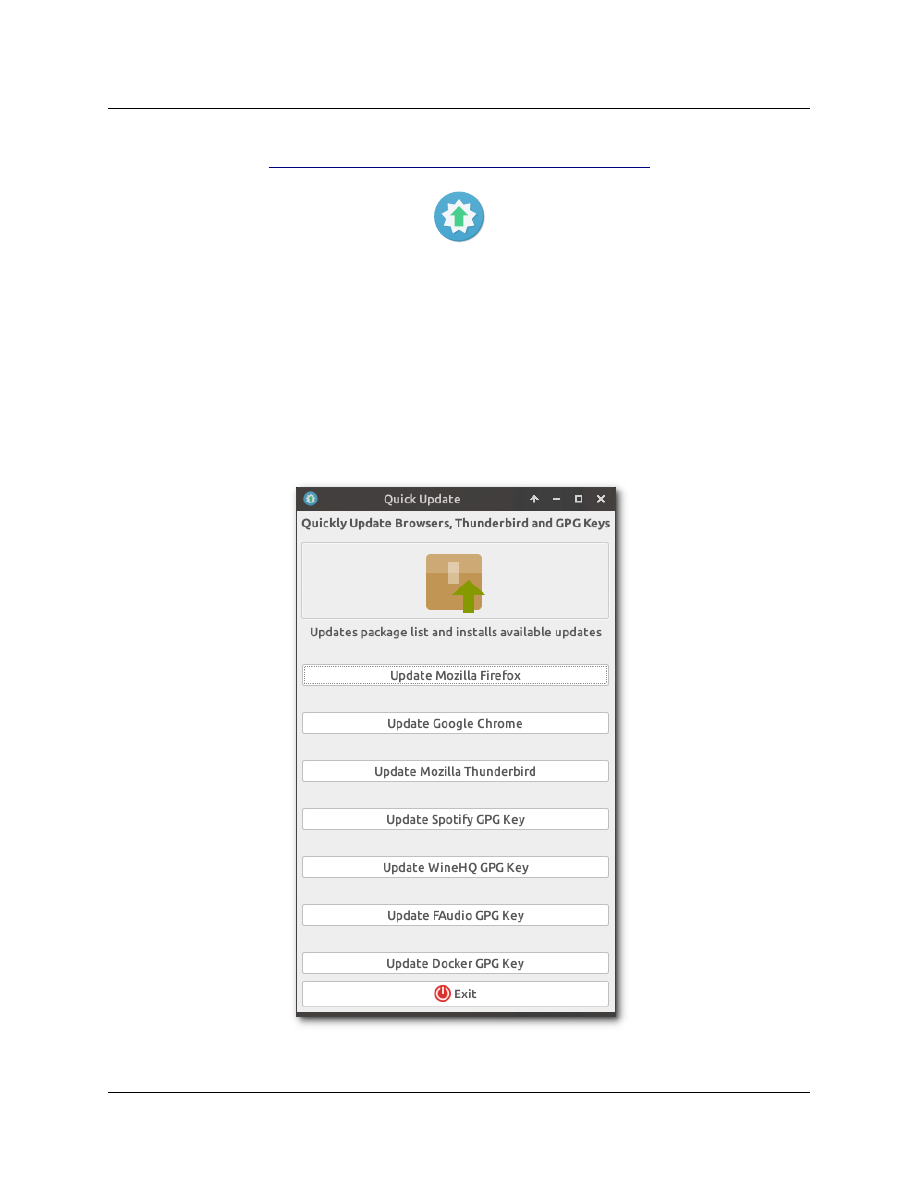
QUICK UPDATE BROWSERS AND GPG KEYS :
Quick Update of Browsers and GPG Keys :
AV Linux 2020 features a new utility to selectively update the Web Browsers and Thunderbird on the
system. The rationale behind this is if during heavy production you want to avoid blanket upgrades of
the system for the sake of stability but want the security of the latest Web Browser and Thunderbird
Email client you can use the ‘Quick Updater’ utility to upgrade only those applications leaving the rest
of the system untouched. An added new feature is to update the GPG keys of 3rd party Repositories in
AV Linux applying to GPG Keys that are known to be updated regularly, when the old keys expire you
will see error messages when using Synaptic Package Manager, with Quick Update you can update the
expired keys with one click.
103
DEBIAN STABLE DISTRIBUTION :
Background on the Debian Distribution Model :
Debian/GNU Linux 10 ‘Buster’ is the actual 'Distribution' that AV Linux 2020 is based on. Debian
employs a multi-branch system to process the entry and inclusion of software which includes three
separate branches commonly known as 'Unstable' or 'Sid' where software applications enter the
Debian system, 'Testing' where software is refined and bugfixed and 'Stable' releases which are quite
static in nature and provide Users with a solid well-tested foundation as a finished Operating System.
104

SOFTWARE UPDATES :
*Recommended Reading!*
Balancing Updates and Risk :
Updating a system can at times be unpredictable, AV Linux is intended to provide a dedicated Audio/
Video workstation OS and since it has a specific, intended use stability is a required trait especially
when doing prolonged production work. How do we keep fresh software on the system and retain
stability? There are no guarantees and there is no surefire definitive answer to this question so below
are two suggested ways to update your system. How to proceed will be up to the individual User and
depend on the amount of experience using Debian Linux, the comfort level with risk and whether AV
Linux is being used casually or for serious production.
Manual APT Tools in ‘APT-Sistant’ :
For most Users, especially those new to using Linux it is highly recommended to install and remove
software in AV Linux with the ‘Synaptic Package Manager’ (description in following pages) this is by far
the safest and most User-friendly graphical method. For experienced Linux Users or those well-versed
with using Debian Linux there are some manual ‘APT-Sistant’ tools in the AV Linux Assistant to work
with Debian ‘APT’ commands. These tools allow you to hand edit the ‘sources.list’ file to determine
which Repositories are enabled, clean the packages cache, see and release ‘held’ Packages and most
importantly to perform software upgrades in 2 different ways:
“APT Upgrade” is a way to only upgrade individual packages on your system that don’t require the
removal, installation or upgrade of their related dependencies, this is a ‘safer’ option because it will
not remove or install new software to complete an upgrade and therefore causes less deep system
changes, the downside is that some packages may not upgrade if they require new or upgraded
dependencies.
“APT Dist-Upgrade” is a more intensive upgrade and will add, remove or upgrade dependencies to
fulfill the upgrade requirements and because of that it will cause deeper system changes, it is
generally safe to use APT Dist-Upgrade with Debian’s ‘Stable’ Distribution but if you are in doubt and
want to play it safe ‘APT Upgrade may be a better option.
105
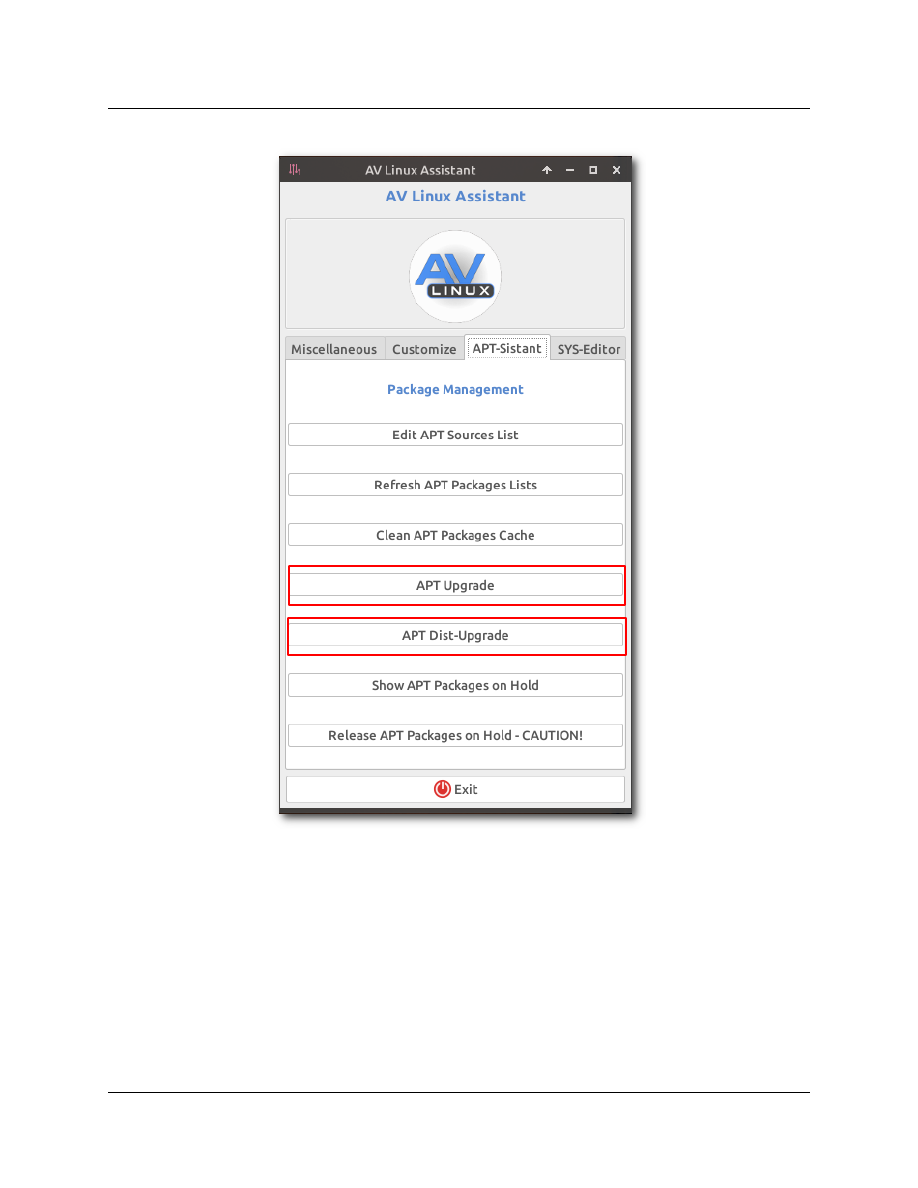
106

SOFTWARE
MANAGEMENT
:
Installing Downloaded or Outside Packages :
If you have a software 'Deb' package you have downloaded outside of the Repository system it can be
installed by double-clicking on it which will automatically launch the 'Gdebi Package Installer'. Gdebi
has the benefit of also installing related dependencies for packages if required. Be aware that you
should only install outside packages from sources you trust. Only one Package Management Tool can run
at the same time so Gdebi will not work if you have Synaptic running. Gdebi will also not force the
downgrade of an installed Package so if you want to roll back to an older version of an installed
package you will need to manually install it in a Root Terminal using the 'dpkg' command line
(examples shown below). A new feature in AV Linux 2020 is an alternate quick install option for
individual Debian Packages by right-clicking on the package in Thunar and using the “Install Debian
Package” Custom Action. Please note the Custom Action just does simple single package installations
and will not install any extra required dependencies it will however allow downgrading of a Package to
an older version.
Packages can also be manually installed with these Debian ‘dpkg’ commands in a Root Terminal:
dpkg -i <PACKAGENAME>
If you have a folder of multiple Deb packages to install you can install them all at once by opening a
Root Terminal within the folder and running dpkg with a 'wildcard' like this:
dpkg -i *.deb
107
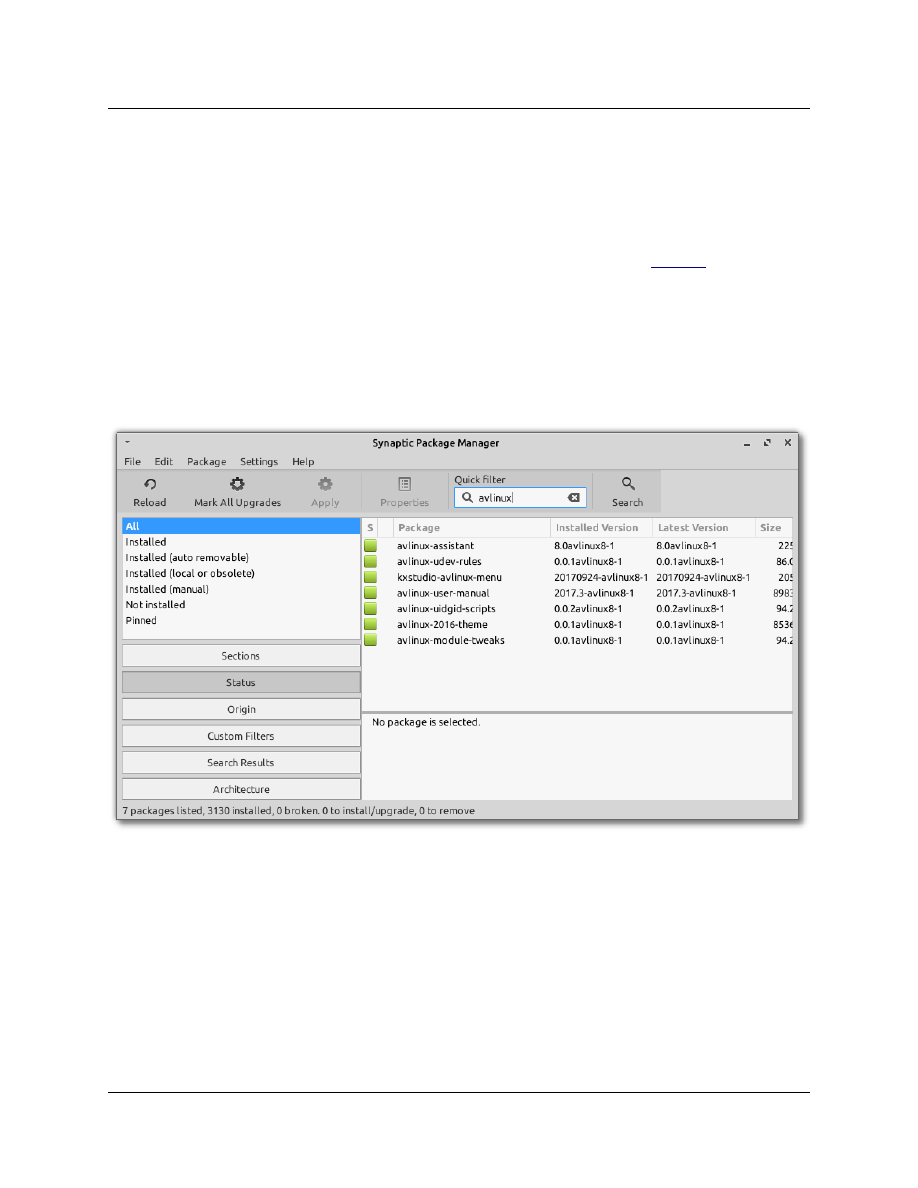
Synaptic Package Manager :
*Recommended method for most Users.
The most familiar Graphical Package management tool to Debian Linux Users is the Synaptic Package
Manager. It has a well laid out and comprehensive interface to view what packages are on the system,
the originating repositories they came from, and much more. It can be used for 'pinning' individual
Packages to prevent them from being upgraded and has many other in-depth capabilities beyond the
scope of this manual. In AV Linux it is recommended to use Synaptic to search for Packages, to install,
remove, upgrade and autoremove individual packages but not necessarily for blanket upgrades
especially if you are using the 'Safe Upgrade' Method. When Safe Upgrade is used any 'held back'
Packages will still be visible as 'Installed (upgradeable)' in Synaptic. This is because Synaptic uses its own
upgrade logic called 'Smart Upgrade' which is quite similar to 'Dist Upgrade' and will forcibly remove
and add dependencies if requires for Package updates if you use the 'Mark All Upgrades' functionality.
Cleaning Up After Package Operations ;
When you refresh the Repository Package lists and upgrade, remove and install packages there are
some residual cached downloaded Package and Package-list files that collect on your system. These
leftover cached files can take up quite a bit of HDD space on your system over time. AV Linux comes
with a program called 'Bleachbit' which can be used to clean these caches and many other system
areas. In addition the AV Linux Assistant has a quick and easy button to clean the residual Packages
and related files. Just select the ' Clean APT Packages Cache' button in the ‘APT-Sistant’ tab of the AV
Linux Assistant to delete these cached files.
108
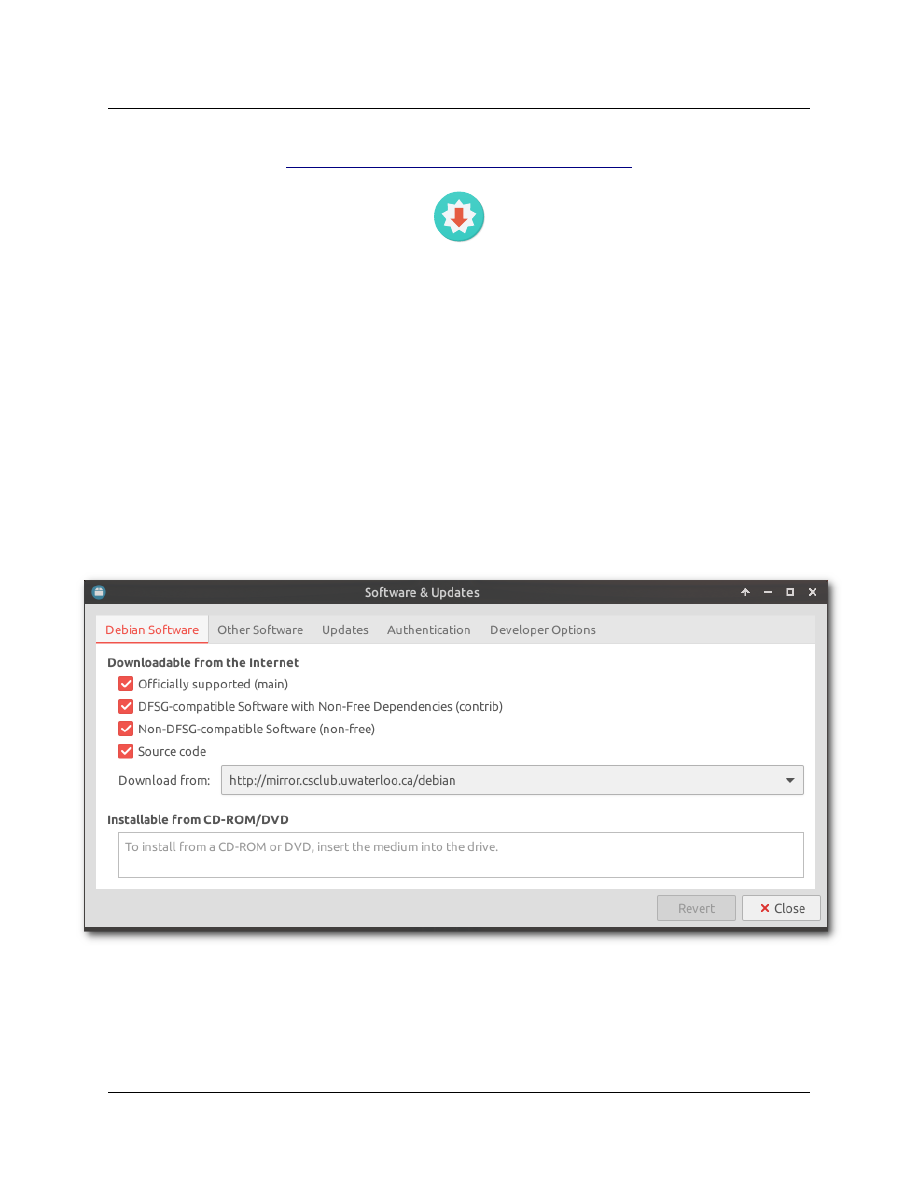
MANAGING SOFTWARE REPOSITORIES :
Controlling What Software Is Available :
In Linux, software is made available from online collections of software formatted as ‘Packages’
called 'Repositories'. This system provides both applications and the required support dependencies
to integrate and make them run properly on the system. Reputable Repositories usually provide a
secure GPG key file that ensures the software is safe to download and install. AV Linux contains the
official Debian Stable Repositories along with various other optional 'Repos' described in the next
section.
Enabling and disabling Repositories is another effective strategy to control the stability of your
system. If you are a 'bleeding-edge' person you can leave them as-is, if you are in heavy production or
happy with your current setup and don't want to be distracted by constant updates then you can
simply disable selected Repositories as you wish. The selection of Repositories is handled by Menu
→
Settings --> 'Software & Updates’.
109
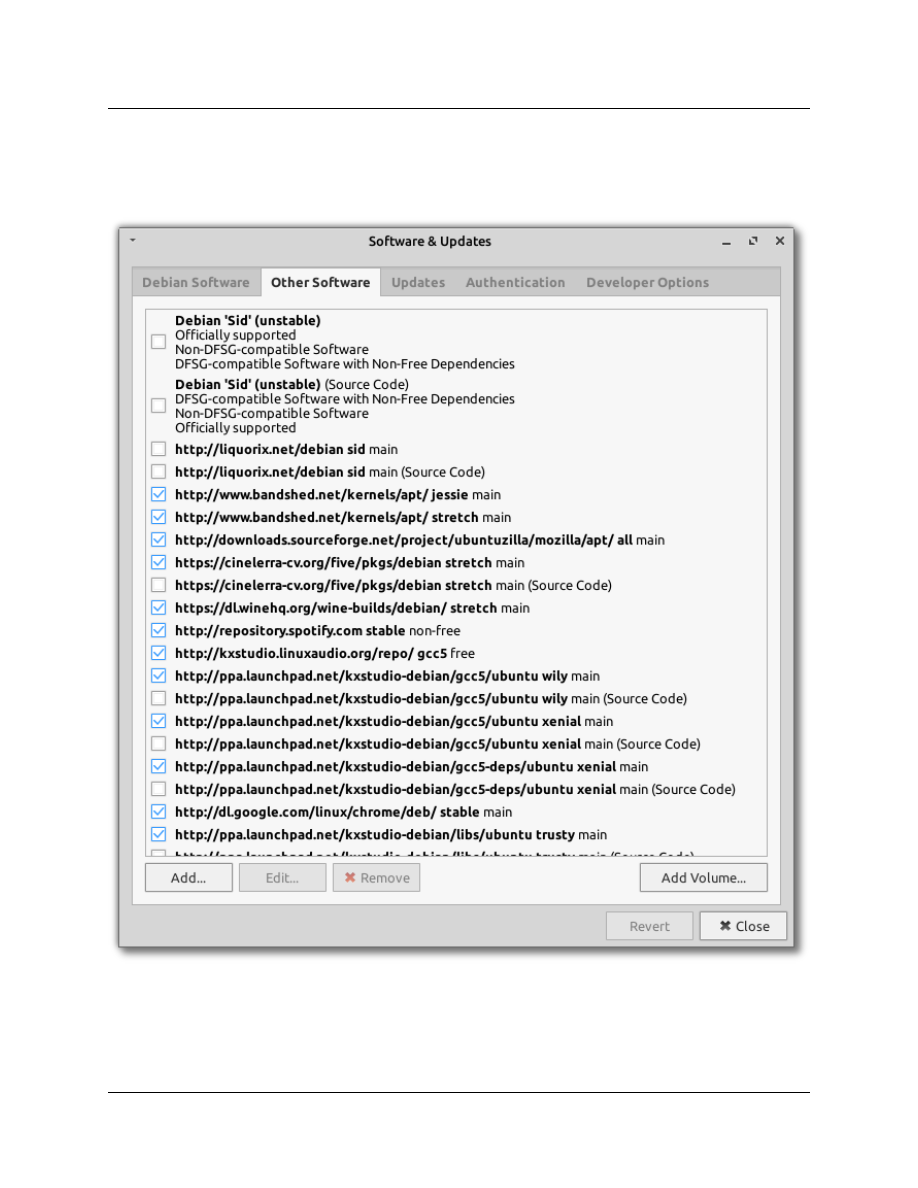
The 'Software & Updates' utility has multiple tabs, the first tab allows you to select the actual Debian
Repositories you want, and the second tab is where you select other external Repositories.
110

EXTERNAL REPOSITORIES IN AV LINUX :
Additional Choices from 3rd Party Repositories :
Like all Debian-based projects AV Linux allows access to thousands of Packages through the official
Debian Repositories by default but since AV Linux is a very focused project with an explicit purpose it
relies on some extra software provided by 3rd party providers. All external Repositories and
Software come from trusted and reputable sources which are listed and provided below. It is
important to note that occasionally repositories may change or move and no longer be accessible and
that for security peace of mind it is common practice for Repository maintainers to update their ‘GPG’
keys which may make Repositories unavailable to Package Management Tools until the keys are
updated. AV Linux tries to mitigate this inconvenience by making common GPG key updates a one-click
process in the ‘Quick Update’ utility but it should be noted the more Repositories on a system the
more potential for problems. I can only provide what is working at the time of creating the AV Linux ISO
and cannot guarantee the permanence or future operation of 3rd party Repositories..
Provided External Repositories Enabled by Default and Their Purpose :
AV Linux Kernel Repository – The custom AV Linux RT Kernels are configured and compiled by Trulan
Martin and are hosted in their own Repository. It should be noted that the outsourcing of these
kernels is paid for out of pocket, donations to AV Linux help support kernel updates and development.
The github page can be found here: https://github.com/musical-chairs/linux
Liquorix Kernel Repository – For User of Debian Linux the Liquorix project has long provided
customized tweaked low latency (*note not RT Preempt) Kernels, if the AV Linux kernel doesn’t suit
your purposes you may want to try installing the Liquorix kernel.
The Liquorix project is here: https://liquorix.net/
KX Studio Repositories – falkTX the brilliant mind behind the KXStudio Distribution and applications
has several 3rd party Repositories with Linux Audio software that are compatible with Debian and
Ubuntu-based Distributions. AV Linux primarily uses these as a source of ‘Carla’ Plugin host and
numerous Audio plugins for DAW hosts.
KXStudio Website: https://kx.studio/
Cinelerra-GG Repository – AV Linux features the incredible ‘GG’ fork of the powerful Video Editor
Cinelerra. This fork has taken Cinelerra to new heights of usablity and functionality!
Cinelerra-GG Website: https://www.cinelerra-gg.org/
111

Ubuntuzilla Mozilla Builds of Firefox Repository – AV Linux has been using Debian Linux since 2007
and over that time period that availability of updated versions of Mozilla’s Firefox Web Browser in the
official Debian repositores has not been consistent, especially if AV Linux is in a temporary phase of
being based on “Old Stable” between releases. For this reason the Ubuntuzilla Repository has been
relied upon to provide independent ‘Mozilla builds’ of Firefox.
Ubuntuzilla Project: https://sourceforge.net/projects/ubuntuzilla/files/mozilla/apt/pool/main/f/
firefox-mozilla-build/
WineHQ Repository - The ‘Wine-Staging’ Windows compatibility layer is used in AV Linux to host
Windows Audio software applications and Audio plugins. Wine-staging is a special heavily developed
version of Wine and is not available in the official Debian Repositories so WineHQ is used to provide
these unique Wine builds.
WineHQ Repository information: https://wiki.winehq.org/Debian
FAudio WineHQ Supplemental Repository – FAudio is an external dependency for versions of Wine-
Staging newer than 5.0, since FAudio is not contained in the Debian 10 (Buster) official Repositories
nor packaged by the WineHQ maintainers currently we need to rely on an external Repository for
FAudio only. This is not really a desirable long term solution so it is possible that this Repository may be
changed or become upsolete before the next AV Linux ISO release.
FAudio Repository Info: https://forum.winehq.org/viewtopic.php?f=8&t=32192
Spotify for Linux Repository – The immensely popular music streaming service ‘Spotify’ makes a
Deskop native Linux app and has a Repository for subscribers and Users of Spotify.
Spotify for Linux: https://www.spotify.com/ca-en/download/linux/
Docker Debian Community Edition – AV Linux 2020 is the first version to provide ‘Docker’ which is a
‘container’ based platform for running and distributing external software on various Operating
Systems (Win, Mac, Linux). This is the Community maintained Repository of the Docker engine for
Users of Debian Linux.
Docker for Debian: https://docs.docker.com/install/linux/docker-ce/debian/
Post Install Docker Info: https://docs.docker.com/install/linux/linux-postinstall/
112
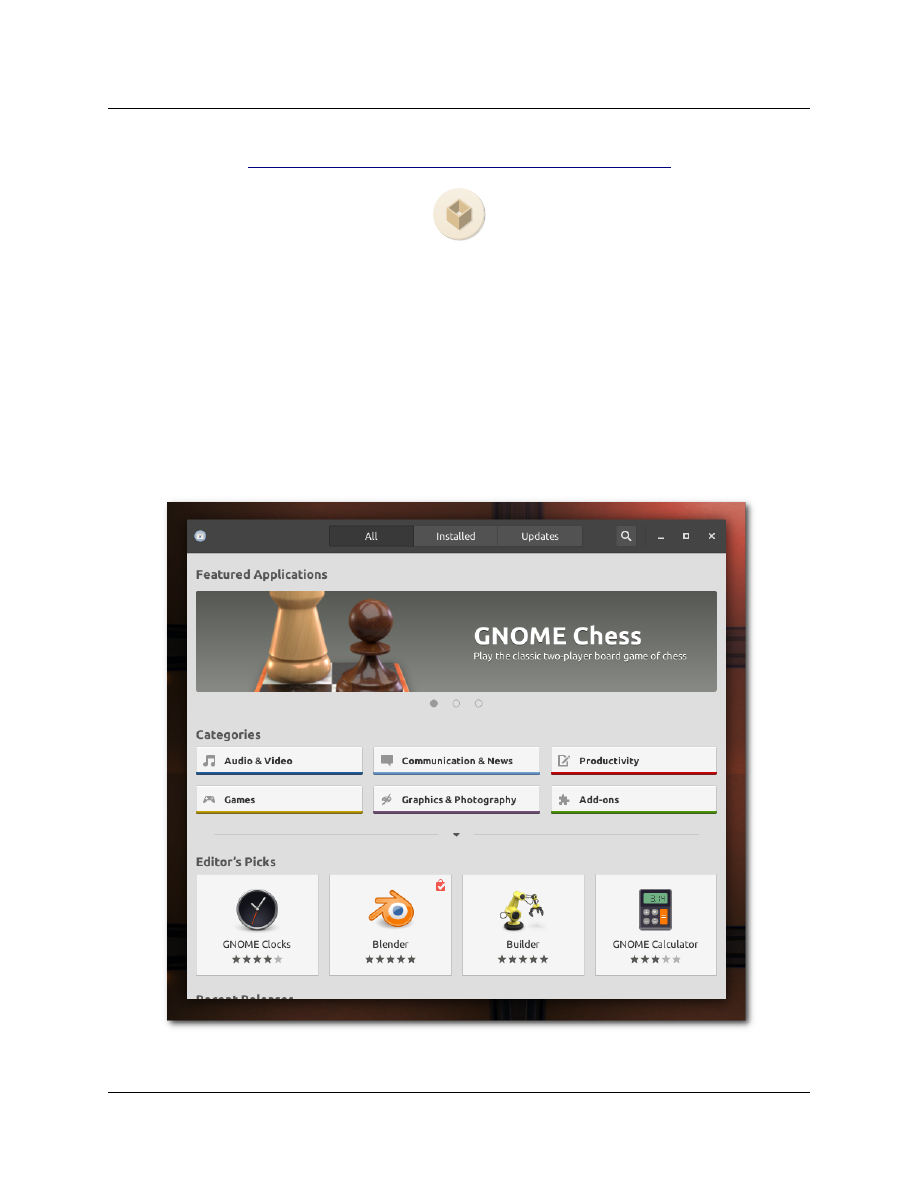
EXTERNAL SOFTWARE PLATFORMS IN AV LINUX
Extending Choices of Applications Even Further!
AV Linux 2020 offers two popular but very different Platforms to extend the choice of Software
available for installation.. ‘Flatpak’ and ‘Docker’. Flatpak is a way of distributing software applications
in a Distro-agnostic format from one central Flatpak Repository (called Flathub). Users of all kinds of
Linux (not just Debian or Ubuntu) can download and install the most recent versions of their favourite
programs. The Flatpak format contains all of the support libraries to run the application so you don’t
have to worry about solving dependencies with your Package Manager, just install the Flatpak and it’s
self contained format will run from it’s own folder. A secondary benefit of this is that it allows to run
new software on older systems which may not be capable of running and installing the latest versions
from their own Repositories, it also provides program choices that may not otherwise be available .
Flatpak has it’s own graphical Software Manager that serves as frontend for the Flathub Repository.
113

*ADDENDUM - Using Flatpak from the Command Line :
The Graphical Software Manager for Flatpak is a work in progress and to be honest at the time of this
writing seems to be infuriatingly prone to stablility problems and hiccups. The fact that the software
frontend isn’t fully baked yet shouldn’t discourage Users from enjoying the convenience of Flatpak so
if you are not afraid to roll up your sleeves and dive into a Root Terminal it is really quite easy to
download some ‘Flatties’ from the commandline…
Obviously in order to issue a Terminal Command you will want to know the name of the Application
you want to install so we can cheat by going to the Flathub webpage here. Once you’ve determined
what you want to install then Flatpak’s command line will ingeniously search for an Application and
then install it with one command.. Let’s suppose I want to use Flatpak to install the fairly new ‘Olive’
Video Editor, I open a Root Terminal and issue this command:
flatpak install olive
Once you’ve entered that command Flatpak will search the ‘flathub’ remote for Applications with the
name ‘olive’ and ask you a series of interactive questions in the Terminal and with your permission will
install Olive and the Launcher for Olive should appear in the ‘Multimedia’ Menu. If it doesn’t appear
right away it should appear on the next Login or Boot.
This is quite a basic example, for more detailed information and more in-depth command possibilities
please refere to the flatpak documentation on this webpage:
https://docs.flatpak.org/en/latest/using-flatpak.html
114
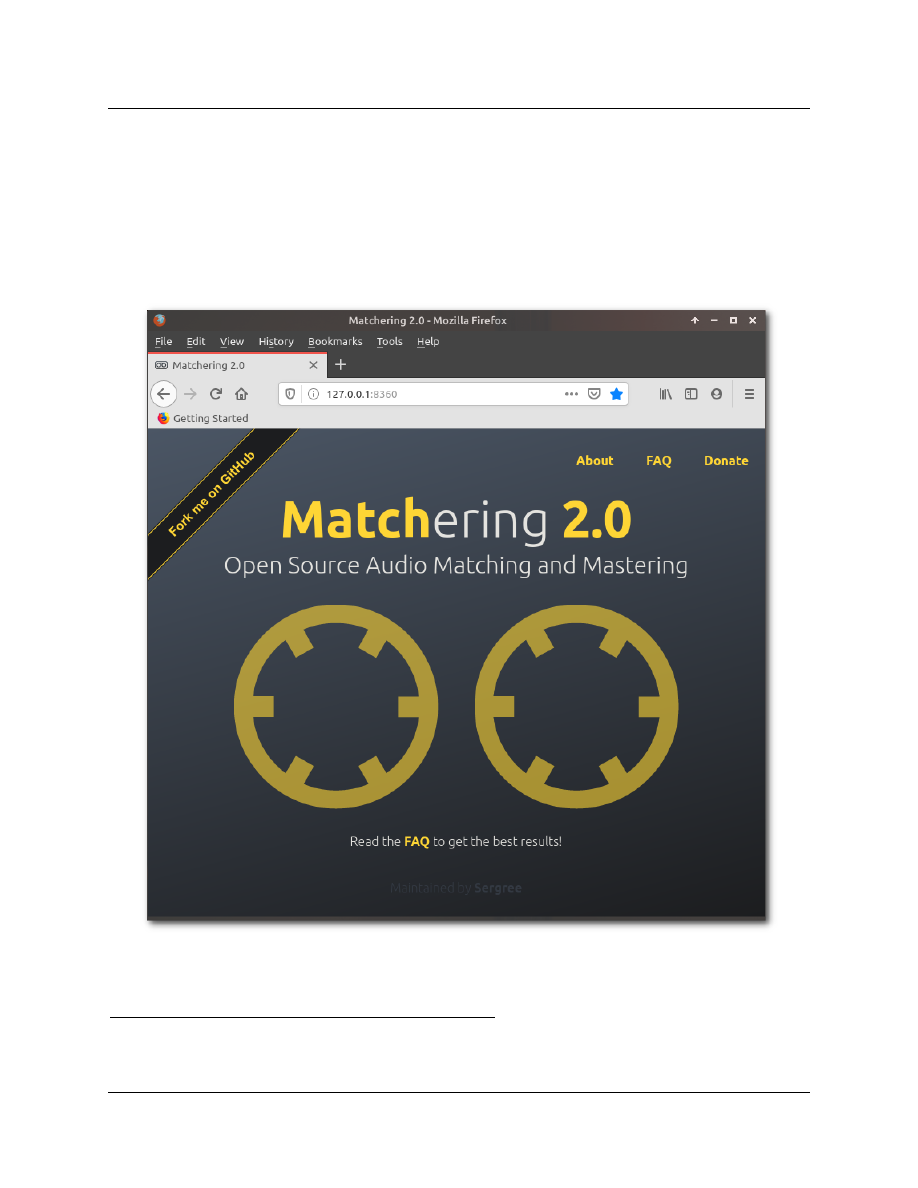
Docker is much different that Flatpak and its system places programs in ‘containers’ which you
download on to your system and run with the Docker engine (pre-installed in AV Linux 2020). Docker
containers are cross-platform and run on Windows, Mac and Linux. Docker containers can contain
anything from simple programs to very complicated software environments. Docker also has a
Repository system that creators of Docker containers can upload their containers to called Docker
Hub. The picture below is a container running ‘Matchering 2.0’ an application to learn and apply
Equalization traits from one Audio file and apply it to another.
For more information on using Docker please refer to the Debian Docker Community information here:
https://docs.docker.com/engine/install/linux-postinstall/
115
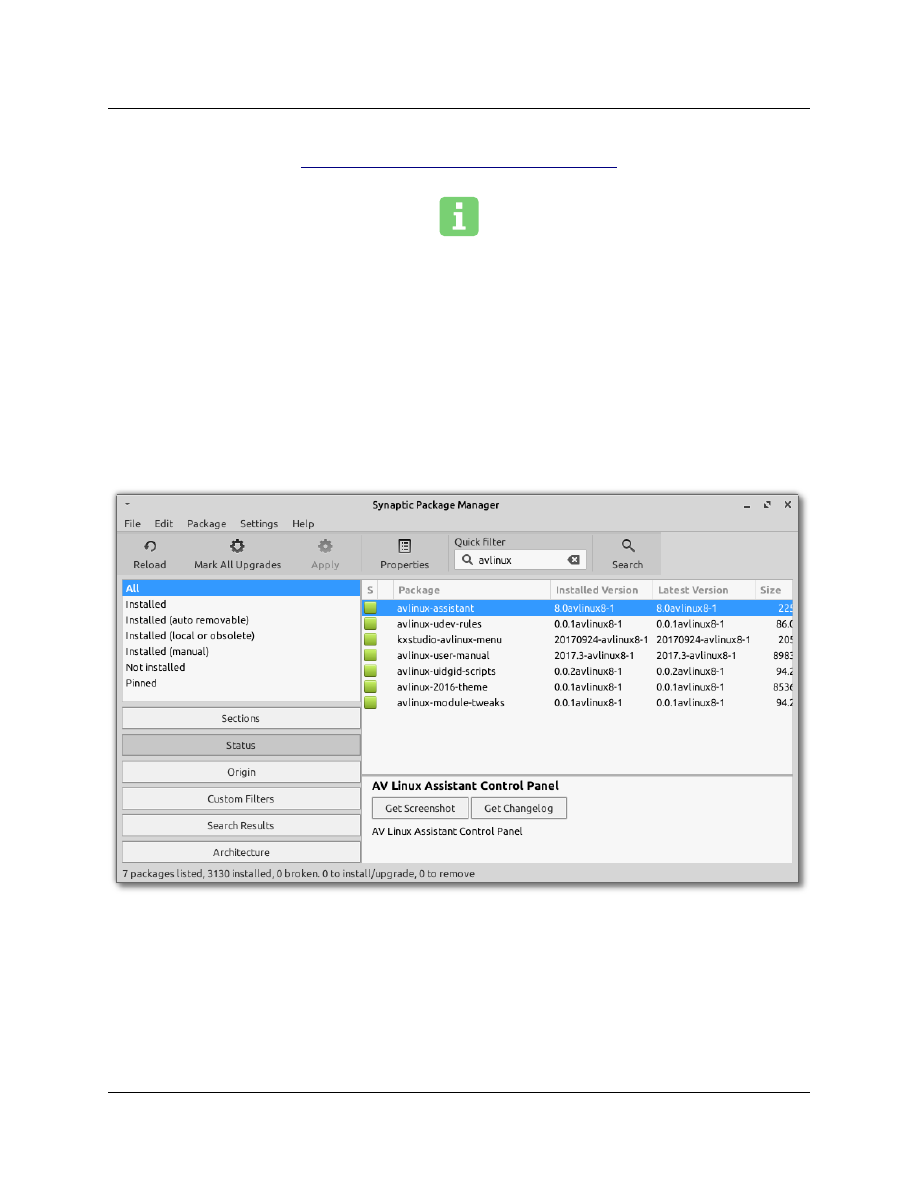
P
INNING AND HOLDING PACKAGES :
Preventing Unwanted Upgrades :
It is possible to prevent unwanted upgrades of Software Packages on your System by using 'Pinning'
within the Synaptic Package Manager or marking Packages to 'hold' using the 'APT' Command Line
Interface. It is important to consider that pinning a Package will also prevent its dependencies from
upgrading. 'Pinning' is only recognized by the Synaptic Package Manager so if you are using 'Aptitude'
or the 'APT' Command Line they will not be aware of the Packages you have pinned, if you are going to
specifically use Pinning as a Package locking method it is recommended to only use Synaptic as your
method of Package Management. To pin a Package in Synaptic find the the Package you want pinned
and highlight it.
Navigate to the 'Package' menu in Synaptic and check off 'Lock Version'. The Package you have
pinned will now appear with its status as 'Pinned' in the left-hand pane of the Synaptic window when
the 'Status' button is selected. To unpin simply uncheck 'Lock Version'.
116
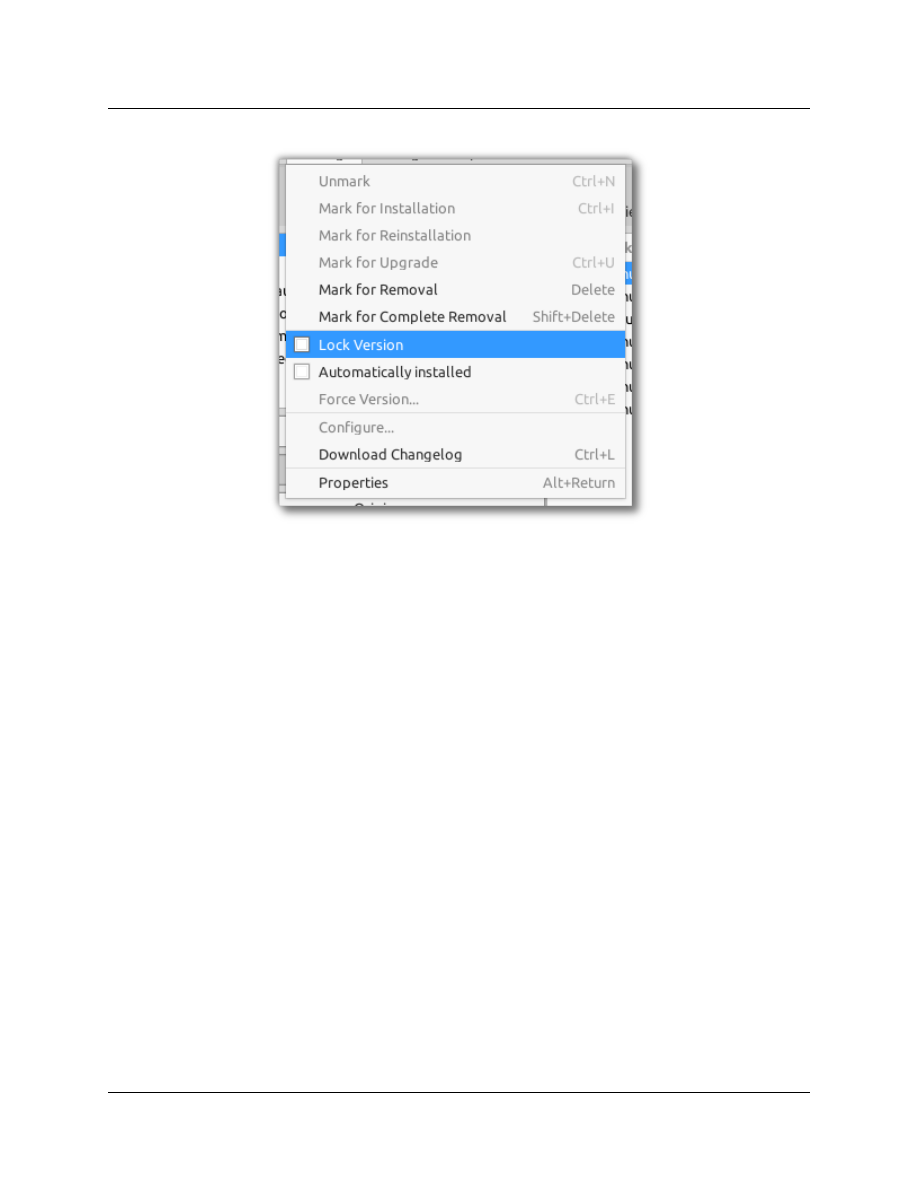
Using 'apt-mark' to Hold and Release Packages :
To use 'APT' Commands to place a Package on hold open a Root Terminal and use the following
commands, note that <PACKAGENAME> requires the actual name of the Package but not the version
number:
apt-mark hold <PACKAGENAME>
To remove the hold on a Package use this command:
apt-mark unhold <PACKAGENAME>
To see what packages are held on your system:
apt-mark showhold
To discover more useful functions of 'apt-mark' use this command:
apt-mark --help
117

Held Packages in AV Linux 2020 :
AV Linux 2020 has some specific held packages in order to maintain compatibility with Systemback.
This enables the AV ISO’s to be created and also helps keep backup functionality intact. It is possible
that these held packages may complicate future updates however it is not advised to to release the
hold on these packages unless you are certain you do not want to use Systemback. To see which
packages are held in AV Linux use the ‘Show APT Packages on Hold’ button in ‘APT-sistant’ tab in the
AV Linux Assistant.
118
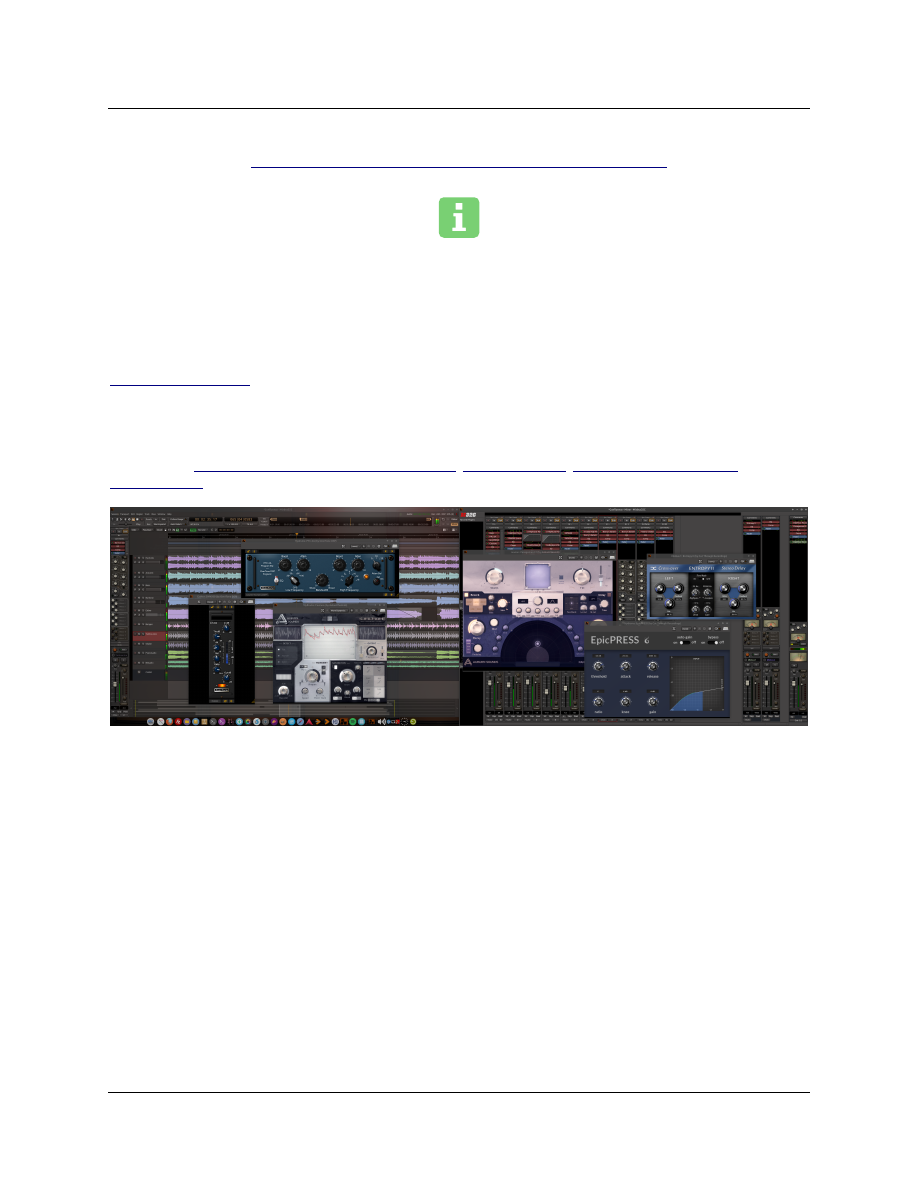
COMMERCIAL SOFTWARE DEMOS IN AV LINUX :
An Introduction to Some New Options :
AV Linux is somewhat unique compared to its contemporaries in that it offers the choice of trying
Commercial software demos right in the base Operating System. Over the years good relationships
with Vendors have been formed and have provided the opportunity to showcase both Open-Source
excellence and innovative Commercial Audio choices. Currently AV Linux provides the Demo version of
Harrison Mixbus 32C which brings the authentic sound of the famous Harrison hardware consoles into
a powerful DAW based on Ardour. Harrison Mixbus 32C also comes with all of Harrison’s Audio Plugin
Demos for you to evaluate as well.
Additionally (and new to AV Linux 2020) are additional versatile Audio plugin choices with Demos
provided by Applied Computer Music Technologies, Auburn Sounds, Cut Through Recordings and
OvertoneDSP.
Purchasing and Registering the Demos :
All of the Commercial Demos are limited in some way and are not fully functional until they are
purchased and registered. The limitation methods vary from not all options being available, dropouts
in sound, generated noises at certain intervals etc. Each Vendor has their own method of handling
purchasing and registration as well. Harrison, Applied Music Technologies and OvertoneDSP all
provide a license text file upon purchase that can be copied and pasted in the Users home folder. Once
this text file is present the software will find it the next time it is launched and will appear as
registered and be fully functional. With this method there is no need to remove the demos and replace
them you can leave them installed as they are and merely add the text key.
Auburn Sounds and Cut Through Recordings employ a different system where the User is given a
special private download URL in an email once purchase and payment are completed and the User then
downloads replacement Plugins which are fully functional. For this method it is necessary for the User
to manually remove the installed demos using either Synaptic Package Manager or ‘dpkg’ command
(shown below) and then install the replacement plugins as instructed by the individual Vendor.
119

To remove Auburn Sounds or Cut Through Recordings Demo versions from your system you can
either search for ‘auburnsounds-demo-plugins’ or ‘ctrecordings-demo-plugins’ in Synaptic, then
remove them or alternately open a Root Terminal and issue this command:
dpkg -r auburnsounds-demo-plugins
dpkg -r ctrecordings-demo-plugins
Detailed information on installing the replacement Plugins can be found at the Vendors respective
websites linked at the beginning of this section. In most cases it is suggested to create a ‘.vst’ folder in
the User’s home folder for Linux VST2 Plugins and a ‘.lv2’ folder for LV2 Plugins and copy your
Registered versions there.
*NOTE – Both Ardour and Harrison Mixbus (the default DAW Applications included in AV Linux) do not
automatically search for Plugins in the User’s home so these folders must be added to the Plugin search
paths manually in Ardour and Mixbus. Plugin search paths can be edited in the ‘Edit’- ’Preferences’-
→
’Plugins’- ’VST’ menus of both Ardour and Mixbus.
→
→
Hey Wait! Not For Me! :
With the knowledge that not everyone necessarily wants to have or purchase Commercial Software
and that some may prefer for ideological reasons to use only Open-Source applications you can of
course choose remove the Commercial Demos from AV Linux.
Removing Harrison Mixbus 32C (and the Harrison Audio Plugins) requires running a script because it is
a bundled application that installs to the ‘/opt’ folder of the Filesystem, it is not installed or removed
with the usual Package Management utilities so to remove it you need to run this command in a Root
Terminal:
/opt/ Mixbus32C-6.0.652.uninstall.sh
The Audio Plugin Demos are Debian Packages and can be removed by searching ‘auburnsounds-
demo-plugins’ ‘ctrecordings-demo-plugins’ ‘acm-demo-plugins’ and ‘overtonedsp-demo-plugins’ in
Synaptic Package Manager and removing them. Or they can all be removed at once with the following
dpkg command in a Root Terminal.
dpkg -r auburnsounds-demo-plugins ctrecordings-demo-plugins acm-demo-plugins
overtonedsp-demo-plugins
120
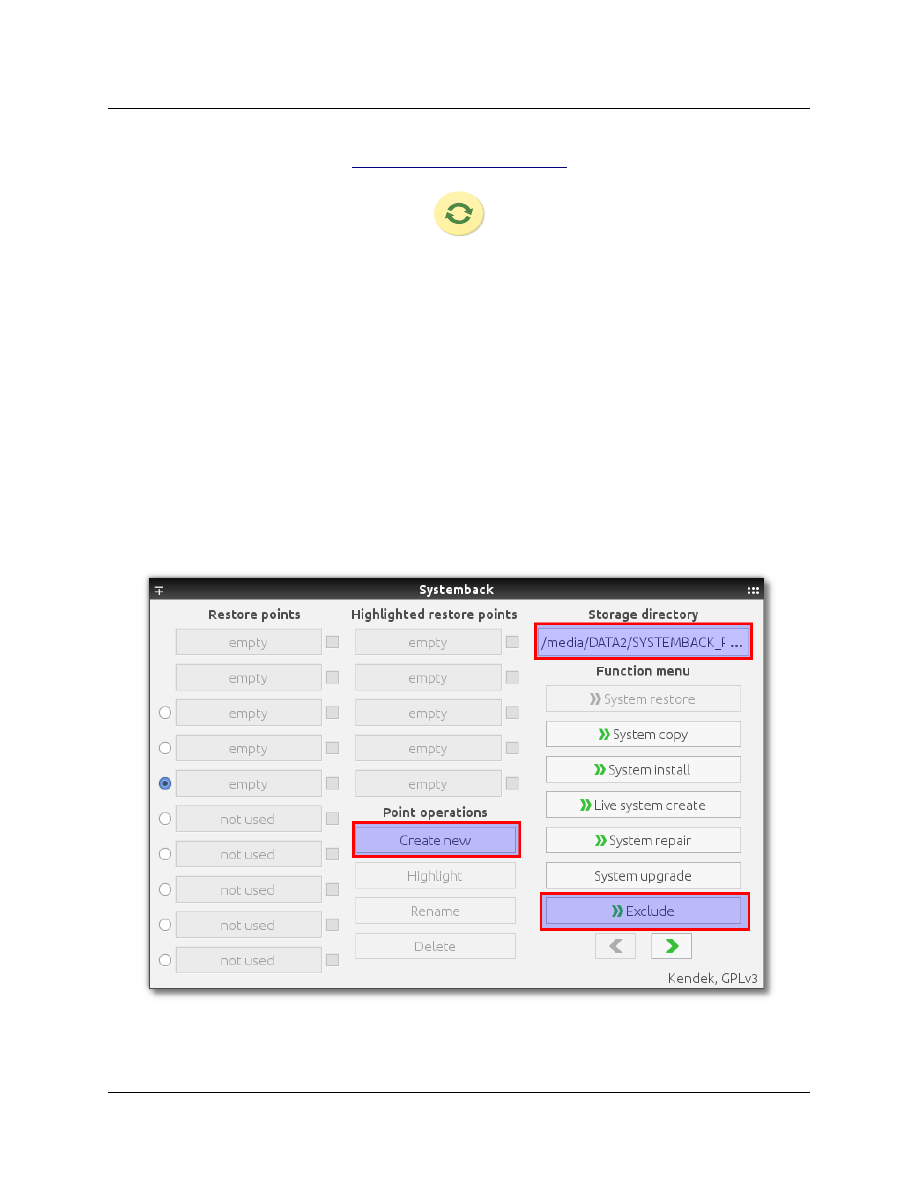
SYSTEMBACK
R
ESTORE :
Comprehensive Backup and Restore :
AV Linux 2020 makes great use of Systemback for ISO creation, its Installer and probably its most
useful daily function: System Restore. Systemback serves an extremely important need by helping
mitigate some of the risk involved with potential bad upgrades. By making regular restore points if
there is some sort of system breakage incurred by faulty upgrades you can simply roll the system back
to your last working restore point much like Windows computers have had as standard issue for many
years. Systemback is quite easy to use and simply requires adequate writable HDD space to store its
Restore data. By default Systemback will store them in the system '/home' folder, most mounted
removable drives and partitions in '/media' can also be used if your User has write permissions.
To get started launch Systemback from the Whisker Menu and enter your Root Password. The
Restore window is shown below, here you can define where the Restore data goes in the 'Storage
directory' field in the upper-right corner. I personally suggest not using the default of '/home' and
selecting a drive or partition that AV Linux is not installed on just to keep the restore point in a safe
and separate location. To set files and data that don't want to be part of the backup use the 'Exclude'
feature.
121
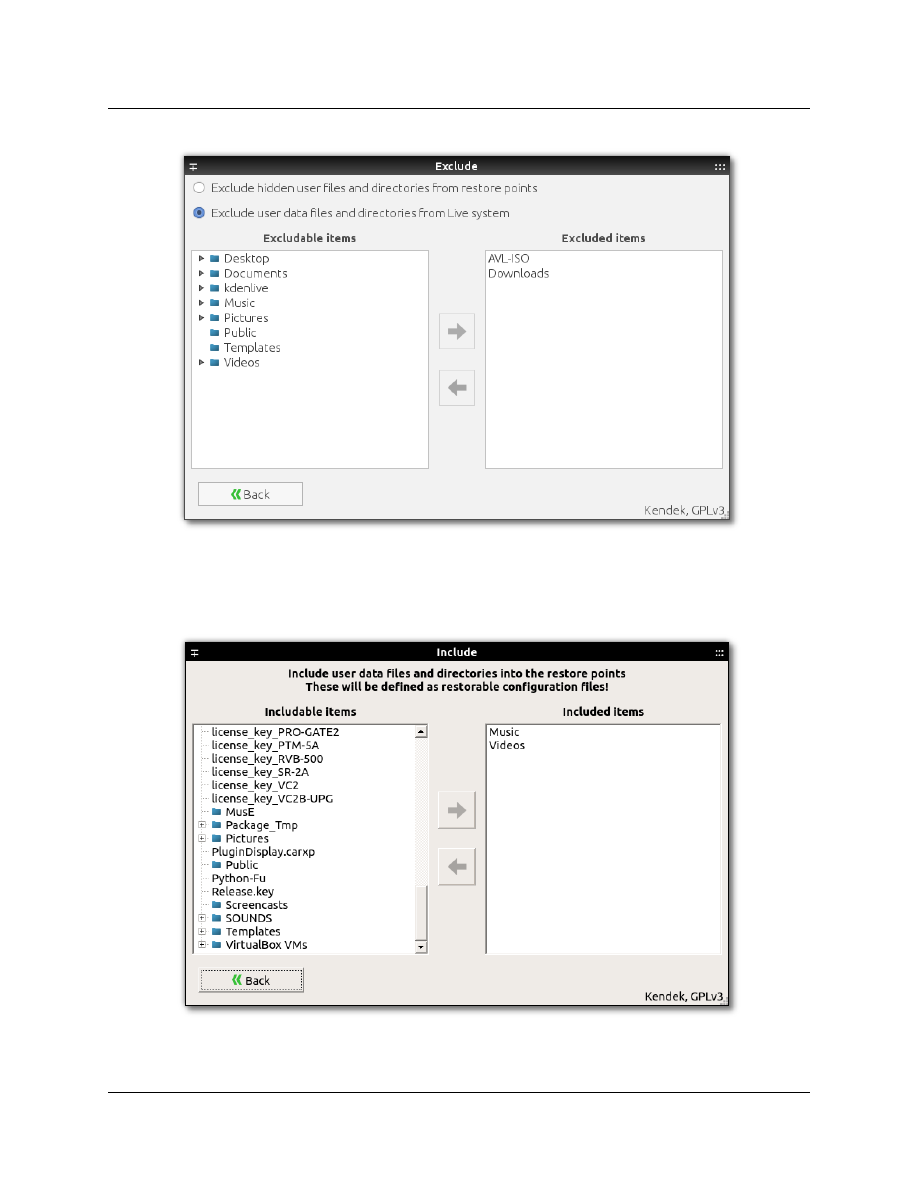
*PLEASE NOTE! - It is important to note that excluded items will be excluded from both Restore
points and any Live ISO's you create. You must also specifically define what data you want to include in
your backups in the ‘Include’ window. Once you have completed your settings click the 'Create New'
button and Systemback will take as long as it requires based on the amount of data you are backing up.
122
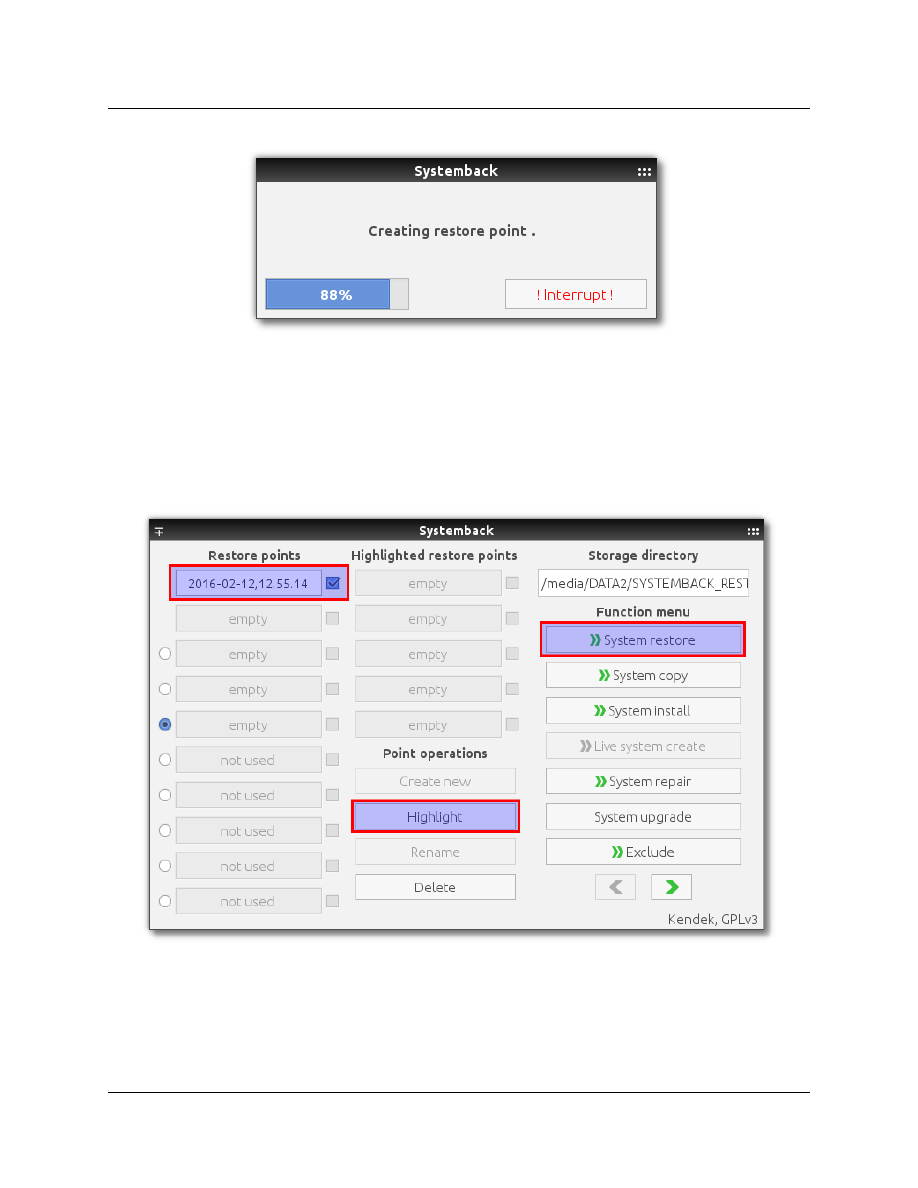
When creation of the Restore point is complete it will appear under the 'Restore points' column in the
Systemback GUI. If you have created a point of some special significance (ie before an update to a
complete new Desktop Environment) you can prioritize it by using the 'Highlight' button and then it
will appear in the 'Highlighted restore points' column. If you need to Restore your system select the
'System restore' button and select your Restore options in the Restore window.
123

D
EBIAN REFERENCE
:
Many people who are new to Linux are reluctant to use the terminal and sometimes consider it to be
either a primitive means of using the computer or too complicated. After some time to adjust to using it
most Linux Users come to appreciate the facility and speed afforded by using the CLI. The following
section can be utilized by experienced Linux Users and demonstrate some fundamentals to new Linux
Users. The apt and dpkg articles are modified from an excellent article by Matthew Danish.
Common APT usage :
apt-get install <package> Downloads <package> and all of its dependencies, and installs or upgrades
them. This will also take a package off of hold if it was put on. See below for more info on hold.
apt-get remove [--purge] <package> Removes <package> and any packages that depend on it. --
purge specifies that packages should be purged, see dpkg -P for more information.
apt-get update Updates packages listings from Debian mirrors, should be run at least once a day if
you install anything that day, and every time after /etc/apt/sources.list is changed.
apt-get upgrade [-u] Upgrades all packages installed to newest versions available. Will not install new
or remove old packages. If a package changes dependencies and requires installation of a new
package, it will not be upgraded, it will be put on hold instead. apt-get upgrade will not upgrade
packages put on hold (that is the meaning of hold). See below for how to manually put packages on
hold. I suggest the `-u' option as well, because then you can see what packages are going to be
upgraded.
apt-get dist-upgrade [-u] Similar to apt-get upgrade, except that dist-upgrade will install or remove
packages to satisfy dependencies.
apt-cache search <pattern> Searches packages and descriptions for <pattern>.
apt-cache show <package> Shows the full description of <package>.
apt-cache showpkg <package> Shows a lot more detail about <package>, and its relationships to
other packages.
124

Common Dpkg Usage :
dpkg -i <package.deb> Installs a Debian package file; one that you downloaded manually, for
example.
dpkg -c <package.deb> Lists the contents of <package.deb>, a .deb file.
dpkg -I <package.deb> Extracts package information from <package.deb>, a .deb file.
dpkg -r <package> Removes an installed package named <package>
dpkg -P <package> Purges an installed package named <package>. The difference between remove
and purge is that while remove only deletes data and executables, purge also deletes all configuration
files in addition.
dpkg -L <package> Gives a listing of all the files installed by <package>. See also dpkg -c for checking
the contents of a .deb file.
dpkg -s <package> Shows information on the installed package <package>. See also apt-cache show
for viewing package information in the Debian archive and dpkg -I for viewing package information
extracted from a .deb file.
dpkg-reconfigure <package> Reconfigures an installed package, if it uses debconf (debconf provides
that consistent configuration interface for package installation). You can reconfigure debconf itself if
you want to change the front-end or priority of questions asked. For example, to reconfigure debconf
with the dialog front-end, you simply run:
dpkg-reconfigure --frontend=dialog debconf
echo ``<package> hold'' | dpkg --set-selections Put <package> on hold (command line method)
dpkg --get-selections ``<package>'' Get the current status of <package> (command line method)
dpkg -S <file> Searches for <file> in package database, telling you which packages have that file in
them.
125

Building Debian Packages from Source :
apt-get source [-b] <package> Download the source Debian package for <package> and extract it.
You must have deb-src lines in your /etc/apt/sources.list for this to work. If you supply the `-b' option
and you are currently root, then the package will be automatically built if possible.
apt-get build-dep <package> Download and install the packages necessary to build the source Debian
package <package>. This feature is only present in apt version 0.5 and up. Currently this means that
woody and above contain this functionality. If you have an older version of apt then the easiest way to
find out the build dependencies is to look in the debian/control file in the source package directory. A
common usage of this command is in conjunction with apt-get source -b. For example (as root):
apt-get build-dep <package>
apt-get source -b <package>
Will download the source package, all of its build dependencies, and attempt to compile the source
package.
dpkg-source -x <package.dsc> If you have downloaded the source package for a program manually,
which includes several files such as a .orig.tar.gz (or .tar.gz if it is Debian native), a .dsc, and a .diff.gz (if
it is not Debian native), then you can unpack the source package using this command on the .dsc file.
dpkg-buildpackage Builds a Debian package from a Debian source tree. You must be in the main
directory of the source tree for this to work. Sample usage:
dpkg-buildpackage -rfakeroot -uc -b
Where `-rfakeroot' instructs it to use the fakeroot program to simulate root privileges (for ownership
purposes), `-uc' stands for ``Don't cryptographically sign the changelog'', and `-b' stands for ``Build the
binary package only''
debuild A handy wrapper script around dpkg-buildpackage that will automatically take care of using
fakeroot or not, as well as running lintian and gpg for you.
Fixing dependencies :
dpkg --configure --pending If dpkg quits with an error while apt-get install, upgrade, or dist-
upgrading try running this to configure the packages that were already unpacked. Then try apt-get
install, upgrade, or dist-upgrade -f, and then try apt-get install, upgrade, or dist-upgrade again. Repeat
as needed. This usually resolves most dependency problems (also, if it mentions a specific package for
some reason, you might want to try installing or removing that package)
apt-get install -f
apt-get upgrade -f
apt-get dist-upgrade -f
Attempt to fix dependencies while doing one of the above. Note that apt-get install -f does not
require a <package> argument.
More info on Debian/GNU Linux: https://wiki.debian.org/
126

HANDY TERMINAL COMMANDS
:
SYMLINK TO A FILE OR FOLDER ELSEWHERE ON SYSTEM (AS ROOT) :
ln -s /path/file/exists /path/link/placed
REBUILD FONT CACHE (AS ROOT) :
fc-cache -f -v
FONT ANTIALIASING AND HINTING SETUP:
dpkg-reconfigure fontconfig-config
DVD RIPPING WITH MPLAYER :
*Creates a file called "dump.vob" in your home folder assuming movie is title 1.
mplayer dvd://1 -dumpstream -dumpfile dump.vob
VIRTUALBOX MODULE SETUP (AS ROOT) :
*Make sure linux-headers are installed and linked
/etc/init.d/vboxdrv setup
PRINT A 'selections.txt' FILE TO DESIGNATE HELD PACKAGES (AS ROOT)
dpkg --get-selections \* > selections.txt
*Then edit selections.txt as Root
SAVE THE 'selections.txt' FILE TO DPKG (AS ROOT)
dpkg --set-selections < selections.txt
BUILD DEBIAN PACKAGE WITH GIT-BUILDPACKAGE:
git-buildpackage --git-upstream-branch=origin/upstream
BUILD DEBIAN PACKAGE WITH DPKG:
dpkg-buildpackage -rfakeroot -uc -b
LINKING KERNEL HEADERS FOR MODULE BUILDING:
ln -s /usr/src/linux-headers-$(uname -r) /lib/modules/$(uname -r)/build
SET A DIFFERENT C COMPILER THAN DEFAULT
*Replace X.X with desired gcc version
export CC=/usr/bin/gcc-X.X
APPLY A PATCH TO SOURCE CODE OR KERNEL
patch -p1 < PATCHFILENAME
CHECK SOUND DEVICES INSTALLED ON SYSTEM
cat /proc/asound/cards
CHECK AUDIO PLAYBACK DEVICES ON SYSTEM
aplay -l
127

T
HANKS
AND ACKNOWLEDGEMENTS :
The Debian/GNU Linux Distribution
Krisztian Kende – Systemback
Franco Conidi – Systemback NVMe support
Trulan Martin – RT Kernels
Anahata, Autostatic, linuxaudio.org – Torrents and Mirrors
Korakios – CPU governing utility and UEFI boot tweaks
Tony Brijeski – Yad/Zenity Scripts
RockHopper – H2 and SFZ Thunar Custom Actions, Shuriken Beat Slicer
Yann Buchau – Thunar Image Custom Actions
XFCE4 Team
Filipe Coelho – KX Studio Repositories, Carla
Paul Davis, Robin Gareus, Ben Loftis – Ardour/Mixbus
osxmidi – LinVST, SFZero
aciddose – Xhip synth and plugins
User Manual Proofreaders
Numix Icon Team – Themes/Icons
Ubuntu fonts
Harrison Consoles – Default Wallpapers
Special Thanks:
Special Thanks
All financial supporters of AV Linux, your kind generosity and encouragement is very much
All financial supporters of AV Linux, your kind generosity and encouragement is very m
appreciated !
appreciated
128